Avete bisogno di inviare email da un’installazione WordPress on localhost?
Eseguire WordPress da localhost sul proprio computer è comodo quando si sviluppa o si testa un nuovo sito, un plugin o un tema. Tuttavia, l’impostazione dell’email di WordPress su localhost è complicata perché il sito è offline, quindi l’email non è abilitata di default.
In questo articolo vi mostreremo come ricevere le email di WordPress da localhost.

Perché eseguire WordPress su localhost?
Prima di apportare modifiche importanti al vostro sito web WordPress, è bene testarle su un altro sito non visibile agli utenti.
Un sito di staging è un clone del vostro sito web che viene utilizzato per testare le modifiche prima di renderle effettive. I siti di staging aiutano a individuare gli errori per evitare che il sito web venga distrutto.
Molti utenti installano i loro siti WordPress di staging in locale sui loro computer Windows o Mac. Una volta che il sito è stato testato, è sufficiente fare l’upload delle modifiche da localhost al server live.
Tuttavia, l’impostazione dell’email su un’installazione di WordPress su localhost può essere complicata e potreste vedere il messaggio di errore “Could not instantiate mail function” quando WordPress cerca di inviare un’email. Questo perché l’email non è abilitata di default sui disponi in colonna dei server WAMP e MAMP.
Detto questo, vediamo come ricevere le email di WordPress da localhost.
Come ricevere le email di WordPress da Localhost
La prima cosa da fare è installare e attivare il plugin WP Mail SMTP sull’installazione di WordPress sul server locale. Per maggiori dettagli, consultate la nostra guida passo passo su come installare un plugin di WordPress.
WP Mail SMTP sostituisce la funzione predefinita di invio di email in WordPress, in modo che le vostre email siano instradate attraverso un provider SMTP. Ciò significa che riceverete notifiche email dal vostro sito di staging anche se non è on line.
Per ulteriori informazioni sull’uso del plugin WP Mail SMTP, potete selezionare la nostra recensione di WP Mail SMTP.
Impostazione di WP Mail SMTP
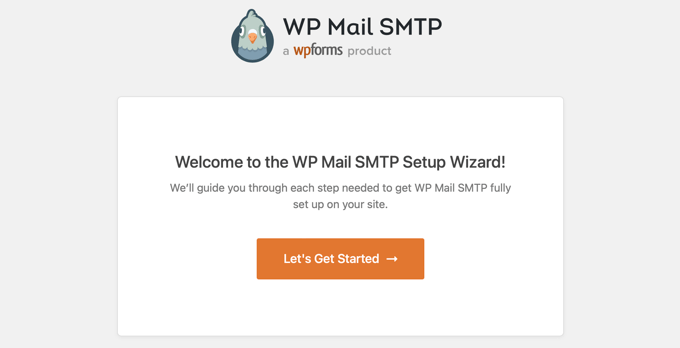
Una volta attivato il plugin, la configurazione guidata di WP Mail SMTP si avvierà automaticamente.
La prima cosa da fare è scegliere un fornitore di servizi SMTP.
Per aiutarvi a scegliere un provider, potete consultare la nostra guida sui migliori fornitori di servizi SMTP con un’elevata deliverability delle email. Se non siete sicuri, Sendinblue è una buona scelta per la maggior parte dei siti WordPress.
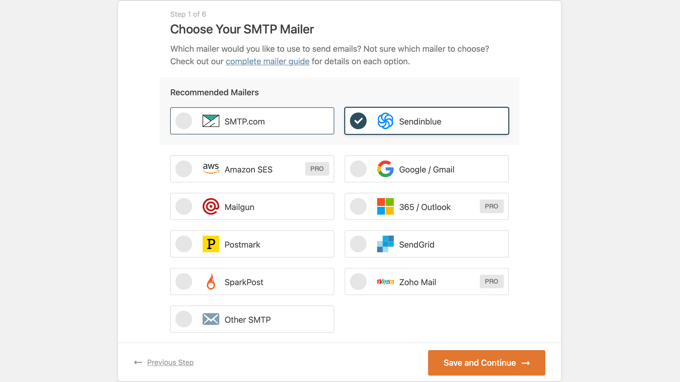
Continuate a seguire la procedura guidata di WP Mail SMTP passo dopo passo. Se avete bisogno di aiuto, potete seguire le nostre guide su come impostare WP Mail SMTP con Sendinblue, Gmail, Microsoft Outlook o Amazon SES.
Nota: se si desidera utilizzare Amazon SES, Microsoft Outlook o Soho Mail come servizio di mailer SMTP, è necessario acquistare una licenza WP Mail SMTP Pro.
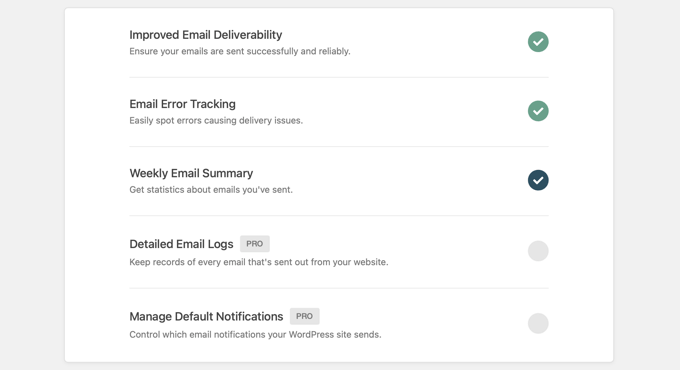
Durante la configurazione, la deliverability delle email e il tracciamento degli errori saranno abilitati automaticamente. Gli utenti della versione Pro possono anche attivare il connesso alle email e gestire le notifiche predefinite.
Invio di un’email di prova
Una volta terminata l’impostazione di WP Mail SMTP, è possibile inviare un’email di prova per assicurarsi che il plugin sia configurato correttamente.
Per farlo, dovete andare su WP Mail SMTP ” Strumenti nel vostro menu di amministrazione, dove vedrete la pagina “Test email”. Come predefinito, l’email di prova sarà inviata all’indirizzo email dell’amministratore del sito, ma è possibile cambiarlo digitando un indirizzo email diverso nel campo “Invia a”.
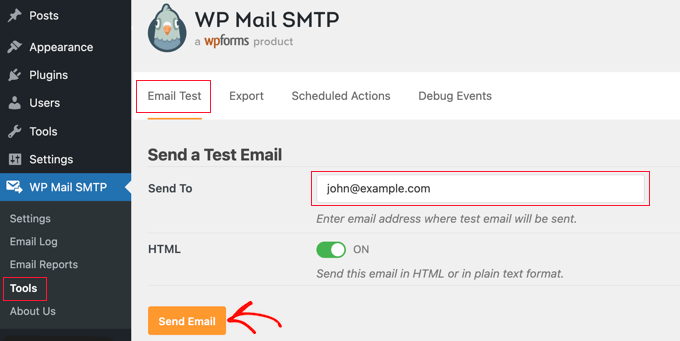
Si consiglia di mantenere l’impostazione ‘HTML’ in posizione ‘On’ e di fare clic sul pulsante ‘Invia email’. WordPress proverà a inviare un’email di prova all’indirizzo inserito.
Se ci sono problemi con la configurazione della vostra email, vedrete un messaggio che descrive il problema, insieme ad alcuni passi da compiere per correggerlo.
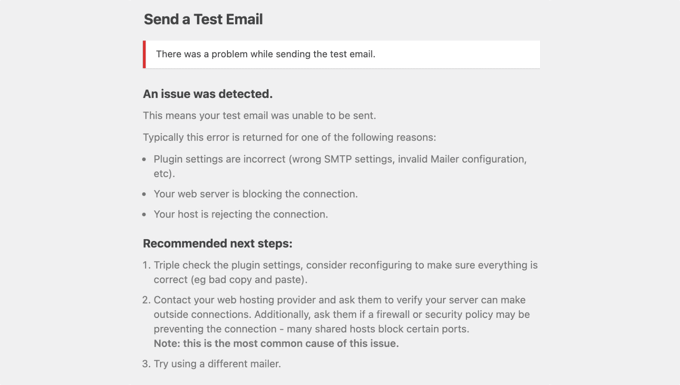
Dopo aver seguito i passaggi per correggere i problemi, dovreste inviare un’altra email di prova per confermare che la vostra email in WordPress è ora funzionante.
Se la configurazione di WP Mail SMTP è corretta, si dovrebbe trovare un’email nella casella di posta.
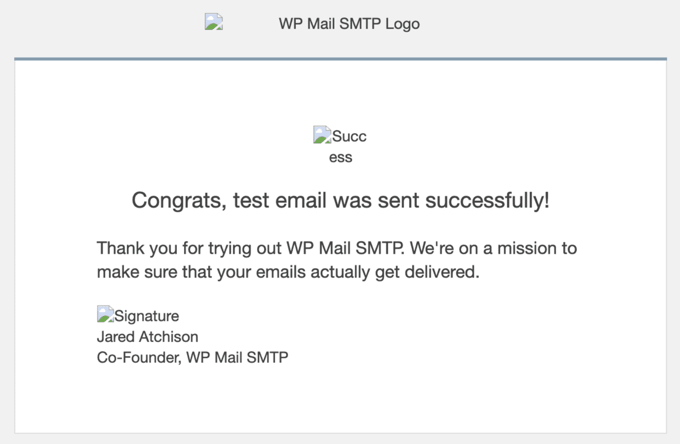
Si noterà che l’email di prova ha le immagini interrotte e questo è del tutto normale quando si inviano email da localhost. Questo perché le immagini vengono normalmente caricate da Internet, ma il sito web di localhost non è online.
Anche se l’email di prova è andata a buon fine, WP Mail SMTP potrebbe aver rilevato un problema con i record DMARC, DKIM o SPF che possono causare problemi di recapito. Troverete dei collegamenti a guide passo passo che vi aiuteranno a configurare correttamente i vostri record DNS.
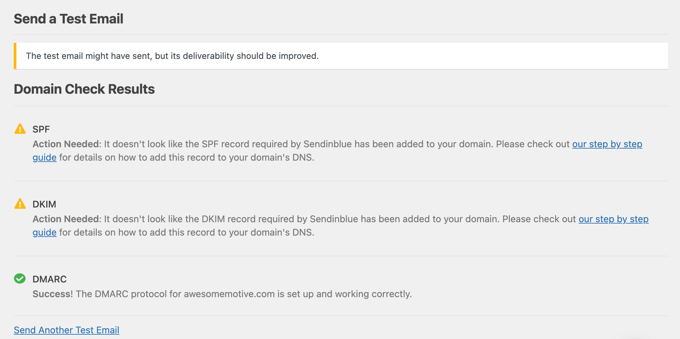
Per saperne di più, potete consultare la guida su come inviare un’email di prova da WordPress.
Una volta corretti i problemi, si dovrebbe inviare un’altra email di prova per assicurarsi che tutto funzioni in corso.
Disabilita le notifiche email di WordPress – Utenti Pro
Ora inizierete a ricevere le email di WordPress da localhost. Queste includono email di notifica sugli aggiornamenti dei plugin, dei temi e del nucleo. Riceverete anche email su modifiche all’amministrazione del sito, reimpostazioni di password, registrazioni di nuovi utenti e altro ancora.
Potreste avere la sensazione di ricevere troppe email. Oppure potreste voler disabilitare alcune notifiche email mentre state sviluppando e testando il vostro sito web.
Gli utenti diWP Mail SMTP Pro possono controllare quali email vengono inviate da localhost. È necessario andare su WP Mail SMTP ” Impostazioni. Una volta lì, si deve fare clic sulla scheda “Controlli email” in alto nella pagina. Qui è possibile disabilitare le email che non si desidera ricevere.
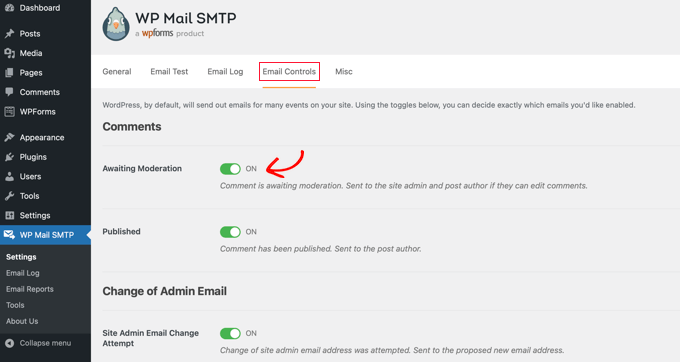
Ad esempio, se non si desidera ricevere email sui commenti in attesa di moderazione, è sufficiente attivare/disattivare l’impostazione.
Speriamo che questo tutorial vi abbia aiutato a imparare a ricevere email da WordPress da localhost. Potreste anche voler imparare come ottenere un dominio email gratuito o controllare il nostro elenco di errori comuni di WordPress e come correggerli.
Se questo articolo vi è piaciuto, iscrivetevi al nostro canale YouTube per le esercitazioni video su WordPress. Potete trovarci anche su Twitter e Facebook.


Geoff
This post is WAY out of date. You now need to set up an API and OAuth on Google. The WP Forms website has full details, but allow 15-20 minutes to do so.
WPBeginner Support
The post was last updated in 2014, thank you for letting us know we should look into updating this post
Admin
Gerard Chartier
I have just tried this out and it does still work but you have to set “Allow less secure apps: ON” in your Google account, which is not recommended.
WPBeginner Support
Thank you for sharing that this still works and how to get it to work.
Prashant Sontale
I installed the plugin but I cant see the options such as those iin Mailer and also cant view the option of SMTP Host, Port, Authentication, Username, Password, etc. In mailer I haveoptions such as PHP, Google, Maligun, Sendgrid, Other SMTP. If I click on Google, they ask Client ID and Client Secret.
What to do?
Carla
That is to send… smtp… not to recieve the email on wordpress… POP3
swarna
my email is not working
Barka Piy Ndahi
Thanks for the tutorial.
I have xampp and i tried above. It showed test message sent, though below i saw: 2017-10-20 13:06:18 SMTP Error: Could not connect to SMTP host.
And i didnt see in my yahoo box.
Please can you help me make this to work.
Thank you.
Ashan Rupasinghe
That’s Worked. Thanks.
sudhakar
Hi i did the same but i have did not get any email for contact form and product enquiry form think that in localhost mail system does not works or there is an idea means please help me
Vivekraj
Hi new user registration mail contact us mail are working but woocommerce order mail and all not sending to the customers.
mukesh
i m mukesh
this is too good
surati
not work so work for me thnq…
Maksym
Works very good! Thank you
Steve
You have to go into your Google account and turn on the feature “Sign In & Security > Connected Apps & Sites > Allow Less Secure Apps > ON”.
Warren
Hi Steve
What’s the navigation to get to the sign in and security > connected apps etc? Loads of tabs on the top once in settings, each with multitude of options.
Thanks,
Shashank Chattopadhyaya
From your Google account:
[Settings -> Accounts and Import -> Other Google Account settings -> Sign-in & security -> Connected apps & sites -> Allow less secure apps (turn ON)]
Sharon
Same here. Otherwise gmail would authenticate because of the “Less secured application”
saurabh
awesome..blowsome.. worked!!
make sure your gmail has access to third party apps to send email.nothing else is needed than this video. good work . loved it.
Pam Marshall
Just what I needed to do my testing.
Roger Moore
I worked well after I enable access to less secure apps in my gmail account. Thanks
Chetan Buddh
array (size=18)
‘authenticate’ => string ‘SMTP Error: Could not authenticate.’ (length=35)
‘connect_host’ => string ‘SMTP Error: Could not connect to SMTP host.’ (length=43)
‘data_not_accepted’ => string ‘SMTP Error: data not accepted.’ (length=30)
’empty_message’ => string ‘Message body empty’ (length=18)
‘encoding’ => string ‘Unknown encoding: ‘ (length=18)
‘execute’ => string ‘Could not execute: ‘ (length=19)
‘file_access’ => string ‘Could not access file: ‘ (length=23)
‘file_open’ => string ‘File Error: Could not open file: ‘ (length=33)
‘from_failed’ => string ‘The following From address failed: ‘ (length=35)
‘instantiate’ => string ‘Could not instantiate mail function.’ (length=36)
‘invalid_address’ => string ‘Invalid address’ (length=15)
‘mailer_not_supported’ => string ‘ mailer is not supported.’ (length=25)
‘provide_address’ => string ‘You must provide at least one recipient email address.’ (length=54)
‘recipients_failed’ => string ‘SMTP Error: The following recipients failed: ‘ (length=45)
‘signing’ => string ‘Signing Error: ‘ (length=15)
‘smtp_connect_failed’ => string ‘SMTP connect() failed.’ (length=22)
‘smtp_error’ => string ‘SMTP server error: ‘ (length=19)
‘variable_set’ => string ‘Cannot set or reset variable: ‘ (length=30)
this error come what can i do now?
i can’t understand.
plz help me guyz.
Dan Canetti
Hi,
Looks as though it’s failed to Authenticate. Try ensuring your Email and Password are entered correctly.
Gabriel Hernández
Thanks! Works!=)
I will save this great website.
Daniel
Works! Thamks for the manual. Google asks to ‘Enable access for less secure apps’ in Gmail, but for testing purposes I see no problem..
deepika
It shows ‘Test message sent’ but I didn’t get any mail.
CarolineElisa
Thanks for this suggestion, but I can only get it to work if I ‘Enable access for less secure apps’ in Gmail, which Google does not recommend. Any other tips?
Marty
Tried this, no luck Any other suggestion? Thanks!
Marty
Hi! Thank you for a great article. I’m trying it all out, but still get an error when sending the test email: SMTP -> ERROR: Failed to connect to server: Operation timed out (60). So I did as suggested, added extension=php_openssl.dll. But nothing seems to work Anyone have another idea? Thanks!
Jesse Brownstein
After sending the test email, the browser loads infinitely without any indication of success/failure. How can I fix?
jam
Thanks very much for sharing your knowledge
Joker
This suggestion should work, But if you got error saying “Failed to connect to server: Unable to find the socket transport “ssl” ” ,
Then Please do the following
1. Edit your php.ini from your installed php folder
2. Search for extension=php_openssl.dll
3. The initial will look like this ;extension=php_openssl.dll
Remove the ‘;’ and it will look like this extension=php_openssl.dll
If you can’t find the extension=php_openssl.dll, add this line extension=php_openssl.dll.
4.Then restart your Xampp or LAMP or APACHE server (depends upon which of these you’re using).
Syed
Nice article. Helped me. Works for me. Thanks.
Komalchand
I used your setting for localhost but it din’t works where it works for my test server. so ur suggestion will be helpful for me. Thanks
Easy
sory if my question sounds sily bt which inbox am I to check?. am on a local machine without an internet service. or do I need internet to receive the mail?
WPBeginner Support
yes you will need an internet connection to receive email.
Admin
Bhargav
I didnt get email. Please help me.
WPBeginner Support
Make sure that you have correctly entered Gmail SMTP settings.
Admin
Cristian Nebunu
This is actually really helpfull. I needed to test some custom features and now i know how.
adolf witzeling
Very helpful. Thanks for sharing.