Il mese scorso, un lettore ci ha inviato un’email in cui ci diceva che aveva perso il 30% del traffico di ricerca. Dopo aver esaminato il sito, abbiamo subito individuato il colpevole: decine di link non funzionanti sparsi per i contenuti. È un problema comune che ho riscontrato innumerevoli volte negli oltre 12 anni di elaborazione in corso con WordPress.
I link rotti non sono solo fastidiosi per i visitatori: sono come piccole crepe nelle fondamenta del sito web che possono danneggiare seriamente la SEO. Google vede questi link morti come un segno di scarsa manutenzione, che può danneggiare le classifiche e il traffico.
Vi illustreremo l’esatto processo che utilizziamo per trovare e correggere i link rotti sui siti WordPress. Sono le stesse tecniche che hanno aiutato migliaia di lettori di WPBeginner a mantenere siti web sani e orientati alla SEO.
Che cos’è un link interrotto?
Un link rotto, noto anche come link morto, è un link che non funziona più.
I link interrotti possono essere causati da molte ragioni, ma il motivo più comune è quando una pagina web viene cancellata o spostata in una posizione diversa, il che fa sì che il server mostri un messaggio di errore “404 non trovato”.
Nei siti WordPress, i link interrotti si verificano in genere quando si sposta un sito su un nuovo nome di dominio o quando si cancella un post o una pagina senza un adeguato reindirizzamento.
A volte i link interrotti possono essere causati anche da un errore di battitura e possono passare inosservati per mesi, se non per anni.
Per questo motivo è estremamente importante monitorare regolarmente i link non funzionanti sul vostro sito web WordPress e correggerli, in modo da evitare che danneggino le vostre classifiche SEO.
In questa guida condivideremo i 5 metodi principali per trovare i link rotti in WordPress. Successivamente, vi mostreremo un modo semplice per correggere i link rotti.
Ecco un indice per facilitare la navigazione:
- Finding Broken Links in WordPress Using Broken Link Checker (Quick & Easy)
- Finding Broken Links Using Semrush (Full Site Audit)
- Finding Broken Links Using Ahrefs (Complete Backlink Profile)
- Finding Broken Links Using MonsterInsights (Advanced Tracking)
- Finding Broken Links in WordPress Using Google Search Console (Free)
- How to Properly Fix Broken Links in WordPress
- Bonus: Our Best Guides on Internal Links
Pronti? Iniziamo.
Non volete correggere da soli i link rotti? Lasciate che se ne occupino gli esperti di WPBeginner Pro Services! Offriamo un’assistenza WordPress d’emergenza a prezzi accessibili per risolvere e correggere i problemi più comuni del sito web, come link rotti, errori di plugin e temi, problemi di immagine e altro ancora. Programmate oggi stesso i servizi di assistenza WordPress on-demand!
Metodo 1: Trovare i link rotti in WordPress usando Broken Link Checker (facile e veloce)
Il plugin Broken Link Checker di AIOSEO è uno strumento essenziale per assicurarsi che tutti i link del vostro sito WordPress funzionino correttamente.
Esegue regolarmente una scansione per individuare i link non funzionanti sul vostro sito web, compresi quelli interni ed esterni che danno luogo a un errore 404.
A differenza di altri plugin per il controllo dei link rotti di WordPress, è costruito come servizio SaaS, quindi non rallenterà il vostro sito web. Inoltre, non sarà bloccato da società di hosting WordPress gestite come WP Engine, perché utilizza un server privato esterno per eseguire il ping dei link rotti.
Per prima cosa, è necessario installare e attivare il plugin Broken Link Checker. Per maggiori dettagli, consultate la nostra guida passo-passo su come installare un plugin di WordPress.
Nota: la versione gratuita di Broken Link Checker consente di analizzare fino a 200 link interni. È possibile passare alla versione Pro per scansionare un numero maggiore di link interni ed esterni.
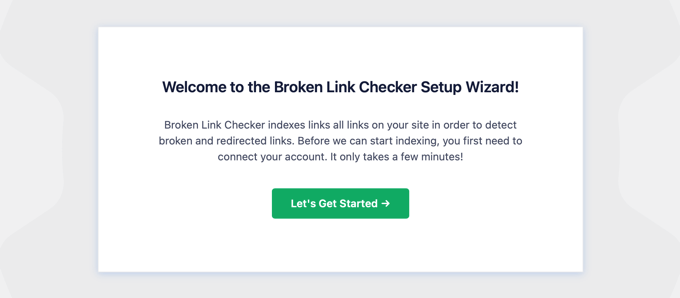
Dopo l’attivazione, la procedura di installazione guidata di Broken Link Checker si avvierà automaticamente per aiutarvi a configurare il vostro account.
Nella pagina successiva, si può scegliere di creare un account gratuito o di collegarsi a un piano già acquistato.
Per creare un nuovo account gratuito, è sufficiente fare clic sul pulsante “Crea un account gratuito”. Dovrete inserire il vostro nome, indirizzo e-mail e numero di telefono. Dovrete anche inserire i dati della vostra carta di credito, in modo da poter essere aggiornati quando supererete il limite di 200 link gratuiti.
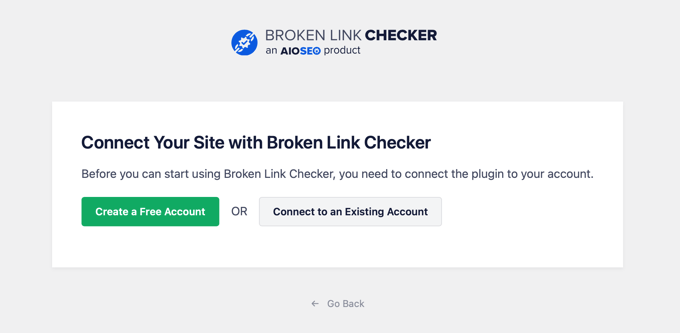
Se avete già acquistato la versione Pro, potete fare clic sul pulsante “Connetti a un account esistente”. Vi verrà chiesto di accedere al vostro account e poi potrete fare clic sul link “Connetti” accanto al vostro piano.
Il plugin inizierà a lavorare in background per trovare i link nei post, nelle pagine e nei tipi di post personalizzati.
È possibile accedere alla scheda “Rottura” per visualizzare il rapporto completo. I link sono suddivisi in categorie: interrotti, reindirizzati e abbandonati.
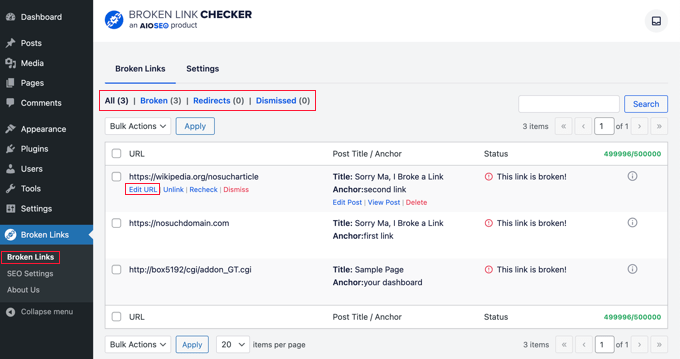
Se gestite il vostro blog WordPress da molto tempo, questo report includerà anche i link non funzionanti a siti web di terze parti.
È possibile correggere rapidamente i link non funzionanti all’interno del plugin SEO facendo clic sul link “Modifica URL”. Oppure, potete rimuovere il link facendo clic su “Unlink”. Una volta terminato, non dimenticate di fare clic sul pulsante “Aggiorna”.

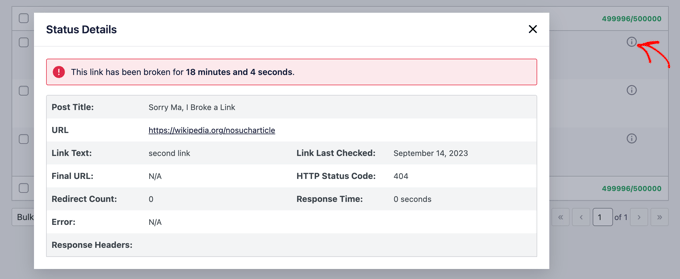
Broken Link Checker fornisce anche i “Dettagli sullo stato” di ciascun link quando si fa clic sull’icona Informazioni ⓘ.
Le informazioni visualizzate includono la durata dell’interruzione del link, il codice di stato HTTP, le intestazioni di risposta e altro ancora.
La scheda Impostazioni del plugin consente di controllare i tipi di post (post, pagine, tipi di post personalizzati) e gli stati (pubblicato, bozza) che si desidera monitorare o escludere.
Broken Link Checker di AIOSEO scansiona automaticamente il vostro sito ogni 3 giorni, in modo da non dovervi preoccupare di link rotti in futuro.
Metodo 2: trovare i link rotti con Semrush (audit completo del sito)
Semrush è uno dei migliori strumenti SEO sul mercato. Permette di monitorare facilmente le classifiche SEO e lo stato di salute generale del vostro sito web.
Include anche un potente strumento di verifica del sito che esegue il crawling del vostro sito web per trovare gli errori più comuni e preparare un rapporto dettagliato per voi.
Per prima cosa, è necessario registrarsi per un account Semrush.
È un servizio a pagamento, ma offre un account gratuito limitato che consente di eseguire il crawling di un massimo di 100 pagine su un nome di dominio. I limiti del piano a pagamento partono da 100.000 pagine al mese.
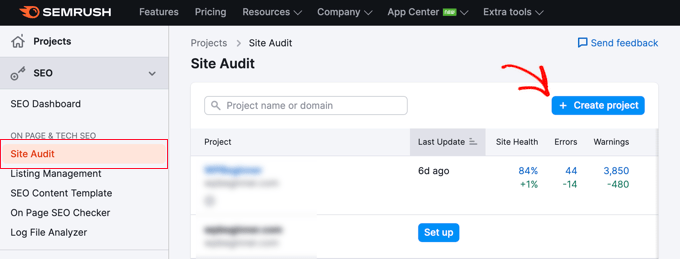
Una volta effettuato l’accesso, è necessario cliccare sul link “Site Audit” dal menu di sinistra.
Si accede così alla pagina Site Audit. Da qui, fate clic sul pulsante “Crea progetto” in alto per aggiungere il vostro sito web.
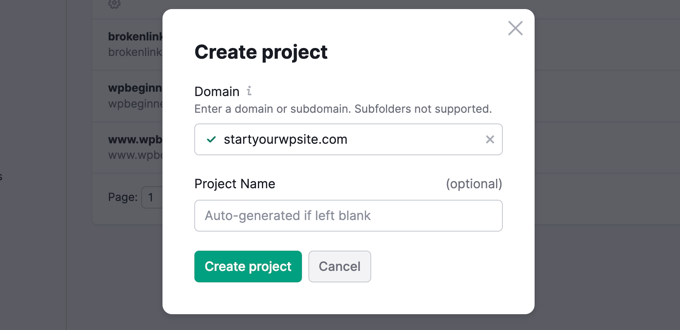
Vi verrà chiesto di inserire il nome del dominio che volete controllare e poi dovrete fare clic sul pulsante “Crea progetto”.
Successivamente, verrà richiesto di configurare le impostazioni di verifica del sito.
Semrush inizierà a eseguire il crawling del vostro sito web per la verifica del sito. Questa operazione potrebbe richiedere alcuni minuti, a seconda del numero di pagine selezionate per la scansione.
Una volta terminato, è possibile fare clic sul proprio dominio nella sezione “Site Audit” per visualizzare il report.
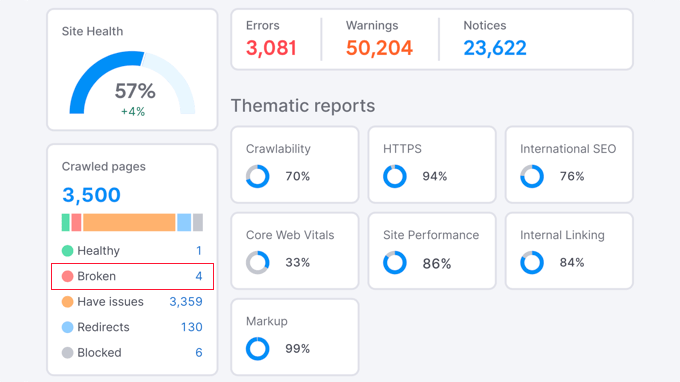
Si noti che il numero di link non funzionanti è scritto in blu. Questo perché si tratta di un link su cui è possibile fare clic per ottenere maggiori informazioni.
Verrà visualizzato un elenco di link non funzionanti trovati nelle pagine del vostro dominio.
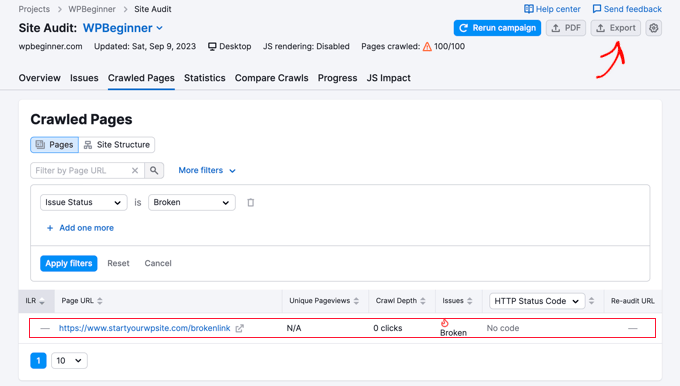
Ora è possibile fare clic sul pulsante “Esporta” nell’angolo in alto a destra dello schermo per scaricare il rapporto di crawl. Vi servirà per correggere i link non funzionanti sul vostro sito web.
Metodo 3: Trovare i link rotti con Ahrefs (profilo completo dei backlink)
Ahrefs è un eccellente strumento SEO all-in-one per marketer, aziende e professionisti SEO. Offre approfondimenti SEO dettagliati sul vostro sito web o su quello dei vostri concorrenti.
È possibile utilizzarlo per la ricerca di parole chiave, l’analisi della concorrenza, le idee per le parole chiave organiche e a pagamento e il monitoraggio della salute del sito, compresi i link non funzionanti. Con lo strumento Site Explorer otterrete un profilo completo dei backlink del vostro sito web.
Innanzitutto, è necessario iscriversi a un account Ahrefs. Si noti che si tratta di un servizio a pagamento.
Una volta effettuato l’accesso alla dashboard di Ahref, è necessario inserire il nome del dominio nello strumento “Site Explorer”.
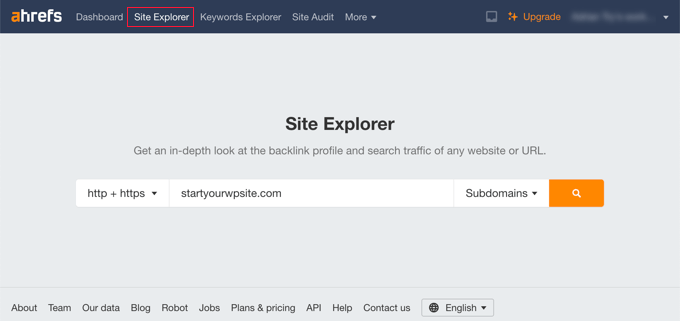
Lo strumento Site Explorer esegue il crawling del sito web per preparare i report. Questa operazione potrebbe richiedere del tempo, a seconda della quantità di contenuti presenti sul sito.
Una volta terminato, verrà visualizzata una panoramica dei risultati di Site Explorer. Da qui, è necessario fare clic sul menu Pagine ” Migliori per link e ordinare il rapporto per stato 404.
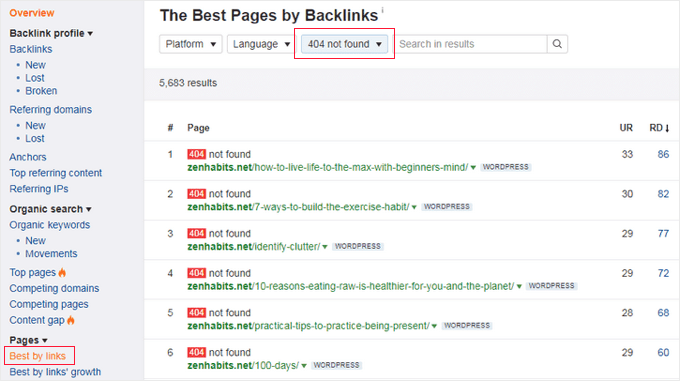
È ora possibile esportare il rapporto in formato CSV per trovare e correggere i link non funzionanti sul proprio sito web WordPress.
Metodo 4: Trovare i link rotti usando MonsterInsights (tracciamento avanzato)
MonsterInsights è la migliore soluzione analitica per WordPress. Tiene automaticamente traccia dei link non funzionanti e degli errori 404 sul vostro sito web utilizzando Google Analytics.
Il plugin consente di impostare Google Analytics senza modificare il codice. Inoltre, consente di impostare il tracciamento dei clic su link e pulsanti, il tracciamento del commercio elettronico, il tracciamento degli autori e altro ancora.
Per iniziare, dovrete registrare un account Google Analytics e collegarlo al vostro sito WordPress utilizzando MonsterInsights. Per maggiori dettagli, potete seguire la nostra guida dettagliata su come installare Google Analytics in WordPress.
Nota: MonsterInsights è un plugin premium per WordPress, ma per questo tutorial utilizzeremo la versione gratuita. Tuttavia, è possibile effettuare l’aggiornamento alla versione Pro per ottenere funzioni di tracciamento avanzate, rapporti sulla dashboard, funzioni per i post più popolari e altro ancora.
Una volta che MonsterInsights è attivo sul vostro sito web, il plugin inizierà a tracciare i link non funzionanti e vi mostrerà un rapporto in Google Analytics. Tuttavia, potrebbero essere necessarie fino a 24 ore prima di vedere i dati.
Per trovare i link interrotti, è necessario creare un rapporto di esplorazione in Google Analytics. Questo prenderà le informazioni sui link non funzionanti da MonsterInsights e le visualizzerà in un elenco.
Una volta effettuato l’accesso a Google Analytics, è necessario passare alla scheda “Esplora” e scegliere un rapporto vuoto.
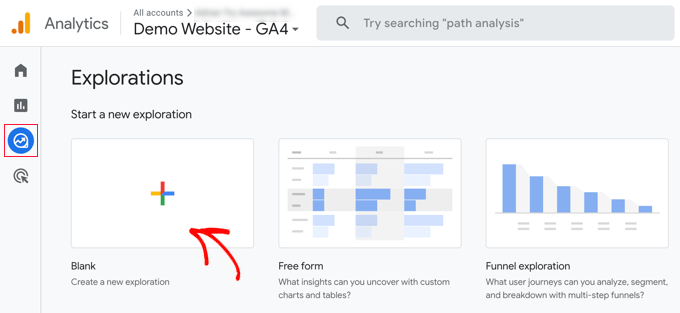
Ora, in Nome esplorazione, è possibile digitare un nome per il rapporto, ad esempio ‘Collegamenti interrotti’.
Successivamente, è necessario fare clic sul pulsante “+” accanto a Dimensioni.
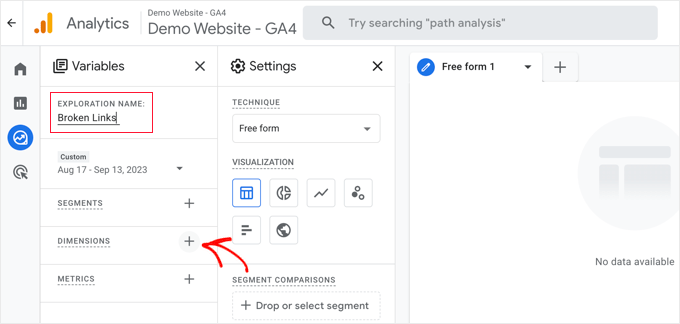
Viene visualizzato un elenco completo delle dimensioni disponibili per il report.
È necessario cercare la dimensione “Titolo della pagina” e selezionarla. Successivamente, si deve fare la stessa cosa per la dimensione “Percorso della pagina + stringa di query”.
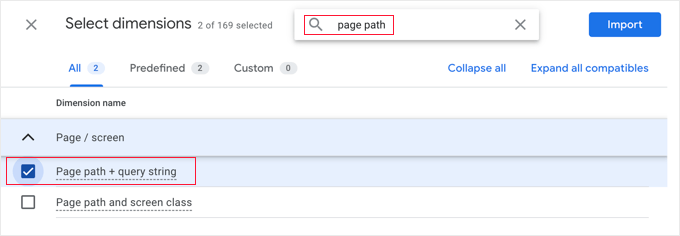
Una volta fatto ciò, basta fare clic sul pulsante “Importa” in alto a destra dello schermo.
Successivamente, è necessario importare una metrica. Questa volta si deve fare clic sul pulsante ‘+’ accanto a Metriche e importare la metrica Sessioni.
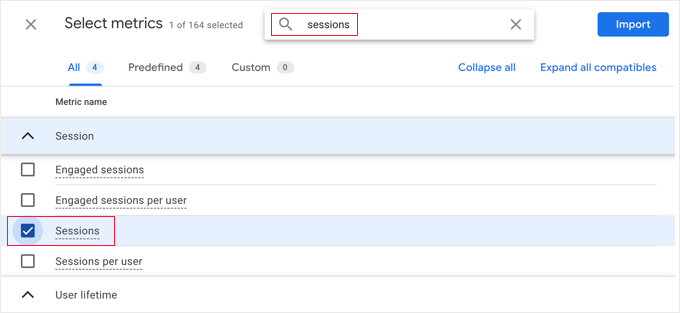
Ora è possibile aggiungere gli elementi importati al report.
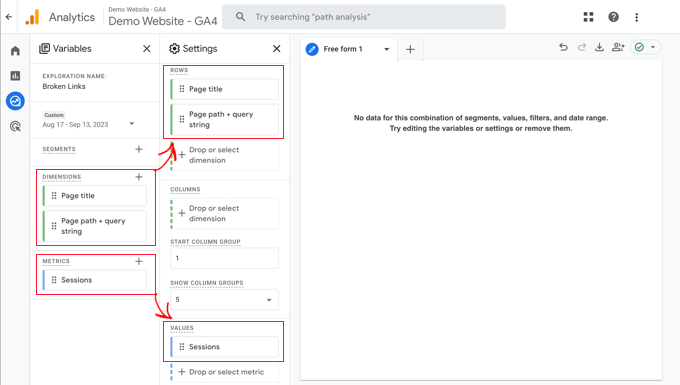
Innanzitutto, è necessario trascinare entrambe le dimensioni nella casella Righe della seconda colonna. Successivamente, trascinare la metrica Sessioni nella casella Valori.
Quindi, scorrere la seconda colonna fino alla sezione Filtri.
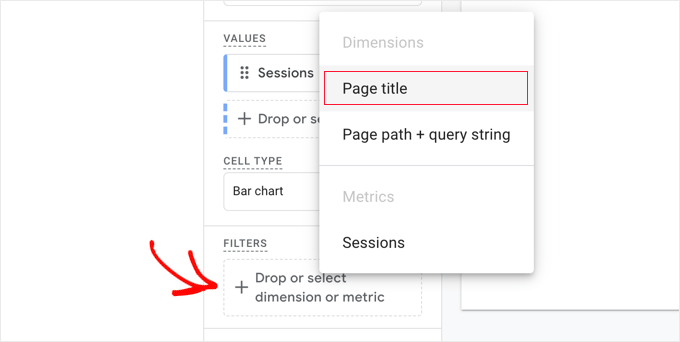
È necessario fare clic sul riquadro con la dicitura “Rilascia o seleziona dimensione o metrica”. Successivamente, fare clic su “Titolo della pagina” dal menu.
A questo punto, alla voce Condizioni, è necessario selezionare “contiene” dal menu a discesa e poi digitare il titolo della pagina 404 del vostro sito web, ad esempio “Pagina non trovata”.
Suggerimento: se non siete sicuri del titolo della pagina 404 del vostro sito web, digitate un URL a caso dopo il nome del vostro dominio, ad esempio https://example.com/xyz e poi controllate la scheda del vostro browser per trovare il titolo.
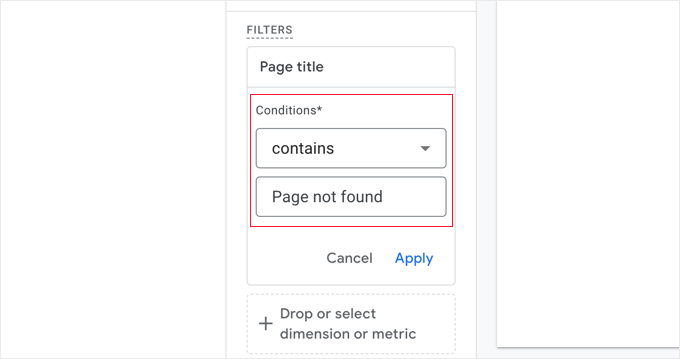
Una volta fatto ciò, è possibile fare clic sul link “Applica”.
A destra della pagina, ora viene visualizzato un rapporto di tutti gli errori 404 verificatisi durante l’intervallo di tempo del rapporto. Tuttavia, nella maggior parte dei casi, la colonna “Pagina + stringa di query” sarà tagliata in modo da non poter vedere l’URL completo.
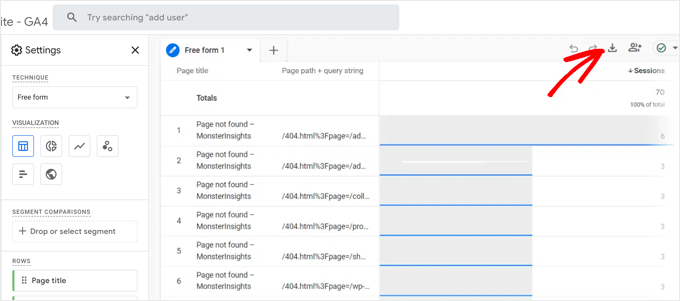
Per visualizzare gli URL, è necessario scaricare i dati. È sufficiente fare clic sull’icona “Download” in alto a destra della pagina.
Quando si visualizzano i dati scaricati, si nota che la maggior parte degli URL ha questo aspetto:
/404.html?page=/error-page-url/&from=http://example.com/page/
La parte dell’URL che mostra i link interrotti viene dopo ?page=. Nell’esempio precedente, si tratta di https://example.com/error-page-url.
La parte dell’URL che mostra la pagina contenente il link interrotto viene dopo &from=. Nell’esempio, è http://example.com/page/.
È possibile utilizzare queste informazioni per correggere i collegamenti interrotti. Vi mostriamo come farlo nell’ultima sezione di questo articolo.
Per visualizzare questo rapporto in futuro, è sufficiente visitare la scheda “Esplora” di Google Analytics.
Metodo 5: Trovare i link rotti in WordPress utilizzando Google Search Console (gratuito)
Google Search Console è uno strumento gratuito offerto da Google per aiutare i webmaster a gestire la visibilità dei loro siti sulle pagine dei risultati dei motori di ricerca (SERP). Segnala anche gli errori, compresi gli errori 404 causati da un link non funzionante.
Per prima cosa, è necessario configurare Google Search Console per il proprio sito web. Per istruzioni dettagliate sulla configurazione, consultate la nostra guida definitiva a Google Search Console.
Dopo aver effettuato l’accesso all’account di Google Search Console, è sufficiente fare clic sul link “Pagine” nel menu di sinistra.
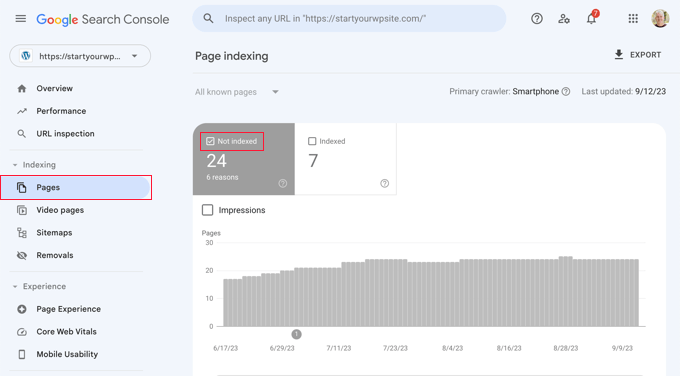
Accertarsi poi che la casella accanto a “Non indicizzato” sia selezionata.
In questo modo sarà possibile visualizzare tutti gli errori 404 riscontrati dagli utenti quando visitano il vostro sito web.
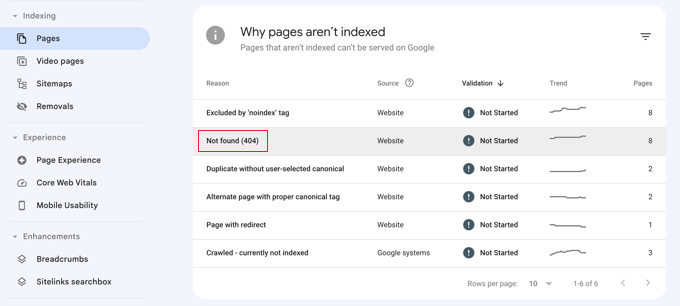
Quando si scorre la sezione intitolata “Perché le pagine non sono indicizzate”, si vedrà un motivo elencato come “Non trovato (404)”.
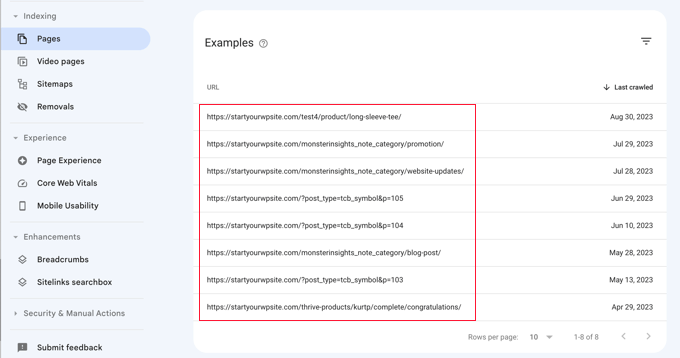
Facendo clic su questa voce, viene visualizzato un elenco di tutti i link non funzionanti che hanno causato un errore 404.
Come correggere correttamente i link rotti in WordPress
Vi abbiamo mostrato 5 diversi metodi per trovare i link rotti in WordPress. Ora parliamo di come risolvere facilmente i link rotti in WordPress.
Il modo migliore per risolvere un link non funzionante è reindirizzarlo a un’altra pagina.
Ad esempio, se il contenuto di un articolo è stato spostato a un indirizzo diverso, è necessario reindirizzarlo all’articolo più recente.
Allo stesso modo, se un articolo non esiste più, si vorrà indirizzare gli utenti verso una pagina simile che sia strettamente correlata ai contenuti del vecchio articolo.
È possibile farlo impostando i reindirizzamenti 301.
Il modo più semplice per correggere i link rotti e impostare il reindirizzamento è utilizzare il plugin All in One SEO (AIOSEO) per WordPress. Offre un potente gestore di reindirizzamenti che aiuta a tenere traccia delle pagine con errori 404 e a creare reindirizzamenti 301.
Nota: utilizzeremo la versione AIOSEO Pro perché include il gestore di reindirizzamenti e offre diversi tipi di reindirizzamenti.
Per prima cosa, è necessario installare e attivare il plugin AIOSEO Pro. Per maggiori dettagli, consultate la nostra guida passo-passo su come installare un plugin di WordPress.
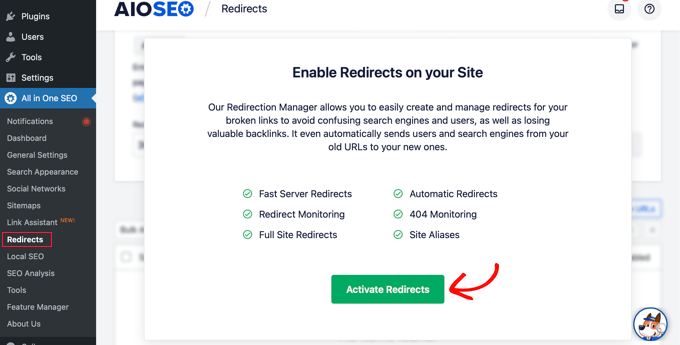
Dopo l’attivazione, è necessario visitare la pagina All in One SEO ” Reindirizzamenti e fare clic sul pulsante ‘Attiva reindirizzamenti’.
Successivamente, è necessario accedere alla scheda “Impostazioni” sotto Reindirizzamenti e abilitare i log 404. L’opzione si trova nella sezione “Registri”.
AIOSEO consente anche di impostare il periodo di tempo in cui registrare i log 404 utilizzando il menu a discesa. Per ottenere prestazioni ottimali e senza intoppi, si consiglia di non superare un mese.
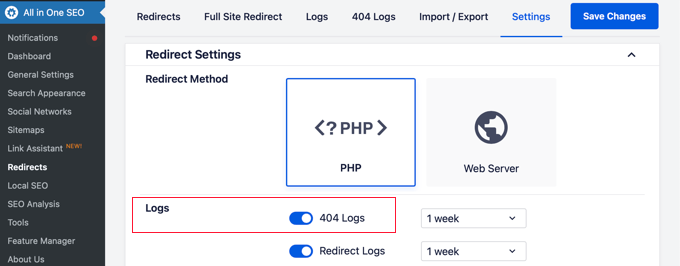
Dopodiché, fare clic sul pulsante “Salva modifiche”.
A questo punto, nella sezione Reindirizzamenti di AIOSEO apparirà la scheda “404 Logs”. Fare clic sulla scheda.
Quando si attiva per la prima volta l’opzione dei registri 404, non ci saranno dati in questa pagina. Il plugin inizierà a monitorare e registrare le pagine 404 solo dopo aver abilitato le impostazioni.
Tuttavia, una volta attivo, AIOSEO mostrerà un elenco di link non funzionanti sul vostro sito web nella colonna “URL”. Inoltre, nella colonna “Hits” vi mostrerà quante persone hanno visitato il link e la data dell’ultimo accesso.
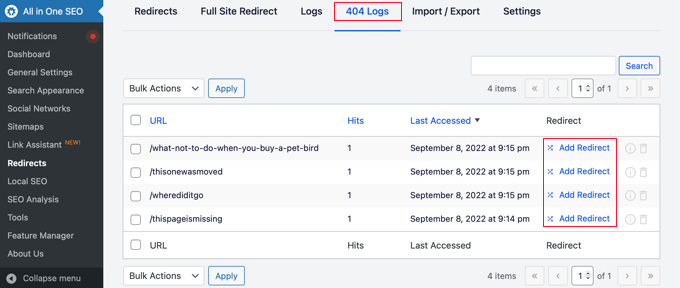
È ora possibile fare clic sul pulsante “Aggiungi reindirizzamento” per qualsiasi link non funzionante che si desidera correggere. Quando si fa clic sul pulsante, vengono visualizzate le opzioni di reindirizzamento per l’URL non funzionante 404.
È sufficiente inserire l’URL di destinazione dove si desidera reindirizzare i visitatori e selezionare “301 Moved Permanently” come tipo di reindirizzamento dal menu a discesa. Una volta fatto questo, si deve cliccare sul pulsante “Aggiungi reindirizzamento”.

È possibile testare il funzionamento visitando il vecchio link non funzionante e si verrà reindirizzati alla nuova pagina.
Ripetete la procedura per tutti i link non funzionanti del vostro sito web.
Per maggiori informazioni, consultate la nostra guida su come impostare i redirect in WordPress per i principianti.
Bonus: le nostre migliori guide sui link interni
Ora che avete trovato e risolto i link rotti sul vostro sito WordPress, vi starete chiedendo quali sono gli altri modi per utilizzare i link interni per migliorare la SEO del vostro sito. Ecco le nostre migliori guide sui link interni:
- Guida per principianti su come aggiungere un link in WordPress
- Link interni per la SEO: La guida definitiva alle migliori pratiche
- I migliori plugin di collegamento interno per WordPress (automatici e manuali)
- Come aggiornare facilmente gli URL quando si trasferisce il sito WordPress
- Come ottenere i sitelink di Google per il vostro sito WordPress
- I migliori plugin SEO link per WordPress
Speriamo che questo articolo vi abbia aiutato a capire come trovare e correggere facilmente i link rotti in WordPress. Potreste anche consultare la nostra guida su come impostare una struttura di URL SEO-friendly e la nostra scelta dei migliori plugin di link interni per WordPress.
Se questo articolo vi è piaciuto, iscrivetevi al nostro canale YouTube per le esercitazioni video su WordPress. Potete trovarci anche su Twitter e Facebook.


THANKGOD JONATHAN
I am using the free version of Broken Links Checker and it is the most easier to use broken links checker I have use. Very easy to find and fix broken links.
Although it has a limit of 200 links but you can scan unlimited links strategically. That is, you can scan 200 links, fix them and then scan another 200 links, until you fix them all.
Ahmed Omar
recently, I faced a problem like this, and I did not know that the link is not working till one of the visitors contacted me I had to correct it manually.
Now with theses option it will solve the problem and guarantee that it will not happen again.
Thank you
WPBeginner Support
You’re welcome, glad we could share this
Admin
Jiří Vaněk
After reading this article, I realized that I hadn’t actually tested my own website for the presence of broken links for a very long time. All this while, I assumed everything was fine. Upon scanning, I discovered an error even in my own links. I had modified the URL structure by adding CS and EN to the URL due to the new Polylang setup. Naturally, it found dozens of links that were incorrect and that I had to adjust. So, it really makes sense to periodically scan the website for this issue. Not just for internal links but also for external links that may eventually lead to discontinued pages. At least now, it cleaned up my website from non-functional links. Great.
WPBeginner Support
Glad our guide could help
Admin
Ralph
Google Search Console looks like best bet for me, at least, the easiest as i don’t use other provided solutions. This will help me fix some errors.
Ahmed Omar
I’m particularly using Google Search Console for tracking and resolving these issues of broken links.
but the other methods is good as well but I think some of them needs premium.
This guide will undoubtedly help me enhance my website’s overall health.
Much appreciated!
WPBeginner Support
Glad to hear you’re finding our guide helpful
Admin
Ethan Plunkett
Heads up. Google search console’s 404 links only include broken internal links (back to your site) and will not detect broken outgoing links to other sites.
WPBeginner Support
Correct, thank you for sharing that information!
Admin
ian Kush
You Rock! Thanks for making it easy
WPBeginner Support
Glad our guide was helpful
Admin
Yash
I am using broken link check WordPress plugin. Is it possible to check broken link for custom buttons?
Please help me.
WPBeginner Support
It should check those links as well
Admin
Imran
This article was super helpful in solving 404 errors on our website as we switched from joomla to wordpress, thank you so much, now our website is doing great.
WPBeginner Support
Glad our guide was helpful
Admin
Raaz shrestha
Thanks for the great stuff on link broken. The article were amazing. It not just only shows to find the broken link but the way you give the solution for the problem is always the best part.
WPBeginner Support
You’re welcome, glad you’ve found our content helpful
Admin
Riky Fahri Hasibuan
This is what i’m looking for! i have 301 redirecy plugin in my website but i have no idea how to use it properly.
thank you so much for this useful tutorial.
WPBeginner Support
You’re welcome, glad our tutorial could be helpful
Admin
Carol Mankin
Thanks for sharing this blog. Your blog is very informative regarding broken websites. The points you shared, are very useful for broken website repair services. It is important that everyone must follow some good tips for their broken website.
WPBeginner Support
Thank you, glad our content could be helpful
Admin
Janie
I installed this plug in and it says no broken links detected. I cannot imagine that is accurate because the site is big and definitely has some broken links. Do I need to reconfigure something to get it to run accurately?
Greg
Thank you for this great post !
Do you know how to bulk export broken links with this plug-in ?
Or maybe, if you have one in stock, even a MySQL request could be used to export them within phpmyadmin.
Cheers
Christopher
Can Yoast Seo handle the same function of the broken link checker?
WPBeginner Support
No it doesn’t.
Admin
EFETACK
Well, I have just read that Yoast SEO has this function, too. It detects and corrects broken links, even directly from Google Console, if wanted, and with a easy button in tool bar, but only Premium version. So have to pay for it.
I am wondering, if I can keep trusting you guys, seeing that you don’t answer to all questions here, and also how can you review a plugin when it is not updated for over a year???
In WP > install New Plugin > the thumbnail is even missing of this plugin.
Wow.
WPBeginner Support
Thank you for your feedback, we are working on improving our answers to comments. For clarification, this article was updated in August, we will certainly look into updating articles such as this one as we find they need updates so thank you for letting us know that we should look into this article.
Andrzej
One question: The best solution is unlinking or dismiss broken links?
Sine Thieme
I’m pretty sure I already know the answer but I’ll ask anyway: This is just for self-hosted sites on WordPress.org, not WordPress.com, correct? Is there ANY way to check broken links on a WordPress.com blog? I am in the process of converting from Blogger and I have over 700 blog posts that ALL have internal links. In other words, a big pain. I suppose I’ll eventually have to manually fix them in any case, but seeing the broken links would give me a priority of which ones to fix first.
WPBeginner Support
Hi Sine Thieme,
Yes, this is for WordPress.org websites. We will suggest that you export your blog posts in XML format using the built in WordPress.com export tool. After that you can use an advanced text editor like Notepad++ or TextWrangler (for Mac), use simple search and replace tool in the editor to replace old blogger URLs with your WordPress.com URLs.
Admin
SeLoRe
After I activate that plugin I got error.
The plugin generated 1690 characters of unexpected output during activation. If you notice “headers already sent” messages, problems with syndication feeds or other issues, try deactivating or removing this plugin.
Janie
Hi-
I use Link Cloaker and it seems that Broken Link Checker is not picking up the links that are not good because those bad links are directed to my homepage. I don’t want those links to be directed to my homepage. I want them to come up as broken so I can fix them.
How can this be fixed?
Thanks
MASI
How can fix incoming broken back-links?
John Okosun
You can fix that by performing a 301 redirection.
So whenever such a link is access from another site, your site simply redirects the person to a new URL.
A plugin for this is redirection WordPress plugin
Hope that helps.
AbbeyLashly
I have tried this solution, but didnt work for me my website is thank you.
WPBeginner Support
Did you get an error?
Admin
Mazid Chowdhury
I was really able to solve my broken links through this article. Thanks to the author.
Ravi
Thanks! I’m running Broken Link Checker now to fix dozens of broken links on my site. My google organic search traffic plummeted this year after moving to a new domain…and wasn’t sure why. I think broken links is the reason (just realizing a lot of my old posts are busted).
Has anyone had direct experience with improved google ranking SEO after fixing broken links? What was the before/after result?
Rick
I’ve been using broken link checker for a while at this domain. After fixing them, seems fairly frequently, I need to do so again, say a few weeks after fixing a bunch.
TJ
I do not recommend this plugin. It is a serious CPU hog that will slow down your site and possibly use up your CPU allocation. A number of host providers have banned it. If you want to check your links you are better off running an app from your computer to check run an external check.
WPBeginner Staff
Yes it does and it is not recommended to use it too often.
Arieon Maison
Just wondering if the plugin have some effect with the speed of the site.
Arieon Maison
Does the plugin will slow the site?
Jeanne Melanson
Very helpful advice, thank you. Now I know what to do with my broken links. Cheers!
kamal singh
Thanks For Sharing this Great Plugins
abhishek taneja
I found 34 broken links in my blog..Thanks for sharing this article , it has been useful for me
Saurabh
Is there any plugin available for the Blogger site??
Editorial Staff
None that we’re aware of.
Admin
Amy
Broken Link Checker has been very handy for me – but what is that Green Tab (shown in this post’s last screenshot and is there any way to hide it?
This is extremely confusing for clients and I find it even worse than sidebar ads.
Any ideas on how to manage this? Thanks!
Editorial Staff
Unfortunately, no way to get rid of it without editing the plugin (at least that is our understanding). You can always contact the plugin author and make a suggestion.
Admin
Corey
What do you do if it tells you that some links are broken but they are not? I went to the pages and double checked the link and it works fine.
Bongo
Sounds useful, i wish it was around a year ago…
Stijn
Used BLC in the past. It’s good to use from time to time, but creates a lot of bloat in your database. That’s probably because of my massive post archive.
Mike
STUN, did the same on my site…over 6,000 posts. However after running the WP-Optimize plugin, the database was nice and clean again.
Iris
This will improve my work, a lot.
Peter Gerwing
I use wpengine.. This is what they have to say about:
“There’s another class of plugins that we disallow simply because they cause a high load on our servers or create an unnatural number of MySQL queries.
Broken Link Checker — Overwhelms even our robust caching layer with an inordinate amount of HTTP requests.”
On their hosting service it is a disallowed plugn!
“wpengine” reccommends:
To track traffic in a more scalable manner, both the stats module in Automattic’s Jetpack plugin and Google Analytics work wonderfully.
chathu
Yes Same here. I have VPS with 1.5GB RAM. This plugin slowdown my blog.
Editorial Staff
You’re not suppose to keep the plugin on. Use it during your spring clean up (like every 6 months). Turn it on. Check if everything is good, and then delete it.
Admin
Jeannette Paladino
I use Broken Link Checker and it is very useful. But why would you disable the plugin after using it the first time? I receive notifications every few days that the plugin has found a couple of more broken links. Usually, because when an a site I linked to has shut down, or the link has become corrupted or a blogger removed a post, — any number of reasons. It is not helpful for SEO — or to your visitors — when they click on a bad click. I believe Broken Link Checker should be active all the time.
Ian
Really realistic and useful.
Martin Velthuizen
Thank you for letting us know about this great plugin! Started to use it on some website right away.
I don’t understand why I should disable the plugin after initial use and wait 6 months to run it manually again. It appears to me that I can leave it Active, and it will check the links automatically every so many hours and send me a mail if it has found a broken link. Much better, isn’t it?
Thanks in advance for your opinion on this.
WPBeginner Support
It is but running a script so many times particularly the one that keeps checking all your posts can be resource incentive on your website.
Admin
E.S. Ivy
I want to finish seeting up my .org site first, but as I’m moving from .com this will be a great tool! Thank you!
Monica
I installed the Broken Link Checker plugin a few months ago and immediately following the installation my site crashed. I would love to have it but I am afraid to install it again.
Frans
I had the same problem, I had to delete the plugin by FTP, because the rest of my screen was whit and it was nog possible to active or deactive it.
Sad, because in my other site it worked well, both site are on the same server.
WPBeginner Support
You can temporarily switch to a default WordPress theme like twenty twelve and then activate the plugin. If it works you can then check for broken links, fix them, and then revert back to your own theme.
Admin