Mantenere le immagini del vostro sito web fresche e di alta qualità è molto importante se volete fare una buona impressione. Quando abbiamo iniziato a lavorare in corso su siti WordPress, aggiornare le vecchie immagini ci sembrava una vera seccatura. Pensavamo: “Deve esserci un modo più semplice!”. E indovinate un po’? C’è.
Con il tempo, abbiamo capito come rendere questo processo rapido e indolore. Ora, abbiamo aiutato molti blogger e proprietari di siti web a fare lo stesso, mantenendo i loro siti in ordine senza stress.
In questa guida, quindi, condivideremo i passaggi per sostituire facilmente immagini e file multimediali in WordPress.
Perché sostituire immagini e file multimediali in WordPress?
La sostituzione delle immagini e dei file multimediali sul vostro sito web WordPress, che si tratti di foto di prodotti, immagini in evidenza o miniature, è importante per diversi motivi.
Ecco alcuni motivi per cui chi siamo dovrebbe preoccuparsi di mantenere freschi i file multimediali:
- Contenuti aggiornati. Immagini fresche e pertinenti mantengono il vostro sito web sempre attuale e coinvolgente. Possono anche rispecchiare le modifiche apportate alla vostra attività.
- Miglioramento dell’esperienza dell’utente. Immagini aggiornate e di alta qualità migliorano l’esperienza dell’utente. Fanno sì che i visitatori rimangano più a lungo sul vostro sito e li incoraggiano a esplorare altre pagine.
- VantaggiSEO (ottimizzazione per i motori di ricerca). L’ottimizzazione dei nuovi file multimediali con parole chiave pertinenti può migliorare la loro visibilità nei motori di ricerca.
- Migliori prestazioni. La sostituzione di file multimediali obsoleti o mal ottimizzati con altri più recenti e ottimizzati può velocizzare il sito web. Inoltre, tempi di caricamento più rapidi migliorano l’esperienza dell’utente e aiutano il posizionamento nei motori di ricerca.
- Coerenza e branding. Mantenere le immagini e i file multimediali allineati con l’identità del brand aiuta a mantenere un aspetto professionale.
Se avete un sito web di una piccola impresa, aggiornare e sostituire con regolarità le immagini e i file multimediali dimostra al pubblico che la vostra azienda è attiva e attenta ai dettagli. Questo vale anche per chi gestisce un negozio online.
Inoltre, mantenere la libreria dei media organizzata e aggiornata facilita la gestione dei contenuti per voi e per il vostro team.
Quando si sa che tutte le immagini e i file multimediali sono aggiornati, ottimizzati e correttamente categorizzati, diventa più facile trovare e utilizzare le risorse giuste quando necessario. Questo salva il tempo e riduce lo stress di gestire centinaia o migliaia di file multimediali.
Così potrete concentrarvi sulla pianificazione dei contenuti e sulla creazione di articoli di alta qualità per il vostro pubblico.
Per questo motivo, vi mostreremo come sostituire facilmente immagini e file multimediali in WordPress. Ecco una rapida panoramica dei 3 passaggi che metteremo in copertina in questa guida:
Pronti? Iniziamo.
Passo 1. Installare Cerca e sostituisci tutto di WPCode
La prima cosa da fare è installare e attivare il plugin gratuito Search & Replace Everything di WPCode.
Il nostro team ha creato il plugin Search & Replace Everything by WPCode per indirizzare una limitazione significativa di WordPress: la mancanza di una caratteristica di ricerca e sostituzione integrata.
La mancanza di questa caratteristica lasciava ai proprietari dei siti web due frustranti opzioni. In primo luogo, potevano aggiornare manualmente ogni pagina, il che richiedeva molto tempo. In secondo luogo, potrebbero dover assumere uno sviluppatore per scrivere una query SQL, il che potrebbe essere costoso.
Search & Replace Everything semplifica questo processo, offrendo una soluzione facile ed economica a chiunque gestisca un sito WordPress.

Ecco alcuni casi d’uso del plugin:
- Sostituite rapidamente le immagini obsolete in tutto il sito con un solo clic.
- Aggiornate di massa i contenuti delle pagine e dei post del vostro sito web in pochi istanti.
- Sostituite facilmente i vecchi URL con quelli nuovi per correggere i link non funzionanti dopo la migrazione di un sito web.
La buona notizia è che è possibile utilizzare la versione gratuita dello strumento per sostituire immagini e file multimediali. Tuttavia, l’aggiornamento alla versione Search & Replace pro sblocca la caratteristica della cronologia, che consente di annullare le modifiche, sostituire le immagini dall’editor a blocchi di WordPress e altro ancora.
Se avete bisogno di aiuto per installare il plugin, potete selezionare la nostra guida su come installare un plugin di WordPress.
Suggerimento dell’esperto: se avete già WPCode Pro, potete installare e attivare Search & Replace Everything dalla dashboard di WPCode nell’area di amministrazione di WordPress. Tutto ciò che dovete fare è navigare in Code Snippets ” Search & Replace e poi fare clic sul pulsante “Installa Search & Replace Everything”.
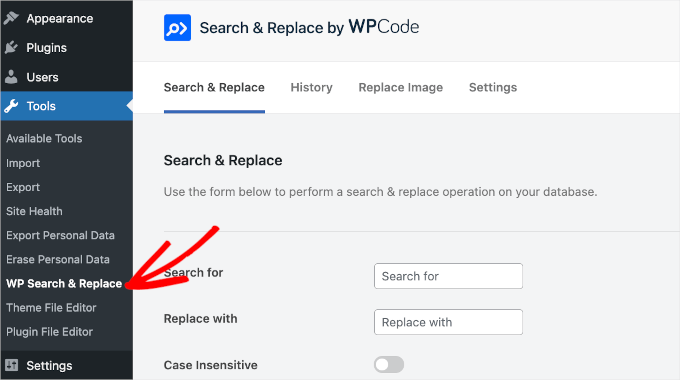
Dopo l’attivazione, è possibile accedere alla dashboard di Search & Replace Everything navigando in Strumenti ” WP Search & Replace.
Non è necessario configurare nulla, quindi è possibile utilizzare lo strumento immediatamente.
Passo 2. Scegliere le immagini o i file multimediali da sostituire
Per sostituire immagini o file multimediali, spostatevi nella scheda “Sostituisci immagine” della dashboard Cerca e sostituisci.
In quest’area è possibile vedere tutte le immagini esistenti.
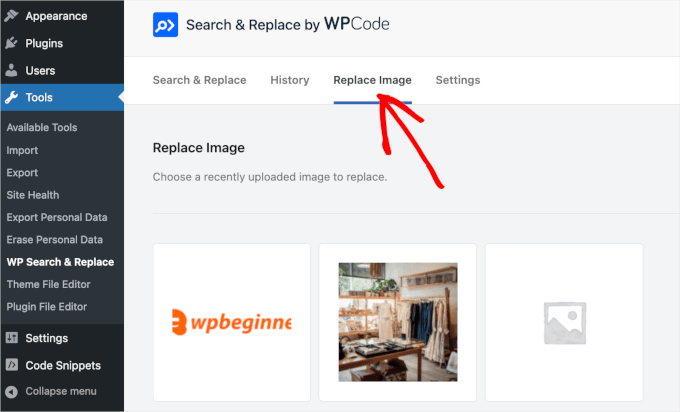
Ora è necessario trovare il file che si desidera sostituire.
Una volta trovato il file, è sufficiente passare il mouse su di esso per vedere un pulsante con l’etichetta “Sostituisci“. Potete fare clic su di esso.
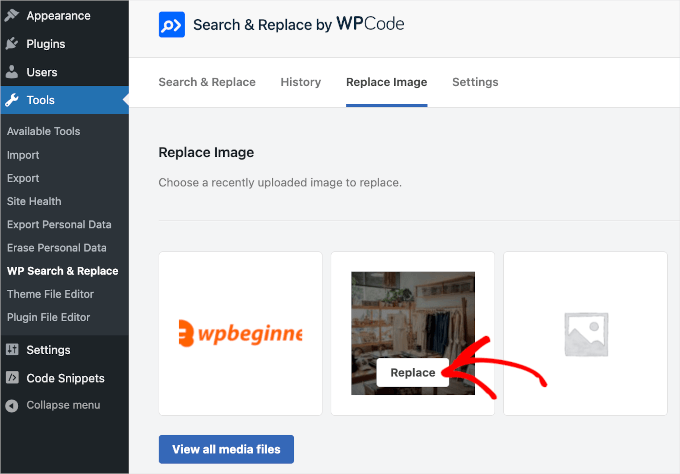
Si accede così al pannello “Sostituisci immagine”.
È possibile caricare il nuovo file facendo clic sul pulsante “Scegli un file” o sul riquadro “Scegli una nuova immagine per vederne l’anteprima”.
In ogni caso, si reindirizza al disco locale del computer per scegliere un’immagine sostitutiva.
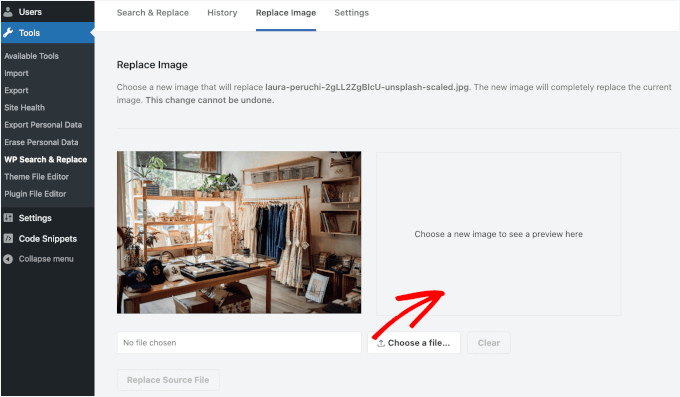
Una volta scelto un file, questo apparirà nel riquadro a destra della vecchia immagine.
Se tutto sembra a posto, fate clic sul pulsante “Sostituisci file sorgente”.
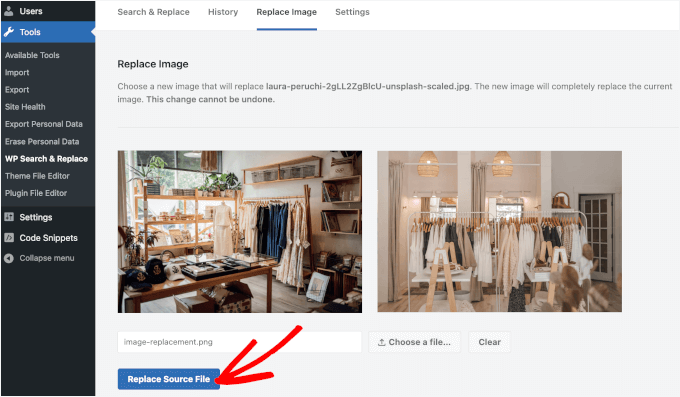
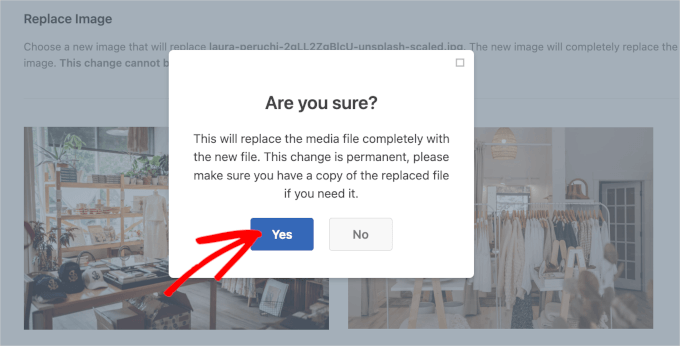
Verrà quindi visualizzata una finestra di attenzione che indica che la modifica sarà permanente.
È sufficiente fare clic sul pulsante “Sì” per avviare il processo, se si è sicuri che tutto sia a posto.
Nota: quando si sostituisce un’immagine, altri dati come il titolo del file multimediale e il testo alt rimangono invariati. È possibile aggiornare questi dati in un secondo momento, una volta completato il processo di sostituzione, ma assicurarsi che la nuova immagine o il file multimediale possano utilizzare lo stesso titolo e lo stesso testo alt aiuta a risparmiare tempo.
Successivamente, Search & Replace Everything elaborerà la sostituzione.
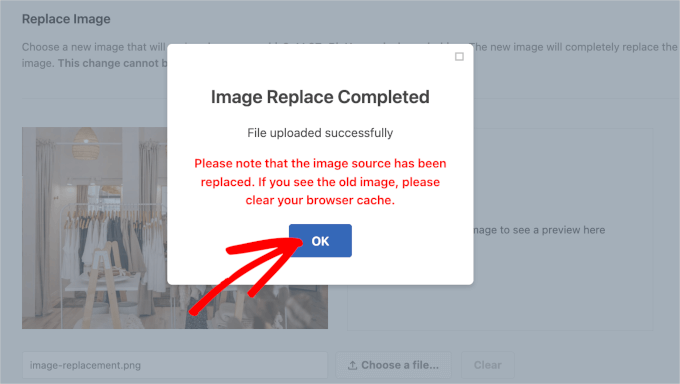
Una volta terminato, verrà visualizzata un’altra finestra a comparsa. Qui compare la scritta “Image Replace Complete” (Sostituzione immagine completata), seguita da alcune note.
È possibile fare clic su “OK” per terminare il processo.
Passo 3. Verificare se le immagini o i file multimediali nuovi sono attivi
Ora è possibile visitare i post o le pagine a cui era allegato il file media e vederlo sostituito con il nuovo file appena caricato.
Ecco come si presenta il nostro:

Se si vede la vecchia immagine, si dovrebbe provare a cancellare la cache.
Per istruzioni più dettagliate, potete consultare la nostra guida dettagliata passo-passo su come cancellare la cache in WordPress.
Video tutorial
Avete bisogno di una guida passo-passo? Guardate gratuitamente il nostro video tutorial per la sostituzione di immagini e file multimediali in WordPress.
Altre guide di WordPress per usare le immagini in modo efficace
Volete portare l’ottimizzazione delle immagini a un livello superiore? Selezionate queste guide aggiuntive per WordPress che vi aiuteranno a usare le immagini come un professionista:
- WebP vs. PNG vs. JPEG: il miglior formato immagine per WordPress
- Come eseguire la modifica di base delle immagini in WordPress (ritagliare, ruotare, scalare, capovolgere)
- Come ridimensionare e ingrandire le immagini senza perdere qualità
- Come visualizzare immagini a grandezza naturale in WordPress
- Come aggiungere un’immagine di sfondo in WordPress
- Come modificare di massa le immagini in evidenza in WordPress
- Come correggere la perdita di colore e di saturazione delle immagini su WordPress
- Come creare una galleria di immagini in WordPress (passo dopo passo)
Speriamo che questo articolo vi abbia aiutato a trovare un modo più semplice per sostituire immagini e file multimediali in WordPress. Potreste anche consultare il nostro tutorial su come rinominare facilmente le immagini e i file multimediali in WordPress o la nostra selezione dei migliori plugin e strumenti per le immagini in evidenza per WordPress.
Se questo articolo vi è piaciuto, iscrivetevi al nostro canale YouTube per le esercitazioni video su WordPress. Potete trovarci anche su Twitter e Facebook.


Daniel Whalen
I love your videos but please slow down on how to do it, older persons need to see it slowly.
WPBeginner Support
Thank you for your feedback on our video!
Admin
Phil
Is there a way to batch replace? I’m a photographer and sometimes have over 100 images per blog post. I wanted to replace them with smaller file sizes to help with my pages speeds. Is this possible?
Many thanks
WPBeginner Support
Not manually but there are plugins to help make the process easier for you that we cover in our list below:
https://www.wpbeginner.com/plugins/best-wordpress-image-compression-plugins-compared/
Admin
Jeff Vetterick
If I use the plugin to just “replace image only” (with one of the same file name) will the alt text, image description, and image caption of the original image be overwritten or preserved. If they are preserved, this would save me a ton of time.
WPBeginner Support
It should keep that information if it is able, you would want to reach out to the plugin’s support for specifics.
Admin
jg
This option isn’t available in the new version as it just allows you to delete or edit it. if I delete it I don’t know the url to replace it with?
WPBeginner Support
You may want to ensure you are in the correct view for your media library as the feature is currently available
Admin
Sanjay Sajeev
Thank you for your post.
I installed enable media replace plugin in my site. But when I replace an image that I used in a blog post, I can see the image has been replaced in the media library. But When I check that image in the blog post, there is no change to that image and its file size. What I have to do to resolve this?
WPBeginner Support
You may want to try clearing your cache and if that does not work, reach out to the plugin’s support for them to take a look at possible issues.
Admin
Linda Joyce
Can I do the same thing manually by replacing the image via FTP? Will that change the image?
WPBeginner Support
Hi Linda,
That would work. But WordPress will not be able to regenerate thumbnails and image sizes.
Admin
Rehan
Can I disable this plugin permanently after all images have been replaced in media library ?
Fede
Hi. I keep getting request timeout. Same as when uploading using usual wp means. That is why I had to switch to uploading via ftp and then loading them through a plugin meant for that. I really need to get this working since some of the images are not scaling properly nd need to change them. Any help would be apreciated. Thanks.
hitesh
Hi
in my wordpress admin there is no any option like replace media..in mine there are only 3 options 1) EDIT 2) DELETE PREMANENTLY 3) VIEW
So what is the issue there ..its old version or have any other issue can u please clear that so that i can replace that media files
Regards
Hitesh
Luke
That’s why you need to install the mentioned plugin.
Nicole
Help
I’m a perfrormer contacting agents and tried to replace voice reels after successfully installing yourplugin ( thought it was safest way to go )
Now htey are blanks – I’ve cleared browsing cache
I followed the instructions
my media player is this :
svnlabs HTML5 Mp3 player 3.6 installed
please help :0
Riccardo
Hi thanks for the article, the plugin works great. There’s one thing I don’t get though: the image replacement seems to only affect the image in its original size, when the site displays the image in other formats (thumbnails, previews, etc…) I can still see the old image file.
How can I force the image replacement on all the other image files (e.g. imagename-300×200.jpg)?
thank you
Rehan
Please use Regenerate thumbnails plugin to regenerate your images. after that you will see the replaced images.
Leed
Thanks a lot.
You help me for this problem.
Panagiotis Tabakis
The Enable Media Replace plugin poses a security threat, I would totally avoid it. Its a shame to suggest users to use dangerous software. Please research before posting.
The exploit holds since 2011.
For more info see
WPBeginner Support
Hi Panagiotis,
The issue was immediately resolved by the plugin author in the very next release (please see plugin’s changelog and scroll down to version 2.4).
This is why we recommend users to keep their WordPress site and plugins updated.
Admin
Panagiotis Tabakis
Yes, you are correct. I’m sorry, I saw a support post which the plugin author didn’t answer and thought it wasn’t resolved.
The exploit was patched @ 09 February 2011 (the same day).
I wonder why the author hasn’t replied but I will inform the forum users.
Again, sorry.
WPBeginner Support
No problem It’s good to be cautious about security issues. Hopefully, your answer on the support forums will help other users.
Blake
I am running WP 4.6.1 bootstrap and I want to remove a background photo and replace it with one that is in my galley. Can you tell me how to do it, Thanks
Sky
I followed the steps and in the library the new image is displayed but where the image is located on the home page remains the old photo. Not sure what to do…
Christian Scholz-Flöter
Maybe it’s a browser cache related issue and you need to clean/delete the browser cache. If you don’t know how to do it, google your browser’s brand name and “clear browser cache”.
jorge
This plugin works great in the media page. However I would like to also replace images/media from within the media modal window inside a post/page edit page without leaving the page. Any ideas?
Thanks for this amazing post!
Marilyn
I wish I had known this sooner! I didn’t detach my media files before I deleted them. I replaced them with a new image. The problem is that resulted in broken images. Even though I go back and reattach/choose the correct image down the road it breaks again. In my Easy recipe program I see the placeholder for the deleted image and the program searching for it. Is there a fix for this? Unfortunately there are about 200 files doing this.
Rosy
Hi, unfortunately the “replace media” link is not showing as an option?