Volete visualizzare i post di WordPress in un layout a griglia?
Un layout a griglia offre una maggiore flessibilità nella visualizzazione dei post in WordPress. Questo può essere utile quando si creano pagine personalizzate.
In questo articolo vi mostreremo come visualizzare facilmente i post di WordPress in un layout a griglia in qualsiasi punto del vostro sito.
Quando è necessario un layout a griglia per WordPress?
Tutti i temi WordPress supportano il tradizionale layout verticale dei post del blog, che funziona bene per la maggior parte dei siti web. Tuttavia, questo layout può occupare molto spazio, soprattutto se i post sono numerosi.
Se state creando una homepage personalizzata per il vostro sito, potreste voler utilizzare il layout a griglia per visualizzare i post recenti.
In questo modo si avrà più spazio per aggiungere altri elementi alla home page.
Inoltre, la griglia dei post metterà in evidenza le immagini in primo piano, in modo da renderle visivamente accattivanti e cliccabili. Potete anche usare la griglia dei post per mostrare il vostro portfolio creativo e altri tipi di contenuti personalizzati.
Molti temi di riviste e di fotografia utilizzano già il layout a griglia per visualizzare i post. Tuttavia, se il vostro tema non supporta questa funzionalità, dovrete aggiungerla.
Detto questo, vi mostriamo come visualizzare i post di WordPress in un layout a griglia. Utilizzate i link rapidi qui sotto per passare direttamente al metodo che desiderate utilizzare.
- Creare un layout a griglia con l’editor di blocchi di WordPress
- Creare un layout a griglia con il plugin Post Grid
- Creare un layout a griglia con il page builder SeedProd
- Creare un layout a griglia aggiungendo codice a WordPress
Video tutorial
Se preferite le istruzioni scritte, continuate a leggere.
Metodo 1. Creare un layout a griglia per i post di WordPress con l’editor di blocchi
Questo metodo consente di visualizzare semplicemente i post e le miniature in un layout a griglia utilizzando l’editor di blocchi di WordPress. Esiste un blocco griglia di post incorporato che consente di creare la propria griglia.
Per farlo, aprire la pagina che si desidera modificare, quindi fare clic sul pulsante “Più” per aggiungere un blocco e cercare “Query Loop”, quindi fare clic sul blocco per aggiungerlo.
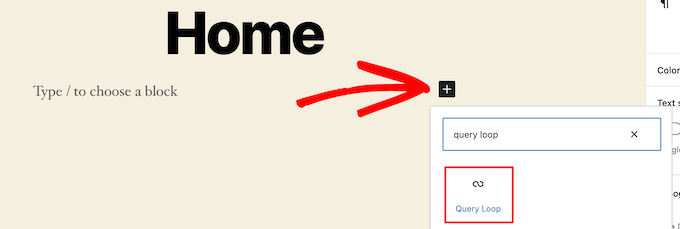
Questo blocco aggiunge il ciclo di post alla pagina.
Quindi, fare clic sull’opzione “Inizia vuoto” nella parte superiore del blocco per creare una griglia di post.

Questo offre alcune scelte diverse, a seconda del tipo di informazioni che si desidera visualizzare con la griglia dei post.
Noi selezioneremo l’opzione “Immagine, data e titolo”, ma voi potete scegliere quella che preferite.

A questo punto, passare il mouse sull’immagine e selezionare l’opzione “Vista griglia”.
Questo trasforma l’elenco in una griglia di post.

Successivamente, è possibile personalizzare le informazioni che si desidera visualizzare.
Per prima cosa, elimineremo la paginazione in fondo al blocco. Per farlo, basta fare clic su di esso e sul menu delle opzioni “Tre puntini”.
Quindi, fare clic su “Rimuovi paginazione”.

Questo rimuoverà automaticamente l’elemento dal blocco.
È possibile eliminare le date dai post nello stesso modo o lasciare più informazioni sui post per i visitatori.
Successivamente, aggiungeremo i link alla miniatura e al titolo del post.
È sufficiente fare clic sulla miniatura del post e attivare la levetta “Link al post” nel pannello delle opzioni a destra.

Poi, fate la stessa cosa per il titolo del vostro post.
Una volta terminato, fare clic sul pulsante “Aggiorna” o “Pubblica” per rendere attiva la griglia dei post.
Ora è possibile visitare il sito web di WordPress per vedere la nuova griglia dei post di WordPress.

È possibile aggiungere questo blocco a qualsiasi pagina o post. Se desiderate utilizzarlo come pagina di archivio del vostro blog, potete consultare la nostra guida su come creare una pagina separata per i post del blog in WordPress.
Metodo 2. Creare un layout a griglia per i post di WordPress con il plugin Post Grid
Questo metodo offre un modo semplice per aggiungere una griglia di post personalizzabile che si può aggiungere in qualsiasi punto del sito web.
La prima cosa da fare è installare e attivare il plugin Post Grid. Per maggiori dettagli, consultate la nostra guida su come installare un plugin di WordPress.
Dopo l’attivazione, è necessario visitare Post Grid ” Add New per creare la prima griglia di post.
Poi, date un titolo alla vostra griglia di post. Questo titolo non apparirà da nessuna parte nella pagina, ma servirà solo per aiutarvi a ricordarlo.

Al di sotto, si trovano le impostazioni della griglia dei post, suddivise in diverse sezioni con più schede.
Per prima cosa, è necessario fare clic sulla scheda “Query Post”. Qui si definiranno i tipi di post che si desidera visualizzare nella casella “Tipi di post”.
Per impostazione predefinita, visualizza solo i post, ma è possibile aggiungere pagine e persino tipi di post personalizzati.

Successivamente, è necessario fare clic sulla scheda “Layout”.
Quindi, fare clic sul pulsante “Crea layout”. Si aprirà una nuova finestra.

È necessario dare un nome al layout. Quindi, fare clic sull’opzione ‘Generale’ e si aprirà un elenco di tag.
Questi tag sono le informazioni che verranno visualizzate nella griglia dei post.

Selezioneremo l’opzione “Miniatura con link” e l’opzione “Titolo del post con link”.
Quindi, fare clic su “Pubblica” o “Aggiorna” per salvare il layout.

Ora, tornate all’editor della griglia del post originale nella scheda precedente e sarà disponibile una nuova opzione di layout che potrete selezionare.
È sufficiente fare clic sul nuovo layout nella sezione “Layout degli elementi” nella parte inferiore dello schermo.

Quindi, fare clic sulla scheda “Stile elemento”. Qui è possibile impostare le dimensioni della griglia.
Le impostazioni predefinite dovrebbero funzionare per la maggior parte dei siti, ma in caso contrario è possibile modificarle qui.

Una volta terminato, fate clic sul pulsante “Pubblica” nella parte superiore della pagina e la griglia sarà pronta per essere aggiunta al vostro blog WordPress.
A questo punto, è necessario fare clic sulla scheda ‘Shortcode’ e copiare il codice breve nella casella ‘Post Grid Shortcode’.

Successivamente, aprire la pagina in cui si desidera visualizzare l’elenco dei post e fare clic sul pulsante ‘Più’ per aggiungere il blocco.
Quindi, cercare “Shortcode” e selezionare il blocco “Shortcode”.

Quindi, incollare nella casella il codice breve copiato in precedenza.
Quindi, fare clic sul pulsante “Aggiorna” o “Pubblica”.

Ora è possibile visualizzare la pagina per vedere il layout della griglia dei post di WordPress dal vivo.

Metodo 3. Creare un layout a griglia per i post di WordPress con il plugin SeedProd Page Builder
Un altro modo per creare un layout a griglia per i post è utilizzare il plugin SeedProd page builder. È il miglior costruttore di pagine WordPress drag and drop sul mercato, utilizzato da oltre 1 milione di siti web.
SeedProd consente di creare facilmente pagine personalizzate e persino temi WordPress completamente personalizzati senza scrivere alcun codice. È possibile utilizzare il plugin per creare qualsiasi tipo di pagina, come pagine 404, pagine coming soon, pagine di destinazione e altro ancora.
Per saperne di più, consultate la nostra guida su come creare una pagina personalizzata in WordPress.
Nel costruttore SeedProd, durante la personalizzazione della pagina, è sufficiente fare clic sul pulsante “Aggiungi sezione” in un punto qualsiasi della pagina.
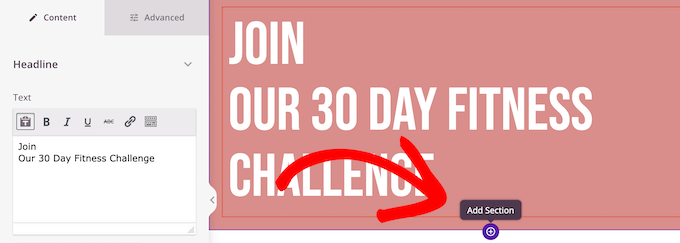
Verrà visualizzata l’opzione per aggiungere un nuovo blocco.
Quindi, trascinate il blocco “Messaggi” sulla vostra pagina e questo aggiungerà automaticamente un elenco di messaggi alla vostra pagina.

Ora è possibile personalizzare questo blocco con il pannello delle opzioni a sinistra.
Per prima cosa, scorrere fino alla sezione “Layout”. Qui è possibile impostare il numero di colonne per la griglia dei post del blog e attivare le levette “Mostra immagine caratteristica” e “Mostra titolo”.
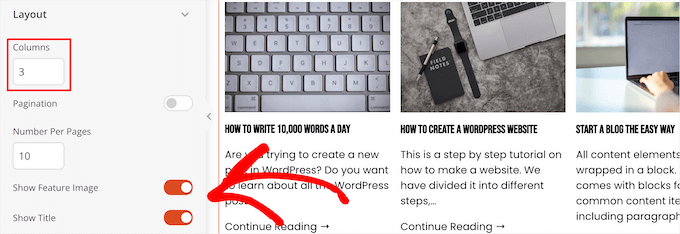
Quindi, scorrere verso il basso fino ai toggle “Mostra estratto” e “Mostra continua a leggere” e disattivarli per creare un semplice layout a griglia per i post del blog.

Se si desidera personalizzare la combinazione di colori, il testo e altro ancora, fare clic sulla scheda “Avanzate” nella parte superiore della colonna di sinistra.
Quindi, fare clic sul menu a tendina “Testo” e apportare le modifiche desiderate.

Potete continuare a personalizzare il layout della griglia delle pagine e dei post del blog quanto volete.
Una volta terminato, fare clic sul pulsante “Salva” e selezionare il menu a tendina “Pubblica” nella parte superiore della pagina per rendere effettive le modifiche.
Ora è possibile visualizzare la griglia dei nuovi post sul sito web.

Metodo 4. Creare un layout a griglia per i post di WordPress aggiungendo codice a WordPress
Questo metodo richiede una conoscenza di base su come aggiungere codice a WordPress. Se non l’avete mai fatto prima, consultate la nostra guida su come copiare e incollare codice in WordPress.
Prima di aggiungere il codice, è necessario creare una nuova dimensione di immagine da utilizzare per la griglia dei post. Per saperne di più, consultate la nostra guida su come creare dimensioni aggiuntive per le immagini in WordPress.
Successivamente, dovrete trovare il file del tema WordPress giusto in cui aggiungere lo snippet di codice. Ad esempio, potete aggiungerlo al file single.php, in modo che appaia in fondo a tutti i vostri post.
È anche possibile creare un modello di pagina personalizzato e utilizzarlo per visualizzare il layout a griglia dei post del blog con le miniature.
Per saperne di più, consultate la nostra scheda sulla gerarchia dei modelli di WordPress, che vi aiuterà a trovare il file del modello del tema giusto.
Una volta fatto questo, si può iniziare ad aggiungere codice a WordPress. Poiché lo snippet di codice è piuttosto lungo, lo suddivideremo sezione per sezione.
Per prima cosa, aggiungere il seguente frammento di codice al file del modello del tema.
1 2 3 4 5 6 7 8 9 10 11 12 | <?php$counter = 1; //start counter $grids = 2; //Grids per row global $query_string; //Need this to make pagination work /*Setting up our custom query (In here we are setting it to show 12 posts per page and eliminate all sticky posts*/query_posts($query_string . '&caller_get_posts=1&posts_per_page=12'); if(have_posts()) : while(have_posts()) : the_post();?> |
Questo frammento di codice imposta la query del ciclo dei post. È possibile modificare la variabile “posts_per_page” per visualizzare più post per pagina, se lo si desidera.
Quindi, aggiungere il seguente frammento di codice al file del modello del tema.
1 2 3 4 5 6 7 8 9 10 11 12 13 14 15 16 17 18 19 20 21 22 23 24 25 | <?php//Show the left hand side columnif($counter == 1) :?> <div class="griditemleft"> <div class="postimage"> <a href="<?php the_permalink(); ?>" title="<?php the_title_attribute(); ?>"><?php the_post_thumbnail('category-thumbnail'); ?></a> </div> <h2><a href="<?php the_permalink(); ?>" title="<?php the_title_attribute(); ?>"><?php the_title(); ?></a></h2> </div><?php//Show the right hand side columnelseif($counter == $grids) :?><div class="griditemright"> <div class="postimage"> <a href="<?php the_permalink(); ?>" title="<?php the_title_attribute(); ?>"><?php the_post_thumbnail('category-thumbnail'); ?></a> </div> <h2><a href="<?php the_permalink(); ?>" title="<?php the_title_attribute(); ?>"><?php the_title(); ?></a></h2> </div><div class="clear"></div><?php$counter = 0;endif;?> |
Questo frammento di codice crea due colonne per i nostri post e visualizza il titolo e l’immagine del post. Inoltre, crea una classe CSS che mostreremo in seguito come stilizzare.
Fa anche riferimento a ‘postimage’, quindi è necessario cambiarlo con il nome della dimensione dell’immagine creata in precedenza.
Quindi, aggiungere il seguente frammento di codice alla fine.
1 2 3 4 5 6 | <?php$counter++;endwhile;//Post Navigation code goes hereendif;?> |
Questo frammento di codice chiude semplicemente il ciclo. Offre anche la possibilità di aggiungere la navigazione del post, ma la maggior parte dei proprietari di siti web usa un plugin diverso per questo, quindi non l’abbiamo incluso per evitare conflitti di codice.
Ecco come appare lo snippet di codice finale.
1 2 3 4 5 6 7 8 9 10 11 12 13 14 15 16 17 18 19 20 21 22 23 24 25 26 27 28 29 30 31 32 33 34 35 36 37 38 39 40 41 42 43 44 45 46 47 | <div id="gridcontainer"><?php$counter = 1; //start counter $grids = 2; //Grids per row global $query_string; //Need this to make pagination work /*Setting up our custom query (In here we are setting it to show 12 posts per page and eliminate all sticky posts) */query_posts($query_string . '&caller_get_posts=1&posts_per_page=12'); if(have_posts()) : while(have_posts()) : the_post(); ?><?php//Show the left hand side columnif($counter == 1) :?> <div class="griditemleft"> <div class="postimage"> <a href="<?php the_permalink(); ?>" title="<?php the_title_attribute(); ?>"><?php the_post_thumbnail('category-thumbnail'); ?></a> </div> <h2><a href="<?php the_permalink(); ?>" title="<?php the_title_attribute(); ?>"><?php the_title(); ?></a></h2> </div><?php//Show the right hand side columnelseif($counter == $grids) :?><div class="griditemright"> <div class="postimage"> <a href="<?php the_permalink(); ?>" title="<?php the_title_attribute(); ?>"><?php the_post_thumbnail('category-thumbnail'); ?></a> </div> <h2><a href="<?php the_permalink(); ?>" title="<?php the_title_attribute(); ?>"><?php the_title(); ?></a></h2> </div><div class="clear"></div><?php$counter = 0;endif;?><?php$counter++;endwhile;//Pagination can go here if you want it.endif;?></div> |
Ora è necessario aggiungere i seguenti CSS al sito per assicurarsi che la griglia dei post venga visualizzata correttamente.
Se non l’avete mai fatto prima, consultate la nostra guida su come aggiungere facilmente CSS personalizzati al vostro sito WordPress.
1 2 3 4 5 6 7 8 9 10 11 12 13 14 15 16 17 18 19 20 | #gridcontainer{ margin: 20px 0; width: 100%; }#gridcontainer h2 a{ color: #77787a; font-size: 13px;}#gridcontainer .griditemleft{ float: left; width: 278px; margin: 0 40px 40px 0;}#gridcontainer .griditemright{ float: left; width: 278px;}#gridcontainer .postimage{ margin: 0 0 10px 0;} |
È possibile modificare i diversi selettori CSS per vedere come cambiano i diversi elementi del ciclo del post.
Speriamo che questo articolo vi abbia aiutato a capire come visualizzare i post di WordPress in un layout a griglia. Potreste anche voler consultare la nostra guida su come scegliere il miglior software di web design e la nostra selezione dei migliori software di live chat per le piccole imprese.
Se questo articolo vi è piaciuto, iscrivetevi al nostro canale YouTube per le esercitazioni video su WordPress. Potete trovarci anche su Twitter e Facebook.


Rachel
I tried to do this under ‘posts’ for my blog that has already been created. It didn’t work.
WPBeginner Support
You would want to ensure you have multiple blog posts published live on your site for them to be visible as the most common reason for that issue.
Admin
julie
Hi
I have tried this on my static homepage but it is not working.
Do I just add the one shortcode or both ( ie the php code also?)
using make theme.
do i just add it to the page as a paragraph and shortcode?
thanks
julie
WPBeginner Support
You should only need to add the shortcode to the page, if you reach out to the plugin’s support they should be able to let you know why it is not displaying properly
Admin
Paige
Is there a way to customize the thumbnails? I have mine set to the featured image, however some are different sizes and are cut off in the wrong areas.
WPBeginner Support
In the layout settings, you should be able to customize the display of the featured iamges
Admin
Lisa
I’m following all the steps to set this grid up on my homepage but it’s not displaying. I created a page, added the short code, and under settings–>reading I set my homepage to static with that page. What am I doing wrong?
p.s. I purchased a child theme (Foodie Pro), could that be my issue? Thanks!
WPBeginner Support
There may be a page template that could be causing a display issue, if you reach out to Post Grid’s support they should be able to help have it display properly
Admin
Jess
This was GREAT!!! Thankyou! I was able to apply this for my main blog page however I also have navigation for the different categories within my blog. How can I make it so that each of these category pages also displays as a grid?
Lu
I installed this plugin but my WordPress site have been automatically updated to Gutenberg and now a box appears in all my WordPress Post pages, covering the content so I can’t see it! The only way I can get rid of it is to de-install Post Grid. Anyone have any other ideas so I can use the Post Grid? Thanks for any help! L
Robert
I have the page set up but I have 5 posts that I did before that are not showing up on the new Post Grid.
How do I get the posts to show up on the grid?
Travenjo
Can anyone help me to have page grid and (not post grid) for my pages. How ro customize?
Hector
I’m using the Twenty Fourteen theme and this only gave me one option for layout instead of what you are showing and the one they let me use is a double but it just doesn’t work even the pagination got stuck on me so I don’t know what to do,is there a better plugin for my theme?
Aurangzaib
What a simple solution, i understand WP and PHP on a good level and this is the smartest and easiest solution to make a grid of posts and fetch them up from the DB, although the need is pretty rare if you are willing to make a different page for any purpose otherwise there are themes that have built-in support of many kinds of grids designs i customized and designed a bit on my web there at simspk.com, also keeping simple and clean content is the simplest way to achieve better ranks, Great post bro, keep them up!
Daniel Grove
What about for blog category pages? They just get listed vertically in my theme and it looks lame and wastes so much space! I want it to grid them just like the home blog page does.
Jess
Meeeee tooooo!!!!! Following to see if there is a response…..
WPBeginner Support
Hey Daniel and Jess,
The plugin’s premium version claims to have the option to create post grid for category archive pages. We didn’t test the premium version for the article. Please check the plugin website to learn more before buying.
Admin
Lori
I have the Dara theme with the Premium plan, and I am VERY NEW. Unfortunately, I just realized that plug-ins are only available with the Business plan, which I cannot afford to invest in at this time since it would triple my cost. Dara has a grid page option, but it only allows child pages to be displayed – I want POSTS to display from a specific category. Looks like I would have to create a static child page every time I want new content to appear in this Premium plan Dara grid page option, right??
WPBeginner Support
Hi Lori,
You can start with a self-hosted WordPress.org website which allows you to install plugins out of the box.
Admin
Carl
This is great but is this same process possible WITHOUT installing a plugin. How do you shows 10 different category separately? How select images for grid?
Brianna
This is awesome! Is there a way to edit from two across ( 2 columns) to three or four? When I change the settings to 20 posts a page, I am getting 2 columns and 10 rows.
Dale Kevin
Hi, I followed all the steps but it doesnt work. The page where I posted the shortcode of postgrid doesnt show up as my how page. Whats wrong? Maybe the Php code is needed?
I need you guidance. Thank you. I appreciate you response
Mr Thanh
Hi, that’s great plugin.
But i can’t creat a grid with three colums, only two colums.
How can i?
Holly
Hi,
I’ve used this plugin on all the sites i’ve created, i love it its so easy to use but im having a problem with the layout a little bit. Im using Layout 1 with 4 Columns and for some reason a row splits into two different rows, how do i stop this from happening?
Dee
Hello there. This was very helpful thank you. It works fine on the front page of my blog but wouldn’t work in the categories. Whenever a category is clicked in the header, the page shows the theme grid and not the Post Grid. How do I go about this? What page do I copy the code into please?
Thank you
DEE
Can anyone help with this please
Liah
My current theme doesn’t have the grid layout for the blog section. I’ve download the plugin and it works great but when I upload a new blog post does it automatically update the grid to include the latest post? Thank you for the super helpful video!
WPBeginner Support
Hi Liah,
Yes it will automatically update the grid.
Admin
Leanne
I’m trying to make the blog section of my site look nicer here – is there a way to automatically style the current blog posts in a grid rather than creating a new page and adding shortcode or editing php files?
WPBeginner Support
Hey Leanne,
You’d need to look for a WordPress theme that automatically displays your blog posts in a grid layout.
Admin
Joseph
Hi Thank you for the nice Article. Is there any way to make the same without plugin. If so how could i ?
Thanks
leighton
I want to use this but i am confused, I follow it but I dont see anything, I copy the shortcode but still nothing, do I have to upload images and text? can someone help?
Shahid
Great Article, just wanted to know if we can add post excerpt length in this plugin?
mike
This is cool for pages only. What if my posts belong under categories only. How do I add the shortcode to category archive. Thanks
Henry
This is just fine for pages! Still can’t figure how it works for posts! Someone help pls.
Dave Parks
I finally found “Taxonomy” setting on the plugin homepage – available if you buy the premium.
Which means the freebee is of zero value.
Dave Parks
The only category setting I see is
“Exclude by post ID
you can exclude post by ID, comma(,) separated”
With all due respect to the creator of this plugin, there’s no way I’m going input all the IDs I do not want to appear. The list is too long, and it will grow as I develop this site.
So is there some place to put in the one ID that I want to appear?
Tina Davidson
Hi – I finally have my blog up and running – yay! But want to add a store element to it. A “Shop Now” page. Do you think this its the best type of plug-in to use or is the one more efficient for a store set-up? Thanks so much! Tina
hasan
thanks for good knowledge
my website has two kinds of contents : post and pages.
can i add my new pages on homepage automatically without using widgets?
thanks again
Karthik
hi thanks for kind info,
please help me how to filter post by categories
hasan
thank you for good knowledge
i use a theme support magazine template on my site but it includes only posts .
how can i use this template for pages also not only posts ?
thanks again
WPBeginner Support
Please contact theme developer they will be able to help you better.
Admin
anil singh
thanks who do not know php and how to cutomize homepage this article will be helpful. i have one question which i searched all the web but not find any article. quetion is how can custmize homepage with category list without showing post area in homepage please make article for it . you can see example on freejobalert.in
judit
Will this pluggin work on wordpress.com?
WPBeginner Support
Please see our guide on the difference between self hosted WordPress.org vs free WordPress.com blog.
Admin
Tonia
Hi – i see an image in your blog article, does this support featured content image ?
natalie james
Thank you so much for this article, it is as though you were reading my mind and my wish list for my blog. I was easily able to follow your step by step instructions until the very end. Im not sure how to put my query correctly, I think what Im trying to say is that I would like the grid page to be my landing page of my blog. At the moment it is inside a post with a post heading. You do mention at the end that I can past the code into my themes file but unfortunately I dont know where that is. Hope this makes sense and I look forward to your reply.
thanks
Natalie
Paul Wandason
Hi Natalie,
I maybe wrong here – but I think you need to create a *page* with the grid on it, then if you go to “settings” then “reading” in the wordpress admin dashboard, you can set “Front page displays” to a static page, and select the page you’ve just created with the grid on it under the “front page” drop down menu.
Hope this helps, and good luck!
Paul