Se volete modificare il nome del mittente e l’indirizzo e-mail predefinito per le e-mail di WordPress in uscita, siete nel posto giusto.
Di default, WordPress utilizza “WordPress” come nome del mittente per tutte le email di notifica di WordPress in uscita. Tuttavia, secondo il nostro parere di esperti, questo non ha un aspetto professionale.
Per questo motivo, si consiglia di modificare il nome della propria azienda o un nome personalizzato di propria scelta. Riteniamo che l’invio di email con il nome della vostra azienda possa aumentare i tassi di apertura e i clic sulle vostre email.
In questo articolo vi mostreremo come modificare facilmente il nome del mittente e l’indirizzo e-mail predefiniti nelle e-mail di WordPress in uscita.

Perché cambiare le informazioni predefinite sul mittente in WordPress?
WordPress invia diverse notifiche via e-mail all’amministratore del sito e agli altri utenti del sito.
Questo include importanti notifiche via e-mail come le e-mail di password dimenticata, le e-mail di errore e di recupero del sito web, la registrazione di nuovi utenti e altro ancora.
Per impostazione predefinita, utilizza “WordPress” come nome del mittente e un indirizzo e-mail inesistente (wordpress@yourdomain.com) come e-mail del mittente.
Molti filtri antispam bloccano le e-mail di WordPress, ritenendole spazzatura. A volte, non arrivano nemmeno alla cartella spam, ma vengono cancellate immediatamente a causa dei filtri.
Per saperne di più su questo argomento, consultate la nostra guida su come risolvere il problema del mancato invio di e-mail da parte di WordPress.
Le notifiche via e-mail in uscita sono importanti e dovreste utilizzare il vostro marchio e il vostro indirizzo e-mail. Questo aumenta l’autenticità del vostro marchio e aumenta il riconoscimento del nome tra gli utenti.
Ad esempio, se gestite un negozio online, volete che i clienti ricevano notifiche email con il nome del vostro negozio come mittente.
Consultate la nostra guida su come ottenere un indirizzo e-mail aziendale gratuito per il vostro sito web in 5 minuti.
Detto questo, vediamo come modificare il nome del mittente e l’indirizzo email predefiniti nelle notifiche email di WordPress in uscita.
In questa esercitazione abbiamo discusso diversi metodi. È possibile utilizzare i link sottostanti per passare a quello desiderato.
Metodo 1. Modifica del nome del mittente e dell’e-mail predefiniti utilizzando WP Mail SMTP
Questo metodo è più semplice e consigliato a tutti gli utenti di WordPress.
Per questo metodo, utilizzeremo il plugin WP Mail SMTP Pro. Si tratta del miglior plugin SMTP per WordPress, utilizzato da oltre 3 milioni di proprietari di siti web.

Questo plugin consente di modificare facilmente il nome del mittente e l’indirizzo e-mail predefiniti per le e-mail WordPress in uscita. Inoltre, vi aiuta a risolvere i problemi di recapito delle e-mail di WordPress.
Per prima cosa, è necessario installare e attivare il plugin WP Mail SMTP Pro. Per maggiori dettagli, consultate la nostra guida passo passo su come installare un plugin di WordPress.
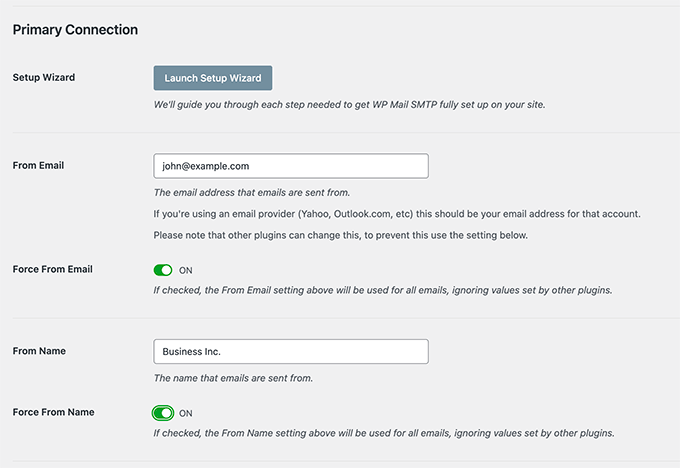
Dopo l’attivazione, visitate WP Mail SMTP ” Impostazioni per configurare le impostazioni del plugin. Nella sezione “Connessione primaria” è sufficiente inserire l’indirizzo email e il nome che si desidera utilizzare per inviare le email di WordPress.
Di seguito, sono riportate le opzioni per impostare un server SMTP per l’invio di e-mail di WordPress. Per impostazione predefinita, il plugin utilizzerà il metodo PHP fornito dalla società di hosting di WordPress, che è meno affidabile.
Si consiglia di utilizzare uno dei servizi SMTP elencati per inviare correttamente i messaggi di posta elettronica di WordPress, per una maggiore garanzia di consegna.
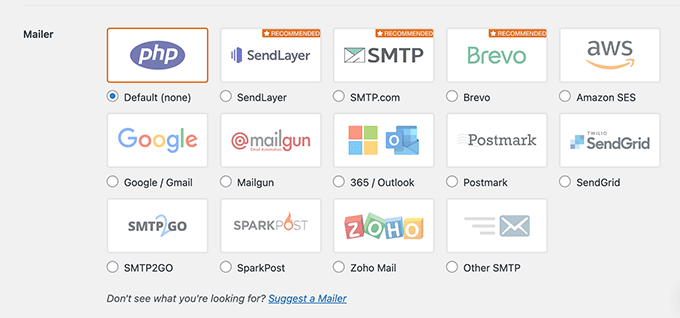
Se si sceglie un servizio SMTP, seguire le istruzioni sullo schermo per collegare il plugin al proprio provider di servizi SMTP.
Non dimenticate di fare clic sul pulsante “Salva impostazioni” per salvare le modifiche.
Testate le vostre e-mail di WordPress
WP Mail SMTP Pro consente anche di testare le impostazioni e-mail di WordPress. Basta andare alla pagina WP Mail SMTP ” Strumenti e passare alla scheda ‘Test e-mail’.
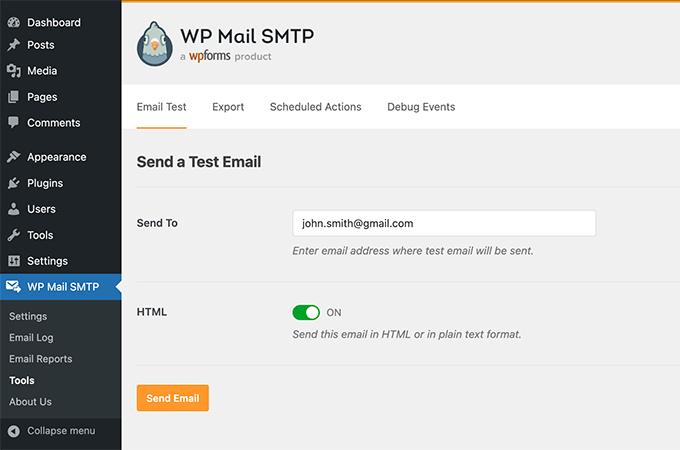
Da qui, è sufficiente fornire un indirizzo e-mail accessibile e cliccare sul pulsante “Invia e-mail”.
Il plugin invierà ora un’e-mail di prova all’indirizzo fornito. Potete controllare la vostra casella di posta per assicurarvi di poter ricevere le e-mail di WordPress e che il nome del mittente e l’indirizzo e-mail del mittente siano corretti.
Abbiamo testato e scoperto che WP Mail SMTP funziona perfettamente con tutti i plugin WordPress più diffusi, come WooCommerce, WPForms e altri.
Per istruzioni dettagliate, potete consultare il nostro articolo su come usare SMTP per inviare email a WordPress.
Metodo 2: Cambiare il nome del mittente e l’email predefiniti usando WP Change Email Sender
Questo metodo è consigliato solo se non si utilizza un servizio SMTP o se il primo metodo non funziona.
L’utilizzo di questo metodo non migliora la consegna delle e-mail di WordPress né facilita la risoluzione dei problemi di posta elettronica. Tuttavia, se le vostre e-mail di WordPress funzionano, vi permetterà di cambiare il nome del mittente e l’indirizzo e-mail.
Per prima cosa, è necessario installare e attivare il plugin WP Change Email Sender. Per maggiori dettagli, consultate la nostra guida passo passo su come installare un plugin di WordPress.
Dopo l’attivazione, è necessario andare alla pagina Impostazioni ” Generali nell’area di amministrazione di WordPress. Lì, troverete i campi “Nome del mittente dell’email” e “Indirizzo email del mittente” in basso.
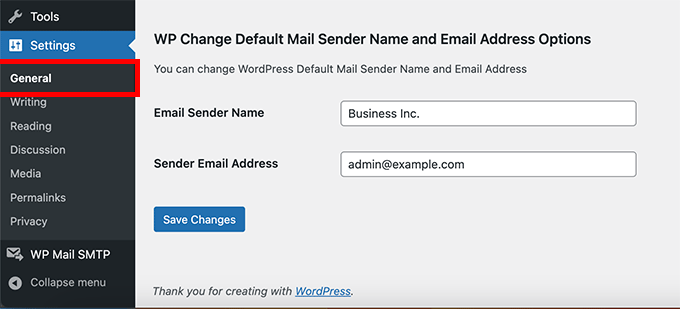
Ora è possibile inserire il nome e l’indirizzo email che si desidera utilizzare per le email di WordPress in uscita.
Non dimenticate di fare clic sul pulsante “Salva modifiche” per memorizzare le impostazioni.
Questo è tutto. Le e-mail di notifica di WordPress mostreranno ora il nome e l’indirizzo e-mail inseriti nelle impostazioni del plugin.
Il plugin non fornisce alcun metodo per verificare le impostazioni delle e-mail. È possibile farlo eseguendo azioni che generano email di notifica di WordPress, come la creazione di un nuovo utente, la richiesta di reimpostazione della password e altro ancora.
Metodo 3: Cambiare il nome del mittente e l’indirizzo e-mail utilizzando WPCode
Un altro modo eccellente per cambiare il nome del mittente e l’indirizzo email è aggiungere uno snippet di codice al vostro sito WordPress.
Consigliamo WPCode, il modo più semplice e sicuro per aggiungere codice a WordPress.
Di solito è necessario aggiungere del codice al file functions.php, ma WPCode rende semplice e facile aggiungere questo snippet di codice con pochi clic.
Non solo, ma WPCode ha molti altri snippet disponibili per aiutare a personalizzare il vostro sito. Inoltre, è possibile aggiungere facilmente i propri snippet personalizzati.
Per prima cosa, è necessario installare il plugin gratuito WPCode.
Quindi, fare clic su Code Snippets “ Aggiungi snippet nella dashboard di amministrazione di WordPress. Digitate semplicemente “snippet” nella barra di ricerca e premete il pulsante “Use snippet” sotto “Change Outgoing Email Sender”.
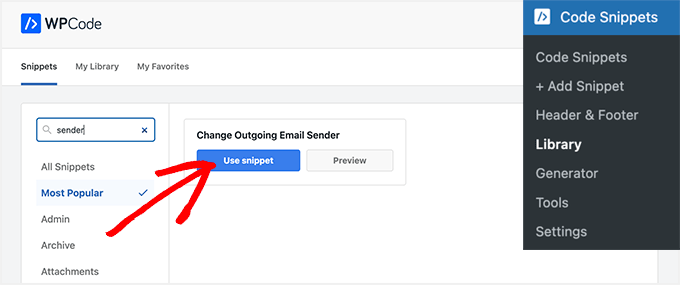
Quindi, si accede alla pagina di modifica dello snippet.
In questo caso, è necessario aggiornare l’e-mail e il nome del mittente nel frammento di codice.
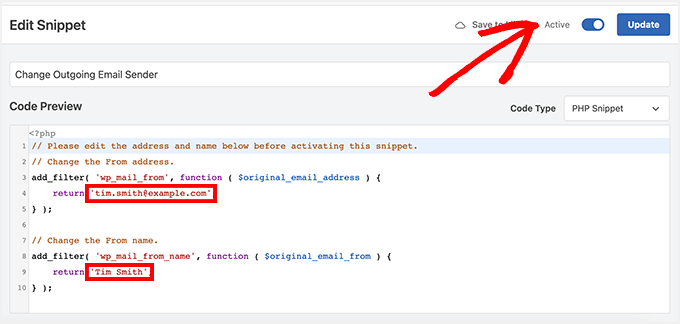
Quindi, spostare la levetta su “Attivo” e fare clic sul pulsante “Aggiorna”.
Uno dei vantaggi di usare WPCode è che viene fornito con una libreria piena di snippet già pronti. È molto probabile che se ne possano trovare alcuni per sostituire altri plugin sul vostro sito, come la disattivazione degli aggiornamenti automatici, la possibilità di caricare file SVG o persino l’uso dell’editor classico al posto dell’editor di blocchi predefinito.
Non è necessario utilizzare la libreria. È possibile aggiungere qualsiasi altro codice di cui si abbia bisogno selezionando il pulsante “Aggiungi il tuo codice personalizzato (nuovo snippet)” invece di cercare nella libreria.
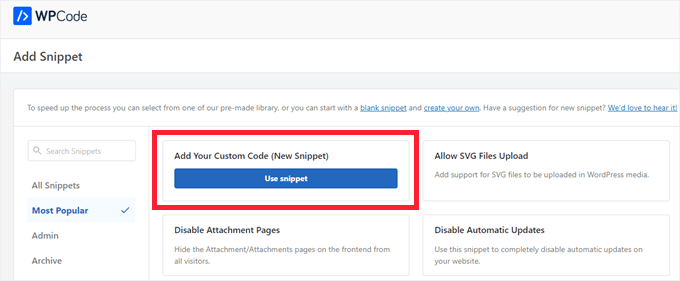
Quindi, tutto ciò che dovete fare è incollare il vostro codice e decidere dove deve essere eseguito sul vostro sito.
Ad esempio, è possibile copiare e incollare questo snippet di seguito nel codice personalizzato di WPCode e personalizzarlo per cambiare il nome del mittente e l’e-mail.
1 2 3 4 5 6 7 8 9 10 | // Please edit the address and name below.// Change the From address.add_filter( 'wp_mail_from', function ( $original_email_address ) { return 'tim.smith@example.com';} );// Change the From name.add_filter( 'wp_mail_from_name', function ( $original_email_from ) { return 'Tim Smith';} ); |
Bonus: modificare il nome completo in WordPress
Oltre a modificare il nome del mittente delle email, è possibile cambiare il proprio nome completo in WordPress. Questo è il nome che viene visualizzato per i post che avete scritto.
Se sul vostro sito web avete un nome utente poco professionale, come “jsmith204”, questo può influire negativamente sulla credibilità del sito e scoraggiare gli utenti dall’esplorare il vostro blog WordPress.

In questo caso, si consiglia di modificare il nome utente in WordPress visitando la pagina Utenti ” Profilo dalla Bacheca.
Qui, scendete fino alla sezione “Nome” per aggiungere il vostro nome, cognome e nickname.
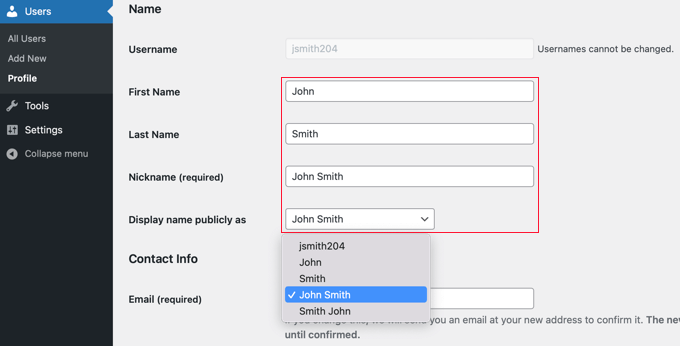
Quindi, cliccare sul menu a discesa “Visualizza nome pubblicamente come” per scegliere un nuovo nome utente.
Una volta terminato, basta cliccare sul pulsante “Salva modifiche” per memorizzare le impostazioni. Per maggiori dettagli, consultate il nostro tutorial su come add-on o modificare il vostro nome completo in WordPress.
Speriamo che questo articolo vi abbia aiutato a capire come cambiare il nome del mittente e l’indirizzo e-mail nelle e-mail WordPress in uscita. Potreste anche dare un’occhiata alle altre guide di WordPress relative alle impostazioni delle e-mail di WordPress.
Le migliori guide di WordPress per le impostazioni delle e-mail
- Come configurare correttamente le impostazioni e-mail di WordPress
- Come limitare i nomi utente e le e-mail degli utenti in WordPress
- Come impostare le notifiche via e-mail per gli aggiornamenti di WordPress
- I metodi comprovati che usiamo in WPBeginner per far crescere la nostra lista di e-mail
- Come impostare il monitoraggio delle e-mail di WordPress (aperture, clic e altro)
- I migliori servizi di email marketing per le piccole imprese
- I migliori costruttori di pagine WordPress con trascinamento e rilascio
Se questo articolo vi è piaciuto, iscrivetevi al nostro canale YouTube per le esercitazioni video su WordPress. Potete trovarci anche su Twitter e Facebook.


Bogdan
Thanks a lot. Super useful!
WPBeginner Support
Glad you found it useful!
Admin
Afshan
Its updating contact form 7 sender name and email.
How to make it only applicable for core WordPress emailing not for contact form 7?
WPBeginner Support
You would need to uncheck the force email and reach out to your contact form’s support for how to set it in the plugin.
Admin
Ana Bella
Thank you so much! 2nd option worked and was so easy to setup!
WPBeginner Support
Glad our guide was helpful
Admin
Sam
I used method 3 as a snippet… worked great, thank you!
WPBeginner Support
You’re welcome!
Admin
Cameron Johnson
Hey thanks for the code it works amazing! Is there a way to change the email sender name for only the new order email and remain the rest of them the same? Thanks!
WPBeginner Support
For that, you would want to reach out to the support for the ecommerce plugin you’re using for if they have an option to set that up.
Admin
Pieter
Thanks a lot!
I used method 3 and it works great!
WPBeginner Support
You’re welcome, glad our guide was helpful
Admin
Jonathan
Hi I tried out the method of adding the code snippet to my functions. One problem that came up is that now my site is sending an extra email with no subject or content(only a blank template) along with the other notifications. After removing the code snippet it still sends these emails. After removing the code do I need to run a remove_filter() or something similar?
WPBeginner Support
You would want to check that it isn’t being sent by one of your other plugins, this code should only change the values for the sender name. What the code modifies would be removed when you remove the code.
Admin
Felipe
I used the Snippets plugin and it did update the from address and the name, but the name shows “my name, WordPress” Any idea what could be causing it?
WPBeginner Support
You may want to ensure you set the sender email as well to ensure that isn’t part of the issue.
Admin
Mrunal
I copy pasted this code into my theme’s functions.php file. Changed the email address and the name. then when i try to refresh the page, I saw the code being displayed on top of my website. I tried using the plugin as well. and the plugin didn’t work either. Please help.
WPBeginner Support
For the code not working, you would want to ensure the code is not after a ?> in your functions.php file. For the plugin not working you may want to reach out to the plugin’s support for them to take a look at possible conflicts.
Admin
Reza Baleghi
I just pasted the code and changed it as I wanted.
It works perfectly!
Thanks for saving lots of time.
WPBeginner Support
Glad our guide was helpful
Admin
adil
Thanks alot you are the best
WPBeginner Support
You’re welcome
Admin
EA
This was extremely helpful, thank you!
WPBeginner Support
You’re welcome, glad our guide was helpful
Admin
M Asif Raza
Fantastic. Its really worked for me and I have done what I wanted in few minutes. Thanks for this Blog Post
WPBeginner Support
Glad our guide was helpful
Admin
Syam
im using method 2, It work very well, thanks
WPBeginner Support
Glad our recommendation was helpful
Admin
Ruth
This works perfectly, but too well!
It overrides the from address in Gravity Forms notifications. Is there a way to only have it apply to the network administrator? We have a WordPress network, not a single site.
WPBeginner Support
You would want to reach out to the plugin’s support for preventing it from overriding your forms for what it sounds like you’re wanting.
Admin
Livingstone
The code worked perfectly. Thanks
WPBeginner Support
Glad our recommendation could help
Admin
Rebecca
This worked, thanks!
However, it still says “via server.example.com”. Anyway around this?
WPBeginner Support
Hi Rebecca,
This is the server used to send the email. You can read our article on how to fix WordPress not sending email issue and use WP Mail SMTP plugin to fix these issues. It will allow you to change sender name and use proper SMTP server to send emails.
Admin
R
Thanks, works!
Patrizio Racco
This worked for me. Much appreciated
Thank you
TH
Hi.
The emails sent from my wordpress website show extra information for the sender name ‘myemailname via msv40-sh-cicadas.mschosting.com’
How do I remove the ‘via msv40-sh-cicadas.mschosting.com’?
How do I set it up my site’s email so that it only shows myemailname?
I have done email authentication on my cpanel.
I deactivated all plugins to check but still the same.
Thanks for the help.
TH
Anil
I have also same problem. any one can help me
Swayam Dhawan
Thanks for the Code Specifically, It helped me to not to increase my number of plugins.
Vaibhav Bajpai
Thanks! It worked.
MELLOR
Hi thanks for putting this in. It works for anything that doesn’t populate these fields, as per Gravity Forms example above, but because this is an output filter it changes anything you send to these values.
I can code but not WordPress, but I will take your template code above and pop in a conditional test for the known wordpress values…
if $original_email_from = “WordPress” then change it,
likewise if $original_email_address = “wordpress@” then change it.
Otherwise leave well alone.
Then it will work for any calling plugin that does fill these or any of these fields.
I chose to change the core code, unfortunately, JETPACK puts these values back in when it calls wp_mail so my default value change was useless because they only changed if the values where not given….lol
On the flip side, the FILTER you gave above comes in AFTER everything else, so it obliterates even the values from plugins like Gravity.
So if anyone can code the conditional statement – only change if it contains the values “WordPress” (and possibly any derivatives) then that will definately fix all scenarios.
If there’s no one to hand, then I will possible get it done in a while for my own site so that it doesn’t look like a phishing site whenever it emails anyone… lol because the from name won’t match my identity or domain or ssl certificate. Until then I have switched off JetPack.
Many thanks for the base code, it will really help me work out the rest.
Bryan
Hi Syed, I noticed that while it works for other notifications, it didn’t work for the initial new user registration email. When a new user registers on my site, it is still not using the updated sender namer and email. Do you know why?
Emmanuel
Great, it worked perfectly. Thank you
Christian
Thank you. It works perfect!
Joshua
Wow, it works…
Aurélien Denis
I’ve been using this method for years… but be careful it’s not compatible with plugins like Gravity Forms who already change this.
WPBeginner Support
If you are using a contact form plugin like WPForms or GravityForms, then you can set sender name and email address in plugin settings. However, this is mostly used by the emails sent by the plugin and not for the WordPress notification emails.
Admin
plu2
Thank you for this great tip.
For user friendliness you could consider removing the line numbers in the method 2 code.
WPBeginner Support
These lines are added by the plugin we use for syntax highlighting and easy embedding of code in WordPress posts. You can click on the tiny ‘code’ button at the top right corner of the snippet to view and copy the raw code with no line numbers.
Admin
Collins
It worked… thanks so much. been searching all through until i finally saw this
WPBeginner Support
Hey Collins, glad you found it helpful Don’t forget to follow us on Twitter for more WordPress tips and tutorials.
Admin
Verdi
Thank you!