Volete mostrare i vostri video e le vostre immagini in modo da attirare l’attenzione senza ingombrare la vostra pagina? Gli slider sono uno strumento fantastico per questo!
Queste caratteristiche consentono di mettere in evidenza i contenuti più importanti, mantenendo l’aspetto elegante e professionale del sito WordPress.
Abbiamo lavorato molto con gli slider di WordPress, quindi siamo qui per assicurarci che lo facciate nel modo giusto fin dall’inizio. ✅
In questa guida vi spiegheremo come creare facilmente uno slider di video e immagini utilizzando Soliloquy.

Perché creare un cursore WordPress con video e immagini?
💡 Ammettiamolo: i cursori di contenuto sono fantastici. Se fatti bene, conservano preziose superfici della schermata e aiutano a coinvolgere i visitatori immediatamente dopo la landing page.
Uno slider di video e immagini contiene entrambi i tipi di media. A volte si desidera che i video e le immagini siano contenuti in un unico cursore, piuttosto che creare cursori per l’uno o per l’altro.
Supponiamo che abbiate un sito web per la pubblicazione di annunci immobiliari. Potete aggiungere le immagini della casa e un video di presentazione dell’interno, per offrire agli utenti un’esperienza più interattiva.

Oppure si può usare il cursore dei contenuti per aggiungere le testimonianze degli utenti o gli elementi del portfolio. Alcuni plugin possono anche offrire una funzione di riproduzione automatica, in modo che i visitatori vedano immediatamente il video.
Inoltre, uno slider è un ottimo modo per raggruppare i contenuti in un unico luogo. Piuttosto che intervallare i video e le immagini in verticale, è possibile categorizzarli tutti in un unico slider.
Se volete mostrare le testimonianze sulla vostra landing page, è molto meglio inserirle in uno slider, in modo che i visitatori possano vederle tutte in una volta anziché scorrere giù.
Si può anche utilizzare uno slider per mostrare i contenuti caratteristici, in modo da indirizzare il traffico verso le pagine più importanti.
Per questo motivo, vi mostreremo come creare uno slider WordPress per immagini e video per il vostro sito web. Ecco tutti i passaggi che copriremo nelle prossime sezioni:
Pronti? Iniziamo!
Passo 1: Installare un plugin per il cursore di WordPress
Il modo più semplice per creare uno slider di video e immagini è Soliloquy, uno dei migliori plugin per slider di WordPress.
È possibile creare facilmente semplici slider utilizzando immagini dalla libreria dei media e video ospitati su piattaforme di terze parti come YouTube.
Per saperne di più sullo strumento, potete consultare la nostra recensione completa di Soliloquy.
Una volta add-on al vostro sito web, lo slider sarà perfetto su tutti i dispositivi, compresi laptop, desktop, tablet e smartphone.
Ecco perché molti siti web utilizzano gli slider di Soliloquy sulle pagine più importanti, come la homepage, la pagina di vendita e la landing page.
E soprattutto, non è necessario scrivere una sola riga di codice per farlo.
Per iniziare, tutto ciò che dovete fare è installare e attivare il plugin Soliloquy sul vostro sito web. Se avete bisogno di aiuto per l’installazione, potete consultare gratuitamente la nostra guida su come installare un plugin per WordPress.
☝ Nota: per questa esercitazione è possibile utilizzare la versione gratuita di Soliloquy. Tuttavia, se avete bisogno di maggiori funzionalità, potreste prendere in considerazione la versione Pro.
L’aggiornamento alla versione premium sblocca la funzione lightbox, la protezione con password e i contenuti in caratteristica. Potrete inoltre integrarlo in Instagram, Pinterest e WooCommerce.
Passo 2: Creare scorrimenti video responsive in WordPress
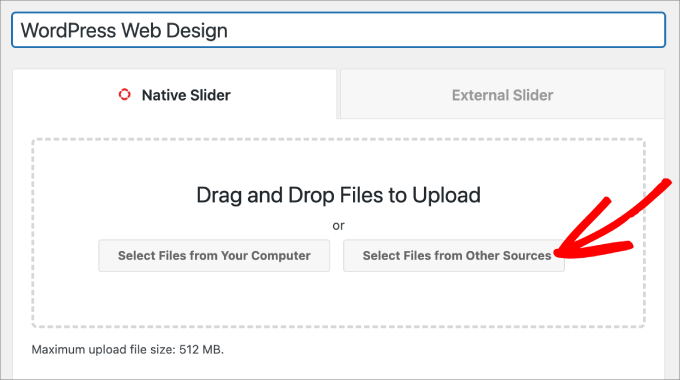
Dopo l’attivazione, dovrete andare su Soliloquy ” Aggiungi nuovo nell’area di amministrazione di WordPress. Da qui, potete dare al vostro cursore un titolo appropriato, in modo da potervi facilmente fare riferimento in seguito.
Ora siete pronti ad aggiungere tutti i contenuti mediali al vostro cursore. Fate clic su “Seleziona file da altre fonti”.

☝ Nota: Sebbene sia possibile caricare i video dal proprio computer su WordPress, non lo consigliamo, poiché il sito subisce un rallentamento. È invece consigliabile incorpora i video da YouTube o da un’altra piattaforma di host.
Per approfondire le strategie, selezionate il nostro elenco dei migliori consigli per accelerare le prestazioni di WordPress.
Verrà quindi visualizzata una finestra popup con le opzioni per inserire i pannelli di inserimento dei media.
Cominciamo con la scheda “Inserisci video diapositiva” per aggiungere video alle diapositive.
È sufficiente assegnare allo scorrimento del video un titolo, un URL del video, un URL dell’immagine, un testo alt e una didascalia. Inoltre, assicuratevi di prendere l’URL del video da una piattaforma ospitata da terzi, come YouTube.

Se si desidera aggiungere altre diapositive, è sufficiente fare clic sul pulsante “Aggiungi un’altra diapositiva video”.
Quindi, aggiungerete le informazioni necessarie per questo scorrimento.

Una volta add-on tutte le diapositive video, fate clic sul pulsante ‘Inserisci nel cursore’.
Gli scorrimenti appariranno in fondo alla pagina per essere modificati in seguito, se necessario.

Passo 3: Aggiungere cursori di immagini in WordPress
Ora che tutti gli scorrimenti video sono stati posizionati, si è pronti ad aggiungere gli scorrimenti immagine.
Con le diapositive di immagini, è sufficiente trascinare e rilasciare le immagini dal computer: è il modo più semplice per aggiungere questi file.

Detto questo, è possibile utilizzare la libreria dei media per aggiungere anche gli scorrimenti.
Per add-on dalla libreria dei media, è sufficiente cliccare su “Seleziona file da altre fonti”.
Si aprirà la finestra popup “Aggiungi media”.
Selezionate le immagini che desiderate aggiungere. Quindi, è sufficiente colpire il pulsante “Inserisci nel cursore”.
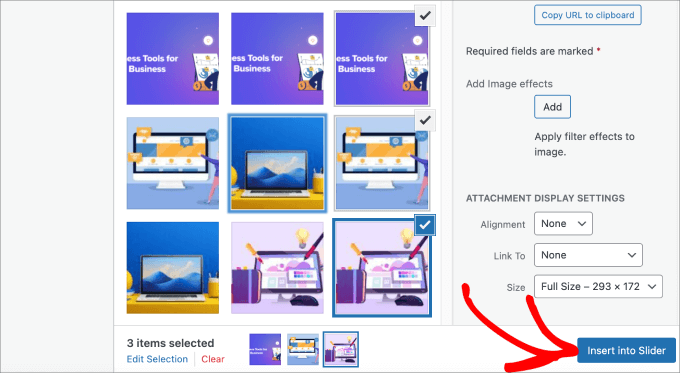
Una volta terminata l’aggiunta di diapositive di immagini, si dovrebbero vedere tutte le diapositive nella sezione inferiore del cursore.
È gratuito riorganizzarli nell’ordine appropriato per adattarli alle proprie esigenze.

Passo 4: modificare le impostazioni del cursore
In questa fase è possibile apportare piccole modifiche per personalizzare l’aspetto del cursore per i visitatori. Per accedere alle impostazioni, è possibile scorrere verso il basso e dirigersi verso la scheda “Configurazione”.
Da qui è possibile modificare opzioni quali il tema del cursore, le dimensioni delle immagini, le dimensioni del cursore e altro ancora.
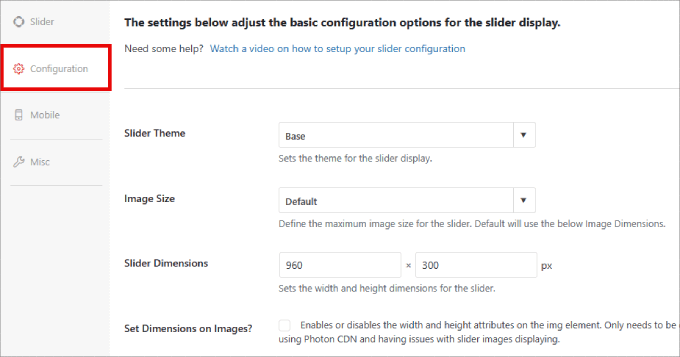
Il tema del cursore influisce sul layout dello scorrimento, per cui è possibile attivare/disattivare le varie opzioni.
Se avete accesso alla versione Pro di Soliloquy, potete anche installare l’add-on Slider Themes per avere maggiori opzioni personalizzate.
Giù nella pagina si trova l’opzione “Autoplay video”. È possibile selezionare la casella per abilitare l’autoplay, in modo che il video si avvii automaticamente prima che l’utente possa continuare a scendere nella pagina.

L’autoplay può essere ottimo per i video esplicativi dei prodotti o per le pagine di vendita, per coinvolgere gli utenti e ridurre le probabilità che facciano clic.
Una volta terminata la regolazione delle impostazioni, è sufficiente colpire il pulsante “Pubblica”.

Passo 5: Visualizzare il cursore nelle pagine o nei post
Ora non resta che pubblicare lo slider su una pagina o una pubblicazione. Potete facilmente copiare e incollare lo shortcode se utilizzate ancora il Classic Editor di WordPress.
Per ulteriori informazioni, potete seguire il nostro tutorial su come add-on uno shortcode in WordPress.

Ma se si utilizza il nuovo editor a blocchi Gutenberg, Soliloquy ha un blocco che può essere utilizzato per linkare direttamente tutti i propri cursori.
Basta andare su Pagine/Posti ” Aggiungi nuovo o modifica una pagina o una pubblica esistente.
Successivamente, si può fare clic sull’icona ‘+’, trovare il blocco Soliloquy e selezionare il cursore video e immagine appena creato.
Una volta terminato, è sufficiente hittare “Pubblica” o “Aggiorna”.

Se volete, potete vedere l’anteprima del vostro cursore per assicurarvi che abbia un bell’aspetto.
Ecco come potrebbe apparire:

Bonus: Aggiungere una Lightbox ai cursori di WordPress
Soliloquy dispone di un’ampia gamma di add-on che possono migliorare i vostri cursori e fornire un’esperienza più interattiva ai visitatori.
Ad esempio, se si aggiunge uno slider, è molto probabile che si voglia aggiungere anche un lightbox.
Aggiungendo l’effetto lightbox ai cursori del vostro sito web WordPress, potrete mostrare i vostri contenuti in modo più professionale. In questo modo, quando gli utenti fanno clic sulle immagini o sui video, si aprirà una finestra popup sul vostro sito – una lightbox.
Le lightbox creano un’esperienza di visualizzazione più coinvolgente per i visitatori, permettendo loro di visualizzare i contenuti in modo più dettagliato. Possono anche scaricare i file multimediali sul proprio computer o condividere le immagini sui social media.
Se gestite un sito web di fotografia, l’effetto lightbox consente ai visitatori di visualizzare le immagini senza distrarre gli altri elementi del sito, aumentando l’engagement.
Per i negozi online, le lightbox aiutano a creare gallerie di prodotti più coinvolgenti.
Per aggiungere una lightbox al vostro cursore, dovete andare su Soliloquy ” Add-on. Scorrete quindi verso il basso fino all’add-on Lightbox e fate clic su “Installa add-on”.
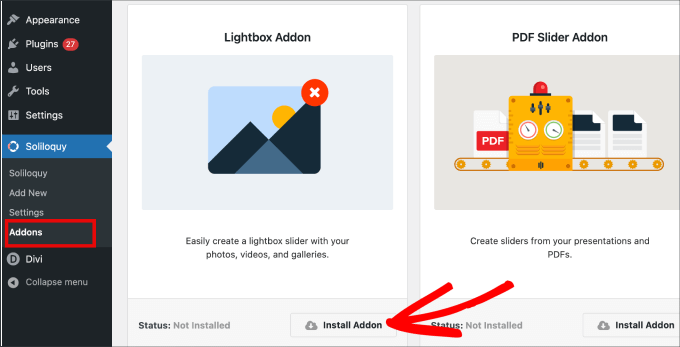
Una volta installato, apparirà nelle impostazioni del vostro cursore.
Da qui è possibile regolare gli effetti e i layout, aggiungere frecce di navigazione, il tema della lightbox e altro ancora.

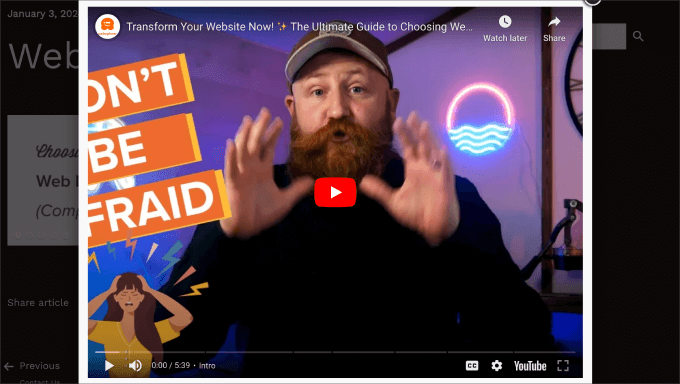
Una volta abilitata, la lightbox dovrebbe funzionare automaticamente.
Ora si può vedere l’anteprima del cursore, che dovrebbe avere un aspetto simile a questo:
🤔 Avete difficoltà a progettare il vostro sito WordPress? Il nostro servizio di progettazione di siti web WordPress può trasformare il vostro sito in un’esperienza visivamente straordinaria e di facile utilizzo. Non lasciate che le sfide del design vi frenino. Prenotate oggi stesso il nostro servizio di progettazione di siti web WordPress!
Speriamo che questo articolo vi abbia aiutato a imparare come creare uno slider WordPress per video e immagini. Potreste anche voler dare un’occhiata alla nostra guida su come aggiungere facilmente immagini interattive a 360 gradi e su come aggiungere file audio MP3 per migliorare la multimedialità del vostro sito WordPress.
Se questo articolo vi è piaciuto, iscrivetevi al nostro canale YouTube per le esercitazioni video su WordPress. Potete trovarci anche su Twitter e Facebook.


Pete Kici
I just want to say this site is the best….
The content on WP the info I have found here connects a lot of dots/blank spaces
Things I was mostly guessing on now I get.
The main point is if your starting out new to WP less is more, not to many moving parts and learn the next new skill.
Thank you for all the great content
Maggie Shnayerson
Hi Syed,
Actually, I was taking issue with SlideDeck eliminating a feature for existing customers for which they’d already paid, not with business decisions they make for future customers. I agree Digital Telepathy has every right to make those, whether I like them or not. I also wasn’t complaining about your piece.
To your point about pricing, yes, with their June update they cut the price for their personal license from $79 to $49, but, as their terms of service declare, those of us who bought it between their launch in March and June shouldn’t expect a refund. Fair enough certainly, if they kept the feature set intact. They implemented an automatic license upgrade for those customers, but unfortunately, it doesn’t do much to tell us to be grateful we’re not paying full-freight for licenses that still carry a lesser feature set than the ones we’d purchased to begin with. Even at the new $49, SlideDeck makes the alternative sliders I mentioned, and yes, obviously the free Nivo slider, seem like attractive options. I like SliderPro because it’s nice to support individual developers and it’s got an easier UI for my users than Nivo.
You didn’t answer whether you’re an affiliate. Are you? I don’t think it should matter, but I like knowing those things upfront.
SlideDeck is absolutely worth giving a try and I agree that they seem to have an engaged forum response team.
Thanks,
Maggie
Editorial Staff
Hi Maggie,
I did answer your question about the affiliate program. If you read my response to your earlier comment, it clearly has the answer in the first 3 lines.
-Syed
Admin
Adrian
Hello, I just installed SlideDeck 2 Developers License to my site. Installation and activation all said successful. However, I can not find an options screen for Slide Deck 2 anywhere. Am i missing it somewhere or do you think there’s interference from another plugin, etc? Thx!
Editorial Staff
Probably best to contact SD support for this. Not sure what is going on there.
Admin
Adrian
Thanks for the quick response. Where would the options screen normally be? In the left side menu under Settings, or a button of its own?
Editorial Staff
It’s a button of its own.
Adrian
Got Slidedeck 2 to work properly, it was a stupid mistake. When I was downloading the purchase, I didn’t realize you had to install all the zip files, I just chose the one that looked like the version I purchased. Very, very pleased with Slidedeck 2 and I absolutely hated Slidedeck 1. They definitely revolutionized their old user interface. I especially like the option to turn on and off iframes. I also really like the admin area – the font, lens, color scheme, etc. selectors are very intuitive and user friendly.
I think a really helpful tutorial that you might want to do would be to go over the basics of building a custom lens for Slidedeck 2…
Maggie Shnayerson
Oh and “Editorial Staff,” especially given that you’re respond to commenters using the personal pronoun, who wrote this piece please? I’d like to ask if WPBeginner is a part of SlideDeck’s new affiliate program and if you could acknowledge ties like that in future posts regardless. Thanks for the site, I’ve always enjoyed it.
Editorial Staff
Hey Maggie,
All comments were responded by myself (Syed Balkhi). The article itself was written by David. Is WPB a part of their “NEW” aff. program. NO. We were part of their OLD affiliate program way before it was even publicized to this extent. Like I said, I have known the DTelepathy team for a while now.
There is a FTC Disclosure link on every single page on our site (look in the footer). – https://www.wpbeginner.com/wpbeginner-disclaimer/
That will explain to users how they can tell if a specific link on WPBeginner is an affiliate link or not (It’s also not Legal Jargon either, fairly easy to read).
Lastly, we don’t promote just about anything that exist. We are actually using this plugin and have been for a while. It was in use in our last design as well. I personally believe that this is by far the BEST slider plugin for WordPress that exists. Because it’s an opinion, you are more than welcome to disagree with it. I’m using it in all of my projects, and I will continue to use it until I truly find a better solution.
-Syed
Admin
Gautam Doddamani
i normally dont use plugins for creating slider…couple months back i created my own image slider from scratch and i liked it very much…but i didnt find time to optimise the code and it was causing a drag when loading pages so removed it. if i use a cdn service in future i will deifinitely put it up back or use slidedeck instead..thanks for the tut
Brian Krogsgard
Slidedeck’s UI is terrible.
As is plainly obvious in your screenshots. It doesn’t even attempt to follow a standard WordPress structure. It is a usibility nightmare for an admin.
Not to mention the top level menu item label it adds. Why can’t it just say “Sliders” or something subtle (Gravity Forms does this without sacrificing marketing – a simple “Forms” title and subtle icon).
And when I tried Slidedeck 1, it hijacked the top spot on the side metabox on EVERY post type in the edit screen to insert a stupid slider. And it was super branded even on that page.
There are better solutions that are less obtrusive. I would never want my clients to be bombarded with all of their garbage marketing in the WordPress dashboard.
Editorial Staff
Comment regarding the UI is simply your “purist” opinion, which you are entitled to. You are assuming that the available WP UI “the standard WP structure” is great for everything which it’s not. I can’t imagine how ugly and complicated the UI would be if they used the built-in styles. Everything would have to be a custom meta box. Currently, it is laid out in a much more “user-friendly” way. Metabox UI is great for simpler things. But when it starts to get this complex, it just starts looking UGLY and old.
I agree with the marketing comment. The logos and such can definitely be toned down.
As for the comment regarding SD taking over the side meta box. Yes, it did use to that in the old version. They have come out with this NEWER version. It no longer does that. You can check it out in their Live Demo. They are now using the little icon next to Upload/Insert just like Gravity Forms.
There are better WordPress slider plugins that let you add dynamic external content, blog posts, custom HTML content, custom skins etc from the WP admin panel? I am NOT aware of any that provides all of this. If there are any, then please let me know. I would be happy to take a look at them. From a developer’s standpoint sure there are jQuery plugins that will let you do all of this, but that requires code knowledge. For your clients, sure give them what you like. If you don’t want any marketing, then probably best NOT to use any popular free plugin that ask for donation (Yoast SEO, W3 Total Cache etc).
From a user’s standpoint, this is by far the BEST solution that exist. It lets you have all the options you want without the coding know-how.
Admin
Brian Krogsgard
There’s no doubt that it’s got loads of options. Depending on who you ask, that could be good or bad. And you’re right, I speak from a developer mindset.
However, even for your average user that needs an average slider, a product like Meteor Slides is far cleaner and leaner and totally sufficient for a large percentage of use cases http://wordpress.org/extend/plugins/meteor-slides/screenshots/
For more advanced functionality, yes, I roll my own. And I use a couple of different tools for it, but largely Flex Slider can get that job done. Soliloquy appears to be a pretty good solution for people that don’t want to code that themselves, and it’s a much nicer UI than Slidedeck. http://soliloquywp.com/ Might not have every option, but it’s got a lot. And Slidedeck could learn from its interface.
Pippin Williamson
I’d be inclined to agree with Brian completely here.
In response to “I can’t imagine how ugly and complicated the UI would be if they used the built-in styles. Everything would have to be a custom meta box.”, I’d just tell you to look at Soliloquy. It uses 98%-ish pure WP styles in meta box layouts and it is very effective and easy to use.
I haven’t used Slidedeck in a really, really long time, so I can’t say anything else about it, just my two cents on the UI.
Editorial Staff
Pippin, I have seen screenshots of Soliloquy, that is why I made that comment. It cannot compare with the UI of SlideDeck. First because it doesn’t have nearly as much features as SD. Second, even without all the features, the UI looks crowded. Like I said, the Meta Box UI looks good when there are NOT as many options. But as you start adding more and more options, it can get pretty clunky. A tab based UI like SD and other commercial themes should be adapted and standardized (to match the admin look and feel) for more complex options panel.
Pippin Williamson
Looks like we agree to disagree
Brian Krogsgard
If they insist on vertical tabs, why not something more subtle like the Upthemes Framework? It’s the same kind of panel without the cheesy and obtrusive faux-mac-app stuff that has no place in the WP admin.
And I disagree that the WP UI can’t handle it. If you’ve seen the WooCommerce settings pages, you know that it can do pretty well. It’s not perfect, and a vertical tab structure could be introduced for these type heavy-settings plugins. But if you’re to that point, I’d argue you have too many settings ; )
Editorial Staff
Brian, I agreed with you about the marketing comment. I definitely like what UpThemes have done in terms of UI for users.
As for WooCommerce, sure it handles it. But it is pretty darn complicated. I am in favor of introducing a vertical tab-based structure for better UI for such things. As for your argument about too many settings, we can have that another day because theoretically we can argue on just about everything
Maggie Shnayerson
There are indeed: SliderPro (sliderpro.net) will cost you about $25 and gives you far more functionality, customization and documentation. I just deleted SlideDeck from a client’s site in favor of SliderPro because of the way they handcuff their customers. See the discussion on their blog here: http://bit.ly/MXQUx6 I stand by my points there.
SlideDeck’s backend is pretty if resource-heavy but it’s hard to justify $80 for the casual WordPress user who wouldn’t feel limited by their entry-level license and lack of customizability and even harder to justify the $200 price tag for the developer license when far cheaper alternatives exist for those who know even just a little about HTML.
CodeCanyon sells a lot of great premium sliders—my favorite is SliderPro (http://bit.ly/MXSijs) but I also like the $20 uBillBoard (http://bit.ly/MXS2AM) and the $25 RoyalSlider (http://bit.ly/MXS2AM). They have different strengths and limitations, but luckily you can buy all three for less than the price of entry to Slidedeck.
Editorial Staff
I read your comment there. It seems that you are complaining about not having a feature reserved for the higher plan. It’s like me complaining to Gravity Forms that they should have Authorize.net or PayPal add-on as a Basic add-on rather than developer. Integration of that is fairly simple (so it should be qualified as a Basic Level add-on). Why did they decide to make it a developer level add-on. Heck why don’t they just give us all for $19 instead? The same can be argued with a lot of other products (clothing brands, cars etc). This is a business decision by the company who owns the product. Some users are ok paying for it while others aren’t. If it doesn’t suit your pocket, then you don’t have to pay for it.
It doesn’t cost $80. The basic plan is $49 and with >> WPB-SD2 << coupon u get 20% off making it $40. As for cheaper alternatives for those who know a little about HTML, I wouldn't even bother paying anything to SliderPro, uBillbloard, or Royal Slider. Might as well just use Nivo Slider and get it over with. It's FREE and pretty well written. They also have good documentation. This article was written specifically for beginners focusing on Video and Images (as stated in the title). I personally haven't tried the 3 cheaper plugins you mentioned in the past. Because like I said above, if I had to code it all without paying a dime, then I would just go with Nivo. Lose the backend functionality (because I know HTML). I have known the folks from SD for a while now. I have seen the development of the product, and it has come a long way. SD2 has tons of new features. I know when I talked to them in the very early stages, documentation initiative was something that we talked about. I agree with you that the documentation is limited as of now, and I'm sure they will get to that soon. However, in my experience, the support has been more than helpful whenever anyone in our team has asked questions. -Syed