Un plugin specifico per il sito consente di aggiungere facilmente snippet di codice al sito WordPress senza dipendere dal tema. Permette di utilizzare il codice personalizzato per migliorare il sito senza preoccuparsi di dover rifare tutto quando il tema viene aggiornato.
Noi di WPBeginner abbiamo creato molti plugin specifici per il sito per aggiungere shortcode, nuovi tipi di post e altre funzionalità al nostro sito. Inoltre, abbiamo anche aiutato i nostri clienti a iniziare con plugin specifici per il sito.
In questo articolo spiegheremo come creare un plugin WordPress specifico per il sito e perché è importante.

Che cos’è un plugin WordPress specifico per il sito?
Un plugin WordPress specifico per il sito è un plugin autonomo che si può utilizzare per aggiungere tutti gli snippet di personalizzazione che non dipendono dal tema.
Quando si lavora sul proprio sito web, spesso si trovano tutorial di WordPress che chiedono di aggiungere codice al file functions.php del proprio tema o a un plugin specifico per il sito.
WordPress non è dotato di un plugin specifico per il sito. È necessario crearne uno proprio e poi installarlo e attivarlo.
Perché creare un plugin WordPress specifico per il sito?
Come abbiamo detto in precedenza, spesso ci si imbatte in tutorial che mostrano un codice da aggiungere al file functions.php del proprio tema o a un plugin specifico per il sito.
Questi codici personalizzati possono essere utilizzati per aggiungere nuovi tipi di post, tassonomie, shortcode e tonnellate di hack per migliorare il vostro sito web.
Se si aggiunge il codice personalizzato al file delle funzioni del tema, esso scomparirà se si aggiorna o si cambia tema.
È possibile creare un tema figlio e utilizzare il file di funzioni del tema figlio per salvare il codice. Tuttavia, il codice scomparirà comunque se si cambia tema.
Un plugin WordPress specifico per il sito consente di aggiungere facilmente snippet di codice personalizzati al sito WordPress e di assicurarsi che siano indipendenti dal tema. Si tratta di un plugin WordPress autonomo, il che significa che non dipende dal vostro tema e che siete liberi di aggiornare o cambiare il vostro tema.
Detto questo, vediamo come aggiungere facilmente codice personalizzato utilizzando un plugin specifico per il sito. Vi mostreremo due modi per farlo e potrete scegliere il metodo più adatto a voi (suggerimento: il metodo #2 è più facile per i principianti).
Metodo 1: Creare manualmente un plugin WordPress specifico per il sito
Sappiamo che per i principianti tutto ciò può sembrare un po’ da smanettoni, ma cercheremo di renderlo il più semplice possibile.
Innanzitutto, è necessario creare una nuova cartella sul desktop e assegnarle il nome del proprio sito web. Ad esempio: mywebsite-plugin.
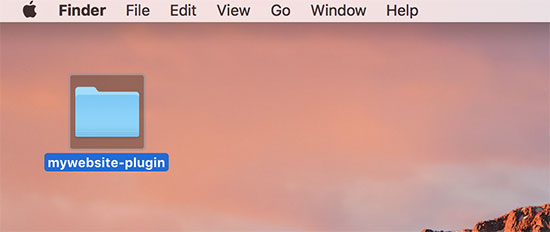
A questo punto, aprire un editor di testo semplice sul computer, come Notepad o TextEdit.
È necessario creare un nuovo file e salvarlo come mywebsite-plugin.php nella cartella dei plugin sul desktop.
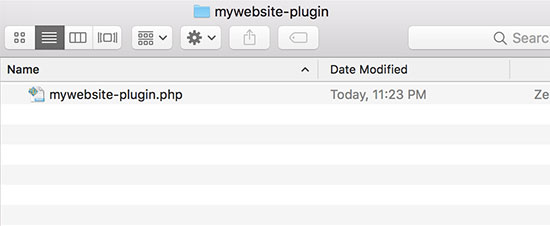
Il file del plugin ha bisogno di un codice di intestazione specifico, in modo che WordPress possa riconoscerlo come plugin. Aggiungete il seguente codice al file mywebsite-plugin.php:
1 2 3 4 5 6 7 8 9 | <?php/*Plugin Name: Site Plugin for example.comDescription: Site specific code changes for example.com*//* Start Adding Functions Below this Line *//* Stop Adding Functions Below this Line */?> |
È possibile sostituire example.com con il proprio nome di dominio. Una volta fatto questo, il plugin specifico per il sito è pronto.
Ci sono due modi per caricare il plugin specifico per il sito sul vostro sito web. Potete caricarlo tramite il pannello di amministrazione di WordPress o utilizzare l’FTP.
1. Installare il plugin specifico per il sito dall’area amministrativa di WordPress (consigliato)
Questo metodo è più semplice e consigliato a tutti gli utenti.
Per prima cosa, è necessario creare un file zip della cartella del plugin specifico del sito.
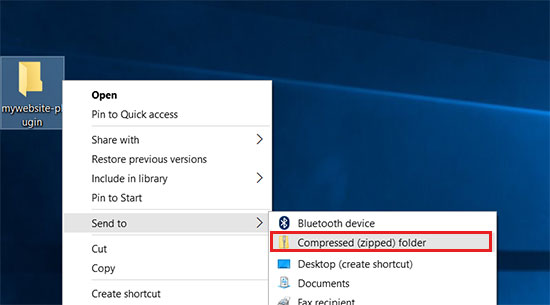
Gli utenti di Windows possono semplicemente fare clic con il tasto destro del mouse sulla cartella del plugin e selezionare Invia a ” cartella compressa (zip).
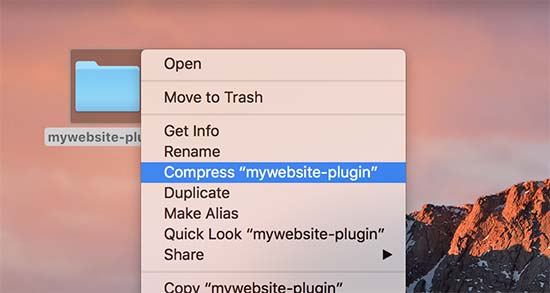
Gli utenti Mac devono fare clic con il tasto destro del mouse.
Quindi, selezionare “Comprimi il mio sito-plugin”.
Una volta ottenuto il file zip del plugin, andare alla pagina Plugin ” Aggiungi nuovo nell’area di amministrazione di WordPress.
Quindi fare clic sul pulsante “Carica plugin” in alto.
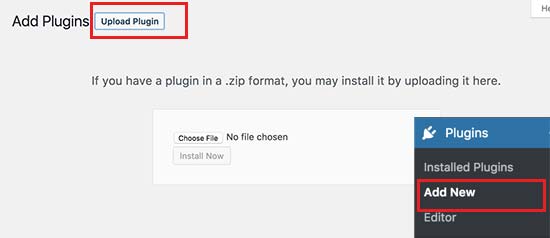
Quindi, fare clic sul pulsante “Scegli file” per selezionare il file zip creato in precedenza, quindi fare clic sul pulsante “Installa ora”.
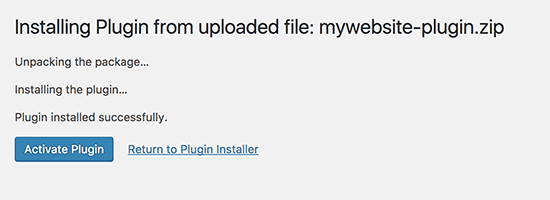
WordPress caricherà e installerà il plugin per voi. Una volta caricato, è necessario fare clic sul pulsante “Attiva plugin” per iniziare a utilizzare il plugin specifico del sito.
2. Caricare il plugin WordPress specifico per il sito tramite FTP
Per questo metodo, non è necessario creare un file zip. Il plugin verrà caricato tramite FTP.
Per prima cosa, è necessario collegarsi al proprio sito web utilizzando un client FTP.
Una volta connessi, andare alla cartella /wp-content/plugins/ nella colonna del sito remoto. Successivamente, è necessario selezionare la cartella dei plugin specifica del sito e caricarla sul proprio sito web.
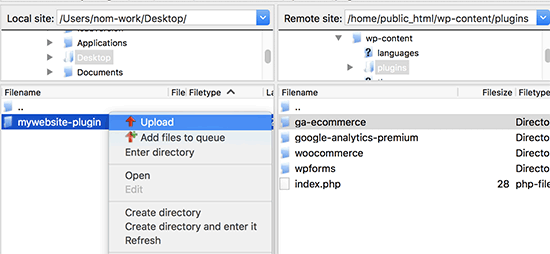
Il vostro client FTP trasferirà ora la cartella del plugin specifico per il sito al vostro sito web WordPress. Questo installerà il plugin sul vostro sito web.
Tuttavia, è necessario attivare il plugin per iniziare a utilizzarlo. È possibile farlo accedendo alla pagina “Plugin” nell’area di amministrazione di WordPress e facendo clic sul link “Attiva” sotto il plugin specifico del sito.

È tutto. Il vostro plugin specifico per il sito è ora pronto per essere utilizzato.
Aggiunta di snippet di codice personalizzati al plugin specifico del sito
Ci sono due modi per modificare il plugin e aggiungere snippet di codice personalizzati.
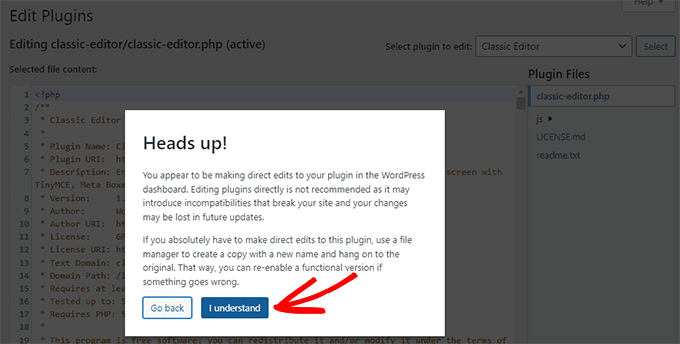
Il primo metodo consiste nel farlo tramite l’area di amministrazione di WordPress. Si può andare alla pagina Plugin ” Editor.
Verrà visualizzato un messaggio di avviso ed è necessario fare clic sul pulsante “Ho capito” per continuare. In alternativa, se volete un modo più sicuro per modificare i file, passate al secondo metodo qui sotto.
Successivamente, è necessario selezionare il plugin specifico del sito dal menu a discesa “Seleziona il plugin da modificare”.
L’editor caricherà il file del plugin e sarà possibile aggiungervi degli snippet di codice.
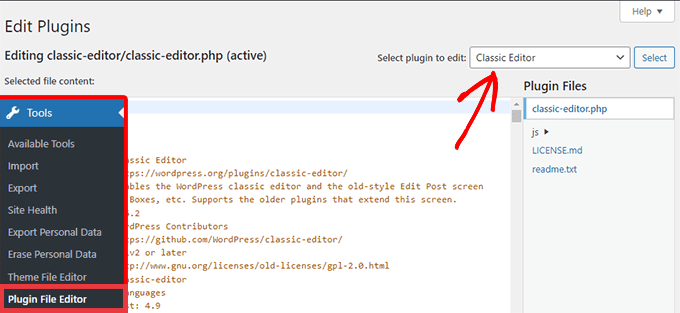
Al termine, fare clic sul pulsante “Aggiorna file” per salvare le modifiche.
Se manca qualcosa nel codice o se questo ha il potenziale di rompere il sito web, l’editor del plugin annullerà automaticamente le modifiche apportate.
Tuttavia, se l’editor non funziona e viene visualizzata la schermata bianca della morte, è possibile utilizzare FTP per modificare il file del plugin e annullare le modifiche.
Il secondo metodo consiste nel modificare direttamente il file del plugin tramite FTP. È sufficiente accedere alla cartella del plugin utilizzando il proprio client FTP. Fare clic con il tasto destro del mouse sul file del plugin e selezionare “Visualizza/Modifica”.
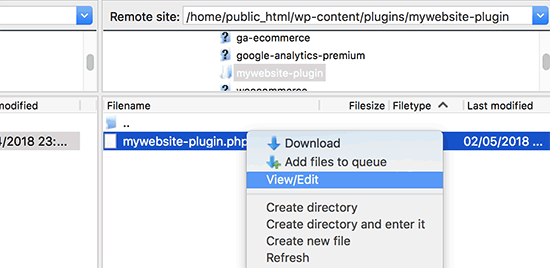
È anche possibile scaricare il file del plugin sul computer, modificarlo e caricarlo nuovamente.
Metodo 2: Aggiunta di codice personalizzato con WPCode (consigliato)
Questo metodo è molto più semplice e offre un modo migliore per gestire i singoli frammenti di codice in WordPress utilizzando WPCode.
La prima cosa da fare è installare e attivare il plugin gratuito WPCode sul vostro sito web. Per maggiori dettagli, consultate la nostra guida passo-passo su come installare un plugin di WordPress.
Articolo correlato: Per ulteriori informazioni, consultate la nostra recensione completa di WPCode.
Dopo l’attivazione, il plugin aggiunge una nuova voce di menu con l’etichetta “Code Snippets” al menu di amministrazione di WordPress. Facendo clic su di essa si accede a una pagina in cui è possibile gestire tutti i codici personalizzati.
Per aggiungere il primo frammento di codice, fare clic sul pulsante “Aggiungi nuovo”.
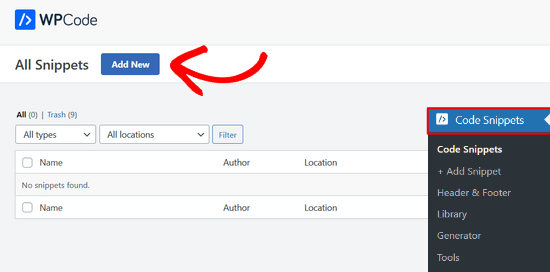
Si accede così alla pagina “Aggiungi snippet”. Qui è possibile scegliere uno snippet di codice dalla libreria predefinita o aggiungere il proprio codice personalizzato.
Per aggiungere il codice personalizzato, passare all’opzione “Aggiungi il tuo codice personalizzato (nuovo snippet)” e fare clic sul pulsante “Usa snippet”.
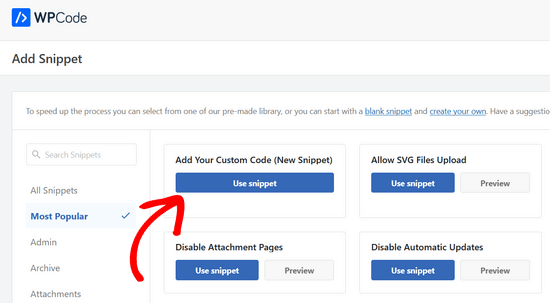
Ora è possibile inserire un titolo per lo snippet di codice personalizzato. Può essere qualsiasi cosa che aiuti a identificare il codice.
Dopodiché, si può procedere a incollare lo snippet di codice nella casella del codice. È inoltre necessario selezionare il tipo “Snippet PHP” dall’elenco a discesa “Tipo di codice” sulla destra.
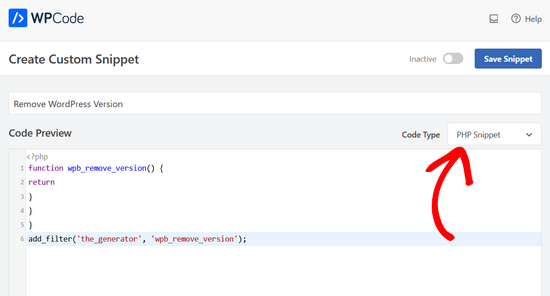
È inoltre possibile aggiungere note al codice nella sezione “Informazioni di base”.
In quest’area dovreste scrivere cosa fa questo codice, dove lo avete trovato e perché lo state aggiungendo al vostro sito web. Questo aiuterà il “futuro” a ricordare perché il “passato” ha aggiunto questo codice.
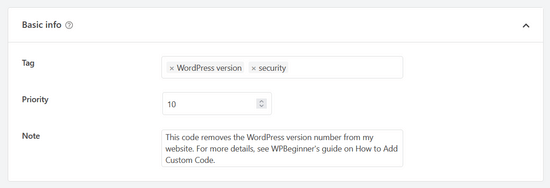
È inoltre possibile assegnare dei tag agli snippet di codice, che possono aiutare a organizzare gli snippet di codice per argomento e funzionalità.
Il plugin consente anche di selezionare la modalità di esecuzione dello snippet di codice. Nella sezione “Inserimento”, è possibile selezionare il metodo “Inserimento automatico” per inserire ed eseguire automaticamente il codice sul sito.
È possibile scegliere tra le opzioni dell’area di amministrazione, del front-end o di tutto il mondo. Se non si è sicuri, mantenere l’opzione predefinita “Esegui ovunque”.

Oppure si può scegliere il metodo ‘Shortcode’. Con questo metodo, lo snippet non viene inserito automaticamente. Una volta salvato lo snippet, si otterrà uno shortcode da inserire manualmente in qualsiasi punto del sito.
È inoltre possibile utilizzare la sezione “Logica condizionale intelligente” per mostrare o nascondere gli snippet inseriti automaticamente in base a una serie di regole.
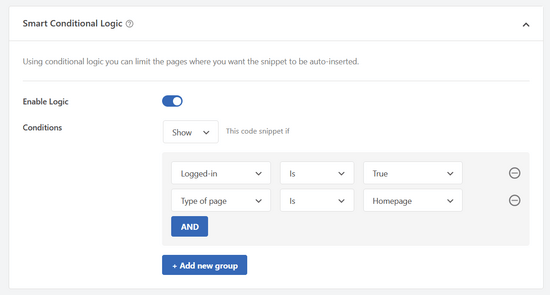
Ad esempio, è possibile caricare gli snippet di codice solo per gli utenti che hanno effettuato l’accesso, caricare gli snippet di codice PHP solo su URL di pagine specifiche, mostrare snippet di codice in base al tipo di pagina e altro ancora.
Infine, è possibile spostare l’interruttore da ‘Inattivo’ ad ‘Attivo’ e quindi fare clic sul pulsante ‘Salva frammento’.
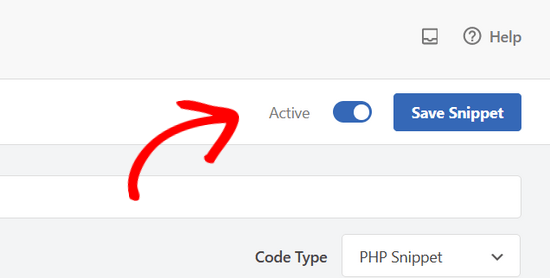
Se si desidera salvare lo snippet di codice senza attivarlo, è possibile fare clic solo sul pulsante ‘Salva snippet’.
Una volta salvato e attivato uno snippet di codice, questo diventerà automaticamente effettivo sul vostro sito web, se questo è il metodo di inserimento che avete scelto.
Per maggiori dettagli, consultate la nostra guida su come aggiungere facilmente snippet di codice personalizzati in WordPress.
Speriamo che questo articolo vi abbia aiutato a capire perché e come creare un plugin WordPress specifico per un sito. Potreste anche voler consultare il nostro elenco di utili suggerimenti per i file di funzioni e gli hack WordPress più ricercati per utilizzare al meglio il vostro plugin specifico per il sito.
Se questo articolo vi è piaciuto, iscrivetevi al nostro canale YouTube per le esercitazioni video su WordPress. Potete trovarci anche su Twitter e Facebook.


BSubra
Is it possible to add code snippets like Google Analytics Code, Adsense code in Site Specific Pliugin. Or only possible to add codes we generally put in functions.php file.
I mean, is it possible to add codes in site-specific plugin what we generally put in Header.php file.
WPBeginner Support
You can do that if you would like, you can also use the insert headers and footers plugin.
Admin
Bola Oussou
hi
Thanks for this tuto
however is there a way to make this plugging(not to be visible) not in plugging list and also in a specific folder (not wp-content folder) ?
Thanls
Tor-Bjorn Fjellner
Actually yes, there is:
Instead of placing the plugin in …/wp-content/plugins/ you put it in …/wp-content/mu-plugins/ (You may have to create that directory, if it’s not there yet.
Plugins that are placed in mu-plugins are ALWAYS run, so the only way to deactivate a MU plugin (MU currently is construed as “must use”) is to delete it (or remain the directly mu-plugins to something else…).
Judith
Hi I tried to do the Site-specific plugin, but it is not working, I get this message “The package could not be installed. No valid plugins were found.
Plugin installation failed.”
What do I do?
WPBeginner Support
Hi Judith,
This usually means that the plugin header information is incorrect. You can try again and make sure that your plugin header is exactly in the format displayed in the tutorial.
Admin
Jonathan Manheim
I get this same error. I have tried maybe 10 times. Uploaded through admin and on FTP. Cannot get it to upload. I am using TextEditor to paste the code. Notice several things you don’t mention in the post that I wonder could be an issue. First, won’t let me save the file as .php. I have to save it as .php.rtf OR .rtf then go back and rename the file after it is saved.
Second, not sure what you mean by making sure the format for the plugin header is exactly the same. Should the line number be in there? If so, I can’t get that to work. If I copy and paste with the line numbers, the green vertical line doesn’t show up and there is no space between the line numbers and the code. Or am I supposed to just copy the code (without the line numbers)? Either way, I’ve tried everything I can with my current Textedit application and it will not work.
Any ideas? I can send you screen shots of exactly what I have if you would like
WPBeginner Support
Hi Jonathan,
You will need to save file as .php. Please use a different text editor on Windows you can use Notepad or download Notepad++. On Mac, you can use TextEdit or download and install TextWrangler.
You don’t need to copy and paste line numbers.
Kacper
In my case the issue was that the file had Unicode encoding. Changing it to ANSI fixed the issue.
Ikram
Hi,
Good day!
Would like to know how to set a white paper in my blog post article to download it with add email address from the visitor.
Thanks, Ikram
WPBeginner Support
Hi Ikram,
You can do that with the pro version of WPForms. You will need at least Plus plan for that. After users enter their email address and click submit you can redirect them to the download page.
Admin
Alain Fradette
Great info! Thanks so much. I have been using WordPress for years and this little gem made it so much easier!
Abhijeet
I have edited some code in Style.css . Will it be overwritten if i update a theme?
is it possible to create style css file in this site specific plugin?
LFreitas
Yes, they will.
You should create a child theme and put your modifications there instead of in the original theme.
Read more: https://www.wpbeginner.com/glossary/child-theme/
dave
White screen on publishing pages.
The code works to show child pages on a parent page using the shortcode however I am getting white screen. Anyone know why?
Tommy
The plugin generated 3 characters of unexpected output during activation. If you notice “headers already sent” messages, problems with syndication feeds or other issues, try deactivating or removing this plugin.
Saurin
I believe best approach to add custom code to site is child theme. No matter if we need to customize theme or not. I mad a practice to always use child theme even if there is no customization. This habit saved my time & effort many times. I dont think it is good to create extra plugin for such customization.
I believe in minimum use of plugin no matter how simple you created one.
Jason
Which is better, site-specific plugin or Child Theme? or both?
I need to create a custom post type to add some major functionality to my site so is the plugin better or the child theme and its functions.php?
Thanks!
Josh
The thing is, is that you’re creating the plug-in yourself, using the functions the same exact way. So the answer to your question would be that neither is better, because you should be using them WITH each other.
Josh
Think of the site-specific plug-ins as functions that are independent of your theme.
Vickey
How would I create a create a new plugin directory in Azure? I have WordPress running on Azure using MS SQL Server, which I activated using Project NAMI.
vishal
not working on multisite with publisher theme can you help me this is my site and also tell me how can i remove featured image inside the post not from front page latest post
Nadia Khan
Hi there,
You WP Beginners are rock. and I want to thank you for your Struggles for us.
Now come to the point. I have installed an theme and in that theme, there is an function that is showing wp toolbar for guests, I have tried so many times to find this function in theme files to remove this, but i can’t. So please help me to remove that toolbar, that is showing to every visitor with wordpress logo and wordpress’s own link to their website. Screen Shot is attached.
Manuel
Does something like this work for plugins too? Im finding that I am making a few changes to plugins that I add to my site….many times deleting certain lines of code I dont want. I’m assuming that after I update that plugin, all my changes will be erased. How can I avoid this?
Elizabeth
Hi, thanks for the post. I’m getting an error when I activate the plugin for some reason:
Parse error: syntax error, unexpected ‘*’, expecting identifier (T_STRING) on line 9
Any ideas what I’ve done wrong?
Thanks!
WPBeginner Support
Hi Elizabeth,
There is an unexpected asterisk sign in the code on line 9 which is blocking the php script. Edit the file again and copy the code exactly as it is shown above. Make sure that you don’t copy line numbers in the code click on the Copy button at the top right corner of the code snippet box
.
Admin
Steven Denger
I tried naming the new folder as you did in the example but I got an error that said something in the way of you cannot use a name like this. This Instruction may be helpful to some – but it is very difficult and confusing to me and does not help at all. As I said – you need to explain this down to the fine details or otherwise these tutorals will not help. The name of this site is wp BEGINNER – and that is what I am. You project these tutorals to the more experienced.
I guess I will have to start going elswhere to get beginners instructiions because, most of time, wp beginner is not helpful – it is more like a techs only club.
Steven Denger
How do you get to the /wp-content/plugins/yoursitename-plugin/ in wordpress and upload a file there? I am lost on the first line of instruction. You guys always assume that we know these things in your instructions but they are not clear enough.
I went to cpanel and opened up the wpcontent > plugins – and it shows a list of plugins – but I am lost from this point. How do I go about uploading a file in here? I am a beginner – and you guys seem to always explain things like your instructing experienced techs. I am not but I go to WP Beginner to try to learn. It is usually difficult to follow your instructions and I end up having to go somewhere else in google search to find things explained down to a beginners level.
If you want to be more helpful try breaking things down a little more simple.
Manuel
Hey Steven,
I know the feeling! I’m far from a expert with wordpress and I pretty much live on google searches and this site trying to learn. I know a little bit and was able to get this to work. Send me your email and I’ll send you the steps with screenshots. I havent tested putting actual code into the plugin so we’ll see if that works….but I was able to see the newly created plugin on my admin page
Steven Denger
thank you manuel
NiceRazer
Hello, can you please tell me how to do that to? I’ve tried finding posts that would help me with this same prob but still didnt found it.
JoAnn Chateau
Thank you for the great advice and simple how-to instructions. I easily created a Site-Specific WordPress Plugin for my site and enabled shortcodes for widgets. Now I have less worry when changing themes, and I didn’t need to install another plugin. Again, thanks!
george
hi i followed the instruction on how to make a site plugin for my site. ive uploaded it but cant see it in my list of plugins.
any ideas why?
Dawn
I cannot find where the folders live in the plug in directory. I tried searching for: /wp-content/plugins/yoursitename-plugin/ (with my site name).
Kara
Never mind, I figured it out and got it activated. My hosting server was acting up, must have timed out or something…cheers!
Kara
I followed your instructions but i don’t know how to activate it. It doesn’t show in my list of plugind in my wp-admin. Can you help?
Sheyejinkazama
Thank you. Thank you so so much.
Molly
How do you get the plugin to “Network Activate” on a multi-site?