Microsoft Outlook è una scelta eccellente per le aziende di qualsiasi dimensione. Tuttavia, se utilizzate un piano gratuito, sarete bloccati con il dominio email predefinito. Ciò significa che vedrete “@outlook.com” alla fine del vostro indirizzo email.
Mantenere il dominio email predefinito non è l’ideale, perché non lascerà una buona impressione sul pubblico. Infatti, un indirizzo email generico non supporta una forte identità del brand e non ha un aspetto molto professionale.
Fortunatamente, il piano Microsoft 365 Business Premium consente di utilizzare il proprio dominio per creare un indirizzo email aziendale utilizzando Outlook. In questo modo si ottiene un aspetto più professionale nell’invio delle email. Inoltre, il piano Premium offre anche caratteristiche potenti come la protezione dallo spam e una migliore sicurezza.
In questo articolo vi mostreremo come impostare un indirizzo email personalizzato con Outlook.

Che cos’è un indirizzo e-mail professionale di marca?
Un’e-mail professionale contiene il nome della vostra azienda. Ad esempio, “support@yourdomain.com” è un indirizzo e-mail professionale. Al contrario, “yourdomain@yahoo.com” non è un indirizzo e-mail professionale.
Ci sono molti modi per creare un indirizzo e-mail professionale. Potete utilizzare il server di posta elettronica integrato che viene fornito con la maggior parte delle società di hosting WordPress.
È adatto alla maggior parte dei siti web iniziali con un budget limitato. Tuttavia, manca di alcune caratteristiche fondamentali, come una migliore protezione antispam e antivirus, una maggiore sicurezza, una facile gestione degli account e altro ancora.
Se desiderate le potenti funzioni di cui sopra, avrete bisogno di un servizio di posta elettronica aziendale professionale che funzioni con il nome della vostra azienda o il nome di dominio esistente.
Che cos’è Outlook.com?
Outlook è un servizio di posta elettronica offerto da Microsoft. È possibile creare un account gratuito “yourname@outlook.com” per utilizzare il servizio.
Tuttavia, se si desidera creare un indirizzo e-mail con marchio professionale con Outlook.com, è necessario iscriversi a un account Microsoft 365 Business Premium.
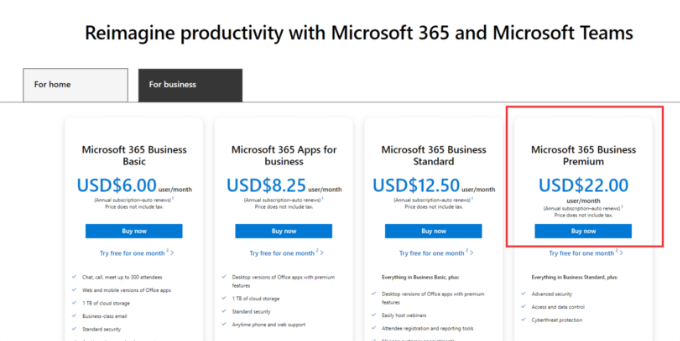
È un servizio a pagamento a partire da 6,00 dollari al mese per utente. Include 1 TB di spazio di archiviazione OneDrive e le ultime versioni di Outlook, Word, Excel e PowerPoint per PC o Mac.
Noi di WPBeginner utilizziamo e raccomandiamo Workspace o G Suite di Google per gli indirizzi e-mail aziendali perché sono più convenienti. Preferiamo anche Google Cloud poiché il nostro team ha familiarità con Gmail e le altre applicazioni di Google.
Per maggiori dettagli, potete consultare il nostro confronto tra G Suite e Office 365 per scoprire come si colloca rispetto a Outlook.com.
Detto questo, vediamo come creare un indirizzo e-mail personalizzato con Outlook.com.
Iscrizione a Outlook Premium con Microsoft 365
Innanzitutto, è necessario visitare il sito web di Microsoft 365 e sottoscrivere l’abbonamento “Microsoft 365 Business Premium”.
È l’unico abbonamento che include il supporto per i domini personalizzati. Per iniziare, è sufficiente fare clic sul pulsante “Acquista ora”.
Nella fase successiva dovrete inserire il vostro indirizzo e-mail. Potrebbe essere l’email del lavoro o della scuola.
Dopo aver inserito l’e-mail, fare clic sul pulsante “Avanti”.
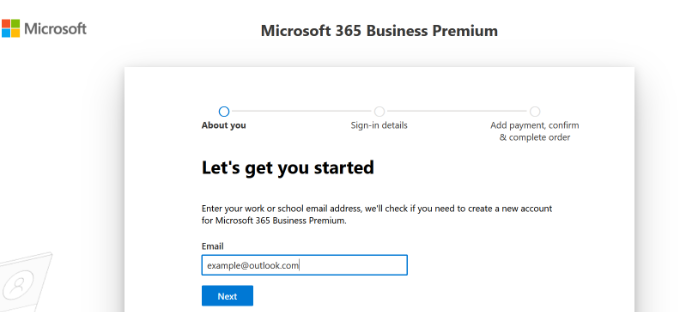
Verrà quindi verificato se l’indirizzo è già associato a un account Microsoft o se è necessario crearne uno nuovo.
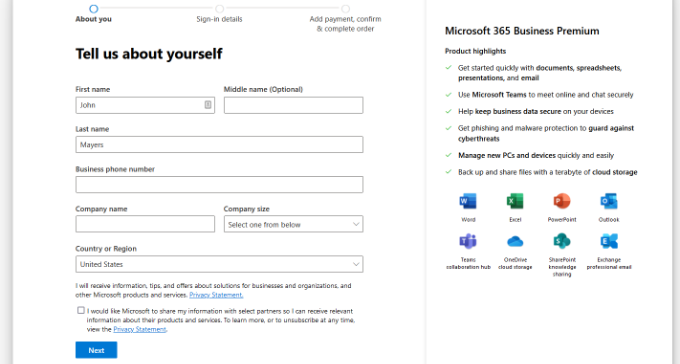
Successivamente, vi verrà chiesto di fornire informazioni personali, come il vostro nome, il numero di telefono dell’azienda, il nome della società, le dimensioni dell’azienda e il paese.
Dopo aver inserito questi dati, fare clic sul pulsante “Avanti”.
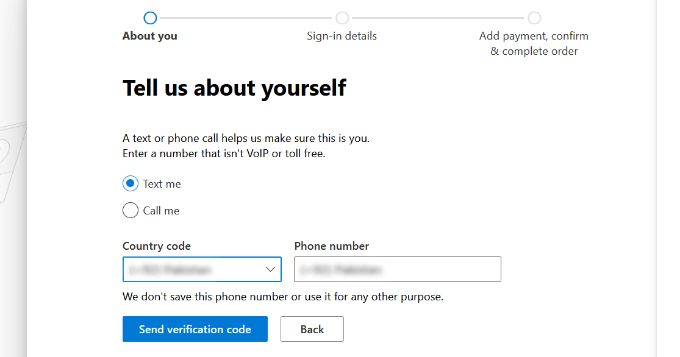
Nella schermata successiva, dovrete verificare il vostro numero di telefono aziendale.
È possibile scegliere di ricevere un messaggio di testo o una telefonata per ottenere il codice di verifica.
Dopo la verifica, vi verrà chiesto di inserire una password e un nome di dominio.
Al termine, è possibile fare clic sul pulsante “Avanti”.
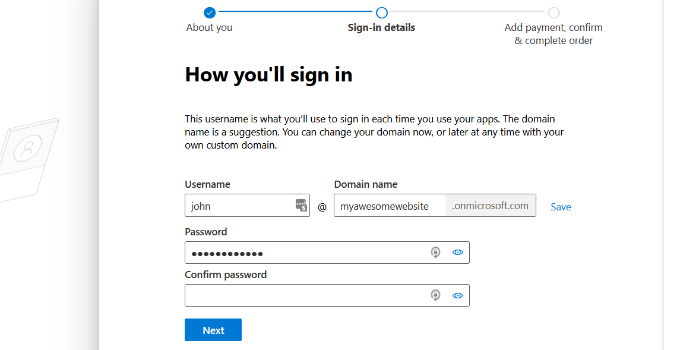
Da qui, dovrete selezionare il numero di account Microsoft 365 Business Premium che desiderate.
Quindi, fare clic su “Aggiungi metodo di pagamento” per continuare.
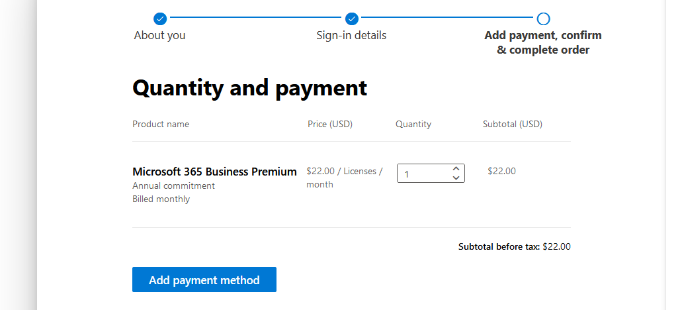
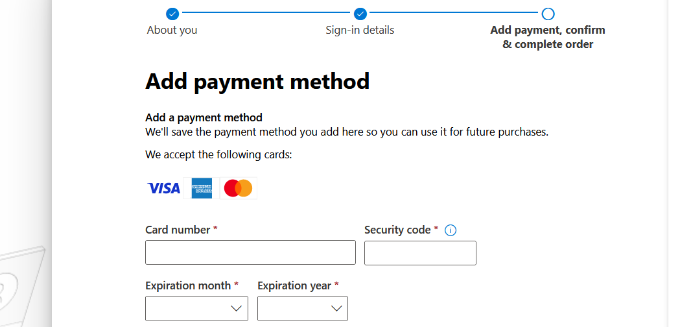
Microsoft chiederà ora di selezionare un metodo di pagamento, ad esempio una carta di credito.
Procedere con l’inserimento dei dati di pagamento per completare il processo di iscrizione.
Successivamente, si accederà alla dashboard di Office 365.
Impostazione della posta elettronica di Outlook con un dominio personalizzato
Nella dashboard vengono visualizzati diversi strumenti e applicazioni offerti da Microsoft nell’ambito della suite Office 365.
La barra laterale di sinistra è piena di scorciatoie per i vari servizi e app a cui si ha accesso con l’abbonamento.
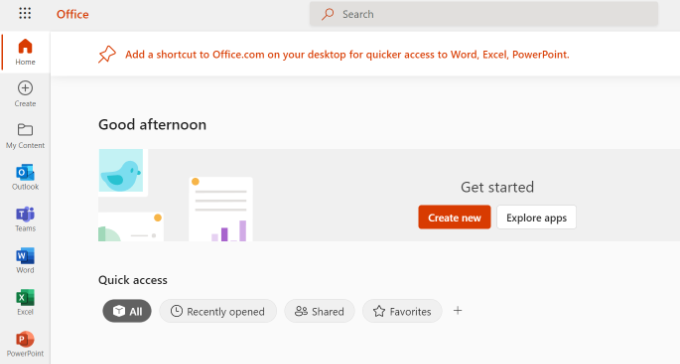
Successivamente, è possibile fare clic sull’opzione “Applicazioni” dal menu della barra laterale.
A questo punto appariranno altri strumenti sotto la voce Applicazioni. Selezionate l’opzione “Admin”.
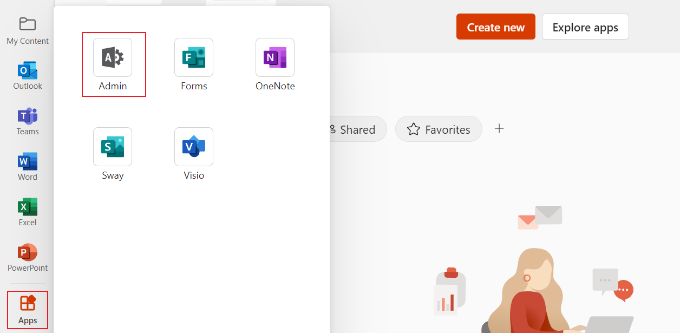
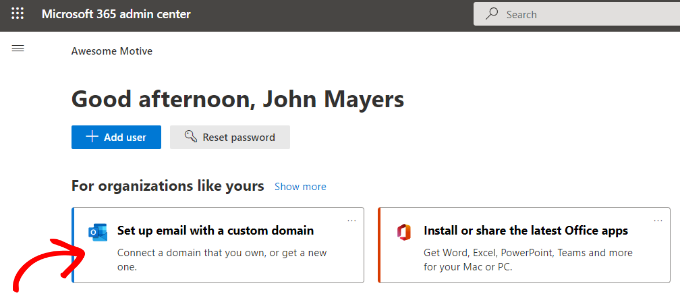
Successivamente, nella parte superiore della pagina verrà visualizzato il “Microsoft 365 admin center”.
Da qui è possibile selezionare l’opzione “Imposta e-mail con un dominio personalizzato”.
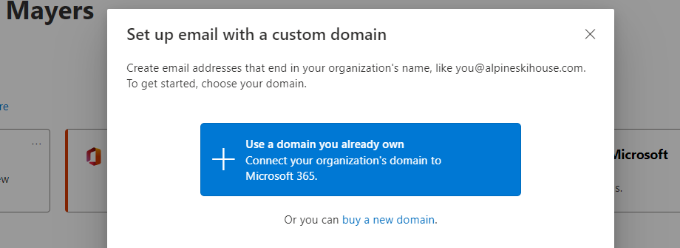
Successivamente, si aprirà una finestra popup in cui vi verrà chiesto di utilizzare un dominio esistente o di acquistarne uno nuovo.
È sufficiente fare clic sul pulsante “Usa un dominio che già possiedi”.
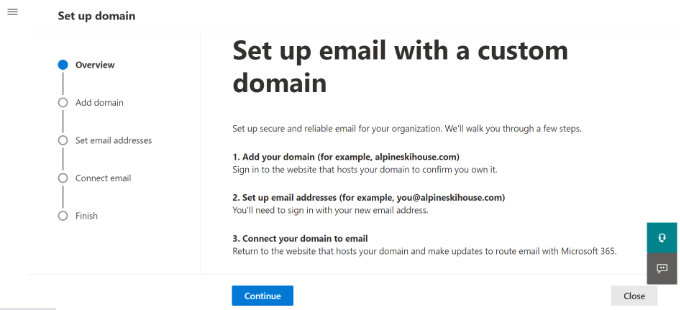
Successivamente, si aprirà una procedura guidata per configurare un dominio personalizzato con Outlook.
Il primo passo vi fornirà una panoramica dei passaggi da seguire. Fare clic sul pulsante “Continua” in basso.
Nella schermata successiva, vi verrà chiesto di inserire il nome di dominio che desiderate impostare.
Dopo aver inserito il nome del dominio, fare clic sul pulsante “Continua”.
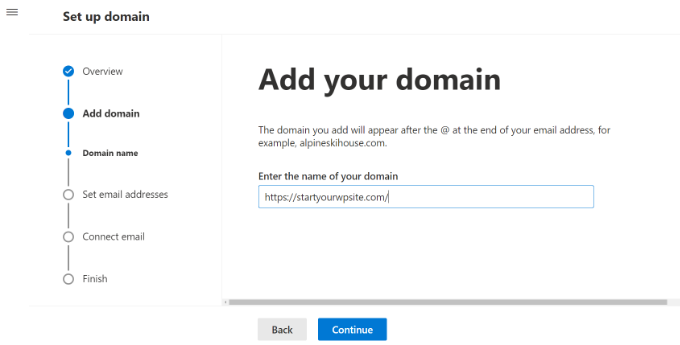
Microsoft cercherà ora il vostro nome di dominio.
Successivamente, vi chiederà di verificare la proprietà aggiungendo informazioni alle impostazioni DNS del vostro dominio.
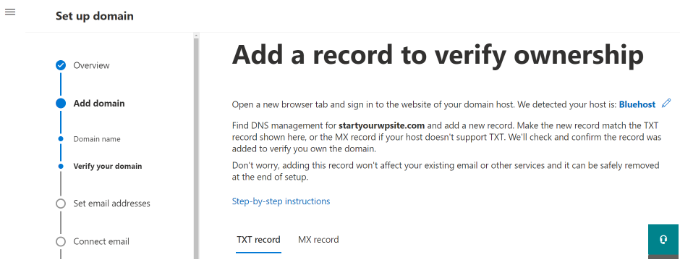
A tal fine, è necessario aprire una nuova scheda o finestra del browser e accedere alla pagina delle impostazioni del proprio dominio. A seconda della società di registrazione del dominio, questa pagina si trova nel proprio account. È necessario trovare l’opzione delle impostazioni DNS.
Se il vostro dominio è registrato dalla vostra società di hosting WordPress, troverete l’impostazione del dominio nella vostra dashboard cPanel etichettata come “Zone Editor” o “DNS Zone Editor”.
Nota: se si è utenti di SiteGround, non si dispone di cPanel. Lo troverete nella sezione Dominio del vostro cruscotto Strumenti del sito.
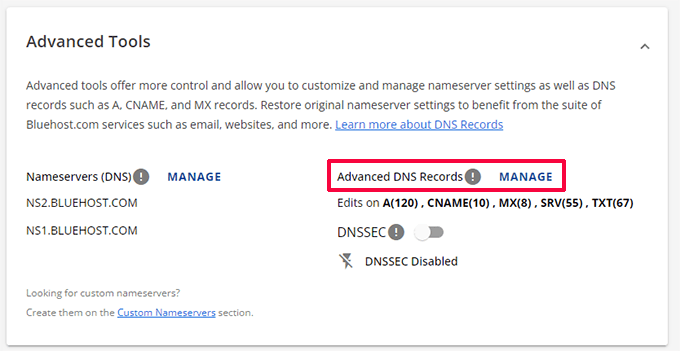
Per questa esercitazione, utilizzeremo la Bacheca di Bluehost. Per iniziare, potete andare su Domini dal menu a sinistra. Quindi, individuate il vostro sito web e fate clic sul pulsante “Impostazioni”.
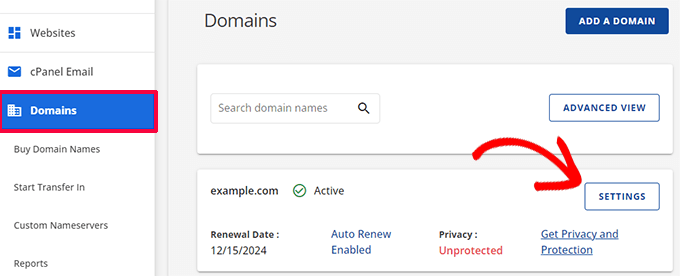
Da qui si può scendere nelle impostazioni del dominio.
Fate clic sull’opzione “Strumenti avanzati”.
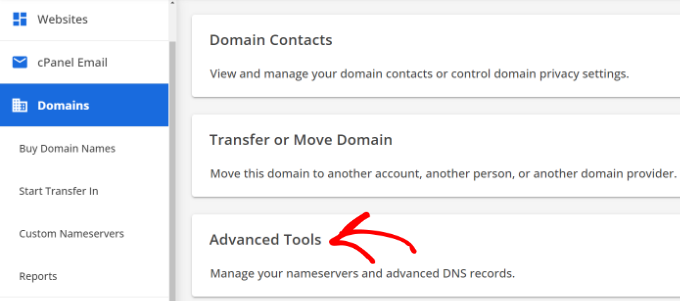
Qui Bluehost mostrerà i nameserver del dominio e altri record.
Per gestire i record DNS, si può fare clic sul pulsante “Gestisci” accanto a “Record DNS avanzati”.
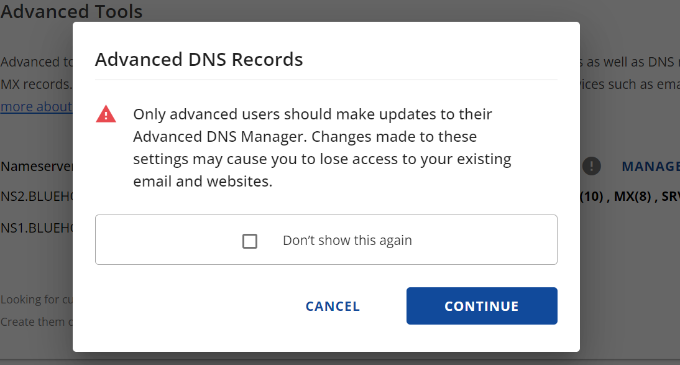
Bluehost mostrerà quindi un messaggio di attenzione.
È possibile fare clic sul pulsante “Continua” per andare avanti.
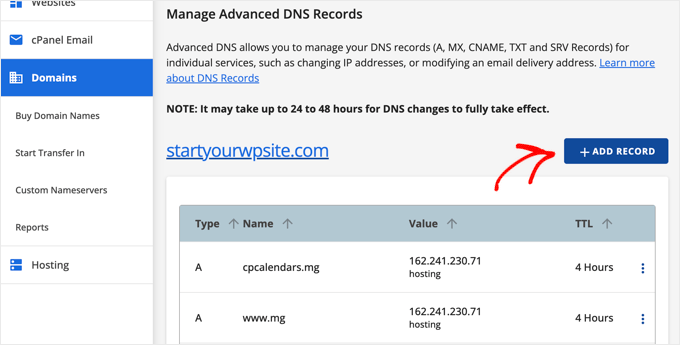
Successivamente, si vedranno diversi tipi di record DNS.
È sufficiente fare clic sul pulsante “+ Aggiungi record”.
Verrà visualizzata una nuova finestra popup per aggiungere il record.
Quindi, fare clic sul menu a discesa e selezionare “TXT” come tipo.
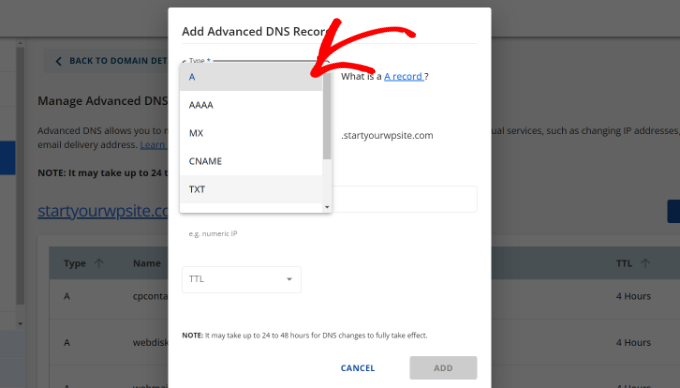
Da qui è necessario inserire i dettagli TXT. Questi includono il record host, il valore TXT e il tempo TTL.
È possibile trovare facilmente queste informazioni nella scheda di Microsoft Office 365.
Una volta aggiunti i dettagli, fare clic sul pulsante “Aggiungi”.
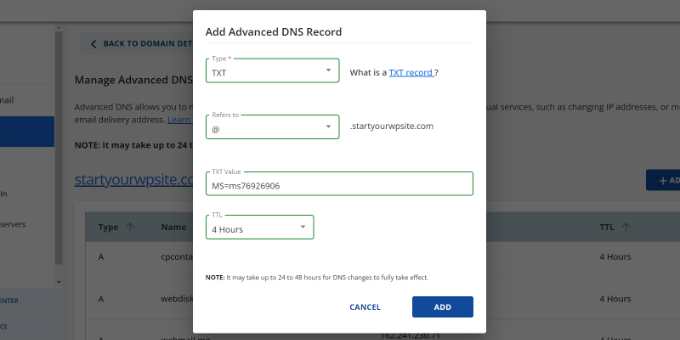
Quando si aggiunge un record DNS, accertarsi che le informazioni immesse corrispondano a quelle visualizzate da Office 365.
Successivamente, è necessario tornare al portale di amministrazione di Microsoft Office 365 e fare clic sul pulsante di verifica.
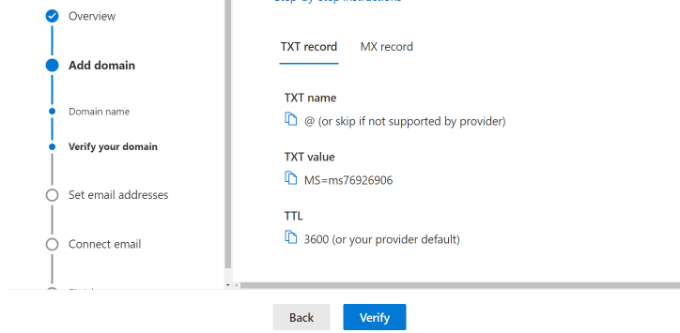
Office 365 controllerà ora i record DNS per verificare che il nome di dominio sia di vostra proprietà. La verifica DNS può richiedere 5-10 minuti perché, a volte, le impostazioni DNS non vengono aggiornate subito.
Dopo la verifica, vi verrà chiesto di impostare il vostro nuovo indirizzo e-mail di marca. Una volta fatto, è sufficiente fare clic sul pulsante “Aggiorna e esci”.
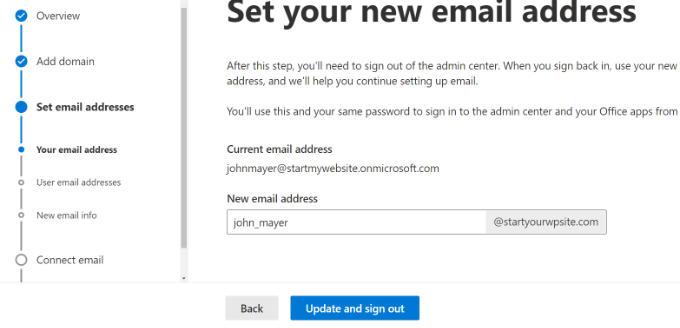
Successivamente, sarà necessario effettuare nuovamente l’accesso utilizzando il nuovo indirizzo e-mail di marca appena aggiunto.
Una volta effettuato l’accesso, vedrete altri record da aggiungere al vostro dominio e da collegare alla posta elettronica di Outlook.
Lo scambio di e-mail necessita di tre record DNS, tra cui un record MX, un record CNAME e un record TXT.
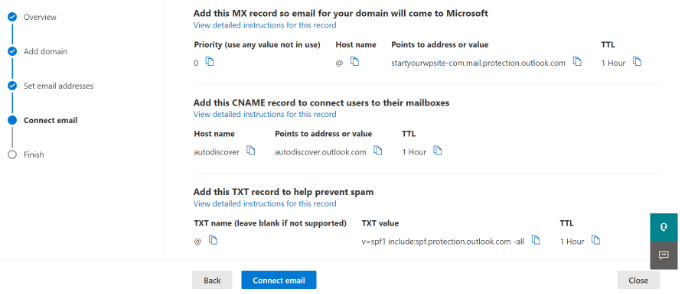
Ancora una volta, è necessario andare alla pagina delle impostazioni DNS del proprio dominio e aggiungere questi record singolarmente.
In primo luogo, si dispone di un record MX, che fornisce istruzioni su dove recapitare i messaggi email.
In Bluehost, accedere alle impostazioni DNS del sito web e fare clic sul pulsante “+ Aggiungi record” per aggiungere un nuovo record MX.

Successivamente, verrà visualizzata una finestra di dialogo con le impostazioni del record.
Per prima cosa, fare clic sul menu a discesa in alto e selezionare l’opzione “MX”.

Se il vostro sito web aveva già un record MX, verrà sostituito da questo. In questo modo si garantisce la possibilità di utilizzare i server di posta di Outlook per inviare e ricevere e-mail dall’indirizzo e-mail del dominio personalizzato.
Dopo di che, si dispone di un record TXT, che aiuta a evitare che qualcuno possa falsificare la vostra e-mail per inviare spam.

Infine, è presente un record CNAME, che consente a software come Outlook di individuare e connettersi al servizio di posta elettronica.
È sufficiente aggiungere un nuovo record CNAME in Bluehost e inserire i dettagli dalla dashboard Microsoft.
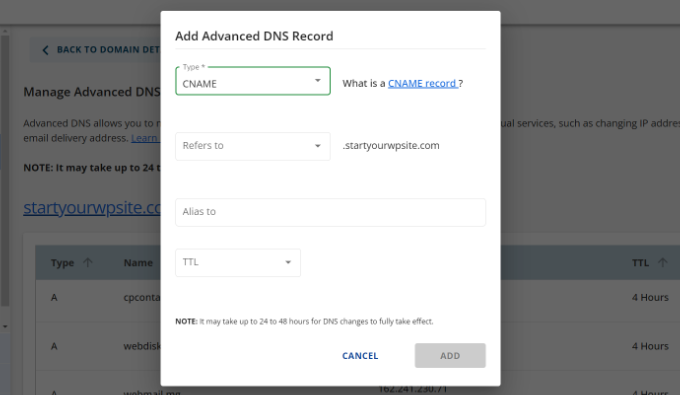
Una volta inseriti tutti i record DNS, è possibile tornare alla scheda Microsoft Office 365 e fare clic sul pulsante “Connetti e-mail”.
Office 365 controllerà ora le impostazioni DNS del dominio. La verifica dei record TXT potrebbe richiedere 24-48 ore.

Una volta che tutto è stato verificato, si arriva alla fine della configurazione.
Nell’ultimo passaggio, verrà visualizzato un riepilogo della configurazione. Chiudere la procedura guidata.
Ecco fatto! Il nome di dominio è stato configurato con successo per funzionare con Outlook.
Aggiunta di un indirizzo e-mail personalizzato in Outlook
Ora siete pronti a creare indirizzi e-mail di dominio personalizzati utilizzando Outlook.
Dalla dashboard di Office 365, andare su Utenti ” Utenti attivi.
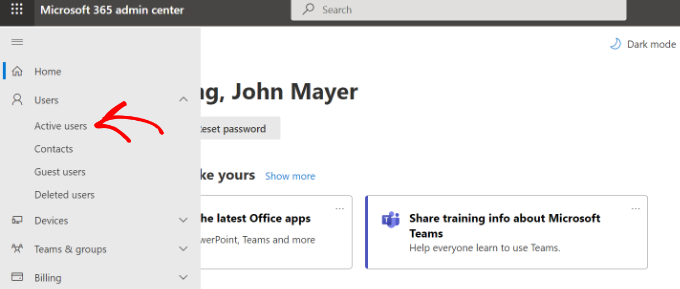
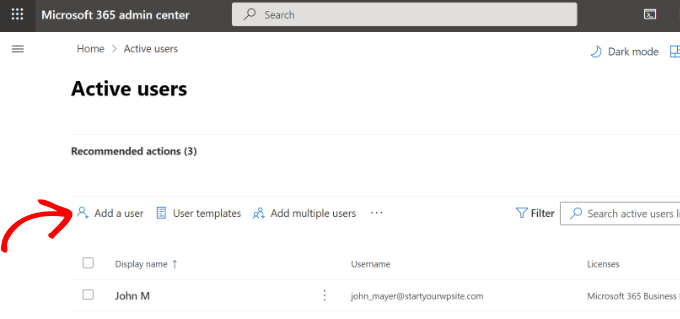
Successivamente, verrà visualizzato un elenco degli utenti attivi.
Fare clic sull’opzione “Aggiungi un utente”.
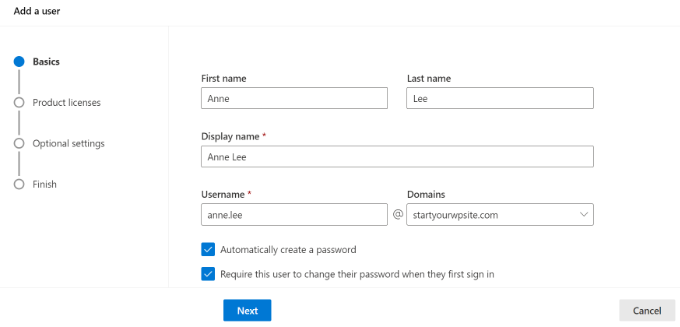
Nella schermata successiva, è necessario fornire le informazioni personali dell’utente e scegliere un indirizzo e-mail.
Dopo aver inserito i dati, è sufficiente fare clic sul pulsante “Avanti”.
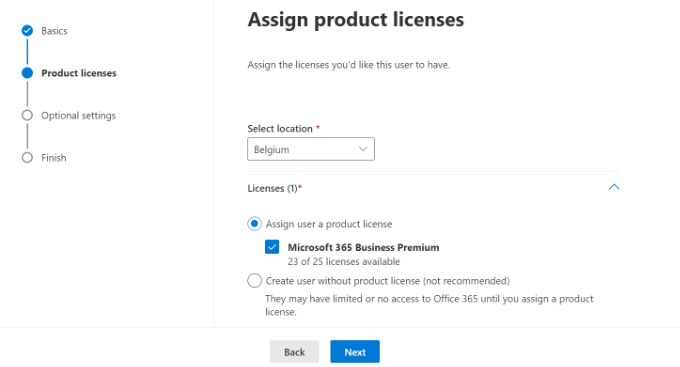
Quindi, dovrete selezionare una località geografica per il vostro utente e assegnare una licenza del prodotto.
Nel piano Microsoft 365 Business Premium è possibile assegnare fino a 25 licenze. Al termine, è sufficiente fare clic sul pulsante “Avanti”.
Microsoft offre anche impostazioni aggiuntive per i nuovi profili utente.
Ad esempio, è possibile selezionare un ruolo utente e concedere l’accesso all’Admin Center. È inoltre possibile aggiungere informazioni sul profilo, come il titolo di lavoro, il reparto, l’ufficio e altro ancora.
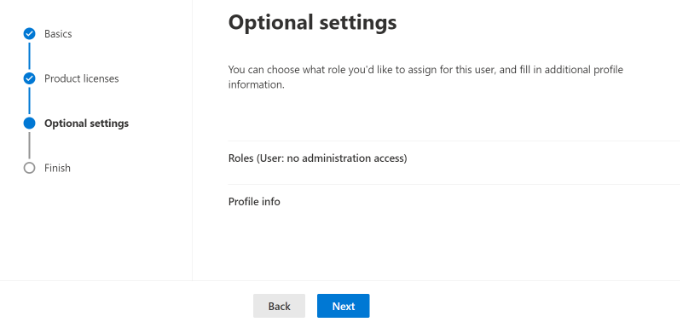
Queste sono impostazioni facoltative e possono essere lasciate vuote. Al termine, fare semplicemente clic sul pulsante “Avanti”.
Infine, verrà visualizzato un riepilogo del nuovo utente appena aggiunto. È possibile rivedere i dettagli, apportare le modifiche necessarie e fare clic sul pulsante “Termina aggiunta”.
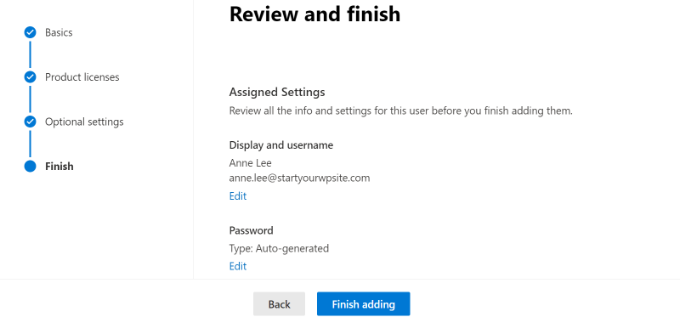
A questo punto, si è riusciti ad aggiungere un nuovo utente e a creare un indirizzo email brandizzato in Outlook.
Ora è possibile accedere utilizzando l’indirizzo e-mail e la password creati nel passaggio precedente per utilizzare la nuova e-mail con marchio professionale in Outlook.
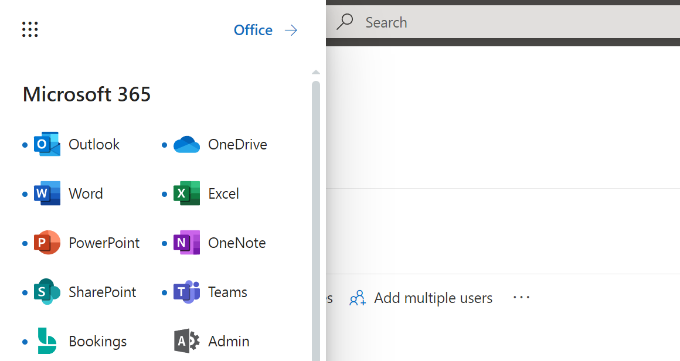
È inoltre possibile installare le applicazioni di Office 365 su Mac e PC, tra cui Outlook. Questo vi permetterà di utilizzare il vostro indirizzo e-mail aziendale Microsoft Outlook con accesso offline tramite l’app Outlook.
Speriamo che questo articolo vi abbia aiutato a capire come impostare un indirizzo email professionale brandizzato con Outlook. Potreste anche leggere il nostro articolo sui migliori provider SMTP con un’elevata deliverability delle email e la nostra guida per principianti all’automazione delle email su WordPress.
Se questo articolo vi è piaciuto, iscrivetevi al nostro canale YouTube per le esercitazioni video su WordPress. Potete trovarci anche su Twitter e Facebook.


Nishant Thakur
Was looking for this! Perfect!
Peter
Hello, thanks for this tutorial, please where do I need to add this
v=spf1 include:hotmail.com ~all
Jay
its more than 72 hrs of changing my dns. but now also it is showing “You need to prove ownership of this domain by creating a DNS record. Use the settings below.”
WPBeginner Support
This probably means your DNS records are not correctly set.
Admin
Abhay
hey! nice article…thank you
Rani
Hi,
I set up the account following your instructions.Thanks
But I have this problem , i am not receiving any mails in my inbox. when i send mails from other accounts to this mail it is bounced.
i checked the microsoft support. looks like it is some internal problem and not a settings problem. people are reporting other issues with accounts.Microsoft says they resolved the issue. But doesnt look like so.
http://answers.microsoft.com/en-us/outlook_com/forum/oemail-osend/my-outlookcom-email-account-is-not-receiving-any/02581144-c02b-4cdc-9132-98a8e0531ab1?msgId=2fd9d76f-6dfa-45bc-9a46-81e11265a7a1&page=1
R
Ankush
Hi,
I am trying to setup emails for my domain. This tutorial is really helping me since I am a non technical person. I have set up my live account and I am getting a message ‘You need to prove ownership of this domain by creating a DNS record. Use the settings below’.
When contacted a person where I have hosted my site, he is saying that the settings displayed here are for CPANEL and my sited is on DreamHost. DreamHost has its own CPANEL and that doesn’t support entries like ‘Priority: 10 (or High priority)’ etc.
Can you please guide us to take this forward.
Thanks,
Ankush
WPBeginner Support
Ankush dreamhost does support A records and Max records. For records ask the person managing your account to go to Mail » Custom MX in Dreamhost Panel. As for A or TXT records go to Domains and then click on DNS.
Admin
Ria Parish
I don’t suppose you’d still be able to use this email for Google+ and YouTube account though, eh…. Better than nothing, I guess.
Thanks for the alternative!
princess
Hi I set up my domain via Godaddy.com..and I already have my live mail set up. My question is: When I tried replying to the email my replies bounces back. what could be the problem?
WPBeginner Support
seems like you have not correctly configured your site to use Outlook’s mail servers.
Admin
Verma
Hi- I did a setup of outlook.com with my domain. All seems to be working fine except i am not able to get emails from MS Outlook. If it is possible to access email via MS Outlook app please let me know.
Paul Jones
Great article thanks.
We run a mail server and batch import mail into a sql server database. Would it be viable/possible to switch our mx to outlook.com and forward all inbound and outbound email to our mail server so that we can still import mail into sql?
WPBeginner Support
Sounds doable. But make sure before you implement it.
Admin
Chris
Hi, I just created an outlook email admin account with my own domain name. i create 2 users. Will I be able to see the emails sent to the users I created? If so, how do I enable that feature? Thank you Great article by the way. Thanks.
sivakumar
Now showing it
You can create up to 50 accounts in your domain.
How to create 500 accounts
WPBeginner Support
Contact outlook support for more accounts.
Admin
david
If you want users to use mail.yourdomain.com to sign in for email address, then you can create a CNAME record in your domain’s custom DNS settings or in cpanel’s Simple DNS Editor. Enter Mail in the Name field, and enter subdomain in CNAME field, e.g. mail.example.com.
this is not well explained. Could you please…
WPBeginner Support
Using a subdomain will allow users to sign in to their accounts by typing in your domain name instead of outlook.com.
Admin
kaycee
please how can i create the sub domain
kaycee
If you want users to use mail.yourdomain.com to sign in for email address, then you can create a CNAME record in your domain’s custom DNS settings or in cpanel’s Simple DNS Editor. Enter Mail in the Name field, and enter subdomain in CNAME field, e.g. mail.example.com
…..Please can you provide a guide on how to create this? cos am using ipage and they said its not possible for me to have mail.businessname.com
thank you
Kelly
Hi, thanks for your tutorial.
So after a week of waiting for the service to become active it is now saying that “Your service is suspended. Please make the required DNS changes.” Can somebody please help?
Letitia
I’m having the same problem
Asad
Currently outlook allows 50 free Email addresses. If I need more Account then what is the procedure ?
WPBeginner Support
Contact outlook support and they will extend your user account limit.
Admin
Tihomir Valkanov
Very good article!!! It save me a lot of time Thank you!
phil
Hi I have a question, I bought my domain name off Godaddy, but I built the site and its being hosted by wix.com, I want to use my own domain with outlook so who do I update my mx and txt with godaddy or wix?
Hope to hear from you soon
Phil
WPBeginner Support
Go Daddy if your domain is controlled by GoDaddy.
Admin
Murali
Thank you. I also got good email service.
Lynn Jackson
Awesome post! Very user-friendly. This was almost effortless. I was up and running after about 10 minutes! Thanks.
JANARTHANAN
Hi Syed, as said earlier I’ve done setting of my domains mails on outlook.com. Let me know how to configure this on blackberry and iPhone devices.
Thanks – Janarthanan
tilak
I want to view my old mails from my previous employers where we were using Outlook server. I have those .pst data files in my external hard disk. But don’t know how to configure them in Outlook 2013. Could any one please help me on the step by step guide. thanks.
Haseeb Ahmad Ayazi
Guys the New UI of outlook is tooooo slow. While loading it makes my PC also slow. Outllook can compete Gmail but will loss badly only due to his loading speed.
Jon Adams
Check your computer. Due to the new Gmail compose debacle, I have been testing Outlook.com for the past few months in case Google makes the change permanent and mandatory. The only reason I don’t make the switch now is six years of company emails in twenty accounts. Not to mention everything that lives in Google Drive.
The Outlook UI is vastly superior to Gmail even without consideration of the new compose.
Kunal
I already have an email account on Google Apps, if I were to move to Outlook, what would happen to emails that I already have in my existing accounts on changing the MX record ? Do I have to transfer my emails from google apps to outlook?
quocnt
Thank you. I have successfully setup my professional email.
But can I go to mail.mydomain.com to check mail or must I go to outlook.com every time?
Ana
Hi,
I followed the steps and everything went fine. But when I started using the email, I can send emails, but not receive them. Any idea what can be the issues?
Thanks!
hunter
I have the exact same problem. help
JANARTHANAN
Hi Ana,
Have you got the solution, did your mail work fine on both send & receive ways!
If you got the solution pls let me know.
Thanks
Ankush
Hi Ana,
Did you get solution to your problem? Are you able to send/receive from your new email account. Please guide us as well.
Thanks,
Ankush
Leon
Hi! I finally finally got to the last part.. I had to login using my old @live.com account, I never saw the DNS options when trying to signup using just my domain name http://hempconnection.net
Anyways I was able to create an info@ email for my domain, but now where do I go to login? I tried mail.mydomain.net and I just see the last page I was on showing the emails I created, but not able to actually access my new email
Leon
Screw this, Outlook and Microsoft sucks… I’ve been trying for 3 hours.. this is freaking ridiculous
marco
Me too, I’ve been trying for 3 days using chrome, maybe I should try using I.E.
JANARTHANAN
Hi Syed,
I have my website already set up at windows live admin center and the emails are already in use by users.
But now i planned to migrating my domain from godaddy to a Blue Host (i came to know about the cheapest and best service of this host by reading your site), what should i do so the emails will not be deleted and users can continue using the same mails.
Pls give me clarification thru email or on you blog. It will be very helpful for me and all others.
Thanks in advance
Janarthanan
Editorial Staff
In your bluehost account setup the MX records. Then do the transfer, and it will work.
Admin
JANARTHANAN
Hi Buddy, Thanks for the info. But i’ve a doubt, before transfering a domain from Godaddy how can i setup MX records in Bluehost for the same domain. PLs explain as i was a newbie on this field.
Thanks
Editorial Staff
In the DNS settings in your Bluehost cPanel, you can specify MX records. Bluehost support will be able to help you with this.
JANARTHANAN
Hi Syed,
Thanks for your info, i followed your tuts, also as per your comment i get details from Blue Host too. Now i successfully transferred my domain. And all my emails associated to it (functions on outlook.com) work fine.
Thanks once again for your great tuts.
Janarthanan
Tuyen
Hi I set up my professional mail on outlook.com, it’s work fine for about a month but now when I send email to client it alway have hotmail_77425feceaf13aa1@live.com on behalf of my email, pls advise how to remove (hotmail_77425feceaf13aa1@live.com on behalf of my email)
hope to hear soon
all the best
WPBeginner Support
Please contact outlook support, they would be able to help you better.
Mohamed
Guys,
Be careful when trying to create a “professional” email account that uses your domain; particularly when using Microsoft Outlook/Live/Hotmail…. It will send your email to the recipient, on receipt of your email the recipient will see “hotmail [a random number]@live.com ON BEHALF OF yourname@yourdomain,com”. This is not professional at all. Its actually less embarrassing than using a regular free @hotmail.com.
O, and Microsoft has no plans to correct this! I’ve tried several forums and made multiple requests.
All the best.
Ed Fishman
This isn’t true as far as I can tell. I have a couple of domains that use Outlook.com and all of them send as the actual sender. No ‘On Behalf Of’ appears anywhere – either in From: or even hidden in the message headers.
Now that Google isn’t offering a free version of Google Apps, Outlook.com is still your best bet for setting up a free, non-pop, e-mail system that can use your own domain.
Ed
Verna
Are u sure about this, does yourname@yourdomain.com not appear in the recipient mail?
Glenn F
Thanks for posting this Mohamed. There is no way I plan on using this now.
Joshua Caluette
If you follow the directions and confirm that your DNS is configured properly and you are not sending your email through your live account as an alias of your professional domain, then this does not happen. I have mine setup and it works just fine. I have seen similar issues on Google Apps as well, but it is always due to mis-configuration.
Marco
I need a catch all alias to be sure to receive all the email adressess i used in the past…. How do i setup a catch-all with live domains? Can’t find it.
lmcpa
When switching from a paid hosted version with godaddy is there a way to save or move emails from the godaddy service to this free outlook.com setup?
Editorial Staff
Not entirely sure about that. Perhaps asking Godaddy would be best. Usually it is hard.
Admin
pishka
I have my website already set up at domains.live.com and the emails are already in use by users. Currently i’m migrating my domain to a new host, what should i do so the emails will not be have to be deleted and users can continue using the same mails?
If i add the mx records on the new host i can continue to use the mails on the same domains.live.com account I had?
Pls reply its important
Thanks
nick bacon
Hi, I am following the instructions but when i get to the screen that will give you a choice to either use an existing Microsoft account to administer this domain or create a new Microsoft account on your own domain name, e.g. yourname@yourdomain.com.
I do not get this option, it automatically goes to a regular live sign in page?
any tips?
Muhammad Tauseef
Thanks you so much buddy.
Your article resolve my biggest problem.
God Bless You
Vivie
Hi, is it possible to have more than one administrator for one domain?
Thanks
Julia
Hi,
Thanks much for the tutorial, and I’ve set up the service successfully. However, for some reason, the interface is the old version of hotmail, which is very ugly. In case you wonder what the old interface looks like, here it is http://4.bp.blogspot.com/-kDpSR53bY5U/UBnXmDiySfI/AAAAAAAAAlo/PwjJaZhdAFA/s1600/2-hotmail.jpg
Is this the interface everyone sees? How do I change it to the better interface?
Thanks.
Editorial Staff
They said they are slowly moving users over.
Admin
pishka
on the right side drop down click on upgrade to outlook or something similar
Lauren
Thank you! Outlook’s support is slooooow, you’ve helped me set up my email accounts, and in the comments above I learned that I could delete and recreate an email account.
Stephanie
Great tutorial!!!!!!! Worked like a charm. Using Joomla CMS though & Hostgator
Thank you so much! We were using the free <10 google apps accounts and have been looking for a replacement for awhile now.
Christine
Im being asked to verify my account. Outlook is sending the verification email to the same account Im trying to access. Do you know a way around that or if I can contact Outlook?
Christine
Also, can I just remove the domain email and just start over?
Editorial Staff
Yes you can do that.
Admin
Carlos Rivera
I followed the steps above and after clicking refresh Windows Live Admin Center says the service has been suspended. Any ideas how to get this corrected?
tony
Thank you! These instructions are much better than on the Live Admin site. Thank you, thank you!
Serge Conus
Thanks for the awesome post. Google apps for personal use was an amazing toolset, I have been forced to create forwarders to my personal gmail account which works ok for a small site, but an organization needs something bigger. I will check out outlook’s pro mail choice.
Rich C
Anyone know why I’d be getting this error message for any domain I’m entering in:
“This domain name can’t be used because it contains a protected word or inappropriate language. Please contact support if you feel this is not the case.”
Aamir Rizwan
I get the following error :
This domain name can’t be used because it contains a protected word or inappropriate language. Please contact support if you feel this is not the case.
Editorial Staff
Not sure why that is. We would suggest that you contact their support like the error ask you to do.
Admin
Héctor
I had the same thing! I searched in their forums and there were few people who had the same issue.
Bikash
I have a created email address in Microsoft using my domain and
How to Manage the user account in my admin panel in Microsoft account. Is there any option to reset the user password and read the user inbox mail for admin.
thanks
Bikash
Scott
My problem is this:
Step 2: Setting up DNS MX Records to use Outlook.com
After the registration, you will reach Windows Live Admin Center’s domain control page and it will be showing MX and TXT record strings which you need to add to your DNS settings.
After the registration, it did not take me to any such page.
Noumaan Yaqoob
@Scott: you can find those strings by going to Your domains click on YourDomain.com and then click on Domain Settings link in the left sidebar.
If that doesn’t work, check the email you provided during registration for an activation email.
Scott
OK. Now I was working with the support people on hostgator to try and figure out this tutorial between the two of us. The support person at hostgator showed me where to put all the codelines from the Windows Live Admin Center. Their chat support allowed him to tell me exactly where to copy and paste the lines of code, and where to paste them.
So…….On to step 3. According to your tutorial, The Windows Live Admin Center should say, “Your service is active” after 48 hours. I obligingly waited the 48 hours, logged in again, and it still was inactive, so I saw that the Windows support says it can take 72 hours. Now a week later I log in, and all it says is: “Your service is Suspended. Please make the required DNS changes.” I was never able to get the thing to the point where it says, “Your service is active.”
So, please kindly tell me what’s going on.
Rudy
When I click on mydomain.com in the YourDomains area, I’m just brought back to the YourDomains area again. It doesn’t go to a page that gives me the settings, etc.
Ed Nailor
Syed,
This is a great article and one work really investigating. I was disappointed to see Google do away with the free version of their Google Apps for Business. I had not yet really looked into Outlook.com, but will certainly have to try this out so I can best recommend options to my clients. Thanks for bringing this to light!
Ed
Damien Carbery
I take a simpler method – just set up a forwarder in the hosting control panel. In my client’s existing free email account (Yahoo/Gmail/Hotmail) I add the new account I want to send email as. This sends a verification email which, due to the forwarder, arrives in the existing inbox.
An advantage of Yahoo/Gmail/Hotmail is that they are built in account types in iOS. You can select the From address on your iOS device. I will admit that you are not using your hosting company email servers.
Editorial Staff
That is one way of doing it, and we have already shown that method a long time ago. Sometimes, when using that it ends up revealing your “real email” that you were sending it from. Even though you can mask it so it can be sent from yourname@domain.com, it will show sent from you@gmail.com
Admin
Carlos Acha
Hello,
I have tried to follow these steps but there is no Get Started button anywhere, I do get a Login button but it only sends me to Live Login Page. The address I am visiting is: domains.live.com
Any help I will appreciate.
Best regards,
Carlos
Noumaan Yaqoob
@Carlos: It is right above the sign in button. You can also click here to get started.
Noumaan Yaqoob
@Haseeb Ahmad Ayazi : Outlook allows you to create up to 500 accounts on one domain name. However, if you reach that limit and you need more free email accounts on your domain then you can contact support to extend your free accounts limit.
@Raheem Khan: I would recommend that you stick with Google Apps and try outlook.com separately by creating a yourname@outlook.com account. That way you can decide which one you like better.
Haseeb Ahmad Ayazi
You! There must be a comparison. How much accounts are allowed in free version?
Raheem Khan
Now there should be a compartision between Google Apps and Outlook Professional Emails. And do tell us which one is better. Currently I’m using Google apps.