
L’aggiunta di un modulo di contatto al vostro sito WordPress è fondamentale per una comunicazione efficace con i vostri visitatori. Ad esempio, un modulo di contatto può consentire ai clienti di rivolgersi a voi con domande o feedback sui vostri prodotti e servizi.
Tuttavia, WordPress non dispone di uno strumento integrato per i moduli di contatto, il che può essere frustrante se non si ha familiarità con la codifica.
Fortunatamente, esiste un modo semplice per aggiungere moduli di contatto senza alcuna competenza tecnica. Con gli strumenti giusti, potete creare facilmente un modulo adatto alle esigenze del vostro sito web. In questo modo si risolve il problema della condivisione manuale dell’e-mail, che può portare a spam e a mancate richieste di informazioni.
Dopo aver cercato tra gli strumenti più diffusi, abbiamo scoperto che la creazione di un modulo di contatto con WPForms è l’approccio più semplice. In questa guida vi guideremo attraverso ogni passo, assicurandovi di impostare rapidamente un modulo di contatto funzionale e attraente.
")
Perché avete bisogno di un modulo di contatto WordPress?
Potreste chiedervi perché avete bisogno di un modulo di contatto; non posso semplicemente aggiungere il mio indirizzo e-mail sul mio sito web in modo che le persone possano inviarmi un’e-mail?
È una domanda molto comune per i principianti, che temono che l’aggiunta di un modulo di contatto richieda conoscenze di codifica.
Fortunatamente, è possibile utilizzare un plugin di WordPress per aggiungere semplicemente un modulo di contatto al vostro sito web WordPress senza alcuna conoscenza di codifica.
Ecco i 3 motivi principali per cui un modulo di contatto è meglio che incollare l’indirizzo e-mail in una pagina.
- Protezione antispam – I bot antispam scansionano regolarmente i siti web alla ricerca del tag mailto: indirizzo e-mail. Quando pubblicate il vostro indirizzo e-mail sul sito web, inizierete a ricevere molte e-mail di spam. D’altra parte, il vostro modulo di contatto può bloccare lo spam del modulo di contatto e bloccare quasi tutte le e-mail di spam.
- Informazioni coerenti – Quando si invia un’e-mail, non sempre si inviano tutte le informazioni necessarie. Con un modulo di contatto, potete dire all’utente esattamente quali informazioni volete, come il numero di telefono, il budget, i dettagli del progetto e altro ancora.
- Risparmio di tempo – I moduli di contatto aiutano a risparmiare tempo in più modi di quanto si possa immaginare. Oltre a fornire informazioni coerenti, è possibile utilizzare le conferme dei moduli per indicare all’utente i passi successivi da compiere. Ad esempio, è possibile guardare un video o aspettare fino a 24 ore per ottenere una risposta, in modo che l’utente non invii più richieste.
Per questo motivo, vi mostreremo passo dopo passo come creare facilmente un modulo di contatto in WordPress. Ecco tutti i passaggi che seguiremo in questa guida:
- Step 1. Choosing the Best WordPress Contact Form Plugin
- Step 2. Install a Contact Form Plugin on WordPress
- Step 3. Create a Contact Form in WordPress
- Step 4. Configuring WordPress Form Notification and Confirmations
- Step 5. Adding WordPress Contact Form on a Page
- Step 6. Adding WordPress Contact Form in a Sidebar
- Bonus Tip: Taking Your WordPress Contact Form to the Next Level
- Video Tutorial
Facciamo un salto nel buio!
Passo 1. Scegliere il miglior plugin per il modulo di contatto di WordPress
La prima cosa da fare è scegliere un plugin per il modulo di contatto di WordPress.
Sebbene esistano diversi plugin gratuiti e a pagamento per i moduli di contatto di WordPress, noi utilizziamo WPForms sul nostro sito e riteniamo che sia l’opzione migliore sul mercato.
Ecco i tre motivi per cui riteniamo che WPForms sia il migliore:
- È il plugin per moduli di contatto più facile da usare per i principianti. È possibile utilizzare il costruttore drag-and-drop per creare facilmente un modulo di contatto in pochi clic.
- WPForms Lite è gratuito al 100% e può essere utilizzato per creare un semplice modulo di contatto (oltre 6 milioni di siti lo utilizzano).
- Quando sarete pronti per funzioni più potenti, potrete passare a WPForms Pro.
Per saperne di più, potete consultare la nostra recensione dettagliata di WPForms.
Ora che abbiamo scelto il plugin per il modulo di contatto, andiamo avanti e installiamolo sul sito.
Passo 2. Installare un plugin per il modulo di contatto su WordPress
Per questo tutorial, utilizzeremo WPForms Lite perché è gratuito e facile da usare.
È possibile installare questo plugin sul proprio sito accedendo alla dashboard di WordPress e andando su Plugin ” Aggiungi nuovo“.
Quindi, nel campo di ricerca, digitate “WPForms” e fate clic sul pulsante “Installa ora”.
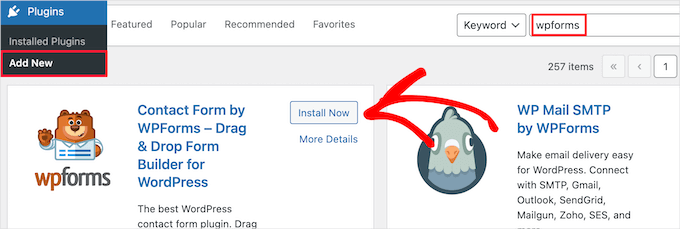
Questo installerà automaticamente il plugin sul vostro sito.
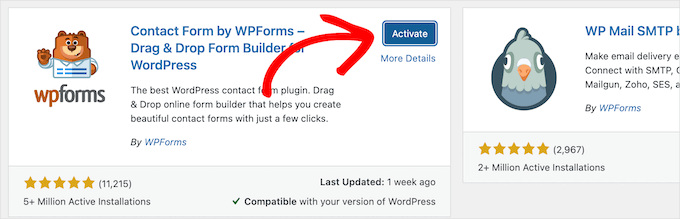
Successivamente, è necessario attivare il plugin facendo clic sul pulsante “Attiva”.
Se non vedete il menu dei plugin o volete istruzioni più dettagliate, potete consultare la nostra guida su come installare un plugin di WordPress.
Passo 3. Creare un modulo di contatto in WordPress
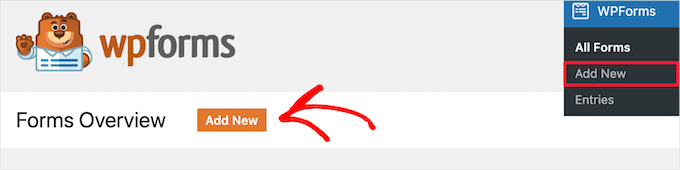
Ora che avete attivato WPForms, siete pronti a creare un modulo di contatto in WordPress.
Per farlo, andate su WPForms ” Tutti i moduli nel pannello di amministrazione di WordPress e fate clic sul pulsante “Aggiungi nuovo”.
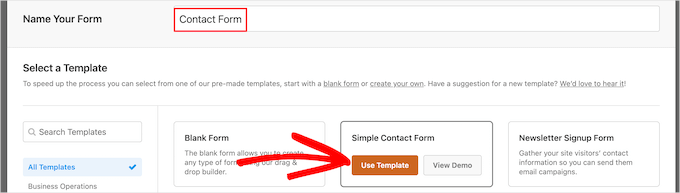
In questo modo si aprirà la libreria dei modelli del costruttore di moduli di WPForms. Iniziate dando un nome al vostro modulo di contatto e poi selezionate il modello di modulo di contatto.
Per scegliere un modello, basta passarci sopra e fare clic sul pulsante “Usa modello”.
WPForms Lite è dotato di oltre 20 modelli di moduli gratuiti tra cui scegliere. È possibile utilizzarli per creare qualsiasi tipo di modulo di contatto.
Per questo esempio, selezioneremo il modello “Modulo di contatto semplice”. Verranno aggiunti automaticamente i campi Nome, Email e Messaggio.
È possibile fare clic su qualsiasi campo del modulo per modificarlo.
Quando si fa clic su un campo del modulo, viene visualizzato il pannello “Opzioni del campo” sulla sinistra, dove è possibile apportare modifiche.
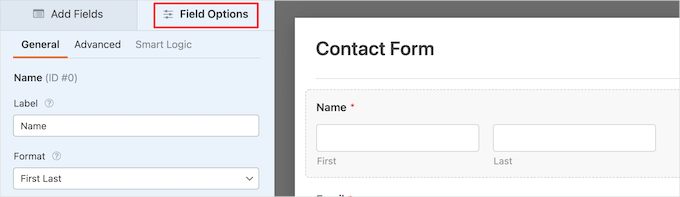
È anche possibile trascinare i campi con il mouse per modificarne l’ordine.
Ecco un esempio:

Se si desidera aggiungere un nuovo campo, è sufficiente selezionarlo tra quelli disponibili nella barra laterale di sinistra.
È possibile trascinarlo sul modulo o fare clic su di esso e verrà aggiunto automaticamente al modulo.

Una volta terminata la personalizzazione del modulo, è necessario fare clic sul pulsante “Salva”.
Passo 4. Configurazione delle notifiche e delle conferme del modulo WordPress
Dopo aver creato il modulo di contatto, è importante configurare correttamente le opzioni di notifica e di conferma del modulo.
La conferma del modulo è ciò che il visitatore del sito web vede dopo l’invio del modulo. Può essere un semplice messaggio di ringraziamento, una pagina in cui avete caricato dei PDF scaricabili o qualsiasi altra cosa desideriate.
La notifica del modulo è l’e-mail che si riceve dopo che qualcuno ha inviato il modulo di contatto sul vostro blog WordPress.
Per personalizzare il messaggio di conferma, facciamo clic sulla scheda “Impostazioni” e poi sulla scheda “Conferme” all’interno del costruttore di moduli.
Esiste già un messaggio di ringraziamento predefinito.
Tuttavia, se lo si desidera, è possibile personalizzarlo nella casella “Messaggio di conferma”.

Se si desidera reindirizzare gli utenti dopo l’invio di un modulo con successo, invece di mostrare un messaggio, selezionare “Vai all’URL” dal menu a discesa “Tipo di conferma”.
Quindi, si inserisce l’URL a cui si desidera reindirizzare gli utenti.

Se si apportano modifiche, fare clic sul pulsante “Salva”.
Dopodiché, si può verificare che le impostazioni di notifica del modulo siano corrette. È sufficiente fare clic sulla scheda “Notifiche” dallo stesso menu “Impostazioni”.
La cosa migliore di WPForms è che le impostazioni predefinite sono ideali per i principianti. Quando si accede alle impostazioni di notifica, tutti i campi vengono precompilati dinamicamente.

Le notifiche, per impostazione predefinita, vengono inviate all’e-mail di amministrazione impostata al momento della creazione del sito.
Se si desidera inviare la notifica a un indirizzo e-mail personalizzato, è possibile modificarlo. Se si desidera inviare la notifica a più e-mail, è sufficiente separare ogni indirizzo e-mail con una virgola.
L'”Oggetto dell’e-mail” è precompilato con il nome del modulo. Il campo “Da” è popolato automaticamente con il nome dell’utente.

Quando si risponde alla richiesta del modulo, la risposta viene inviata all’indirizzo e-mail utilizzato dall’utente per compilare il modulo di contatto.
Non dimenticate di fare clic sul pulsante “Salva” se apportate delle modifiche.
Se volete inviare l’e-mail del modulo a più persone o a diversi reparti, potete consultare la nostra guida su come creare un modulo di contatto con più destinatari.
Se avete problemi a ricevere le e-mail dei moduli, potete consultare la nostra guida su come risolvere i problemi di WordPress che non inviano e-mail.
Passo 5. Aggiunta del modulo di contatto di WordPress a una pagina
Ora che avete configurato il modulo di contatto di WordPress, è il momento di aggiungerlo a una pagina.
È possibile aggiungerla a una pagina di contatto esistente o creare una nuova pagina in WordPress.
Per creare una nuova pagina di modulo di contatto, basta andare su Pagine ” Aggiungi nuovo e dare un nome alla pagina.
Utilizzeremo il blocco WPForms per aggiungere il modulo in una pagina. È sufficiente fare clic sul pulsante “Più” per aggiungere un blocco e cercare “WPForms”.
Poi, si può fare clic sul blocco ‘WPForms’.
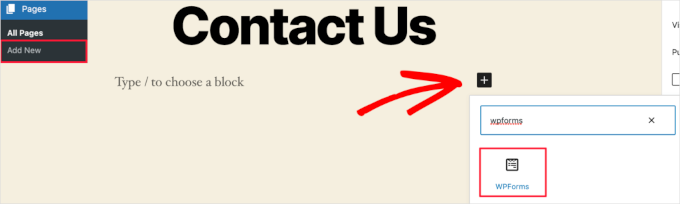
Il blocco WPForms apparirà ora nell’area del contenuto della pagina.
È necessario fare clic sul menu a discesa per selezionare il modulo creato in precedenza.

WPForms caricherà l’anteprima del modulo di contatto nell’editor. Ora è possibile fare clic sul pulsante “Pubblica” o “Aggiorna” per salvare il modulo.
Per maggiori dettagli, vi invitiamo a consultare la nostra guida su come incorporare i moduli in WordPress.
Ora potete visitare il vostro sito web per vederlo in azione. Ecco come si presenta il modulo in un esempio di pagina di contatto di WordPress:

Se si vuole aggiungere solo il modulo di contatto alla pagina, il gioco è fatto. Congratulazioni.
Detto questo, WPForms dispone anche di uno shortcode per i moduli di contatto di WordPress. È possibile utilizzarlo visitando WPForms ” Tutti i moduli e copiando lo shortcode accanto al modulo.

Quindi, tutto ciò che dovete fare è aprire la pagina in cui volete aggiungerlo e fare clic sul pulsante “Più” per aggiungere il blocco e cercare “Shortcode”.
Quindi, facciamo clic sul blocco ‘Shortcode’.

Quindi, incollare nella casella lo shortcode copiato in precedenza.
Dopodiché, potete fare clic su “Aggiorna” o “Pubblica” e il modulo di contatto sarà attivo sul vostro sito web, proprio come sopra.

Per saperne di più sugli shortcode, consultate la nostra guida definitiva su come aggiungere uno shortcode in WordPress.
Passo 6. Aggiunta del modulo di contatto di WordPress in una barra laterale
WPForms è dotato anche di un widget per il modulo di contatto di WordPress che potete utilizzare per aggiungere il vostro modulo di contatto a una barra laterale o a qualsiasi altra area predisposta per widget nel vostro tema WordPress.
Per farlo, è necessario andare su Aspetto ” Widget e poi fare clic sull’icona ‘Più’ per aggiungere il blocco nell’area del widget che si desidera aggiungere al modulo.

Poi cerchiamo “WPForms”.
Poi, si può cliccare sul blocco ‘WPForms’ per aggiungerlo alla barra laterale.

Successivamente, è necessario selezionare il modulo di contatto dal menu a tendina.
In questo modo si caricherà automaticamente un’anteprima del modulo.

Quindi, fare clic sul pulsante “Aggiorna” per salvare le modifiche.
Ora è possibile visitare il sito per vedere il modulo di contatto nella barra laterale o in un’altra area widget.

Per saperne di più sui widget, consultate la nostra guida su come aggiungere e utilizzare i widget in WordPress.
Suggerimento bonus: Portare il modulo di contatto di WordPress al livello successivo
Oltre a creare semplici moduli di contatto, WPForms Pro è dotato di oltre 2.000 modelli di moduli preconfezionati che potete utilizzare per creare rapidamente qualsiasi tipo di modulo WordPress di cui abbiate bisogno.
Ci sono funzioni potenti come la logica condizionale, i sondaggi, la raccolta di firme elettroniche, l’abbandono dei moduli, i dati di geolocalizzazione, i codici coupon personalizzabili e molto altro ancora.
Inoltre, consente di accettare facilmente pagamenti online tramite Stripe, PayPal, Authorize.net e Square. Anche la versione gratuita di WPForms consente di raccogliere pagamenti tramite Stripe.
Inoltre, si integra con migliaia di strumenti di marketing e aziendali come Google Sheets, HubSpot e altri ancora, per aiutarvi a ottimizzare il flusso di lavoro.
WPForms ha anche aggiunto strumenti di personalizzazione dei moduli, come landing page, moduli conversazionali, moduli per i contatti e moduli di calcolo, che consentono di aggiungere moduli interattivi al sito senza costi elevati.

Per ulteriori suggerimenti, potete dare un’occhiata alla nostra guida su come creare moduli più interattivi in WordPress.
Avete riscontrato errori nel modulo di contatto? Lasciate che WPBeginner Pro Services li corregga! Offriamo un’assistenza WordPress di emergenza a prezzi accessibili per risolvere rapidamente i problemi e correggere gli errori dei moduli di contatto. Salvate il tempo, ottenete la massima tranquillità e assicuratevi che i vostri clienti possano raggiungervi. Programmate oggi stesso i servizi di assistenza WordPress!
Video tutorial
Se imparate guardando, vi piacerà il nostro video tutorial:
Speriamo che questo articolo vi abbia aiutato a creare un semplice modulo di contatto in WordPress. Potreste anche voler consultare le nostre scelte degli esperti sui migliori costruttori di moduli online o la nostra guida definitiva all’uso dei moduli di WordPress.
Se questo articolo vi è piaciuto, iscrivetevi al nostro canale YouTube per le esercitazioni video su WordPress. Potete trovarci anche su Twitter e Facebook.


 in 2024")

Shamli
Hi, I’ve done all the steps as mentioned above, but I cannot see the Contact page when I preview.
Please help me to solve.
Thank you.
WPBeginner Support
Hi Shamli,
You need to edit the page, insert the form, and then click on the preview button. Your contact form will only appear on the page where you insert the form.
Admin
Brenda
HI – We are using this contact form and it’s fine but I would like to add Captcha and, more importantly, some text that can be overwritten in the message box. There is a local company with a very similar name so we are constantly receiving messages which relate to this other company. We want to have some text, that has to be overwritten, to reiterate what our company is to try and reduce these messages. Is this possible?
Brenda Donovan
I redid the form and rechecked the add recaptcha on the confirmation settings and it worked this time. I had done it before but somehow didn’t take.
now on to the mail problem. thanks
safi
sir how can i know which email system notify or receive message i did everything but don,t which i will receive the email from client i am beginner with wp
WPBeginner Support
Hi Safi,
Please see how to fix WordPress not sending emails issue
Admin
Yamin Kamboh
Thank you, was really helpful.
Sarah Zubair
So how do I access the library of media (if I’ve an option of attaching some files in my WP forms) then where do they all get stored?
WPBeginner Support
Hi Sarah,
By default, the user-uploaded files are stored in the WPForms folder inside the Uploads directory of your site.
If you’d prefer to upload the files to the WordPress Media Library, click on the File Upload field in the form builder. Then, under Advanced Options, check the box next to Store file in WordPress Media Library.
For more details see this guide.
Admin
marypeter
This is truly helpful. I can say it is my first time to leave a review in any website. The information you have provided has prompted me to do this. Thank you a thousand times!!
Eston
Hi
how do i set it up that i recieve emails in Gmail, and be able to reply to customers right there in Gmail.com?
WPBeginner Support
Hi Eston,
You can go to settings section of any form and click on the confirmation tab. From here you can add any email address where you want to be notified.
Admin
Cathy
I found this very helpful in setting up, however, after completion I ran a test, so did a friend of mine, I cannot figure out why we are not receiving the email tests sent from the web site? Although I’ve gone through the steps a second time to be sure all was correctly set up, I am not receiving messages from the web site, I hope you can assist with constructive suggestions to aid in problem solving, much appreciate the assistance…
Lori Jo
I am very new, easily confused! Regarding the assigned admin email address in my WP blog site, can that actually be used to receive messages from the contact form? I think the address looks more professional and it would be nice to have all site messages responding back to the actual site instead of an outside email like my Gmail. I did a test and I could not find the reply, installed Flamingo and I did see it but there is no reply option like regular email.
Please let me know, thanks!
Ron Isaac
Thanks, this was a great help to me!
Yoshi
I’m looking to build my own contact form plugin because the contact forms in the market I’ve tried slow down my site. Is this the best alternative?
Srinivas Goud
What is the easiest way to add products in wp
Shirley
Thank you so much! Your help saved my hours of banging my head against the wall.
Eslam Tolba
Hi,
Is there a way to add onClick code for the submit button for WpForms lite?
Thanks
gigi
hi, i have key in my email address in the notification but i’m yet to get any notification from my email even though i have done few testing.. how do i solve this matter? please guide, thanks
Al Kadam
I have contact form plugin installed but customization is very limited and the code is too long and complicated. Now I plan to copy a simpler .php code and install it myself. is it better to do it this way? is there security issue accessing the .php file from the page where the contact form is placed?
Ashley
Hi, I have tried several different forms and this keeps happening. Whenever I go to the contact page, under the title it says “>contact”. I can remove the word “contact” by removing the page title, but that little carrot ( > ) is still there. how do I get rid of that? Thanks.
Joe Tittiger
The mail does not arrive from this form.
Is there a video on how WP handles email so that I can fix this?
Keith
Thanks guys, a real easy process that let me set up my first contact form in like 10 minutes; tested and works
Dave
Hello. I’ve had wpforms set up for a couple weeks and have tried to send to it from two other email accounts, from two separate login locations….but I’ve yet to receive an email to my admin email account. Please help.
WPBeginner Support
Hi Dave,
Please take a look at our guide on how to fix WordPress not sending email issue. If that doesn’t help, then please contact WPForms support and they’ll be able to help you fix it.
Admin
olx
Hello
i tried inserting form after creating it but on the add page the form did not insert. my wordpress seems to be limited and cant add and form. please help
pratima Shrivastav
Hi,
I have created the Wp form as mentioned but when I test it out I am receiving any email notifications. i have turned on the notifications by clicking on email Notification section of the form. Am I missing any other settings? Please guide me to this
WPBeginner Support
Hi Pratima,
Please see our article on fixing WordPress not sending email issue.
Admin
Yvonne
I have set up the form, just like it was explained, but it isn’t showing up on the page I told to add the form.
Rodrigo
Hello, is it possible to use html / css in forms construction?
WPBeginner Support
Hi Rodrigo,
Yes, you can add HTML and custom CSS with WPForms.
Admin
david
Can I export this contact form to an Excel file?
Rebecca Yurkanin
WP forms is super easy to set up, but DOES NOT work. I tried several times to send an email to myself. It worked once! The other 20 times did not. I went back and tried to change things around. It still did nothing. I am familiar with shortcodes, so that wasn’t the problem. And never saw a recaptcha. And wpforms doesn’t even have a contact form to fill out so I can contact them! What a joke!
WPBeginner Support
Hi Rebecca,
To fix the email issue, please take a look at our guide on how to fix WordPress not sending email issue.
If you are using the free version of the plugin, then you can ask for support on the plugin’s support page on WordPress.org. If you are using the paid version of the plugin then you can contact support on plugin’s website.
Hope this helps.
Admin
Brenda
My blog isn’t even launched yet. I have a Coming Soon Page. I have been working on getting a Contact Form to appear for what seems like hours. I had added a new Contact Page on my menu. I saved the code on my Contact Page. Published. And, The Contact Form is not showing up when I live preview Contact on my primary menu. I’m following your tutorial. This seems so easy, and yet…not so much! Does this work with Genesis child? I’ve tried WPForms and Contact Form. I don’t know what I’m doing wrong. Since I’m a newbie, I’m having trouble with menu + page connection and menu category drop downs. This blog setup is more difficult than I thought. Any advice?
zelda zerafa
When I go on SETTINGS it looks different to your video.
I get 3 tabs : General, Integrations and System Info as follows:
General > Form Styling/ Email/Re Captcha/Validations
Integrations > Integrate Constant Contact with WP forms
System info
I have no idea what to fill in for Validations and Email.
Under validations there are also two mysterious fields : Number and Confirm Value
Please help!
WPBeginner Support
Hey Zelda,
The screen you are viewing is for the plugin settings. Click on WPForms » All Forms and then edit a form or go to WPForms » Add New to launch the WPForms’ form builder interface. There you will see a screen like the screenshot above with a Settings tab. These settings are specific to the form you are creating.
Admin
MAINUDDIN
When i instal wpforms another page not working only wpforms page is showing
WPBeginner Support
Hi,
Can you please share the link of your website? You can also contact WPForms support.
Admin
Maciej
Hi,
Is it possible to add a simple text to the form like: “The file must be max 2mb”?
Saumya
Please help me to resolve the issue of email,i am not getting e-mail notification.
Myri
Is this setup (Form plugin) recommended for creating a form with ~500 entries per month where users upload images + complete payments. Eg. Now I am using contact form 7 plus cc7 paypal addon to create a “submit your images + pay” type form. Is this sustainable or is it better to use a professional form builder service?
Catherine O
Thanks for this. Easy to follow!
Dock
excellent blog, very rich in content and correctly thought out, personally I found
here much interesting and useful…..Well! let know my friend as well.
Heather Pooley
I followed this tutorial and I got the contact form working. But when I tried to send a test email through it to my blog email address from my personal one, it didn’t get to me. Any advice on how I can fix this?
WPBeginner Support
Hi Heather,
Please see our guide on how to fix WordPress not sending email issue.
Admin
Prats
Unable to add contact form as sidebar. Already created form using WPforms, added to WordPress widgets (Appearance-widgets) but unable to see the form on page (But getting the title form the form on the sidebar widget area). Tried several times, so frustrated, Can you help ?
FYI, I am using live composure and beaver page builder to design page.
Thanks in advance
WPBeginner Support
Hi,
Try adding a form to a post or page to see if it appears correctly there.
Admin
Kathy Broyles
Hi! created the form and linked the page – works great! but… when i do a test and hit submit, I get this:
how do I fix that?
thanks,
Kathy
Kathy Broyles
think I’ve got it!
WPBeginner Support
Hi Kathy,
You are seeing this error because you have set an invalid email as the from email address in your form settings. You can fix it by adding a valid email address.
Admin
Calli Jacobs
Hello,
For some reason, the shortcode doesn’t work, and the “add form” button doesn’t, either. It just gives me the shortcode in both “text” and “visual.” What am I doing wrong?
Asking you because I used the suggested plugin.
WPBeginner Support
Try to deactivate all other WordPress plugins on your site and then test. If it works, then probably a plugin on your site is causing the conflict.
Admin
Roxanne
Thank you, this was super helpful!
Joe Andrews
How long does it take for the wpforms contact me plugin to work? I set it up on my wordpress site and the submit appears to work and the reply message appeared as expected. I have tested it 3 times (now an hour later on the last one) and have yet to receive any of the notices. I tried it first to the admin, and then changed it to my regular email. 0-3 have been received. I have checked the spam folder.
WPBeginner Support
Hi Joe,
If you are using the PRO version of WPForms, then you can go to WPForms » Entries to confirm that the message you submitted using contact form was actually submitted.
In most cases it is the problem with how your WordPress hosting provider handles emails generated from WordPress. Please take a look at our guide on how to fix WordPress not sending email issue.
Admin
Ediwin
Thanks for sharing.
stephen thomas
how do I use the same form but know what page it has come from automatically. I want to design a simple form and have custom made a few for every page I place it on. I’d rather it just emailed me and somewhere tells me ‘came from contact us page’ or ‘enquiry came from price list page’
Kevin
Hello thanks for the post. Is there away to change the font color? The font is black and our web page, thus you can’t see the words.
Thanks
WPBeginner Support
Hi Kevin,
Please see this guide to learn how to change colors and style your form.
Admin
The Mayflower
This is awesome information. Thank you so so much.
Neil Hanes
I’m brand new to blogging and this guide is fantastic! Thank you. I have a couple of follow up queries:
– If I fill in a custom email address, can I respond to the inquiry through my website? If so, how?
– Is there any way to change the font of the form to be more in line with my website theme? I’m thinking maybe I just want to unbold the title and field headings.
Thanks
Neil
WPBeginner Support
You can respond to emails using an email service. Yes you can use custom CSS to adjust fonts and styles.
Admin
Alicia
After building up the contact form, (yes, i did add the email address for notification) do not receive any notification. I had trouble with Contact Form 7 so I am now trying WPForms and it shows the same problem! How to make WPForms work? Thx.
WPBeginner Support
Please see our guide on how to fix WordPress not sending email issue.
Admin
Saher
From:domain name [mailto:info@domain name]
Sent: Sunday, May 15, 2016 4:53 AM
To: info@domain name
Subject: Contact from domain name
Name : XYZ
Email :]xyz@gmail.com
Message :This is testing email
Hi ,
when I used short code of contact form & send testing email to check I got email with 1st paragraph . I don’t need this info can you help how can I stop it ?
WPBeginner Support
We are not sure we understand your question. The first part is added by your email client. It shows you where this email message is coming from.
Admin
Harsha
I installed. I filled info in the form to test it and clicked “sumbit”. It said “Thank you, will be in touch with you” And nowhere it appeared in the mail. Where to see that info???
WPBeginner Support
Please see Step 4: Configuring Form Notification and Confirmations in the article. By default the plugin will send email to the admin address provided in WordPress settings, you can add more email addresses in the notifications.
If you still don’t receive email, then please take a look at our guide on how to fix WordPress not sending email issue.
Admin
Harsha
I have set up email using go daddy C panel. Is it same for WordPress also? Or Do I have to setup a different admin email id in WordPress? Please guide me.
However I have included all email ids in the notification settings separated by commas (Cpannel id & personal gmail id)
But nowhere I received any mail regarding the info I filled in the contact form for testing purpose.
Also, I went through the link “how to fix WordPress not sending email issue” and installed Gmail SMTP it didn’t work either. I tried troubleshooting by configuring port with 587 (with TLS encryption), 465 (with SSL encryption). 25 with TLS first and then SSL. Nothing worked.
Lesley Jackson
Hi,
This all looks very useful but when I want to use some of this I can’t seem to find it on my admin site. I wanted to create a contact form but can’t find any way to add a new plug in. Are these tips and suggestions just for people who have a self hosted WordPress blog?
WPBeginner Support
Yes, these are just for people using self hosted WordPress blog. Please see our guide on the difference between self hosted WordPress.org vs free WordPress.com blog.
Admin
jo dewberry
Thank you so much. I am new to blogging and your step by step information was easy to understand and I installed my Contact plug in first time.
WPBeginner Support
Glad you found it helpful.
Admin
Jayne Bodell
Thanks for the information. I installed the form, easy peasy.