Vous envisagez de transférer votre site WordPress chez un nouvel hébergeur ou sur un autre serveur ? C’est une décision importante, et il est compréhensible que vous soyez préoccupé par la perte potentielle de données et les temps d’arrêt.
D’après notre expérience, ce sont certainement les plus grands risques lors d’un changement d’hébergement web ou de la migration d’un site. Cependant, vous pouvez passer en toute sécurité à un nouvel hébergeur ou à un nouveau serveur sans compromettre l’expérience de l’utilisateur ou le temps de disponibilité.
En fait, nous avons fait passer le site WPBeginner de HostGator à SiteGround en 2020. Ainsi, nous avons réussi à naviguer dans ce processus nous-mêmes sans impact négatif sur nos lecteurs.
Dans ce tutoriel étape par étape, nous vous montrerons comment migrer en toute sécurité votre site WordPress vers un nouvel hébergeur sans aucun temps d’arrêt. Nous répondrons également aux questions les plus fréquemment posées sur le transfert d’un site WordPress vers un nouvel hébergeur.
Important : Avant de commencer, nous voulons que vous sachiez que beaucoup d’entreprises d’hébergement WordPress offrent un service de migration gratuit. Il se peut qu’il ne soit pas répertorié sur leur site, donc tout ce que vous avez à faire est de demander. En général, c’est gratuit, mais certains peuvent facturer une petite somme.
Ceci étant dit, voyons les étapes que nous allons couvrir pour déplacer WordPress vers un nouveau serveur d’hébergement (sans aucun temps d’arrêt) :
Vous êtes prêts ? Premiers pas.
Étape par étape : Choisissez votre nouvel hébergeur WordPress
Si vous êtes épinglé par un hébergeur lent même après avoir optimisé la vitesse et les performances de WordPress, alors il est temps de déplacer votre site WordPress vers un nouvel hébergeur capable de gérer votre trafic croissant.
Lorsque vous cherchez un nouveau fournisseur d’hébergement WordPress, il est important de faire un choix judicieux afin de ne pas avoir à déménager de sitôt.
Voici ceux que nous recommandons :
- Pour un hébergement mutualisé fiable, nous recommandons Bluehost. Ils sont officiellement recommandés par WordPress.org. En utilisant notre coupon Bluehost, les utilisateurs de WPBeginner obtiennent jusqu’à 75% de réduction et un nom de domaine gratuit.
- Pour un hébergement mutualisé plus rapide, nous vous recommandons Hostinger. Ils font partie des meilleures entreprises d’hébergement WordPress et offrent des serveurs plus rapides avec un support client/cliente exceptionnel.
- Si vous êtes à la recherche d’un hébergement cloud ou de fournisseurs Emplacement, nous vous recommandons de consulter SiteGround. Ils disposent de centres de données sur trois continents différents.
- Si vous êtes à la recherche d’un hébergeur WordPress infogéré, nous vous recommandons de consulter WP Engine. C’est le meilleur fournisseur et le plus connu du secteur.
Après avoir acheté votre nouvel hébergeur, n’installez PAS WordPress. Nous le ferons dans une étape ultérieurement.
Pour l’instant, votre nouveau compte d’hébergeur doit être vide, sans fichiers ni dossiers dans votre répertoire principal.
Étape par 2 : Configurer Duplicator pour faciliter la migration
La première chose à faire est d’installer et d’activer l’extension Duplicator sur le site que vous souhaitez déplacer. Pour plus de détails, consultez notre guide étape par étape sur l’installation d’une extension WordPress.
Duplicator est la meilleure extension de migration WordPress sur le marché. Il est également livré avec des sauvegardes planifiées automatisées, un support de stockage dans le cloud, une restauration en clic et des migrations intelligentes.
Remarque : Duplicator dispose également d’une version gratuite appelée Duplicator Lite. Elle peut être utilisée pour déplacer votre site, mais ses fonctionnalités sont limitées par rapport à la version pro.
Une fois que vous avez installé et activé Duplicator, rendez-vous sur la page Duplicator ” Sauvegardes dans votre zone d’administration WordPress.
Ensuite, vous devez cliquer sur le bouton “Ajouter une nouvelle” dans le coin supérieur gauche.
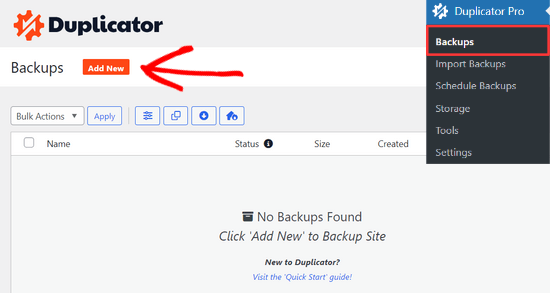
L’assistant de sauvegarde du Duplicator est alors lancé.
Dans l’écran suivant, vous pouvez saisir un nom pour votre expéditeur ou utiliser les identifiants dynamiques pour créer automatiquement un format de nom, comme la date et le titre de votre site.

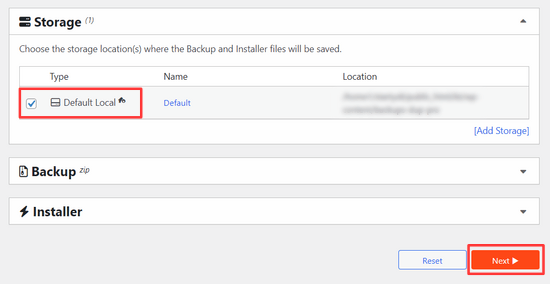
Ensuite, vous pouvez développer la section ” Stockage ” pour sélectionner un emplacement de stockage. Pour ce tutoriel, nous utiliserons l’emplacement par défaut, mais vous pouvez ajouter un nouvel emplacement comme Dropbox ou Google Drive en cliquant sur le lien ” Ajouter un stockage “.
Cliquez simplement sur le bouton “Suivant” pour continuer.
Ensuite, Duplicator analyse votre système pour s’assurer que tout est en ordre afin de préparer le paquet.
Assurez-vous que les résultats de l’analyse sont corrects (tout doit être “bon”), puis cliquez sur le bouton “Créer une sauvegarde”.
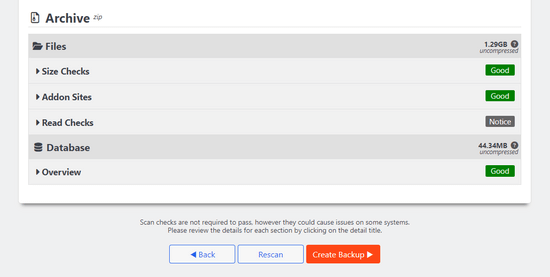
Le processus peut prendre plusieurs minutes avant d’être terminé, laissez donc l’onglet ouvert pendant que l’extension fait son travail.
Une fois le processus terminé, vous verrez des options de téléchargement pour le programme d’installation et le paquet d’archives. Vous devez cliquer sur le bouton “Télécharger” et sélectionner l’option “Les deux fichiers”.
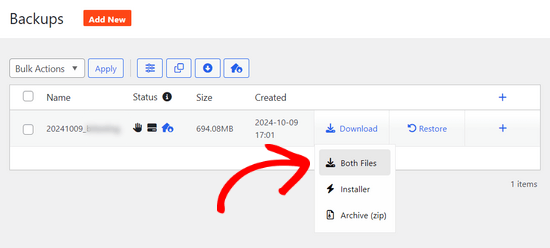
Le fichier d’archive est une copie de votre site terminé, et le fichier d’installation automatise le processus d’installation pour vous.
Étape 3 : Importation de votre site WordPress chez le nouvel hébergeur
Maintenant que vous avez téléversé les fichiers d’archive et d’installation, l’étape suivante consiste à les téléverser sur votre nouvel hébergeur.
Vous pouvez le faire en vous connectant à votre nouvel hébergeur à l’aide du protocole FTP.
Si vous n’avez jamais fait cela auparavant, consultez notre guide du débutant pour téléverser des fichiers via FTP sur WordPress.
Normalement, vous saisissez le nom de domaine de votre site en tant qu’hébergeur lorsque vous vous connectez à votre client FTP.
Toutefois, comme votre nom de domaine pointe toujours vers votre ancien hébergeur, vous devrez vous connecter en saisissant l’adresse IP ou le nom d’hébergeur de votre serveur.
Vous trouverez ces informations dans le tableau de bord de votre nouveau compte hébergeur.
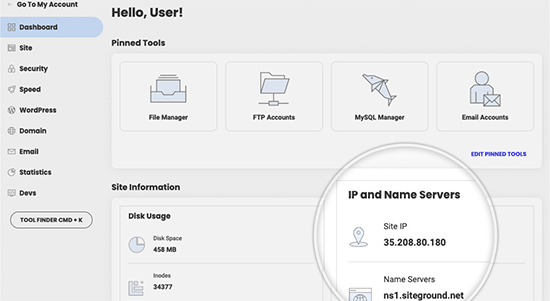
Si vous ne trouvez pas ces informations, vous pouvez demander le support de votre nouvelle entreprise d’hébergeur, qui vous aidera.
À l’aide du client FTP, vous devez téléverser le fichier installer.PHP et le fichier archive .zip dans le répertoire racine de votre site.
Il s’agit généralement du dossier /username/public_html/.
Là encore, si vous n’êtes pas sûr, demandez à votre entreprise d’hébergeur.
Confirmez que votre répertoire racine est complètement vide. Certaines entreprises d’hébergeur installent automatiquement WordPress lorsque vous vous inscrivez.
Si WordPress est installé dans votre répertoire racine, vous devez d’abord le supprimer.
Une fois que c’est fait, vous devez téléverser le fichier zip de l’archive et le fichier installer.php dans le répertoire racine de votre site.
Étape par étape : Modifier le fichier hébergeurs pour éviter les temps d’arrêt
Une fois que vous avez téléversé les deux fichiers sur votre nouvel hébergeur, vous devez accéder au fichier installer.php dans un navigateur.
Normalement, ce fichier est accessible à l’aide d’une URL comme celle-ci :
http://www.example.com/installer.php
Cependant, cette URL vous renverra à votre ancien hébergeur, et vous obtiendrez une erreur 404. En effet, votre nom de domaine pointe toujours vers votre ancien hébergeur.
Normalement, d’autres tutoriels pourraient vous dire de modifier les serveurs de noms de votre domaine et de le faire pointer vers votre nouvelle entreprise d’hébergement, mais c’est une erreur.
Si vous le faites maintenant, vos internautes verront un site cassé lors de la migration.
Nous vous afficherons comment vous pouvez accéder temporairement à votre nouveau site sur votre ordinateur sans affecter votre ancien site.
Cela se fait par le biais du fichier hébergeur de votre ordinateur.
Le fichier hébergeur peut être utilisé pour faire correspondre des noms de domaine à des adresses IP spécifiques. En d’autres termes, il vous permet de faire croire à votre ordinateur que le site est déplacé alors qu’il ne l’est pas.
Voyons comment ajouter une entrée pour votre nom de domaine dans le fichier hébergeur afin qu’il pointe vers votre nouvelle entreprise d’hébergement.
Ces modifications vous permettent d’accéder aux fichiers de votre nouvel hébergeur en utilisant votre propre nom de domaine, tandis que le reste du monde accède toujours à votre site à partir de l’ancien hébergeur. Cela garantit un temps de fonctionnement de 100 %.
La première chose à faire est de trouver l’adresse IP de votre nouveau serveur d’hébergement web.
Pour le trouver, vous devez vous connecter à votre Tableau de bord cPanel et cliquer sur le lien Déplier les statistiques dans la colonne latérale gauche. L’adresse de votre serveur sera répertoriée comme “Adresse IP partagée”.
Par exemple, sur Hostinger, vous trouverez l’adresse IP de votre serveur dans les détails de votre offre d’hébergement.
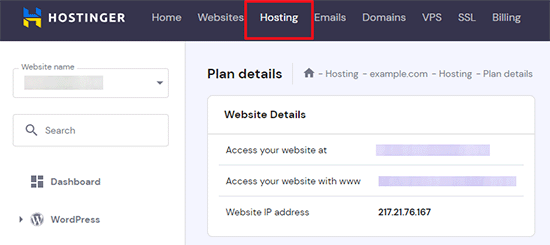
Si vous utilisez un PC Windows, vous devez ouvrir l’application Notepad avec les privilèges d’administrateur/administratrice.
Cliquez simplement sur le bouton “Démarrer”, puis recherchez l’application Notepad. Cliquez avec le bouton droit de la souris sur l’icône de l’application Notepad et sélectionnez “Exécuter en tant qu’administrateur/administratrice”.
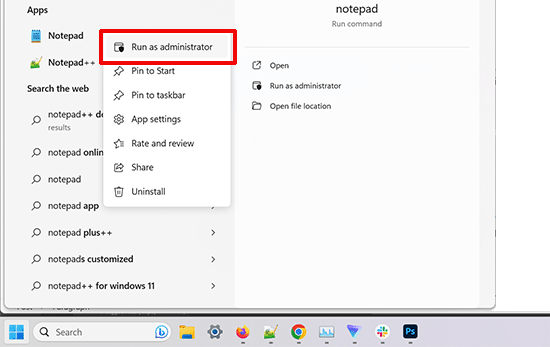
Une invite Windows UAC apparaît et vous devez cliquer sur “Oui” pour lancer le Bloc-notes avec les privilèges d’administrateur/administratrice.
Sur l’écran du Bloc-notes, allez dans Fichier ” Ouvrir “, puis naviguez jusqu’au dossier C:\NWindows\NSystem32\Ndrivers\Netc. Dans ce dossier, sélectionnez le fichier hébergeur et ouvrez-le.
Si vous utilisez un Mac, vous devez ouvrir l’application Terminal et saisir cette commande pour modifier le fichier hébergeur :
sudo nano /private/etc/hosts
Pour les utilisateurs/utilisatrices Windows et Mac, en bas du fichier hébergeur, vous devez saisir l’adresse IP que vous avez copiée, puis saisir votre nom de domaine. Comme ceci :
192.168.1.22 www.example.com
Confirmez que vous remplacez l’adresse IP par celle que vous avez copiée depuis le cPanel et que vous remplacez example.com par votre propre nom de domaine.
Une fois que vous avez terminé, enregistrez vos modifications.
Vous pouvez maintenant accéder à vos fichiers sur le nouvel hébergeur en utilisant votre nom de domaine sur votre ordinateur.
Importance : N’oubliez pas d’annuler les modifications apportées au fichier hébergeurs une fois la migration terminée (étape par étape).
Étape par étape : Création d’une base de données MySQL sur votre nouvel hébergeur
Avant d’exécuter le programme d’installation sur le nouvel hôte, vous devez créer une base de données MySQL sur votre nouveau compte d’hébergement. Si vous avez déjà créé une base de données MySQL, vous pouvez passer à l’étape suivante.
Création d’une base de données dans cPanel
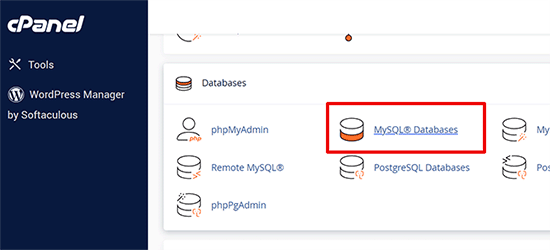
Allez dans le tableau de bord cPanel de votre nouveau compte d’hébergement, défilez vers le bas jusqu’à la section Bases de données, et cliquez sur l’icône ‘Bases de données MySQL’.
Vous verrez un champ pour la création d’une nouvelle base de données.
Saisissez/saisie un nom pour votre base de données et cliquez sur le bouton “Créer une base de données”.

Après avoir créé la base de données MySQL, vous devez défiler jusqu’à la section Utilisateurs/utilisatrices MySQL.
Ensuite, indiquez un identifiant et un mot de passe pour votre nouvel utilisateur et cliquez sur le bouton “Créer un utilisateur”.
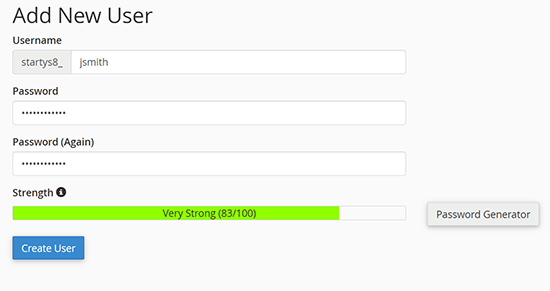
Ensuite, vous devez ajouter cet utilisateur à votre base de données. Cela donnera à l’identifiant que vous venez de créer tous les droits nécessaires pour travailler sur cette base de données.
Pour ce faire, défilez vers le bas jusqu’à la section “Ajouter un utilisateur à une base de données”. Il vous suffit de sélectionner l’utilisateur de la base de données que vous avez créé dans le menu déroulant situé à côté de l’utilisateur, puis de sélectionner la base de données et de cliquer sur le bouton “Ajouter”.
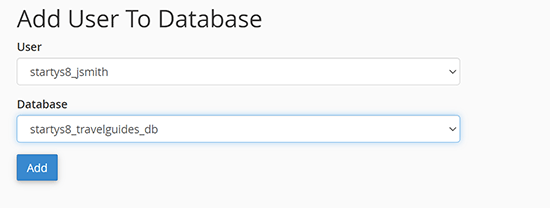
Votre base de données est maintenant prête à être utilisée avec WordPress. Confirmez bien que vous avez noté le Nom de la base de données, l’identifiant et le mot de passe. Vous aurez besoin de ces informations à l’étape suivante.
Étape par 6 : Commencer le processus de migration du Duplicator
Nous sommes maintenant prêts à exécuter le programme d’installation. Naviguez vers l’adresse suivante dans la fenêtre de votre navigateur, en remplaçant exemple.com par votre nom de domaine :
http://www.example.com/installer.php
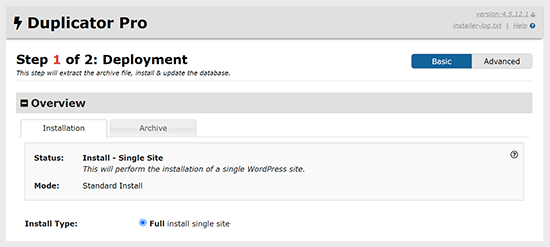
Le programme d’installation effectue quelques tests et affiche “Pass” à côté des tests d’archive et de validation.
Vous devez cocher la case des termes et conditions et continuer en cliquant sur le bouton “Suivant”.
Nom de l’expéditeur : vous devrez saisir votre hébergeur MySQL, le nom de votre base de données, votre identifiant et votre mot de passe.
Votre hébergeur sera probablement localhost. Ensuite, vous saisirez les détails de la base de données que vous avez créée à l’étape précédente.
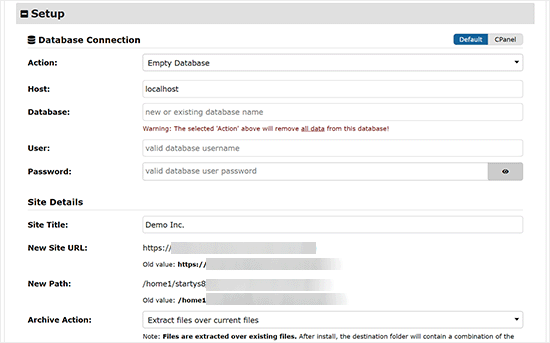
Ensuite, le Duplicator doit vérifier qu’il peut se connecter à la base de données et qu’il est en mesure d’exécuter l’installation.
Cliquez sur le bouton “Valider” en bas pour continuer.

Si Duplicator parvient à se connecter, les résultats du test s’affichent comme suit : “Pass”.
Vous pouvez maintenant cocher la case des termes et notifications et cliquer sur le bouton “Suivant”.
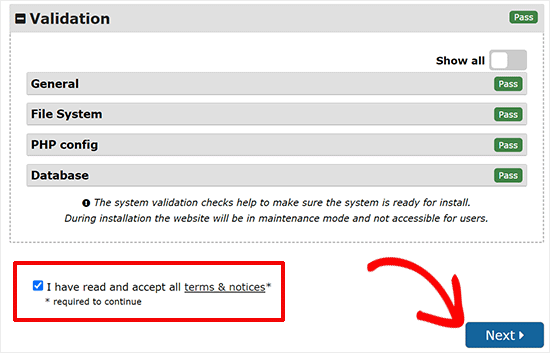
Cliquez sur le bouton “Suivant” pour continuer.
Duplicator va maintenant importer votre base de données WordPress à partir de l’archive zip dans votre nouvelle base de données.
Ensuite, il vous demandera de mettre à jour l’URL ou le chemin d’accès du site. Comme vous ne changez pas de nom de domaine, vous n’avez PAS besoin de modifier quoi que ce soit ici.
Cliquez simplement sur le bouton “Suivant” pour continuer.
Duplicator exécutera les dernières étapes et vous affichera le bouton de connexion.
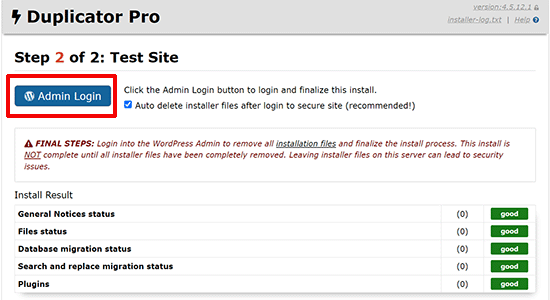
Vous pouvez maintenant vous connecter à votre site WordPress sur le nouvel hébergeur pour vous assurer que tout fonctionne comme prévu.
Étape par 7 : Mise à jour de vos serveurs de noms de domaine (DNS)
À ce stade, vous avez créé une copie terminée de votre base de données et de vos fichiers WordPress sur votre nouveau serveur d’hébergement, mais votre domaine pointe toujours vers votre ancien compte d’hébergement web.
Pour mettre à jour votre domaine, vous devez changer vos serveurs de noms DNS. Ainsi, vos utilisateurs/utilisatrices seront dirigés vers le nouvel emplacement de votre site lorsqu’ils taperont votre nom de domaine dans leur navigateur.
Si vous avez inscrit votre domaine auprès de votre fournisseur d’hébergement, il est préférable de le transférer vers un nouvel hébergeur.
En revanche, si vous utilisez un bureau d’enregistrement de domaines comme Domain.com, GoDaddy ou Network Solutions, vous devez mettre à jour vos serveurs de noms.
Vous aurez besoin des informations sur le serveur de noms DNS de votre nouvel hébergeur. Il s’agit généralement de quelques URL qui ressemblent à ceci :
ns1.hostname.comns2.hostname.com
Pour les besoins de ce guide, nous allons vous afficher comment modifier les serveurs de noms DNS avec GoDaddy.
Pour les autres fournisseurs d’hébergement, consultez notre guide sur la modification des serveurs de noms de domaine.
Selon votre registraire de domaine ou votre hébergeur, les captures d’écran peuvent être différentes. Cependant, le concept de base est le même.
Vous devez rechercher la zone de gestion du domaine, puis les serveurs de noms. Si vous avez besoin d’aide pour mettre à jour vos serveurs de noms, vous pouvez vous adresser à votre entreprise d’hébergement web.
Pour GoDaddy, vous devez vous connecter à votre compte GoDaddy et cliquer sur “Domaines”.
Ensuite, vous devez cliquer sur le bouton “Gérer” à côté du nom de domaine que vous souhaitez modifier.

Allez dans la section “Réglages supplémentaires”.
Cliquez ensuite sur “Gérer les DNS” pour continuer.
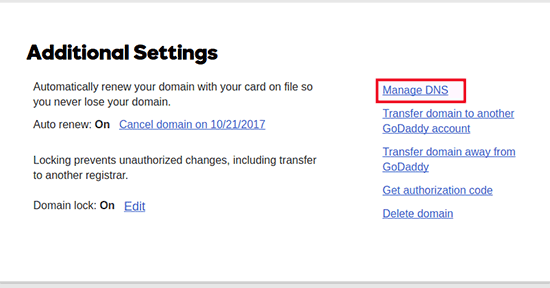
Ensuite, vous devez défiler jusqu’à la section “Serveurs de noms”.
Cliquez sur le bouton “Modifié”.
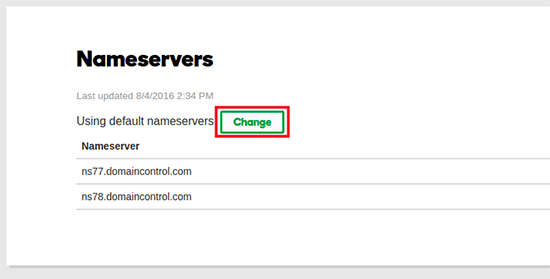
Tout d’abord, vous devez changer le menu déroulant du type de serveur de noms de “Défaut” à “Personnalisé”.
Ensuite, vous pouvez compléter les informations de votre nouveau fournisseur d’hébergement sous Nameservers.
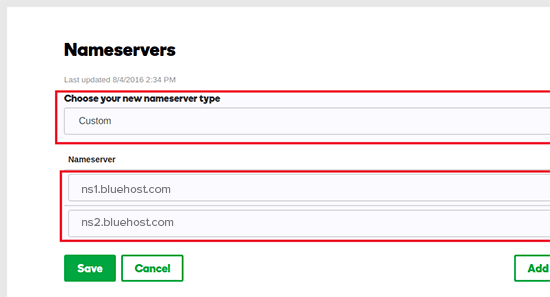
N’oubliez pas de cliquer sur le bouton “Enregistrer” pour stocker vos modifications.
Vous avez bien modifié les serveurs de noms de votre domaine. Les modifications DNS peuvent prendre de 4 à 48 heures pour se propager à tous les utilisateurs/utilisatrices.
Comme vous avez le même contenu sur votre ancien hébergeur et sur le nouvel hébergeur, vos utilisateurs/utilisatrices ne verraient aucune différence. Votre migration WordPress se fera en toute transparence et sans aucun temps d’arrêt.
Par mesure de sécurité, nous vous recommandons d’attendre 7 jours après votre migration pour résilier votre ancien compte d’hébergeur.
Foire aux questions
Voici quelques questions que beaucoup de nos utilisateurs/utilisatrices se posent lorsqu’ils déplacent WordPress d’un hébergeur à un autre.
1. Comment migrer mon site WordPress vers un autre hébergeur ?
Vous pouvez migrer votre site WordPress en déplaçant vos fichiers et votre base de données WordPress de votre ancien hébergeur vers le nouveau fournisseur d’hébergement.
Certaines entreprises d’hébergement proposent également des services gratuits de transfert de sites, mais vous devrez leur demander. Vous pouvez également le faire vous-même en transférant les fichiers à l’aide d’un client FTP et en important la base de données via phpMyAdmin.
2. Puis-je migrer mon site WordPress vers un autre fournisseur d’hébergement ?
Oui, vous êtes libre de migrer votre site WordPress vers un autre fournisseur d’hébergement.
3. Puis-je m’inscrire au nouveau compte hébergeur sans inscrire de nom de domaine ?
Oui, vous pouvez tout à fait vous inscrire à un compte d’hébergeur sans inscrire de nom de domaine.
Le nom de domaine et l’hébergement sont deux services différents, et vous ne devez pas nécessairement inscrire un nom de domaine lorsque vous vous inscrivez chez un nouvel hébergeur. Pour plus de détails, consultez notre guide sur la différence entre nom de domaine et hébergement web.
Certains fournisseurs d’hébergement vous demanderont de sélectionner un nom de domaine comme première étape par rapport à l’achat d’un hébergement. Ils vous permettent également de saisir un nom de domaine si vous en avez déjà un.
4. Dois-je transférer mon nom de domaine vers le nouvel hébergeur ?
Aucun, vous n’avez pas besoin de transférer votre nom de domaine vers le nouvel hébergeur. Cependant, le transfert de votre nom de domaine vers votre nouvel hébergeur facilitera son renouvellement et sa gestion sous le même tableau de bord que votre nouveau compte d’hébergement.
Pour en savoir plus sur ce Sujet, consultez notre guide ultime sur les noms de domaine et leur fonctionnement.
5. Comment corriger l’erreur d’établissement de la connexion à la base de données dans Duplicator ?
Si vous voyez une erreur de connexion à la base de données ou une erreur de connexion à la base de données dans Duplicator, il est probable que vous ayez saisi/saisie des informations incorrectes pour votre connexion à la base de données.
Confirmez que le nom de votre base de données, l’identifiant MySQL et le mot de passe sont corrects. Certaines entreprises d’hébergement Web n’utilisent pas localhost comme hébergeur de leurs serveurs MySQL. Si c’est le cas, vous devrez demander au personnel de support de votre hébergeur de vous fournir les informations correctes.
6. Comment puis-je vérifier si mon site se charge à partir du nouvel hébergeur ?
Il existe plusieurs outils en ligne qui vous permettent de savoir qui héberge un site. Après avoir transféré votre site vers le nouvel hébergeur, vous pouvez utiliser n’importe lequel de ces outils, et ils vous afficheront le nom de l’entreprise qui héberge votre site.
Si la migration de votre site web et les modifications apportées à votre serveur de noms de domaine (DNS) ne datent pas d’hier, il y a de fortes chances que votre site se charge encore à partir de votre ancien hébergeur. Les modifications de nom de domaine peuvent prendre jusqu’à 48 heures pour se propager complètement.
7. Dois-je supprimer des fichiers ou des données de l’ancien hébergeur ?
Lorsque vous changez d’entreprise d’hébergeur, nous vous recommandons de conserver votre ancien site pendant au moins une semaine. Après cela, vous pouvez supprimer les fichiers de votre ancien hébergeur. Si vous résiliez votre compte, votre fournisseur d’hébergement supprimera toutes vos données conformément à sa politique.
8. Pendant combien de temps mon compte doit-il rester activé chez l’ancien hébergeur ?
Une fois que vous avez migré votre site vers le nouvel hébergeur, et si vous n’avez pas d’autres sites web hébergés chez votre ancien hébergeur, vous pouvez résilier votre ancien compte d’hébergement web.
Cependant, dans certains cas, il se peut que vous les ayez déjà payés pour un hébergement annuel. Vous devriez vérifier leur politique de remboursement pour voir si vous avez droit à un remboursement en cas d’annulation.
9. Comment déplacer un site WordPress avec SSL/HTTPS ?
Vous devrez installer un certificat SSL chez votre nouveau fournisseur d’hébergement. Après cela, vous pouvez suivre les mêmes étapes que celles mentionnées ci-dessus. Confirmez simplement que vous utilisez HTTPS dans les URL, comme https://example.com.
10. Bonus : Migration gratuite du site par votre nouvel hébergeur
Si vous souhaitez changer d’hébergeur, mais que les étapes ci-dessus vous semblent trop compliquées, vous pouvez choisir les fournisseurs abonnés, qui se chargeront de migrer votre site pour vous.
SiteGround, Hostinger et WP Engine proposent une migration gratuite des sites pour les utilisateurs/utilisatrices de WPBeginner.
Nous espérons que ce tutoriel vous a aidé à déplacer WordPress vers votre nouvel hébergeur sans aucun temps d’arrêt. Vous pouvez également consulter nos choix d’experts du meilleur hébergement WordPress pas cher ou notre guide sur les erreurs WordPress les plus courantes et comment les résoudre, si vous rencontrez des problèmes lors de votre migration WordPress.
Si vous avez aimé cet article, veuillez alors vous abonner à notre chaîne YouTube pour obtenir des tutoriels vidéo sur WordPress. Vous pouvez également nous trouver sur Twitter et Facebook.


Shane
In the next step, Windows users need to go to Programs » All Programs » Accessories, right click on Notepad and select Run as Administrator. A Windows UAC prompt will appear, and you need to click on Yes to launch Notepad with administrator privileges.
On the Notepad screen, go to File » Open and then go to C:\Windows\System32\drivers\etc. Select hosts file and open it.
I’m having trouble with this step. Can anyone shed any light?
WPBeginner Support
Hi Shane,
You just need to open the Notepad app as an administrator so that you can edit the hosts file.
Admin
Shane
Oh, just microfosft simple wordpad and then “run as administrator”?
Is that all I have to do?
Muhammed Shabeer
Thanks for the wonderfull trick. Exactly the trick was intented to migrate WordPress to new host, but I used for migrating from root to subdomain/subfolder. It done successfully with the plugin. Thank for sharing the trick.
Kenneth Aycox
Thank you for a wonderful product! worked perfect.
James Crow
Briliiant! Thanks so much, I’ve just moved a few sites without any problem at all.
Max
Sadly, this didn’t work for me either. I deleted all the website files as directed , uploaded to the installer.php file and package but when I went to website.com/installer.php I was served a 404 error: Not Found
The requested URL /installer.php was not found on this server.
I think it’s easier to just transfer the website the old fashioned way, as others have mentioned. No need for any scripts that might not work.
Max
Please disregard my comment. I later noticed the root folder was set to httpdocs. So created a folder, named it httpdocs and put the package and installer.php in there. Then the website.com/installer.php worked no problem. All went very smoothly thereafter.
Nandan Jha
Hello Max,
Actually it did work for me in the end. I am guessing that you moved the installer and archive to your new host , correct ?
Please look up the IP address from cpanel or equiv of the new host and try accessing via the IP address
http://IPAddress/installer.phpKB
Seems like a good tutorial, but I had no luck with it. There are also a few steps/screens in the Duplicator sequence that were different from mine. The end result was, I got a 404 error upon clicking Site Login – Login to finalize the setup in Step 4 of 4 of the Test Site screen. This differs substantially from the above. Top right corner there’s a version number of 1.2.30. Fairly certain I have the most up to date version of the plugin. If I use File Manager to view the contents of public_html I don’t see the normal list of wp files that I think I should see aside from a wp-snapshots directory, a few web.config files, some installer files and the archive.zip…oh and database.sql. So something has clearly gone wrong, but I’m at a loss to understand what. So…there it is.
Stephen Duffield
Let me guess, you tried to move from a WordPress.com site? Duplicator & Duplicator Pro wont work for wp.com sites. Nothing works unless you use one of two host sites that they recommend. Duplicator after lots of help, ended up giving me a refund.
Rob
Hey, Just wanted to say thanks for this tutorial. Went perfectly smoothly and would use this duplicator again
Nandan Jha
Great article.
Friends, How do I make it work for an Addon Domain. I took a new plan with GoDaddy and now need to move my sites there. What entry do I make in my hosts file to navigate to install.php ? Thank you,
Nandan Jha
I tried it with my AddOn Domain. It worked for me over a couple of iterations. The thing to take care of is to supply the right ‘domain name’ at Step 3 (or Step 4). The default value which it picks is ‘primarydomain.com/addondomain’. Delete the default value and put addondomain.com
Thanks.
Sean
I recently switched hosts and my original hosting plan has expired. I failed to create a back up before it expired. I do have a local copy of my site on my computer (I use Dreamweaver for FTP). Is there any way to recreate the site with the local files?
Thanks.
Dave Porter
Hi Sean,
Try using WayBack Machine – it takes snapshots of websites over time…
You may be able to grab the source code, images etc… and recreate it from that. I’ve had to do that a few times for clients who have come to me after they have lost contact with their developer…
HTH, Dave
Miki
Hi there,
I have used the Wayback machine and was able to make a copy of my site. Unfortunately I have found myself involved with an unsavory company that had other plans for my business (selling their services on my site) without full disclosure in the beginning. I am now tasked with finding a new programmer to finish the site although it is in wordpress. I do not have wordpress at this time as I was not developing the site; however my understanding from these posts is that if I move the site to another host, I should be able to access wordpress. Is that correct?
WPBeginner Support
Hi Miki,
Yes you can move an existing WordPress website to any other host.
Michael
update…
it works….
be careful with IP address information…. you should read the information carefully…
Thanks
Michael
No luck..
After change the host file, my browser shows message:
This site can’t be reached
example.com took too long to respond.
Search Google for idea inspirations
ERR_CONNECTION_TIMED_OUT
I did flush dns, net stop, dan net start and restart my computer & modem, still not working…
Navajo
I have another question:
In the text it says:
“At this point, you’ve created a complete copy of your WordPress database and files on your new hosting server. But your domain still points to your old web hosting account.
To update your domain, you need to switch your DNS nameservers. This ensures that your users are taken to the new location of your website when they type your domain into their browsers.
If you registered your domain with your hosting provider, then it’s best to transfer the domain to the new host.”
I thought that when i buy a new hosting space, i also and immediatly have to name a doman name. As in: buying a hosting space is always linken to buying a domain. So the new ip addres which i have uploaded my old site to, and which i have to link to my old doman name, already HAS a (newly bought) domain name.
Or can i buy a hosting space, ánd get an IP address which i can use in this tutorial, without it already having a domain name?
Regards, Navajo
WPBeginner Support
Hi Navajo,
It is a common misconception. Hosting and domain name are two different services and you can buy them from two different companies. On the same page where hosting companies offer you to register domain name, they also show another option to indicate that you already have a domain name and you can continue without registering a new one.
For more details please see our detailed guide on What is a domain name and how do domains work?
Admin
Uldis
this is really profound stuff. I was just scratching my head how to migrate client’s site without interruption while changing name servers. Eternally grateful!
Shadat
Hello, I face the database connection failed problem.
can you plz help me? plz
see the screenshots
Dave Porter
Shadat – this is quite an old article now – and you don’t give very much to go on – I would seek help from your hosting company, or get onto a WordPress discussion forum where there are active people who may be able to help you.
But if you are getting a database connection error message, it is generally because the database name/user or password is incorrect
I would try one of the backup tools like Duplicator and see if that works better for you.
Slade
Did you set up a new database and user on your new host?
You must make sure the database name and user and password are all correct for the new host.
Usually a database connection error is a simple oversight like a mispelling or something simple like that.
Michael Goriany
Thanks for this excellent tutorial
If I have well understood, the hosts file (Step 4) is providing for 100% uptime only for the Webmanager but not for the public
How can the DNS switchover time be shortened, or how can the downtime for the public be avoided ?
Slade
Editing the host file allows you to see your site at your new host. Until you update your dns nameservers the public will go to the old host.
The time it takes for dns changes to updare (propagate) is not something that can be controlled. However this guide is correct in providing a no down time solution.
What is happening on the backend that the public does not see is that your website is being hosted at two hosts. The nameservers tell the public which host they are viewing the site on. During the dns update process the users will still view the site at the old host until the propogation is complete.
Once the dns change officially kicks in the public will then be viewing the site at your new host.
Again, to provide the no downtime transfer you would need to change your host file on your local machine (tells your computer you want to view the site at the new host).
This allows you to do the actual install of your website on the new host.
Hope that helps
Lydia
i had to move a client’s site off our subdomain into their own hosting overnight and this REALLY REALLY saved my life! Especially as the domain needed to be repointed seamlessly! I only had trouble with the FTP, i dunno what was wrong with all the logins but i couldn’t get it working. Thankfully my hoster always has an awesome file manager on cpanel.
So yes, very nearly seamless, i’m just testing out the contact forms now which seems to need the DNS switchover time in order to function properly…
And one thing to add, Duplicator has changed the SQL database setup to Step 2 in their latest version, which really made me freak out a bit there.
Thanks very much for the detailed and extremely godsent tutorial!
Kurt
I’m getting ready to follow this tutorial. One question: I am switching servers but also am switching domain names. Should I change my website address in the WP admin settings before running duplicator or after? (Does the order matter?) Thanks!
Johel Fernandez
This tutorial worked out perfectly by April, 2017. ¡Thank you so much!
Ravijit
Hey,
I used this plugin so many times. even, once i used it for too. I really like this plugin but, the problem is it do not extract the big package. We’ve to manually unzip it or need to upload unzipped data to the new hosting.
Any fix for that? Reply as soon as possible.
Archit
Duplicator doesn’t work properly with GoDaddy’s cPanel Linux Hosting service. Script gets terminated even if the settings in php.ini are changed. Please suggest what to do to make Duplicator work there? If not possible, what would be the best alternative?
Hernan
Hi Archit,
I’ve just migrated a site to godaddy and it worked just fine. Which part failed?
best
Hernán
Susan Taunton
This GREAT tutorial successfully guided me through my very first migration of a WordPress site to a different host! Especially life saving was the instruction about changing “sudo nano /private/etc/hosts” in Terminal – worked like a charm. wpbeginner.com has the most succinct, articulate and smart tutorials, which I have come to depend on.
Thank you!!!!
Susan
Prinze
hi, pls have been having issues uploading my site to s new server using FTP client, my hosting company tried to give tutorials on how to transfer with no result.
the tutorials am getting from your site is abt using a duplicate plugin. my site is down, i can’t access my wp-admin to install the plugin.
i use a backup plugin when my site is up so i have a backup file from the plugin i used n also i did a cpanel backup from my old server.
pls, i need a tutorial hoe to upload my backup files to my new server, which one is best to upload?
the plugin backup or the cpanel backup…
pls help!
Greg Draven
What backup plugin did you use?
Ritadrik Chowdhury
Hi Sir,
I am stuck up with 3rd part which is verification part. I have changed the permalinks and I can see the dashboard as usual but the site is not running. Whenever I am clicking on “TEST SITE” it returns error 404: File Not Found. I tried their help documents. Made changes as usual but no luck. Can you please help me out?
saurabh shelar
Hello Sir. I am saurabh from India. I love your website. I have a blog about software review. And I saw your posts and observe that you edited image in microscope effect. This is really fantastic. Can you please tell me how you do this or please make tuts for this please.
Thank you.
WPBeginner Support
Hi Saurabh,
Thanks for the kind words. There are actually tons of tutorials already. Try searching for how to add magnifying glass effect in Photoshop.
Admin
Brad
Hello,
I have a situation where it would be ideal to have the database on separate hosting. Just because the host of the current site does not offer mysql. I cannot move the site (for a company)
Can I install wordpress on current hosting in a sub domain and have the database on another host? I have never used anything except “localhost” in the wp-config file? Thank you!
Sachin
php not supported they are giving reason?? what to do??
Samuel
Does it work on addon domain?
Because there is this step
“Make sure that your root directory is completely empty. If you have WordPress installed in your root directory, then you need to delete WordPress first”
While my primary domain is already up and running
Cory
This is a well put together article, nice job guys!
Just as an FYI for users reading through the comments, any comment pre-dated 12-6-2016 does not pertain to the article above or the Duplicator plugin specifically.
This article was originally written using the Backup Buddy plugin and has since been updated and rewritten using the Duplicator plugin. This should help clear-up any confusion should some of the comments not really make sense or refer to topics not covered in the article.
Mark Rudder
This is an excellent tutorial.
I also believe this is the easiest and fastest way to to migrate a site.
Migrating DB files and tables with phpMyAdmin is the long way around.
Using Duplicator or BackupBuddy is way less work and you are less prone to mistakes that way.
You need to change DNS no matter what method you choose, so that aspect can’t be counted as far as which method is best.
Changing TTL settings to 1 hour (3600 seconds) as Dave Porter pointed out is the only missing piece of the puzzle. (even though that is not essential to success)
Augusto
Nice article, guys!
I feel that the most critical point migrating a site to another host is the email service. If the default email solution provided by host need to be replaced, a lot of work will came.
Anyone want to share your workflow to do this kind of thing?
Thanks!
Frans Kemper
hello,
Would this procedure also work for sub domains?
I have an add on domain to transfer with about 10 related sub domains.
Thank you
Dave Porter
A few days before I move a domain, I go into the DNS settings and change the TTL settings to 1 hour (3600 seconds), so that the site will move quickly (and do it overnight – so the new location will show for everyone in the morning)
(I was expecting this to be mentioned in the article when I saw the title!)
And to answer Dave’s question you can have as many entries in your Hosts file as you want – I have a reseller account with my hosting company and I’m often working on 2 or more sites I am working on that are located on a different server. You can’t specify a sub-directory in the entry – the one entry will point to all locations for that domain – to do what you want to do you are better using sub-domains – so for example example.com is the main location, then you can have play1.example.com as a sub domains that will have it’s own hosts entry.
Harindepreet singh
I think you should make a video or attach screenshots
David in Mississippi
Another article – directly related to this one, but sufficiently different to warrant its own separate article – would be “Replacing A Legacy Website with a Fully-Developed WordPress Website.”
This has happened to me several times already. I have clients with older, legacy-type (non-WordPress) websites, and they ask me to convert their site to WordPress.
I have two methods I use to do this, and one of them involves building the brand new WordPress site on a temporary development URL. When it is done, I then need to transfer it to the existing URL for the client.
In other words, I develop it at DevelopmentSite, and when it is done, I then move it to ExistingLegacySite
I should think it would be easier to do this than the procedure outlined in your article above, but it would still be helpful for you to do an article on this type of migration.
Thanks.
Dave
Correct me if I’m missing something, but this ‘hosts file change’ will only work if you have a just one site on your plan at that new IP address. I have several low-usage sites I’m hosting on one plan. They are in subdirectories under phulic_html.
So doing this:
192.168.1.22 http://www.example.com
in the hosts file will not specify which of your 5 sites to point to. And it seems the only thing you can specify in the hosts file is an IP address and a URL.
You can’t do something like this:
192.168.1.22/sitea http://www.example.com
Am I wrong?
Felipe
I think this is correct, it won’t work for shared domains.
It is better explained here: the voted answer says “If you have shared hosting, this will make your site inaccessible by direct IP. In a shared hosting environment, the host (GoDaddy) will have multiple websites living at the same IP address. When a browser requests a website, the server relies on the domain name to determine which of the many websites to serve. Without a domain name, the server has no way to tell what the browser actually wants so you don’t get your website. To avoid this situation, you will need a host to give you exclusive use of an IP address.”
I think this should be highlighted in the article.
WPBeginner Support
Once you have added your domain name to your new host, your webserver knows that it is hosting domain name example.com and it’s root directory (Doesn’t matter if it is also hosting other domains as well). However, DNS servers take time to propagate so instead of sending your request to your new webserver, they will be sending users to old location for a while. The hosts file allows you to send your request directly to the new server. Hope this clears the confusion.
Admin
Matt Davis
Correct me if I’m wrong, but I believe you can type in (directly in the browser’s address bar) the IP address followed by a slash (/) and then the sub-directory of whichever site you’re trying to access. I would avoid changing the hosts file altogether. Most hosting companies I’ve used will also usually assign temporary URLs to each new website as well, so if that’s the case you could use that instead of the IP or messing with the hosts file.
Niko
That’s correct MATT. Temporary using the IP address instead of altering the hosts file seems like a better approach. However, both work fine.
Vyse
hello. good article but what about wp multisite?
Tanisia
I’ve tried for four hours to make these instructions work. The result? Now I can’t access my site at my old host. I tried following the directions on this 2-year-old article (will there be an update, since BackupBuddy has evolved?) and now everything is messed up.
I used FTP to upload the files, and edited the host file as instructed, but the ImportBuddy PHP script won’t run. It just shows me the code. I tried contacting Bluehost for assistance, and they were no help. So I tried setting all my other settings back to where they were before I started this odyssey, and now I can’t see my site at all. Not the Admin panel, nothing.
WPBeginner Support
Tanisia, please refer to our guide on what to do when you are locked out of WordPress admin area.
Admin
Tanisia
I’m back in at my old host – my servers needed to re-propagage from Bluehost, and it took longer than I had anticipated. I’m still left with BackupBuddy not working the way it’s supposed to. Again, do you have updated instructions from 2014, since there have been several updates to BackupBuddy since this was written? When I did the Notepad update in Windows 10, it looked different from what was described here, so I couldn’t be sure if that trick worked.
Thank you for answering back.
Fahim
If it was a primary domain , can i follow this Process? I need to move and that domain is Main/primary domain, how can i move,will u plz help me?
Mark
Just stuck i step 4, can i just simply addon domain and change dns in new host, ? Following that, C:\Windows\System32\drivers\etc. , there is nothing in my etc, nothing like hosts file, btw great tutorial easy to fallow, thanks
Jacob
I was hoping there would be an easier way to do it with a third party service, but I’m not about to shell out 80 bucks just to do that.
Ash
The backupbuddy steps in the new version have changed quite a bit. Nothing to be afraid of though. I was able successfully migrate from t1.micro on aws to t2.small instance. So far so good.
David
A few questions for you:
1. Isn’t there a SIMPLE way to back up one site (themes, child themes, plugins, and post data), then restore it to another site?
It truly should be as simple as (a) Backup To (dropbox mysite.zip), then (b) Restore From (dropbox mysite.zip).
2. Is it possible, perhaps even EASY, to develop a client’s WP site on your development server, then use Backup Buddy (or some other backup/restore program) to migrate it to the client’s site?
3. Does Backup Buddy, or any other backup/restore program you know of, give you the ability to restore to an existing WP installation? In other words, can you set it to restore everything except the WP core files?
Thanks for this article.
David in Mississippi
WPBeginner Support
Actually, in the article we have shown how BackupBuddy does exactly what you are asking for. You simply backup your site, download an archive file and an importer file. Upload these files to the new location and run the script. Hope this helps.
Admin
Ash
@David, with backupbuddy you can choose which files to leave out while backing up. So you can leave out the core WP files.
Robert
hi guys,
A friend just make me a new wordpress website and uploaded it to my hosting account. Now, I want to change the domain and hosting account and want to upload the website to the new hosting account.
My friend sent me the archive with all files of the website including database. How is possible to upload the website to my new host?
I appreciate your answer.
thank you
Ricardo Clarke
I actually just went through this process yesterday and need to transfer another site today. This is hands down the most thorough walkthrough I’ve seen. The 4 to 48 timeframe really helped ’cause I thought something went wrong, but the transfer just needed time to propagate across the interwebs.
WPBeginner Staff
As soon as you figure out that your new domain has regained the search positions for your old site. We hope that you have setup 301 redireccts on old domain otherwise search engines wouldn’t know that your old content has moved to the new domain permanently.
WPBeginner Staff
What’s the shorter way of doing this?
Sebastien
Hi there, thanks for your tutorial, here’s an other way of doing it… free.
1. Tools > export posts and pages from admin panel. If you also need the DB phpMyAdmin export tables from the db. Import them in the new db. Check for the extension of the tables to be the same (_wp for instance)
2. edit your virtual host config file, add what follows between your server {}
allow your_public_ip;
deny all;
3. Access the site by its ip. (make sure you set the ip of your new server instead of the url in phpmyadmin > wp_options > siteurl and home options)
4. Tools > import posts and pages
5. Change your DNS records at the old host.
6. Done. Use another plugin like UpdraftPlus to backup for free.
Ash
Tried UpdraftPlus. Didn’t do anything at all.
Rachel Charles
Clean and modern and Easy to modify!
Kate_H
Great guide. I can confirm these steps work brilliantly as I recently moved a 5 year old WP site from one domain to another domain and swapped web hosts as well.
The only difference I did was redirect the old site to the new site via the .htaccess as I wasn’t migrating the old domain name over at the time.
Out of curiosity how long would you leave it before deleting all the old content from the old domain and setting up a permanent URL redirect via your registrar?
zimbrul
I really hate Backup Buddy. In 80% of cases I got errors and their support is not that good. I’d rather move a site with Duplicator free WordPress plugin
WPBeginner Staff
Zimbrul, Duplicator is a nice plugin too. However, we have moved many WordPress sites using BackupBuddy and it has always worked flawlessly for us. That’s why we recommend it.
Jim
Fully agree. Duplicator has never let me down and I have backed up and installed to many websites to count. No need for a paid plugin.
Dennis Does Cricket
That’s a ridiculously long winded way of doing it.
Jonathan
I was looking for this. This already assumes knowledge of FTP etc. so why not just:
1. Copy over all files (download locally, upload to new server).
2. Export the DB (you can use Migrate DB free version if you can’t access the old hosts phpmyadmin or such). Also, if you’re moving from a different domain it replaces the urls etc.
3. Create a new DB on your new host, import the DB.
4. Transfer the domain.
Same result, no fiddling with installer scripts and such.
Matt Davis
This is how I would do it.. In addition, you would also need to edit your wp-config.php file with the new DB info (Specifically the database host entry, as I believe importing the old database will create the same database name, user and password on the new one). Also, I would avoid editing your hosts file and instead either use the IP address directly in your browser’s address bar followed by your sub-directory name (if needed) or use the temporary URL most hosters provide when a new account is set up.
The steps in this article are good for someone that doesn’t want to touch configuration files in their WordPress folders, or who want an all-in-one solution that gets them their site and DB in one step.