De nombreux utilisateurs/utilisatrices de WordPress préfèrent travailler sur leur site en utilisant un serveur local sur leur ordinateur. Cela vous permet de travailler sur votre site en privé avant de rendre les modifications disponibles en ligne.
En fin de compte, vous devrez le déplacer vers un serveur direct pour le rendre accessible aux internautes. Cette transition est cruciale pour garantir le bon fonctionnement de votre site sur le site direct.
Nous avons travaillé sur de nombreux sites locaux, nous avons donc dû apprendre la manière la plus simple de transférer du contenu vers des sites En direct.
Dans cet article, nous fournirons des instructions étape par étape sur la façon de déplacer WordPress d’un serveur local vers un site direct.
Pourquoi déplacer WordPress d’un serveur local vers un site En direct ?
La version de votre blog WordPress sur un serveur local est un moyen sûr de tester les modifications apportées à votre site sans affecter les internautes.
Lorsque vous avez fini de perfectionner votre site, l’étape suivante consiste à passer de votre serveur local à un site en direct.
Nous allons vous afficher deux façons de déplacer votre site d’un serveur local vers un site en direct.
La première méthode utilise une extension de migration WordPress et est recommandée pour les débutants.
Dans la deuxième méthode, nous vous afficherons comment déplacer manuellement WordPress d’un serveur local vers un site en direct.
Vous pouvez choisir la méthode qui vous convient le mieux :
Avant de migrer votre site WordPress
Pour migrer WordPress d’un serveur local vers un serveur En direct, vous devez mettre en place un certain nombre d’éléments.
Tout d’abord, nous supposons que vous avez un site WordPress fonctionnant sur un serveur local (également appelé localhost) sur votre ordinateur et que vous y avez un accès complet.
Ensuite, vous devrez disposer d’un nom de domaine et d’un hébergeur.
Nous avons entendu d’innombrables histoires de débutants qui ont commencé avec des fournisseurs d’hébergement web médiocres ou gratuits et qui l’ont regretté. D’après notre expérience, le choix du bon fournisseur d’hébergement est déterminant pour la réussite d’un site.
Pour faciliter votre décision, nous vous recommandons d’utiliser Bluehost. C’est une entreprise d’hébergement WordPress officiellement recommandée, et ils donnent aux utilisateurs/utilisatrices de WPBeginner une remise exclusive + un domaine et un SSL gratuits.
En gros, vous pouvez Premiers pas pour aussi peu que 1,99 $ par mois.
Si vous voulez une excellente alternative à Bluehost, vous pouvez regarder Hostinger. Ils offrent également une remise exclusive aux utilisateurs/utilisatrices de WPBeginner avec un nom de domaine gratuit.
Si vous pouvez vous permettre de payer un peu plus, alors regardez du côté de SiteGround. Ils ont également une offre spéciale pour les lecteurs de WPBeginner.
Si vous avez besoin d’aide pour configurer votre site web, suivez notre guide étape par étape sur la création d’un site web.
Enfin, vous aurez besoin d’un programme FTP et saurez comment l’utiliser pour téléverser le site de votre serveur local sur le site en direct.
Vous êtes prêt ? Commençons à migrer votre site WordPress.
Tutoriel vidéo
Si vous préférez des instructions écrites, continuez à lire.
Méthode 1 : Transférer WordPress du serveur local vers le site En direct à l’aide d’une extension de migration (Recommandé)
Cette méthode est plus facile et recommandée pour les débutants. Nous utiliserons une extension de migration WordPress pour déplacer WordPress de l’hôte local vers un site direct.
Étape par : Installer et configurer l’extension Duplicator
Tout d’abord, vous devez installer et activer l’extension Duplicator sur votre site local. Pour plus de détails, consultez notre guide étape par étape sur l’installation d’une extension WordPress.
Astuce de pro: Il existe également une version pro de Duplicator qui offre des sauvegardes sécurisées, un stockage dans le cloud, une restauration facile des sites, et bien plus encore.
Lors de l’activation, vous devez vous rendre sur la page Duplicator ” Sauvegardes et cliquer sur le bouton ‘Créer une nouvelle’.
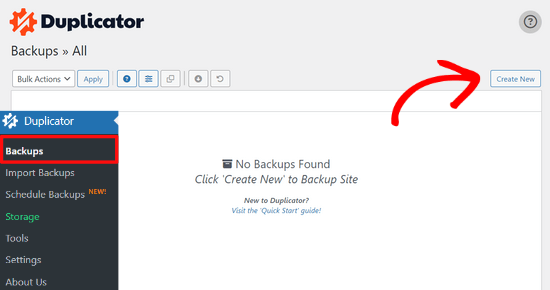
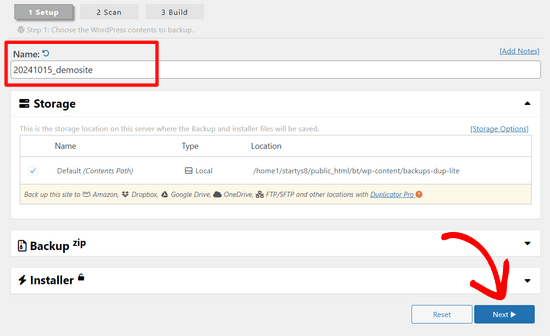
Vous accédez alors à un écran dans lequel vous pouvez donner un nom à votre sauvegarde.
Cliquez ensuite sur le bouton “Suivant”.
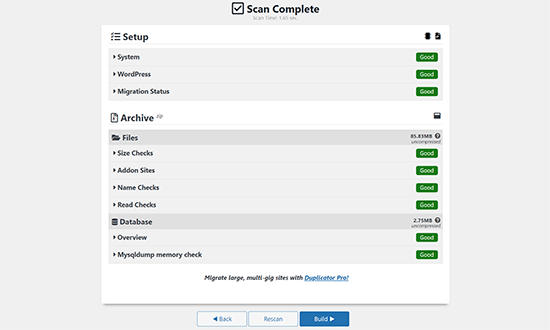
Duplicator va maintenant effectuer quelques tests pour vérifier que tout est bien en ordre.
Si tous les articles sont marqués “Bon”, cliquez sur le bouton “Version”.
Ce processus peut prendre quelques minutes, en fonction de la taille de votre site. Vous devez laisser cet onglet ouvert jusqu’à ce qu’il soit terminé.
Une fois l’opération terminée, vous verrez des options de téléchargement pour les programmes d’installation et d’archivage. Vous devez cliquer sur le bouton “Télécharger les deux fichiers” pour télécharger les deux fichiers sur votre ordinateur.
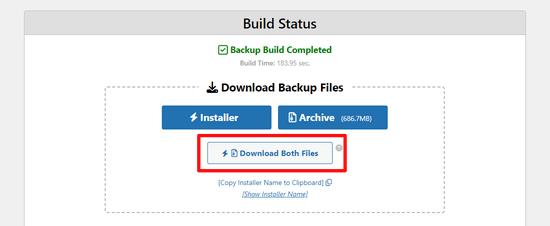
Le fichier “Archive” est une copie terminée de votre site WordPress. Il comprend tous les fichiers du cœur de WordPress ainsi que vos images, vos téléversements, vos thèmes, vos extensions et une sauvegarde de votre base de données WordPress.
Le fichier “Installer” est un script qui automatise l’ensemble du processus de migration en décompressant le fichier d’archive contenant votre site.
Étape par étape : Créer une base de données pour votre site WordPress En direct
Avant de pouvoir exécuter le programme d’installation ou de téléverser le site WordPress de l’hôte local vers votre serveur d’hébergement, vous devez créer une base de données MySQL pour votre nouveau site.
Si vous avez déjà créé une base de données MySQL, vous pouvez sauter cette étape.
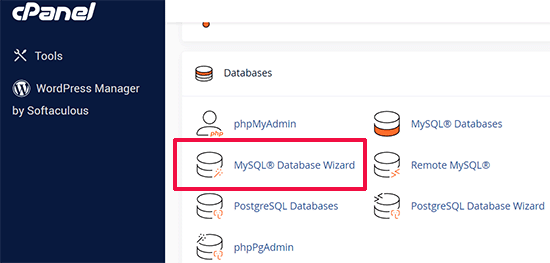
Pour créer une base de données, vous devez vous rendre dans le tableau de bord cPanel de votre compte hébergeur. Localisez ensuite la section “Bases de données” et cliquez sur l’icône “Assistant de base de données MySQL”.
Sur l’écran suivant, un champ permet de créer une nouvelle base de données.
Il vous suffit de donner un nom à votre base de données et de cliquer sur le bouton “Créer une base de données”.

cPanel va maintenant créer une nouvelle base de données pour vous.
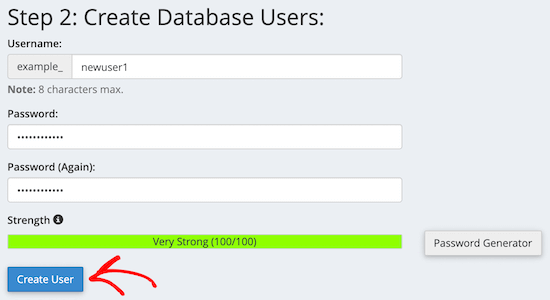
Vous devez ensuite saisir un identifiant et un mot de passe pour votre nouvel utilisateur, puis cliquer sur le bouton “Créer un utilisateur”.
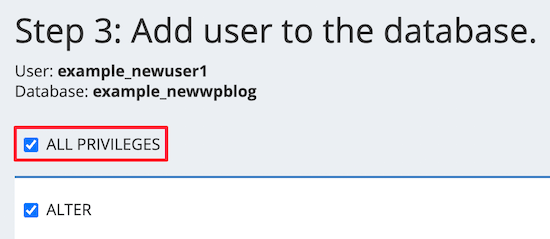
Ensuite, vous devez ajouter l’utilisateur que vous venez de créer à la base de données.
Tout d’abord, cliquez sur la case à cocher “Tous les privilèges”.
Ensuite, défilez vers le bas et cliquez sur le bouton “Apporter des modifications” pour enregistrer vos modifications.
Votre base de données est maintenant prête à être utilisée avec votre site WordPress. Confirmez Notez-vous le nom de la base de données, l’identifiant et le mot de passe. Vous aurez besoin de ces informations à l’étape suivante.
Étape par 3 : Téléverser les fichiers du serveur local vers le site WordPress En direct
Vous devez maintenant téléverser les fichiers d’archive et d’installation de votre site local vers votre compte hébergeur.
Tout d’abord, connectez-vous à votre site en direct à l’aide d’un client FTP. Une fois terminé, assurez-vous que le répertoire racine de votre site est complètement vide.
Normalement, le répertoire racine est le dossier /home/public_html/.
Certaines entreprises d’hébergement WordPress installent automatiquement WordPress lorsque vous vous inscrivez. Si vous y avez des fichiers WordPress, vous devez les supprimer.
Ensuite, vous pouvez téléverser les fichiers archive.zip et installer.php de Duplicator dans votre répertoire racine vide.

Étape par étape : Exécution du script de migration
Après avoir téléversé les fichiers de migration, vous devez visiter l’URL suivante dans votre navigateur :
http://example.com/installer.php
N’oubliez pas de remplacer “exemple.com” par votre propre nom de domaine.
L’assistant de migration de Duplicator est alors lancé.
Le programme d’installation effectue quelques tests et initialise le script.
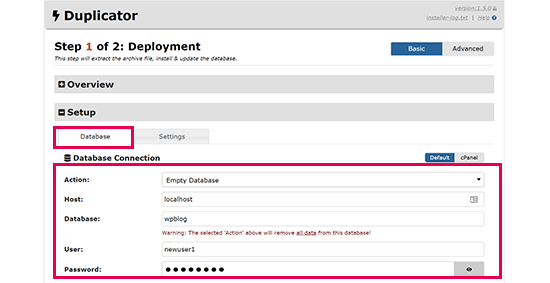
Dans la section Configuration, il vous sera demandé de saisir votre hébergeur MySQL, le nom de votre base de données, votre identifiant et votre mot de passe.
Votre hébergeur sera probablement un hébergeur local. Ensuite, vous saisirez les détails de la base de données que vous avez créée à l’étape précédente.
Cliquez ensuite sur le bouton “Valider” pour vous assurer que les données saisies sont correctes.
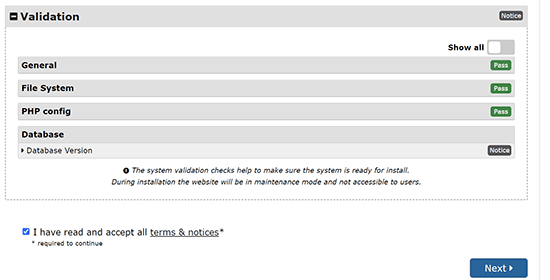
Cliquez ensuite sur le bouton “Suivant” pour continuer.
Duplicator va maintenant importer la sauvegarde de votre base de données WordPress depuis l’archive dans votre nouvelle base de données.
Il mettra également à jour les URL pointant vers le site local et votre nouveau site en direct.
Vous pouvez maintenant cliquer sur le bouton “Connexion Admin” pour saisir la zone d’administration WordPress de votre site en direct.

Une fois que vous vous serez connecté à votre site direct, Duplicator nettoiera automatiquement les fichiers d’installation.
C’est tout. Vous avez bien déplacé WordPress du serveur local vers votre site En direct.
Méthode 2 : Transférer manuellement WordPress du serveur local vers le site En direct
Dans cette méthode, nous allons vous afficher comment déplacer manuellement WordPress du serveur local vers votre site En direct. Elle sera utile si la première méthode ne fonctionne pas ou si vous préférez le faire manuellement.
Étape par étape : Exportation de la base de données WordPress locale
La première chose à faire est d’exporter votre base de données WordPress locale. Nous utiliserons phpMyAdmin pour ce faire.
Si vous ne le connaissez pas, vous pouvez consulter notre guide sur la gestion des bases de données WordPress à l’aide de phpMyAdmin.
Allez simplement sur http://localhost/phpmyadmin/ et cliquez sur votre base de données WordPress. Ensuite, cliquez sur le bouton ” Exporter ” dans la barre de menu supérieure.

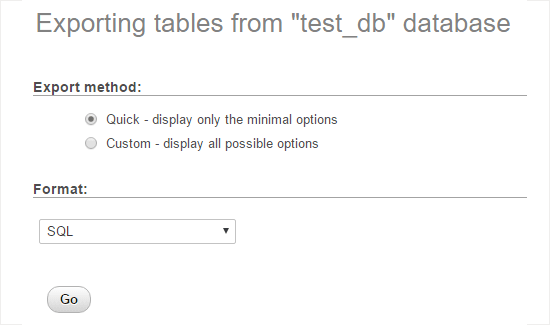
Dans l’option “Méthode d’exportation :”, vous pouvez choisir “Rapide” ou “Personnalisé”. L’option personnalisée vous offre plus d’options pour l’exportation de votre base de données.
Mais nous vous recommandons de choisir “Rapide” et de cliquer ensuite sur le bouton “Go” pour télécharger votre base de données.
Étape par étape : Téléverser les fichiers WordPress sur le site En direct
Nous allons maintenant devoir déplacer tous les fichiers de votre site vers le site En direct.
Pour Premiers pas, ouvrez votre client FTP et connectez-vous à votre compte d’hébergement.
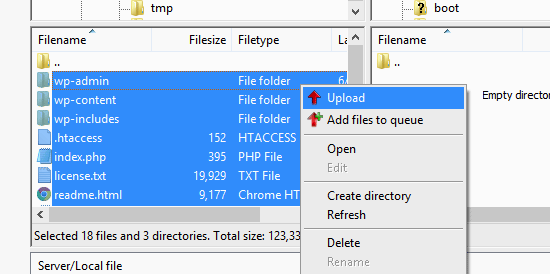
Une fois que vous êtes connecté à votre site En direct, assurez-vous de téléverser les fichiers dans le bon répertoire. Par exemple, si vous souhaitez que le site soit hébergé sur “yoursite.com”, vous devrez téléverser tous les fichiers dans votre répertoire public_html.
Sélectionnez maintenant vos fichiers WordPress locaux et téléversez-les sur votre serveur live.
Étape par étape : Créer une base de données MySQL sur votre site En direct
Pendant que votre client FTP téléverse vos fichiers WordPress, vous pouvez commencer à importer votre base de données sur le serveur direct.
La plupart des fournisseurs d’hébergement WordPress proposent cPanel pour gérer votre compte d’hébergement, nous allons donc vous afficher comment créer une base de données à l’aide de cPanel.
Tout d’abord, vous devez vous connecter à votre tableau de bord cPanel et cliquer sur l’icône “Assistant de base de données MySQL”, qui se trouve dans la section “Bases de données”.

Dans l’écran suivant, vous pouvez créer une nouvelle base de données.
Vous devez donner un nom à votre base de données, puis cliquer sur “Créer une base de données”.

cPanel va maintenant créer automatiquement une nouvelle base de données pour vous.
Saisissez ensuite un identifiant et un mot de passe pour votre nouvel utilisateur, puis cliquez sur “Créer un utilisateur”.
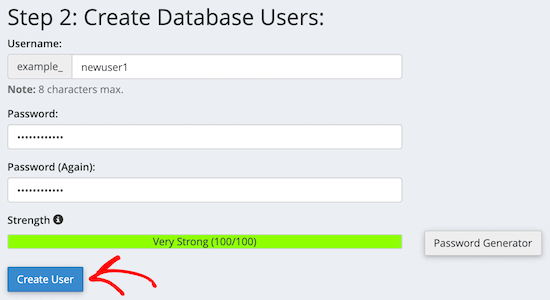
Ensuite, vous devez ajouter l’utilisateur que vous venez de créer à la base de données.
Tout d’abord, cochez la case “Tous les privilèges”.
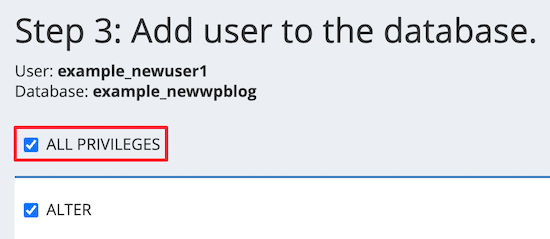
Ensuite, défilez vers le bas et cliquez sur “Apporter des modifications” pour enregistrer vos modifications.
Vous avez bien créé une nouvelle base de données pour votre site WordPress en direct.
Étape par étape : Importation de la base de données WordPress sur le site En direct
L’étape suivante du processus consiste à importer votre base de données WordPress.
Allez dans votre Tableau de bord cPanel, défilez vers le bas jusqu’à la section ‘Bases de données’, et cliquez sur ‘phpMyAdmin’.
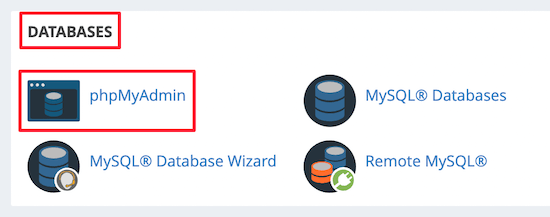
Cela vous mènera à phpMyAdmin, où vous voudrez cliquer sur la base de données que vous venez de créer ci-dessus. phpMyAdmin affichera votre nouvelle base de données sans tables.
Cliquez ensuite sur l’onglet “Importation” dans le menu supérieur. Sur la page d’importation, cliquez sur le bouton “Choisissez un fichier” et sélectionnez le fichier de base de données du site local que vous avez enregistré lors de la première étape.
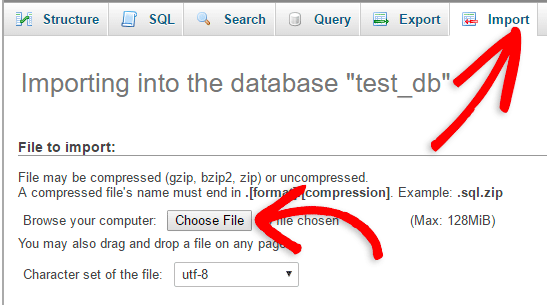
Cliquez ensuite sur le bouton “Go” en bas de la page. Votre base de données sera automatiquement importée dans phpMyadmin.
Étape par étape : Modification de l’URL du site
Vous devez maintenant modifier l’URL du site dans votre base de données afin qu’il se connecte à votre site WordPress direct.
Dans phpMyAdmin, recherchez la table wp_options dans votre base de données que vous venez d’importer ci-dessus.
Si vous avez modifié le préfixe de votre base de données, il se peut qu’au lieu de wp_options, ce soit {nouveau_préfixe}_options.
Cliquez ensuite sur le bouton “Parcourir” situé à côté de wp_options. Vous pouvez également cliquer sur le lien dans la colonne latérale pour ouvrir la page contenant la liste des champs de la table wp_options.
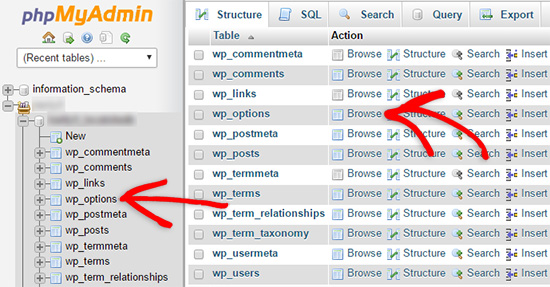
Ensuite, dans la colonne options_name, vous devez rechercher l’option siteurl.
Cliquez ensuite sur l’icône “Modifier”.

Une fenêtre s’ouvre, dans laquelle vous pouvez modifier le champ.
Dans le champ option_value, vous verrez l’URL de votre installation locale, qui sera quelque chose comme http://localhost/test.
Vous devez insérer l’URL de votre nouveau site dans ce champ, par exemple : https://www.wpbeginner.com.
Vous pouvez ensuite enregistrer le champ en cliquant sur le bouton “Go”.
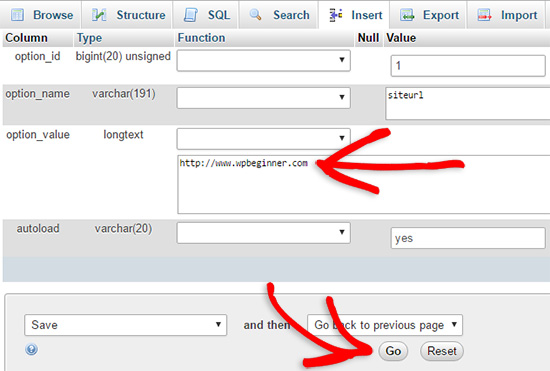
Ensuite, vous devez suivre les mêmes étapes que ci-dessus pour le nom de l’option d’accueil. Le menu wp_options peut comporter plusieurs pages. En général, l’option d’accueil se trouve sur la deuxième page.
Ensuite, mettez à jour l’URL de la page d'accueil, afin qu’elle soit identique à l’URL de votre site direct.
Étape par 6 : Configurer votre site En direct
Maintenant que vous avez importé la base de données et téléversé votre contenu, il est temps de configurer WordPress.
À ce stade, votre site devrait afficher une erreur“Erreur lors de l’établissement de la connexion à la base de données“.
Pour corriger ce problème, connectez-vous à votre site à l’aide d’un client FTP et ouvrez le fichier wp-config.php.
Vous rechercherez les lignes de code suivantes :
1 2 3 4 5 6 7 8 9 | // ** MySQL settings - You can get this info from your web host ** ///** The name of the database for WordPress */define( 'DB_NAME', 'database_name_here' );/** MySQL database username */define( 'DB_USER', 'username_here' );/** MySQL database password */define( 'DB_PASSWORD', 'password_here' );/** MySQL hostname */define( 'DB_HOST', 'localhost' ); |
Vous devrez fournir le nom de la base de données, l’identifiant et le mot de passe que vous avez créés précédemment.
Ensuite, enregistrez le fichier wp-config.php et téléversez-le sur votre serveur d’hébergement WordPress.
Maintenant, lorsque vous visitez votre site, il devrait être en direct.
Après cela, vous devez vous connecter à votre panneau d’administration WordPress et aller dans les Réglages ” Général“. Ensuite, sans rien modifier, défilez jusqu’en bas et cliquez sur le bouton ” Enregistrer les modifications “.
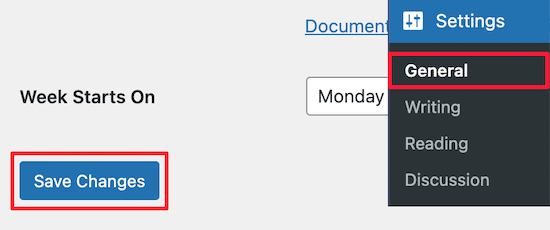
Confirmez-vous que l’URL de votre site est corrigée partout où elle doit l’être.
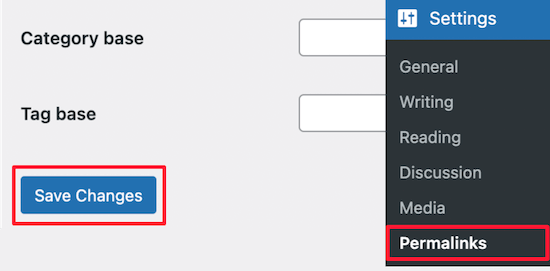
Une fois que vous avez fait cela, allez dans Réglages ” Permaliens, puis défilez vers le bas et cliquez sur ” Enregistrer les modifications ” pour vous assurer que tous les liens de publication fonctionnent correctement.
Étape par 7 : Corriger les images et les liens brisés en mettant à jour les chemins d’accès
Chaque fois que vous déplacez un site WordPress d’un domaine à un autre ou d’un serveur local à un site en direct, vous serez confronté à des liens brisés et à des images manquantes.
Nous allons vous afficher deux façons de mettre à jour les URL. Vous pouvez choisir celle qui vous convient le mieux.
1. Mettre à jour les URL à l’aide de l’extension Search & Replace Everything (Recommandé)
Le moyen le plus sûr de corriger cela est d’utiliser Rechercher & Remplacer tout. C’est une puissante extension WordPress qui vous permet d’effectuer facilement des tâches de mise à jour en masse sur votre site sans écrire de requêtes de base de données complexes.
Tout d’abord, vous devez installer et activer l’extension Search & Replace Everything.
Après l’activation, allez sur la page Outils ” WP Search & Replace.
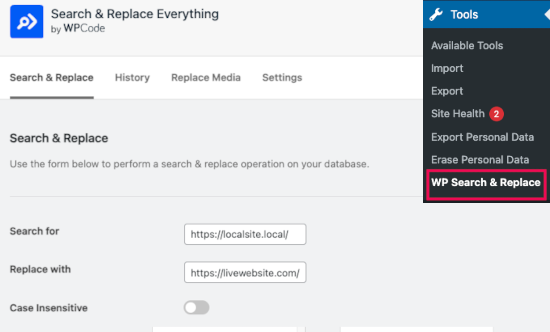
Saisissez ensuite l’URL de votre site local dans le champ “Rechercher” et l’URL de votre site direct dans le champ “Remplacer par”.
Défilez un peu et cliquez sur “Tout sélectionner” sous les tableaux. Cela garantit que l’extension recherchera l’ancienne URL partout dans la base de données.
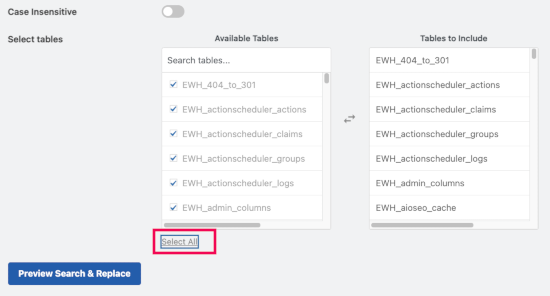
Cliquez ensuite sur le bouton “Prévisualisation de la recherche et du remplacement” pour continuer.
L’extension recherchera dans votre base de données toutes les instances de l’ancienne URL, puis prévisualisera les résultats.
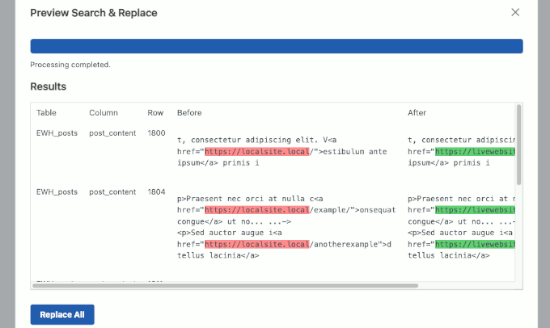
Si tout semble correct, cliquez sur “Remplacer tout” pour enregistrer les modifications.
Vous verrez un avertissement concernant les modifications que vous êtes en train d’effectuer. Cliquez sur “Oui” pour continuer.
L’extension va maintenant mettre à jour la base de données et remplacer les URL locales par l’URL actuelle de votre site.
2. Mise à jour manuelle des URL (avancé)
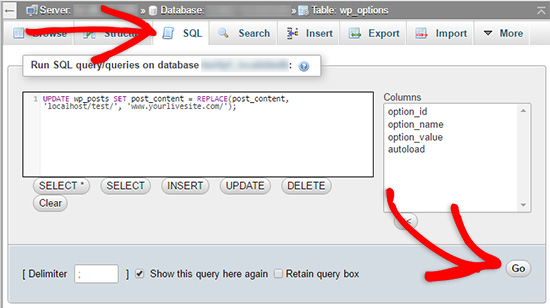
Une autre façon de mettre à jour les URL est d’utiliser la requête SQL suivante :
1 | UPDATE wp_posts SET post_content = REPLACE(post_content, 'localhost/test/', 'www.yourlivesite.com/'); |
Allez simplement dans phpMyAdmin, cliquez sur votre base de données, puis cliquez sur “SQL” dans le menu supérieur et ajoutez la requête ci-dessus.
Confirmez les modifications apportées aux URL de votre site local et de votre site direct, puis cliquez sur le bouton “En direct”.
Voilà, c’est fait. Vous avez bien migré WordPress de votre serveur local vers un site En direct.
En direct, votre site est opérationnel et fonctionne correctement. Si vous remarquez des erreurs, vous pouvez consulter notre guide des erreurs courantes de WordPress pour obtenir de l’aide pour le dépannage.
Nous espérons que cet article vous a aidé à déplacer WordPress d’un serveur local vers un site En direct. Vous pouvez également consulter notre guide sur le déplacement d’un site direct vers un serveur local ou regarder la liste de contrôle ultime de migration de site Web pour les étapes pratiques de migration de WordPress.
Si vous avez aimé cet article, veuillez alors vous abonner à notre chaîne YouTube pour obtenir des tutoriels vidéo sur WordPress. Vous pouvez également nous trouver sur Twitter et Facebook.


ANTONIO
Some days ago I posted I had used method #1 successfully. I am now trying again, from scratch, with no success.
I have two webs in one host (two subdomains: www and blog). one seats in /public/ and the other seats in /public_blog/.
(so, not a subfolder but a sibling, in my host provider). Both (www and blog subdomains) have a SSL.
I got to enter the WP admin area, clean the remaining files; posts and pages are listed, but clicking preview shows a blank page. No errors on the log
I don’t know how to trace and find out the steps (although I have the dup-installer-log.txt
thanks
WPBeginner Support
You would likely want to reach out to your hosting provider to ensure that the subdomain is set to the correct folder location for the most common reason for that issue.
Admin
Rob H
Brilliant tutorial.
I went with option 1. Got write through to point 4, but then on trying to launch WordPress, I received a “too many redirects”. Spent ages trying to figure out what I had done wrong, trying all the suggested for the error type and turned out not to be my fault. It wasn’t working because the database version I was using on Wamp was newer than the version on my hosting company 1and1 ionos.
I called up 1and 1 CS’s to ask if they could update the database version and it appears they must have had other complaints. 2 days later, database version updated and my local website transferred to the live site within minutes.
So…… database versions is another thing to consider if you get problems.
Thanks for such an excellent tutorial, I will use this method again in the future.
WPBeginner Support
Thanks for sharing your solution should anyone else run into this issue
Admin
Antonio
Perfect. I used method #1. Now the site (in server) is up and running.
But, then, when I add some posts, pages, menus in localhost,… how can I update the real site, without starting from scratch again?
thanks
WPBeginner Support
You could use the duplicator method to move the updated content over to your current site
Admin
Antonio
Thanks. I will try.
I didn’t notice my post was published yesterday, so I just wrote a new one asking the same question.
Sorry for the inconvenience.
WPBeginner Support
No worries
Bahadur
My website working fine on localhost but when i upload it to my live domain some of the Social button images are not showing can you help please ?
WPBeginner Support
We would first recommend reaching out to the support for the plugin you are using to ensure there isn’t a hiccup that is specific to transferring the content.
Admin
Luisa
Hi! I followed every step but once I get to step 4 and click on Admin Login I get an error saying “Too many redirects occurred trying to open […]. This might occur if you open a page that is redirected to open another page which then is redirected to open the original page”.
How can I fix that?
WPBeginner Support
For that error you would want to try the troubleshooting steps in our article here: https://www.wpbeginner.com/wp-tutorials/how-to-fix-error-too-many-redirects-issue-in-wordpress/
Admin
Anita Steen-van Meerveld
Hi, I’ve followed the instructions so far, and everything seems to go as it has, but the problem begins on step 4.
I’ve uploaded the migration files, after check the file is 1.2 gig.
After launching the installer.php the message is : file is 4k, please upload the complete file.
I am sure that the uploaded file is completely uploaded.
The process stops here, what can I do?
WPBeginner Support
You would want to reach out to duplicator’s support and let them know the error and they will be able to assist.
Admin
Jessica
Thankyou for this fantastic tutorial! I am building a new website locally but I already have a live site running that I will want to completely overwrite with the new one. Do I need to delete my whole live website before migrating? Both are running WordPress but are completely different themes… thanks!
WPBeginner Support
It would normally be best to remove the site you are replacing so you do not have unnecessary additional files on your server.
Admin
nurudeen
In my opinion I recommend you guys to please organize a complete video tutorial, it gonna be a great practical guide and more helpful and much easier, for it may allow to view in real doing until results achieve.. Thanks you guys for good job you are offering.
WPBeginner Support
Thank you for your recommendation
Admin
Reggie
Hi, I did this and now my slider/carousel does not work live but it shows and works on localhost. What can I do to fix this? Thank you.
WPBeginner Support
It would depend on what error you are running into at the moment. If you reach out to the slider plugin’s support they should be able to assist.
Admin
Gage
Hi I really appreciate the in depth explanation. I am completely finished with step 5, changed my URL and Home to my actual URL i am using, but now when I type in my URL it still gives me the “if you are the owner login to launch site”. Not sure what I’m missing but i dont get an error message.
WPBeginner Support
Hi Gage,
Please recheck if you uploaded WordPress files to the correct directory. If you are unsure, then ask your hosting provider and they will let you know which directory you should upload it to.
Admin
Vladimir
Thank. Very useful tutorial.
WPBeginner Support
Thank you
Admin
Tarun Bisht
Thanks for sharing the post, i will surely try.
WPBeginner Support
Glad our post can help you
Admin
Hazel beaver
I normally love your tutorials and have built my two personal websites with your help and guidance… But this is too complicated for me!
When I run Duplicator If doesn’t list all the entries as ‘good’. The size check and add on checks come back as having a warning. so I can’t get any further. My site isn’t that big.. but I think it’s trying to package everything ( including back-up and plugins that I assume I don’t need to migrate. Is there a way round this ( I’m trying to down load my live site to WAMP so I can work on using a new theme )
WPBeginner Support
As long as they are only warnings you should be able to continue, if you click on the section with the warning it should let you know different options on how to change from warning to good. You can also enable filters to ignore certain files/folders
Admin
Fahim
Good post.
WPBeginner Support
Thank you
Admin
Ravi gupta
Great! Thanks for sharing this information I am so very happy to read this information
WPBeginner Support
Glad you like our article
Admin
Rosa
Hi there! I’ve followed your instructions so far, and everything seems to go as it has, but I’ve stuck on Step 6.
I read: “To fix this, connect to your website using an FTP client and edit wp-config.php file. Provide the database name, user and password you created earlier in Step 3. Save the wp-config.php file and upload it back to your server. Visit your website, and it should be live now.”
Can you please be more specific? Where exactly do I find wp-config.php file and how do I edit it?
WPBeginner Support
You would find the wp-config file where your WordPress folders are which is normally in the public_html or www folder of your hosting. You would use a text editor such as notepad or similar to edit the content of the file
Admin
Hirr
Could be more helpful if you uploaded a video..
WPBeginner Support
Thank you for your recommendation, we’ll certainly take a look for a possible video
Admin
Mike
“Click on the Import tab in the top menu. On the import page, click on Choose File button and then select the database file you saved in Step 1.” I cannot locate this file – no idea where to even look.
WPBeginner Support
Hi Mike,
In the first step you would have saved a file to your computer. This is the file you need to import here.
Admin
Samad
Thank you very much for the information,
I have been doing these wrong in the past.
Jim Thorne
Fantastic how-to article. I followed it and easily migrated my site from localhost to the live server. Thanks for posting! I’m a newbie at moving a site, so I had to figure out some of the simplest things. One thing I had to discover was how to move the file folders from my computer to the host server using cPanel. After researching this, I discovered to ZIP the entire folder with all of its subfolders into a ZIP file and then upload that one file.
Christian
Fix Images and Broken Links by Updating Paths: How to update background images? The method mention in step 7, only work normal image not background images. So how to update images?
WPBeginner Support
Hi Christian,
You’ll have to manually update those.
Admin
Alex
Hi guys, great tutorial.
But when i try to access my site through the url, it asks me to re-install WordPress (i mean is shows me the wizard of the WordPress when it starts)
Plus, when you say go to the database and create a new user, mySQL doesn’t have an option.
Olaniyan
Hello please i followed all the steps but at the end of it all am getting an error message stating Erro In Establishing a database connection message
Steph
Hi, how do I proceed if there is no cPanel? Thank you in advance!
Jasonas
Hello! Great article. Just two things that I think would be cool to read on this subject.
1.Are there any tips of workflow in order to avoid the broken links, images etc. that you mention?
2.Also, I’ve read plugin reviews where users claim that some bad plugins will leave “trash code” (unusable code and files) after the uninstall/deletion of the plugin, which eventually makes their website slower. Is that true? If yes how could we, as beginners, detect that “trash code” (essentially the leftovers of plugins that we deleted) and remove it?
In my local website I try many plugins that I don’t intend to use and will end up deleting (like many others do), so I am interested in this.
Thank you in advance.
WPBeginner Support
Hi Jasonas,
1. You can follow the steps above in order they appear to avoid broken links.
2. You can view leftover data in your WordPress database by using phpMyAdmin. However, we don’t recommend beginners to do that unless they are certain that this data is slowing down their website.
Admin
Sally
Hi,
I have been building my site on the local server, I now want to move it over to a temporary Url on my WordPress which is installed on my hosting package to finish and then once ready it will be pointed to the domain name which currently hosts the old site, I have attempted the above steps but I get as far as step 1 and have no idea where the export file goes?
Sorry if this is a silly question but can’t seem to find it anywhere!
Any help would be much appreciated.
Thanks,
Sally
WPBeginner Support
Hi Sally,
Export file is automatically downloaded to your computer. Check your computer’s Downloads folder or any other folder where your browser usually stores downloaded files.
Admin
Sally
Hello,
Thanks, sorry can’t find it there at all. I emptied the folder and did it again but nothing appeared in there at all, hence asking the question.
All Safari downloads go into the normal download folder, so don’t know where it could be going. Going to give it a go with Duplicator and see if I get any further!
Thanks,
Sally
Sheuen
I think maybe you can try choose download custom instead of download quick, and then in output field, choose “Save output to a file” > Compression: > gzipped
JD Simpkins
Depending on your setup, it may not automatically download. It may open up in a new screen and you can then copy/paste it into a file and save yourself. Not sure if this is just a MAMP thing or what but when I migrated over to working on a Mac, this part of the steps changed.
Sally
Hi,
Your tutorials are great, thank you!
I have just been following this thread and not sure if what I am doing is wrong but I do Step 1 (Export) but no idea where the file that I am exporting goes?
I am running a local server on my Mac and have got stuck here, am I missing something?
I am trying to get my website from the local server to WordPress running on my hosting package with 123 Reg. This is going onto a temporary URL until I am ready to move onto the domain which has currently got the old website on it.
Any help will be much appreciated.
Many thanks
Sally
Ahmad Lone
Thank you so much.
Ismail
I have a wordpress website on live server, i want to replace it by another wordpress server that i created on localhost, i want to keep the same host and same domaine name. what should i do please ?
Sandy
This is very helpful. I want to ask about the next step. What if I continue to develop locally and want to sync changes from time to time ? Do you have a tutorial for that ?
DEAN O
I have an issue where my laptop died with localhost MAMP server. I have been able to extract the all the files from the hard disc but I can’t run a database export.
I have an laptop set up with XAMP.
Any thoughts?
Mauricio
Sunday evening.
The client wants the website.
I have tried Duplicator all day long, no way.
Problems with PHP and DB, just doesn’t work… until I get to your post.
Back to basics man, manually put the live on air.
Thanks for sharing.
Its the simpler idea yet we try to automate things and get less work done sometimes.
Had to share with you my truly akcnowledgment.
Nicely done
Stefan
Thank you! This guide is perfect. I use it every time I forget how I move wordpress from local to live!
Chell
I have recieved a complete WP “filesystem” through an FTP server from a supplier of mine, and I want to creat a new webpage with these files, but with my own domain.
Can I use this “walk-through” for this?
Sorry silly questions, but I have only worked on WP through a cloud solution
WPBeginner Support
Hi Chell,
You will also need the WordPress database not just the files. Once you have both database and WordPress files, then you will be able to upload them to your own domain name and import the database.
Admin
Scott
Hello. I have finished building my site on a local server and ready to move it to my live server. I am assuming that before I follow your steps, that I would need to install WordPress on my hosting account first. Is that correct? And if so, should I click the box that says “Automatically create a new database for this installation” ? If I do that, I will need to replace that database with the one from my local server, right? Or should I leave that box unchecked since I’m about to migrate a new database to it? Thanks.
WPBeginner Support
Hi Scott,
No, instead of installing WordPress you will be moving one from your local server to the live site. Similarly, you will export your local database and then import it on your live server’s hosting account using phpmyadmin via cpanel.
Admin
Bryn Why
Hi, after updating my wp-config.php file to reflect the database information, I am now presented with the below when accessing the live site:
Fatal error: Class ‘WP_Widget_Media’ not found in /home/…/wp-includes/widgets/class-wp-widget-media-audio.php on line 17
Manos Liakos
Dude, you are a life saver. That thing with the SQL query to change the links just saved me. I’ve been trying for 2 days straight to fix the site not displaying properly when accessing it from public ip through my domain name, even if “siteurl” and “home” were correctly configured. Thanks!
WPBeginner Support
Hi Manos,
Glad you found the solution. Don’t forget to join us on Twitter for more WordPress tips and tutorials.
Admin
Shreshta
Thank you in advance.
I have to upload the word press website from my local machine to the web server my company owns which sits in the same building as I work. My problem is I am not using any hosting services so I am not sure what to do when it comes to the file manager step for the database transfer. Just to be clear, how would I go if I were to upload the website from my local machine to the private company server without using a web hosting service.
Dimitris
Hello I am going to do this migration, but I have a question. What happened if i have to upload a website to a server but in my localhost this website is a part of multisite? How can I isolate this website from the local WordPress Network and finally upload it to a real web server?
Olumide
phpMyAdmin – Error
Error during session start; please check your PHP and/or webserver log file and configure your PHP installation properly. Also ensure that cookies are enabled in your browser.
session_start(): open(SESSION_FILE, O_RDWR) failed: No such file or directory (2)
The above is what i get and my site is not working please help.
WPBeginner Support
Hi Olumide,
If the error occurs on your live site, then please contact your hosting provider. If this happens on your local server, then this means your local server set up is not properly configured.
Admin
Angela
I just followed these steps to move a local site to active and none of my local site transferred over.
Olakorede O
Please i am having issues with step 7. i imputed the life site but what will i put for the local site? thanks
Dimitri
Thanks god for this article !
The Step 6 saved my life, it could not be found anywhere on the internet !!!
Kisses from France
Marlon
Hi WPBEGINNER SUPPORT et al,
Thanks I have found your article helping people out there. I hope I can find your favor to my problem. After having modifies by adding codes in functions.php (live site) i can’t view or access the website anymore, it always shows the message saying:
Notice: ob_end_clean(): failed to delete buffer. No buffer to delete in /home/dh_awey63/website/wp-content/plugins/nextgen-gallery/nggallery.php on line 92
ParseError thrown
syntax error, unexpected ‘ang’ (T_STRING)
I used to searched in google the message error and got some advices to access it thru FTP FileZilla client, but I can’t login successfully I always got an error in: “Response: 530 Login incorrect”. “Error: Critical error: Could not connect to server”. Is there a way i can edit the functions.php file to delete my comments there and put back the site in normal, I just don’t know if the web developer have configured ftp account, that freelance developer left his messy and lousy stuff in his web design and has gone out after he receives the payment. I am really new to this area and don’t know what to do. Please help. Thank you very much.
WPBeginner Support
Hi Marlon,
You can also access your WordPress files using the File Manager in cPanel under your web hosting account dashboard. Once you are connected to your site using file manager, you need to locate your functions.php file and undo the changes you made earlier.
Admin
Marlon
Hi WPBEGINNER SUPPORT,
Thank you for your prompt reply. I sad I really have no idea if the guy who build the site created a cpanel account, I really don’t know the login details if there’s any. That bad guy never replies my messages after he receives the money from us. Please help me what to do if there’s any available options. Please visit the website at rheumacares.ph. Thank you very much.
Victor
Hi, I’m with a problem in step 4. After importing my database I get an error message. I don’t now what I did wrong in the process and I don’t know how to fix it. Could you give me some advice? I’m posting the error message below
Thanks
Error
SQL query:
—
— Database: `meusite`
—
— ——————————————————–
—
— Table structure for table `wp_commentmeta`
—
CREATE TABLE `wp_commentmeta` (
`meta_id` bigint(20) UNSIGNED NOT NULL,
`comment_id` bigint(20) UNSIGNED NOT NULL DEFAULT ‘0’,
`meta_key` varchar(255) COLLATE utf8mb4_unicode_520_ci DEFAULT NULL,
`meta_value` longtext COLLATE utf8mb4_unicode_520_ci
) ENGINE=InnoDB DEFAULT CHARSET=utf8mb4 COLLATE=utf8mb4_unicode_520_ci
MySQL said: Documentation
#1050 – Table ‘wp_commentmeta’ already exists
WPBeginner Support
Hi Victor,
The table in your database already exists. If you do not have any content on your live site, then you can simply DROP all tables in your WordPress database and then try to import again.
Admin
Jonathan
Thank you for a fantastic article!
I have locally built a wordpress site which I would like to replace a site currently live online.
If I want to upload the local site to a test environment online, am I able to do this without the need to setup a new database? i.e. am i able to share the same database being used by the live site? If so how can I do this?
Cheers, Jon
Jon
Fantastically helpful article thankyou! I have been building a wordpress site locally to replace one that is hosted online.
I would like to move the locally hosted one to online in a test environment so that it does not replace the existing site.
You instructions suggest that I need to setup a new SQL database for which I will incur charges. Is there a way that I can upload the test site to the existing database without disturbing the live site? If so how?
Thanks,
Jon
WPBeginner Support
Hi Jon,
It is not recommended, but you can change the table prefix in the wp-config.php file of your test site to something unique. Use the same MySQL database as your live site. Doing so your live website’s database will have tables for different WordPress installs.
Admin
Jojo Esposa Jr
Can I use the Cpanel Softaculous installation of WordPress, then simply upload the sql database and the current theme I used? Uploading the entire wordPress files from my laptop to the live site using ftp takes very long since my internet connection is extremely slow, (2 mbps).
WPBeginner Support
Hello Jojo Esposa Jr,
Yes, you can do that.
Admin
Lyada Emmanuel
Hello i followed all the steps ,however when i open login page to wordpress i get this
Internal Server Error
WPBeginner Support
Hi Lyada,
Please see our guide on how to fix internal server error in WordPress.
Admin
Madison Duncan
Hello,
I am confused by step two. When I click on my FTP client account it prompts me to use Cyberduck, but then I am not sure which files to upload or where (how to I make sure it is on public html?). I completed step one, so are those the files that I am supposed to upload? I just don’t see all of those anywhere. Thanks!
WPBeginner Support
Hi Madison,
This tutorial is about moving a WordPress website built on local server (Your computer) to a live website. If you have a local server installed on your computer (programs like Wamp, MAMP, XAMP), then you will find local files on your computer. These are the files you need to upload.
The first step only exports your database. You will need it in Step 4.
Admin