Vous souhaitez disposer d’un espace sûr pour expérimenter avec votre site WordPress sans craindre de casser quelque chose sur votre site en direct ?
Déplacer votre site WordPress sur un serveur local sur votre ordinateur est la solution idéale, à notre avis, en particulier pour les développeurs, les concepteurs ou les débutants en matière de WordPress.
L’installation de WordPress sur votre ordinateur (serveur local) vous permet d’apprendre facilement à utiliser WordPress et de tester des choses. Lorsque vous déplacez un site WordPress en direct sur un serveur local, cela vous permet d’expérimenter avec les mêmes données que votre site en direct.
Dans cet article, nous vous montrerons comment déplacer facilement un site WordPress en direct vers un serveur local.
Pourquoi et qui voudrait déplacer un site WordPress en direct vers un serveur local ?
Si vous gérez un site WordPress depuis un certain temps, il se peut que vous souhaitiez tester de nouveaux thèmes ou une extension. Cependant, si vous le faites sur un site en direct, vos utilisateurs risquent d’avoir une mauvaise expérience.
Pour éviter cela, de nombreux utilisateurs créent une copie de leur site WordPress sur un serveur local pour tester de nouveaux thèmes, des extensions, ou faire des essais de développement.
Cela vous permet de configurer votre thème avec tout votre contenu et de tester toutes les fonctionnalités sans craindre de casser votre site. De nombreux utilisateurs copient leur site sur un serveur local afin de mettre en pratique leurs compétences en matière de WordPress et de codage avec les données réelles du site.
Même si vous pouvez effectuer tous les tests avec un contenu fictif dans WordPress, les données d’un site réel vous donnent une meilleure représentation visuelle de la façon dont ces changements apparaîtront sur votre site direct.
Préparation du transfert d’un site local vers un serveur local
Tout d’abord, vous devez vous assurer de toujours sauvegarder votre site WordPress. Il existe plusieurs excellentes extensions de sauvegarde WordPress que vous pouvez utiliser.
Deuxièmement, vous devez installer un environnement de serveur local sur votre ordinateur. Vous pouvez utiliser WAMP pour Windows et MAMP pour Mac. Une fois l’environnement installé, vous devez créer une nouvelle base de données à l’aide de phpMyAdmin.
Il suffit de visiter l’URL suivante dans votre navigateur pour lancer phpMyAdmin.
http://localhost/phpmyadmin/
http://localhost:8080/phpmyadmin/
A partir de là, vous devez cliquer sur l’onglet “Bases de données” et créer une nouvelle base de données. Vous aurez besoin de cette base de données pour décompresser ultérieurement les données de votre site en direct.

Vous êtes maintenant prêt à déplacer votre site WordPress en direct vers un serveur local.
Méthode 1. Déplacer un site WordPress En direct vers un serveur local à l’aide d’une extension
Cette méthode est plus simple et recommandée pour tous les utilisateurs.
La première chose à faire est d’installer et d’activer l’extension Duplicator. Pour plus de détails, consultez notre guide pas à pas sur l’installation d’une extension WordPress.
Duplicator vous permet de créer facilement un paquet de duplicata de l’ensemble de votre site. Il peut être utilisé pour déplacer votre site WordPress vers un nouvel emplacement, et peut également être utilisé comme une extension de sauvegarde.
Remarque : il existe une version gratuite de Duplicator avec laquelle vous pouvez commencer. Cependant, Duplicator Pro propose des sauvegardes illimitées et des fonctionnalités plus avancées.
Dès l’activation, rendez-vous dans Duplicator Pro ” Sauvegardes depuis votre barre latérale d’administration WordPress. Pour créer un nouveau package, vous devez cliquer sur le bouton ” Ajouter un nouveau “.
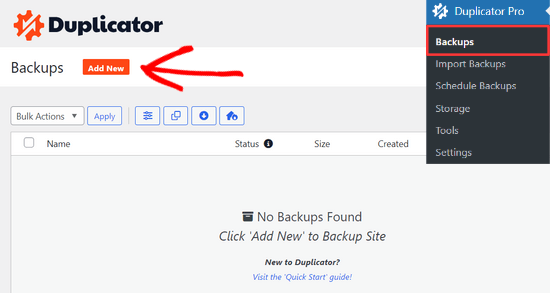
Duplicator lance alors l’assistant de sauvegarde.
Tout d’abord, vous devez saisir un nom pour votre paquet de sauvegarde. Vous pouvez également utiliser les identifiants dynamiques pour créer automatiquement un format de nom comme la date et le titre de votre site.

Développez ensuite la section “Stockage” et choisissez un emplacement de stockage.
Pour ce tutoriel, nous utiliserons l’emplacement par défaut. Vous pouvez cliquer sur le lien “Ajouter un stockage” pour ajouter un nouvel emplacement, comme Dropbox ou Google Drive, si vous le souhaitez.
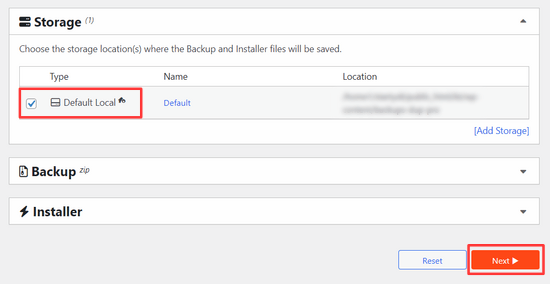
Cliquez sur le bouton “Suivant” pour continuer.
L’extension analysera ensuite votre site et effectuera des vérifications en arrière-plan. Il vous présentera ensuite un récapitulatif de ces vérifications.
Si tout semble correct, cliquez sur le bouton“Créer une sauvegarde” pour continuer.
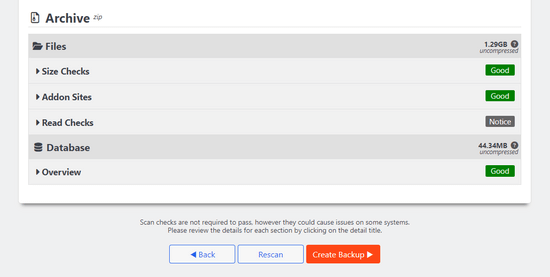
Duplicator va maintenant créer le paquet de votre site.
Une fois l’opération terminée, vous verrez apparaître un fichier d’archive zip contenant toutes les données de votre site, ainsi qu’un fichier d’installation. Vous devez télécharger les deux fichiers sur votre ordinateur.
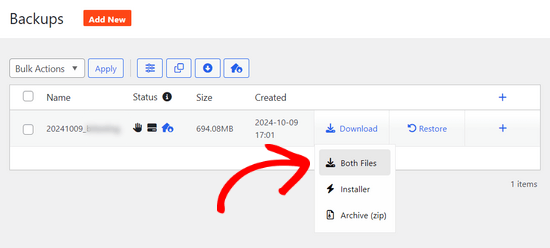
Vous êtes maintenant prêt à décompresser et à installer ces fichiers sur votre serveur local.
Tout d’abord, vous devez créer un nouveau dossier dans le dossier racine de votre serveur local. Il s’agit du dossier dans lequel votre serveur local stocke tous les sites web.
Par exemple, si vous utilisez MAMP, il s’agira du dossier /Applications/MAMP/htdocs/. Si vous utilisez WAMP, il s’agira du dossier C:\wamp\www\.
Dans ce dossier, vous pouvez créer de nouveaux dossiers pour chaque nouveau site que vous souhaitez importer ou créer sur votre serveur local.
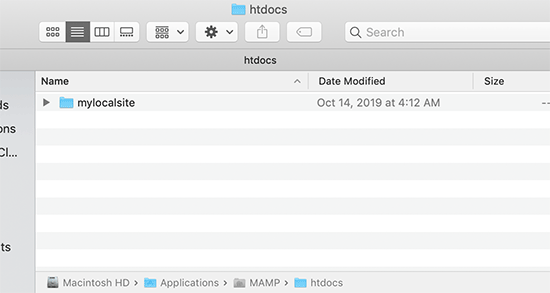
Ensuite, vous devez ouvrir le dossier que vous avez créé pour votre site local, puis copier et coller le fichier zip de l’archive et le programme d’installation que vous avez téléchargé plus tôt.
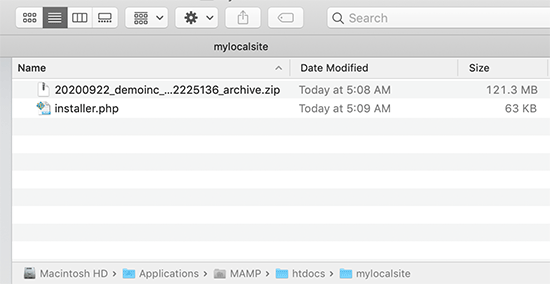
Pour lancer l’installation, vous devez ouvrir le script installer.php dans votre navigateur web.
Par exemple, si vous avez collé les deux fichiers dans le dossier /mylocalsite/, vous y accéderez dans votre navigateur en visitant http://localhost/mylocalsite/installer.php.
Le script d’installation de Duplicator s’affiche alors comme suit :
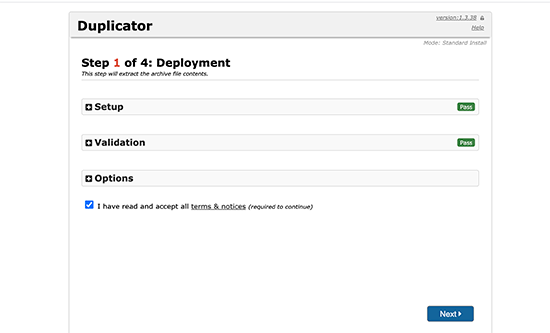
Cliquez sur le bouton “Suivant” pour continuer.
Duplicator va maintenant décompresser le fichier zip de l’archive et vous demandera de saisir les informations relatives à la base de données de votre site local. Il s’agit de la base de données que vous avez créée précédemment.
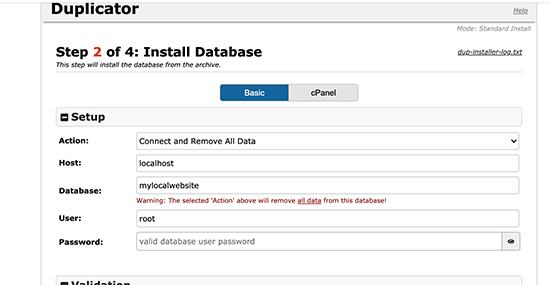
Le nom du serveur est presque toujours localhost et le nom d’utilisateur est root. Dans la plupart des cas, l’installation de votre serveur local ne prévoit pas de mot de passe pour root, vous pouvez donc laisser ce champ vide.
En bas de la page, vous verrez un bouton “Tester la base de données” que vous pouvez utiliser pour vous assurer que les informations de votre base de données sont correctes.
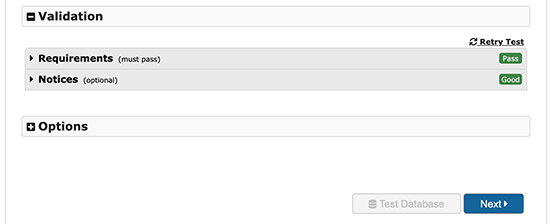
Si tout semble correct, cliquez sur le bouton “Suivant” pour continuer.
Duplicator va maintenant importer votre base de données WordPress. Ensuite, il vous demandera de revérifier les informations du nouveau site qu’il a détecté automatiquement.
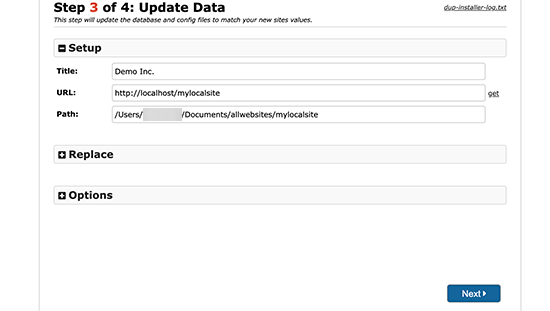
Cliquez sur le bouton “Suivant” pour continuer.
Duplicator va maintenant terminer l’installation et vous montrera un bouton pour vous connecter à votre site local. Vous utiliserez le même nom d’utilisateur et le même mot de passe WordPress que ceux que vous utilisez sur votre site En direct.
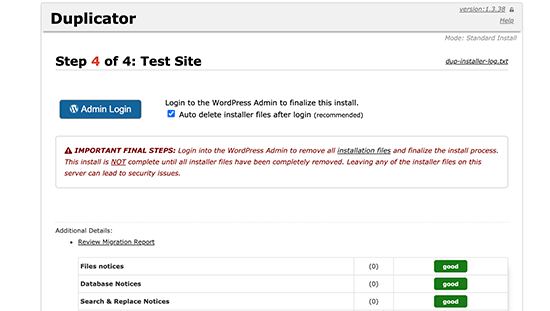
C’est tout, vous avez réussi à déplacer votre site direct vers le serveur local.
Méthode 2. Déplacer manuellement un site WordPress en direct vers un serveur local
Si l’extension ne fonctionne pas, vous pouvez toujours déplacer manuellement votre site en direct vers un serveur local. La première chose à faire est de sauvegarder manuellement votre site à partir de votre compte d’hébergement WordPress.
Étape par étape. Exporter la base de données WordPress de votre site direct
Pour exporter la base de données WordPress de votre site en direct, vous devez vous connecter à votre tableau de bord cPanel et cliquer sur phpMyAdmin.
Note : Nous montrons des captures d’écran du tableau de bord de Bluehost.
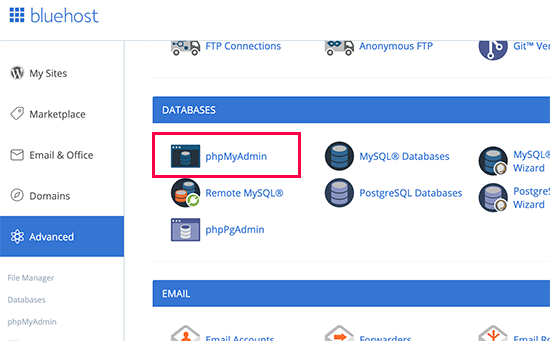
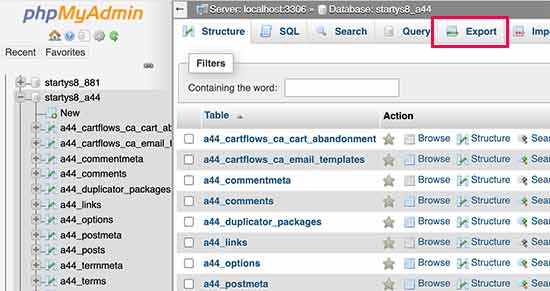
Dans phpMyAdmin, vous devez sélectionner la base de données que vous souhaitez exporter, puis cliquer sur l’onglet d’exportation en haut.
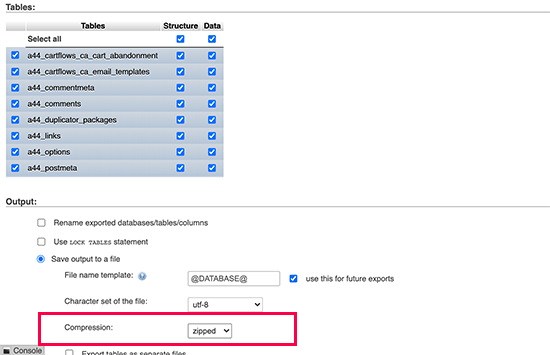
phpMyAdmin vous demandera alors de choisir une méthode d’exportation rapide ou personnalisée. Nous vous recommandons d’utiliser la méthode personnalisée et de choisir zip comme méthode de compression.
Il arrive que des extensions WordPress créent leurs propres tables à l’intérieur de votre base de données WordPress. Si vous n’utilisez plus cette extension, la méthode personnalisée vous permet d’exclure ces tables.
Laissez les autres options telles quelles et cliquez sur le bouton “Go” pour télécharger la sauvegarde de votre base de données au format zip.
phpMyAdmin va maintenant télécharger le fichier de votre base de données. Pour plus de détails, consultez notre tutoriel sur la sauvegarde manuelle de votre base de données WordPress.
Étape par étape. Téléchargez tous vos fichiers WordPress
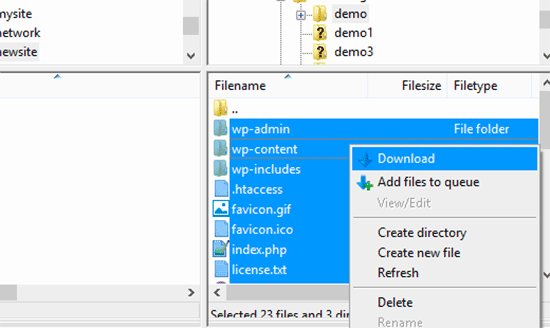
L’étape suivante consiste à télécharger vos fichiers WordPress. Pour ce faire, vous devez vous connecter à votre site WordPress à l’aide d’un client FTP.
Une fois connecté, sélectionnez tous vos fichiers WordPress et téléchargez-les sur votre ordinateur.
Étape par étape. Importez vos fichiers WordPress et votre base de données sur le serveur local
Après avoir téléchargé vos fichiers WordPress, vous devez créer un dossier sur votre serveur local où vous souhaitez importer le site local.
Si vous utilisez WAMP, vous devez créer un dossier dans le dossier C:³wamp³www³ pour votre site local. Les utilisateurs de MAMP devront créer un dossier dans le dossier /Applications/MAMP/htdocs/.
Ensuite, il suffit de copier et de coller vos fichiers WordPress dans le nouveau dossier.
Ensuite, vous devez importer votre base de données WordPress. Ouvrez simplement phpMyAdmin sur votre serveur local en visitant l’URL suivante :
http://localhost/phpmyadmin/
Comme vous avez déjà créé la base de données précédemment, vous devez maintenant la sélectionner et cliquer sur l’onglet “Importer” en haut de la page.
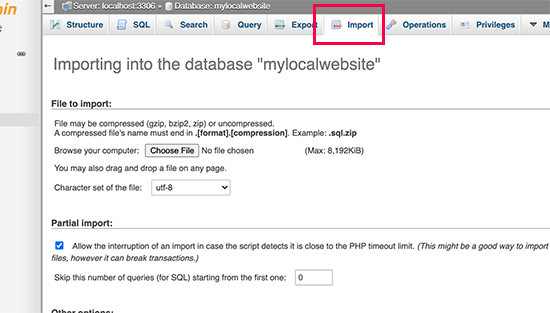
Cliquez sur le bouton ‘Choose File’ pour sélectionner et téléverser le fichier d’exportation de la base de données que vous avez téléchargé à la première étape. Cliquez ensuite sur le bouton “Go” en bas de la page.
phpMyAdmin va maintenant décompresser et importer votre base de données WordPress.
Maintenant que votre base de données est prête, vous devez mettre à jour les URLs de votre base de données WordPress qui font référence à votre site en direct.
Vous pouvez le faire en lançant une requête SQL dans phpMyAdmin. Assurez-vous d’avoir sélectionné la base de données de votre site local, puis cliquez sur SQL.
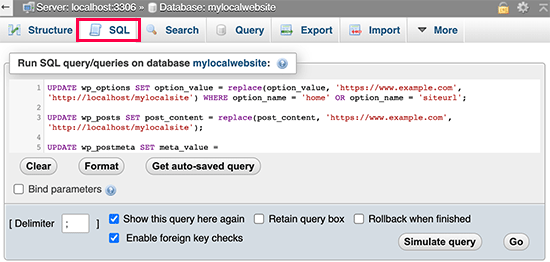
Dans l’écran SQL de phpMyAdmin, copiez et collez ce code, en veillant à remplacer exemple.com par l’URL de votre site direct et http://localhost/mylocalsite par l’URL du serveur local de votre site.
UPDATE wp_options SET option_value = replace(option_value,'https://www.example.com','http://localhost/mylocalsite') WHERE option_name ='home'OR option_name ='siteurl';UPDATE wp_posts SET post_content = replace(post_content,'https://www.example.com','http://localhost/mylocalsite');UPDATE wp_postmeta SET meta_value = replace(meta_value,'https://www.example.com','http://localhost/mylocalsite');
Cette requête remplacera les références à l’URL de votre site direct à partir de la base de données et la remplacera par l’URL de l’hôte local.
Étape par étape. Mettre à jour le fichier wp-config.php
La dernière étape consiste à mettre à jour le fichier wp-config.php de votre site local. Ce fichier contient les paramètres de WordPress, y compris la façon de se connecter à votre base de données WordPress.
Allez simplement dans le dossier où vous avez installé WordPress sur votre serveur local, puis ouvrez le fichier wp-config.php dans un éditeur de texte comme le Bloc-notes.
Remplacez le nom de la base de données par celui que vous avez créé dans phpMyAdmin sur votre hôte local.
Ensuite, remplacez le nom d’utilisateur de la base de données par votre nom d’utilisateur MySQL local, généralement root. Si vous avez défini un mot de passe pour l’utilisateur MySQL root sur votre hôte local, saisissez-le. Sinon, laissez le champ vide et enregistrez vos modifications.
/** The name of the database for WordPress */define('DB_NAME','database_name_here');/** MySQL database username */define('DB_USER','username_here');/** MySQL database password */define('DB_PASSWORD','password_here');
Vous pouvez maintenant visiter votre site local dans une fenêtre de navigateur en saisissant l’URL comme suit :
http://localhost/mylocalsite/
Remplacez ‘mylocalsite’ par le nom du dossier dans lequel vous avez copié vos fichiers WordPress.
C’est tout, votre site WordPress direct est maintenant copié sur votre serveur local.
Nous espérons que cet article vous a aidé à apprendre comment déplacer facilement un site WordPress live vers un serveur local. Vous pouvez également consulter notre guide sur la façon de créer facilement un site de mise en scène pour WordPress à des fins de test, ou comment déplacer un site WordPress d’un serveur local vers un site direct.
Si vous avez aimé cet article, veuillez alors vous abonner à notre chaîne YouTube pour obtenir des tutoriels vidéo sur WordPress. Vous pouvez également nous trouver sur Twitter et Facebook.


Jakob Uzioa
So i followed the instructions to manually move the site to the letter using wampserver but when i navigate to the file path localhost/mysite and hit enter, the site does not open but instead only a file downloads which is called. ” download” which is a php file:
/**
* Front to the WordPress application. This file doesn’t do anything, but loads
* wp-blog-header.php which does and tells WordPress to load the theme.
*
* @package WordPress
*/
/**
* Tells WordPress to load the WordPress theme and output it.
what could be the problem ?
WPBeginner Support
Please ensure you go through the installer.php when first installing the site and ensure WAMP is running as common possible reasons for that issue.
Admin
Tye
Thanks for the tutorial, its more clear than a lot of the ones I found online, I have a problem though, migration all fine, the site is running but I cannot login with the usernames I had on the live site, cannot access the admin dashboard to create new usernames either. Help please?
WPBeginner Support
If your users are not working then you could manually add a user following the steps in our article below. You would be able to use your file manager instead of FTP for a local installation.
https://www.wpbeginner.com/wp-tutorials/how-to-add-an-admin-user-in-wordpress-using-ftp/
Admin
Mark
Thank you for this tutorial, you run a very helpful website. It took me a long time to run through this, as there are alot of steps and I find a lot of ways to go wrong! I ended up using the file names that you used in your examples, to reduce complication. And success! Much appreciated.
WPBeginner Support
Glad our guide could help!
Admin
Lina
Thanks for the great tutorial! However, it only works for my home page. When I try to open a subpage, I see this error message: “The requested URL was not found on this server.” Can you help me here?
Best regards,
Lina
WPBeginner Support
It would depend on the method you used but we would recommend ensuring you used the SQL update as that should fix your URLs in your database. You may also want to ensure the links you are using in your menu are not custom URLs as that can be a common reason for that issue as well.
Admin
Awais
is the above code is right ?
I copy and paste in SQL but every time this massage comes,
0 rows affected. (Query took 0.0046 seconds.)
WPBeginner Support
The code should work but especially if you’ve already run it once, there will be no change in your site and it will come back with 0 affected.
Admin
Deb
Hi, thanks for your fab instructions. I used the Duplicator method and everything works…except when viewing the site my images/thumbnails don’t show up (broken image), until I click on them. Then they show in their own window, as expected.
They do show properly in the wp dashboard editor.
Cheers, Deb
WPBeginner Support
There are a few possible reasons but for a starting point you could try regenerating the thumbnails following our guide below as the most common solution for that error:
https://www.wpbeginner.com/plugins/regenerate-thumbnails-new-image-sizes-wordpress/
Admin
Aamir Khan
I have created a backup of my website manually and setup on local machine and run the above quires, but my website is redirecting to online version.
WPBeginner Support
It seems like you may have not updated the URL, you can do so using step 3 of the manual method of this article.
Admin
George
Thank you so much for this clear and useful article. I was able to follow it and migrate my WP site in less than 20 minutes – and I’m no expert. You’ve saved me a lot of pain – thank you.
WPBeginner Support
Glad our guide was helpful
Admin
Barry
Doesn’t work for me. I create the package, but it installs the basic WordPress files. So when I navigate to the folder it asks me to setup wordpress
WPBeginner Support
For the most common reason, you would want to ensure you are properly connected to the database, if you are not then it would show the option for creating a new site instead of showing the correct site.
Admin
Daniel
Nooo, its not working for me. pefrectly written tutorial and easy to follow (apart from it says hhttpps in the 3rd query)
i get this in my browser:
This site can’t be reachedlocalhost refused to connect.
Try:
Checking the connection
Checking the proxy and the firewall
ERR_CONNECTION_REFUSED
WPBeginner Support
Thanks for pointing out that typo, it should be fixed. For that error, you would want to ensure you updated your URL in step 3 correctly for the most common reason for that issue.
Admin
McKenzie
Thanks for your tutorial.
The front page is partially working but every other page is not working at all. Furthermore, it seems that front page is loading All the pages. What could be wrong?
WPBeginner Support
We would recommend starting by going through our troubleshooting guide below:
https://www.wpbeginner.com/beginners-guide/beginners-guide-to-troubleshooting-wordpress-errors-step-by-step/
Admin
Collins
Hi, Thank you for this super useful article.
I don’t know why mine doesn’t just work, I have done the exact same thing and gotten all the correct feedback. Whenever I try to open the home page localhost/site/ I get a page that doesn’t exist with the headers and footers and the rest of the pages still point to the live site.
WPBeginner Support
It sounds like you may have not set the URLs correctly. You would likely want to go to method 2 and try the SQL changes to update your URLs.
Admin
Murat
For those who are getting “wp_options doesn’t exist” error, you may have changed your table_prefix before. Just open the wp_config.php file and check $table_prefix = ‘wp_’
if the value isn’t “wp_” you get that error so when pasting the code edit it accordingly, for instance:
UPDATE xx_options SET option_value………..
WPBeginner Support
Thanks for sharing this should someone be running into that error
Admin
Chinwe
Thank you so much for this. It worked.
WPBeginner Support
Glad our guide was helpful
Admin
Ivana Spasic
When I copy and paste the code you provided to phpMyAdmin’s SQL screen, I am getting message: #1146 – Table ‘xyz.wp_options’ doesn’t exist.
How can this be fixed?
WPBeginner Support
You would want to ensure you have the correct database selected for the most common reason for that issue.
Admin
Jill
I used the Duplicator plugin to set up a copy of a website for a non-profit that I inherited. After reloading it so that all plugins are disabled I finally came to the conclusion that my site is attempting to use https:// to log in to the dashboard. To further confuse me, an empty site that I created on localhost does NOT use https:// for log in to the dashboard. I understand the value of https:// on the live site, but it appears there may be a way to disable it on localhost?
WPBeginner Support
For changing your local site’s URL you can follow our guide below and remove the s:
https://www.wpbeginner.com/wp-tutorials/how-to-change-your-wordpress-site-urls-step-by-step
Admin
Hazel beaver
Is there a plugin that allows you to download a zip file from the live site then upload into a fresh install of wordpress on the local host in a simpler way?
WPBeginner Support
For what it sounds like you’re wanting, the closest would be method 2 of this guide that you would want to take a look at.
Admin
Daniel
I successfully uploaded to localhost but when i try to use localhost/mysite_location/wp-admin, it redirects to the live site. Not the one on the localhost.
Need help
WPBeginner Support
You would want to go into your site’s database, go to the options table, and change your site url and address to localhost there. For how to modify your database you would want to take a look at our article here: https://www.wpbeginner.com/beginners-guide/beginners-guide-to-wordpress-database-management-with-phpmyadmin/
Admin
Bine
Great tutorial. It’s straight forward. Unfortunately I still get redirected to the dashboard as soon as I try to enter my URL. I followed all the steps but something must be missing. Does anyone has an idea what the problem might be? Cheers
WPBeginner Support
You may want to check your options table in your database to be sure that you didn’t set the site’s url to your wp-admin area
Admin
Niaz Muhammad
Great tutorial thanks for sharing your knowledge
WPBeginner Support
Glad you liked our article
Admin
alvaro hernandez
it works great!!! i love you!
WPBeginner Support
Glad our guide was helpful
Admin
T_WA
Hi, thanks for the tutorial, it’s was super helpful!!
However, after following all your steps, I have problems “establishing secure connection” (I guess because of the SSL) and thus it doesn’t work . I even tried and changed a line ‘DB_HOST’ to ‘localhost/localhost:8888’ in the wp-config.php that wasn’t mentioned in the video but didn’t help.
Also, when changing links I tried many variations nothing worked. Has someone faced a similar issue and found a solutions to it?
WPBeginner Support
Did you attempt to clear all of your caching after updating the URLs and is there the option to continue anyway under advanced on that error page?
Admin
Said
First of all thank you for theses clear explanations that I followed to the letter. The result is that i can access to to my site homepage locally, but links in this homepage do not seem to work because when I click on a link, for example :
localhost.mysite.com/subject.html
it is the following page that is displayed fir all links :
localhost/dashboard
Can you help me to resolve this problem
Thanks in advance
WPBeginner Support
It is likely due to your localhost not accepting pretty permalinks: https://www.wpbeginner.com/wp-tutorials/how-to-enable-custom-permalinks-in-wordpress-wamp-installation/
Admin
Ifthikar Hussain
Great Working, am facing a new problem which is i can access the only home page of my word press side. how can i able to access other pages??
WPBeginner Support
It would depend on what error you are running into. To get started you could take a look at the troubleshooting steps in: https://www.wpbeginner.com/beginners-guide/beginners-guide-to-troubleshooting-wordpress-errors-step-by-step/
Admin
Hannah
Hi there,
this is really easy to follow and helpful so thank you for that.
I do have a very straightforward question though.
When updating the URLs, you say to replace http:// example.com with your live site, but what if my live site uses https?
WPBeginner Support
If you’re moving your site to a local server we recommend http to avoid local installation issues with not having an SSL, you would change to https if you’re moving the content back to a live site that is using SSL.
Admin
Philip
Thanks. You wrote this article over 5 years ago, and it’s still good. I managed to set everything up nicely without too much trouble by following your manual instructions. Thanks in particular for the SQL queries.
Philip
WPBeginner Support
Glad our guide could be helpful and still works
Admin
Basem
After finishing the installation I click Admin Login button. the browser open new window to the installation of wordpress again? and the login page is not there
I checked the folders. all files are copied.
Patrick
Somebody find a fix for the localhost site copy (from live https) administration wanting to use https ?
dowlass
I found your instructions for the manual move of my site (from live server to localhost) worked pretty well. I had to do the permalinks thing – just click on ‘save’ without changing anything – to make links work properly. But otherwise it’s mostly good.
However, I’ve encountered a problem when trying to use new themes. If I add a new theme, then sure the theme installs ok and shows up on the theme page. However, if I try to preview or activate the new theme I just get a totally blank page – even the admin goes blank. The only recourse is to use the browser back button to get back to the admin view where I can delete the theme.
Adding new themes and trying to use them just makes the whole thing fall over!
Any ideas?
(p.s. I’m using a very old version of WordPress – 2.9.2…!! Which is the reason for wanting to play with it on localhost and work out the best way to upgrade.)
Michael
Tutorial worked pretty good but I had “internal Server Error”. I was downloading an entire network installation. I recopied the wp-config.php file because it had become compressed, all spacing removed. Then replaced the .htaccess with a fresh network version and that “RewriteBase /sitename/” was to the folder of the installation, instead of “RewriteBase /”
Emma
The instructions are clear and straightfoward but unfortunately I am having a total nightmare getting my site to work on the local server. After much trial and I’ve managed to get connect to the database and get some of the site content displayed but links aren’t working (they’re not found, apparently). I’m using MAMP Pro for Windows. Maybe I’ll try XAMMP – or using a Mac – instead. I think alot of the problem is to do with permissions but don’t really know where to start there seem to be so many fixes needed!
WPBeginner Support
Hi Emma,
If you can access the WordPress admin area, then try visiting Settings » Permalinks and then click on the save changes button without changing anything.
Admin
andy
I solve my problem. If you manually moved wordpress to localhost, and you install w3 total cache in your wordpress, you have to clear the browser cache after change database and wp-config. Or just open your localhost site with different browser.
andy
I have changed wp-config and all database url to localhost, but localhost still redirect me to live site. Why? I cannot install any plugin like duplicator anymore because the site already deleted
Suhana
Hi Andy
Have u tried changing the settings from wp dashboard?
Settings-> General->WordPress Address (URL),Site Address (URL)
Even if it shows the localhost address just save it and check. Hope it helps.
Patrick Pogi
Hi wpbeginner,
Thank you for the tutorial, it helps me a lot. I tried the manual install and but in the end it keeps redirecting me into wordpress installation page. Pls help me, i think i’m almost done. Im using xampp.
Thank you
Jason
Hi,
Im having issues while moving my site, it says LOCALHOST REFUSED TO CONNECT.
But my other local sites are okay.
Im moving it to local because something gone terribly wrong and my page woun’t load on the server’s.
Please any suggestion or advise is appriciated
John
In MAMP Preferences set your Ports to – Apache 80, Nginx 443 and MySQL 3306 and see if that fixes it
Steve
Thanks for this article, I found it very useful but would like to add to it if I may.
I used the manual method successfully with one exception, I could not navigate to any of the pages or posts from my sites menu. I would get a page not found error. I tried everything here, saving the premalinks, but nothing worked. I finally found a post elsewhere that gave me the solution. I had to modify a line in Apache’s httpd.conf file. Open the file and search for ‘AllowOverride’. If it looks like this: ‘AllowOverride None’, change it to ‘AllowOverride All’. I could not get to every page and post and see all the content!. FYI, there are several ‘AllowOverride’ options but the one you are looking for resides on a line by itself. I know this is a WordPress and not an Apache config forum but others may be experiencing the same issue. Hope this helps.
Braun Philippe
Hello Guys,
I’m running into a serious problem. When I click on my local site forler with servers ON on MAMP, it redirects to live site I’ve done everything this tutorial says, do you know where is the problem ?
Thanks for your help
Sara
Hi
I am also having blank screen like IDRIS D…any suggestion
Idris D
Unfortuntely when I follow this guide, all the links in my local site redirect to the live site.
Any suggestions?
Adrian Stangell
Hi,
after following the instructions for the manual migration I end up with a blank screen when I try to access my website on the localhost. Any ideas?
Joel M
After running the SQL Query to replace links I receive a 1064 error – it seems there is a problem with the code syntax. I’m guessing it’s the (:) in my localhost url : ‘http://localhost:888/localwebsite’ – any ideas how I can work around this? I am using MAMP to run the local server.
Aaron L
try four ‘8’s instead of 3…. localhost:8888/localwebsite
Natalie Bell
Hi there!
I’ve had a successful migration to local site except for my Media Library, every picture is there (lots of files), url’s are correct, but when they don’t show up in the actual blog. When I go to media library it just shows the grid of the pics – all blank, but in description, url etc everything is correct.
Any idea what to do next?
Grant
Try going to your wordpress dashboard, click on the settings menu near the bottom of the sidebar on the left. Then click on the reading menu in the settings submenu, scroll down to the site visibility options and select the ‘allow search engines to index’ option and click save changes at the bottom of the page. See if that works, if not you may have to go to your terminal and manually pull media files from your old site recursively – I had to go this route and can walk you through it if you have any questions. Hope this helps
Carolina
Hi there, Thanks for the post, it’s a huge success for me.
So far, I’ve been able to get to the wp-login page.
and I’m sorry if this is a very silly question. but I’m really newbie with wp
my problem is I can’t login :$
I’ve tried the same logins as the live details = don’t work
as I haven’t set up the dashboard and it’s a local. no email will work.
what should I do?
btw, it’s on a mac.
Many thanks in advanced. Help is appreciated!!
WPBeginner Support
Hi Carolina,
You can change password using PHPMyAdmin.
Admin
DavidA
Hi again,
My sincere apologies! Posted a comment yesterday (July 24) re difficulty running the Duplicator program from my browser. Went back to check today and realised that I had made a mistake with the placement of the “test-site” folder which contained the installer.php and the zip archive database.
Once I truly placed this folder in the htdocs folder then everything worked fine and I was able to install the website data locally as per your instructions.
Thank you again for all your help!
DavidA
Hi — thank you again for another great article! All very helpful!
I am at the step of opening the Duplicator installer on my local computer. However when I put “http://localhost/test-site/installer.php” into my browser I get a “404 error message” saying “object not found”.
Interestingly if I use “localhost” alone or “localhost/phpmyadmin” they both work. I have moved the “test-site” folder to the “htdocs” folder but still does not work.
Any suggestions??
Thank you
Shun
Thanks for this guide, but what if you’re migrating from a live site with an SSL cert down to a dev site without SSL (https to http?)
I got the front-end working fine, however, HTTPS is still added to my wp-login URL, preventing me from accessing the login page into the admin.
Any additional steps required to eliminating https on a local/dev site’s WP login page?
simone
I am having a similar issue. I migrated a live site to MAMP using WP Migrate DB plug in and FTP. I get the following error – due to the live sites SSL Certificate. It has something to do with the database prefixes not matching. But – I cannot change the prefix on the live site, I called Go Daddy to see if I edited the live site prefix to match my local install database prefix if it would break the site, they said no guarantees, I tried it and it broke the site.
error message I get when entering localhost:8888 url.
An error occurred during a connection to localhost:8888. The client has encountered bad data from the server. Error code: SSL_ERROR_BAD_SERVER
The page you are trying to view cannot be shown because the authenticity of the received data could not be verified.
Please contact the website owners to inform them of this problem.
Thank you in advance for any help!
xasmatic
Well, i used SSL certificate and that is what I did:
At the step where you have to update the URLs inside your WordPress database referencing to your live site, you write the SQL query 4 times to change every URL that may exist.
First time write code like above “http://www.example.com”, then “http://example.com”, after that “https://www.example.com” and finally “https://example.com”.
Make sure: 1) that you write all four times the URL
http://localhost/test-sitewhich will replace those URLs2) change wp_options, wp_posts and wp_postmeta to your right ones (mine for example were cagwp_options etc.)
And a last reminder: Finally (if you’re moving on localhost), on the last step you have also to change the host name to localhost (wp_config.php file)
/** MySQL hostname */
define(‘DB_HOST’, ‘localhost’);
Veer Abheek Singh Manhas
I am tried using this article but I am not sure at which point of time i am supposed to install wordpress. Can anyone help me here?
Thanks
AIAI
you don’t have to reinstall wordpress again. all files from the source wp installation is already backed up.
Alex
I have used these instruction before and they worked fine, however i now have an updated version of mamp and wordpress and i continually get errors. betwen playing around i get the white blank screen or the index.php file. as text.
Both similar problems to users below.
it might be time to update this.
I gave up on moving my site to local and decided to just have a dev url too however, when i run the sql query above i always end up with a token missmatch, despite making all the necessary changes.
Andi
Thank’S a lot for your work.
But it doesn’t work. If I run local installer.php I see blank screen.
Best regards
Andi
mc
hey
I did everything as it is described and when I get to the last phase and put the url: localhost/mysite it automatically downloads a file that has this information:
<?php
/**
* Front to the WordPress application. This file doesn't do anything, but loads
* wp-blog-header.php which does and tells WordPress to load the theme.
*
* @package WordPress
*/
/**
* Tells WordPress to load the WordPress theme and output it.
*
* @var bool
*/
define('WP_USE_THEMES', true);
/** Loads the WordPress Environment and Template */
require( dirname( __FILE__ ) . '/wp-blog-header.php' );
is it something wrong that i did in the process?