Après des années de création de sites WordPress, nous avons appris à quel point il est important d’avoir une installation locale de WordPress sur votre ordinateur.
Avoir WordPress sur votre machine personnelle vous permet d’expérimenter de nouvelles fonctionnalités sans risquer votre site en direct, de plonger profondément dans le développement de WordPress, et même de construire des sites entiers avant qu’ils ne soient mis en direct. C’est comme si vous aviez un bac à sable privé pour tous vos projets WordPress.
Si vous êtes un utilisateur de Windows, il existe de nombreuses façons d’installer WordPress localement. Mais nous avons réduit la liste aux deux méthodes les plus simples. Dans ce guide, nous vous montrerons comment installer facilement WordPress sur un ordinateur Windows, quelle que soit la version que vous utilisez.
Pourquoi installer WordPress sous Windows ?
Si vous utilisez Windows, l’installation locale de WordPress sur votre ordinateur présente plusieurs avantages.
Une installation locale de WordPress crée un environnement de test qui n’affecte pas votre site direct. Cette installation, souvent appelée serveur local, est votre terrain de jeu personnel pour WordPress.
Les développeurs WordPress utilisent régulièrement des installations locales pour leur travail. Par exemple, ils peuvent s’en servir pour expérimenter de nouvelles extensions ou de nouveaux thèmes, ou pour tester le site avant la mise à jour vers l’éditeur de blocs Gutenberg.
Mais ce n’est pas seulement pour les professionnels. Si vous êtes nouveau sur WordPress, une installation locale est parfaite pour apprendre. Vous pouvez explorer les fonctionnalités, tester les thèmes et les extensions, et expérimenter librement sans craindre de casser un site en direct.
Il est important de noter que lorsque vous installez WordPress localement sous Windows, vous êtes le seul à pouvoir voir le site. Si vous souhaitez créer un site public, vous aurez besoin d’un nom de domaine et d’un hébergement.
Techniquement, il est possible d’installer WordPress sur Windows en utilisant XAMPP, et nous avons déjà écrit un tutoriel à ce sujet.
Cela dit, nous avons trouvé deux méthodes encore plus simples que XAMPP pour mettre en place un environnement WordPress local, ce qui les rend parfaites pour les débutants ou les utilisateurs qui ont besoin de créer un site local rapidement. Vous pouvez cliquer sur le lien ci-dessous pour passer à la méthode qui vous intéresse :
Méthode 1 : Installer WordPress sur Windows à l’aide de Studio (rapide et simple)
Pour la première méthode, nous utiliserons Studio. Il s’agit d’un logiciel WordPress local conçu par Automattic, la société qui gère et exploite WordPress.com, qui est un constructeur de sites web basé sur le logiciel WordPress.
Nous parlerons d’abord de cette méthode parce qu’elle est beaucoup plus rapide et plus simple à suivre, ce qui la rend idéale pour les débutants complets.
Tout d’abord, vous devez ouvrir le site Studio by WordPress.com. Ensuite, cliquez sur le bouton “Télécharger pour Windows”.
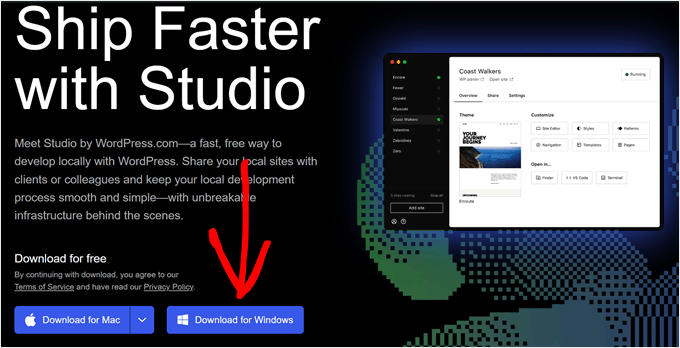
Une fois cela fait, il suffit d’ouvrir le fichier téléchargé pour lancer l’installation.
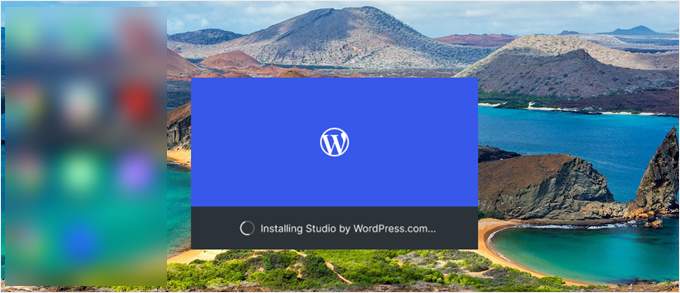
Une fenêtre contextuelle apparaît alors, vous indiquant que l’application est en cours d’installation.
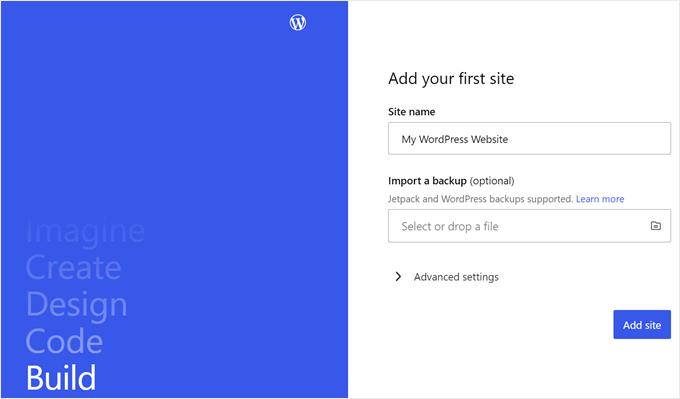
Ceci fait, vous pouvez ajouter votre premier site.
Pour ce faire, il vous suffit de saisir le nom de votre nouveau site WordPress local et de cliquer sur “Ajouter un site”. Vous pouvez nommer le site comme vous le souhaitez, tant qu’il vous permet de l’identifier facilement.
Vous devriez maintenant voir le tableau de bord de votre site WordPress local.
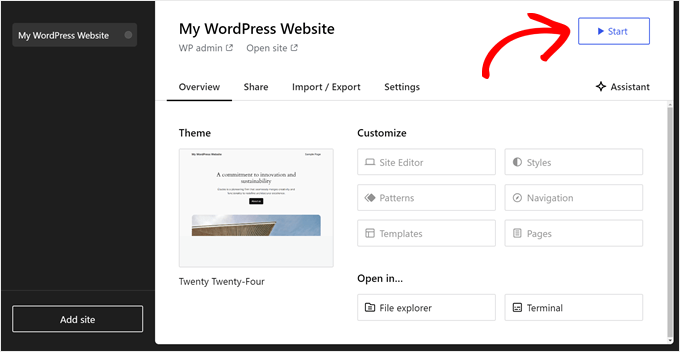
Pour accéder à votre tableau de bord WordPress et modifier votre site, il vous suffit de cliquer sur le bouton ” Démarrer ” en haut à droite. Vous pourrez ainsi accéder à votre site local sur votre ordinateur.
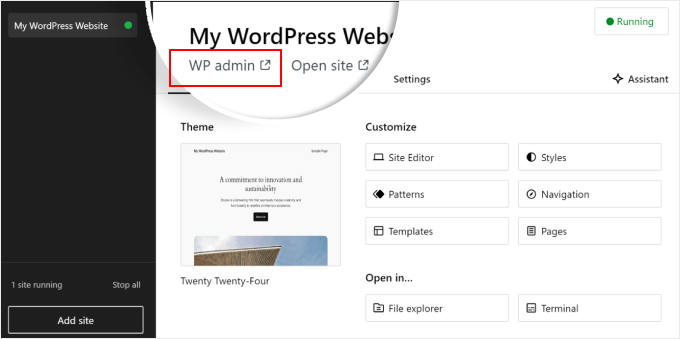
Une fois que le bouton “Start” est modifié en “Running”, vous pouvez cliquer sur le lien “WP Admin” en haut à gauche de la page.
Cela vous amènera à la page d’administration locale de WordPress.
Et c’est à peu près tout pour la configuration. Explorons les autres paramètres qui peuvent s’avérer nécessaires au fur et à mesure que vous construisez votre site local.
Comme vous pouvez le voir dans l’onglet ‘Overview’, vous pouvez immédiatement accéder au menu de l ‘éditeur WordPress full-site directement depuis le tableau de bord de Studio. Vous pouvez également cliquer sur ‘File explorer’ pour ouvrir les dossiers et les fichiers de votre site WordPress et cliquer sur ‘Terminal’ pour gérer votre site à l’aide de WP-CLI.
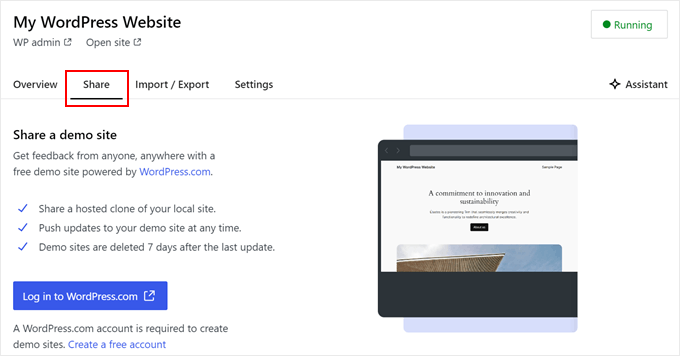
Si vous passez à l’onglet “Partager”, vous pouvez vous connecter à votre compte WordPress.com, cloner votre site local et le téléverser sur les serveurs de WordPress.com. Cela rendra temporairement le site cloné en ligne, ce qui est utile pour partager des sites de démonstration avec vos clients ou les membres de votre équipe.
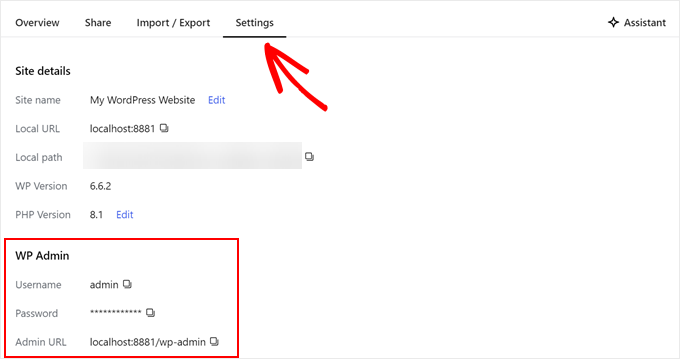
Il peut arriver que vous souhaitiez vous connecter à votre site local directement via votre navigateur au lieu d’utiliser Studio. Dans ce cas, vous devez connaître vos identifiants wp-admin.
Pour les trouver, vous pouvez passer à l’onglet “Réglages” et y trouver votre nom d’utilisateur, votre mot de passe et votre URL de connexion pour l’administration de WordPress.
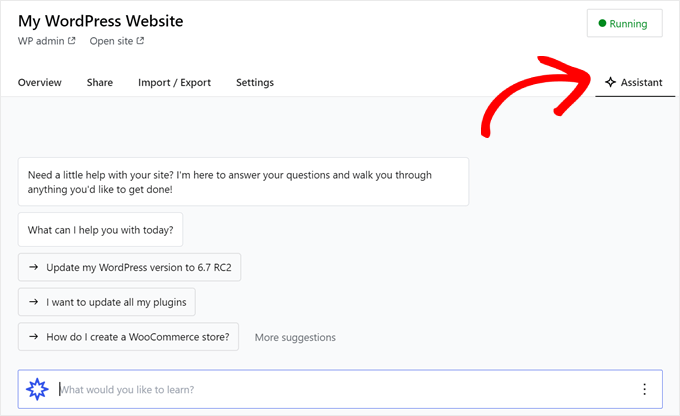
Une autre fonctionnalité intéressante de Studio est son chatbot IA intégré, avec lequel vous pouvez communiquer en cliquant sur le bouton “Assistant”.
Ici, vous pouvez demander de l’aide à Studio pour des tâches telles que la mise à jour de toutes vos extensions en une seule fois, la mise à jour de votre version principale de WordPress ou la création de code pour un bloc personnalisé.
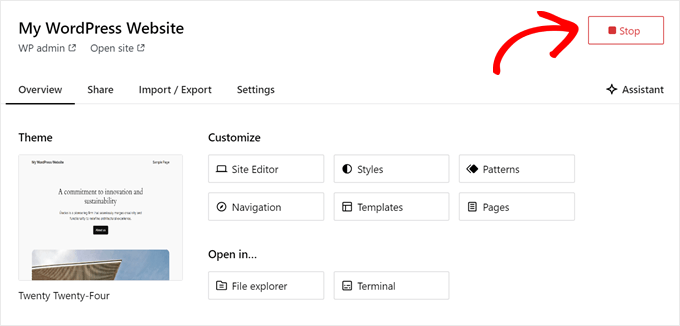
Lorsque vous avez fini de travailler sur votre site local, survolez le bouton “En cours d’exécution” dans le coin supérieur droit jusqu’à ce qu’il indique “Arrêter”.
Cliquez ensuite sur le bouton pour arrêter le site.
L’inconvénient de Studio est que vous ne pouvez pas configurer l’environnement WordPress à votre guise. Cela signifie que vous devez utiliser la version PHP, le serveur web et la base de données qui ont été présélectionnés pour vous.
Cela peut être un inconvénient si vous devez tester votre site ou votre extension avec des configurations de serveur spécifiques.
Si vous avez besoin de plus de contrôle sur votre environnement WordPress local ou de faire correspondre votre configuration locale avec une configuration de serveur live spécifique, alors vous pouvez consulter la méthode suivante en utilisant Local WP.
Méthode 2 : Installer WordPress sur Windows en utilisant Local WP (plus personnalisable)
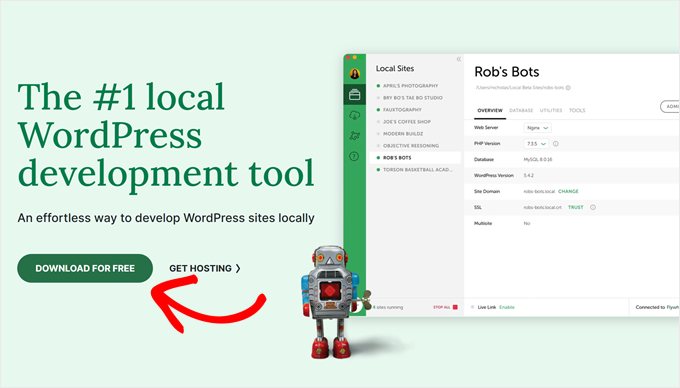
Tout d’abord, vous devez télécharger et installer le logiciel Local WP sur votre ordinateur Windows. Il vous suffit de vous rendre sur le site de Local WP et de cliquer sur le bouton “Télécharger gratuitement”.
Après cela, une fenêtre popup apparaîtra où vous devrez sélectionner votre plateforme. Choisissez “Windows” dans le menu déroulant.
Ensuite, vous pouvez saisir vos coordonnées telles que vos nom et prénom, votre adresse e-mail professionnelle et votre numéro de téléphone pour télécharger le logiciel.
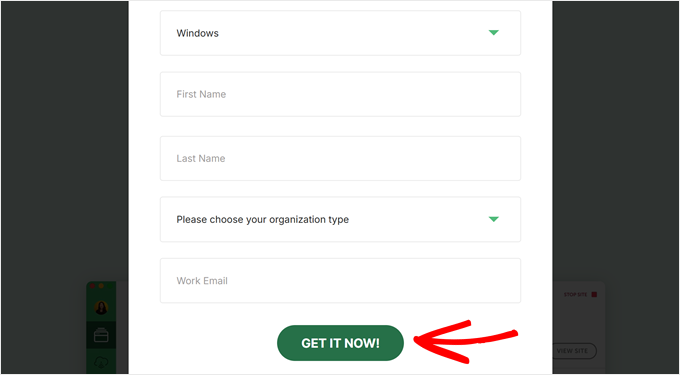
Après avoir saisi/saisie les détails, il suffit de cliquer sur le bouton “Get it Now”.
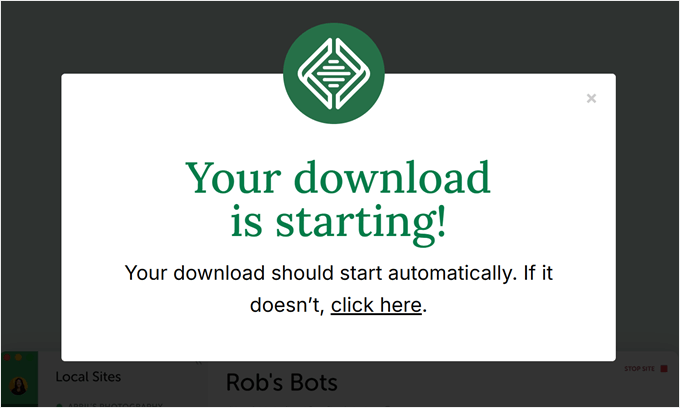
Ensuite, le logiciel sera automatiquement téléchargé sur votre ordinateur. Sinon, vous pouvez cliquer sur le lien “cliquez ici” pour lancer le téléchargement.
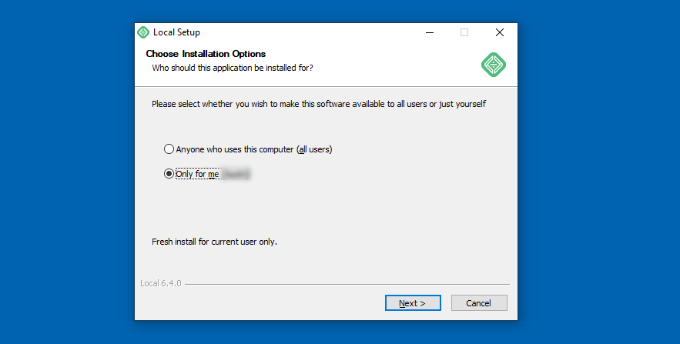
Une fois le fichier téléchargé, lancez l’assistant de configuration.
Vous devez maintenant sélectionner si vous souhaitez installer le logiciel pour tous les utilisateurs ou seulement pour vous.
Une fois que vous avez sélectionné une option, cliquez sur le bouton “Suivant”.
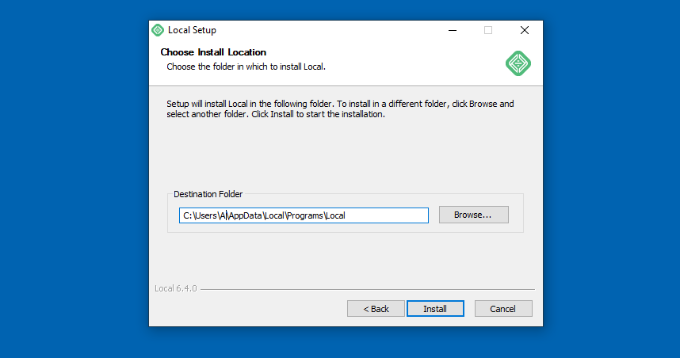
À l’étape suivante, vous pouvez sélectionner le “Dossier de destination” dans lequel le logiciel sera installé.
Il suffit de cliquer sur le bouton “Parcourir” pour définir le chemin d’accès, puis de cliquer sur le bouton “Installer”.
Le logiciel Local WP va maintenant s’installer sur votre ordinateur Windows.
Une fois que c’est fait, vous pouvez cocher la case “Exécuter localement” et cliquer sur le bouton “Terminer” de l’assistant de configuration.
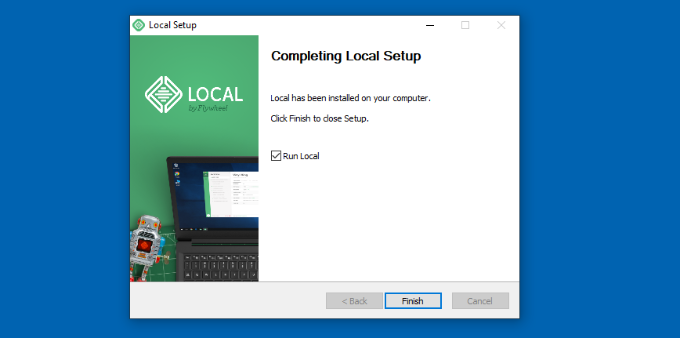
Le logiciel est maintenant lancé sur votre appareil Windows.
L’étape suivante consiste à ajouter un nouveau site local. Pour ce faire, il suffit de cliquer sur le bouton “+” en bas de la page.
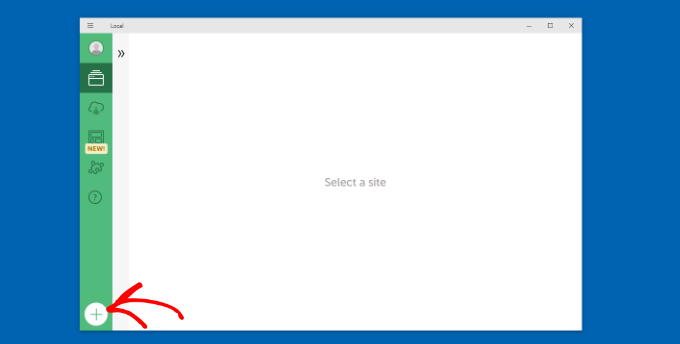
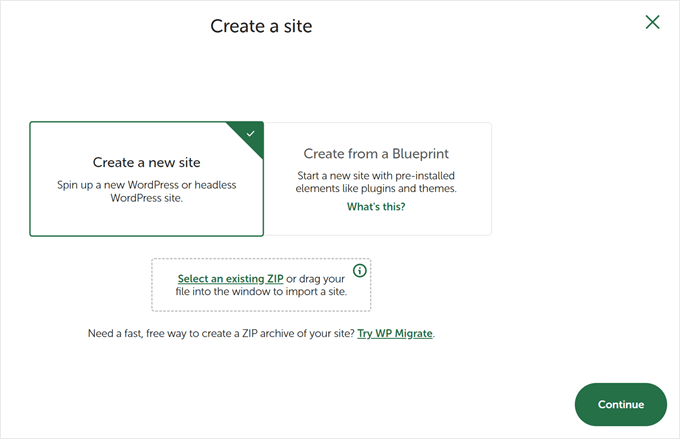
Ensuite, vous pouvez créer un site dans le logiciel local.
Sélectionnez l’option “Créer un nouveau site” et cliquez sur le bouton “Continuer”. Il est également possible de créer le site à partir d’un plan ou d’un fichier de site web existant, mais nous choisirons la première option pour les besoins de la démonstration.
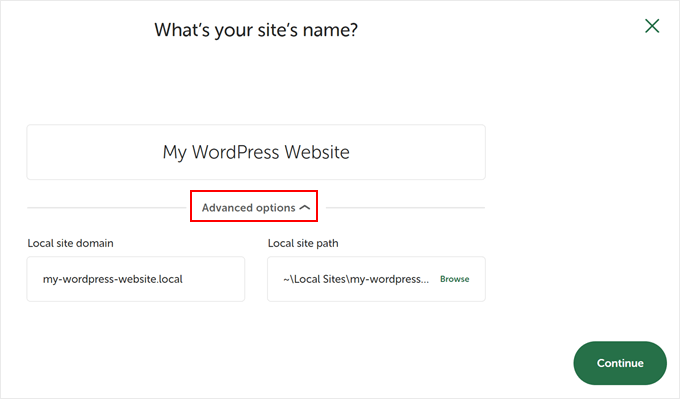
Ensuite, vous pouvez saisir un nom pour votre site local, par exemple “Mon site WordPress”.
Il existe également des options avancées qui vous permettent de saisir le domaine et le chemin d’accès du site local. Par défaut, le domaine utilisera le titre de votre site, mais séparé par des tirets.
Une fois que vous avez terminé, cliquez simplement sur le bouton “Continuer”.
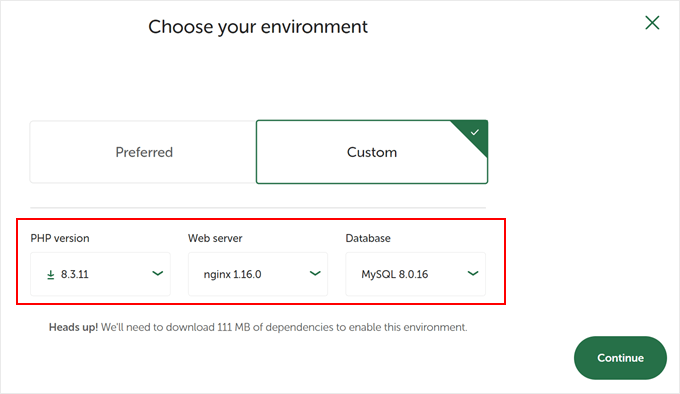
Ensuite, vous devrez choisir un environnement pour votre site local.
Vous pouvez utiliser l’environnement “Préféré” dans lequel le logiciel sélectionnera automatiquement la version PHP, le serveur web et la version MySQL. D’autre part, vous pouvez également sélectionner “Personnalisé” et saisir les détails de l’environnement.
Local WP propose les dernières versions de PHP. En ce qui concerne le serveur web, vous avez le choix entre NGINX et Apache. Vous pouvez également sélectionner MySQL ou MariaDB pour les bases de données.
Notez que certaines versions de PHP, de serveurs web et de bases de données nécessitent le téléchargement de certaines dépendances pour fonctionner correctement.
Ensuite, vous pouvez saisir un nom d’utilisateur et un mot de passe WordPress pour votre site local. Il est également possible de choisir une adresse e-mail WordPress à laquelle vous recevrez toutes les notifications par e-mail.
À part cela, il y a une option avancée où le logiciel vous demandera si vous avez un réseau multisite WordPress. Si ce n’est pas le cas, cliquez simplement sur “Non”.
Après avoir saisi/saisie ces informations, il suffit de cliquer sur le bouton “Ajouter un site”.
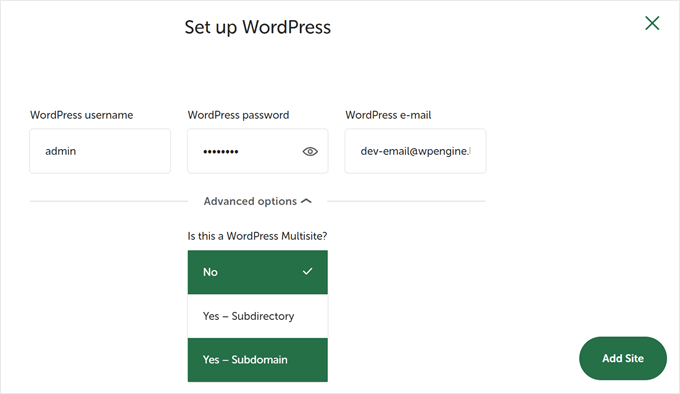
Le logiciel va maintenant installer WordPress et configurer votre site.
Pour lancer le site local, cliquez sur le bouton “Démarrer le site” en haut à droite.
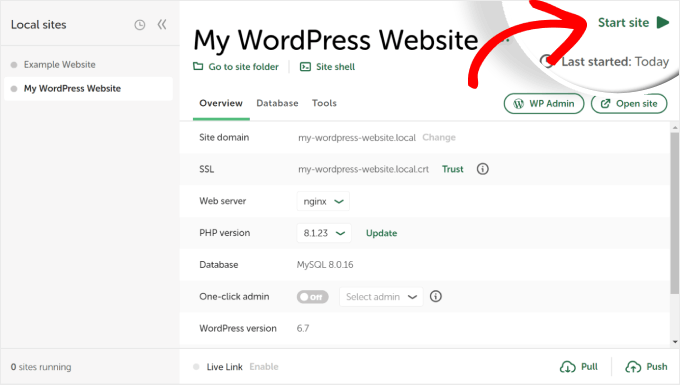
Ensuite, cliquez sur le bouton “WP Admin”, et vous verrez la page de connexion à l’administration de WordPress.
Il suffit de saisir le nom d’utilisateur et le mot de passe que vous avez saisis lors de la configuration du site local, puis de cliquer sur le bouton “Se connecter”.
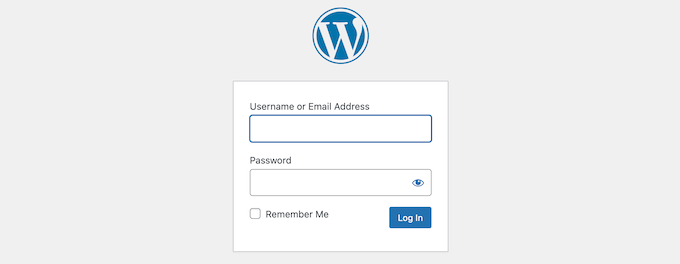
Vous pouvez maintenant modifier votre site local sur votre ordinateur Windows.
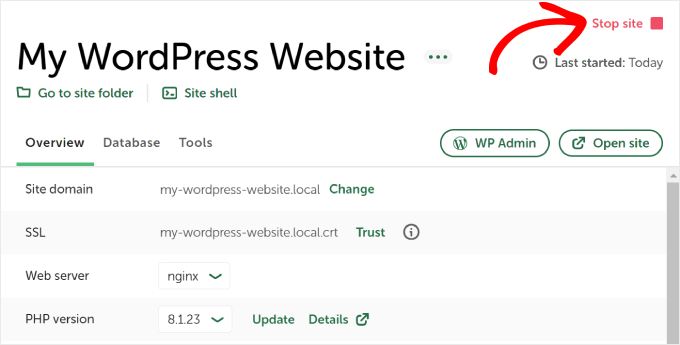
Lorsque vous avez terminé, n’oubliez pas d’arrêter le site à partir du logiciel Local WP en cliquant sur le bouton ‘Arrêter le site’.
Astuce : Si vous voulez sauter le processus de connexion, vous pouvez activer une connexion d’administration en un clic dans Local WP.
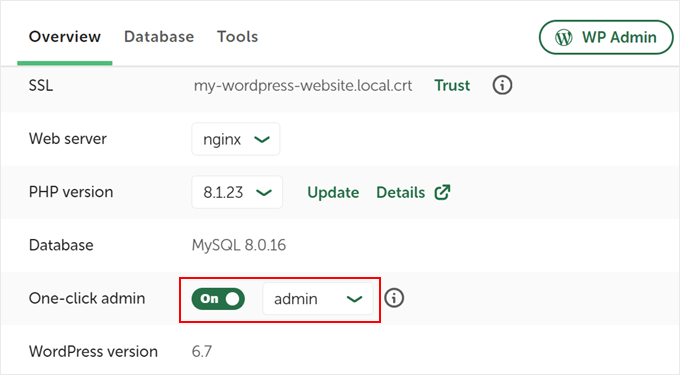
Pour ce faire, il suffit de retourner dans le tableau de bord local de WP et de faire basculer le bouton ” One-click admin ” jusqu’à ce qu’il indique ” On “. Ensuite, dans le menu déroulant, sélectionnez l’utilisateur administrateur qui peut utiliser cette fonctionnalité de connexion en un clic.
Alternative : Utiliser WordPress Playground pour tester des thèmes, des extensions et plus encore
WordPress Playground est un outil innovant qui vous permet d’expérimenter avec WordPress directement dans votre navigateur web. Il s’agit d’un bac à sable virtuel où vous pouvez essayer de nouveaux thèmes, extensions et fonctionnalités WordPress sans affecter un site réel.
Le terrain de jeu WordPress diffère d’un environnement WordPress local à plusieurs égards.
Tout d’abord, il ne nécessite pas d’installation sur votre ordinateur et se réinitialise après chaque utilisation, contrairement aux installations locales permanentes. Vous pouvez y accéder depuis n’importe quel appareil doté d’un navigateur, alors que les installations locales sont liées à un ordinateur.
Alors que WordPress Playground est idéal pour les tests rapides et l’apprentissage, un environnement WordPress local sur votre ordinateur Windows offre plus de flexibilité pour les projets de développement à long terme.
Pour une description détaillée, consultez notre guide sur l ‘utilisation de WordPress Playground dans votre navigateur.
J’ai installé WordPress sur mon ordinateur Windows, que faire maintenant ?
Maintenant que vous avez installé WordPress sur votre ordinateur, voici ce que vous pouvez faire :
- Apprenez les trucs et astuces de base de WordPress pour mieux utiliser votre site.
- Essayez différents thèmes WordPress pour voir à quoi votre site peut ressembler.
- Installez et testez les extensions WordPress indispensables pour ajouter de nouvelles fonctionnalités à votre site.
- Apprenez à corriger les erreurs courantes de WordPress par vous-même.
- Essayez différents constructeurs de pages par glisser-déposer pour rendre votre site attrayant.
- Découvrez comment réinitialiser le mot de passe administrateur de WordPress sur localhost pour récupérer l’accès à votre site.
- Mettezen place des flux de travail automatisés pour faciliter la gestion de votre site.
- Apprenez à connaître la sécurité de WordPress pour protéger votre site des pirates informatiques.
- Déplacez votre site WordPress local vers un serveur live lorsque vous êtes prêt à le partager avec tout le monde.
Nous espérons que cet article vous a aidé à apprendre comment installer WordPress localement sur un ordinateur Windows. Vous pouvez également consulter notre article sur la façon d’installer WordPress localement sur un ordinateur Mac et notre guide ultime pour créer un site de mise en scène WordPress.
Si vous avez aimé cet article, veuillez alors vous abonner à notre chaîne YouTube pour obtenir des tutoriels vidéo sur WordPress. Vous pouvez également nous trouver sur Twitter et Facebook.


Thomas
Great tutorial! I’m trying to download a wordpress site to a local copy. I’ve based my self on this tutorial. So far this is what I’ve done right (I think…):
1- I’ve downloaded all the files from the live website using FileZilla to wamp/www/mysite/.
2 – I’ve exported, downloaded and zipped the live site database.
3 – Using WAMP>phpmyadmin I’ve created a new database and imported the zip file (from 2)
4- Changed the wp-config.php and updated the database name, user and password.
Now at this point, I’m able to see the homepage when I type http::/localhost/mysite. The them has been rest however. Also, the admin side as far as I can tell works perfectly.
The main problem I’m getting is that apart from the homepage I get 404 errors for all the other pages on the local site.
I’m not sure what I’m doing wrong! Thanks in advance!
George
Thanks so much. I have everything up and running. Very helpful. I would not have been able to do this on my own.
maggie
xampp is good for wordpress .It supports max range of url and all
maggie
thanks… It was helpfull and easy
karis
Been postponing this with the misconception that the process is tedious and takes time. Wow, thanks to you, I am now done. So easy. Thanks again for the good work. May it never go unrewarded.
Dmitry M
Thanks for the tut, very easy to follow.
Naaz
great..!! was as simple as 1+1 :p
Marty
Excellent, worked 110%. Thanks dude!
Bob S
This was an awesome tutorial! Thanks for the help
Faisal Masood
Thanks for sharing the nice WordPress resources.
Sabine Blackburn
Have it all installed but can not create a database in MyphpAdmin, it shows ‘No Privileges’ where the create button should be
Any suggestions?
David
After following your instructions, I got everything right except when I wanted to log in with the “root” username. When I log in, I get this message ” #1045 Cannot log in to the MySQL server”. Please what should I do?
WPBeginner Staff
Try to log in with blank password if that does not work you would need to reset root password for your MySQL server.
pran
how to change the root password
Gabriel Popov
Thanks, this article was really useful.
Omar
Amazing!! thanks a ton!!
Aaron
Downloaded everything. I can access wordpress but need to create a database for wordpress. When i click on phpmyadmin it takes me to a 403 forbidden error saying You don’t have permission to access /phpmyadmin/ on this server. I cant figure it out.
Annie L
Hello – your tutorial rocks. I’m able to get pass the 5 min setup and land on the WordPress login page.
One issue, after entering the same credentials provided in the 5-min setup (/wordpress/wp-login.php), I get “SSL connection error.”. Looking at the wp-login.php file, it forces a redirect to SSL.
How do I get around it without installing a SSL locally?
Running Wamp 2.4, Windows 7, Chrome browser.
lubna
really help tutorial bro.I just cant log in to word after the successful installation Help.
Miriam
I think your tutorials are clearer than anything else I find for a newbie like me. Thanks!
Can you offer any suggestions for my problem creating a database? I already have a WP site under Bitnami. I decided to download WAMP to have multiple WP sites using WAMP. After installing WAMP, when I open phpMyAdmin I get a log in window. If I log in using the username/pswd originally set up (with Bitnami installation) it says I don’t have priveliges to create a database. I can log into phpMyAdmin using the usename/pswd from the Bitnami WordPress site and I have priveliges but it gives me a 1044 Error when I try to create a new database. I am not sure what to try next. Thanks in advance for any suggestion you may have.
Miriam
I figured out that problem and am on to a different problem. After installing WAMP and putting WordPress in c:WAMP/WWW… I open a browser and try http://localhost/mysite/ but get a 404 Not Found. Could this be related to the fact that I already have Bitnami/localhost? Thanks!
Win
You didn’t paste it in the www folder. You can’t post it in the main wordpress file — you have to navigate to the www folder and paste it next to the index.html file. This should fix your 404 error problem
Merom
Hi,
I am facing the same problem. what exactly should I paste to www?
thanks
IBAS
I really found this tutorial so helpful to me, thanks for the efforts
Kriss
Wamp Server is an outdate program died on 2013. Probably it is not the best for wordpress
Laurent Lafont
You are not saying what the username and password are when launching phpmyadmin! And all web searches are giving dummy information as well….. So now stuck…. very useful instructions indeed…….
Win
Username: Root
Password: Blank
Helen Magner
Thanks for the instruction. It worked well. I have had a wordpress site up and running for a year now. but now but I would like to be able to import it to to local site so that I can write and save wile I cannot connect to the internet and publish when I can get back on line. Thanks for your help.
ludovic
Simply perfect. Merci !!!
Robert
When i follow the steps wampserver to myphpadmin I get the login page, not the page which allows me to click on the database tab as shown in your very well written tutorial. Suggestions to get the wp-config.php file set up?
Dave
I had the same problem, just leave the password blank & you’ll get in.
Psdfreak.com
On that login page fill Username: “root” and press login (no password required)
Maryam Jamil
thanks alot
your article really helps
Dharmesh Joshi
Thanks you bro…(Y)
Vivi
Hey! Really helpfull article, But… I can’t log in in wordpress..Firstly , in the step of installing wordpress i was directed in a blank page( logo only) , then i reloaded and said it has allready been istalled, so i procceded with the log in, but it seems that my account is not valid..nothing workd..not even the e-mail for getting a new pswrd .
What should i do? I allready copied the steps twice from the beggining with different databases and data.
nel
your tutorial worked PERFECTLY
ty
Andy
Please help . Thanks
installed WAMServer, as according to your instructions, I chose phpMyadmin, and I encountered this error msg, “HTTP Error 404.0 – Not Found
The resource you are looking for has been removed, had its name changed, or is temporarily unavailable.
Detailed Error Information
Module IIS Web Core
Notification MapRequestHandler
Handler StaticFile
Error Code 0×80070002
Requested URL http://localhost:80/phpmyadmin/
Physical Path C:\inetpub\wwwroot\phpmyadmin\
Logon Method Anonymous
Logon User Anonymous”
I installed and re-installed WAMServer, but encounter the same error, how do I proceed from here?
farah
Hi, Thank you for great tutorial, I am facing an issue please help me to solve the issue. After successful installation of WAMP, when I have clicked on PhpMyAdmin , It is asking me to login , but i dont know what is my username and password that can be used here?
Regards
Farah
WPBeginner Support
Try username root and leave password field blank
Admin
Barbara
I had the same error and other sites had very complicated and, frankly, unsuccessful suggestions on how to fix it. Thank you for this clear and simple solution – it worked!
KarSho
Simple, Clear and Helped.
Thanks Dude…
zubekk
thanks dude………..!
Sara
Hey there! I installed WampServer like you said but when i press phpmyadmin it opens a blank chrome webpage. No database menu or anything like the printscreen you showed. it’s just blank. I’ve tried unistalling and installing again but it remains the same. help!
WPBeginner Support
Where do you press phpMyAdmin? Try accessing it using the url http://localhost/phpmyadmin/
Admin
Sara
I pick the WampServer icon out of the taskbar and pick the phpmyadmin just like in your printscreen. No, that didn’t work either. I don’t know what can be wrong!
Sara
Ok, reboot the system and It opened something on the phpmyadmin but it’s asking me login and password!
Omer
Hi. Although this article is helpful, however I would like to give some suggestions in improving it. There are some fill in the blanks in this article which makes it difficult to install wordpress.
1. After instructing on installing Wamp Server 2, you immediately jump to phpmyadmin where as you should have told that we need to install mySQL -service- install service and start it. Then we have to install apache – service – install service and start it. Then after making sure that the wamp icon is green head over to the phpmyadmin.
2. After opening the localhost site, you didn’t mention that the username was “root” and password was blank for the database site and jumped immediately on creating database through database tag.
Apart from that it was great effort.
hujat ul islam
can you help me in installing word press on xampp
sumit
while installing wamp server it wll shows error again and again.. . error is about MSVC3100.dll file error.. . kindly fix this error
LIsa
I installed wamp successfully, renamed database, installed wordpress, entered all fields and then once I hit the final “install wordpress”, got a weird blank screen with the wordpress logo at the top. When I hit the “back button” it said wordpress was already installed so I tried entering the username and password and it says it is not found. I tried entering the email I had entered to reset the password and says it isn’t found. I tried using the instructions above for changing the password within the phpmyadmin found the Wp-users file in my database and clicked on pencil icon to edit users and it says “my sql returned an empy result” … help!
Lisa Tomsio
Never mind … I just deleted wordpress installation, created a new database and started over and it worked. I had unchecked the “allow search engines …” on the wordpress page the first time so I left it checked the second time and it worked fine. Thanks for this information!
Campbell
I installed WAMServer, as according to your instructions, I chose phpMyadmin, and I encountered this error msg, “HTTP Error 404.0 – Not Found
The resource you are looking for has been removed, had its name changed, or is temporarily unavailable.
Detailed Error Information
Module IIS Web Core
Notification MapRequestHandler
Handler StaticFile
Error Code 0x80070002
Requested URL http://localhost:80/phpmyadmin/
Physical Path C:\inetpub\wwwroot\phpmyadmin\
Logon Method Anonymous
Logon User Anonymous”
I installed and re-installed WAMServer, but encounter the same error, how do I proceed from here?
yousef mayeli
hi there
i installed many times with different options but same problem,it’s icon appears and when i click it to proceed it doesn’t appear anything. i don’t know what should i do.just disappointed
yousef mayeli
i installed wamp and its icon came on desk but when i click on it doesn’t open i even went to my skype and changed but didn’t affect anything , thanks
. guide me
WPBeginner Support
Try installing WAMP again.
Admin
sumit
while installing wamp server it wll shows error again and again.. . error is about MSVC3100.dll file error.. . kindly fix this error
please help meee….
Kevin Salt
Good article … Thanks.
I don’t want to nit-pick but I think you’re missing a semi-colon in the Skype section …
“and go to Tools » Options. Click on Advanced and then Connections.”
——————-> »
al b
I seem to be hung up on the http://localhost/mysite/ I get a 404 Not found error.
Al B
Disregard. I overlooked renaming the WP directory when moving to www. Thank you for this tutorial!
WPBeginner Support
make sure you have WordPress installed there. Make sure your WAMServer is running.
Admin
Kenia
I had just installed WAMP and then had no idea how to proceed from there as there is no manual for WAMP. This and the next article on making the wordpress site live are both lifesavers. Seriously. THANK YOU for writing this for beginners, and not assuming we know things we don’t (I see that a lot with experts: they take their knowledge for granted and forget what it’s like to start out and not know things).
THANK YOU, THANK YOU, THANK YOU!!!
Martin
Hello Guys, all done.. no matter what I am doing.. still last step freezes. I see only WP white-blue logo and white unloaded text box. After typing my website I get: “Error establishing a database connection” error. Any ideas? Cheers.
Chris
Thanks so much for this! Successfully installed. Only problem I ran into was with the wp-config.php file. I needed to open the copy of wp-config-sample.php, make changes on my own and then save. Other than that, easy install.
Amelia
When I went to click on “create database” in phpmMyAdmin, it said “X No privileges”. What did I do wrong?
Amelia
No matter, I got that fixed. Now I’m just stuck on the configuration page, info filled out and hit submit but the install wordpress page never comes up!
om gupta
in my laptop wamp server is not working in the local user account .it work only in administrator account but i want to run wamp server in local user account because i do not have administrator access right pls help me how can i run wamp server in my local user account.
WPBeginner Support
Without administrator rights it would be difficult for you to run wamp.
Admin
Ratan
Hi ,
I followed the complete step and dowloaded the WP and started uploading theme . With my first theme only , I got the below message after tryin to install the same :
The uploaded file exceeds the upload_max_filesize directive in php.ini.
Please guide .
Regards ,
WPBeginner Support
Please check out this guide: How to increase the maximum upload size in WordPress
Admin
utpal
after install Wampserver i go to phpmyadmin, inthin a login option is here
where i get pass and id
WPBeginner Support
Try root for username and leave password blank.
Admin
Tony Leary
Same problem – that works. Thanks.
Alan
Hello again,
Per my last comment, I think I figured it out. Sorry for the bother.
Alan
Thanks for the write-up! Wondering if you might have any ideas as to why I cannot create a db from phpmyadmin? After clicking “databases” to create a db, I get a “loading” message for quite some time, then that disappears & nothing…
The same occurs no matter which tab I select in the phpmyadmin dash. Been Googling for over an hour & I haven’t been able to find a solution. Thanks again!
WPBeginner Support
Try uninstalling and then reinstalling WAMP server. If that does not help you can also install XAMPP.
Admin
Maureen
Hi Guys! Step by Step Wonderful! Installed WAMP successfully, set up database, downloaded wp with no problem Sucess! now log in… user name or password invalid… press here to have password sent via email… i receive this message “The e-mail could not be sent.
Possible reason: your host may have disabled the mail() function.” any help is appreciated!
WPBeginner Support
Check out our guide on how to reset a WordPress password from phpMyAdmin
Admin