Après des années de création de sites Web WordPress, nous avons appris l'importance d'avoir une configuration WordPress locale sur votre ordinateur.
Avoir WordPress sur votre machine personnelle vous permet d'expérimenter de nouvelles fonctionnalités sans risquer votre site en ligne, de plonger en profondeur dans le développement WordPress, et même de créer des sites Web entiers avant leur mise en ligne. C'est comme avoir un bac à sable privé pour tous vos projets WordPress.
Si vous êtes un utilisateur Windows, il existe de nombreuses façons de configurer WordPress localement. Mais nous avons réduit cela aux deux méthodes les plus simples. Dans ce guide, nous vous montrerons comment installer facilement WordPress sur un ordinateur Windows, quelle que soit la version que vous utilisez.
Pourquoi devriez-vous installer WordPress sur Windows ?
Si vous êtes un utilisateur Windows, l'installation locale de WordPress sur votre ordinateur offre plusieurs avantages.
Une installation locale de WordPress crée un environnement de test qui n'affecte pas votre site Web en ligne. Cette configuration, souvent appelée serveur local ou localhost, est votre terrain de jeu personnel pour WordPress.
Les développeurs WordPress utilisent régulièrement des installations locales pour leur travail. Par exemple, ils peuvent l'utiliser pour expérimenter de nouveaux plugins ou thèmes ou tester le site avant la mise à jour vers l'éditeur de blocs Gutenberg.
Mais ce n'est pas seulement pour les professionnels. Si vous êtes nouveau sur WordPress, une configuration locale est parfaite pour apprendre. Vous pouvez explorer les fonctionnalités, tester les thèmes et les plugins, et expérimenter librement sans vous soucier de casser un site en ligne.
Il est important de noter que lorsque vous installez WordPress localement sur Windows, seul vous pouvez voir le site. Si vous souhaitez créer un site web public, vous aurez alors besoin d'un nom de domaine et d'un hébergement web.
Maintenant, techniquement, vous pouvez installer WordPress sur Windows en utilisant XAMPP, et nous avons déjà écrit un tutoriel à ce sujet.
Cela dit, nous avons trouvé 2 méthodes encore plus simples que XAMPP pour configurer un environnement WordPress local, ce qui les rend idéales pour les débutants ou les utilisateurs qui ont besoin de créer un site local rapidement. Vous pouvez cliquer sur le lien ci-dessous pour accéder à la méthode qui vous intéresse :
- Méthode 1 : Installer WordPress sur Windows avec Studio (Rapide et Simple)
- Méthode 2 : Installer WordPress sur Windows avec Local WP (Plus personnalisable)
- Alternative: Use WordPress Playground to Test Themes, Plugins, and More
Méthode 1 : Installer WordPress sur Windows avec Studio (Rapide et Simple)
Pour la première méthode, nous utiliserons Studio. C'est un logiciel WordPress local créé par Automattic, l'entreprise qui gère et exploite WordPress.com, qui est un constructeur de sites web basé sur le logiciel WordPress.
Nous allons parler de cette méthode en premier car elle est beaucoup plus rapide et simple à suivre, ce qui la rend parfaite pour les débutants complets.
Tout d'abord, vous devez ouvrir le site web Studio by WordPress.com. Ensuite, cliquez sur le bouton « Download for Windows ».
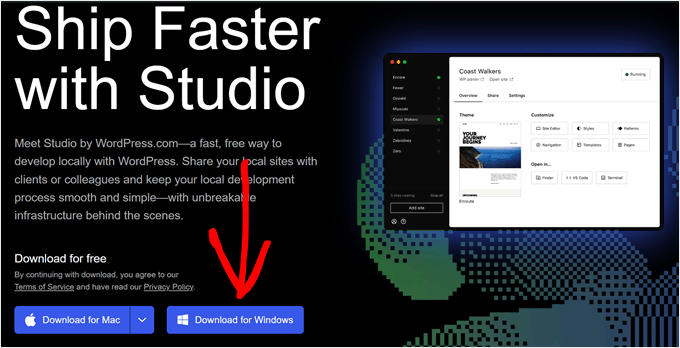
Une fois que vous avez fait cela, ouvrez simplement le fichier téléchargé pour commencer l'installation.
Une fenêtre contextuelle apparaîtra maintenant, vous indiquant que l'application est en cours d'installation.
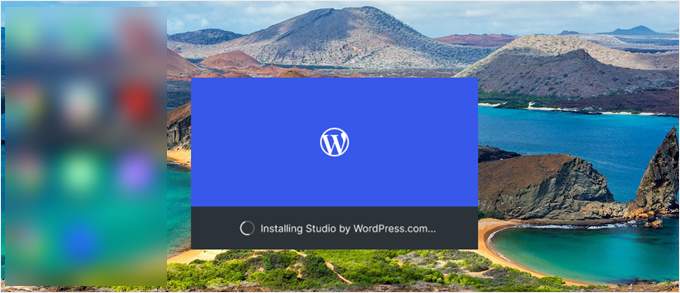
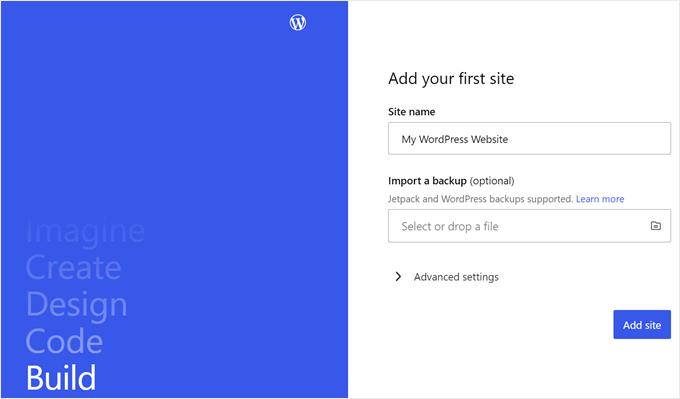
Une fois cela fait, vous pouvez ajouter votre premier site.
Pour ce faire, entrez simplement le nom de votre nouveau site WordPress local et cliquez sur « Ajouter un site ». Vous pouvez nommer le site comme vous le souhaitez tant que cela vous aide à l'identifier facilement.
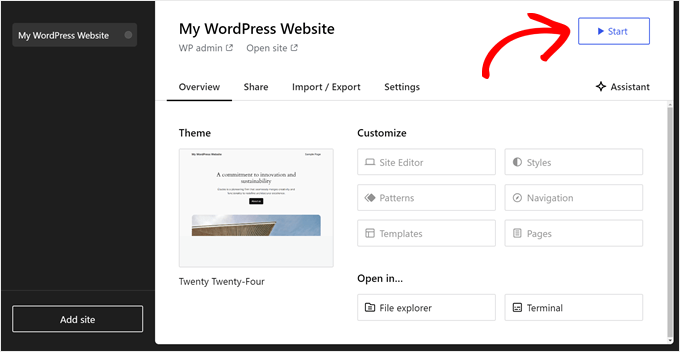
Vous devriez maintenant voir le tableau de bord de votre site WordPress local.
Pour accéder à votre tableau de bord WordPress et modifier votre site Web, cliquez simplement sur le bouton « Démarrer » en haut à droite. Cela rendra votre site Web local accessible sur votre ordinateur.
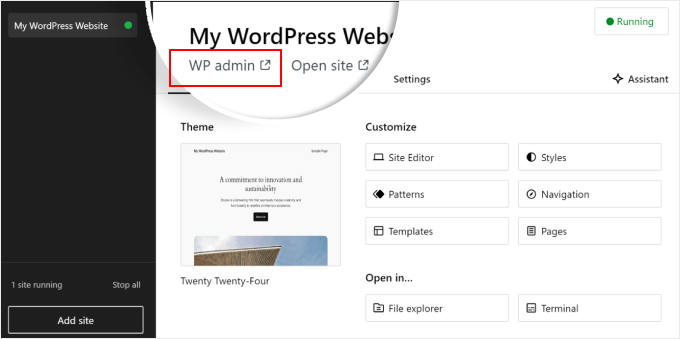
Une fois que le bouton « Démarrer » devient « En cours d'exécution », vous pouvez cliquer sur le lien « WP Admin » en haut à gauche de la page.
Cela vous amènera à votre page d'administration WordPress locale.
Et voilà, c'est à peu près tout pour la configuration. Explorons les autres paramètres qui pourraient être nécessaires lorsque vous construisez votre site web local.
Comme vous pouvez le voir dans l'onglet « Aperçu », vous pouvez accéder immédiatement au menu de l'éditeur complet de site WordPress directement depuis le tableau de bord Studio. Vous pouvez également cliquer sur « Explorateur de fichiers » pour ouvrir les dossiers et fichiers de votre site WordPress et cliquer sur « Terminal » pour gérer votre site à l'aide de WP-CLI.
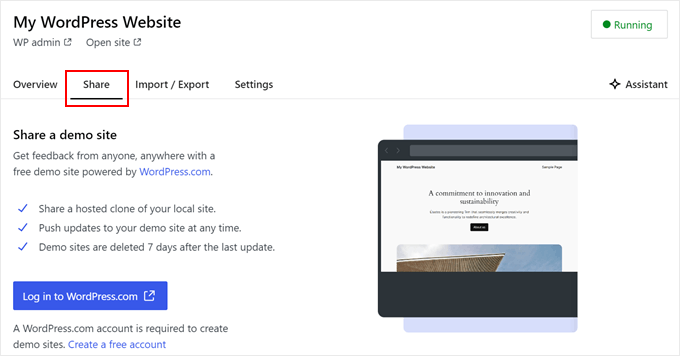
Si vous passez à l'onglet « Partager », vous pouvez vous connecter à votre compte WordPress.com, cloner votre site web local et le téléverser sur les serveurs de WordPress.com. Cela rendra temporairement le site cloné en ligne, ce qui est utile pour partager des sites de démonstration avec vos clients ou les membres de votre équipe.
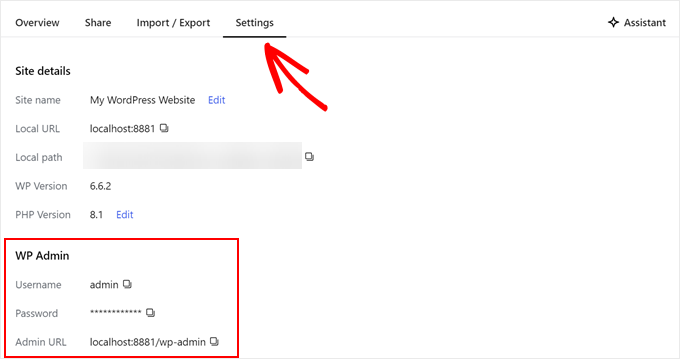
Parfois, vous voudrez peut-être vous connecter directement à votre site web local via votre navigateur au lieu d'utiliser Studio. Dans ce cas, vous devez connaître vos identifiants wp-admin.
Pour les trouver, vous pouvez passer à l'onglet « Paramètres » et y trouver votre nom d'utilisateur administrateur WordPress, votre mot de passe et votre URL de connexion.
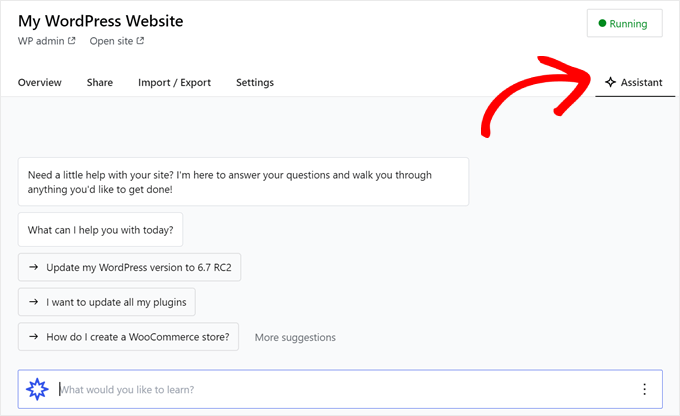
Une autre fonctionnalité intéressante de Studio est son chatbot IA intégré, avec lequel vous pouvez communiquer en cliquant sur le bouton « Assistant ».
Ici, vous pouvez demander à Studio de l'aide pour des tâches telles que la mise à jour de tous vos plugins en une seule fois, la mise à jour de votre version principale de WordPress, ou la création de code pour un bloc personnalisé.
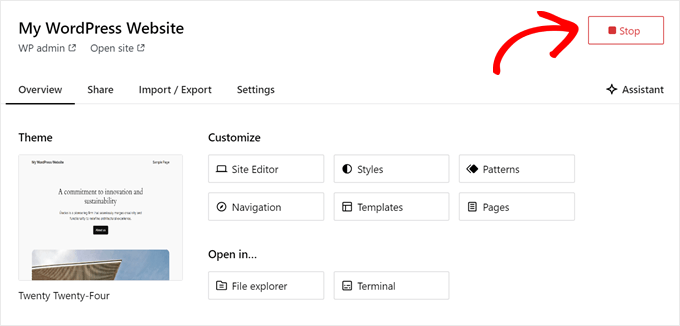
Lorsque vous avez terminé de travailler sur votre site local, survolez le bouton « En cours » dans le coin supérieur droit jusqu'à ce qu'il indique « Arrêter ».
Ensuite, cliquez sur le bouton pour arrêter le site Web.
Un inconvénient de Studio est que vous ne pouvez pas configurer l'environnement WordPress à votre guise. Cela signifie que vous devez utiliser la version PHP, le serveur Web et la base de données qui ont été présélectionnés pour vous.
Cela peut être un inconvénient si vous avez besoin de tester votre site Web ou votre plugin avec des configurations de serveur spécifiques.
Si vous avez besoin de plus de contrôle sur votre environnement WordPress local ou si vous devez faire correspondre votre configuration locale à une configuration de serveur en direct spécifique, vous pouvez consulter la méthode suivante utilisant Local WP.
Méthode 2 : Installer WordPress sur Windows avec Local WP (Plus personnalisable)
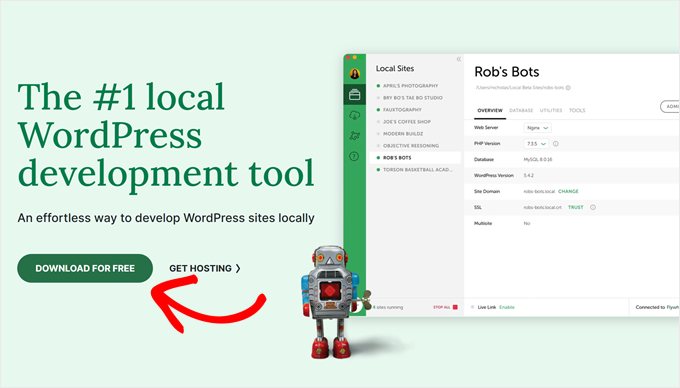
Tout d'abord, vous devez télécharger et installer le logiciel Local WP sur votre ordinateur Windows. Allez simplement sur le site Web Local WP et cliquez sur le bouton « Télécharger gratuitement ».
Après cela, une fenêtre contextuelle apparaîtra où vous devrez sélectionner votre plateforme. Allez-y et choisissez « Windows » dans le menu déroulant.
Ensuite, vous pouvez entrer vos informations telles que votre prénom et nom, votre adresse e-mail professionnelle et votre numéro de téléphone pour télécharger le logiciel.
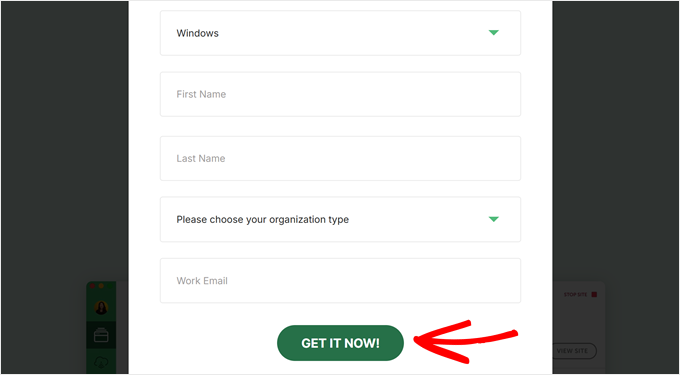
Une fois les informations saisies, cliquez simplement sur le bouton « Obtenir maintenant ».
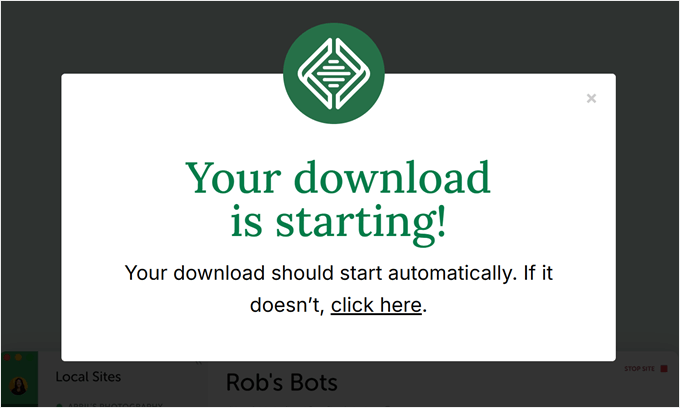
Après cela, le logiciel sera automatiquement téléchargé sur votre ordinateur. Sinon, vous pouvez cliquer sur le lien « cliquez ici » pour démarrer le téléchargement.
Une fois le fichier téléchargé, lancez l'assistant d'installation.
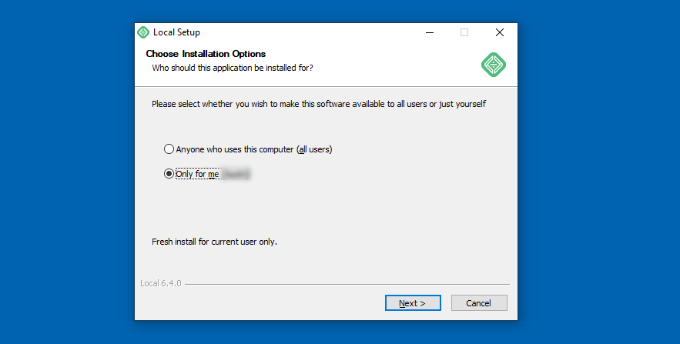
Maintenant, vous devrez sélectionner si vous souhaitez installer le logiciel pour tous les utilisateurs ou uniquement pour vous.
Une fois que vous avez sélectionné une option, cliquez sur le bouton « Suivant ».
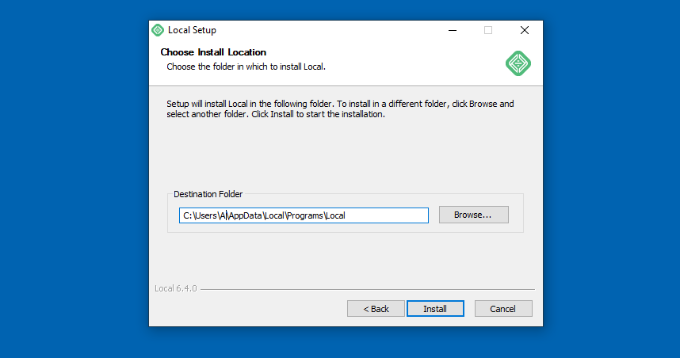
À l'étape suivante, vous pouvez sélectionner le « Dossier de destination » où le logiciel sera installé.
Cliquez simplement sur le bouton « Parcourir » pour définir le chemin, puis cliquez sur le bouton « Installer ».
Le logiciel Local WP s'installera maintenant sur votre ordinateur Windows.
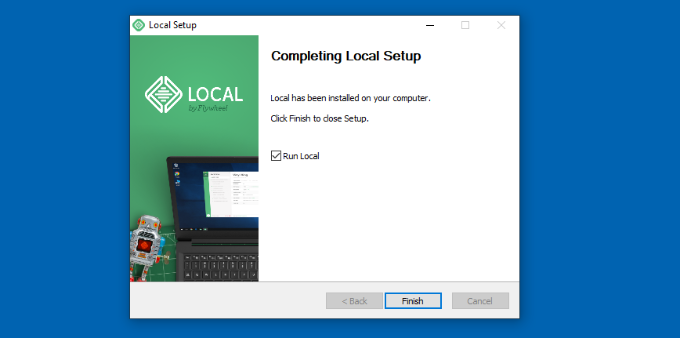
Une fois terminé, vous pouvez cocher la case « Exécuter en local » et cliquer sur le bouton « Terminer » dans l'assistant d'installation.
Le logiciel se lancera maintenant sur votre appareil Windows.
La prochaine étape consiste à ajouter un nouveau site web local. Pour ce faire, cliquez simplement sur le bouton plus « + » en bas.
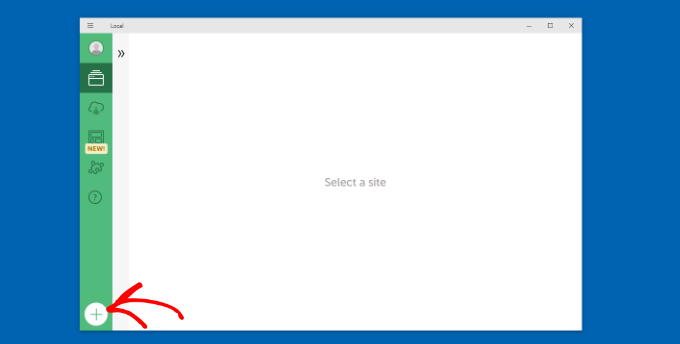
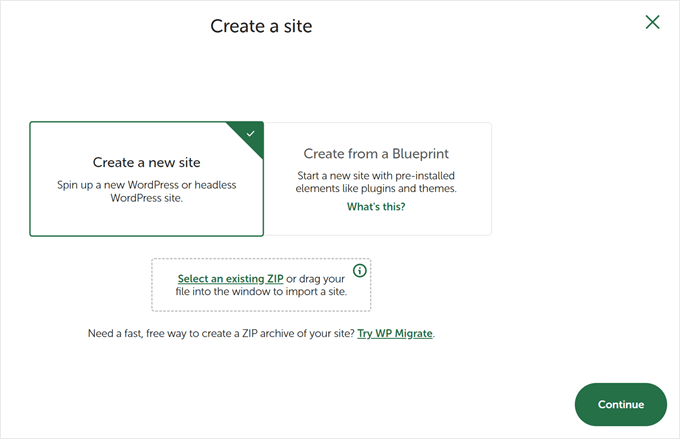
Après cela, vous pouvez créer un site dans le logiciel Local.
Sélectionnez l'option « Créer un nouveau site » et cliquez sur le bouton « Continuer ». Il existe également des options pour créer le site à partir d'un modèle ou d'un fichier de site web existant, mais nous choisirons la première option pour des raisons de démonstration.
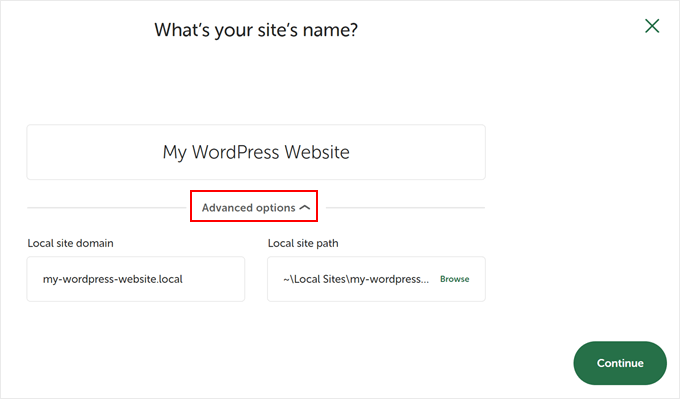
Ensuite, vous pouvez entrer un nom pour votre site web local, par exemple « Mon site WordPress ».
Il existe également des options avancées où vous pouvez entrer le domaine du site local et le chemin du site local. Par défaut, le domaine utilisera le titre de votre site web mais séparé par des tirets.
Une fois que vous avez terminé, cliquez simplement sur le bouton « Continuer ».
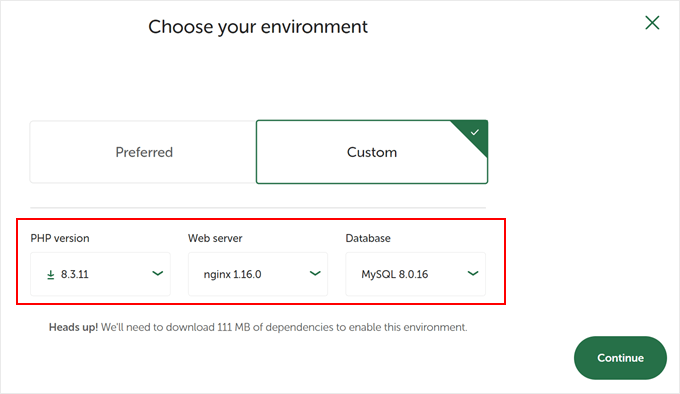
Après cela, vous devrez choisir un environnement pour votre site web local.
Vous pouvez utiliser l'environnement « Préféré » où le logiciel sélectionnera automatiquement la version PHP, le serveur web et la version MySQL. D'autre part, vous pouvez également sélectionner « Personnalisé » et entrer les détails de l'environnement.
Local WP propose les dernières versions de PHP. Quant au serveur web, vous pouvez choisir entre Nginx ou Apache. Vous pouvez également choisir entre MySQL ou MariaDB pour les bases de données.
Notez que certaines versions de PHP, de serveur web et de base de données nécessitent le téléchargement de certaines dépendances pour fonctionner correctement.
Ensuite, vous pouvez entrer un nom d'utilisateur et un mot de passe WordPress pour votre site web local. De plus, il y a aussi une option pour choisir une adresse e-mail WordPress où vous recevrez toutes les notifications par e-mail.
En dehors de cela, il existe une option avancée où le logiciel vous demandera si vous avez un réseau WordPress multisite. Sinon, cliquez simplement sur « Non ».
Après avoir entré ces détails, cliquez simplement sur le bouton « Ajouter un site ».
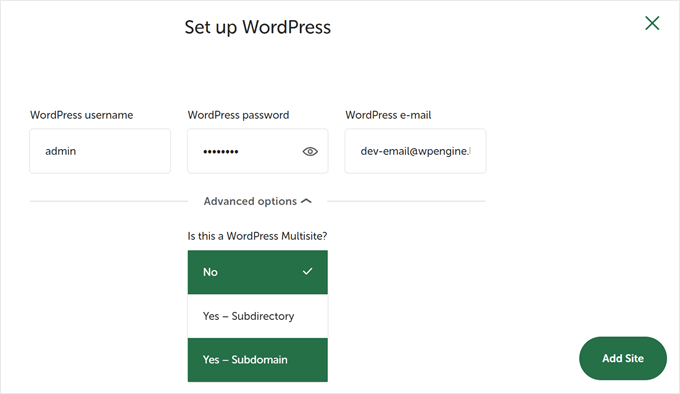
Le logiciel va maintenant installer WordPress et configurer votre site web.
Pour lancer le site web local, cliquez sur le bouton « Démarrer le site » en haut à droite.
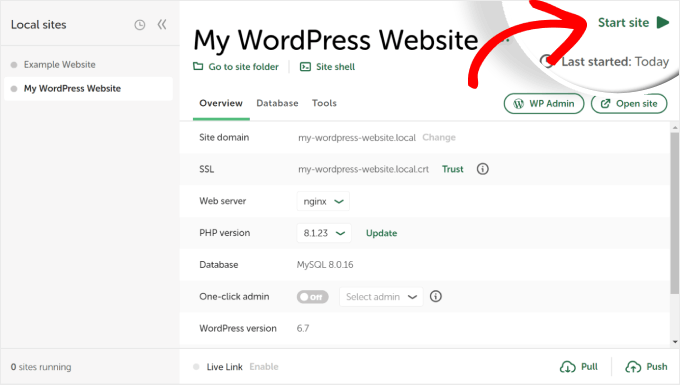
Ensuite, cliquez sur le bouton « WP Admin », et vous verrez la page de connexion de l'administrateur WordPress.
Entrez simplement le nom d'utilisateur et le mot de passe que vous avez saisis précédemment lors de la configuration du site web local, puis cliquez sur le bouton « Se connecter ».
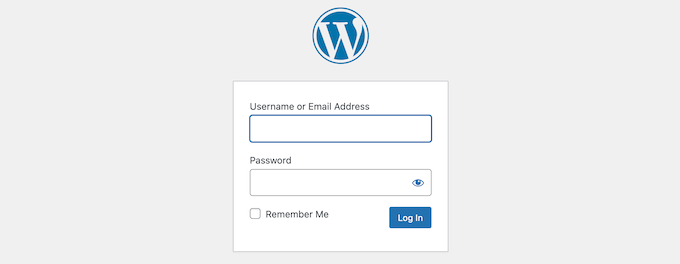
Vous pouvez maintenant modifier votre site web local sur votre ordinateur Windows.
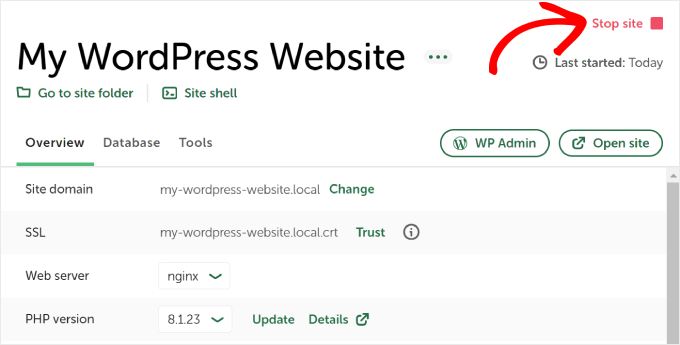
Lorsque vous avez terminé, n'oubliez pas d'arrêter le site web depuis le logiciel Local WP en cliquant sur le bouton « Arrêter le site ».
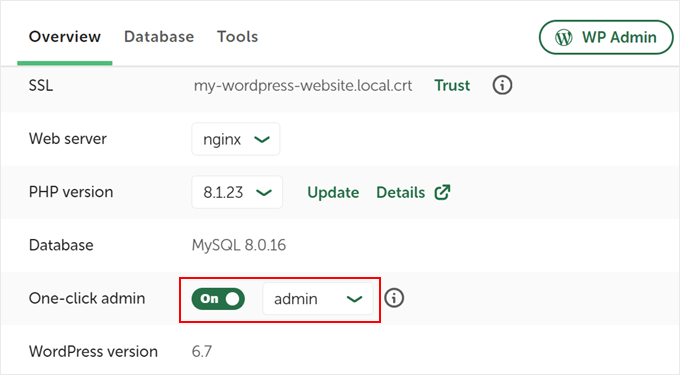
Astuce de pro : Si vous souhaitez sauter le processus de connexion, vous pouvez activer une connexion administrateur en un clic dans Local WP.
Pour ce faire, retournez simplement au tableau de bord Local WP et activez le bouton « Connexion administrateur en un clic » jusqu'à ce qu'il indique « Activé ». Ensuite, dans le menu déroulant, sélectionnez l'utilisateur administrateur qui peut utiliser cette fonctionnalité de connexion en un clic.
Alternative : Utilisez WordPress Playground pour tester des thèmes, des plugins et plus encore
WordPress Playground est un outil innovant qui vous permet d'expérimenter WordPress directement dans votre navigateur web. C'est un bac à sable virtuel où vous pouvez essayer de nouveaux thèmes WordPress, des plugins et des fonctionnalités sans affecter aucun site web réel.
WordPress Playground diffère d'un environnement WordPress local à plusieurs égards clés.
Premièrement, il ne nécessite aucune installation sur votre ordinateur et se réinitialise après chaque utilisation, contrairement aux configurations locales permanentes. Vous pouvez y accéder depuis n'importe quel appareil doté d'un navigateur, tandis que les installations locales sont liées à un seul ordinateur.
Bien que WordPress Playground soit idéal pour des tests rapides et l'apprentissage, un environnement WordPress local sur votre ordinateur Windows offre plus de flexibilité pour les projets de développement à long terme.
Pour un guide détaillé, consultez notre article sur comment utiliser WordPress Playground dans votre navigateur.
J'ai installé WordPress sur mon ordinateur Windows, et maintenant ?
Maintenant que vous avez WordPress sur votre ordinateur, voici quelques choses que vous pouvez faire :
- Apprenez des conseils et astuces WordPress de base pour mieux utiliser votre site.
- Essayez différents thèmes WordPress pour voir à quoi votre site peut ressembler.
- Installez et testez des plugins WordPress indispensables pour ajouter de nouvelles fonctionnalités à votre site.
- Apprenez à corriger vous-même les erreurs WordPress courantes.
- Essayez différents constructeurs de pages glisser-déposer pour rendre votre site agréable.
- Apprenez à réinitialiser le mot de passe administrateur WordPress sur localhost pour retrouver l'accès à votre site.
- Configurez des flux de travail automatisés pour faciliter la gestion de votre site.
- Renseignez-vous sur la sécurité WordPress pour protéger votre site contre les pirates.
- Déplacez votre site WordPress local vers un serveur en ligne lorsque vous êtes prêt à le partager avec tout le monde.
Nous espérons que cet article vous a aidé à apprendre comment installer WordPress localement sur un ordinateur Windows. Vous voudrez peut-être aussi consulter notre article sur comment installer WordPress localement sur un Mac et notre guide ultime pour créer un site de staging WordPress.
Si cet article vous a plu, abonnez-vous à notre chaîne YouTube pour des tutoriels vidéo WordPress. Vous pouvez également nous retrouver sur Twitter et Facebook.


Olaf
J'ai utilisé XAMPP pour Windows et Linux (Ubuntu). Mais votre logiciel Local WP a attiré mon attention. J'aime essayer de nouvelles choses, donc je vais certainement l'essayer dès que possible et comparer si XAMPP ou Local WP fonctionne mieux pour moi. Ce qui est génial, c'est que Local WP a également un installateur pour Linux, spécifiquement pour Ubuntu. Je peux donc l'essayer sur les deux plateformes.
Moinuddin Waheed
C'est la meilleure méthode pour quiconque souhaite simplement apprendre et mettre les mains à la pâte avant de faire ses débuts dans l'industrie de WordPress.
J'ai utilisé les deux méthodes, Local by Flywheel et Wampserver, pour l'installation locale de WordPress.
J'ai également utilisé le serveur XAMPP pour l'installation de WordPress et j'ai expérimenté de nombreux thèmes et plugins.
Konrad
Tout s'est déroulé sans problème, aucune difficulté d'installation, grâce au guide simple mais efficace. Merci beaucoup !
Support WPBeginner
Glad to hear it worked for you
Admin
saajina
Bonjour. Je suis nouveau sur WordPress et j'essaie d'installer WampServer. J'ai téléchargé WampServer depuis le lien que vous avez mentionné ci-dessus. et j'ai essayé de l'installer après le téléchargement, j'ai choisi la langue anglaise, puis j'ai accepté l'accord. après cela, lorsque je clique sur le bouton suivant pour installer, une fenêtre apparaît disant que cette installation ne peut fonctionner que si le package vc++ ci-dessus est installé……. et veuillez annuler l'installation. Je ne sais pas quoi faire ensuite. S'il vous plaît, aidez-moi.
Support WPBeginner
Cela dépendrait du package VC++ manquant, mais vous devriez pouvoir aller sur le site Web de Microsoft et rechercher la bibliothèque Visual C++ dont WAMP a besoin pour télécharger et installer.
Admin
Jiří Vaněk
Merci pour le guide. Habituellement, j'ai toujours testé WordPress, par exemple, sur des services comme instawp.com, ou j'ai tout configuré moi-même dans un outil de virtualisation sur une distribution Linux. Cela semble assez simple.
Support WPBeginner
Glad you found this a helpful option
Admin
sieutonghop
Les données du site Web Local WP sont-elles garanties ?
Support WPBeginner
Je ne pense pas comprendre ce que vous demandez, les fichiers et votre contenu sont stockés sur votre ordinateur.
Admin
kiemtienspeed
Si j'utilise Local WP, où seront sauvegardées les données du site web ? Pouvez-vous expliquer plus clairement ?
Support WPBeginner
Les données seraient stockées dans la base de données et les fichiers seraient sauvegardés dans le dossier du site.
Admin
Jiří Vaněk
C'est pratiquement la même chose qu'avec WordPress sur un hébergement mutualisé. La base de données peut ensuite être exportée via PHPMyAdmin, et les données via un client FTP (les données FTP sont stockées dans un dossier localement sur l'ordinateur). Alternativement, un plugin de migration peut être utilisé, tout comme sur le serveur.
Koweh
Bonjour, y a-t-il une vidéo explicative pour les étapes ci-dessus pour installer WordPress sur Windows en utilisant WampServer ?
Support WPBeginner
Pas pour le moment, mais nous y réfléchirons pour de futures vidéos !
Admin
M Sohail
cet article m'est très utile.
Merci à toute l'équipe
Support WPBeginner
Nous sommes heureux d'apprendre que notre article a été utile !
Admin
Danielle
Bonjour, article très utile. Comment feriez-vous cela pour un site WordPress existant ? (J'héberge sur Hostinger et j'ai sélectionné WordPress pour construire mon site). J'ai déjà un nom de domaine et un accès à WordPress également.
Support WPBeginner
Pour déplacer un site actuellement actif vers un site WordPress installé localement, vous voudrez consulter notre guide ci-dessous !
https://www.wpbeginner.com/wp-tutorials/how-to-move-live-wordpress-site-to-local-server/
Admin
Joseph Lewinski
Ensemble d'instructions fabuleux. J'ai installé WAMP Server simplement et sans problème. Il n'y a eu qu'un seul "glitch" très mineur dans vos instructions, facile à comprendre. Lorsque les instructions expliquent l'installation de WordPress proprement dite, elles disent : "Collez le dossier 'wordpress' dans le dossier C:\wamp64\www.", mais l'IMAGE vous montre en train de l'installer dans le dossier C:\wamp64. Comme je l'ai dit, c'était assez facile à comprendre (j'ai utilisé vos MOTS, PAS l'IMAGE).
MERCI pour cela ! Je m'abonne MAINTENANT !
Support WPBeginner
Nous sommes heureux que notre guide vous ait été utile et merci de l'avoir signalé !
Admin
Duncan Philps-Tate
Salut article utile. La seule chose que je remarque ne pas voir est quoi que ce soit sur quand utiliser Local WP et quand utiliser WAMP. Maintenant, j'ai un choix et je ne sais pas lequel est le mieux pour moi.
Local WP semble plus simple et avec moins à faire – mais le test ne dit pas s'il installe également Apache, PHP, MySQL (ce que le texte WAMP dit).
D'un autre côté, WAMP semble nécessiter plus d'efforts pour le mettre en marche (il suffit de comparer le nombre de paragraphes nécessaires), mais à part (éventuellement) ajouter un choix sur Apache, PHP, MySQL, qu'est-ce qu'il vous apporte que Local WP n'a pas ?
J'espère que vous pourrez répondre à cela facilement.
Support WPBeginner
WAMP existe depuis plus longtemps et était notre recommandation initiale, Local WP a été créé pour faciliter les choses à ceux qui débutent et les deux installeront ce qui est nécessaire pour exécuter un site WordPress sur votre ordinateur.
Admin
Duncan Philps-Tate
Merci – utile
Seyi
Merci pour cela… vraiment utile
Support WPBeginner
Nous sommes heureux que notre article vous ait été utile !
Admin
Kylie
J'ai installé wampserver et j'ai un feu vert. Lorsque je fais un clic droit, je ne trouve aucun bouton appelé phpadmin. Et lorsque je tape localhost/phpadmin dans mon navigateur, je reçois ce message.
L'URL demandée est introuvable sur ce serveur.
Apache/2.4.51 (Win64) PHP/7.4.26 Server at localhost Port 80
Support WPBeginner
Vous devriez faire un clic gauche sur l'icône de WAMP pour phpmyadmin, lorsque vous passez par ce chemin, cela devrait afficher l'URL à laquelle elle est définie si elle n'est pas correctement définie sous localhost.
Admin
Layla
J'ai fait cela et j'ai commencé à travailler sur un PC, mais celui-ci doit maintenant être réparé et sera absent un moment. Si je dois installer cela sur un deuxième PC, quels fichiers dois-je transférer pour pouvoir continuer à travailler sur le même site Web sur l'autre PC ? Je me sens un peu idiot de ne pas pouvoir le comprendre moi-même.
Support WPBeginner
Nous vous recommandons de suivre notre guide ci-dessous pour transférer votre site sur un autre ordinateur afin de continuer à y travailler. Bien que l'article concerne les sites en ligne, la méthode devrait toujours fonctionner pour votre installation locale.
https://www.wpbeginner.com/wp-tutorials/how-to-move-live-wordpress-site-to-local-server/
Admin
Layla
Merci beaucoup ! Cela a parfaitement fonctionné et c'était si simple !
Support WPBeginner
Nous sommes heureux d'avoir pu vous aider !
Renata
J'ai installé Wamp Server et C++ Redistributable 2012, 2013 et 2015, mais quand j'essaie de l'ouvrir, il ouvre 4 fenêtres noires puis il s'arrête. Que dois-je faire ?
Support WPBeginner
Vous devriez vérifier dans le coin inférieur droit avec vos icônes masquées. WAMP n'a pas de fenêtre qui apparaît par défaut, mais ajouterait une icône là pour vos options avec WAMP.
Admin
Hosea
Guide simple et direct. Je l'ai suivi et j'ai obtenu exactement ce que je voulais. Excellent article utile.
Support WPBeginner
Glad you found our guide helpful
Admin
Ibrahim Yusuff
Merci pour ce guide inestimable. Le problème que j'ai concerne le téléchargement de wamp. La langue est en français et chaque fois que j'essaie de la changer, elle revient en français que je ne comprends pas. J'ai rempli toutes les informations nécessaires mais en cliquant sur télécharger, elle revient en français. S'il vous plaît, aidez-moi.
Support WPBeginner
They currently have a popup that is French when selecting the file to download but at the end of the first paragraph you should see a link to download directly without having to deal with the popup
Admin
prilla kobugabe
bonjour, j'ai besoin d'aide. quand je tape localhost/mysite/ dans mon navigateur, il répond négativement en disant
« L’URL demandée est introuvable sur ce serveur.
Apache/2.4.41 (Win64) PHP/7.3.12 Serveur sur localhost Port 80 »
Support WPBeginner
Si vous avez redémarré votre ordinateur depuis l'installation de WAMP, vous devriez vous assurer que WAMP est en cours d'exécution, car c'est la cause la plus fréquente de cette erreur spécifique.
Admin
Ronnie Ferrer
Vous êtes des légendes les gars ! Merci.
Francis Guchie
Merci beaucoup pour cet excellent article pour débutants
prakoo
api-ms-win-crt-string-l1-1-0.dll est manquant sur votre ordinateur, cela affiche une erreur ?
Support WPBeginner
Vous voudrez vous assurer d'installer Visual C++ Pro pour la solution la plus courante à cette erreur.
Admin
Melissa
Bonjour – J'ai WAMP installé localement sur ma machine Windows 10 exécutant la version PHP : 7.3.12. Je veux passer à PHP 7.4 – dois-je réinstaller WAMP ou puis-je mettre à jour PHP séparément ?
Support WPBeginner
Vous voudrez cliquer sur l'icône WAMP, et vérifier sous PHP, Version et selon quand vous avez installé WAMP, il devrait y avoir l'option de changer de version en cliquant sur la version que vous souhaitez utiliser.
Admin
melissa
merci – c'était un conseil parfait !
Holly
Merci pour cet article ! C'est le meilleur et le plus direct que j'ai trouvé, il est très utile et détaillé. Continuez votre excellent travail ! En tant que débutant, j'apprécie vraiment.
Support WPBeginner
Glad you found our guide helpful
Admin
Jules Ivan
C'est génial ! Merci d'avoir créé cet article !
Support WPBeginner
Glad you found our guide helpful
Admin
Ben
Lors de l'installation, j'ai eu une erreur système qui dit « L'exécution du code ne peut pas continuer car MSVCR120.dll est introuvable. La réinstallation du programme peut corriger ce problème »
Comment puis-je faire cela s'il vous plaît
Support WPBeginner
You need to install Visual C++ Redistributable that we link to in the article
Admin
Diya
J'ai installé WordPress dans WAMP et terminé mon premier site web. J'ai un autre projet maintenant. Alors pour le deuxième site web, comment dois-je commencer ? Dois-je installer WordPress à nouveau dans un deuxième dossier « mysite2 » ?
Support WPBeginner
Vous pouvez certainement faire cela pour la méthode la plus courante pour créer un nouveau site.
Admin
saheed
Je reçois une erreur système myssqld.exe. Comment puis-je la corriger
Support WPBeginner
Vous devriez vous assurer d'avoir installé le redistribuable Visual C++
Admin
Tom Bauer
WAMP64 ne s'installera pas sur une machine win7 64.
Support WPBeginner
Sauf indication contraire, vous pouvez toujours l'installer sous Windows 7, en fonction de l'erreur que vous rencontrez, vous devrez peut-être contacter le support de WAMP.
Admin
Paul
Super instructions, merci.
Tout s'est bien installé, j'ai juste un problème ce matin pour me connecter au navigateur. Tous les réglages que j'ai essayés n'ont pas fonctionné.
Je sais que je suis lent mais pourriez-vous confirmer ce que je dois taper dans le navigateur pour accéder au programme.
Merci
Support WPBeginner
Comme indiqué dans l'article, il devrait s'agir de quelque chose de similaire à localhost/mysite. Vous devriez également vous assurer que WAMP est en cours d'exécution, car c'est la raison la plus courante de ce problème.
Admin
Peter
J'avais un problème similaire à celui des autres. Tout s'est bien passé jusqu'à ce que j'arrive au point où Apache ne fonctionnait pas. Le problème venait du port 80, il était utilisé par autre chose (pas skype), donc je suis allé dans Outils > Utiliser un autre port que 80, j'ai ajouté le port 8080. Ensuite, tout a fonctionné, mais lorsque vous voulez accéder à votre site Web, vous ne pouvez pas utiliser localhost/mysite/ mais localhost:8080/mysite/ puisque vous avez changé le port par défaut.
Je n'ai pas trouvé cela dans les commentaires. Peut-être que cela aidera quelqu'un.
Support WPBeginner
Thanks for sharing what helped you with this issue
Admin
Bas
Bonjour, merci pour le tutoriel. Je l'ai terminé, et ça fonctionne à merveille. Mais maintenant ma question est : comment puis-je obtenir mes données de site Web "réelles" en direct dans l'environnement de test local ? Y a-t-il un moyen de les exporter et de les importer dans l'environnement de test local ?
Support WPBeginner
Pour cela, vous devriez consulter notre article ci-dessous :
https://www.wpbeginner.com/wp-tutorials/how-to-move-live-wordpress-site-to-local-server/
Admin
Mahima Pandey
ici, j'ai téléchargé le fichier WordPress et fait tout selon les instructions données. mais je suis bloqué dans la barre d'adresse de localhost
localhost/nom_du_serveur dans Internet Explorer doit être tapé pour accéder à WordPress. mais que faut-il taper pour Google, Firefox. S'il vous plaît, aidez-moi, c'est vraiment urgent.
Support WPBeginner
Vous devriez pouvoir taper la même adresse sur n'importe quel navigateur Internet pour voir le site sur votre ordinateur local. Si vous vouliez que votre site soit trouvé en ligne, vous devriez vous renseigner sur un fournisseur de domaine et d'hébergement.
Admin
Konstantinos Paturas
Merci beaucoup.
Support WPBeginner
You’re welcome
Admin
Armel
Merci pour cet article utile. J'ai installé WordPress avec succès en utilisant Wamp. Mais, je reçois ce message. « Installation échouée : une erreur critique s'est produite sur votre site web. Veuillez vérifier la boîte de réception de votre e-mail d'administration pour obtenir des instructions. En savoir plus sur le débogage dans WordPress. »
S'il vous plaît, comment puis-je résoudre ce problème ?
Support WPBeginner
Pour cette erreur, vous voudrez consulter notre article ci-dessous :
https://www.wpbeginner.com/wp-tutorials/how-to-fix-the-wordpress-white-screen-of-death/
Admin
Hoat Le
Cher support WPBeginner ;
J'ai lu votre tutoriel très attentivement, et je n'ai pas vu que vous mentionniez VirtualHost dans WampServer, donc je ne sais pas si je dois créer un Virtual Host pour mon site de test.
Support WPBeginner
Cela peut rendre les URL plus proches de ce que vous attendez d'un site, mais ce n'est pas une exigence et cela peut être difficile à configurer pour les débutants.
Admin
Shani
Bonjour,
Merci beaucoup pour cet article !
Vous m'avez vraiment aidé !
Je suis maintenant intéressé de savoir comment me connecter à mon site lorsque je vais sur WordPress.
Support WPBeginner
Si vous pouvez accéder à votre site WordPress, vous ajouteriez /wp-admin à la fin. Nous couvrons quelques options supplémentaires dans notre article ci-dessous que vous pouvez également essayer :
https://www.wpbeginner.com/beginners-guide/how-to-find-your-wordpress-login-url/
Admin
mimi
J'ai suivi le processus en conséquence, mais lorsque je clique sur l'icône verte WAMP pour créer une base de données MySQL vierge, rien ne s'affiche.
Support WPBeginner
La raison la plus courante serait que vous n'avez pas installé le redistribuable C++ si vous ne l'avez pas fait.
Admin
Aminat
Merci beaucoup, très utile
Support WPBeginner
You’re welcome
Admin
Dav
Bonjour,
J'ai installé comme indiqué mais je reçois une erreur en essayant de me connecter à
ERREUR : Échec de la définition du cookie de session. Peut-être utilisez-vous HTTP au lieu de HTTPS pour accéder à phpMyAdmin.
Qu'est-ce que je fais de mal ?
Support WPBeginner
Il s'agit probablement d'un problème avec le cache de votre navigateur ou un module complémentaire de navigateur. Nous vous recommandons de vider votre cache ou d'essayer d'utiliser un navigateur incognito pour voir si cela résout le problème.
Admin
Dav
Thanks, that works
Nathan Zindikilani
Bonjour, merci pour l'article. lorsque j'essaie d'ouvrir mon site localhost, j'obtiens l'erreur suivante : Il y a eu une erreur critique sur votre site web. ceci après avoir collé 'wordpress' dans le dossier www. comment puis-je résoudre ce problème
Support WPBeginner
Vous voudrez peut-être vous assurer que le fichier est décompressé, si c'est le cas, vous pourriez essayer de lire un nouveau téléchargement de WordPress dans le dossier pour voir s'il y a eu un problème avec votre téléchargement.
Admin
Spyros
Bonjour, j'ai besoin de votre aide s'il vous plaît, j'ai suivi toutes les étapes de votre article détaillé mais j'ai vu un message « impossible de sélectionner la base de données Nous avons pu nous connecter au serveur de base de données (ce qui signifie que votre nom d'utilisateur et votre mot de passe sont corrects) mais pas sélectionner la base de données test_db et d'autres que je crois que vous connaissez ».
Merci d'avance !
Support WPBeginner
Vous voudrez peut-être vous assurer qu'il n'y a pas de fautes de frappe dans le nom de la base de données que vous avez défini, il semble qu'il ne parvienne pas à trouver une base de données portant le nom indiqué.
Admin
Raheel
J'obtiens « Erreur lors de l'établissement d'une connexion à la base de données »
Une aide ici s'il vous plaît
Support WPBeginner
Pour des solutions courantes à cette erreur, vous voudrez consulter notre article ci-dessous :
https://www.wpbeginner.com/wp-tutorials/how-to-fix-the-error-establishing-a-database-connection-in-wordpress/
Admin
Steve
Bonjour,
J'ai installé WAMP et créé un site WordPress sur mon ordinateur – merci pour votre excellent guide. J'ai utilisé « mysite » comme dans votre exemple pour rester cohérent avec vous pendant que je construisais mon royaume logiciel. Maintenant que les choses se présentent bien, est-il possible de simplement renommer le dossier « mysite » (qui se trouve dans « www ») avec mon nom préféré, ou est-ce plus compliqué que cela ? J'essaie d'éviter de recommencer. Merci.
Support WPBeginner
Nous vous recommandons de conserver le format que vous avez déjà configuré si possible et une fois que vous aurez votre hébergement prêt, nous vous recommandons de consulter notre guide ci-dessous :
https://www.wpbeginner.com/wp-tutorials/how-to-move-wordpress-from-local-server-to-live-site/
Admin