L’installation de WordPress sur votre Mac vous permet d’explorer ses fonctionnalités sans avoir besoin d’un hébergeur.
Vous apprendrez à connaître le fonctionnement de WordPress et verrez s’il convient à votre projet. C’est également parfait pour tester des thèmes et des extensions avant de mettre votre site en direct. De plus, expérimenter localement vous donne la liberté de faire des erreurs et d’apprendre.
Nous avons beaucoup joué avec les sites locaux, à la fois sur les ordinateurs Mac et Windows. Et dans ce tutoriel, nous allons partager 2 méthodes simples pour configurer WordPress sur votre Mac.
Note : Vous n’utilisez pas Mac ? Nous avons également un tutoriel sur la façon d’installer WordPress localement sous Windows.
Pourquoi installer WordPress localement sur Mac ?
Normalement, vous avez besoin d’un compte d’hébergeur et d’un nom de domaine pour créer un site WordPress.
Cependant, le logiciel WordPress de base peut être téléchargé gratuitement et peut être exécuté localement sur votre ordinateur. Ce site WordPress local n’est généralement pas disponible sur l’internet et peut uniquement être vu sur votre ordinateur.
L’avantage de cette approche est que vous pouvez, à titre privé, vous exercer à l’utilisation de WordPress, l’essayer et voir quel type de sites vous pouvez réaliser .
Vous pouvez également utiliser cette installation locale pour tester différents thèmes et extensions WordPress avant de les installer sur votre site direct.
De quoi avez-vous besoin pour installer WordPress localement sur Mac ?
WordPress est principalement écrit en PHP, un langage de programmation côté serveur. Pour utiliser PHP, vous aurez besoin d’un serveur web et d’un système de gestion de base de données MySQL.
Installer tous ces logiciels indépendamment les uns des autres et les faire fonctionner ensemble semble être une tâche ardue.
Heureusement, il existe des outils de développement gratuits qui permettent de les installer super facilement en un seul paquet, même pour les utilisateurs/utilisatrices les moins doués en technologie. Dans cette optique, voici 2 méthodes pour installer WordPress localement sur un Mac sans aucune compétence particulière en matière d’administration de serveur :
Vous êtes prêt ? Lançons l’exécution de WordPress sur votre ordinateur.
1. Installer WordPress localement sur Mac en utilisant Local WP (Recommandé)
Local WP est un outil de développement WordPress qui vous permet de configurer facilement un serveur local sur votre ordinateur Mac. Vous pouvez également utiliser Local sous Windows et Linux pour configurer WordPress.
Tout d’abord, vous devez vous rendre sur le site de la section locale et cliquer sur le bouton “Télécharger” situé dans le coin supérieur droit de l’écran.
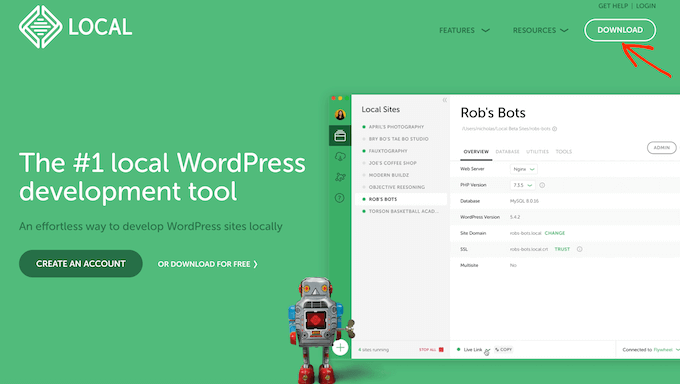
Une fenêtre surgissante de téléchargement local s’ouvre alors.
Ici, choisissons Mac comme plateforme.
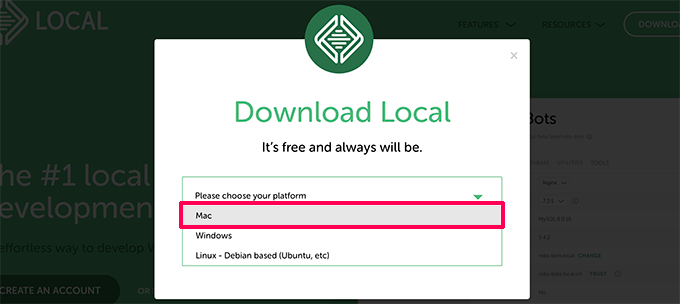
La section locale vous demandera alors de compléter un bref formulaire.
Après avoir saisi votre Nom, votre adresse e-mail et votre numéro de téléphone, vous pouvez cliquer sur le bouton “Get it Now”.
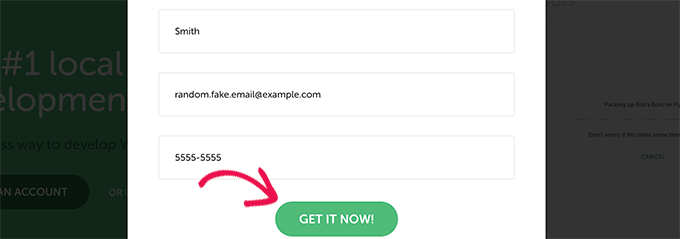
Le fichier d’installation local est alors téléchargé sur votre ordinateur. Vous pouvez double-cliquer pour ouvrir le fichier téléchargé dès que le téléchargement est terminé.
Vous verrez alors apparaître un assistant de configuration qui vous guidera tout au long du processus d’installation du Local sur votre ordinateur.
Les utilisateurs/utilisatrices de Mac doivent simplement faire glisser l’application locale dans leur dossier “Applications”.
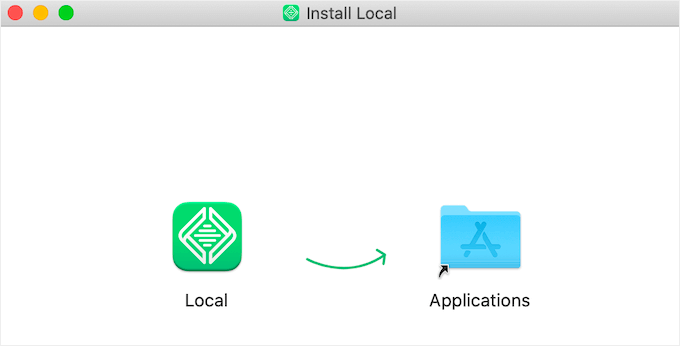
Une fois l’installation terminée, vous pourrez lancer l’application locale à partir du dossier Applications.
Lors du premier lancement, il se peut que l’on vous pose quelques questions et que l’on vous demande de créer un compte local gratuit. Ces étapes sont facultatives et vous pouvez les sauter si vous le souhaitez.
Créer un site WordPress en local
Local permet de créer très facilement un site local et d’installer WordPress rapidement.
Pour Premiers pas, il suffit de cliquer sur le bouton “Créer un nouveau site” pour continuer.

Dans l’écran suivant, vous devez saisir le nom de votre site.
Ensuite, cliquez sur le bouton “Continuer”.

Ensuite, il vous sera demandé de choisir votre plateforme.
Local vous permet de choisir la version de PHP, Apache et MySQL que vous souhaitez utiliser.
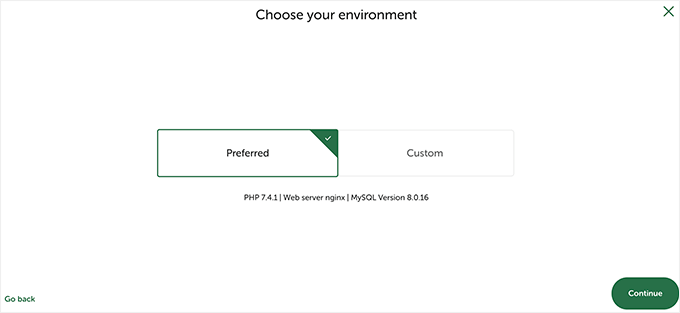
Si vous n’êtes pas sûr, choisissez les Réglages “préférés” et cliquez sur le bouton “Continuer”.
Enfin, vous devrez saisir un identifiant et un mot de passe WordPress. Vous pouvez ensuite cliquer sur le bouton “Ajouter un site”.
Local va maintenant télécharger et installer WordPress pour créer votre site. Vous serez peut-être prompt à saisir votre identifiant et votre mot de passe Mac pour effectuer des modifications.
Une fois l’opération terminée, vous verrez des informations sur votre site nouvellement créé, ainsi que des boutons permettant de visiter la zone d’administration de WordPress ou de voir votre site local.
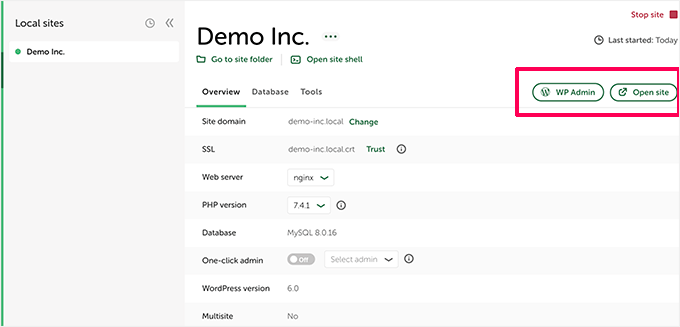
Vous pouvez maintenant visiter votre site ou vous connecter à la zone d’administration de WordPress.
À partir de là, vous pouvez utiliser votre site WordPress hébergé localement comme vous le feriez pour un site en direct.
Vous pouvez installer des extensions et des thèmes et concevoir votre site comme bon vous semble.
2. Installer WordPress en local sur Mac avec MAMP
MAMP est un programme populaire qui vous permet d’utiliser WordPress sur votre ordinateur Mac.
Commençons par visiter le site de MAMP. Vous devriez consulter cette page avec la dernière version de MAMP et MAMP Pro.
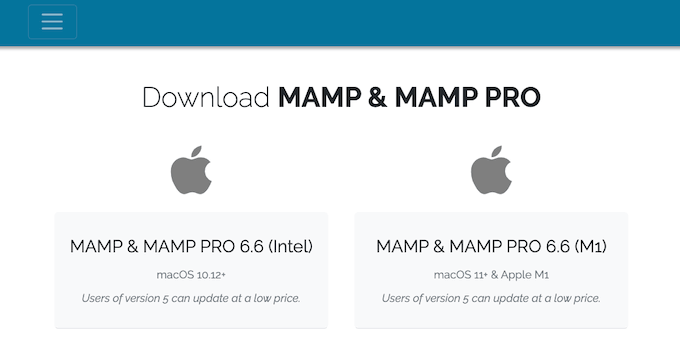
MAMP propose des téléchargements distincts pour les différentes versions du système d’exploitation macOS.
Vous n’êtes pas sûr de la version de macOS installée sur votre ordinateur ? Pour le trouver, il suffit de cliquer sur l’icône Apple dans la barre d’outils de votre ordinateur.
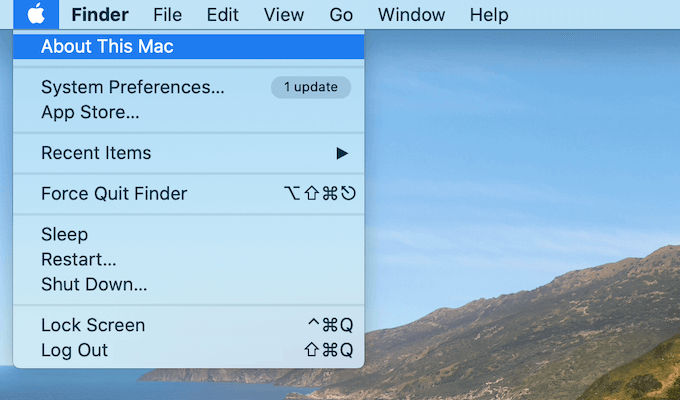
Vous pouvez ensuite cliquer sur l’option “À propos de ce Mac”.
Cela ouvrira une fenêtre surgissante qui affiche de nombreuses informations sur votre ordinateur, notamment votre version de macOS.
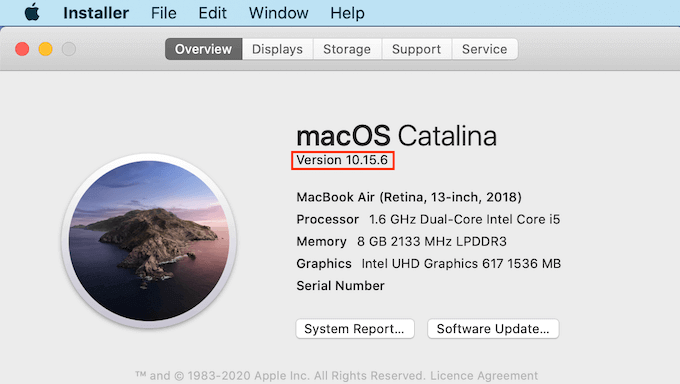
Vous pouvez maintenant télécharger la version de MAMP correspondant à votre système d’exploitation.
Une fois le téléchargement terminé, double-cliquez sur le fichier .pkg de MAMP. Cela lancera le programme d’installation de MAMP.

Il ne vous reste plus qu’à suivre les instructions qui s’affichent à l’écran pour installer MAMP.
Après avoir installé ce programme, lancez MAMP en ouvrant le dossier “Applications” de votre ordinateur.
Ici, vous trouverez 2 versions de MAMP. MAMP Pro est la version Sélectionnée, assurez-vous donc de sélectionner la version gratuite.
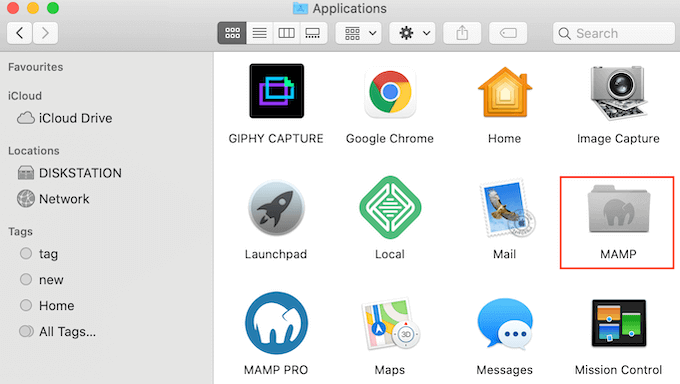
À l’intérieur de ce dossier MAMP, vous trouverez divers fichiers, ainsi qu’une application MAMP.
Il suffit de double-cliquer pour lancer l’application MAMP.
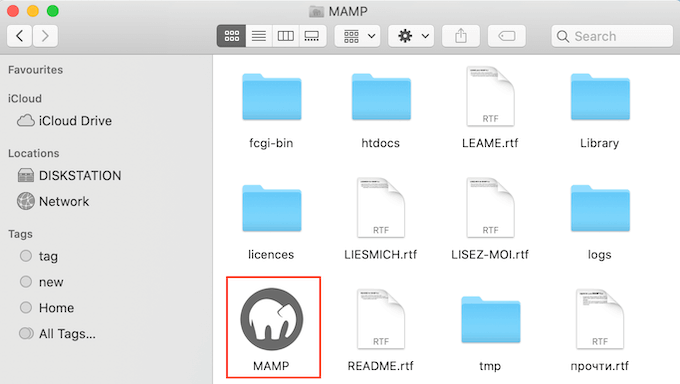
Avant de Premiers pas, nous vous recommandons de configurer quelques réglages pour améliorer votre expérience MAMP.
Pour effectuer ces modifications, cliquez sur “MAMP” dans votre barre d’outils, puis sélectionnez “Preferences….”.
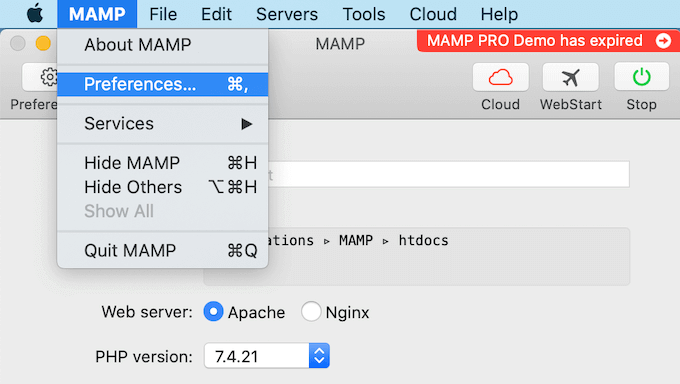
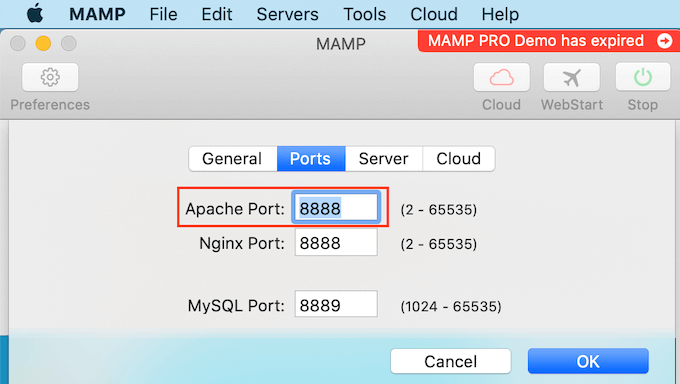
Dans la fenêtre surgissante, vous devez passer à l’onglet “Ports”.
Vous pouvez maintenant vérifier le port Apache utilisé par MAMP. Nous recommandons d’utiliser le port Apache 8888 si MAMP ne l’utilise pas déjà.
L’étape suivante consiste à configurer le dossier racine de votre document. C’est là que vous créerez et stockerez tous vos sites WordPress locaux.
Par défaut, MAMP utilise le dossier /Applications/MAMP/htdocs/, mais vous pouvez le modifier pour un autre emplacement.
Dans la boîte de dialogue “Préférences…”, cliquez sur l’onglet “Serveur”. La racine de votre document devrait maintenant être visible.
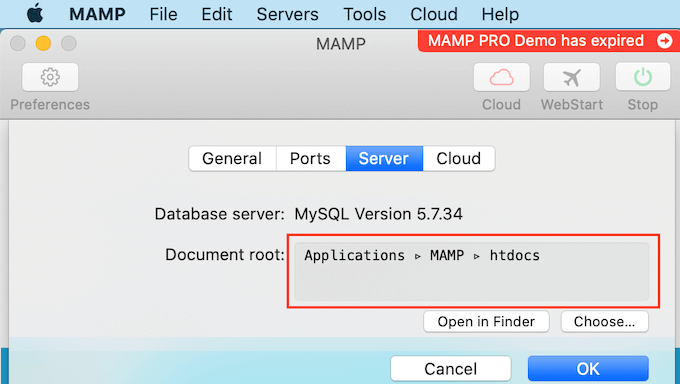
Pour stocker vos sites dans un autre dossier, cliquez sur le bouton “Choisissez…”.
Une fenêtre surgissante s’ouvrira, dans laquelle vous pourrez choisir un nouvel Emplacement. Vous pouvez également créer un nouveau dossier pour stocker tous vos sites WordPress.
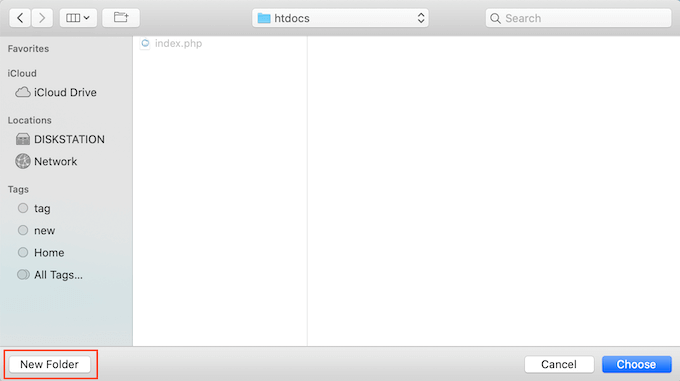
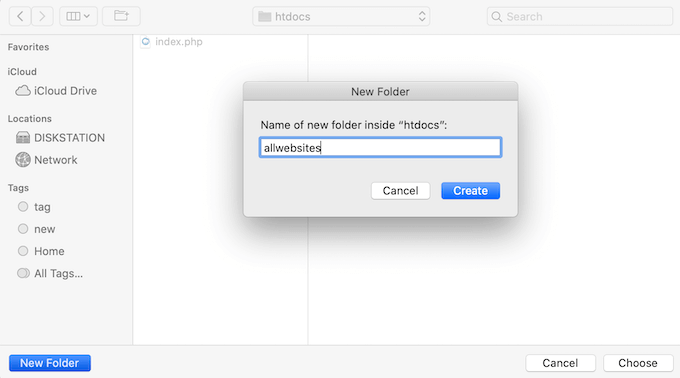
Vous pouvez donner à ce dossier le nom que vous voulez.
Pour cet article, nous stockerons nos sites dans un dossier appelé “allwebsites”.
Programme d’installation de WordPress sur MAMP
Maintenant que vous avez configuré MAMP, il est temps d’installer WordPress sur votre ordinateur Mac.
Tout d’abord, vous devez vous rendre sur le site WordPress.org et télécharger la dernière version de WordPress Core.
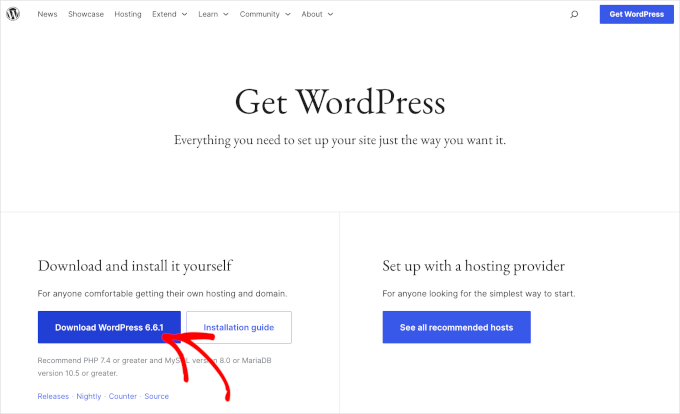
Note : Il existe deux versions de WordPress. Pour plus de détails, consultez notre article de comparaison entre WordPress.com et WordPress.org.
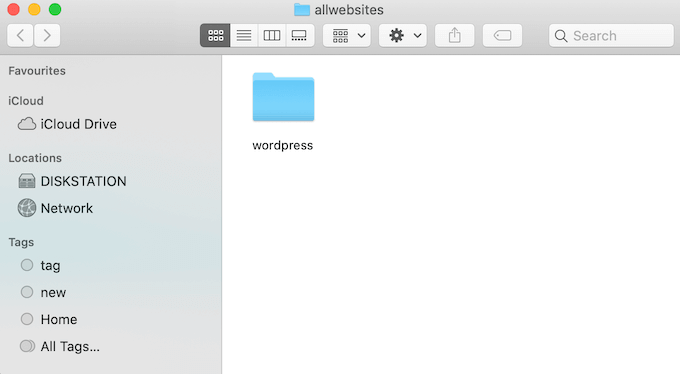
Après avoir téléchargé le fichier depuis WordPress.org, il vous suffit de le décompresser. Cela créera un dossier ‘wordpress’ décompressé.
Maintenant, copiez simplement ce dossier dans le dossier racine de votre document MAMP.
Puisque nous avons modifié le dossier racine du document, nous devons copier “WordPress” dans applications/MAMP/htdocs/allwebsites.
WordPress a besoin d’une base de données pour stocker l’ensemble de son contenu et de ses données. Vous devrez créer cette base de données avant de pouvoir créer un site local.
Ne vous inquiétez pas, ce n’est pas aussi difficile qu’il n’y paraît.
Dans la fenêtre “Préférences…” de MAMP, cliquez simplement sur le bouton “OK”. Cela devrait lancer l’application MAMP dans un nouvel onglet du navigateur.
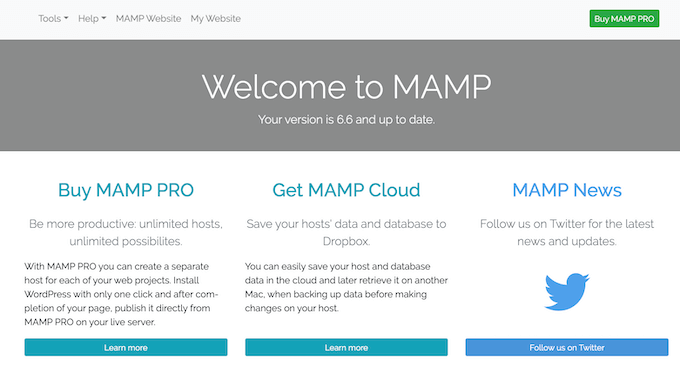
Votre prochaine tâche consiste à lancer phpMyAdmin. Il s’agit d’une application web permettant de gérer la base de données MySQL de votre site.
Dans la barre d’outils, naviguons vers Outils ” phpMyAdmin.
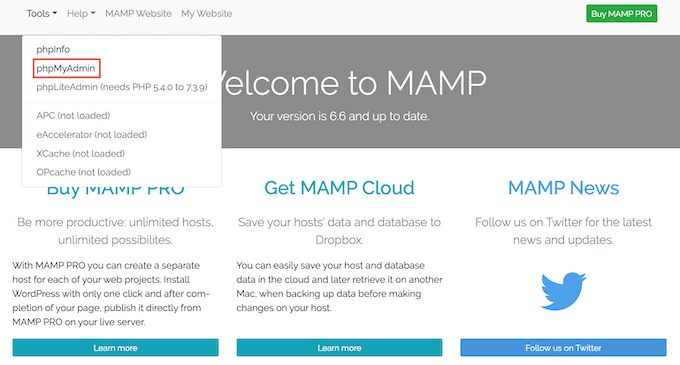
Cela ouvrira phpMyAdmin dans un nouvel onglet.
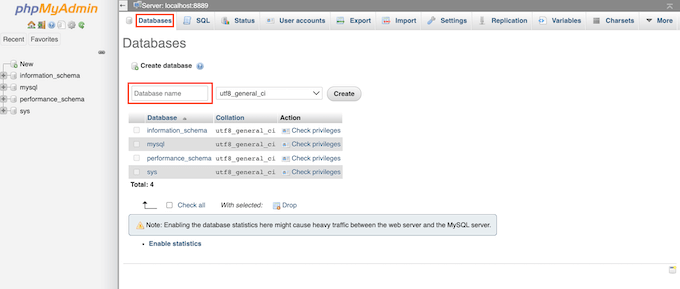
Dans le Tableau de bord de phpMyAdmin, vous devez aller dans l’onglet ‘Bases de données’.
Vous pouvez maintenant saisir un nom pour votre base de données dans le champ ‘Nom de la base de données’ avec ce que vous voulez. Confirmez simplement ce nom, car nous l’utiliserons à l’étape suivante.
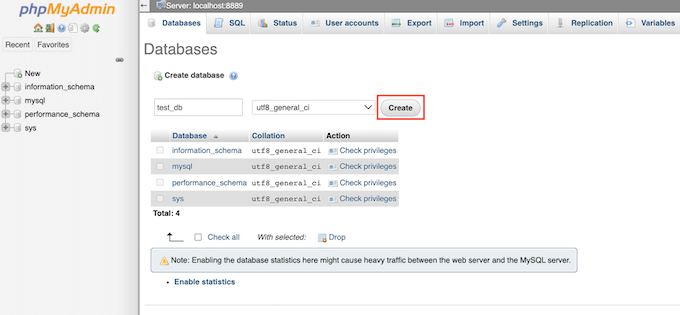
Pour ce tutoriel, nous appellerons notre base de données “test_db”.
Après avoir saisi le nom de votre base de données, vous pouvez cliquer sur le bouton “Créer”.
PhpMyAdmin créera alors votre base de données.
Il est maintenant temps d’installer WordPress.
Dans un nouvel onglet du navigateur, allez simplement à http://localhost:8888/. Si vous utilisez un port autre que 8888, modifiez simplement cette URL pour mentionner votre port.
Vous devriez maintenant voir un lien vers le dossier “wordpress” que vous avez copié dans votre dossier racine. Cliquez sur ce lien. Cela ouvrira l’assistant d’installation de WordPress.
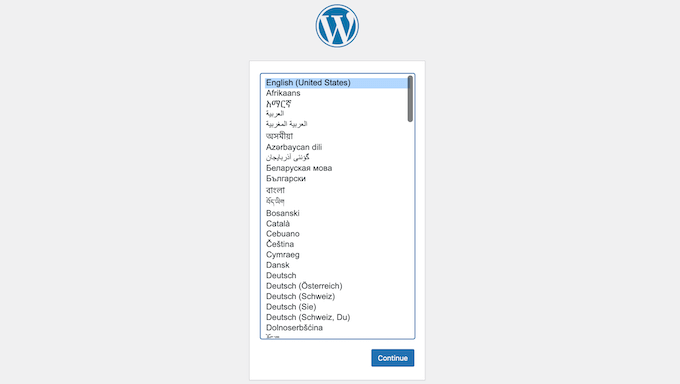
L’assistant d’installation de WordPress commence par vous demander de choisir une langue. Après avoir fait votre choix, vous pouvez cliquer sur le bouton ” Continuer “.
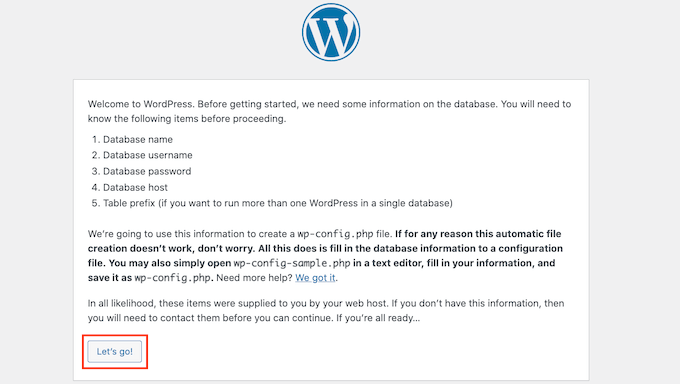
Sur l’écran suivant, WordPress vous affiche la liste de toutes les informations dont il a besoin pour terminer l’installation.
Après avoir lu cet écran, allez-y et cliquez sur le bouton “Allons-y” pour avancer.
L’assistant de configuration va maintenant vous demander les informations relatives à votre base de données WordPress. Pour le nom de la base de données, tapez simplement le nom que vous avez créé à l’étape précédente.
Dans les champs “Identifiant” et “Mot de passe”, tapez simplement “root”.
Vous pouvez ensuite taper “localhost” dans le champ “Base hébergeur”. Localhost signifie que la base de données et le site sont hébergés sur le même serveur, qui, dans ce cas, est votre ordinateur Mac.
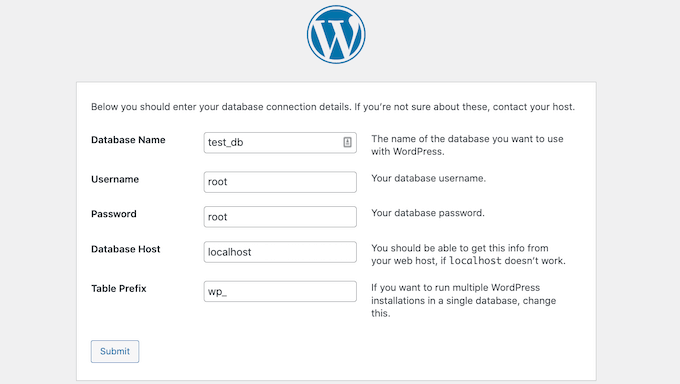
Après avoir saisi toutes ces informations, il suffit de cliquer sur le bouton “Envoyer”.
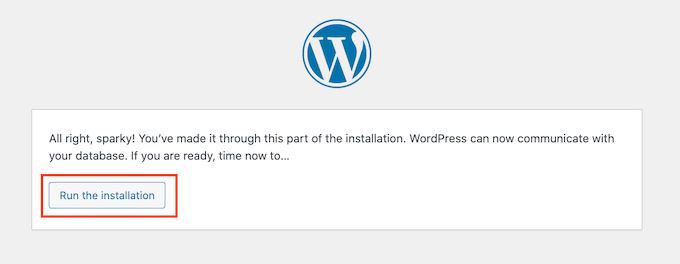
WordPress va maintenant se connecter à votre base de données et créer un fichier de configuration pour vous. Une fois que c’est fait, vous verrez un message de réussite.
Pour passer à l’étape suivante, vous pouvez cliquer sur le bouton “Exécuter l’installation”.
Sur l’écran suivant, WordPress vous demandera d’ajouter un titre de site. Par exemple, vous pouvez utiliser le nom de votre entreprise. La plupart des thèmes WordPress affichent ce titre tout en haut de votre site.
Si vous n’êtes pas sûr du titre de votre site, inutile de paniquer. Vous pouvez à tout moment modifier le titre dans votre Tableau de bord WordPress.
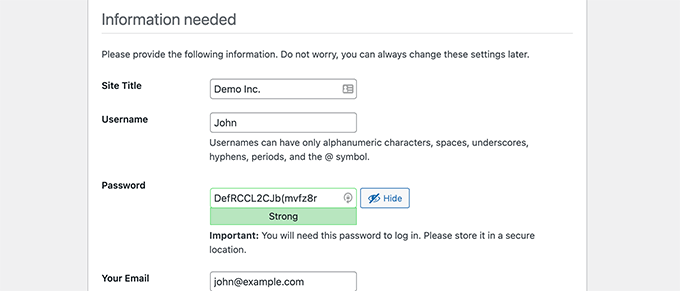
Vous devrez ensuite créer un identifiant et un mot de passe. Ce sont les informations de connexion que vous utiliserez pour accéder à votre Tableau de bord WordPress.
Vous pouvez également saisir votre adresse e-mail dans le champ “Votre e-mail”. C’est à cette adresse que WordPress enverra tous ses e-mails d’administration.
Une fois le formulaire terminé, cliquez sur le bouton “Installer WordPress”.

WordPress va maintenant lancer l’installation.
Après quelques instants, un message de réussite devrait s’afficher.

Pour accéder directement à l’écran de connexion de WordPress, cliquez sur le bouton “Se connecter”.
Vous pouvez également vous connecter à votre site WordPress local en utilisant l’URL suivante : http://localhost:8888/wordpress/wp-login.php.
Note : Si vous utilisez un port Apache différent, vous devrez modifier la partie ‘8888’ de cette URL.
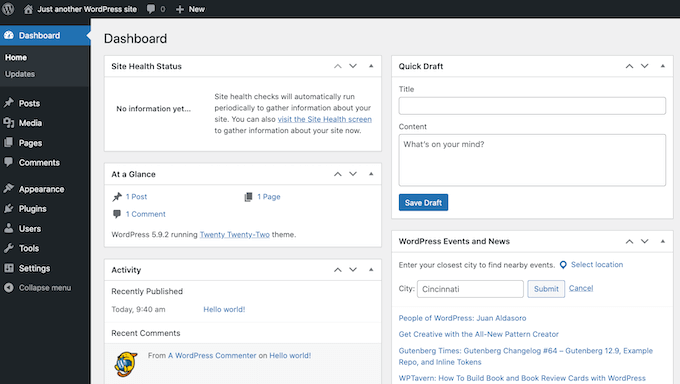
Vous pouvez maintenant vous connecter à votre site WordPress en saisissant le nom d’utilisateur et le mot de passe que vous avez créés à l’étape précédente.
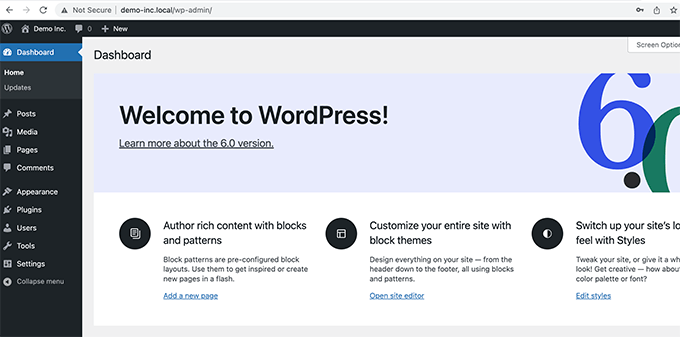
Vous accéderez ainsi au Tableau de bord WordPress.
Essayer WordPress en local sur Mac
Une installation locale est parfaite pour tester WordPress ou développer des sites/développeuses sur votre ordinateur. Maintenant que WordPress s’exécute localement sur votre Mac, voici quelques exemples de ce que vous pouvez faire :
- Expérimentez les meilleurs thèmes WordPress.
- Essayez de trouver le thème WordPress qui vous convient.
- Testez localement les extensions WordPress essentielles.
- Apprenez la programmation WordPress en créant vos propres extensions et thèmes personnalisés.
Transférer votre programme d’installation WordPress local vers un site En direct
En direct, une fois que vous avez joué avec WordPress, vous pouvez déplacer votre installation WordPress sur un site en ligne. C’est uniquement de cette manière que d’autres personnes pourront voir votre site.
Pour ce faire, vous devrez acheter un nom de domaine et un hébergeur.
Le nom de domaine est l’adresse de votre site sur l’internet, et l’hébergeur est l’endroit où sont stockés les fichiers de votre site. Vous pouvez considérer l’hébergeur comme la maison de votre site sur l’internet.
Pour l’hébergeur, nous recommandons Bluehost. C’est l’une des plus grandes entreprises d’hébergement au monde et elle est également officiellement recommandée par WordPress.org.
Heureusement, Bluehost offre aux utilisateurs/utilisatrices de WPBeginner une remise sur l’hébergeur, un certificat SSL gratuit et un nom de domaine gratuit. En gros, vous pouvez transformer votre installation WordPress locale en un site direct pour 1,99 $ par mois.
Une fois que vous avez acheté un hébergeur, vous pouvez consulter notre article sur la manière de déplacer WordPress d’un serveur local vers un site direct.
Nous espérons que cet article vous a aidé à apprendre comment installer WordPress en local sur Mac. Ensuite, vous pouvez également consulter notre guide sur comment créer un site web avec WordPress ou voir notre comparatif des meilleurs hébergeurs WordPress infogérés.
Si vous avez aimé cet article, veuillez alors vous abonner à notre chaîne YouTube pour obtenir des tutoriels vidéo sur WordPress. Vous pouvez également nous trouver sur Twitter et Facebook.


Robin
Hello,
I tried to follow this tutorial but got stuck when I had to go to the localhost
I changed to root in MAMP… my browser returns an empty white page
I don’t understand what the localhost stands for (is it the root on my MacBook or is it the root that I set during the setup of MAMP ?
WPBeginner Support
It is the URL that MAMP sets up to go to the folder on your site and properly load your site. If you changed the address for MAMP then you would need to go to that updated address.
Admin
Henry Barnett
I pop the URL Desktop/Wp_docs/vh_website into a new browser tab and ‘This site can’t be reached’. Can you please help?
WPBeginner Support
You would want to try reaching it using http://localhost
Admin
Sop
Thank you for this tutorial! I have successfully installed MAMP and have WordPress running locally. I’ve played around with it but would like to delete it now because I won’t be using WordPress anymore. What is the best way to do this?
WPBeginner Support
You could uninstall MAMP and delete the folder with your site information.
Admin
Lola
If localhost/mysite didnt work for you, check that you MAMP is running then click Webstart > My Webiste > Language and so on.
Thank you for the post,
WPBeginner Support
Thank you for sharing what helped you ensure the site was active
Admin
Russell
Having set up on my desktop (thank you so much!) and begun to build, I was trying to transfer everything to my laptop by copying the MAMP folder and the Mysite folder with all the WordPress files to the exact same places as my desktop. But I am unable to get it to work after a good few hours trying to figure a way through.
WPBeginner Support
For transferring your local installation, you would want to follow the steps in our guide below for properly transferring your content:
https://www.wpbeginner.com/wp-tutorials/how-to-move-live-wordpress-site-to-local-server/
Admin
Simon Miles
Nope, doesn’t work if you don’t understand computer science. This bit here – Go to localhost/mysite in a new browser tab. If you re-named the wordpress folder to something else, then use that name here – requires more explanation. I have no idea what to type in the browser.
WPBeginner Support
If you did not name the folder where you placed the WordPress files ‘mysite’ then you would replace the mysite in the URL with the name of the folder you decided to use.
Admin
kpatterson
I am running into an issue with the WordPress Installation Wizard on my browser, nothing is loading its just a blank screen, there are no errors displayed. Any advice?
WPBeginner Support
You would want to ensure MAMP is running and if it is to then use the debug option from our article below:
https://www.wpbeginner.com/wp-tutorials/how-to-fix-the-wordpress-white-screen-of-death/
Admin
jeania
I am having the same problem, how do you make sure that MAMP is running?
WPBeginner Support
You would open the MAMP program and if it gives the option to turn off your server then MAMP is running.
Admin
Geoff
wow, after 3 days messing around with other instructions I followed these and bingo I have wordpress running on de mac. Thank you.
WPBeginner Support
Glad our guide was helpful
Admin
Jennifer
Success! Thank you for these instructions. It took a little trial and error a few times, but I ultimately figured it out. One thing that tripped me up for a while was that apparently I needed to click on “start servers” in MAMP before the “Open web start page” would allow me to click on it. I didn’t see that anywhere in the instructions, so maybe that will help someone else. Thanks again! Onward with playing around with WordPress
WPBeginner Support
Thanks for sharing what helped you
Admin
nandhini
Thanks it helped me
Imran
The wordpress page was not opening on my Mac… then i changed localhost port setting back to 8888… and then it worked
WPBeginner Support
Glad you were able to find a solution that worked for you
Admin
Mel
Thank you for the very helpful article! Other articles were not up to date and the links to other articles at the end are useful
WPBeginner Support
Glad our article was helpful
Admin
sumeet
can we monetize the wordpress blog if we are hosting through MAMP
?
WPBeginner Support
Normally no as MAMP is for creating a local installation
Admin
Wendy
I managed to install wordpress finally and logged in, but once everything is closed and I want to get back to my local wordpress site, how do I access it? I feel like a total ditz right now…lol
WPBeginner Support
You would visit the localhost address you visited before and ensure MAMP is running before you try to visit the address
Admin
Elliott
How do you fix this issue? I see this when trying to access wordpress admin area
This page isn’t workinglocalhost is currently unable to handle this request.
HTTP ERROR 500
WPBeginner Support
There are a few different reasons, you may want to start with following our guide below:
https://www.wpbeginner.com/wp-tutorials/how-to-fix-the-internal-server-error-in-wordpress/
Admin
jane
i got half way then when it said to type in http localhost/mywebsite it didnt work
WPBeginner Support
You would want to ensure MAMP is running for the most common reason for that issue.
Admin
John
Thanks for the tutorial. Just one thing I’d like to mention… changing the default location of htdocs to one in my documents folder meant MAMP didn’t work. Changed it back to applications > MAMP > htdocs and it worked.
WPBeginner Support
Thanks for sharing this in case others ran into this issue or this is a change to MAMP since the last update of this article
Admin
Marianne
Thanks for sharing. I had the same problem.
Jen Harrigan
Thanks for the help, you are a lifesaver!
WPBeginner Support
You’re welcome, glad our guide could be helpful
Admin
Willy
When I put localhost/mysite in browser, I changed the folder´s name to wordpress_beginner so I put
localhost/wordpress_beginner in browser, but get error can´t find it??
WPBeginner Support
You may want to start by trying localhost and if that is not displaying correctly then you would want to ensure MAMP is running and does not have any errors.
Admin
Anjana
I copy the worpress folder to mamp folder and rename that folder with mysites name. When I try to run localhost:8888/mysites it gives
The requested URL /mysites/index.php was not found on this server.
Please help me
WPBeginner Support
Just in case, you would want to ensure MAMP is running when you try to visit the local installation
Admin
A
I get to the point of “Simply click on the Open Web Start Page button in MAMP application window”, but this option is greyed out and unclickable.. any thoughts on why this might be?
WPBeginner Support
One of the services may not be running correctly, in the tip right of the MAMP window there should be icons for each service with a green dot, if one of those isn’t green then that service could be the root of the issue.
Admin
Joanna Ma
I followed all the steps up until the installment, but I can’t open my http:localhost page, it just says error or unable to open on my screen. I’m not sure where I’m going wrong here, please let me know what else I should try!
WPBeginner Support
If you’ve come back after restarting your computer you would want to ensure MAMP is running so the local install can be found
Admin
Eva Giddings
Hey there, I have downloaded WordPress and created a database, but when I type localhost/mysite into the address bar it gives me a 404 not found error.
I just kept /Applications/MAMP/htdocs/ as my root folder, and I renamed the wordpress file to mysite. right now the wordpress folder is in htdocs, is that where it’s supposed to be?
WPBeginner Support
That all looks correct, are you certain MAMP is running before you tried to visit that address?
Admin
Dan
How do I restart WP on my mac to continue working on my site, I can’t find any info on how to do that.
Thanks,
Dan
WPBeginner Support
You would need to run MAMP again for the site to be findable at the address if that is what you mean.
Admin
Andrew
Wow. SUPER COOL and kind of you to take the time to post. This website is fantastic. THANK THANK THANK YOU!
WPBeginner Support
Thank you, glad you like our guide
Admin
Rick Karlson
I got to the point where you instructed to copy the WordPress to the MAMP Document root folder, AND you gave not a clue as to just where that might be found on my mac mini.
I dug through the MAMP files and folders (post install) and can find nothing like you reference. My opinion is your instructions are, without this small piece of info, useless.
WPBeginner Support
Some users may have changed where it is installed but normally you should see your MAMP folder in your Applications folder.
Admin
Joan Houston
So the “MAMP Document root folder” refers to the MAMP folder that got installed in the Applications folder? I, too, am confused by this.
WPBeginner Support
Correct
Peter Fritz Walter
Thanks for this comprehensive tutorial, it was very useful to me.
Peter
WPBeginner Support
Glad our guide could be helpful
Admin
Carrie
Oops! Looks like MAMP isn’t free anymore. I get as far as “Open WebStart Page” only to be directed to the website to purchase.
WPBeginner Support
From taking a look, they bundled the pro and free versions together. You should still be able to run MAMP for free
Admin
Tabish Hyyat
Hey! Kindly update the article….can’t work out which thing is which……
anurag
thanks , it is really helpful
Oleg
Thanks! Worked well.
Andrea
Hi, thanks for the great post! I have MAMP installed since a WordPress training I took suggested it. Does having MAMP serve as a localhost for testing my site serve the same purpose as using a subdomain as a staging site? I’ve read your articles on the latter, and am trying to understand. I guess one difference would be that if I used the MAMP method, I would always have to use my Mac; if I used a subdomain and just made it private, I could test from any computer. Am I thinking of this correctly? Basically, I am a beginner planning to start a blog, and want to make sure I have a testing environment. Thanks!
WPBeginner Support
Hi Andrea,
Yes, using MAMP you can create websites on localhost. These websites will only be accessible only on your computer. A staging website is on a live server that can be accessed using any computer.
Admin
Stan
Be aware that with MAMP 4.1.1 and PHP 7.1.1, you will see phpMyAdmin grayed out. The solution is to go into MAMP click the PHP tab and change PHP to 7.0.15. Presto !
By default MAMP shows only two versions of PHP , so if you don’t see 7.0.15 on list then rename folders with PHP versions you don’t want to use in the Applications/MAMP/bin/php folder.
Tara
I have changed the database charset in creating database tables, now I can not view my wepage or even in wp-admin. How do you find the database names from MAMP on a mac to change the database name back? Thanks
Fannie
When I’m in “phpMyAdmin”, I don’t see the tab “databases”, neither all the other options in the menu. I just see a table (grey and purple)… Someone know what I did wrong ?
Laura
Is there a newer version of this tutorial to go along with the current version of MAMP? The screenshots here are very different. Also, the instructions to create the document root aren’t very clear – first you advise putting it in a new folder in the Documents folder (which I did), but then you make it seem like it’s supposed to be in the MAMP folder in the Applications folder! I can’t get my localhost page to come up… This is my folder tree thingy…
Macintosh HD\Applications\MAMP\htdocs\WEBSITES\name\wordpress
What should my localhost address be?
I’ve also tried putting the WordPress folder here…
Macintosh HD\users\me\documents\WEBSITES\name\wordpress
I’m very confused.
BP
From the MAMP webpage click “my website”, 2nd from the left on the menu.
That will take you to the localhost site.
lisa
were you able to find a new tutorial?
Apoorv
This is so helpful..!! Worked like a Charm.
Charles Bewlay
I installed everything – brilliant – and was working on installing a template from template vendor. It asked to select a Cherryframework zip file. I did and then everything went blank. I’ve not been able to see anything since. I realised I had selected the wrong Cherryframework file – not the one in the template folder but one from outside that I had downloaded earlier and just had in my “new website’ folder.
I don’t really want to have to start from scratch. when I look at all my previous history I just get blank white pages.
Help!
Charles Bewlay
Many thanks guys, couldn’t have gone anywhere without you
Ed
I’m developing WordPress sites locally and then move it to a live server when i’m done. But when i start new projects locally I don’t really know how to handle the old files from previous work and databases?? Shall I just delete database, files and everything and start again??
Michael
Okay, so I setup my wordpress page using MAMP on my mac a few weeks ago and it was working and I was able to use edit the content. But going back to it now, I can’t seem to edit, just view my page. I start MAMP, go to the ‘WebStart Page’, click ‘My Website’ from the menu bar and choose my page. It loads, but I don’t see how I get to the WordPress editor??
Please help…
WPBeginner Support
We hope you have tried accessing your website’s admin area by visiting the URL:
http://localhost/wp-admin
This URL may differ depending on how you installed WordPress. Let’s suppose you installed it in a folder mysite, then your login URL would be.
http://localhost/mysite/wp-admin
Also check our guide on how to find your WordPress login URL.
Admin
Carolyn
It is unclear where to create the file below. I did not see this in MAMP or in the new window. If you are going to take people step by step in doing something, you need to be CLEAR!
Open a new browser window and type http://localhost/mysite. If you re-named the wordpress folder to something else, then use that name here. WordPress will notify you that it was unable to find wp-config.php file.
Click on Create a Configuration File button.
Create a Configuration file for WordPress in MAMP on Mac
M L Williams
I have everything installed and working, only I followed other instructions and didn’t use port 80. Plus I ended up using the default site htdocs inside Applications.
Is there a way I can have a do over, and reinstall everything the way you say to. I cannot may my site multisite, which was the whole reason I went down this rabbit hole.
Thanks so much for the article. It is well written and very helpful, just what I was looking for. Just wish I had found it first.
WPBeginner Support
Yes you can uninstall MAMP by simply visiting the Applications in Finder and then deleting MAMP.
Admin
Dee
Just wondering – what is the whole point of installing this on a MAC if we can work through the WordPress website? I’m trying to understand if I should bother downloading this onto my MAC or if it’s ok to just work through the regular website. Thanks.
Elisabeth Howlett
Very Helpful Article, from grateful person thinking that I would NOT be able to pull off MAMP then WordPress install. I actually did it!!!
Claire
I’m having issues where i don’t get the option to ‘Create a Configuration File’. I have the WordPress database information window first, then I get an error ‘Error establishing a database connection’ screenshot below – but no option to create configuration.
Am I doing it wrong? Any help would be greatly appreciated.
Thanks
Gorish Aggarwal
i too am getting the same error. did u find out how to fix it?
Liza
I had the same issue. There was an auto generated DB password in my wp-config.php file, so I changed it to ‘root’ and it worked. Obviously you should change your password after you get everything working.
/** MySQL database password */
define(‘DB_PASSWORD’, ‘root’);
SoHoWebStudio
Thanks for the help folks. 1st time doing this stuff. It helps to have good instructions. Some steps have been automated, but that’s cool. Let’s see how it goes from here. One my way to building my website. Thanks again.
Laura
I installed MAMP and got WordPress running, but for some reason my changes to the CSS aren’t being reflected on the page. At first I thought it was a caching issue, until I realized that it’s reflecting other changes, such as adding an item to the navigation menu. It’s the custom.css file it’s not seeing. (I am using Thesis 1.8.5.) Does it have anything to do with my naming the root folder dev-site instead of htdocs? Also my WP installation is directly inside the root folder, not two levels down. Thanks for any ideas you guys might have.
AM
I had this problem too. First I moved the root document folder from my desktop to ‘my documents.’ Then I changed the root in MAMP. When I ‘opened the start page’ I went to phpLiteAdmin and created a database there. Although wordpress said it couldn’t find the name of the database I had created there (I used the phpMyAdmin database name) I think it still got rid of my 404 error not found.
Tay
Did you guys change the port numbers?
Gaetan
Thanks to you guys I have successfully installed WordPress on my computer. Now I have one more issue :
I already have a live wordpress blog that runs via the online web version of wordpress at wordpress.com.
How can I access the blog I already created via the web version on the version I just installed on my computer?