Avez-vous déjà essayé de téléverser un fichier sur votre site WordPress et vous êtes heurté à un mur ? C’est très frustrant de ne pas pouvoir téléverser l’image, l’extension ou le thème dont vous avez besoin. Nos Lecteurs nous demandent souvent de l’aide pour les problèmes de téléversement de fichiers, car ils peuvent ralentir votre flux de travail.
Parfois, ces limites de téléversement de fichiers peuvent inopinément vous empêcher d’ajouter du contenu à votre médiathèque ou d’installer les plugins et thèmes plus volumineux dont vous avez besoin. C’est comme si vous étiez épinglé avec les mains liées. Et c’est encore plus ennuyeux lorsque vous ne savez pas comment corriger la situation !
Mais ne vous inquiétez pas, nous sommes là pour vous aider. Nous aimons que WordPress soit une plateforme si configurable, et il y a souvent plusieurs façons de résoudre le même problème.
Dans ce guide, nous allons vous afficher les moyens les plus simples pour augmenter la taille maximale de téléversement des fichiers dans WordPress. Nous allons vous permettre de dépasser ces limitations afin que vous puissiez retourner faire ce que vous aimez : gérer votre site !
Pourquoi augmenter la taille maximale de l’outil téléversé dans WordPress ?
Votre fournisseur d’hébergement WordPress définira une taille maximale de téléversement de fichiers par défaut lorsque vous configurerez et installerez WordPress. Cette limite est définie par votre fournisseur d’hébergement et se situe généralement dans une plage de 2 Mo à 500 Mo.
Pour la plupart des propriétaires de sites WordPress, cette limite sera largement suffisante.
Cependant, il est parfois nécessaire d’augmenter cette limite afin d’éviter les erreurs de téléversement.
Par exemple :
- Vous gérez un site de photographie et devez téléverser des images de grande taille.
- Votre portfolio de design ou de photographie contient des images de grande taille.
- Vous souhaitez installer un thème ou une extension WordPress de plus grande envergure.
- Vous souhaitez vendre des produits numériques comme des eBooks, des photos, des vidéos, etc.
- Vous mettez régulièrement à jour le contenu et ajoutez de l’audio, des photos et d’autres éléments qui dépassent la limite actuelle.
Ceci étant dit, nous allons vous afficher comment vous pouvez augmenter la taille maximale de téléversement des fichiers sur votre site WordPress.
Note: Gardez à l’esprit que l’affichage d’un grand nombre de fichiers volumineux sur votre site peut sérieusement ralentir sa vitesse et ses performances. C’est pourquoi nous recommandons généralement de ne jamais téléverser de vidéos sur WordPress.
Comme la plupart des utilisateurs/utilisatrices ont des configurations d’hébergeurs WordPress différentes, nous aborderons les points suivants :
- How to Check Your Maximum File Upload Size Limit in WordPress
- Method 1: Contact Your WordPress Hosting Provider
- Method 2: Create or Edit an Existing php.ini file
- Method 3: Add Code to Your WordPress Theme functions.php File
- Method 4: Add Code to Your .htaccess File
- Method 5: Use a WordPress Plugin to Increase File Upload Size
Comment vérifier la taille maximale de votre outil de téléversement dans WordPress
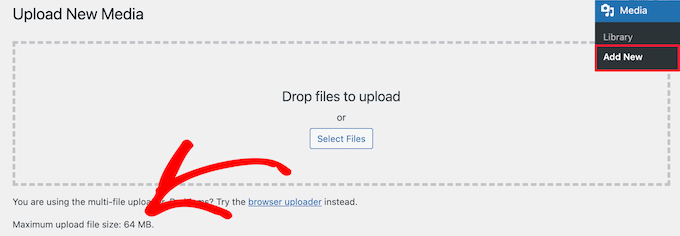
WordPress affiche automatiquement la taille maximale de téléversement des fichiers lorsque vous téléversez des images ou d’autres médias.
Pour le vérifier, il vous suffit d’aller dans la rubrique ” Médias ” Ajouter nouveau dans votre panneau d’administration WordPress, et vous verrez la limite maximale de taille de téléversement de fichiers pour votre site WordPress.
Maintenant que vous savez comment trouver la limite de taille, nous allons vous afficher comment augmenter la taille maximale de téléversement dans WordPress.
Méthode 1 : Contactez votre fournisseur d’hébergement WordPress
L’un des moyens les plus simples d’augmenter la taille maximale de téléversement des fichiers dans WordPress est de contacter votre fournisseur d’hébergement WordPress.
Il s’agit d’une tâche relativement simple pour leur équipe de service à la clientèle, qui peut être réalisée en quelques minutes.
Pour les débutants, cela peut être beaucoup plus facile que d’ajouter du code à WordPress et de modifier les fichiers du serveur.
Il vous suffit de vous rendre sur le site de votre fournisseur d’hébergement, comme Bluehost, et de vous connecter.
Cliquez ensuite sur l’icône ” Discussion ” qui se trouve en bas de l’écran. Vous pouvez alors demander au support d’augmenter la taille de téléversement des fichiers sur votre site WordPress.
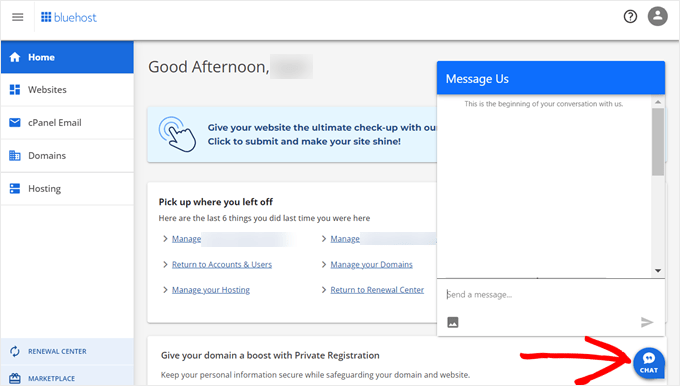
Vous pouvez également contacter le support depuis le tableau de bord de votre compte hébergeur.
Méthode 2 : Créer ou modifier un fichier php.ini existant
Une autre façon d’augmenter la taille maximale de téléversement des fichiers est de créer ou de modifier un fichier appelé php.ini. Ce fichier définit de nombreux réglages pour votre environnement d’hébergement WordPress.
La plupart des fournisseurs d’hébergement WordPress, comme Bluehost, disposent d’un cPanel convivial pour les débutants afin de vous aider à gérer votre site.
Si votre hébergeur dispose d’un tableau de bord cPanel, vous pouvez augmenter la taille de téléversement des fichiers grâce aux outils intégrés.
Note : Les informations suivantes proviennent du cPanel de Bluehost. Cependant, la plupart des fournisseurs d’hébergement mutualisé ont des étapes similaires.
Vous trouverez un bouton cPanel en bas de l’onglet Hébergement dans Bluehost.
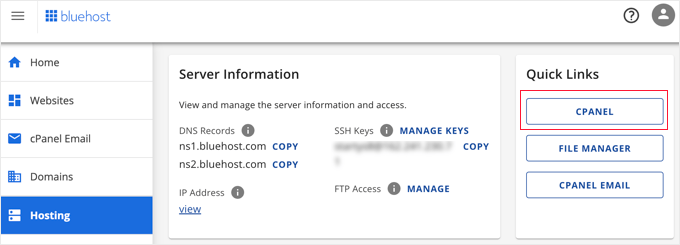
En cliquant sur ce bouton, vous ouvrirez votre Tableau de bord cPanel.
Vous devez maintenant défiler jusqu’à la section Logiciels et cliquer sur ‘MultiPHP INI Editor’.
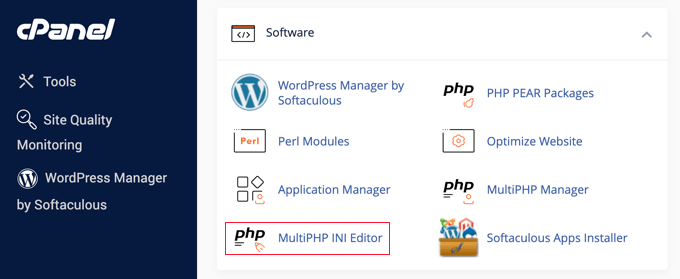
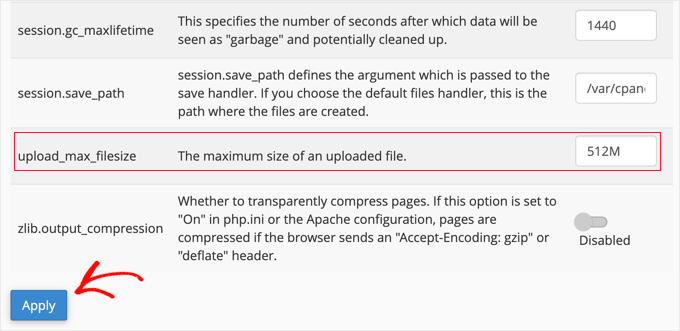
Ensuite, défilez vers le bas jusqu’à la section libellée “upload_max_filesize” et saisissez une nouvelle taille maximale de fichier dans la case.
Cliquez ensuite sur le bouton “Appliquer”.
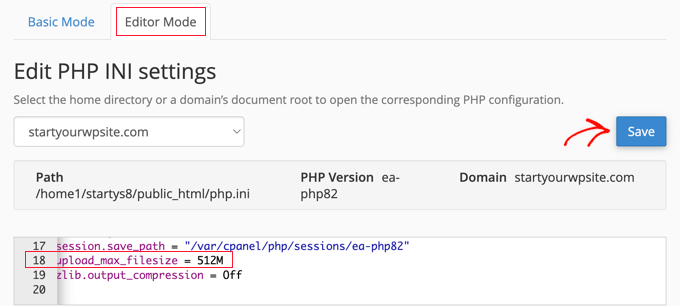
Vous pouvez également cliquer sur l’onglet de menu “Mode éditeur” et modifier la taille maximale de l’outil de téléversement directement dans l’éditeur.
Vous devez modifier la section ‘upload_max_filesize’ pour augmenter la taille de téléversement de vos fichiers.
Une fois que vous avez terminé, cliquez sur le bouton “Enregistrer”.
Modifier le php.ini en y ajoutant du code
Si votre fournisseur d’hébergement actuel ne propose pas l’option cPanel, vous devrez modifier ce fichier manuellement.
Pour ce faire, vous pouvez utiliser un client FTP ou l’option du gestionnaire de fichiers dans le panneau de contrôle de votre hébergeur WordPress.
Si vous utilisez un hébergeur mutualisé, il se peut que vous ne voyiez pas le fichier php.ini dans votre répertoire d’hébergement. Si ce n’est pas le cas, créez simplement un fichier nommé php.ini et téléversez-le dans votre dossier racine.
Ajoutez ensuite l’extrait de code suivant au fichier :
1 2 3 | upload_max_filesize = 256Mpost_max_size = 256Mmax_execution_time = 300 |
Vous pouvez modifier la limite de “256M” en fonction de la taille de fichier dont vous avez besoin pour votre blog WordPress.
Méthode 3 : Ajouter du code au fichier functions.php de votre thème WordPress
Cette méthode consiste à ajouter du code au fichier functions.php de votre thème WordPress.
Au lieu de modifier le fichier directement, nous vous recommandons d’utiliser WPCode. C’est la meilleure extension d’extraits de code qui vous permet d’ajouter du code à votre site sans le casser.
Si vous ne l’avez jamais fait auparavant, consultez notre guide du débutant sur la façon d’ajouter un module personnalisé dans WordPress.
Tout d’abord, vous devez installer l’extension gratuite WPCode. Pour plus de détails, consultez notre guide étape par étape sur l’installation d’une extension WordPress.
Une fois activé, vous devez naviguer jusqu’à Extraits de code ” + Ajouter un extrait.
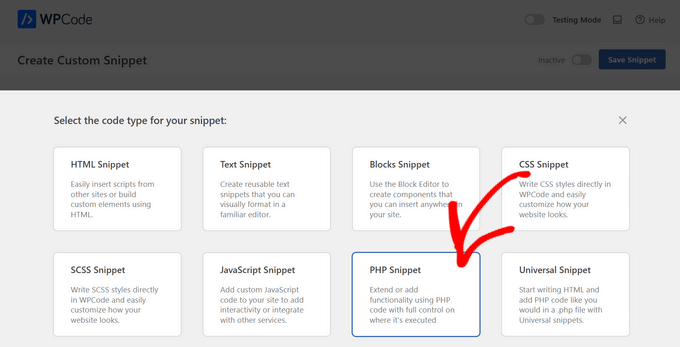
Vous devez survoler l’option “Ajouter votre code personnalisé (nouvel extrait)”, puis cliquer sur le bouton “+ Ajouter un extrait personnalisé”.

Ensuite, vous devez choisir “PHP extrait de code” comme type de code dans la liste d’options qui apparaît.
Dans l’écran suivant, saisissez un nom pour votre nouvel extrait, qui peut être n’importe quoi pour vous aider à vous rappeler à quoi sert le code.
Ensuite, vous pouvez copier et coller l’extrait de code suivant sous “Prévisualisation du code”. Confirmez vos modifications en remplaçant “256M” par la taille maximale du fichier dont vous avez besoin :
1 2 3 | @ini_set( 'upload_max_size' , '256M' );@ini_set( 'post_max_size', '256M');@ini_set( 'max_execution_time', '300' ); |
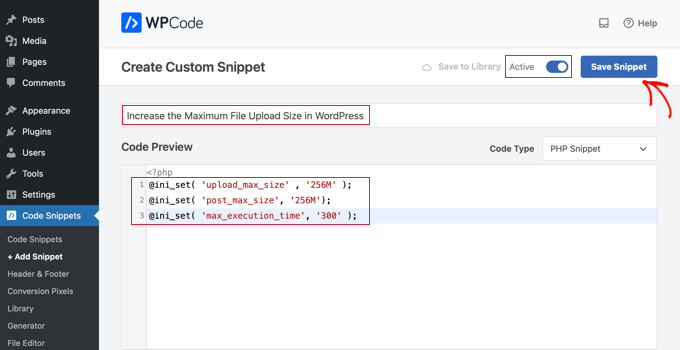
Enfin, mettez le permuter en haut sur “Actif” et cliquez sur le bouton “Enregistrer l’extrait”. Le code sera maintenant exécuté sur votre site.
Méthode 4 : Ajouter du code à votre fichier .htaccess
Un autre moyen d’augmenter la taille maximale des fichiers consiste à modifier le fichier .htaccess. Ce fichier contrôle les paramètres de configuration de haut niveau de votre site.
Pour ce faire, vous devez vous connecter au serveur de votre site via FTP. Si vous n’avez jamais fait cela auparavant, consultez notre guide sur l’utilisation de FTP pour téléverser des fichiers sur WordPress pour les débutants.
Ensuite, vous devez localiser votre fichier .htaccess dans le dossier racine de votre site.

Si vous ne trouvez pas votre fichier .htaccess, c’est qu’il est peut-être masqué par votre gestionnaire de fichiers ou votre client FTP. Pour en savoir plus, consultez notre guide sur les raisons pour lesquelles vous ne trouvez pas le fichier .htaccess sur votre site WordPress.
Ensuite, vous devez ajouter l’extrait de code suivant à votre fichier .htaccess :
1 2 3 4 | php_value upload_max_filesize 256Mphp_value post_max_size 256Mphp_value max_execution_time 300php_value max_input_time 300 |
Pour augmenter encore la taille maximale de votre outil téléversé, il vous suffit de modifier la valeur “64M” en fonction de la taille nécessaire.
Méthode 5 : Utiliser une extension WordPress pour augmenter la taille du téléversement des fichiers
Une autre façon d’augmenter la limite maximale de téléversement de fichiers est d’utiliser l’extension WP Increase Upload Filesize. Si vous n’êtes pas à l’aise avec l’ajout de code sur WordPress, cette option pourrait vous convenir.
La première chose à faire est d’installer et d’activer l’extension. Pour plus de détails, consultez notre guide sur l’installation d’une extension WordPress.
Une fois activé, naviguez vers ” Médias ” Augmenter la limite de téléversement dans votre panneau d’administration WordPress.
Vous accédez à un écran dans lequel vous pouvez sélectionner une nouvelle taille de téléversement dans le menu déroulant “Choisissez la taille maximale de l’outil de téléversement”.
Cliquez ensuite sur le bouton “Enregistrer les modifications”.

Note : La taille maximale de l’outil téléversé est définie par votre fournisseur d’hébergement. Si vous avez besoin d’une taille de fichier supérieure à celle indiquée dans la liste déroulante, vous devez contacter votre fournisseur d’hébergement et lui demander d’augmenter la limite.
Tutoriel vidéo
Si vous n’aimez pas suivre des instructions écrites, vous pouvez consulter notre tutoriel vidéo :
Nous espérons que cet article vous a aidé à augmenter la taille maximale de téléversement des fichiers dans WordPress. Vous pouvez également consulter notre guide sur la façon d’ajouter des types de fichiers supplémentaires à téléverser dans WordPress et nos choix d’experts de plugins et d’astuces pour améliorer la zone d’administration de WordPress.
Si vous avez aimé cet article, veuillez alors vous abonner à notre chaîne YouTube pour obtenir des tutoriels vidéo sur WordPress. Vous pouvez également nous trouver sur Twitter et Facebook.


Lisha Van Nieuwenhove
This help was BRILLIANT. THANK YOU!
WPBeginner Support
You’re welcome!
Admin
Ray Konopka
Thanks for the tips. My site is hosted in BlueHost so I first tried Method 2. However, after changing the upload_max_filesize value, the Add New media page for my site still showed 64 MB. I went back into the MultiPHP INI Editor and looked at the other values. One other value stood out:
post_max_size
Sets max size of post data allowed. This setting also affects file upload. To upload large files, this value must be larger than upload_max_filesize. Generally speaking, memory_limit should be larger than post_max_size.
After I increased the post_max_size value as well, then the Add New media upload page showed the new limit. Perhaps you can update the post to include this tip.
WPBeginner Support
Thank you for sharing this, we’ll be sure to look into it and possibly add it to the article in the future
Admin
Mark
All my limits were increased as suggested, but I started getting ‘files are too big’ after a plugin update. After double checking everything server and email side, the solution was changing from 5M to 5120kb in Contact Form 7 settings. The plugin suddenly stopped recognizing M when trying to override the default 1024kb setting.
WPBeginner Support
Thanks for sharing this should someone else run into this issue!
Admin
devshah
Function.php method is not Working.
WPBeginner Support
It would depend on your host and what else is set up on your server for what will work. If nothing else works you can always reach out to your host for assistance.
Admin
Halil AHMAD
The .htaccess worked for me. Thank you
Muzoora Barnabas
The .htaccess worked for me. Thank you
WPBeginner Support
Glad our recommendation was able to assist
Admin
Muhammad Farooqi
You comments and thanks secion is almost 10 times longer..than the content of this page is guarantee of your amazing tips
WPBeginner Support
We’re happy we can help so many WordPress users
Admin
Jacob Alas
The only method that worked for me was: htaccess Method
Thank you.
WPBeginner Support
Glad one of our methods was able to work for you
Admin
Daniyar Nauryz
htaccess Method has worked for me.
WPBeginner Support
Glad our recommendation worked for you
Admin
furqan
its not working.
WPBeginner Support
If the recommendations are not working for you, we would recommend reaching out to your hosting provider and they should be able to assist if this is something they’ve set on their end.
Admin
Abdullah Ashraf
Thank you so much. I tried all the methods and the last method was helpful for me.
I would like to know should I undo the second last step that was php.ini?
WPBeginner Support
It is not required to remove that file but you can remove it if it is not working for your server.
Admin
Bradley
None work.
WPBeginner Support
If none of our recommendations work, we would recommend reaching out to your hosting provider to see if it is a restriction that they have set on their servers.
Admin
Ben
If you have access to the FTP, can I just upload the file in the wp-content/uploads/[year]/[month] folder?
WPBeginner Support
If you do that you would need a plugin to find the images, we have a guide on how to do that below:
https://www.wpbeginner.com/plugins/how-to-bulk-upload-wordpress-media-files-using-ftp/
Admin
naved ahmed
Thanks a lot
.htaccess method worked for me.
You saved my lot of time.
Thanks again.
WPBeginner Support
Glad our guide was able to help you
Admin
Adio Usman
Does this method works for restoring backup that is up to 3.5gb manually?
WPBeginner Support
It would depend on the method you are using but it could help with restoring a backup that large.
Admin
viren
method 3 is perfectly worked for me.keep inspiring us.great work man.thnks
WPBeginner Support
Glad our recommendation was helpful
Admin
ayman
.htaccess methode worked with me
WPBeginner Support
Glad our recommendation was helpful
Admin
Sanchit Setia
Does this work on free hosting?
WPBeginner Support
You would want to check with your hosting provider if you are concerned
Admin
bara
It works for me
WPBeginner Support
Glad our recommendation helped you
Admin
abc
nothing is working for lms
WPBeginner Support
If none of the recommendations worked we would recommend reaching out to your hosting provider for assistance.
Admin
Ahmad
I tried this but the size did not change… status is same please help what should I do know I am using localhost
WPBeginner Support
You would want to try restarting your localhost service just in case, otherwise, you would want to ensure you added/editied the php.ini correctly for the most common reason.
Admin
Vittorio
I think
@ini_set( ‘upload_max_size’ , ’64M’ );
should be
@ini_set( ‘upload_max_filesize’ , ’64M’ );
WPBeginner Support
upload_max_size currently increases that value as well as a few other things which is why we don’t use upload_max_filesize
Admin
MFoale
Thank you. The 3rd method worked for me. Very useful post and video.
WPBeginner Support
You’re welcome, glad we were able to help
Admin
Masud Rana
Wow !its work. Thanks
WPBeginner Support
Glad our guide could help you
Admin
Oliver
IT WORKS!!! THANKS
I made a file ini.php then uploaded it, then renamed it from ini.php.txt to ini.php and it worked.
thanks
WPBeginner Support
You’re welcome, glad our guide was able to help
Admin
Brad
None of these works
WPBeginner Support
If our recommendations do not work you would want to reach out to your hosting provider to ensure they do not have it as part of their settings.
Admin
Arivazhagan
Method 2 worked for me thanks a lot ive been struggling with this for two days …
WPBeginner Support
You’re welcome, glad our recommended solution was able to help you
Admin
Sujan Chakraborty
you are great.I fix my problem by reading you post.Tnx
WPBeginner Support
Glad our article could be helpful
Admin
Krakawid
Method 3 worked
WPBeginner Support
Glad our recommendation worked for you
Admin
Tung
Method 1 worked wonders for me. Thanks a bunch!
WPBeginner Support
You’re welcome, glad our recommendation worked for you
Admin
Trasadu
Thanks Method 3 really worked for me.
WPBeginner Support
Glad our recommendation was helpful
Admin
Asad
How can i increase the upload limit while i have the wordpress hosting also functions.php isn’t updating
WPBeginner Support
If the file will not update, you would want to reach out to your hosting provider and they should be able to assist
Admin
Chris
I want to increase the limit to 250mb but i dont know if this exposes my site to security treats, though am only using gravity form and I have also set to disable php execution on my upload folder. And have allowed only jpg, and mp3 files.
Please do you think this may affect my site load times as huge upload is coming from several users?
WPBeginner Support
If multiple users attempt uploads at the same time it can have an effect on your site’s load time but it shouldn’t open you to security threats
Admin
Vinod
Thanks a lot!!! Method 3 worked for me
WPBeginner Support
Glad our recommendation worked for you
Admin
Janice
Nice article, but I tried adding your 3 lines of code to the functions.php file, but got an “unknown @ rule” error. What’s that all about?
WPBeginner Support
It would depend on the entire error but it could have been a hiccup with how the code was inserted, you may want to take a look at our guide here: https://www.wpbeginner.com/beginners-guide/beginners-guide-to-pasting-snippets-from-the-web-into-wordpress/
Admin
Abduaziz
Thanks a lot!!! Method 3 worked for me
WPBeginner Support
Glad our recommendation could help
Admin
Alexander Gartley
Thanks, this helped me troubleshoot an upload limit. I’m on a WordPress multisite network install, so it ended up being a setting in the Network Admin Settings.
I was confused at first, because my php settings were allowing larger uploads, but it was restricted in the Network Settings.
WPBeginner Support
Thanks for sharing what solved the problem for you
Admin
Ernesto
Would have been great if you have included the .user.ini method.
.user.ini uploaded in the root folder with the same value/text in your edited php.ini
Most of the time, only this method works for shared hosting.
ErnestPH
WPBeginner Support
The php.ini file should work the same as the user.ini file unless your specific host ignores the php.ini but thank you for sharing your recommendation
Admin
Mark
This is the only solution that works on my shared hosting server. Thanks Ernesto!
Tamir Davidoff
Not working for me.
I have followed this guide and double checked the php.ini file to make sure that the changed are in fact saved. changed htaccess file to increase limits. and also tried modifying the phpMyAdmin httpd-app.conf and php-settings.conf file. All of these files reflect max upload higher than 40m and my WP site does not reflect Any of these changes. Really frustrated here.
Please help me, thanks !
WPBeginner Support
If you haven’t already, you would want to reach out to your hosting provider to ensure there is not a setting on their end that is overriding what you are setting
Admin
rajesh
i have tried all 3 method none of them worked. i am trying to upload newspaper theme in my in my wordpress site. but every time it show that php.ini file upload max file size.
plz help me
WPBeginner Support
You would want to reach out to your hosting provider to ensure they don’t have a setting that is overriding the changes you made.
Admin
Adam Walsworth
Watchout for hidden php.ini files. In my setup I found 2 of them. The one which I found actually resolved the issue was found under
./etc/php/7.0/apache2/php.ini
modifying this file fixed my issue.
WPBeginner Support
Thanks for sharing your solution, with where that file is located we would recommend most users reach out to their hosting provider before looking in locations like that.
Admin
Rafiq khan
Thanks buddy i have solved my problem by adopting method 2 by editing my php.ini file
Thanks alot you are working great
WPBeginner Support
Glad our article could help
Admin
Carla
None of the above worked for me. A matter of fact, editing the htaccess file broke my site even after deleting the above code. Overwriting with a new file fixed the problem though.
I have a dedicated server on Bluehost. What worked for me was going in the WHM root, not cpanel nor FTP access. Search for MultiPHP INI Editor. Give it at least 5 minutes to load if you only see the title and icon. You can set you upload time, post size, etc. there. Works instantly, even if your site is using Cloudflare, without placing it in development mode or clearing the cache. I hope this helps someone.
WPBeginner Support
Thank you for sharing what worked for you, should other users be on a dedicated server, if they reach out and let BlueHost know the need to increase the upload size then BlueHost can normally edit that for them
Admin
Pezza
Great Stuff! .htaccess worked for me!
WPBeginner Support
Thank you, glad our guide could help
Admin
ReineR
htaccess metod worked for me, thanks!
WPBeginner Support
Glad our article could help
Admin
Ahmed
Work for me
3. htaccess Method
you need to click (show hidden files to view and edit this file).
WPBeginner Support
Glad our article could help
Admin
rahul
when i tried this
Unable to communicate back with site to check for fatal errors, so the PHP change was reverted. You will need to upload your PHP file change by some other means, such as by using SFTP.
this happened to me
whats the solution of this
WPBeginner Support
You would need to use FTP rather than WordPress itself to add the code: https://www.wpbeginner.com/beginners-guide/how-to-use-ftp-to-upload-files-to-wordpress-for-beginners/
Admin
Ephraim
I had been trying php.ini method but it never works please how will I set it..
Or you should please tell me the were to paste at function.php
WPBeginner Support
You would normally use a text editor to set the content in the php.ini file. For your functions.php it should go at the end normally so it can be removed later as needed. You may also want to check with your hosting provider if you are having trouble with these methods for if they can assist in increasing the file size for you.
Admin
Ivos G.
None worked for me. But this one fixed it – add to your .htaccess this line:
LimitRequestBody 104857600
WPBeginner Support
Thanks for sharing your solution for this issue
Admin
Achilleas
I am using Nginx and i had already setup properly the values for php in the php.ini but what fixed it was puting the same value in the server block with the variable client_max_body_size xxxM;
I am writing this hoping it will help someone.
Editorial Staff
Thank you for sharing this with us
Admin