L’une des premières choses que nous faisons lorsque nous voulons réorganiser un site est de cloner ce site dans un environnement local ou de staging. De cette façon, nous pouvons créer une réplique exacte du site sur lequel nous travaillons sans affecter la version directe.
Si vous êtes un propriétaire de site web avec peu ou pas de compétences techniques, vous êtes probablement fatigué de voir les modifications que vous faites prospecter des erreurs inattendues. Vous souhaitez essayer de cloner votre site WordPress à des fins de test, mais vous craignez que le processus soit trop difficile.
En fait, c’est tout le contraire. Avec l’extension Duplicator, cloner un site WordPress est super facile, et nous allons vous afficher comment dans cet article.
Qu’est-ce que le clonage de sites WordPress et pourquoi l’utiliser ?
L’idée derrière le clonage d’un site WordPress est que vous faites une copie exacte d’un site et que vous l’appliquez à un autre site.
Il existe de nombreuses raisons pour lesquelles vous pouvez avoir besoin de cloner un site. Par exemple, vous pouvez déplacer un site vers un nouvel hébergeur ou un nouveau nom de domaine. En clonant un site, vous pouvez gagner beaucoup de temps et d’efforts et terminer le processus de migration beaucoup plus rapidement.
Un autre exemple est le développement d’un site pour un client sur votre propre hébergeur local. Une fois le travail terminé, il vous suffit de cloner le site et de le transférer sur le serveur direct du client.
Vous pouvez également cloner un site WordPress en direct et configurer un site de staging pour tester les modifications avant de les mettre en ligne.
Ceci étant dit, nous allons vous afficher comment vous pouvez cloner un site WordPress en quelques étapes faciles. Vous pouvez utiliser les liens rapides ci-dessous pour naviguer dans le tutoriel :
- Step 1: Set Up the Duplicator WordPress Plugin for Easy Cloning
- Step 2: Create a Duplicator Package of Your WordPress Site
- Step 3: Upload Your WordPress Site Archive and Installer to a New Location
- Step 4: Create a New WordPress Database for Your Website
- Step 5: Run the WordPress Website Importer Script
- Step 6: Test Your Cloned Website and Delete Temporary Files
Étape par étape : Configurer l’extension WordPress Duplicator pour un clonage facile
La meilleure façon de cloner un site WordPress est d’utiliser l’extension Duplicator. C’est une puissante extension de clonage et de duplication WordPress qui reste très facile à utiliser.
L’extension sauvegarde tout ce qui se trouve sur votre site dans un fichier unique, qu’il vous suffit de déplacer vers le nouvel emplacement.
La première chose à faire est d’activer et d’installer l’extension sur le site que vous souhaitez cloner. Pour plus de détails, consultez notre guide étape par étape sur l’installation d’une extension WordPress.
Note : Il y a une version pro de Duplicator qui a des fonctionnalités supplémentaires comme les sauvegardes planifiées, la migration multisite, et plus encore. Cependant, nous utiliserons la version gratuite pour ce guide car elle dispose de tout ce dont vous avez besoin pour cloner un site WordPress.
Étape par étape : Créer un Duplicator de votre site WordPress
Une fois activé, allez dans Duplicator ” Sauvegardes et cliquez sur le bouton ‘Créer une nouvelle’ en haut de la page.
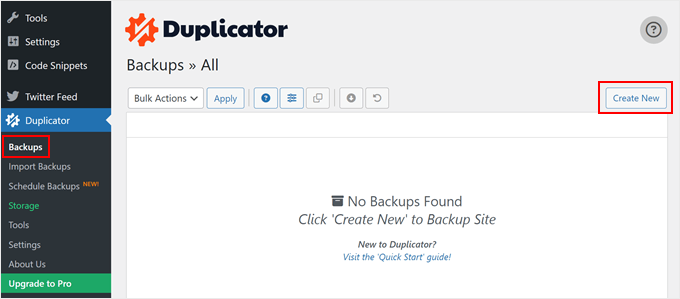
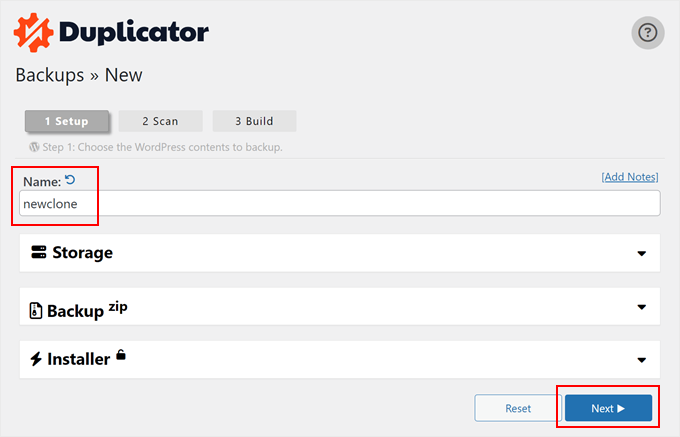
Vous accédez ensuite à un écran dans lequel vous pouvez saisir un nom pour le fichier duplicateur. Il s’agit d’un nom de référence, vous pouvez donc utiliser ce que vous voulez.
Cliquez ensuite sur le bouton “Continuer”.
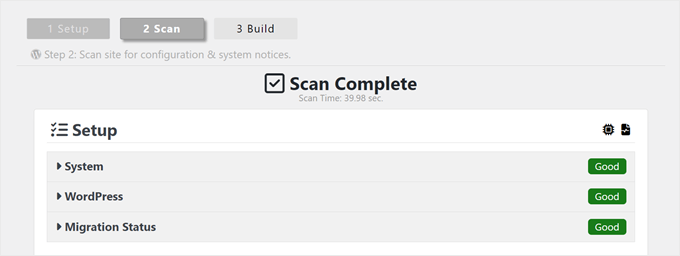
Duplicator va maintenant analyser votre site.
S’il trouve un problème avec une partie de votre site WordPress, vous verrez un avertissement avec des informations sur la façon de corriger le problème. Sinon, il dira simplement “Bon”.
Défilez maintenant vers le bas de la page.
Cliquez ensuite sur “Version” pour créer le fichier de sauvegarde.
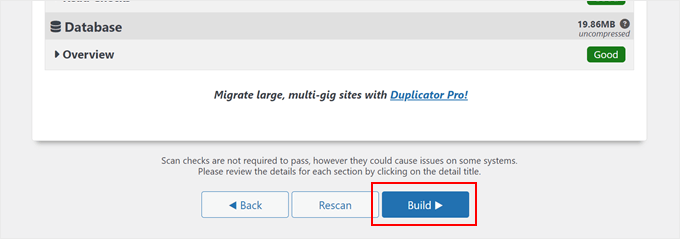
Le plugin sauvegardera désormais votre base de données WordPress, vos images, vos modèles, vos extensions et tous les autres fichiers dans un seul package téléchargeable.
Selon la taille de votre site, le processus peut prendre quelques minutes.
Une fois le processus de sauvegarde terminé, il est temps de télécharger vos fichiers.
Vous devez télécharger à la fois le fichier d’archive, qui contient votre sauvegarde, et le programme d’installation qui décompactera l’archive.
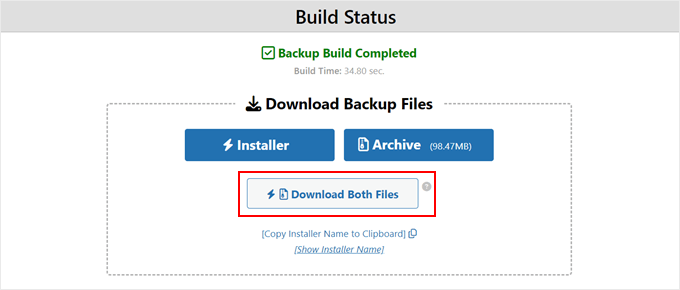
Pour ce faire, cliquez sur le bouton “Télécharger les deux fichiers”.
Astuce de pro : Techniquement, vous pouvez passer le reste de ces étapes et suivre simplement notre tutoriel sur la restauration d’une sauvegarde de site WordPress, où nous vous affichons comment importer votre fichier de sauvegarde avec Duplicator.
Cela dit, n’hésitez pas à suivre le reste de ces étapes si vous souhaitez restaurer le site cloné dans un environnement vide.
Étape 3 : Téléverser l’archive et le programme d’installation de votre site WordPress à un nouvel emplacement
Maintenant que vous disposez d’une sauvegarde complète de votre site et du fichier d’installation, l’étape suivante consiste à les téléverser au nouvel emplacement.
Ce nouvel Emplacement peut être un blog WordPress en direct ou un site sur votre serveur local. Si le site se trouve sur un serveur local, vous devrez créer un nouveau dossier dans le dossier racine de votre serveur local. Il s’agit du dossier dans lequel votre serveur local stocke tous les sites web.
Par exemple, si vous utilisez MAMP, il s’agira du dossier ‘/Applications/MAMP/htdocs/’.
Si vous utilisez WAMP, il s’agit du dossier ‘C:\Nwamp\Nwww\N’.
Ensuite, vous devez ouvrir le dossier que vous avez créé pour votre site cloné et copier le fichier d’archive et le programme d’installation dans ce dossier.

Si vous souhaitez cloner votre site web sur une autre plateforme d’hébergement WordPress, vous pouvez d’abord créer un site vide et y téléverser les fichiers à l’aide du gestionnaire de fichiers du fournisseur.
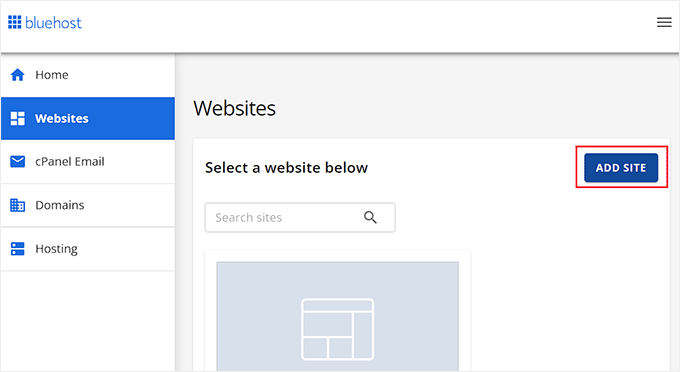
Si vous utilisez Bluehost, il vous suffit de vous connecter au tableau de bord de votre compte d’hébergement et de naviguer jusqu’à l’onglet ” Sites “. Cliquez ensuite sur “Ajouter un site”.
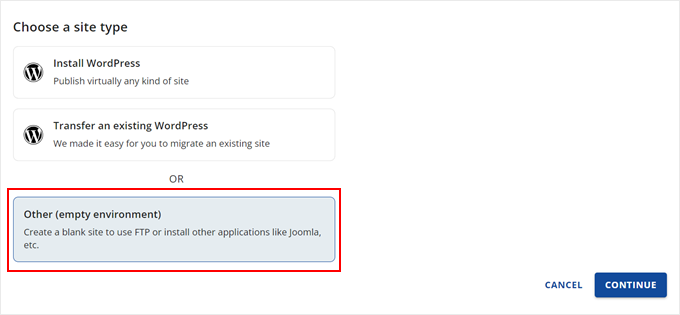
Sur l’écran suivant, vous verrez quelques options de type de site.
Il suffit de sélectionner “Autre (environnement vide)” et de cliquer sur “Continuer”.
Ensuite, insérez le titre de votre site.
Vous pouvez également passer cette étape si nécessaire et cliquer simplement sur “Continuer”.

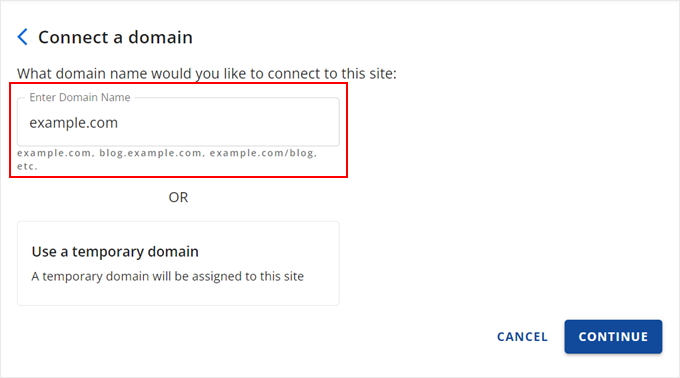
À ce stade, vous pouvez associer votre site à un nom de domaine.
Vous pouvez également utiliser un domaine temporaire si vous n’avez pas encore de nom de domaine.
Cliquez sur “Continuer” pour poursuivre.
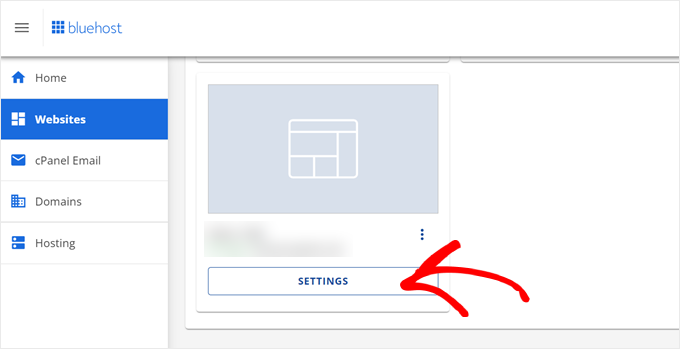
Une fois que votre site vide est prêt, vous retournerez à l’onglet “Sites web”.
Sur votre site nouvellement défini, cliquez sur le bouton “Réglages”.
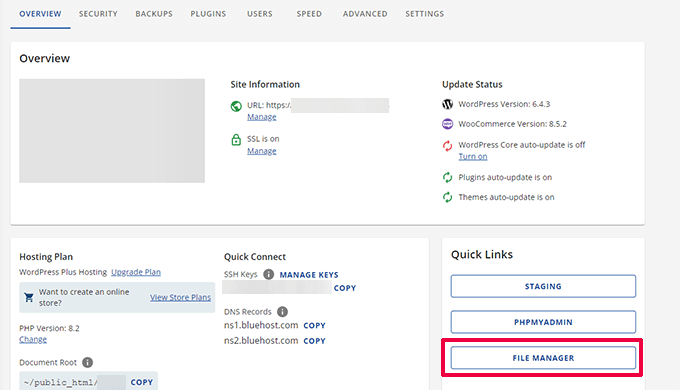
Défilez ensuite vers le bas jusqu’à la section “Liens rapides”.
Cliquez ensuite sur le bouton “Gestionnaire de fichiers”.
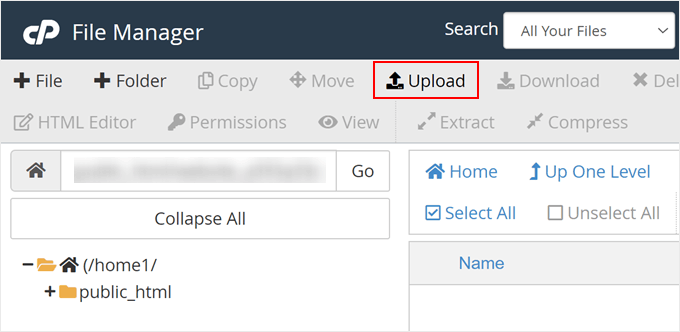
Bluehost vous amène maintenant au gestionnaire de fichiers de votre site.
Cliquez sur le bouton “Téléverser” pour téléverser vos fichiers.
Sélectionnez maintenant les fichiers que vous souhaitez téléverser sur le site vide.
Une fois que c’est fait, il suffit de cliquer sur “Retourner à …”.
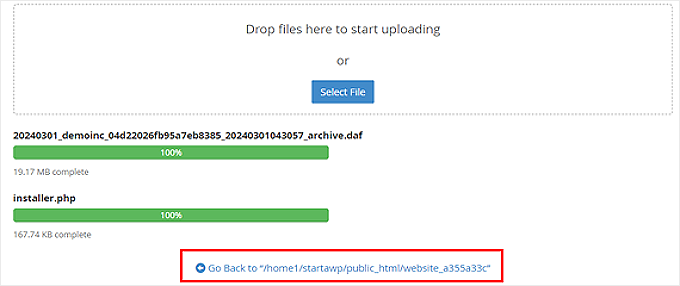
Vous devriez maintenant voir vos fichiers d’archive et d’installation dans le gestionnaire de fichiers.
Retirez les autres fichiers qui se trouvent dans ce répertoire afin de vous assurer que l’installation se déroulera ultérieurement dans de bonnes conditions.

Vous pouvez également téléverser le programme d’installation et l’archive dans le répertoire racine à l’aide d’un client FTP.
Si vous n’avez jamais fait cela auparavant, consultez notre guide pour débutants sur l’utilisation du FTP pour téléverser des fichiers sur WordPress.
Quel que soit l’endroit où vous téléversez les fichiers, vous devez vous assurer que le dossier contient uniquement votre programme d’installation.php et les fichiers zip de l’archive.

Étape par étape : Créer une nouvelle base de données WordPress pour votre site
Ensuite, vous devez créer une nouvelle base de données WordPress pour décompresser votre version clonée de WordPress. Si vous avez déjà créé une base de données, vous pouvez sauter cette étape.
Il existe plusieurs façons de créer une base de données, selon que le nouvel Emplacement est un site en direct ou un site sur votre serveur local.
Si vous utilisez un site en direct, il vous suffit de vous connecter au tableau de bord de votre compte d’hébergement WordPress.
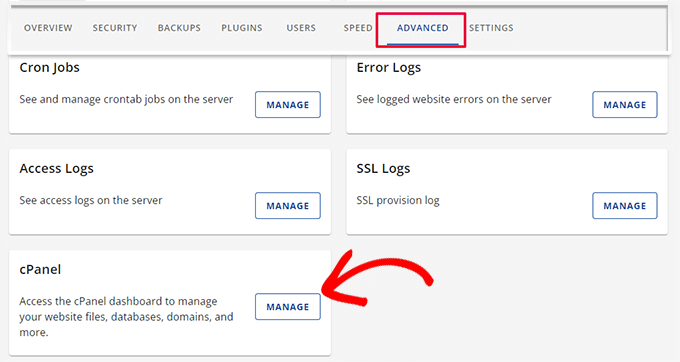
Pour les utilisateurs/utilisatrices de Bluehost, vous devez vous rendre dans l’onglet ‘Réglages’ de votre site vide comme précédemment. Ensuite, passez à l’onglet ‘Avancé’ et cliquez sur ‘Gérer’ à côté de cPanel.
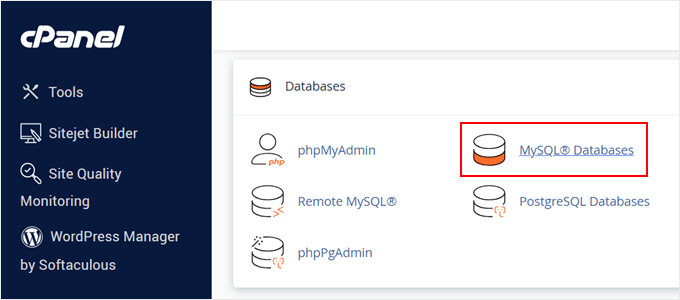
Dans le cPanel, défilez jusqu’à la section “Bases de données”.
Sélectionnez ensuite “Bases de données MySQL”.
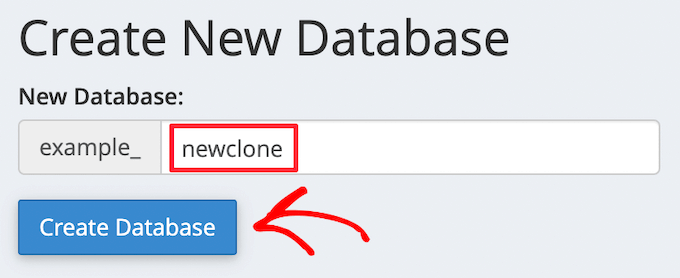
Vous accédez alors à un écran dans lequel vous pouvez saisir un nom pour votre base de données.
Cliquez ensuite sur le bouton “Créer une base de données”.
Ensuite, vous devez ajouter un nouvel utilisateur à la base de données MySQL.
Défilez simplement jusqu’à la section ‘Utilisateurs/utilisatrices MySQL’. Saisissez ensuite un identifiant et un mot de passe pour le nouvel utilisateur, puis cliquez sur le bouton “Créer un utilisateur”.
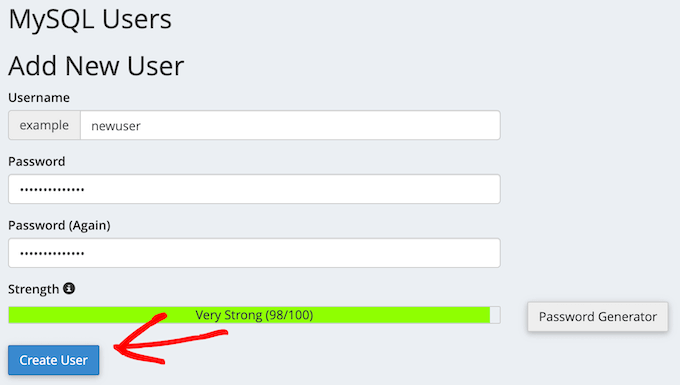
Une fois que vous avez fait cela, l’étape suivante consiste à ajouter l’utilisateur à votre base de données.
Défilez simplement jusqu’à la section “Ajouter un utilisateur à une base de données” et ouvrez le menu déroulant “Utilisateur”. Sélectionnez ici l’utilisateur de la base de données que vous avez créé à l’étape précédente.
Ensuite, ouvrez la liste déroulante “Base de données” et sélectionnez la base de données que vous avez créée précédemment.
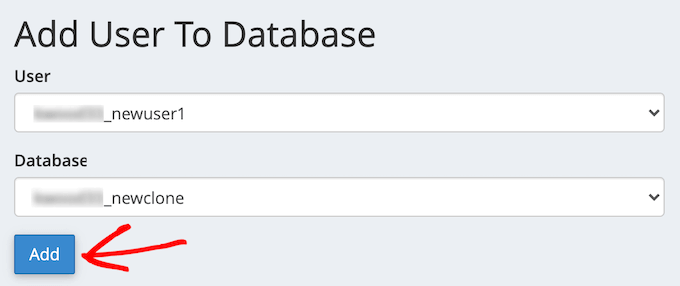
Confirmez bien le nom de la base de données, l’identifiant et le mot passe, car vous aurez besoin de ces informations à l’étape suivante.
Cliquez ensuite sur le bouton “Ajouter”.
Si vous utilisez une installation locale avec XAMPP ou d’autres outils, visitez simplement ‘http://localhost/phpmyadmin/’ ou ‘http://localhost:8080/phpmyadmin/’ dans votre navigateur pour lancer phpMyAdmin.
Cliquez ensuite sur l’onglet “Menu”, puis sélectionnez l’option “Base de données”.
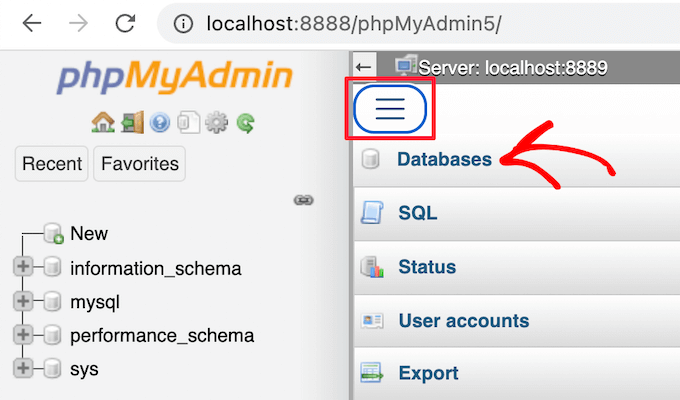
Vous devez ensuite saisir un nouveau nom pour la base de données.
Cliquez ensuite sur le bouton “Créer”.

Vous utiliserez le nom de la base de données dans l’étape par étape suivante. Pour la plupart des installations en local, votre hébergeur sera localhost, et le nom d’utilisateur sera root, avec un mot de passe vide.
Étape par 5 : Exécuter le script d’importation du site WordPress
Maintenant que tous vos fichiers sont en place, il est temps d’exécuter le programme d’installation de Duplicator. Ce script décompresse votre fichier d’archive en quelques clics.
Tout d’abord, tapez l’URL de votre site dans le navigateur et ajoutez installer.php à la fin de l’URL. Cela ressemblera à “https://example.com/installer.php”. Confirmez que vous remplacez “example.com” par votre propre nom de domaine ou par l’adresse de l’hôte local de votre site.
Ensuite, le script d’installation de Duplicator apparaît à l’écran. Tout d’abord, vous devez saisir les informations de votre base de données WordPress.
Il s’agit des informations relatives à la base de données que vous avez copiées ci-dessus.
Une fois cela fait, cliquez sur “Valider”.
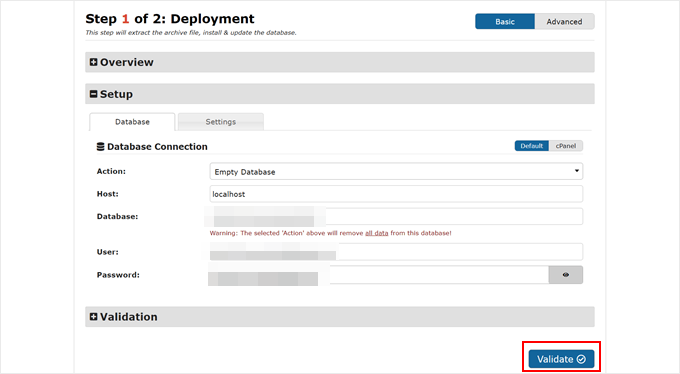
En l’absence d’erreur, cochez la case des termes et notifications en bas de page.
Cliquez ensuite sur “Suivant” pour continuer.
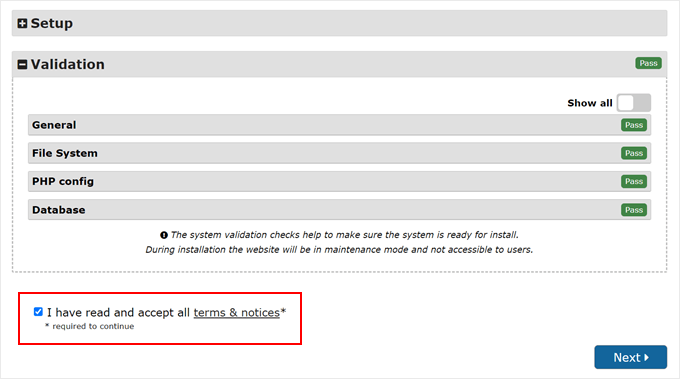
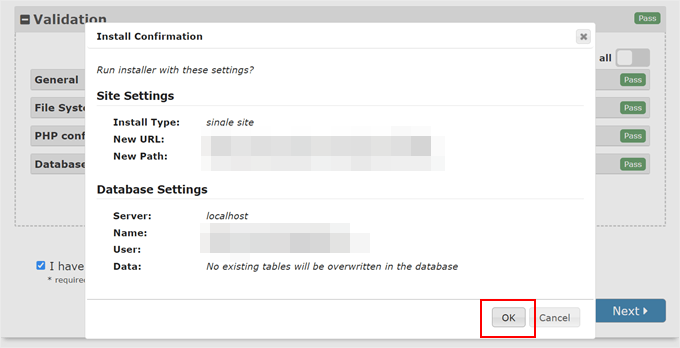
Ensuite, une fenêtre surgissante apparaît pour confirmer l’installation.
Cliquez sur le bouton “OK”.
Si le programme d’installation est bien réussi, vous pouvez immédiatement vous connecter à votre nouveau site WordPress.
Pour ce faire, veillez à cocher la case “Suppression automatique des fichiers d’installation après la connexion au site sécurisé (recommandé !)” et cliquez sur le bouton “Connexion admin”.
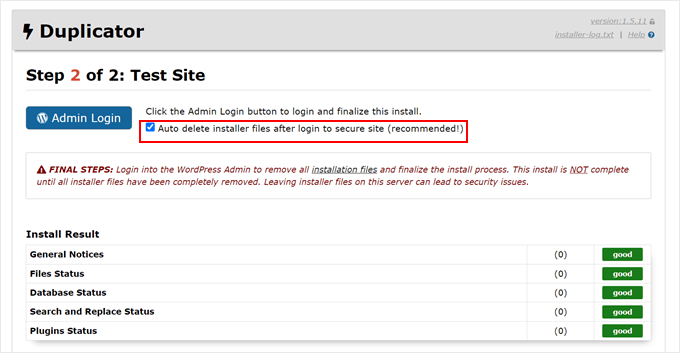
En cochant cette case, les fichiers d’installation seront automatiquement retirés afin d’éliminer les problèmes de sécurité potentiels et de finaliser l’installation.
Étape par étape : Testez votre site cloné et supprimez les fichiers temporaires
Vous pouvez maintenant tester votre site cloné.
Nous vous recommandons de tester à la fois la zone d’administration de WordPress et l’interface publique de votre site pour vous assurer que toutes vos données sont présentes et que le site fonctionne comme prévu.
Si vous obtenez des erreurs WordPress, consultez notre guide du débutant pour dépanner les erreurs WordPress.
Vous devrez également vérifier si vos fichiers d’installation existent toujours. Pour faire bonne mesure, nous vous conseillons de vous rendre dans Duplicator ” Outils puis de cliquer sur le bouton ” Retirer les fichiers d’installation “.
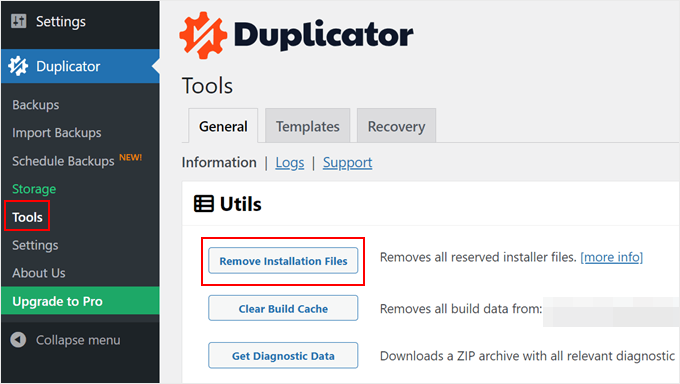
Voilà, vous avez bien cloné un site WordPress.
J’ai cloné mon site WordPress, que faire ensuite ?
Si vous avez bien cloné votre site WordPress, voici ce que vous pouvez faire ensuite :
- Vérifiez si vous avez correctement migré votre site à l’aide de cette liste de contrôle ultime de la migration.
- Vérifiez les Réglages des permaliens de votre site cloné.
- Installez les extensions WordPress indispensables pour développer votre site.
- Désactivez les fonctionnalités du blog si vous offrez un site sans blog.
- Consultez cette liste de contrôle pour le lancement de votre site avant de le publier.
- Prévisualisez votre site pour vérifier que tout fonctionne.
- Activez le mode débogage de WordPress pour résoudre rapidement les erreurs potentielles.
- Apprenez à libérer de l’espace disque et à réduire l’utilisation des inodes pour maintenir votre serveur web en bonne santé.
- Effectuez un test de vitesse du site pour voir si les performances de votre site doivent être améliorées.
Nous espérons que cet article vous a aidé à apprendre comment cloner facilement votre site WordPress. Vous pouvez également consulter notre guide sur la façon de gérer plusieurs sites WordPress à partir d’un seul tableau de bord et nos choix d’experts des meilleurs plugins de journal d’activité et de suivi WordPress.
Si vous avez aimé cet article, veuillez alors vous abonner à notre chaîne YouTube pour obtenir des tutoriels vidéo sur WordPress. Vous pouvez également nous trouver sur Twitter et Facebook.


Dan
Hi, I have done this however upon completing the Install and clicking the admin button, it takes me back to the original domain page prior to a WordPress Install. I’ve double checked the process and I don’t think I’ve missed any steps?
It just appears that everything was wiped (just an original WP install) but the duplicate file hasn’t been installed?
WPBeginner Support
Your domain is pointing to your original host. You can either change your hosts file to see the cloned site or point your domain to the new host location. For moving your site to a new domain, we would recommend taking a look at our article below:
https://www.wpbeginner.com/wp-tutorials/how-to-properly-move-wordpress-to-a-new-domain-without-losing-seo/
Admin
Martin Page
I have followed your instructions and uploaded the 2 files to an otherwise empty file but when i go to the site/installer.php I get a 404 page.
My FileZilla screen loos exactly like your example.
Any suggestions?
Thanks
WPBeginner Support
You would want to visit the duplicator plugin’s FAQ page and they cover the different troubleshooting steps for that error.
Admin
Rene Young
Thanks. I did that and I have successfully completed creating the clone. I have a question about the step to install the database in the new location (Step 2 of 4 – Install Database): The screen shot shows a choice between “Basic” and “cPanel” but you don’t discuss this.
WPBeginner Support
In this tutorial, we went with Basic
Admin
Rene Young
I could not complete Step 2. I do get warnings in Duplicator, under Paths:
“If the root WordPress path is not writable by PHP on some systems this can cause issues.
If Duplicator does not have enough permissions then you will need to manually create the paths above.”
WPBeginner Support
You would want to either follow our guide below for updating your file permissions:
https://www.wpbeginner.com/beginners-guide/how-to-fix-file-and-folder-permissions-error-in-wordpress/
Or you can reach out to your hosting provider for assistance with the folder permissions.
Admin
Sue
I’m trying to clone a demo site I’m making for people to use as a template. Using Duplicator I’ve created the package, gone into File Manager of CPanel and navigated to the root directory for the subdomain I’m testing it on, and uploaded the zip file and installer file. There is nothing else in the folder.
When I follow the instructions and go to the website address with installer.php added to the end, I do not get the Duplicator import info. I get a Page Not Found….though it does have the header, footer and top menu of the site I’m cloning. What did I do wrong?
WPBeginner Support
If you are using the same domain then you are likely still looking at the old site and not the new one, if you reach out to your hosting provider, they can normally assist with setting up a temporary domain that you can use.
Admin
Tarık Hacıalioğulları
Thank you very much, this saved me so much time. It worked very good!!!
WPBeginner Support
You’re welcome
Admin
saad
Everything s clear thank you but what about login and password to WordPress dashboard can we duplicate ?
WPBeginner Support
It copies your users table so it would transfer your user and password over for you.
Admin
Kara
I’m having a bit of trouble with step 4. With my Hostgator account I don’t have access to my server panel but when I try to add the file via an FTP client, I’m under able to find the folder containing the installer.php. Am I missing something? Could the file name be different or could someone tell me where exactly to put the zip file?
WPBeginner Support
You would want to reach out to your hosting provider and they would be able to assist
Admin
ed
HI there, what if i have paid plugins and themes specific for 1 wordpress site
Will it still work ? Thanks alot, your tutorial so far is the easiest to follow
WPBeginner Support
You would want to reach out to the support for those tools for how they handle that.
Admin
Emma
What do you do when there is a size check notice? Limit is 500mb and my site is 1.32gb uncompressed. Not sure how to compress. It is recommending a 2 part install manually from c panel which is sadly beyond my tech abilities.
WPBeginner Support
You would want to reach out to your hosting provider’s support and they should be able to assist
Admin
Dominique
uploaded zip and installer script to root and i am getting this message when i enter domain.com/installer.php
403 Forbidden
Request forbidden by administrative rules.
What next?
WPBeginner Support
There are a few different options you can try, for a starting point, you would want to take a look at our article below:
https://www.wpbeginner.com/wp-tutorials/how-to-fix-the-403-forbidden-error-in-wordpress/
Admin
Loz Bigrave
Great article, worked like a charm.
WPBeginner Support
Thank you, glad our article was helpful
Admin
Derek
I’ve successfully copied across to a new URL and the cloned website seems to be working. However, when I go into wordpress it’s a reduced version with quite a few tabs missing such as: users/plugins/settings to name a few. How can I get a full version of wordpress the same as the site I copied from?
WPBeginner Support
You may want to ensure you are logged in as an admin user on your cloned site as the most likely reason for that issue.
Admin
Adi
How do you change the name of the website, the url and also the database when installing the cloned site using Duplicator?
WPBeginner Support
To do that, you would want to take a look at our article here:
https://www.wpbeginner.com/wp-tutorials/how-to-properly-move-wordpress-to-a-new-domain-without-losing-seo/
Admin
diana
Hi, I have a question , can a clone my site without erased the other one , i mean the original website ?
WPBeginner Support
Yes, cloning your site does not remove the original
Admin
Todd Murray
This is a great post. Just one clarification before I run the import…on STEP 4, these are the instructions:
No matter where you are copying the files, you need to make sure that the folder is completely empty and has no other files or folders inside it except installer.php file and your backup zip file.
If I already have a theme and started building a site before finding this article, do I need to delete everything from the destination? “folder completely empty” refers to which folder?
Thanks!
Todd
WPBeginner Support
If you want to duplicate a site from elsewhere then you would need to remove what is currently there for your site.
Admin
Christie Bellah
Been using this article for years. Thanks so much!
WPBeginner Support
You’re welcome, glad our guide has been so helpful
Admin
Alexandre
You were right, I didn’t put in the root folder :/
So I tried again, but in the end, I got an error 404 result.
I’ve fixed the wp_config (name, user, pw & host) and made the changes to the htaccess (copied the NEW .htaccess).
All files are deleted, besides the now unzipped folder which contain all the files. *what about the __MACOSX folder? I tried with and without, but get the same result.
Even after this, in Step 4, I still get the 2 warnings in the General Notices:
wp-config not found
wp-config.php not found.
I found the wp-config.php, but seem like I don’t have the wp-config. Are they the same?
Anything else missing?
Thank you
WPBeginner Support
The macosx you don’t need, the wp-config files should be the same. For moving from the subfolder if the original site is still available you would likely want to go through the steps in: https://www.wpbeginner.com/wp-tutorials/how-to-get-rid-of-wordpress-from-your-wordpress-site-url/
Admin
Alexandre
I end up on a “Index of” page showing the file in my sub folder. Anyone know why?
Thanks
WPBeginner Support
You likely installed your WordPress site in the subfolder rather than the root folder for your site.
Admin
Alexandre
Sorry, forgot to say. If I type in the full path on my web browser, I have a loading time, but end up on a white page.
Thanks
WPBeginner Support
If you are getting that white screen you may want to try the recommendations in our article here: https://www.wpbeginner.com/wp-tutorials/how-to-fix-the-wordpress-white-screen-of-death/
JanysF
Does anyone know why the Packages option under Duplicator » Packages isn’t showing for me? I only see under Duplicator: Tools, Settings, and Go Pro.
WPBeginner Support
You may want to try reinstalling the plugin and if that doesn’t work you would want to reach out to the plugin’s support and let them know about that not appearing properly
Admin
ouiouiphoto
Cloning works well with duplicator but having a clone site online seems not to be liked by jetpack
During my tests Jetpack have put himselt in failure on the original site even if jetpack was not active one the cloned site telling me the original was a copy of the clone
If google find your clone you have also some possible issues
WPBeginner Support
While there is a problem with simply cloning a site without any new content, the primary goal would normally be to use this when transferring your site from one location to another and then removing the old site or using the copied site as a template and adding new content to your new site.
Admin
Bidmead
For some inexplicable reason, when I save this useful page to Pocket, what actually arrives there is the old 11 May 2015 version, which discusses a completely different method based on a plugin called BackupBuddy which costs $52 for the 1-site version.
—
Chris
WPBeginner Support
We’ll certainly take a look if it is something on our end. You may want to check with Pocket if there is a cache that needs to be cleared on their end as well
Admin
Chris Bidmead
I’ve been in touch with Pocket. They suggest it might be a problem with their Parser, which checks the content and determines the best way to display it. They’ve managed to reproduce the bug and are investigating.
—
Chris
Gary Andrews
I wand to upgrade my production site to WP 5 and change themes. I thought it might be a good idea to clone my site on my local windows machine under Desktop Server.
I’ve been trying for 2 days to clone my site.
Let me just add that your tuto is perfectly straightforward as long as things go well. It doesn’t go into what might not work correctly.
Firstly Duplicator package creation times out (despite having filtered out the big files). Of course my hosting company doesn’t support Duplicator because it tries to change the time limit, can’t really blame the host company.
I also tried the Duparchive option which doesn’t time out and generates a .daf archive instead of a .zip.
On the Desktop Server local side I tried to run installer.php from my browser but got messages saying I needed to enable ziparchive and/or shell exec. I contacted Desktop Server support about that and have had no answer.
I thought I’d try to extract the data from the daf archive manually but the software that is needed to do this no longer seems to be available.
I imagine that the Duplicator Pro version would work better but I don’t have the budget (association website).
Oh woe is me, looks like I’ll have to do it all by hand.
WPBeginner Support
From the sound of it you sadly may need to manually import/export the data, the other option would be if you have a backup of your site that you could restore to your local installation.
Admin
Adam
Awesome article!!!
Followed your steps and it worked perfectly.
I did make one error though, I extracted the zip file and uploaded the files in ftp which did create errors. Much easier to simply upload the zip instead.
Thanks heaps!
WPBeginner Support
You would likely need to extract the zip once it is on your hosting provider but glad you found a solution for your error
Admin
Donna Lutheran
I copy sites all the time.
The plugins actually look more complicated than doing it manually.
Just download your files, back up your database, ftp to the new server, restore your database to your new database, edit the wp-config file to point to the new database, edit the url in your database to point to the new url.
I also download velvet blue to correct any url problems.
I had a site not pass our security scan that used the plugin. Also, the database back up was stored in the root of your site.
James Cook
I used a much simpler way. My WP installation is with Godaddy…so logged in the cPanel of the site I wanted to cloned…went to subdomains and created the domain for the site destination…then I went to applications and the top of cPanel and clicked the little check box next the primary site I wanted to clone…then hit the clone button…and voila…and exact copy of our site was created in less than 10 minutes…
Indusekar S K
Is there any plugin or other software that could clone a wordpress website to another wordpress on the live?
Mark C
The price for this is riduculous. Even the cheapest option is $80 PER YEAR! What an absolute rippoff!
Better off just going to Control Panel, zipping up your files and download them … then go to PHPMyAdmin and downloading a copy of your database. Then upload your zipped files to the new location…edit the config file, then import the database.
If that’s too hard for website retards … just install the free version of “Duplicate” (similar to Backup Buddy … but FREE).
Carlos A. B. S.
You’re right man, no need to spend a dime on such a a simple task…
Felisha
Either of you have a step by step guide? I am trying to copy my site to a subdomain to target a different city from the main site.
The only thing I understand so far is that I have to:
1. create a subdomain
2. create a new database
3. copy the public html folder of the main site over to the subdomain pubic html folder
After that, every tutorial I’ve seen on the internet gets too confusing
Jerri
What are you talking about? Duplicator is free. I mean, there’s a pro version, but I use the free version all the time to duplicate websites.
The only thing these instructions didn’t add is that you need to first create a new database and add a user to it on the new site before running the installer.
But it’s all easy and free.
Lipa
thx a lot !!! ;]
Mack
Can i copy someone’s site page to my site??
Allan Seabrook
Hi,
I really appreciate all the posts you share with us! Please keep them coming!
My question regarding this post is…
This technique using BackupBuddy works flawlessly.
However, I now have a problem:
When I type in the URL of my original site (where I took the backup), I get directed to the site I cloned from that backup. It’s as if my original site now has a redirect to the cloned site.
What on earth have I broken?
Any advice would be much appreciated!
Thanks,
Allan
Stephen
Check your DNS record. That would be one of the only ways this would happen.
Jonathan
Thanks! Worked perfect!
Mamun sarkar
Hi,
I would like to know how to clone any wordpress website have no hosting access information as well. I mean, suppose a buyer order your wpbeginner like website. Then, How to do it sir. Do you have any tutorials plz.
Hanna
not possible anymore to use backup buddy unless you want to pay. Is their a different method?
Nelson
Duplicator is perfect.
sandeep
i want to copy the theme of running website to another website…
Moses
Hi Sandeep,
Did you get solution to this. I also want to copy a theme to another website(subdomain)
Chris
I’ve used another service to clone WordPress sites and have discovered a problem with residual tables, and I was curious whether this was an issue with BackupBuddy as well.
In the scenario I recently encountered, I create WP Site A with table prefix wp1_.
Then I have to create a new environment to clone to, so I install WordPress at WP Site B with table prefix wp2_.
Now I use my [unnamed] tool to clone site A to site B, which appears good on the admin and public side but when I look in the database I have both wp1_ and wp2_ sets of tables, and all of the GUIDs in the functioning tables for the new cloned site have WP Site A’s URL, not WP Site B’s as I would have expected.
These have to be cleaned up manually. So I wonder, does BackupBuddy do the same thing? Is this to be expected?
WPBeginner Support
BackupBuddy’s sales/support team can probably answer this better.
Admin
Andrew Lopez
I’d be curious to know how to manually perform this task without a plugin or is a plugin recommended for backing up and migrating over to a new website?
Dave Navarro
BackupBuddy fails on large WordPress installs. I can’t get it to back up our site which between database all files is over 400GB in size.
I had to manually download all of the files, then re-upload them to the new site and use importbuddy with just the database. Even that fails if the raw database is too large (failed around 200MB in size).
Nitin
wonderful technique but there is use of another plugin
Gf
I recently moved a small simple blog with all-in-one wordpress migration and it worked great. But when I attempted a larger site on wp4.1 it failed. I think I would like back up buddy but the price is staggering. It would be my biggest wordpress expense, almost twice as much as my hosting!
Jean
I love using BackupBuddy for backups and migrations.
All you need is access to install the plugin and your set to move.
Great article!
johnraf
I used to have similar problems too, but after using
“long path tool” You can use to solve this problem.
yaser
How about if we want to clone a website that we have no backend access? Is there an easy way?
fletch
Do you have ftp access? Do you have access to the database? You would need those two things to backup a website if you don’t have access to wp-admin.