Organiser votre contenu WordPress est facile avec les catégories et les étiquettes. Mais au fil des années de création de sites WordPress, nous avons appris que les catégories et les étiquettes par défaut ne suffisent pas toujours pour créer la structure de contenu parfaite.
C'est là qu'interviennent les taxonomies personnalisées. Avec les taxonomies personnalisées, vous pouvez créer vos propres façons de trier et de regrouper le contenu.
Nous les avons utilisées pour organiser tout, des ingrédients de recettes aux annonces immobilières, et elles offrent un contrôle et une flexibilité incroyables sur la façon dont vos articles, produits ou tout autre contenu sont catégorisés.
Dans ce guide, nous vous expliquerons comment créer des taxonomies personnalisées dans WordPress, que vous utilisiez un plugin ou que vous préfériez le faire manuellement.
Qu'est-ce qu'une taxonomie WordPress ?
Une taxonomie WordPress est un moyen d'organiser des groupes d'articles et de types d'articles personnalisés.
Par défaut, WordPress est livré avec 2 taxonomies appelées catégories et étiquettes. Vous pouvez les utiliser pour organiser vos articles de blog.
Cependant, si vous utilisez un type d'article personnalisé, les catégories et les étiquettes peuvent ne pas convenir à tout le contenu.
Par exemple, vous pouvez créer un type d'article personnalisé appelé « Livres » et le trier à l'aide d'une taxonomie personnalisée appelée « Sujets ». Ensuite, vous pouvez ajouter des termes de sujet tels que « Aventure », « Romance », « Horreur » et d'autres sujets de livres que vous souhaitez.
Cela vous permettrait, ainsi qu'à vos lecteurs, de trier et de filtrer facilement les livres par chaque sujet.
Les taxonomies peuvent également être hiérarchiques, ce qui signifie que vous pouvez avoir des sujets principaux ou parents comme « Fiction » et « Non-fiction ». Ensuite, vous auriez des sous-sujets, ou enfants, sous chaque catégorie.
Par exemple, la catégorie parente « Fiction » pourrait avoir « Aventure », « Romance » et « Horreur » comme enfants.
Maintenant que vous savez ce qu'est une taxonomie personnalisée, apprenons à créer des taxonomies personnalisées dans WordPress.
Bien que la création de taxonomies personnalisées soit puissante, il y a beaucoup à couvrir. Pour vous aider à configurer cela correctement, nous avons créé une table des matières facile ci-dessous :
- Créer des taxonomies personnalisées avec un plugin (la méthode facile)
- Créer des taxonomies personnalisées manuellement (avec du code)
- Afficher les taxonomies personnalisées
- Ajouter des taxonomies pour des articles personnalisés
- Ajouter des taxonomies personnalisées au menu de navigation
- Video Tutorial
Prêt ? Commençons !
Créer des taxonomies personnalisées avec un plugin (la méthode facile)
La première chose que vous devez faire est d'installer et d'activer le plugin Custom Post Type UI. Pour plus de détails, consultez notre guide sur comment installer un plugin WordPress.
Dans ce tutoriel, nous avons déjà créé un type d'article personnalisé appelé « Livres ». Assurez-vous donc d'avoir un type d'article personnalisé créé avant de commencer à créer vos taxonomies.
Ensuite, allons dans CPT UI » Ajouter/Modifier des taxonomies dans la zone d'administration de WordPress pour créer votre première taxonomie.
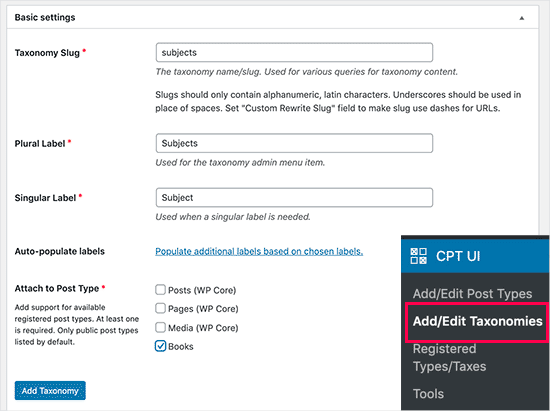
Sur cet écran, vous devrez faire ce qui suit :
- Créez le slug de votre taxonomie (il apparaîtra dans votre URL)
- Créez le libellé au pluriel
- Créez le libellé au singulier
- Remplir automatiquement les libellés
Votre première étape consiste à créer un slug pour la taxonomie à utiliser dans l'URL et dans les requêtes de recherche WordPress. Notez qu'un slug ne peut contenir que des lettres et des chiffres, et qu'il sera automatiquement converti en minuscules.
Ensuite, vous remplirez les noms au pluriel et au singulier de votre taxonomie personnalisée.
À partir de là, vous avez la possibilité de cliquer sur le lien « Remplir les étiquettes supplémentaires en fonction des étiquettes choisies ». Si vous le faites, le plugin remplira automatiquement le reste des champs d'étiquettes pour vous.
Vous pouvez maintenant faire défiler vers le bas jusqu'à la section « Étiquettes supplémentaires ».
Dans cette zone, vous pouvez fournir une description de votre type de publication.
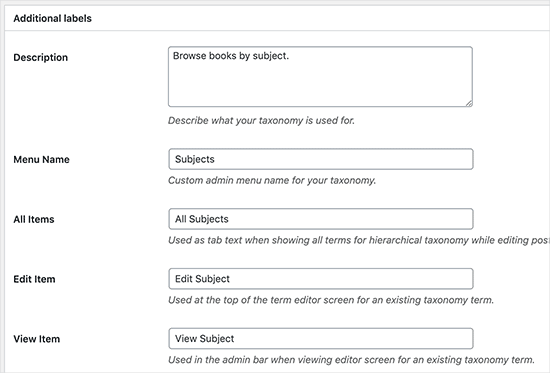
Ces étiquettes sont utilisées dans votre tableau de bord WordPress lorsque vous modifiez et gérez le contenu de cette taxonomie personnalisée particulière.
Ensuite, nous avons l'option des paramètres. Dans cette zone, vous pouvez configurer différents attributs pour chaque taxonomie que vous créez. Chaque option a une description détaillant ce qu'elle fait.
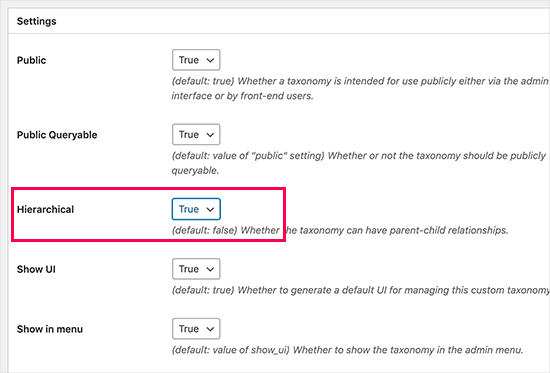
Dans la capture d'écran ci-dessus, vous verrez que nous avons choisi de rendre cette taxonomie hiérarchique.
Cela signifie que notre taxonomie « Sujets » peut avoir des sous-thèmes. Par exemple, un sujet appelé « Fiction » peut avoir des sous-thèmes comme « Fantasy », « Thriller », « Mystère », et plus encore.
Il existe de nombreux autres paramètres plus bas sur votre écran dans votre tableau de bord WordPress, mais vous pouvez les laisser tels quels pour ce tutoriel.
Vous pouvez maintenant cliquer sur le bouton « Ajouter une taxonomie » en bas pour enregistrer votre taxonomie personnalisée.
Après cela, vous pouvez modifier le type de publication associé à cette taxonomie dans l'éditeur de contenu WordPress pour commencer à l'utiliser.
Créer des taxonomies personnalisées manuellement (avec du code)
Cette méthode vous demande d'ajouter du code à votre site WordPress. Si vous ne l'avez jamais fait auparavant, nous vous recommandons de lire notre guide sur comment ajouter facilement des extraits de code dans WordPress.
Nous ne recommandons pas de modifier directement vos fichiers WordPress car la moindre erreur peut casser tout votre site. C'est pourquoi nous recommandons à tous d'utiliser WPCode, le plugin d'extraits de code le plus simple et le plus sûr disponible.
Pour commencer, vous devrez installer et activer le plugin gratuit WPCode. Pour des instructions détaillées, consultez notre guide étape par étape sur comment installer un plugin WordPress.
1. Créer une taxonomie hiérarchique
Commençons par une taxonomie hiérarchique qui fonctionne comme les catégories et peut avoir des termes parents et enfants.
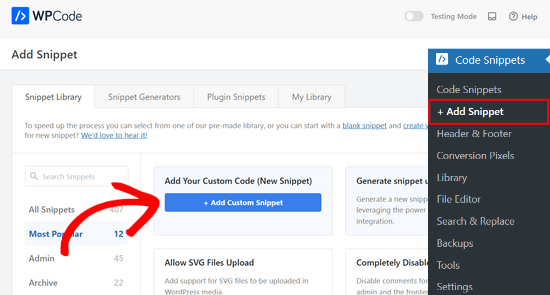
Une fois que vous avez installé et activé WPCode, vous pouvez naviguer vers Extraits de code » + Ajouter un extrait dans votre tableau de bord WordPress.
À partir d'ici, vous pouvez survoler « Ajouter votre code personnalisé (Nouvel extrait) » et cliquer sur le bouton « + Ajouter un extrait personnalisé ».
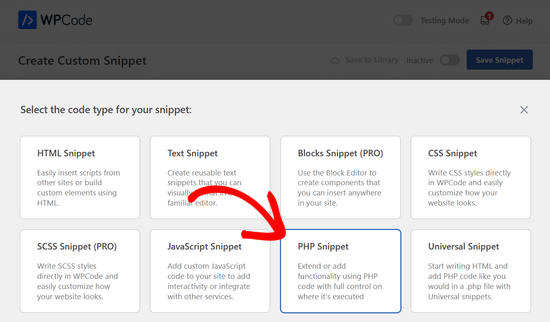
Ensuite, vous devez sélectionner un type de code parmi la liste d'options qui apparaissent à l'écran.
Pour ce tutoriel, choisissez « Snippet PHP ».
Ensuite, vous serez dirigé vers la page « Créer un extrait personnalisé ».
Commencez par entrer un nom pour votre nouvel extrait de code, qui peut être n'importe quoi pour vous aider à vous souvenir de l'utilité du code.
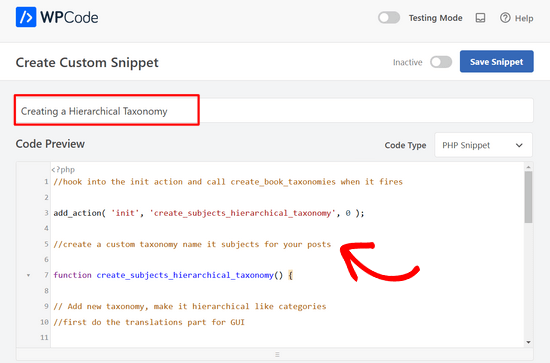
Après cela, collez simplement le code suivant dans la zone « Aperçu du code » :
//hook into the init action and call create_book_taxonomies when it fires

add_action( 'init', 'create_subjects_hierarchical_taxonomy', 0 );

//create a custom taxonomy name it subjects for your posts

function create_subjects_hierarchical_taxonomy() {

// Add new taxonomy, make it hierarchical like categories
//first do the translations part for GUI

  $labels = array(
    'name' => _x( 'Subjects', 'taxonomy general name' ),
    'singular_name' => _x( 'Subject', 'taxonomy singular name' ),
    'search_items' =>  __( 'Search Subjects' ),
    'all_items' => __( 'All Subjects' ),
    'parent_item' => __( 'Parent Subject' ),
    'parent_item_colon' => __( 'Parent Subject:' ),
    'edit_item' => __( 'Edit Subject' ),
    'update_item' => __( 'Update Subject' ),
    'add_new_item' => __( 'Add New Subject' ),
    'new_item_name' => __( 'New Subject Name' ),
    'menu_name' => __( 'Subjects' ),
  );

// Now register the taxonomy
  register_taxonomy('subjects',array('books'), array(
    'hierarchical' => true,
    'labels' => $labels,
    'show_ui' => true,
    'show_in_rest' => true,
    'show_admin_column' => true,
    'query_var' => true,
    'rewrite' => array( 'slug' => 'subject' ),
  ));

}
N'oubliez pas de remplacer le nom de la taxonomie et les étiquettes dans l'extrait par vos propres étiquettes de taxonomie. Vous remarquerez également que cette taxonomie est associée au type de publication Books. Vous devrez changer cela pour le type de publication avec lequel vous souhaitez l'utiliser.
Ensuite, faites défiler vers le bas et assurez-vous que « Insérer automatiquement » et « Exécuter partout » sont sélectionnés dans la boîte d'insertion.
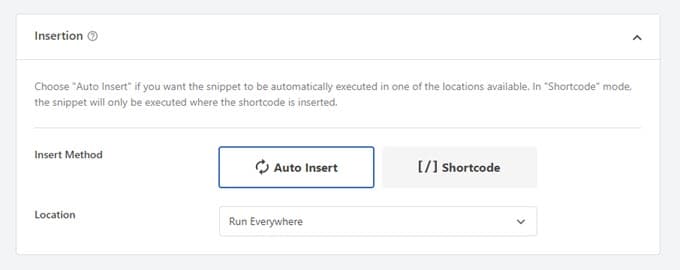
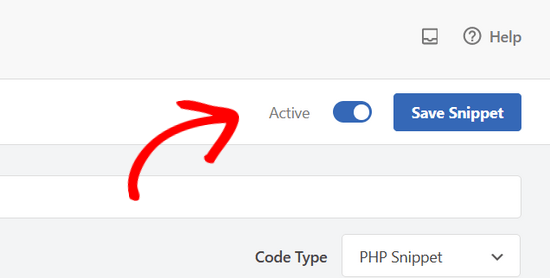
Vous pouvez maintenant faire défiler vers le haut de la page et basculer l'interrupteur de « Inactif » à « Actif ».
Enfin, cliquez sur le bouton « Enregistrer l'extrait » pour publier vos modifications.
2. Créer une taxonomie non hiérarchique
Pour créer une taxonomie personnalisée non hiérarchique comme les étiquettes, vous utiliserez WPCode et suivrez exactement les mêmes étapes que ci-dessus.
Seulement, vous utiliserez ce code à la place :
//hook into the init action and call create_topics_nonhierarchical_taxonomy when it fires

add_action( 'init', 'create_topics_nonhierarchical_taxonomy', 0 );

function create_topics_nonhierarchical_taxonomy() {

// Labels part for the GUI

  $labels = array(
    'name' => _x( 'Topics', 'taxonomy general name' ),
    'singular_name' => _x( 'Topic', 'taxonomy singular name' ),
    'search_items' =>  __( 'Search Topics' ),
    'popular_items' => __( 'Popular Topics' ),
    'all_items' => __( 'All Topics' ),
    'parent_item' => null,
    'parent_item_colon' => null,
    'edit_item' => __( 'Edit Topic' ),
    'update_item' => __( 'Update Topic' ),
    'add_new_item' => __( 'Add New Topic' ),
    'new_item_name' => __( 'New Topic Name' ),
    'separate_items_with_commas' => __( 'Separate topics with commas' ),
    'add_or_remove_items' => __( 'Add or remove topics' ),
    'choose_from_most_used' => __( 'Choose from the most used topics' ),
    'menu_name' => __( 'Topics' ),
  );

// Now register the non-hierarchical taxonomy like tag

  register_taxonomy('topics','books',array(
    'hierarchical' => false,
    'labels' => $labels,
    'show_ui' => true,
    'show_in_rest' => true,
    'show_admin_column' => true,
    'update_count_callback' => '_update_post_term_count',
    'query_var' => true,
    'rewrite' => array( 'slug' => 'topic' ),
  ));
}
Remarquez la différence entre les 2 extraits de code. Sous la fonction register_taxonomy(), la valeur de l'argument hierarchical est définie sur true pour la taxonomie de type catégorie et false pour les taxonomies de type étiquette.
De plus, dans le tableau des libellés pour les taxonomies non hiérarchiques, nous avons ajouté null pour les arguments parent_item et parent_item_colon, ce qui signifie que rien ne sera affiché dans l'interface utilisateur pour créer un élément parent ou une taxonomie pouvant avoir des sous-sujets.
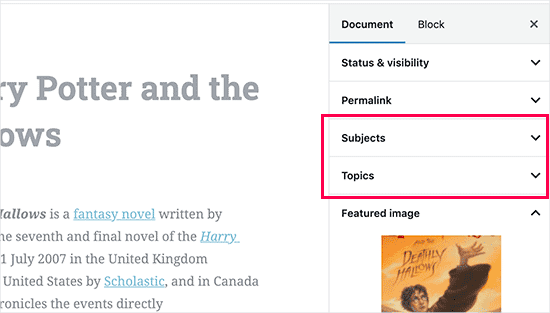
Encore une fois, assurez-vous de modifier le code pour inclure vos propres libellés de taxonomie personnalisés.
Afficher les taxonomies personnalisées
Maintenant que nous avons créé des taxonomies personnalisées et ajouté quelques termes, votre thème WordPress ne les affichera toujours pas.
Pour les afficher, vous devrez ajouter du code à votre thème WordPress ou à votre thème enfant. Plus précisément, ce code doit être ajouté aux fichiers de modèle où vous souhaitez afficher les termes.
Vous pouvez ajouter manuellement cet extrait à vos fichiers de thème, tels que single.php, content.php, archive.php ou index.php. Pour déterminer quel fichier vous devez modifier, vous pouvez consulter notre guide sur la hiérarchie des modèles WordPress pour des instructions étape par étape.
Cependant, si cela n'est pas fait correctement, cela peut casser votre site, nous vous recommandons donc une fois de plus d'utiliser le plugin gratuit WPCode.
Vous devrez ajouter le code suivant là où vous souhaitez afficher les termes :
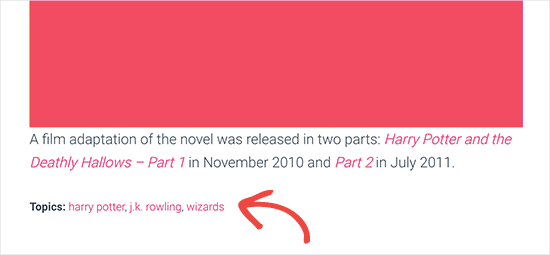
<?php the_terms( $post->ID, 'topics', 'Topics: ', ', ', ' ' ); ?>
Ensuite, vous pouvez simplement suivre les étapes ci-dessus pour coller l'extrait dans WPCode.
Mais sous Insertion, vous voulez cliquer sur la liste déroulante à côté de « Emplacement » et sélectionner où vous souhaitez afficher la taxonomie, par exemple avant l'article, après, ou même entre les paragraphes.
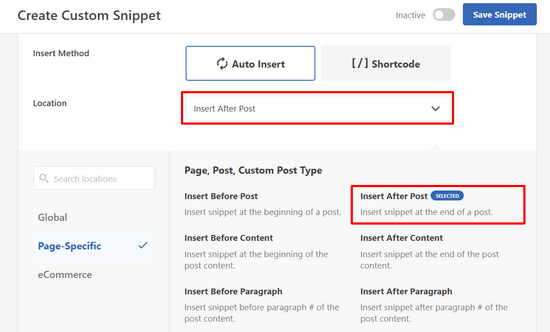
Pour ce tutoriel, nous sélectionnerons « Insérer après l'article ».
Vous pouvez voir dans l'image ci-dessous comment cela apparaîtra sur votre site en direct.
Ajouter des taxonomies pour des articles personnalisés
Maintenant que vous savez comment créer des taxonomies personnalisées, mettons-les en pratique avec un exemple.
Nous allons créer une taxonomie et l'appeler « Non-fiction ». Puisque nous avons un type de publication personnalisé nommé « Livres », c'est similaire à la façon dont vous créeriez un article de blog ordinaire.
Dans votre tableau de bord WordPress, vous pouvez naviguer vers Livres » Sujets pour ajouter un terme ou un sujet.
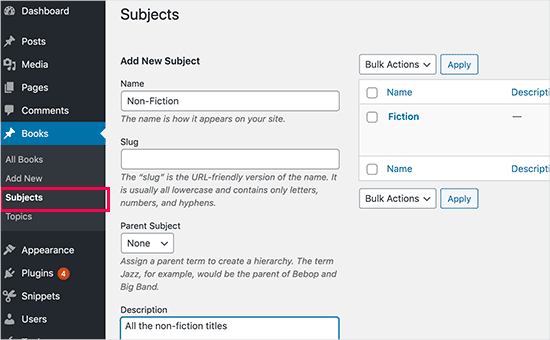
Sur cet écran, vous verrez 4 zones :
- Nom
- Slug
- Parent
- Description
Dans le champ nom, vous écrirez le terme que vous souhaitez ajouter. Vous pouvez ignorer la partie slug et fournir une description pour ce terme particulier.
Enfin, cliquez sur le bouton « Ajouter un nouveau sujet » pour créer votre nouvelle taxonomie.
Votre terme nouvellement ajouté devrait alors apparaître dans la colonne de droite.
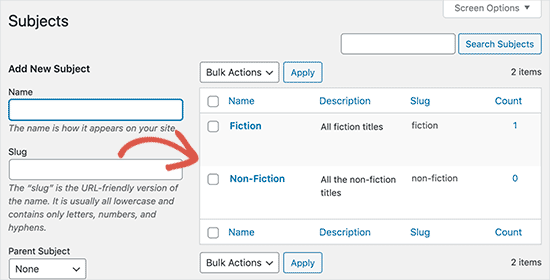
Maintenant, vous avez un nouveau terme que vous pouvez utiliser dans vos articles de blog. Vous pouvez également ajouter des termes directement lors de la modification ou de la rédaction de contenu sous ce type de publication particulier.
Allez simplement dans Livres » Ajouter pour créer une publication.
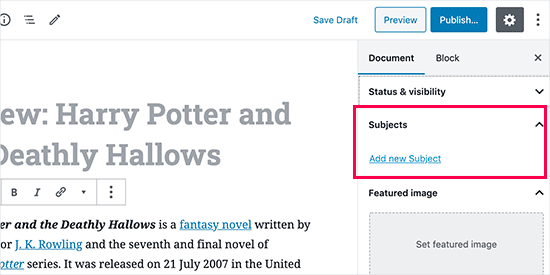
Dans l'éditeur de publication, vous trouverez l'option de sélectionner ou de créer de nouveaux termes à partir de la colonne de droite.
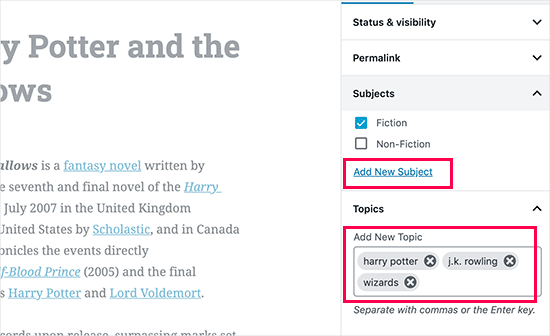
Après avoir ajouté des termes, vous pouvez continuer et publier ce contenu.
Tous vos articles classés sous ce terme seront accessibles sur votre site Web en utilisant leur propre URL. Par exemple, les articles classés sous le sujet « Fiction » apparaîtraient à l'URL suivante :
https://example.com/subject/fiction/

Ajouter des taxonomies personnalisées au menu de navigation
Maintenant que vous avez créé des taxonomies personnalisées, vous voudrez peut-être les afficher dans le menu de navigation de votre site Web.
Vous devrez aller dans Apparence » Menus et sélectionner les termes que vous souhaitez ajouter sous votre onglet de taxonomie personnalisée qui apparaît sur le côté gauche de l'écran.
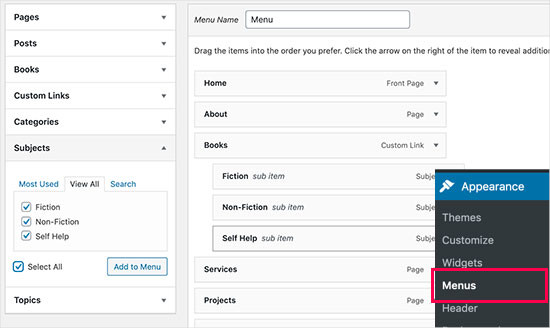
N'oubliez pas de cliquer sur le bouton « Enregistrer le menu » pour sauvegarder vos paramètres.
Vous pouvez maintenant visiter votre site web pour voir votre menu en action.

Pour plus de détails, vous pouvez consulter notre guide étape par étape sur comment créer un menu déroulant dans WordPress.
Tutoriel vidéo
Si vous préférez regarder et apprendre comment créer des taxonomies personnalisées, consultez notre tutoriel vidéo :
Bonus : Allez plus loin avec les taxonomies WordPress
Les taxonomies personnalisées vous permettent de faire beaucoup de choses. Par exemple, vous pouvez les afficher dans un widget de barre latérale ou ajouter des icônes d'image pour chaque terme.
Vous pouvez également pour les taxonomies personnalisées et permettre aux utilisateurs de s'abonner à des termes individuels. Ainsi, vos lecteurs ne recevront que les mises à jour concernant le contenu spécifique qui les intéresse.
Si vous souhaitez personnaliser la mise en page de vos pages de taxonomie personnalisée, vous pouvez consulter SeedProd. C'est le meilleur constructeur de pages WordPress par glisser-déposer et constructeur de thèmes qui vous permet de créer des mises en page personnalisées sans aucun codage.
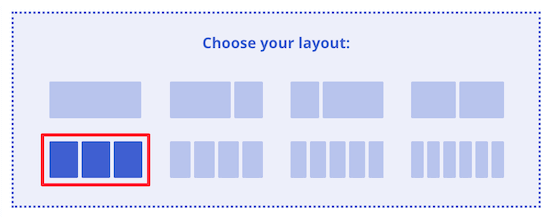
Pour en savoir plus, vous pouvez consulter notre article sur comment créer une page personnalisée dans WordPress.
Nous espérons que cet article vous a aidé à apprendre comment créer des taxonomies personnalisées dans WordPress. Vous voudrez peut-être aussi consulter nos guides sur comment ajouter des images de taxonomie (icônes de catégorie) dans WordPress et comment changer, déplacer et supprimer correctement les catégories WordPress.
Si cet article vous a plu, abonnez-vous à notre chaîne YouTube pour des tutoriels vidéo WordPress. Vous pouvez également nous retrouver sur Twitter et Facebook.


joe barrett
N'oubliez pas d'ajouter `show_in_rest` => true,
si vous souhaitez utiliser vos éléments personnalisés dans l'API REST à $args
Support WPBeginner
Merci d’avoir partagé cela pour ceux qui souhaitent ajouter cette fonctionnalité.
Admin
Michael Morad-McCoy
J'ai essayé de mettre cela dans un plugin spécifique au site et j'obtiens ce qui suit dans une boîte en haut :
y() attend le paramètre 1 comme rappel valide, la fonction 'create_topics_hierarchical_taxonomy' introuvable ou nom de fonction invalide dans /home2/kaibabpr/public_html/wp-includes/class-wp-hook.php à la ligne 286
Avertissement : Impossible de modifier les informations d’en-tête – les en-têtes ont déjà été envoyés par (sortie commencée à /home2/kaibabpr/public_html/wp-includes/class-wp-hook.php:286) dans /home2/kaibabpr/public_html/wp-admin/includes/misc.php à la ligne 1198
comme c’est la première fois que j’essaie cela, je suis perdu.
Support WPBeginner
Vous voudrez peut-être vous assurer que votre plugin spécifique au site est un fichier php après avoir ajouté le code, car votre système d’exploitation peut parfois essayer de modifier le type de fichier.
Admin
Naji Boutros
Avez-vous un autre plugin à recommander ?
Ajeet singh
c’est un tutoriel très utile…..merci beaucoup.
Suresh
Merci d’avoir partagé ce code. J’ai utilisé le code non hiérarchique, et la partie admin fonctionne bien. J’ai créé un modèle séparé également comme taxonomy-[taxoName]-.php Mais en essayant d’accéder à l’URL, cela donne une erreur HTTP 500. J’ai essayé plusieurs choses, comme de nouveaux démarrages de cache, une ré-enregistrement des permaliens, un nouveau .htaccess et une augmentation de la mémoire. même alors, la page ne fonctionne pas. S’il vous plaît, aidez-moi.
Rabby
WOW, des détails incroyables et utiles. J’ai créé ma taxonomie personnalisée en utilisant des règles manuelles. Merci
Joseph Peter
Bonjour,
merci pour ces informations utiles, je suis nouveau sur WordPress et je voulais connaître la signification qui m'a amené ici, c'était en fait utile.
Cordialement
Joseph Peter
Cindi Gay
J'ai utilisé le code pour ajouter une étiquette à un type de publication personnalisé. Heureusement, Topics est exactement l'étiquette dont j'avais besoin, donc tout ce que j'avais à changer était post en lesson (je modifie le type de publication LifterLMS lesson).
Je veux maintenant afficher les balises. J'ai essayé d'utiliser le nuage de balises par défaut de Wordpress mais il ne passe pas à la balise nouvellement ajoutée. Il continue d'afficher toutes mes balises de publication, même lorsque je choisis Sujets
Y a-t-il une étape que j'ai manquée ? Comment afficher la nouvelle balise : Sujets ?
Ero
Les taxonomies ne se comportent pas exactement comme les catégories des articles par défaut. Elles n'apparaissent pas dans l'URL (surtout pour les taxonomies imbriquées). Y a-t-il un moyen de définir une taxonomie personnalisée associée à un type d'article personnalisé pour qu'elle se comporte comme les catégories d'articles ?
Rangan Roy
J'ai utilisé ce code dans mon type d'article personnalisé de galerie pour le support des catégories. Il affiche le nom de la catégorie mais lorsque je clique sur le nom de la catégorie, il affiche une erreur 404 : introuvable. Aidez-moi à résoudre ce problème. Je veux que les articles de catégorie s'affichent sur ma page archive.php.
Utshab Roy
J'ai rencontré le même problème que vous. La façon dont je l'ai résolu est très simple. Allez dans vos paramètres de permaliens et cliquez sur le bouton Enregistrer. Rafraîchissez la page. Cette étape simple résoudra le problème.
Carol
Cela a fonctionné ! Merci beaucoup.
Russell
Bonjour, j'ai créé une boîte de métadonnées personnalisée avec une nouvelle catégorie. Je peux aussi l'afficher sur la page de l'article. Mais lorsque je clique sur l'élément de catégorie nouvellement créé, cela me renvoie à une page 404. Je veux que cela fonctionne comme les balises, la catégorie par défaut ou l'auteur. Ainsi, si je clique, cela affiche tous les articles sous cette catégorie.
Olivier
Bonjour,
Je suis nouveau sur WordPress et sur le codage en général. Ce tutoriel est très bien expliqué, merci.
Cependant, je ne comprends pas comment afficher les termes de ma taxonomie sur mes pages.
Où dois-je aller pour « ajouter cette seule ligne de code dans votre fichier single.php, à l'intérieur de la boucle » ?
Merci pour votre aide
Cordialement,
Olivier
Azamat
Merci beaucoup pour ce super tutoriel !
J'ai créé une taxonomie personnalisée sur mon site web dédiée aux livres et maintenant je suis capable de filtrer les livres par auteurs !
James Angel
Le problème avec certains plugins est qu'ils peuvent ne pas être compatibles avec tous les thèmes. J'ai constaté qu'il est avantageux de faire appel à un développeur qualifié pour qu'il fasse sa part et teste et dépannne toute modification de site Web après l'ajout d'un plugin ou la mise à jour de Wordpress vers une nouvelle version afin de s'assurer que tout fonctionne comme il se doit.
paul
Mec, tu es une légende,
J'ai galéré 3 jours pour obtenir ça, que j'ai trouvé sur de nombreux sites, mais pas aussi clair que ça.
Merci !
Support WPBeginner
Salut Paul, content que tu aies trouvé ça utile. N'oublie pas de nous suivre sur Facebook pour plus d'astuces et de tutoriels WordPress.
Admin
Rangan Roy
J'ai utilisé ce code dans mon type de publication personnalisé de galerie pour le support de catégorie. Il affiche le nom de la catégorie mais lorsque je clique sur le nom de la catégorie, il affiche la page 404.php. Aidez-moi à résoudre ce problème. Je veux que les publications de catégorie s'affichent sur ma page archive.php.
Ayla
J'ai créé un type de publication personnalisé et une taxonomie pour l'accompagner, mais lorsque je crée une publication personnalisée et que je lui ajoute des étiquettes, elles n'apparaissent pas comme les étiquettes normales sur les publications normales. Comment faire pour qu'elles s'affichent en bas de la publication comme d'habitude afin que les gens puissent cliquer dessus et en trouver d'autres similaires ?
Merci !
-Ayla
Support WPBeginner
Vous devrez créer un nouveau modèle pour afficher votre type de publication personnalisé et modifier ce modèle pour afficher votre taxonomie personnalisée.
Admin
Giulia
Hi everybody! First of all thank you for this article!
I’ve found that “Simple Taxonomies” plugin is kind of out of date, since it hasn’t been updated since 2 years…. do you have any other plugin to suggest to create custom taxonomies?
thanks
Giulia
Mario
Je ne suis pas l'auteur de cette publication, mais j'utilise « Custom Post Type UI » pour créer des taxonomies personnalisées. Avec 300 000 installations, je suis à peu près sûr que ce plugin est aussi proche que possible de la norme de l'industrie.
J'espère que cela vous aidera !
Ryan Hall
Incroyable. Merci !
Ryan
Comment dissocier les publications des catégories « normales » ?
Support WPBeginner
Veuillez consulter notre guide sur comment fusionner et modifier en masse les catégories et les étiquettes dans WordPress.
Admin
Sunny
Bonjour,
La description n'est pas visible par défaut ; cependant, certains thèmes peuvent l'afficher. Mais elle s'affiche toujours sur le front-end.
Comment masquer la description de la taxonomie sur le front ?
Je veux ajouter une description à la taxonomie mais je ne veux pas qu'elle s'affiche sur le front.
S'il vous plaît, dites-moi ce que je peux faire.
Merci
ajax
Comment automatiser la population de la valeur de la taxonomie avec la valeur d'un champ personnalisé.
Charles Hall
L'article est correct, mais la vidéo est très médiocre. La qualité du son est mauvaise, elle parle beaucoup trop vite, des choses évidentes sont développées mais l'explication de ce que vous faites et pourquoi est manquante, tout comme l'autre contenu dans la partie inférieure de l'article.
Jennifer
Je travaille sur un site WordPress. J'ai créé des catégories à l'aide d'un plugin appelé « Categories Images ». L'une des catégories s'appelle « Vidéos », il y a donc un dossier/une catégorie qui est censé afficher des vidéos mais des images. Le problème est que, comme le plugin est conçu pour télécharger uniquement des images, les vidéos YouTube ne s'affichent pas. Comment puis-je modifier les fichiers PHP (créer une taxonomie personnalisée, modifier single.php, modifier taxonomy-{taxonomy-slug}.php, etc.) afin que le post puisse afficher et lire des vidéos YouTube ??
Jamie Wallace
Si vous souhaitez avoir plus de contrôle sur la façon dont les choses sont extraites du backend vers le frontend, regardez du côté du plugin Advanced Custom Fields. C'est un plugin pour développeurs (donc du code est impliqué) mais il est très puissant pour des choses comme ce que vous demandez
Muhammad
Bonjour, j'ai suivi la méthode manuelle de création de taxonomie personnalisée et j'ai juste utilisé Ads/Ad au lieu de Topics/Topic. Mais je ne vois aucune taxonomie personnalisée dans l'éditeur de publication bien que j'aie vérifié l'option d'écran du formulaire de taxonomie personnalisée.
bien que la taxonomie personnalisée (Ads) s'affiche dans le sous-menu d'administration sous Posts.
Muhammad
Voici mon extrait de code dans le fichier functions.php
[ '_x( ‘Publicités’, ‘taxonomy general name’ ),
‘singular_name’ => _x( ‘Publicité’, ‘taxonomy singular name’ ),
‘search_items’ => __( ‘Rechercher des publicités’ ),
‘all_items’ => __( ‘Toutes les publicités’ ),
‘parent_item’ => __( ‘Publicité parente’ ),
‘parent_item_colon’ => __( ‘Publicité parente :’ ),
‘edit_item’ => __( ‘Modifier la publicité’ ),
‘update_item’ => __( ‘Mettre à jour la publicité’ ),
‘add_new_item’ => __( ‘Ajouter une nouvelle publicité’ ),
‘new_item_name’ => __( ‘Nom de la nouvelle publicité’ ),
‘menu_name’ => __( ‘Publicités’ ),
);
// Now register the taxonomy
register_taxonomy(‘ads’,array(‘post’), array(
‘hierarchical’ => true,
‘labels’ => $labels,
‘show_ui’ => true,
‘show_admin_column’ => true,
‘query_var’ => true,
‘rewrite’ => array( ‘slug’ => ‘ad’ ),
));
}
?>
Robert Herold
How to show the number of posts on taxonomy-{taxonomy-slug}.php?
Robert Herold
Comment puis-je afficher ma liste de taxonomie personnalisée comme la liste des catégories
Support WPBeginner
Veuillez consulter notre guide Comment afficher les termes de taxonomie personnalisée dans les widgets de la barre latérale WordPress.
Admin
Robert Herold
Wow ! Merci ! Superbe !!!!!! :))
Abdul Rauf Bhatti
Cher support WPBEGINNER,
J'ai appris beaucoup de choses dans ce tutoriel. La prochaine fois, pourriez-vous s'il vous plaît détailler les paramètres des fonctions que vous avez utilisés ? Parfois, j'ai des problèmes ou je suis confus avec les paramètres.
Merci beaucoup, bon tutoriel, 5 étoiles
Support WPBeginner
Merci pour vos commentaires, nous allons essayer d'améliorer l'explication de notre code à l'avenir.
Admin
lee
Existe-t-il un moyen d'avoir plusieurs taxonomies personnalisées utilisant le même slug ou la même URL ? Montrez-nous comment si vous ou quelqu'un d'autre le savez.
pdepmcp
Cela peut sembler évident, mais... n'oubliez pas de rafraîchir le cache des permaliens, sinon vous pourriez passer des heures à essayer de comprendre pourquoi les pages d'archives ne fonctionnent pas...
Ilya
Merci beaucoup !!!
J'ai passé des heures en mode débogage, mais je n'arrivais pas à déterminer pourquoi mon permalien redirigeait vers une page 404 ! Mais après avoir vidé le "cache des permaliens", tout fonctionne bien.
Merci encore !
winson
Bonjour.
Comment puis-je obtenir un lien différent pour les articles ? Je veux dire, je veux obtenir 2 liens différents après avoir publié un nouvel article.
Par exemple :
Nom de la catégorie – > Facebook (template de thème A)
Nom du sujet – > Twitter (template de thème B)
Ensuite, je soumets un article à ces 2 catégories. Je veux obtenir 1 lien pour "Facebook" et 1 lien pour "Twitter".
Cordialement
foolish coder
comment créer des pages / templates uniques pour les taxonomies ?
Je veux dire comme single.php et non comme category.php
Alex
Essayez taxonomy.php ()
L'équipe de WPBeginner
Oui, vous pouvez faire ça.
fatima
et si nous voulons créer plus de 2 taxonomies, style catégories (hiérarchie vraie)
Aalaap Ghag
Je construis un site qui a plusieurs miniatures d'articles, chacune menant à une page avec plusieurs images pour cet article (c'est-à-dire un produit). Les taxonomies sont-elles la bonne approche ou devrais-je chercher autre chose ?
leona
Salut, c'est un excellent tutoriel. Mais que faire si je veux afficher des taxonomies personnalisées comme des articles dans mon menu ? Par exemple, j'ai un type d'article personnalisé appelé 'poèmes' et des taxonomies personnalisées classique, moderne, nouvelle vague. Chaque article de poème est assigné à l'une de ces taxonomies. Dans le menu, je veux voir un menu intitulé poèmes avec 3 sous-titres (classique, moderne, nouvelle vague). Chacun n'affichera que les poèmes étiquetés avec une taxonomie. Est-ce possible ?
angel1
C'est génial ! Comment créer des « articles similaires » pour la taxonomie personnalisée ?
Je suppose que je dois mettre un code PHP conditionnel pour afficher les articles similaires pour que la nouvelle taxonomie personnalisée apparaisse uniquement lorsqu'il s'agit d'un article de nouvelle taxonomie et qu'elle se cache lorsqu'il s'agit d'un article de catégorie/étiquette de base, car ils partagent tous deux le même fichier content.php.
Toute suggestion serait grandement appréciée.
SteveMTNO
J'ai utilisé le code ci-dessus pour créer la taxonomie personnalisée – tout a très bien fonctionné. Le champ a été ajouté à tous mes articles, et je l'ai rempli en conséquence.
J'utilise le plugin « Taxonomy Dropdown Widget » – cela fonctionne aussi.. en quelque sorte.
La liste déroulante est correctement remplie, mais lorsque vous cliquez sur l'un des éléments pour afficher ces articles, j'obtiens une erreur 404. Cependant, le plugin fonctionne pour afficher les étiquettes.
Des idées ? Je serais heureux de poster mon code, je ne savais juste pas si je devais le coller ici ou quelque part et y faire un lien ici à la place.
Faites-moi savoir.. merci !
SteveMTNO
Ruben
Aller dans Réglages > Permaliens > Enregistrer les modifications
(pas besoin de faire de modifications, cela réécrit simplement votre fichier .htaccess pour que le lien fonctionne)
Cette étape doit-elle être incluse dans l'article ?
David
Mauvais tutoriel. Vous vous attendez simplement à ce que les gens copient/collent le code et n'expliquez pas comment cela fonctionne.
Support WPBeginner
Non, nous ne voulons pas que les gens copient-collent simplement le code, nous voulons qu'ils l'étudient et le modifient s'ils le souhaitent.
Admin
Cletus
Salut, pouvez-vous me recommander un autre plugin de taxonomie qui fonctionne ?
Même une version premium, celui que vous avez posté n'a pas été mis à jour depuis des mois et l'auteur semble en avoir fait un.
Support WPBeginner
Le plugin fonctionne très bien, et l'auteur a 19 autres plugins. Il a également d'excellentes critiques et nous l'avons personnellement testé et utilisé. Cependant, si vous souhaitez toujours essayer un autre plugin, vous pouvez consulter GenerateWP qui vous permettra de générer le code pour votre taxonomie personnalisée. Vous pouvez ensuite coller ce code dans le fichier functions.php de votre thème ou dans un plugin spécifique au site.
Admin
Dineshkumar
Je suis débutant et j'utilise un thème WordPress de petites annonces, ma liste de taxonomie ne fonctionne pas correctement.
Quand je sélectionne un pays, il s'affiche correctement, mais quand je sélectionne un état, il affiche la liste des états avec la liste des villes. Quand je sélectionne une ville, elle ne s'affiche pas sous le parent. Comment puis-je résoudre cela sans utiliser de plugin, s'il vous plaît aidez-moi.
Joe
C'est probablement une question de débutant, mais je ne trouve la réponse nulle part. Je veux afficher le chemin hiérarchique de chaque page en haut de la page. Cette page, par exemple, a « WPBEGINNER » BLOG » TUTORIELS » COMMENT CRÉER UNE TAXONOMIE PERSONNALISÉE… » en haut et chaque élément est un lien. Il me manque le vocabulaire web pour savoir comment cela s'appelle. Si quelqu'un peut me dire quels termes rechercher pour comprendre comment faire, ce serait excellent.
Support WPBeginner
Joe, on appelle ça des fil d'Ariane. Vous pouvez ajouter des fil d'Ariane à votre site en utilisant le plugin Yoast's WordPress SEO. Vous pouvez également rechercher des fil d'Ariane dans le répertoire des plugins WordPress pour trouver d'autres plugins.
Admin
Mark
J'obtenais une erreur 404 après avoir configuré manuellement une taxonomie personnalisée avec vos instructions et votre code. Pour quiconque le fait, voici la solution que j'ai trouvée sur Codex.
« Si votre site utilise des permaliens personnalisés, vous devrez vider votre structure de permaliens après avoir apporté des modifications à vos taxonomies, sinon vous pourriez voir une erreur « Page introuvable ». Votre structure de permaliens est automatiquement vidée lorsque vous visitez Réglages > Permaliens dans votre tableau de bord WordPress. »
SteveMTNO
J'avais le même problème de 404 après avoir modifié la taxonomie. Vider les permaliens a parfaitement fonctionné.. merci !
Poivre
Salut,
merci beaucoup pour tes super tutoriels !
Jordan
Bonjour, merci pour ce super article.
Y a-t-il un moyen de créer une page pour une taxonomie personnalisée ?
Actuellement, ma taxonomie personnalisée s'appelle « issue » et je veux afficher tous les articles de l'issue 1 sur la page d'accueil. Le problème est que le lien ressemble à ceci exemple.com/issue/1, ce qui est bien. Sauf qu'il n'y a aucun moyen de faire en sorte que WordPress enregistre cela comme la page d'accueil.
Merci
Support WPBeginner
Vous pouvez remplacer votre modèle d'index par défaut par home.php. À l'intérieur de home.php, ajoutez cette ligne juste avant la boucle
$query = new WP_Query( array( ‘issues’ => ‘issue 1’ ) );
Admin
Keisa
Comment puis-je afficher chaque taxonomie sur des pages séparées ?
Par exemple//
PSDS (page)
—Vampire Diaries
——–Elena Gilberts
——–Stephen
——–Damon
——–Klaus
—Teen Wolf
——–Derek Hale
——–Scott McCall
——–Stiles Stilinski
——–Lydia Martin
Comment pourrais-je afficher chaque personnage sur sa propre page en utilisant des taxonomies ?
J'ai utilisé "psd_categories" pour la taxonomie, puis j'ai ajouté "Teen Wolf" comme catégorie.
J'ai trouvé un moyen d'afficher des liens vers la page de la série, mais je n'ai aucune idée de comment afficher tous les articles sous le nom de chaque personnage...
Je suis extrêmement novice dans ce domaine, alors soyez indulgent avec moi lol.
Puis-je envoyer un e-mail peut-être ? >.<
Support WPBeginner
Si vous utilisez des permaliens, vous devriez automatiquement avoir des pages séparées pour chaque terme d'une taxonomie.
Par exemple, si vous créez une taxonomie appelée personnages, et que vous marquez certains articles avec le terme Stephen, alors ces articles apparaîtront sur
http://example.com/characters/stephen/
Admin
JNorell
Le modèle archive-{taxonomy-slug}.php n'a pas fonctionné pour moi dans WordPress 3.6... il doit être taxonomy-{taxonomy-slug}.php à la place (voir http://codex.wordpress.org/Template_Hierarchy).
Merci pour le tutoriel, il a été utile !
Personnel éditorial
Fixed it Thanks
Admin
Kiki
Y a-t-il un moyen de faire en sorte que les catégories ne soient pas des hyperliens ? Je veux juste qu'elles soient listées. Je ne veux pas qu'elles mènent quelque part.
Photoreview
Envisagez alors de créer des champs personnalisés au lieu de taxonomies personnalisées.
Azis
thanks for the easy-to-understand tutorial
et pourriez-vous m'aider à insérer ces taxonomies personnalisées dans la classe de l'article ? par exemple... quand on met une catégorie nommée 'tutoriel' dans l'article, la catégorie serait normalement insérée dans la classe de l'article comme 'category-tutorial', n'est-ce pas ? mais il semble que l'exemple de cet article ne le fasse pas.
Encore une fois, merci pour cet excellent article.
P.S. : J'ai choisi la méthode manuelle pour créer les taxonomies personnalisées, car je préfère ne pas utiliser de plugins supplémentaires pour mon site si possible.
Robby Barnes
Bonjour et merci pour cette information.
J'utilise le thème enfant Responsive sur WP 3.5.1 sur DreamHost.
Je construis un site WordPress pour une petite publication imprimée. J'essaie de faire afficher sur mes pages WordPress (pas les articles) les noms des auteurs des articles qui se trouvent sur les pages. J'ai installé le plugin Simple Taxonomy et créé une taxonomie personnalisée. Je l'ai configuré pour qu'il fonctionne sur les pages et les médias, mais pas sur les articles. En utilisant le widget pour Simple Taxonomies, j'ai pu faire apparaître les noms des auteurs dans la barre latérale droite.
La taxonomie personnalisée apparaît dans le panneau d'administration de la page Modifier et semble me permettre de sélectionner des auteurs à associer à une page... Mais, après avoir mis à jour la page, les auteurs n'apparaissent pas sur la page HTML.
J'ai suivi votre suggestion et collé du code dans ce que je crois être la boucle (je ne suis pas sûr si les pages ont la boucle) et cela n'a rien changé.
J'apprécierais toute suggestion pour gérer cela. / Robby, Seattle, USA
Personnel éditorial
Les pages ont bien une boucle, et oui vous devrez coller le code pour vous assurer que la taxonomie apparaît sur la page HTML. Envoyez-nous le fichier page.php ou l'endroit où vous avez ajouté le code. Utilisez notre formulaire de contact.
Admin
Mattia
Bonjour, dans l'exemple de code, il me manque comment vous liez la taxonomie personnalisée « topic » au type de publication personnalisé « books »… Dois-je remplacer « post » par « books » ?
Personnel éditorial
Oui, c'est exact.
Admin
Arpit
Comment puis-je cibler les catégories d'une taxonomie ?
Tout comme je veux exécuter une fonction lorsque les produits de la catégorie Livres > Fiction uniquement sont affichés...