Vous souhaitez afficher les publications WordPress sous forme de grille ?
Une mise en page en grille vous donne plus de flexibilité dans l’affichage de vos publications dans WordPress. Cela peut s’avérer utile lorsque vous créez des pages personnalisées.
Dans cet article, nous allons vous montrer comment afficher facilement vos publications WordPress dans une disposition en grille n’importe où sur votre site.
Quand avez-vous besoin d’une Mise en page en grille pour WordPress ?
Tous les thèmes WordPress supportent la traditionnelle mise en page verticale des publications de blog, et cela fonctionne bien pour la plupart des types de sites. Cependant, cette mise en page peut prendre beaucoup d’espace, surtout si vous avez beaucoup de publications.
Si vous créez une page d’accueil personnalisée pour votre site, vous pouvez utiliser la disposition en grille pour afficher vos publications récentes.
Vous aurez ainsi plus de place pour ajouter d’autres éléments à votre page d’accueil.
De plus, votre grille de publication mettra en évidence vos images vedettes, ce qui la rendra visuellement attrayante et cliquable. Vous pouvez également utiliser la grille de publication pour afficher votre portfolio créatif et d’autres types de contenu personnalisé.
De nombreux thèmes de magazine et de photographie utilisent déjà la mise en page basée sur une grille pour afficher les publications. Cependant, si votre thème ne supporte pas cette fonctionnalité, vous devrez l’ajouter.
Ceci étant dit, nous allons vous afficher comment afficher vos publications WordPress dans une disposition en grille. Utilisez simplement les liens rapides ci-dessous pour passer directement à la méthode que vous souhaitez utiliser.
- Mise en page d’une grille avec l’éditeur de blocs de WordPress
- Créer une grille avec l’extension Post Grid
- Créer une grille avec le constructeur de page SeedProd
- Créer une grille en ajoutant du code à WordPress
Tutoriel vidéo
Si vous préférez des instructions écrites, continuez à lire.
Méthode 1. Créer une mise en page de grille de publication WordPress avec l’éditeur/éditrices de blocs
Cette méthode vous permet d’afficher simplement vos publications et vos miniatures dans une disposition de grille de publication à l’aide de l’éditeur de blocs de WordPress. Il existe un bloc de grille de publication intégré qui vous permet de créer votre propre grille.
Pour ce faire, ouvrez la page que vous souhaitez modifier, cliquez sur le bouton d’ajout de bloc « Plus » et recherchez « Boucle de requête », puis cliquez sur le bloc pour l’ajouter.
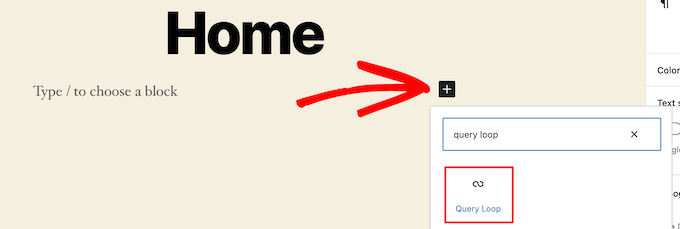
Ce bloc ajoute votre boucle de publication à votre page.
Cliquez ensuite sur l’option « Commencer à blanc » en haut du bloc pour créer une grille de publication.

Vous avez ainsi le choix entre plusieurs options en fonction du type d’informations que vous souhaitez afficher dans votre grille de publication.
Nous allons sélectionner l’option « Image, date et titre », mais vous pouvez choisir ce que vous voulez.

Survolez ensuite l’image et sélectionnez l’option « Vue en grille ».
Cela transforme votre liste en une grille de publication.

Ensuite, vous pouvez personnaliser les informations que vous souhaitez afficher.
Tout d’abord, nous allons supprimer la pagination au bas du bloc. Pour ce faire, il suffit de cliquer dessus, puis de cliquer sur le menu d’options » Trois points « .
Cliquez ensuite sur « Retirer la pagination ».

Cette opération retire automatiquement l’élément du bloc.
Vous pouvez supprimer les dates des publications de la même manière ou laisser plus d’informations sur les publications pour vos internautes.
Nous allons ensuite ajouter des liens vers la miniature et le titre de la publication.
Il vous suffit de cliquer sur la miniature de votre publication et d’activer le permutateur « Link to Post » dans le panneau d’options de droite.

Ensuite, faites la même chose pour le titre de votre publication.
Une fois que vous avez terminé, cliquez sur le bouton « Mettre à jour » ou « Publier » pour mettre votre grille de publication en direct.
Maintenant, vous pouvez visiter votre site WordPress pour voir votre nouvelle grille de publication WordPress.

Vous pouvez ajouter ce bloc à n’importe quelle page ou publication. Si vous souhaitez l’utiliser comme page d’archive de votre blog, vous pouvez consulter notre guide sur la création d’une page séparée pour les publications de blog dans WordPress.
Méthode 2. Créer une Mise en Page WordPress avec le Plugin Post Grid
Cette méthode offre un moyen simple d’ajouter une grille de publication personnalisable que vous pouvez ajouter n’importe où sur votre site.
La première chose à faire est d’installer et d’activer l’extension Post Grid. Pour plus de détails, consultez notre guide sur l’installation d’une extension WordPress.
Une fois activé, vous devez vous rendre sur Grille d’affichage » Ajouter nouvelle pour créer votre première grille d’affichage.
Ensuite, donnez un titre à votre grille de publication. Celui-ci n’apparaîtra nulle part sur votre page, c’est juste pour vous aider à vous en souvenir.

En dessous, vous trouverez les Réglages de la grille de publication divisés en différentes sections avec plusieurs onglets.
Tout d’abord, vous devez cliquer sur l’onglet « Requête de publication ». C’est ici que vous définirez les types de publication que vous souhaitez afficher dans le champ « Types de publication ».
Par défaut, il affiche uniquement les publications, mais vous pouvez ajouter des pages et même des types de publications personnalisés.

Ensuite, vous devez cliquer sur l’onglet « Mises en page ».
Cliquez ensuite sur le bouton « Créer une mise en page ». Une nouvelle fenêtre s’ouvrira.

Vous devez donner un nom à votre mise en page. Ensuite, cliquez sur l’option » Général « , et une liste d’identifiants s’ouvrira.
Ces identifiants sont les informations qui s’afficheront dans la grille de votre publication.

Nous allons sélectionner l’option « miniature avec lien » et l’option « titre de la publication avec lien ».
Cliquez ensuite sur « Publier » ou « Mettre à jour » pour enregistrer votre mise en page.

Revenez maintenant à l’éditeur de grille de publication original dans l’onglet précédent, et il y aura une nouvelle option de mise en page disponible que vous pouvez sélectionner.
Il suffit de cliquer sur la nouvelle mise en page dans la section « Mises en page des articles » au bas de l’écran.

Cliquez ensuite sur l’onglet « Style d’article ». Ici, vous pouvez définir la taille de votre grille.
Les réglages par défaut devraient fonctionner pour la plupart des sites, mais si ce n’est pas le cas, vous pouvez les modifier ici.

Une fois que vous avez terminé, cliquez sur le bouton « Publier » en haut de la page, et votre grille sera prête à être ajoutée à votre blog WordPress.
Vous devez maintenant cliquer sur l’onglet » Shortcode « , puis copier le code court dans le champ » Post Grid Shortcode « .

Ensuite, ouvrez la page où vous souhaitez afficher votre liste de publications et cliquez sur le bouton d’ajout de bloc « Plus ».
Ensuite, recherchez « Shortcode » et sélectionnez le bloc « Shortcode ».

Ensuite, collez le code court que vous avez copié plus tôt dans la boîte.
Cliquez ensuite sur le bouton « Mettre à jour » ou « Publier ».

Maintenant, vous pouvez voir votre page pour voir la mise en page de votre grille de publication WordPress en direct.

Méthode 3. Créer une Mise en Page de la Grille des Articles de WordPress avec le Constructeur de Page SeedProd Plugin
Une autre façon de créer une mise en page de grille de post est d’utiliser l’extension de constructeur de page SeedProd. C’est le meilleur constructeur de page WordPress drag and drop du marché utilisé par plus d’un million de sites.
SeedProd vous aide à créer facilement des pages personnalisées et même des thèmes WordPress complètement personnalisés sans écrire le moindre code. Vous pouvez utiliser l’extension pour créer n’importe quel type de page que vous voulez, comme les pages 404, les pages coming soon, les pages d’atterrissage, et plus encore.
Pour en savoir plus, consultez notre guide sur la façon de créer une page personnalisée dans WordPress.
Dans le constructeur de SeedProd, lorsque vous personnalisez votre page, cliquez simplement sur le bouton plus « Ajouter une section » n’importe où sur la page.
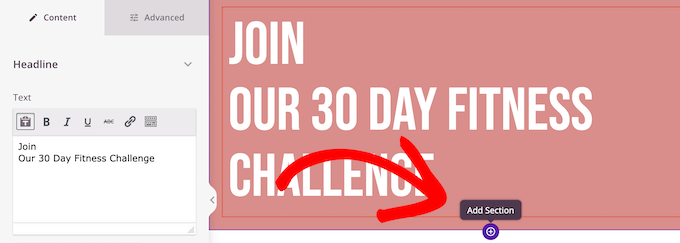
Une option permettant d’ajouter un nouveau bloc apparaît.
Ensuite, faites glisser le bloc « Posts » sur votre page, et il ajoutera automatiquement une liste de publications à votre page.

Vous pouvez maintenant personnaliser ce bloc à l’aide du panneau d’options situé à gauche.
Tout d’abord, défilez vers le bas jusqu’à la section « Mise en page ». Vous pouvez y définir le nombre de colonnes de votre grille de publication en avant du blog et permuter les options » Afficher l’image de mise en avant » et » Afficher le titre « .
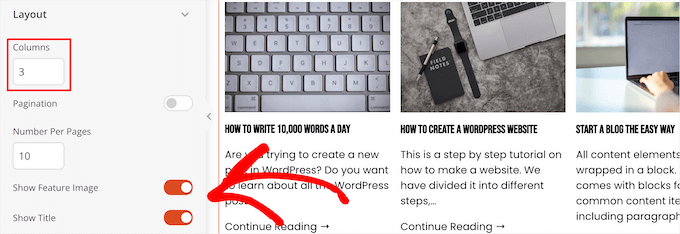
Ensuite, défilez vers le bas jusqu’aux permutations « Afficher l’extrait » et « Afficher la suite » et inactivez-les pour créer une grille de publication de blog simple.

Si vous souhaitez personnaliser le jeu de couleurs, le texte, etc., cliquez sur l’onglet « Avancé » en haut de la colonne de gauche.
Cliquez ensuite sur le menu déroulant « Texte » et apportez vos modifications.

Vous pouvez continuer à personnaliser la disposition de la grille de vos pages et de vos publications de blog autant que vous le souhaitez.
Une fois que vous avez terminé, cliquez sur le bouton « Enregistrer » et sélectionnez le menu déroulant « Publier » en haut de la page pour mettre en œuvre vos modifications.
Vous pouvez maintenant voir votre nouvelle grille de publication sur votre site.

Méthode 4. Créer une Mise en page de Grille d’Articles WordPress en Ajoutant du Code à WordPress
Cette méthode nécessite quelques connaissances de base sur l’ajout de code dans WordPress. Si vous n’avez jamais fait cela auparavant, consultez notre guide sur la façon de copier et coller du code dans WordPress.
Avant d’ajouter du code, vous devez créer une nouvelle taille d’image que vous utiliserez pour votre grille de publication. Pour en savoir plus, consultez notre guide sur la création de tailles d’images supplémentaires dans WordPress.
Ajouté à cela, vous devrez trouver le bon fichier de thème WordPress où vous ajouterez l’extrait de code. Par exemple, vous pouvez l’ajouter à votre single.php, afin qu’il apparaisse au bas de toutes vos publications.
Vous pouvez également créer un modèle de page personnalisé et l’utiliser pour afficher la disposition en grille de vos publications de blog avec des miniatures.
Pour en savoir plus, consultez notre aide-mémoire sur la hiérarchie des fichiers modèles WordPress pour vous aider à trouver le bon fichier de modèle de thème.
Une fois que vous avez fait cela, vous pouvez commencer à ajouter du code à WordPress. Comme l’extrait de code est assez long, nous allons le décomposer section par section.
Tout d’abord, ajoutez l’extrait de code suivant au fichier du modèle de votre thème.
1 2 3 4 5 6 7 8 9 10 11 12 | <?php$counter = 1; //start counter $grids = 2; //Grids per row global $query_string; //Need this to make pagination work /*Setting up our custom query (In here we are setting it to show 12 posts per page and eliminate all sticky posts*/query_posts($query_string . '&caller_get_posts=1&posts_per_page=12'); if(have_posts()) : while(have_posts()) : the_post();?> |
Cet extrait de code configure la requête de la boucle de publication. Vous pouvez modifier la variable ‘posts_per_page’ pour afficher plus de publications par page si vous le souhaitez.
Ensuite, ajoutez l’extrait de code suivant au fichier du modèle de votre thème.
1 2 3 4 5 6 7 8 9 10 11 12 13 14 15 16 17 18 19 20 21 22 23 24 25 | <?php//Show the left hand side columnif($counter == 1) :?> <div class="griditemleft"> <div class="postimage"> <a href="<?php the_permalink(); ?>" title="<?php the_title_attribute(); ?>"><?php the_post_thumbnail('category-thumbnail'); ?></a> </div> <h2><a href="<?php the_permalink(); ?>" title="<?php the_title_attribute(); ?>"><?php the_title(); ?></a></h2> </div><?php//Show the right hand side columnelseif($counter == $grids) :?><div class="griditemright"> <div class="postimage"> <a href="<?php the_permalink(); ?>" title="<?php the_title_attribute(); ?>"><?php the_post_thumbnail('category-thumbnail'); ?></a> </div> <h2><a href="<?php the_permalink(); ?>" title="<?php the_title_attribute(); ?>"><?php the_title(); ?></a></h2> </div><div class="clear"></div><?php$counter = 0;endif;?> |
Cet extrait de code crée deux colonnes pour nos publications et affiche le titre et l’image de la publication. Il crée également une classe CSS que nous afficherons ultérieurement.
Il fait également référence à « postimage », vous devrez donc modifier ce nom pour qu’il corresponde à la taille de l’image que vous avez créée précédemment.
Ensuite, ajoutez l’extrait de code suivant à la fin.
1 2 3 4 5 6 | <?php$counter++;endwhile;//Post Navigation code goes hereendif;?> |
Cet extrait de code permet simplement de fermer la boucle. Il donne également l’option d’ajouter la navigation dans les publications, mais la plupart des propriétaires de sites utilisent une extension différente pour cela, nous ne l’avons donc pas incluse pour éviter les conflits de code.
Voici à quoi ressemble l’extrait de code final.
1 2 3 4 5 6 7 8 9 10 11 12 13 14 15 16 17 18 19 20 21 22 23 24 25 26 27 28 29 30 31 32 33 34 35 36 37 38 39 40 41 42 43 44 45 46 47 | <div id="gridcontainer"><?php$counter = 1; //start counter $grids = 2; //Grids per row global $query_string; //Need this to make pagination work /*Setting up our custom query (In here we are setting it to show 12 posts per page and eliminate all sticky posts) */query_posts($query_string . '&caller_get_posts=1&posts_per_page=12'); if(have_posts()) : while(have_posts()) : the_post(); ?><?php//Show the left hand side columnif($counter == 1) :?> <div class="griditemleft"> <div class="postimage"> <a href="<?php the_permalink(); ?>" title="<?php the_title_attribute(); ?>"><?php the_post_thumbnail('category-thumbnail'); ?></a> </div> <h2><a href="<?php the_permalink(); ?>" title="<?php the_title_attribute(); ?>"><?php the_title(); ?></a></h2> </div><?php//Show the right hand side columnelseif($counter == $grids) :?><div class="griditemright"> <div class="postimage"> <a href="<?php the_permalink(); ?>" title="<?php the_title_attribute(); ?>"><?php the_post_thumbnail('category-thumbnail'); ?></a> </div> <h2><a href="<?php the_permalink(); ?>" title="<?php the_title_attribute(); ?>"><?php the_title(); ?></a></h2> </div><div class="clear"></div><?php$counter = 0;endif;?><?php$counter++;endwhile;//Pagination can go here if you want it.endif;?></div> |
Vous devez maintenant ajouter le CSS suivant à votre site pour vous assurer que votre grille de publication s’affiche correctement.
Si vous ne l’avez pas encore fait, consultez notre guide sur la façon d’ajouter facilement des CSS personnalisés à votre site WordPress.
1 2 3 4 5 6 7 8 9 10 11 12 13 14 15 16 17 18 19 20 | #gridcontainer{ margin: 20px 0; width: 100%; }#gridcontainer h2 a{ color: #77787a; font-size: 13px;}#gridcontainer .griditemleft{ float: left; width: 278px; margin: 0 40px 40px 0;}#gridcontainer .griditemright{ float: left; width: 278px;}#gridcontainer .postimage{ margin: 0 0 10px 0;} |
Vous pouvez modifier les différents sélecteurs CSS pour voir comment ils modifient les différents éléments de votre boucle de publication.
Nous espérons que cet article vous a aidé à apprendre comment afficher vos publications WordPress dans une disposition en grille. Vous pouvez également consulter notre guide sur la façon de choisir le meilleur logiciel de conception Web et nos choix d’experts du meilleur logiciel de discussion en direct pour les petites entreprises.
Si vous avez aimé cet article, veuillez alors vous abonner à notre chaîne YouTube pour obtenir des tutoriels vidéo sur WordPress. Vous pouvez également nous trouver sur Twitter et Facebook.


Rachel
I tried to do this under ‘posts’ for my blog that has already been created. It didn’t work.
WPBeginner Support
You would want to ensure you have multiple blog posts published live on your site for them to be visible as the most common reason for that issue.
Admin
julie
Hi
I have tried this on my static homepage but it is not working.
Do I just add the one shortcode or both ( ie the php code also?)
using make theme.
do i just add it to the page as a paragraph and shortcode?
thanks
julie
WPBeginner Support
You should only need to add the shortcode to the page, if you reach out to the plugin’s support they should be able to let you know why it is not displaying properly
Admin
Paige
Is there a way to customize the thumbnails? I have mine set to the featured image, however some are different sizes and are cut off in the wrong areas.
WPBeginner Support
In the layout settings, you should be able to customize the display of the featured iamges
Admin
Lisa
I’m following all the steps to set this grid up on my homepage but it’s not displaying. I created a page, added the short code, and under settings–>reading I set my homepage to static with that page. What am I doing wrong?
p.s. I purchased a child theme (Foodie Pro), could that be my issue? Thanks!
WPBeginner Support
There may be a page template that could be causing a display issue, if you reach out to Post Grid’s support they should be able to help have it display properly
Admin
Jess
This was GREAT!!! Thankyou! I was able to apply this for my main blog page however I also have navigation for the different categories within my blog. How can I make it so that each of these category pages also displays as a grid?
Lu
I installed this plugin but my WordPress site have been automatically updated to Gutenberg and now a box appears in all my WordPress Post pages, covering the content so I can’t see it! The only way I can get rid of it is to de-install Post Grid. Anyone have any other ideas so I can use the Post Grid? Thanks for any help! L
Robert
I have the page set up but I have 5 posts that I did before that are not showing up on the new Post Grid.
How do I get the posts to show up on the grid?
Travenjo
Can anyone help me to have page grid and (not post grid) for my pages. How ro customize?
Hector
I’m using the Twenty Fourteen theme and this only gave me one option for layout instead of what you are showing and the one they let me use is a double but it just doesn’t work even the pagination got stuck on me so I don’t know what to do,is there a better plugin for my theme?
Aurangzaib
What a simple solution, i understand WP and PHP on a good level and this is the smartest and easiest solution to make a grid of posts and fetch them up from the DB, although the need is pretty rare if you are willing to make a different page for any purpose otherwise there are themes that have built-in support of many kinds of grids designs i customized and designed a bit on my web there at simspk.com, also keeping simple and clean content is the simplest way to achieve better ranks, Great post bro, keep them up!
Daniel Grove
What about for blog category pages? They just get listed vertically in my theme and it looks lame and wastes so much space! I want it to grid them just like the home blog page does.
Jess
Meeeee tooooo!!!!! Following to see if there is a response…..
WPBeginner Support
Hey Daniel and Jess,
The plugin’s premium version claims to have the option to create post grid for category archive pages. We didn’t test the premium version for the article. Please check the plugin website to learn more before buying.
Admin
Lori
I have the Dara theme with the Premium plan, and I am VERY NEW. Unfortunately, I just realized that plug-ins are only available with the Business plan, which I cannot afford to invest in at this time since it would triple my cost. Dara has a grid page option, but it only allows child pages to be displayed – I want POSTS to display from a specific category. Looks like I would have to create a static child page every time I want new content to appear in this Premium plan Dara grid page option, right??
WPBeginner Support
Hi Lori,
You can start with a self-hosted WordPress.org website which allows you to install plugins out of the box.
Admin
Carl
This is great but is this same process possible WITHOUT installing a plugin. How do you shows 10 different category separately? How select images for grid?
Brianna
This is awesome! Is there a way to edit from two across ( 2 columns) to three or four? When I change the settings to 20 posts a page, I am getting 2 columns and 10 rows.
Dale Kevin
Hi, I followed all the steps but it doesnt work. The page where I posted the shortcode of postgrid doesnt show up as my how page. Whats wrong? Maybe the Php code is needed?
I need you guidance. Thank you. I appreciate you response
Mr Thanh
Hi, that’s great plugin.
But i can’t creat a grid with three colums, only two colums.
How can i?
Holly
Hi,
I’ve used this plugin on all the sites i’ve created, i love it its so easy to use but im having a problem with the layout a little bit. Im using Layout 1 with 4 Columns and for some reason a row splits into two different rows, how do i stop this from happening?
Dee
Hello there. This was very helpful thank you. It works fine on the front page of my blog but wouldn’t work in the categories. Whenever a category is clicked in the header, the page shows the theme grid and not the Post Grid. How do I go about this? What page do I copy the code into please?
Thank you
DEE
Can anyone help with this please
Liah
My current theme doesn’t have the grid layout for the blog section. I’ve download the plugin and it works great but when I upload a new blog post does it automatically update the grid to include the latest post? Thank you for the super helpful video!
WPBeginner Support
Hi Liah,
Yes it will automatically update the grid.
Admin
Leanne
I’m trying to make the blog section of my site look nicer here – is there a way to automatically style the current blog posts in a grid rather than creating a new page and adding shortcode or editing php files?
WPBeginner Support
Hey Leanne,
You’d need to look for a WordPress theme that automatically displays your blog posts in a grid layout.
Admin
Joseph
Hi Thank you for the nice Article. Is there any way to make the same without plugin. If so how could i ?
Thanks
leighton
I want to use this but i am confused, I follow it but I dont see anything, I copy the shortcode but still nothing, do I have to upload images and text? can someone help?
Shahid
Great Article, just wanted to know if we can add post excerpt length in this plugin?
mike
This is cool for pages only. What if my posts belong under categories only. How do I add the shortcode to category archive. Thanks
Henry
This is just fine for pages! Still can’t figure how it works for posts! Someone help pls.
Dave Parks
I finally found « Taxonomy » setting on the plugin homepage – available if you buy the premium.
Which means the freebee is of zero value.
Dave Parks
The only category setting I see is
« Exclude by post ID
you can exclude post by ID, comma(,) separated »
With all due respect to the creator of this plugin, there’s no way I’m going input all the IDs I do not want to appear. The list is too long, and it will grow as I develop this site.
So is there some place to put in the one ID that I want to appear?
Tina Davidson
Hi – I finally have my blog up and running – yay! But want to add a store element to it. A « Shop Now » page. Do you think this its the best type of plug-in to use or is the one more efficient for a store set-up? Thanks so much! Tina
hasan
thanks for good knowledge
my website has two kinds of contents : post and pages.
can i add my new pages on homepage automatically without using widgets?
thanks again
Karthik
hi thanks for kind info,
please help me how to filter post by categories
hasan
thank you for good knowledge
i use a theme support magazine template on my site but it includes only posts .
how can i use this template for pages also not only posts ?
thanks again
WPBeginner Support
Please contact theme developer they will be able to help you better.
Admin
anil singh
thanks who do not know php and how to cutomize homepage this article will be helpful. i have one question which i searched all the web but not find any article. quetion is how can custmize homepage with category list without showing post area in homepage please make article for it . you can see example on freejobalert.in
judit
Will this pluggin work on wordpress.com?
WPBeginner Support
Please see our guide on the difference between self hosted WordPress.org vs free WordPress.com blog.
Admin
Tonia
Hi – i see an image in your blog article, does this support featured content image ?
natalie james
Thank you so much for this article, it is as though you were reading my mind and my wish list for my blog. I was easily able to follow your step by step instructions until the very end. Im not sure how to put my query correctly, I think what Im trying to say is that I would like the grid page to be my landing page of my blog. At the moment it is inside a post with a post heading. You do mention at the end that I can past the code into my themes file but unfortunately I dont know where that is. Hope this makes sense and I look forward to your reply.
thanks
Natalie
Paul Wandason
Hi Natalie,
I maybe wrong here – but I think you need to create a *page* with the grid on it, then if you go to « settings » then « reading » in the wordpress admin dashboard, you can set « Front page displays » to a static page, and select the page you’ve just created with the grid on it under the « front page » drop down menu.
Hope this helps, and good luck!
Paul