Microsoft Outlook est un excellent choix pour les entreprises de toutes tailles. Toutefois, si vous utilisez une offre gratuite, vous serez épinglé par le domaine d’e-mail par défaut. Cela signifie que vous verrez “@outlook.com” à la fin de votre adresse e-mail.
Conserver le domaine d’e-mail par défaut n’est pas idéal, car cela ne laissera pas une très bonne impression à votre public. En effet, une adresse e-mail générique n’est pas le support d’une identité de marque forte et n’a pas l’air très professionnelle.
Heureusement, le plan Microsoft 365 Business Premium vous permet d’utiliser votre nom de domaine pour créer une adresse e-mail professionnelle à l’aide d’Outlook. Cela crée un aspect plus professionnel lors de l’envoi d’e-mails. De plus, l’offre premium vous permet de bénéficier de fonctionnalités puissantes comme la protection contre les indésirables et une meilleure sécurité.
Dans cet article, nous allons vous afficher comment configurer une adresse e-mail personnalisée et marquée avec Outlook.

Qu’est-ce qu’une adresse e-mail de marque professionnelle ?
Un e-mail professionnel contient le nom de votre entreprise. Par exemple, “support@yourdomain.com” est une adresse e-mail professionnelle. En revanche, “yourdomain@yahoo.com” n’est pas une adresse e-mail professionnelle.
Il existe de nombreuses façons de créer une adresse e-mail professionnelle. Vous pouvez utiliser le serveur e-mail intégré qui est livré avec la plupart des entreprises d’hébergement WordPress.
Il conviendra à la plupart des sites débutants disposant d’un budget serré. Cependant, il manque plusieurs fonctionnalités avant comme une meilleure protection contre les indésirables et les antivirus, une sécurité améliorée, une gestion de compte facile, et plus encore.
Si vous souhaitez bénéficier des fonctionnalités puissantes mentionnées ci-dessus, vous aurez besoin d’un service d’e-mail professionnel qui fonctionne avec votre nom d’entreprise ou votre nom de domaine existant.
Qu’est-ce que Outlook.com ?
Outlook est un service d’e-mail proposé par Microsoft. Vous pouvez créer un compte gratuit “yourname@outlook.com” pour utiliser ce service.
Toutefois, si vous souhaitez créer une adresse e-mail de marque professionnelle avec Outlook.com, vous devrez alors souscrire à un compte Microsoft 365 Business Premium.
C’est un service payant à partir de 6 $ par utilisateurs/utilisatrices/mois. Il comprend 1 To de stockage OneDrive et les dernières versions d’Outlook, de Word, d’Excel et de PowerPoint pour votre PC ou votre Mac.
Chez WPBeginner, nous utilisons et recommandons Workspace ou G Suite by Google pour les adresses e-mail professionnelles, car ils sont plus rentables. Nous préférons également Google Cloud car notre équipe est familiarisée avec Gmail et d’autres applications Google.
Pour plus de détails, vous pouvez consulter notre comparatif G Suite vs Office 365 pour savoir comment il se positionne par rapport à Outlook.com.
Ceci étant dit, voyons comment créer une adresse e-mail personnalisée avec Outlook.com.
S’inscrire à Outlook Premium avec Microsoft 365
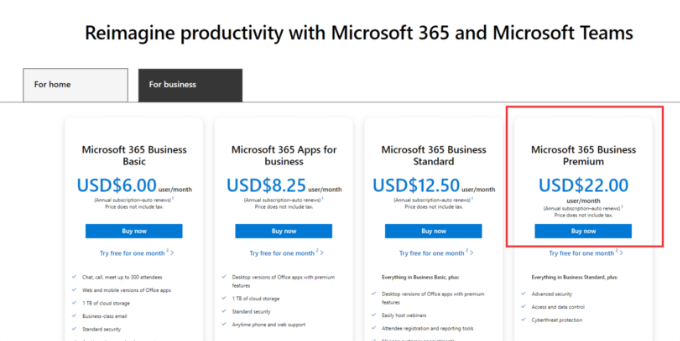
Tout d’abord, vous devez vous rendre sur le site de Microsoft 365 et souscrire à l’abonnement ” Microsoft 365 Business Premium “.
C’est le seul abonnement qui inclut le support pour les domaines personnalisés. Pour commencer, cliquez simplement sur le bouton “Acheter maintenant”.
Vous devrez saisir votre adresse e-mail à l’étape suivante. Il peut s’agir de votre e-mail au travail ou à l’école.
Une fois l’e-mail saisi/saisie, cliquez sur le bouton “Suivant”.
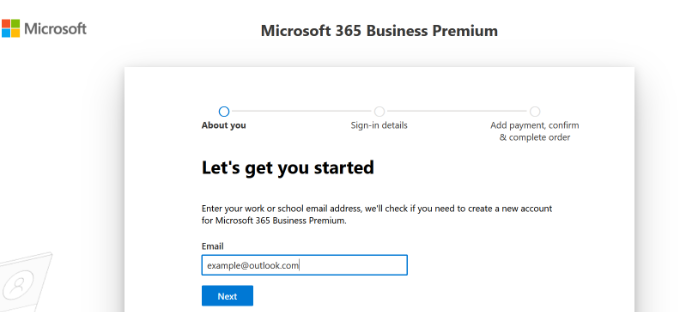
Il vérifiera ensuite si l’adresse est déjà associée à un compte Microsoft ou si vous devez en créer un nouveau.
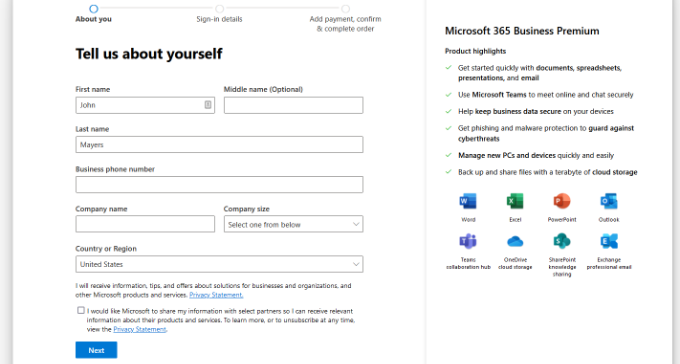
Ensuite, il vous sera demandé de fournir des informations personnelles, telles que votre nom, votre numéro de téléphone professionnel, le nom de votre entreprise, la taille de votre entreprise et votre pays.
Après avoir saisi/saisie ces informations, cliquez sur le bouton “Suivant”.
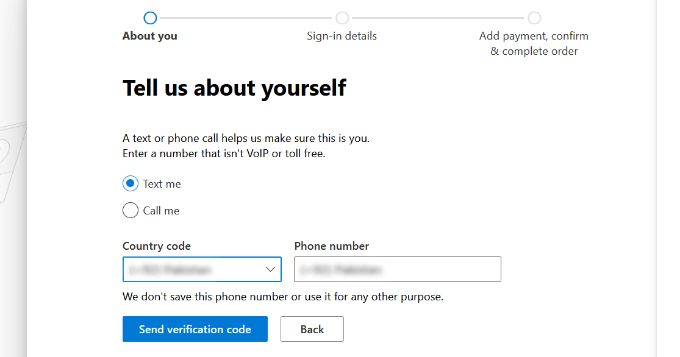
Sur l’écran suivant, vous devez vérifier le numéro de téléphone de votre entreprise.
Vous pouvez sélectionner de recevoir un message texte ou de recevoir un appel téléphonique pour obtenir le code de vérification.
Après vérification, il vous sera demandé de saisir un mot de passe et un nom de domaine.
Vous pouvez cliquer sur le bouton “Suivant” lorsque vous avez terminé.
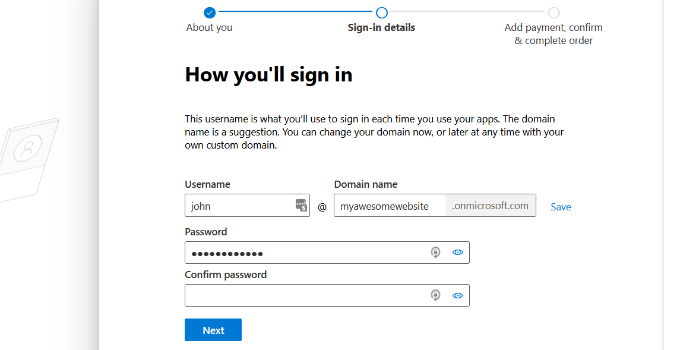
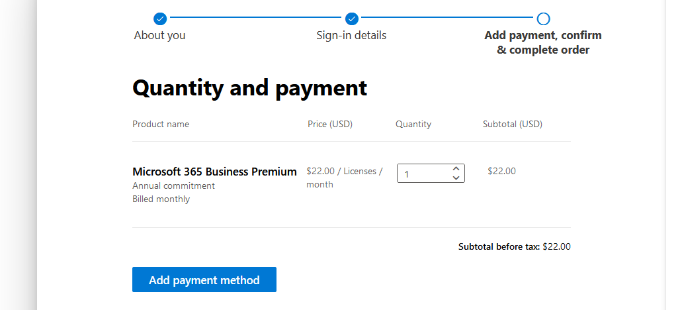
À partir de là, vous devrez sélectionner le nombre de comptes Microsoft 365 Business Premium que vous souhaitez.
Cliquez ensuite sur “Ajouter un moyen de paiement” pour continuer.
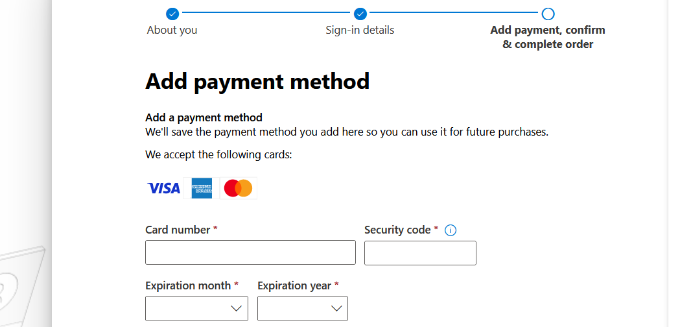
Microsoft vous demande alors de sélectionner un moyen de paiement, comme une carte bancaire.
Saisissez/saisie les détails du paiement pour terminer le processus d’inscription.
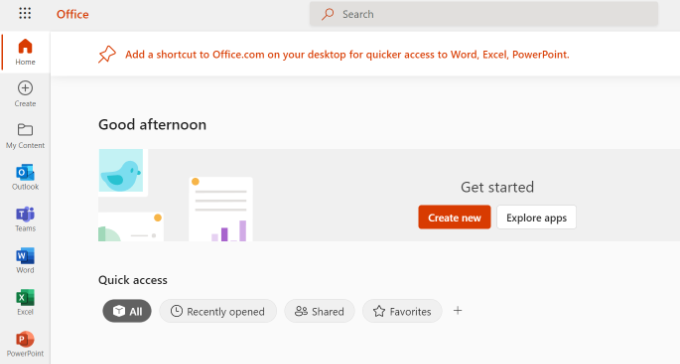
Après cela, vous atterrirez sur le tableau de bord d’Office 365.
Réglages de l’E-mail de Outlook avec un domaine personnalisé
Dans le tableau de bord, vous verrez différents outils et apps proposés par Microsoft dans le cadre de la suite Office 365.
La colonne latérale de gauche est remplie de raccourcis vers les différents services et applis auxquels vous avez accès avec votre abonnement.
Ensuite, vous pouvez cliquer sur l’option “Apps” dans le menu de la colonne latérale.
D’autres outils apparaissent maintenant sous Apps. Sélectionnez l’option “Admin”.
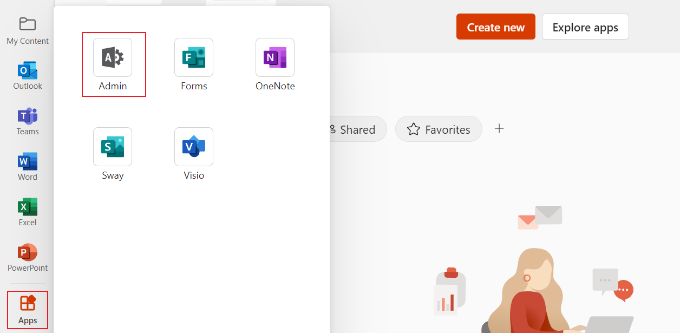
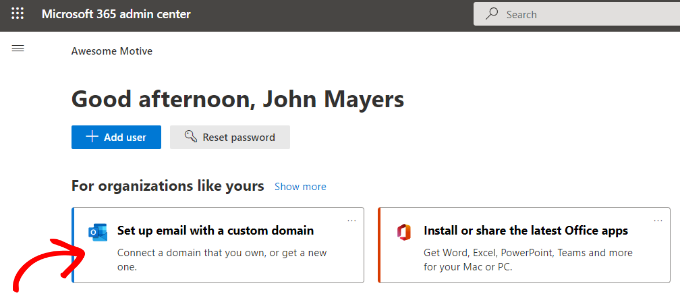
Ensuite, vous verrez le ” centre d’administration Microsoft 365 ” en haut de la page.
À partir de là, vous pouvez sélectionner l’option “Configurer l’e-mail avec un domaine personnalisé”.
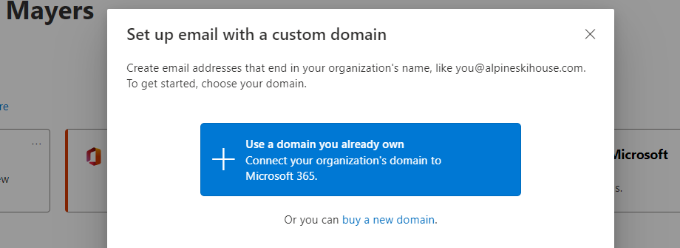
Ensuite, une fenêtre surgissante s’ouvrira dans laquelle il vous sera demandé d’utiliser un domaine existant ou d’en acheter un nouveau.
Cliquez simplement sur le bouton “Utiliser un domaine que vous possédez déjà”.
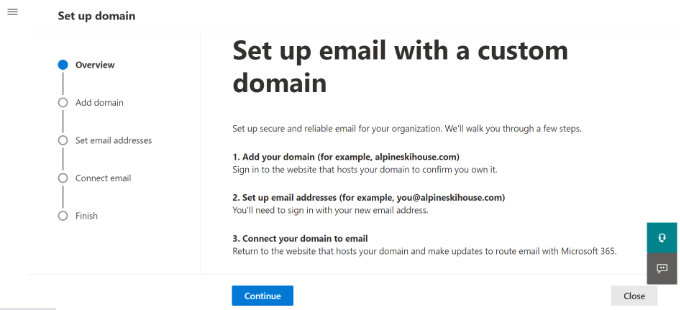
Ensuite, un assistant de configuration s’ouvrira pour vous aider à configurer un domaine personnalisé avec Outlook.
La première étape vous donnera un aperçu des étapes à suivre. Cliquez sur le bouton “Continuer” en bas de la page.
Sur l’écran suivant, il vous sera demandé de saisir le nom de domaine que vous souhaitez configurer.
Après avoir saisi/saisie le nom de domaine, cliquez sur le bouton “Continuer”.
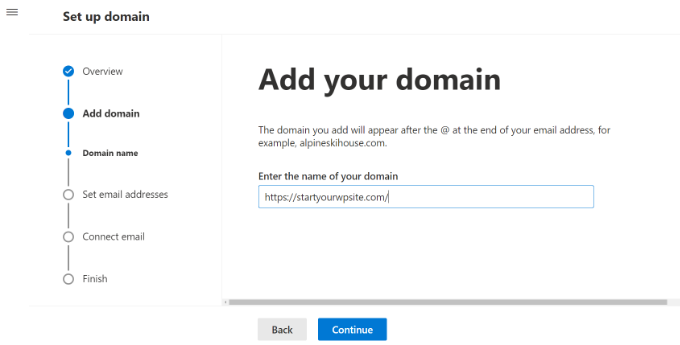
Microsoft va maintenant rechercher votre nom de domaine.
Ensuite, il vous demandera de vérifier la propriété en ajoutant des informations aux Réglages DNS de votre domaine.
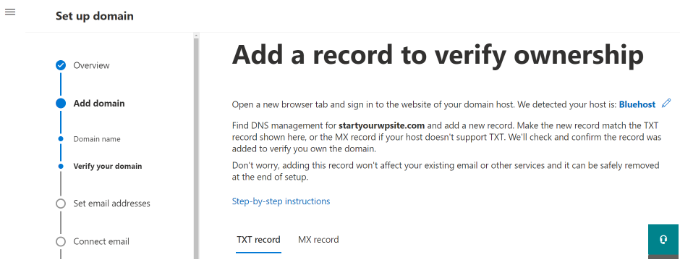
Pour ce faire, vous devez ouvrir un nouvel onglet ou une nouvelle fenêtre dans le navigateur et vous rendre sur la page des Réglages de votre domaine. En fonction de votre registraire de domaine, cette page se trouvera dans votre compte. Vous devez trouver l’option Réglages DNS.
Si votre domaine est inscrit par votre entreprise d’hébergement WordPress, vous trouverez le réglage du domaine dans votre tableau de bord cPanel sous l’intitulé “Editeur de zone” ou “Editeur de zone DNS”.
Note : Si vous êtes utilisateurs/utilisatrices de SiteGround, vous n’aurez pas de cPanel. Vous trouverez cela dans la section Domaine de votre Tableau de bord Site Tools.
Pour ce tutoriel, nous utiliserons le Tableau de bord de Bluehost. Pour commencer, vous pouvez aller sur Domaines dans le menu à votre gauche. Ensuite, localisez votre site et cliquez sur le bouton ‘Réglages’.
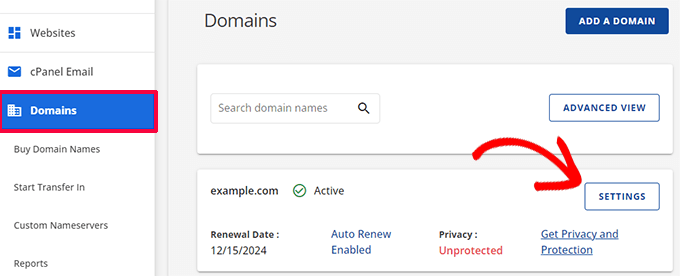
À partir de là, vous pouvez défiler vers le bas dans les Réglages du domaine.
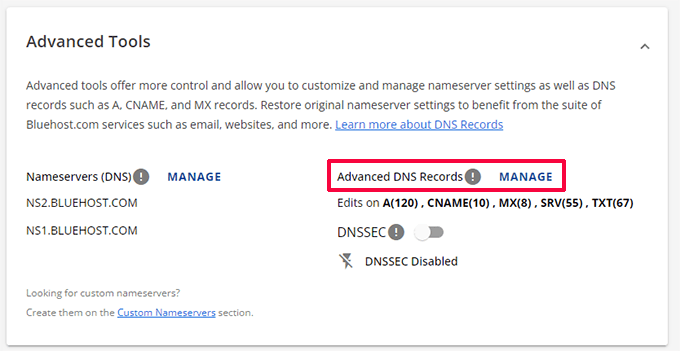
Cliquez sur l’option “Outils avancés”.
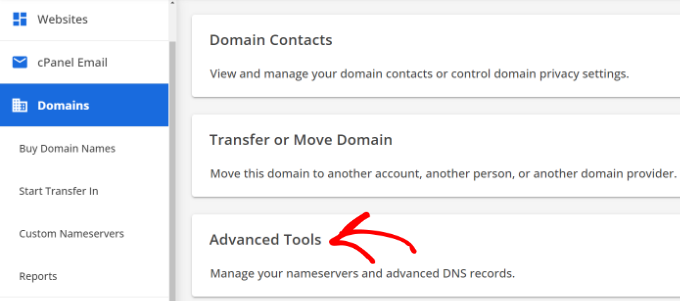
Ici, Bluehost affichera les serveurs de noms pour votre domaine et d’autres enregistrements.
Pour gérer les enregistrements DNS, vous pouvez cliquer sur le bouton “Gérer” situé à côté de “Enregistrements DNS avancés”.
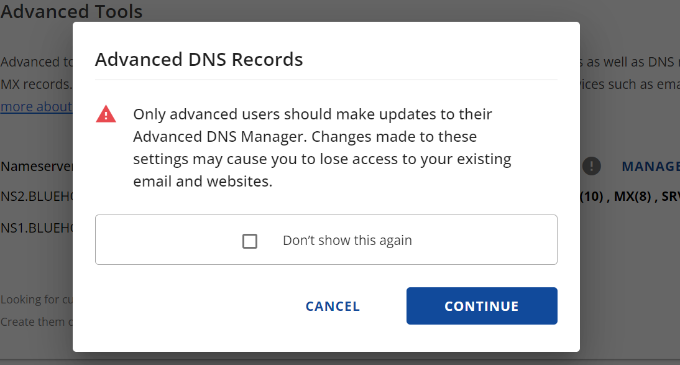
Bluehost affiche alors un message d’avertissement.
Vous pouvez cliquer sur le bouton “Continuer” pour poursuivre.
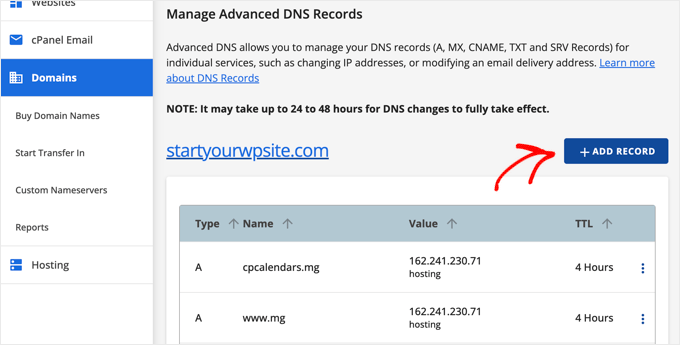
Ensuite, vous verrez différents types d’enregistrements DNS.
Il suffit de cliquer sur le bouton “+ Ajouter un enregistrement”.
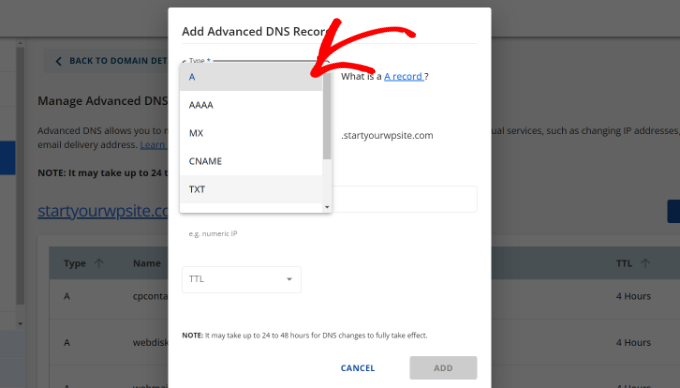
Une nouvelle fenêtre surgissante apparaît alors pour ajouter l’enregistrement.
Cliquez ensuite sur le menu déroulant et sélectionnez le type “TXT”.
À partir de là, vous devez saisir les détails du TXT. Il s’agit de l’enregistrement de l’hébergeur, de la valeur TXT et de la durée du TTL.
Vous pouvez facilement trouver ces informations dans l’onglet Microsoft Office 365.
Une fois les détails ajoutés, cliquez sur le bouton “Ajouter”.
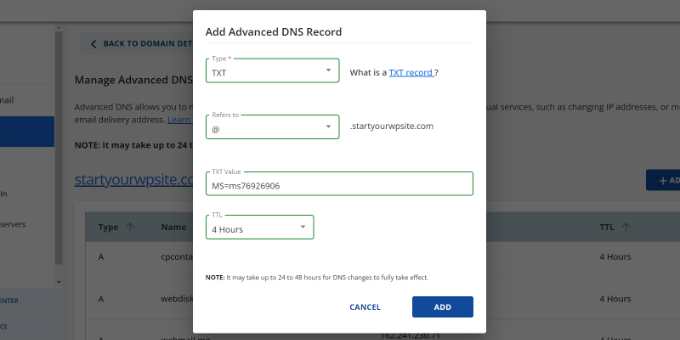
Lors de l’ajout d’un enregistrement DNS, assurez-vous que les informations saisies correspondent à celles affichées par Office 365.
Ensuite, vous devez basculer à nouveau vers le portail d’administration de Microsoft Office 365 et cliquer sur le bouton Vérifier.
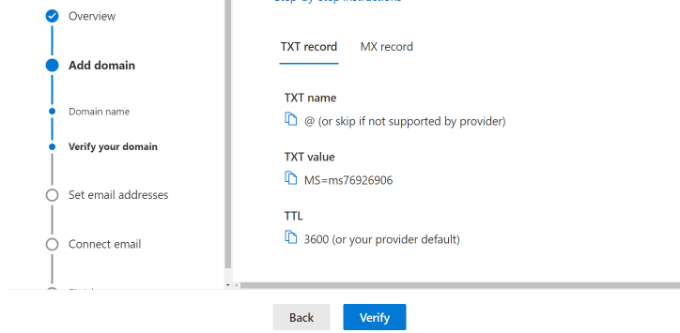
Office 365 va maintenant vérifier les enregistrements DNS pour s’assurer que vous êtes bien le propriétaire du nom de domaine. La vérification DNS peut prendre 5 à 10 minutes car, parfois, vos Réglages DNS ne seront pas mis à jour tout de suite.
Après vérification, il vous sera demandé de définir votre nouvelle adresse e-mail marquée. Une fois que c’est fait, cliquez simplement sur le bouton “Mettre à jour et se déconnecter”.
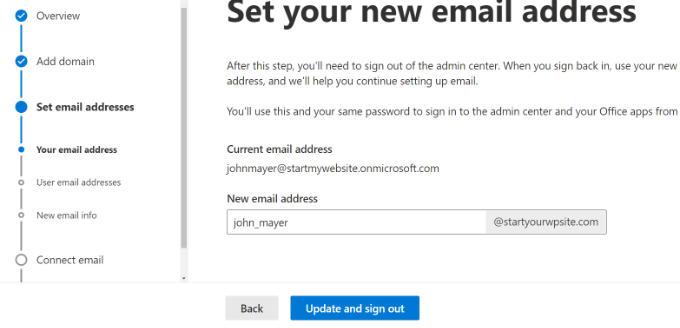
Ensuite, vous devrez vous connecter à nouveau en utilisant la nouvelle adresse e-mail de marque que vous venez d’ajouter.
Une fois connecté, vous verrez d’autres enregistrements à ajouter à votre domaine et à connecter à l’e-mail Outlook.
L’échange d’e-mails nécessite trois enregistrements DNS, à savoir un enregistrement MX, un enregistrement CNAME et un enregistrement TXT.
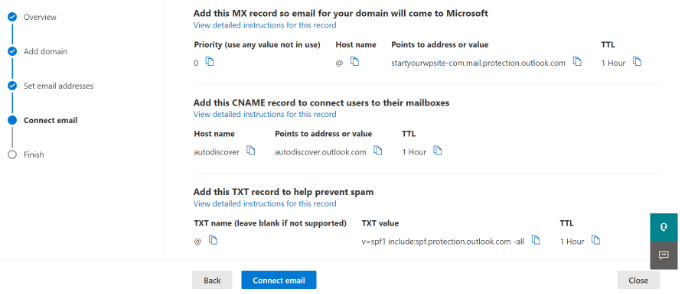
Une fois encore, vous devrez vous rendre sur la page des Réglages DNS de votre domaine et ajouter ces enregistrements individuellement.
Tout d’abord, vous disposez d’un enregistrement MX, qui fournit des instructions sur l’endroit où délivrer les e-mails.
Dans Bluehost, allez dans les Réglages DNS de votre site et cliquez sur le bouton “+ Ajouter un enregistrement” pour ajouter un nouvel enregistrement MX.

Une fenêtre surgissante s’affiche ensuite avec les réglages de l’enregistrement.
Tout d’abord, cliquez sur le menu déroulant en haut et sélectionnez l’option “MX”.

Si votre site disposait déjà d’un enregistrement MX, il sera remplacé par celui-ci. Cela garantit que vous pouvez utiliser les serveurs de messagerie d’Outlook pour envoyer et recevoir des e-mails à partir de l’adresse e-mail de votre domaine personnalisé.
Après cela, vous avez un enregistrement TXT, qui aide à empêcher quelqu’un d’usurper votre e-mail pour envoyer des indésirables.

Dernier point, vous avez un enregistrement CNAME, qui permet à des logiciels comme Outlook de découvrir le service d’e-mail et de s’y connecter.
Il suffit d’ajouter un nouvel enregistrement CNAME dans Tableau de bord Bluehost et de saisir les détails à partir du tableau de bord Microsoft.
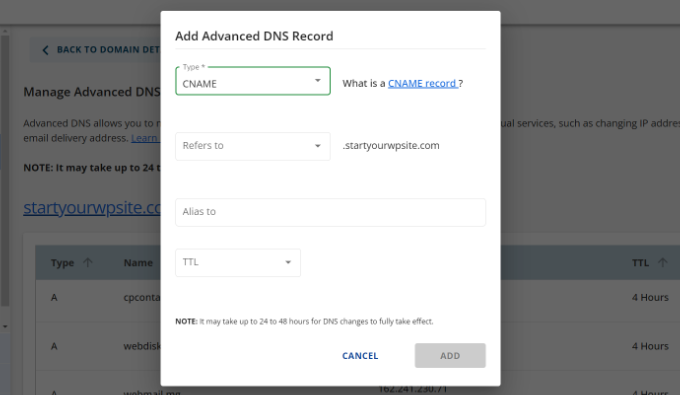
Une fois que vous avez saisi tous les enregistrements DNS, vous pouvez revenir à l’onglet Microsoft Office 365 et cliquer sur le bouton ” Connecter l’e-mail “.
Office 365 va maintenant vérifier les réglages DNS de votre domaine. Vérifiez si la vérification des enregistrements TXT peut prendre de 24 à 48 heures.

Une fois que tout a été vérifié, vous arrivez à la fin de la configuration.
Dans la dernière étape, vous verrez un résumé de votre configuration. Allez-y et fermez l’assistant de configuration.
Vous avez réussi à configurer votre nom de domaine pour qu’il fonctionne avec Outlook. Vous avez bien configuré votre nom de domaine pour qu’il fonctionne avec Outlook.
Ajout d’une adresse e-mail personnalisée de marque dans Outlook
Vous êtes maintenant prêt à créer des adresses e-mail de domaines personnalisés à l’aide d’Outlook.
Depuis votre Tableau de bord Office 365, accédez à Utilisateurs ” Utilisateurs/utilisatrices actifs.
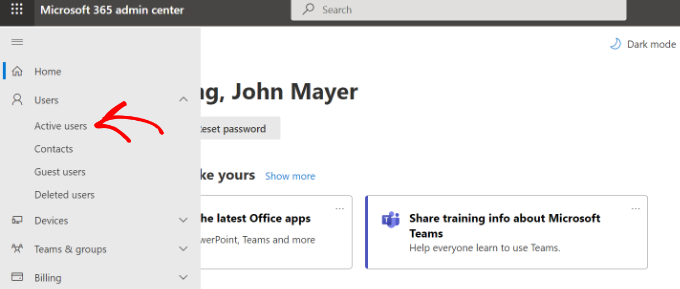
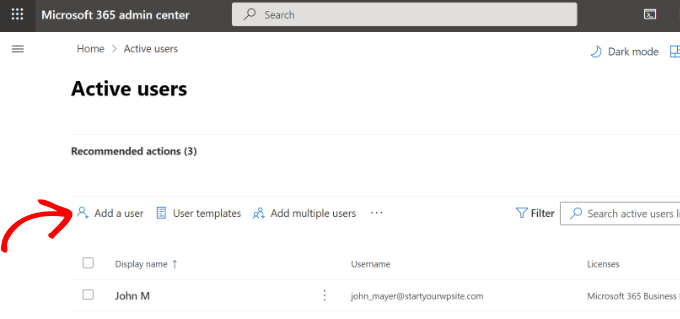
Ensuite, vous verrez une liste de vos utilisateurs/utilisatrices activés.
Cliquez sur l’option “Ajouter un utilisateur”.
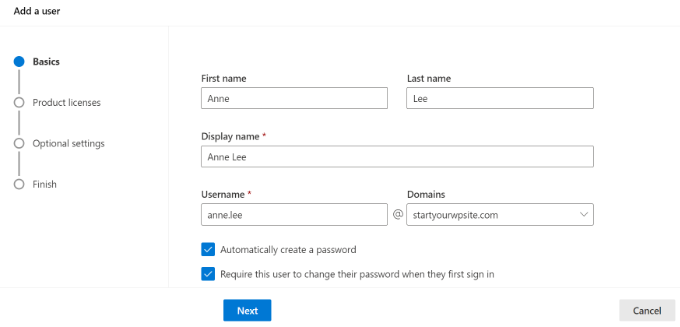
Sur l’écran suivant, vous devez fournir les informations personnelles de l’utilisateur, puis choisir une adresse e-mail.
Après avoir saisi/saisie les données, il suffit de cliquer sur le bouton “Suivant”.
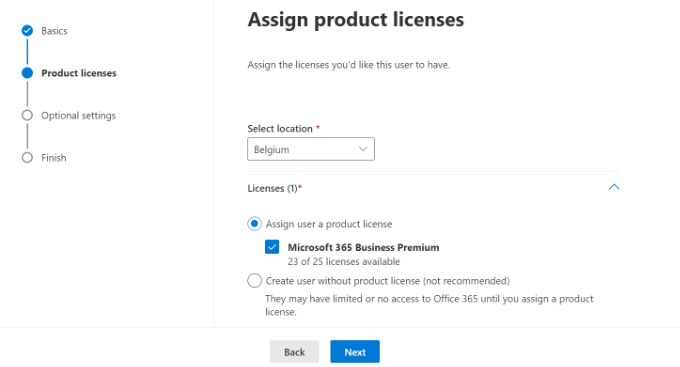
Ensuite, vous devrez sélectionner un emplacement géographique pour votre compte et assigner une licence de produit.
Dans l’offre Microsoft 365 Business Premium, vous pouvez assigner jusqu’à 25 licences. Lorsque vous avez terminé, il vous suffit de cliquer sur le bouton ” Suivant “.
Microsoft propose également des réglages supplémentaires pour les nouveaux comptes utilisateurs/utilisatrices.
Par exemple, vous pouvez sélectionner un rôle du compte de l’utilisateur et lui accorder l’accès au Centre d’administration. Il existe également une option permettant d’ajouter des informations de profil, comme l’intitulé du poste, le département, le bureau, et plus encore.
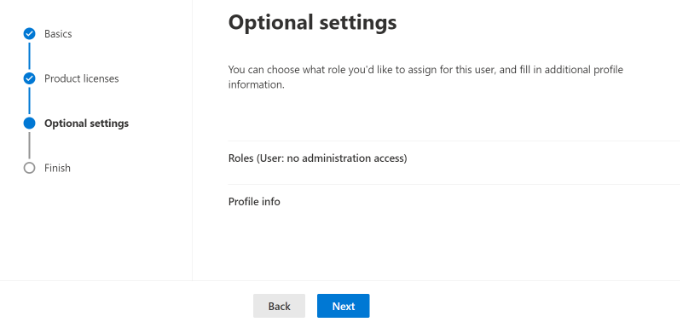
Ces réglages sont facultatifs et vous pouvez les laisser vierges. Lorsque vous avez terminé, cliquez simplement sur le bouton “Suivant”.
Dernier point, vous verrez un résumé du nouvel utilisateur que vous venez d’ajouter. Vous pouvez en consulter les détails, apporter les modifications nécessaires, puis cliquer sur le bouton “Terminer l’ajout”.
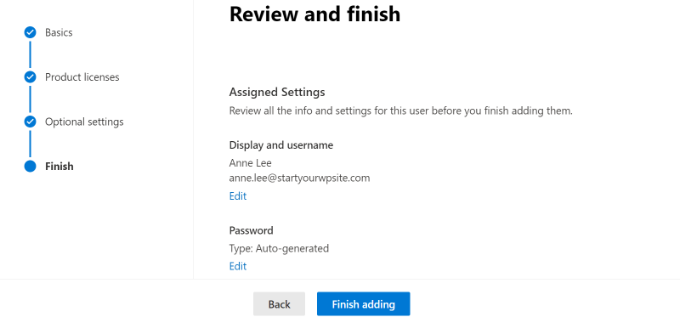
À ce stade, vous avez bien ajouté un nouvel utilisateur et créé une adresse e-mail marquée dans Outlook.
Vous pouvez maintenant vous connecter à l’aide de l’adresse e-mail et du mot de passe que vous avez créés à l’étape précédente pour utiliser votre nouvel e-mail de marque professionnelle avec Outlook.
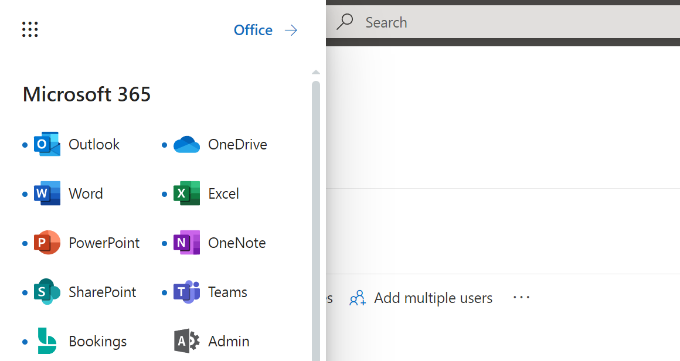
Vous pouvez également installer les apps Office 365 sur votre Mac et votre PC, notamment Outlook. Cela vous permettra d’utiliser votre adresse e-mail professionnelle Microsoft Outlook marquée, avec un accès hors ligne via l’app Outlook.
Nous espérons que cet article vous a aidé à apprendre comment configurer une adresse e-mail de marque professionnelle avec Outlook. Vous pouvez également consulter notre article sur les meilleurs fournisseurs SMTP avec une délivrabilité élevée des e-mails et notre guide pour débutants sur l’automatisation des e-mails WordPress.
Si vous avez aimé cet article, veuillez alors vous abonner à notre chaîne YouTube pour obtenir des tutoriels vidéo sur WordPress. Vous pouvez également nous trouver sur Twitter et Facebook.


Nishant Thakur
Was looking for this! Perfect!
Peter
Hello, thanks for this tutorial, please where do I need to add this
v=spf1 include:hotmail.com ~all
Jay
its more than 72 hrs of changing my dns. but now also it is showing “You need to prove ownership of this domain by creating a DNS record. Use the settings below.”
WPBeginner Support
This probably means your DNS records are not correctly set.
Admin
Abhay
hey! nice article…thank you
Rani
Hi,
I set up the account following your instructions.Thanks
But I have this problem , i am not receiving any mails in my inbox. when i send mails from other accounts to this mail it is bounced.
i checked the microsoft support. looks like it is some internal problem and not a settings problem. people are reporting other issues with accounts.Microsoft says they resolved the issue. But doesnt look like so.
http://answers.microsoft.com/en-us/outlook_com/forum/oemail-osend/my-outlookcom-email-account-is-not-receiving-any/02581144-c02b-4cdc-9132-98a8e0531ab1?msgId=2fd9d76f-6dfa-45bc-9a46-81e11265a7a1&page=1
R
Ankush
Hi,
I am trying to setup emails for my domain. This tutorial is really helping me since I am a non technical person. I have set up my live account and I am getting a message ‘You need to prove ownership of this domain by creating a DNS record. Use the settings below’.
When contacted a person where I have hosted my site, he is saying that the settings displayed here are for CPANEL and my sited is on DreamHost. DreamHost has its own CPANEL and that doesn’t support entries like ‘Priority: 10 (or High priority)’ etc.
Can you please guide us to take this forward.
Thanks,
Ankush
WPBeginner Support
Ankush dreamhost does support A records and Max records. For records ask the person managing your account to go to Mail » Custom MX in Dreamhost Panel. As for A or TXT records go to Domains and then click on DNS.
Admin
Ria Parish
I don’t suppose you’d still be able to use this email for Google+ and YouTube account though, eh…. Better than nothing, I guess.
Thanks for the alternative!
princess
Hi I set up my domain via Godaddy.com..and I already have my live mail set up. My question is: When I tried replying to the email my replies bounces back. what could be the problem?
WPBeginner Support
seems like you have not correctly configured your site to use Outlook’s mail servers.
Admin
Verma
Hi- I did a setup of outlook.com with my domain. All seems to be working fine except i am not able to get emails from MS Outlook. If it is possible to access email via MS Outlook app please let me know.
Paul Jones
Great article thanks.
We run a mail server and batch import mail into a sql server database. Would it be viable/possible to switch our mx to outlook.com and forward all inbound and outbound email to our mail server so that we can still import mail into sql?
WPBeginner Support
Sounds doable. But make sure before you implement it.
Admin
Chris
Hi, I just created an outlook email admin account with my own domain name. i create 2 users. Will I be able to see the emails sent to the users I created? If so, how do I enable that feature? Thank you Great article by the way. Thanks.
sivakumar
Now showing it
You can create up to 50 accounts in your domain.
How to create 500 accounts
WPBeginner Support
Contact outlook support for more accounts.
Admin
david
If you want users to use mail.yourdomain.com to sign in for email address, then you can create a CNAME record in your domain’s custom DNS settings or in cpanel’s Simple DNS Editor. Enter Mail in the Name field, and enter subdomain in CNAME field, e.g. mail.example.com.
this is not well explained. Could you please…
WPBeginner Support
Using a subdomain will allow users to sign in to their accounts by typing in your domain name instead of outlook.com.
Admin
kaycee
please how can i create the sub domain
kaycee
If you want users to use mail.yourdomain.com to sign in for email address, then you can create a CNAME record in your domain’s custom DNS settings or in cpanel’s Simple DNS Editor. Enter Mail in the Name field, and enter subdomain in CNAME field, e.g. mail.example.com
…..Please can you provide a guide on how to create this? cos am using ipage and they said its not possible for me to have mail.businessname.com
thank you
Kelly
Hi, thanks for your tutorial.
So after a week of waiting for the service to become active it is now saying that “Your service is suspended. Please make the required DNS changes.” Can somebody please help?
Letitia
I’m having the same problem
Asad
Currently outlook allows 50 free Email addresses. If I need more Account then what is the procedure ?
WPBeginner Support
Contact outlook support and they will extend your user account limit.
Admin
Tihomir Valkanov
Very good article!!! It save me a lot of time Thank you!
phil
Hi I have a question, I bought my domain name off Godaddy, but I built the site and its being hosted by wix.com, I want to use my own domain with outlook so who do I update my mx and txt with godaddy or wix?
Hope to hear from you soon
Phil
WPBeginner Support
Go Daddy if your domain is controlled by GoDaddy.
Admin
Murali
Thank you. I also got good email service.
Lynn Jackson
Awesome post! Very user-friendly. This was almost effortless. I was up and running after about 10 minutes! Thanks.
JANARTHANAN
Hi Syed, as said earlier I’ve done setting of my domains mails on outlook.com. Let me know how to configure this on blackberry and iPhone devices.
Thanks – Janarthanan
tilak
I want to view my old mails from my previous employers where we were using Outlook server. I have those .pst data files in my external hard disk. But don’t know how to configure them in Outlook 2013. Could any one please help me on the step by step guide. thanks.
Haseeb Ahmad Ayazi
Guys the New UI of outlook is tooooo slow. While loading it makes my PC also slow. Outllook can compete Gmail but will loss badly only due to his loading speed.
Jon Adams
Check your computer. Due to the new Gmail compose debacle, I have been testing Outlook.com for the past few months in case Google makes the change permanent and mandatory. The only reason I don’t make the switch now is six years of company emails in twenty accounts. Not to mention everything that lives in Google Drive.
The Outlook UI is vastly superior to Gmail even without consideration of the new compose.
Kunal
I already have an email account on Google Apps, if I were to move to Outlook, what would happen to emails that I already have in my existing accounts on changing the MX record ? Do I have to transfer my emails from google apps to outlook?
quocnt
Thank you. I have successfully setup my professional email.
But can I go to mail.mydomain.com to check mail or must I go to outlook.com every time?
Ana
Hi,
I followed the steps and everything went fine. But when I started using the email, I can send emails, but not receive them. Any idea what can be the issues?
Thanks!
hunter
I have the exact same problem. help
JANARTHANAN
Hi Ana,
Have you got the solution, did your mail work fine on both send & receive ways!
If you got the solution pls let me know.
Thanks
Ankush
Hi Ana,
Did you get solution to your problem? Are you able to send/receive from your new email account. Please guide us as well.
Thanks,
Ankush
Leon
Hi! I finally finally got to the last part.. I had to login using my old @live.com account, I never saw the DNS options when trying to signup using just my domain name http://hempconnection.net
Anyways I was able to create an info@ email for my domain, but now where do I go to login? I tried mail.mydomain.net and I just see the last page I was on showing the emails I created, but not able to actually access my new email
Leon
Screw this, Outlook and Microsoft sucks… I’ve been trying for 3 hours.. this is freaking ridiculous
marco
Me too, I’ve been trying for 3 days using chrome, maybe I should try using I.E.
JANARTHANAN
Hi Syed,
I have my website already set up at windows live admin center and the emails are already in use by users.
But now i planned to migrating my domain from godaddy to a Blue Host (i came to know about the cheapest and best service of this host by reading your site), what should i do so the emails will not be deleted and users can continue using the same mails.
Pls give me clarification thru email or on you blog. It will be very helpful for me and all others.
Thanks in advance
Janarthanan
Editorial Staff
In your bluehost account setup the MX records. Then do the transfer, and it will work.
Admin
JANARTHANAN
Hi Buddy, Thanks for the info. But i’ve a doubt, before transfering a domain from Godaddy how can i setup MX records in Bluehost for the same domain. PLs explain as i was a newbie on this field.
Thanks
Editorial Staff
In the DNS settings in your Bluehost cPanel, you can specify MX records. Bluehost support will be able to help you with this.
JANARTHANAN
Hi Syed,
Thanks for your info, i followed your tuts, also as per your comment i get details from Blue Host too. Now i successfully transferred my domain. And all my emails associated to it (functions on outlook.com) work fine.
Thanks once again for your great tuts.
Janarthanan
Tuyen
Hi I set up my professional mail on outlook.com, it’s work fine for about a month but now when I send email to client it alway have hotmail_77425feceaf13aa1@live.com on behalf of my email, pls advise how to remove (hotmail_77425feceaf13aa1@live.com on behalf of my email)
hope to hear soon
all the best
WPBeginner Support
Please contact outlook support, they would be able to help you better.
Mohamed
Guys,
Be careful when trying to create a “professional” email account that uses your domain; particularly when using Microsoft Outlook/Live/Hotmail…. It will send your email to the recipient, on receipt of your email the recipient will see “hotmail [a random number]@live.com ON BEHALF OF yourname@yourdomain,com”. This is not professional at all. Its actually less embarrassing than using a regular free @hotmail.com.
O, and Microsoft has no plans to correct this! I’ve tried several forums and made multiple requests.
All the best.
Ed Fishman
This isn’t true as far as I can tell. I have a couple of domains that use Outlook.com and all of them send as the actual sender. No ‘On Behalf Of’ appears anywhere – either in From: or even hidden in the message headers.
Now that Google isn’t offering a free version of Google Apps, Outlook.com is still your best bet for setting up a free, non-pop, e-mail system that can use your own domain.
Ed
Verna
Are u sure about this, does yourname@yourdomain.com not appear in the recipient mail?
Glenn F
Thanks for posting this Mohamed. There is no way I plan on using this now.
Joshua Caluette
If you follow the directions and confirm that your DNS is configured properly and you are not sending your email through your live account as an alias of your professional domain, then this does not happen. I have mine setup and it works just fine. I have seen similar issues on Google Apps as well, but it is always due to mis-configuration.
Marco
I need a catch all alias to be sure to receive all the email adressess i used in the past…. How do i setup a catch-all with live domains? Can’t find it.
lmcpa
When switching from a paid hosted version with godaddy is there a way to save or move emails from the godaddy service to this free outlook.com setup?
Editorial Staff
Not entirely sure about that. Perhaps asking Godaddy would be best. Usually it is hard.
Admin
pishka
I have my website already set up at domains.live.com and the emails are already in use by users. Currently i’m migrating my domain to a new host, what should i do so the emails will not be have to be deleted and users can continue using the same mails?
If i add the mx records on the new host i can continue to use the mails on the same domains.live.com account I had?
Pls reply its important
Thanks
nick bacon
Hi, I am following the instructions but when i get to the screen that will give you a choice to either use an existing Microsoft account to administer this domain or create a new Microsoft account on your own domain name, e.g. yourname@yourdomain.com.
I do not get this option, it automatically goes to a regular live sign in page?
any tips?
Muhammad Tauseef
Thanks you so much buddy.
Your article resolve my biggest problem.
God Bless You
Vivie
Hi, is it possible to have more than one administrator for one domain?
Thanks
Julia
Hi,
Thanks much for the tutorial, and I’ve set up the service successfully. However, for some reason, the interface is the old version of hotmail, which is very ugly. In case you wonder what the old interface looks like, here it is http://4.bp.blogspot.com/-kDpSR53bY5U/UBnXmDiySfI/AAAAAAAAAlo/PwjJaZhdAFA/s1600/2-hotmail.jpg
Is this the interface everyone sees? How do I change it to the better interface?
Thanks.
Editorial Staff
They said they are slowly moving users over.
Admin
pishka
on the right side drop down click on upgrade to outlook or something similar
Lauren
Thank you! Outlook’s support is slooooow, you’ve helped me set up my email accounts, and in the comments above I learned that I could delete and recreate an email account.
Stephanie
Great tutorial!!!!!!! Worked like a charm. Using Joomla CMS though & Hostgator
Thank you so much! We were using the free <10 google apps accounts and have been looking for a replacement for awhile now.
Christine
Im being asked to verify my account. Outlook is sending the verification email to the same account Im trying to access. Do you know a way around that or if I can contact Outlook?
Christine
Also, can I just remove the domain email and just start over?
Editorial Staff
Yes you can do that.
Admin
Carlos Rivera
I followed the steps above and after clicking refresh Windows Live Admin Center says the service has been suspended. Any ideas how to get this corrected?
tony
Thank you! These instructions are much better than on the Live Admin site. Thank you, thank you!
Serge Conus
Thanks for the awesome post. Google apps for personal use was an amazing toolset, I have been forced to create forwarders to my personal gmail account which works ok for a small site, but an organization needs something bigger. I will check out outlook’s pro mail choice.
Rich C
Anyone know why I’d be getting this error message for any domain I’m entering in:
“This domain name can’t be used because it contains a protected word or inappropriate language. Please contact support if you feel this is not the case.”
Aamir Rizwan
I get the following error :
This domain name can’t be used because it contains a protected word or inappropriate language. Please contact support if you feel this is not the case.
Editorial Staff
Not sure why that is. We would suggest that you contact their support like the error ask you to do.
Admin
Héctor
I had the same thing! I searched in their forums and there were few people who had the same issue.
Bikash
I have a created email address in Microsoft using my domain and
How to Manage the user account in my admin panel in Microsoft account. Is there any option to reset the user password and read the user inbox mail for admin.
thanks
Bikash
Scott
My problem is this:
Step 2: Setting up DNS MX Records to use Outlook.com
After the registration, you will reach Windows Live Admin Center’s domain control page and it will be showing MX and TXT record strings which you need to add to your DNS settings.
After the registration, it did not take me to any such page.
Noumaan Yaqoob
@Scott: you can find those strings by going to Your domains click on YourDomain.com and then click on Domain Settings link in the left sidebar.
If that doesn’t work, check the email you provided during registration for an activation email.
Scott
OK. Now I was working with the support people on hostgator to try and figure out this tutorial between the two of us. The support person at hostgator showed me where to put all the codelines from the Windows Live Admin Center. Their chat support allowed him to tell me exactly where to copy and paste the lines of code, and where to paste them.
So…….On to step 3. According to your tutorial, The Windows Live Admin Center should say, “Your service is active” after 48 hours. I obligingly waited the 48 hours, logged in again, and it still was inactive, so I saw that the Windows support says it can take 72 hours. Now a week later I log in, and all it says is: “Your service is Suspended. Please make the required DNS changes.” I was never able to get the thing to the point where it says, “Your service is active.”
So, please kindly tell me what’s going on.
Rudy
When I click on mydomain.com in the YourDomains area, I’m just brought back to the YourDomains area again. It doesn’t go to a page that gives me the settings, etc.
Ed Nailor
Syed,
This is a great article and one work really investigating. I was disappointed to see Google do away with the free version of their Google Apps for Business. I had not yet really looked into Outlook.com, but will certainly have to try this out so I can best recommend options to my clients. Thanks for bringing this to light!
Ed
Damien Carbery
I take a simpler method – just set up a forwarder in the hosting control panel. In my client’s existing free email account (Yahoo/Gmail/Hotmail) I add the new account I want to send email as. This sends a verification email which, due to the forwarder, arrives in the existing inbox.
An advantage of Yahoo/Gmail/Hotmail is that they are built in account types in iOS. You can select the From address on your iOS device. I will admit that you are not using your hosting company email servers.
Editorial Staff
That is one way of doing it, and we have already shown that method a long time ago. Sometimes, when using that it ends up revealing your “real email” that you were sending it from. Even though you can mask it so it can be sent from yourname@domain.com, it will show sent from you@gmail.com
Admin
Carlos Acha
Hello,
I have tried to follow these steps but there is no Get Started button anywhere, I do get a Login button but it only sends me to Live Login Page. The address I am visiting is: domains.live.com
Any help I will appreciate.
Best regards,
Carlos
Noumaan Yaqoob
@Carlos: It is right above the sign in button. You can also click here to get started.
Noumaan Yaqoob
@Haseeb Ahmad Ayazi : Outlook allows you to create up to 500 accounts on one domain name. However, if you reach that limit and you need more free email accounts on your domain then you can contact support to extend your free accounts limit.
@Raheem Khan: I would recommend that you stick with Google Apps and try outlook.com separately by creating a yourname@outlook.com account. That way you can decide which one you like better.
Haseeb Ahmad Ayazi
You! There must be a comparison. How much accounts are allowed in free version?
Raheem Khan
Now there should be a compartision between Google Apps and Outlook Professional Emails. And do tell us which one is better. Currently I’m using Google apps.