Un site web rapide est essentiel pour des internautes heureux et un bon classement dans les moteurs de recherche. En effet, les moteurs de recherche comme Google considèrent désormais la vitesse du site comme un facteur de classement important.
WP Super Cache est une extension populaire qui crée des fichiers HTML statiques de vos pages web. Cela signifie que votre serveur n’a pas à travailler aussi dur, ce qui rend votre site plus rapide à charger pour les internautes.
Nous utilisons des extensions de performance comme Cloudflare et WP Rocket pour améliorer la vitesse de WPBeginner. WP Super Cache est une alternative gratuite qui peut améliorer considérablement les performances, stimuler le référencement et améliorer l’expérience utilisateur pour les internaute.
Dans cet article, nous allons vous guider pour installer et configurer WP Super Cache sur votre site WordPress. Nous expliquerons chaque étape clairement, de sorte que même si vous n’êtes pas doué pour la technologie, vous pourrez suivre. À la fin, vous aurez un site plus rapide que les internautes et les moteurs de recherche apprécieront.
Qu’est-ce que WP Super Cache et pourquoi l’utiliser ?
WP Super Cache est l’une des extensions de mise en cache WordPress les plus populaires et les meilleures. C’est un outil gratuit et il a plus d’un million d’installations activées.
WP Super Cache fait une mise en cache de chaque page de votre site sous le formulaire d’un fichier HTML statique. Ainsi, lorsque quelqu’un visite votre site, il reçoit rapidement la version copiée au lieu de générer l’intégralité du site à partir de zéro.
En conséquence, la vitesse et les performances de votre site WordPress s’améliorent considérablement. Le plugin de mise en cache passe de nombreuses étapes en coulisses pour s’assurer que vos internautes n’ont pas à attendre que la page s’ouvre.
L’expérience des internautes sur votre site s’en trouvera améliorée. Un site qui se charge rapidement encourage les gens à le visiter plus souvent, ce qui se traduit par plus d’engagement et de conversions, car les utilisateurs/utilisatrices passent plus de temps sur vos publications et vos pages.
En outre, avec un site à chargement rapide, vous pouvez également voir un coup de pouce dans votre référencement WordPress et le classement des moteurs de recherche. C’est parce que Google donne un avantage significatif aux sites plus rapides, car il utilise la vitesse du site comme facteur de classement.
Maintenant, êtes-vous prêt à configurer WP Super Cache sur votre site ? C’est parti !
Réglages de WP Super Cache – la méthode la plus simple
La première chose à faire est d’installer et d’activer le plugin WP Super Cache sur votre site. Pour plus de détails, vous pouvez suivre notre guide sur l’installation d’une extension WordPress.
Dès qu’il est activé, WP Super Cache vous informe que la mise en cache n’est pas activée sur votre site pour le moment.
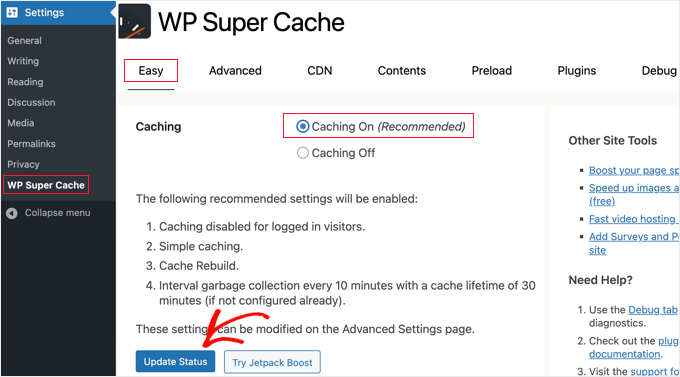
Pour activer le cache, allez dans Réglages ” WP Super Cache. Ensuite, sous l’onglet ” Easy “, allez-y et cliquez sur l’option ” Caching On “. Une fois que vous avez fait cela, cliquez sur le bouton ” Mettre à jour l’état “.
Après avoir activé le cache, vous devez défiler vers le bas jusqu’à la section “Cache Tester”.
Une fois arrivé, vous devez cliquer sur le bouton “Tester le cache” pour vérifier s’il fonctionne.
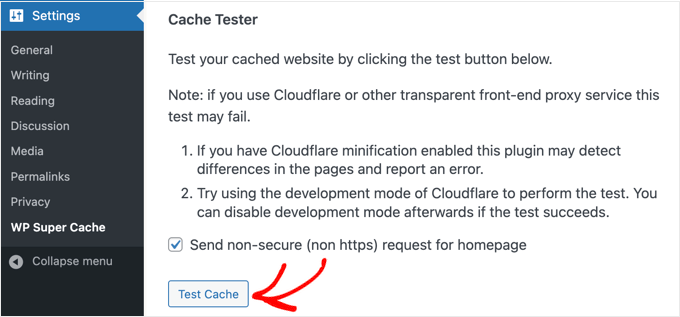
WP Super Cache va chercher votre site WordPress deux fois et comparer les horodatages des deux pages. Si les deux horodatages correspondent, cela signifie que la mise en cache fonctionne sur votre site maintenant.
WP Super Cache Advanced Setup (Configuration avancée de WP Super Cache)
WP Super Cache est une puissante extension WordPress qui est livrée avec des tonnes d’options avancées. Ces options peuvent encore améliorer les performances de votre site et vous donner plus de contrôle sur la façon dont le plugin mettra en cache votre site.
Activer la mise en cache
Pour configurer WP Super Cache avec des options avancées, allez dans l’onglet ” Avancé ” dans les Réglages du plugin WP Super Cache. Ensuite, cliquez sur la case à cocher ” Activer la mise en cache “.
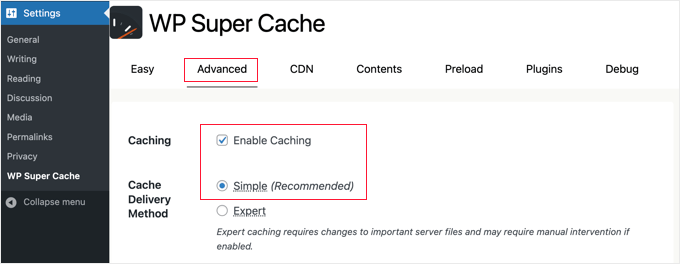
En dessous de la mise en cache, vous trouverez des options pour la “Méthode de distribution du cache”. Nous vous recommandons d’utiliser l’option “Simple” si vous êtes débutant et n’avez pas l’habitude de modifier les fichiers de votre serveur.
Après avoir choisi votre option de mise en cache, n’oubliez pas de cliquer sur le bouton “Mettre à jour l’état”.
Activer la compression dans WP Super Cache
La compression permet à WP Super Cache de servir les fichiers mis en cache sous forme de fichiers compressés, ce qui améliore le temps de chargement. Ces fichiers sont plus petits et peuvent être téléchargés par les navigateurs plus rapidement.
Pour activer la compression, défilez jusqu’à la section “Divers” de l’onglet “Réglages avancés” et cochez la case “Compresser les pages pour qu’elles soient servies plus rapidement aux internautes”.

Cliquez à nouveau sur le bouton “Mettre à jour l’état” pour enregistrer vos modifications.
Activer la mise en cache dynamique
Si vous souhaitez conserver certaines parties d’une page web dynamiques pendant la mise en cache, WP Super Cache propose une option à cet effet.
L’activation de la mise en cache dynamique est utile dans certaines modifications, en particulier pour les pages dont le contenu change fréquemment. Par exemple, vous pouvez accélérer les pages contenant des publicités en permettant la mise en cache dynamique.
Pour activer cette option, vous pouvez vous rendre dans la section “Avancé” et cliquer sur la case à cocher “Activer la mise en cache dynamique”.

Confirmez vos modifications lorsque vous avez terminé.
Configurer le délai d’expiration et le ramassage des déchets
WP Super Cache vous permet également de configurer le délai d’expiration et la fréquence de suppression des pages mises en cache sur votre serveur.
Pour commencer, il suffit de défiler jusqu’à la section “Délai d’expiration et collecte de déchets” sous l’onglet “Avancé” pour la configurer.
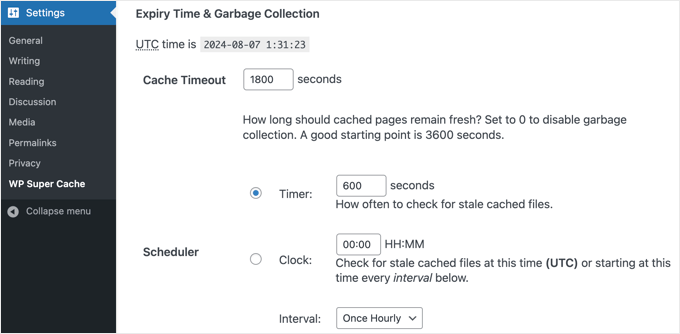
Le délai de mise en cache indique à l’extension de retirer la page mise en cache et de procéder à une nouvelle mise en cache. L’extension le définira à 1800 secondes par défaut, ce qui est idéal pour un site à fort trafic.
Cependant, si vous avez un site nouveau qui n’est pas très fréquenté, 3600 secondes est un bon point de départ.
En outre, vous pouvez planifier une heure à laquelle l’extension vérifiera la présence de fichiers mis en cache périmés et les supprimera.
Une fois vos sélections terminées, vous devez cliquer sur le bouton “Modifier l’expiration” pour enregistrer vos modifications.
Spécifiez les pages que vous ne souhaitez pas voir mises en cache
Par défaut, l’extension met en cache toutes les pages de votre site. Cela peut augmenter la taille de vos fichiers de cache et utiliser plus de ressources. Cependant, WP Super Cache vous permet de choisir les pages que vous ne souhaitez pas voir mises en cache.
Vous pouvez défiler vers le bas jusqu’à la section ‘Chaînes d’URL rejetées’ dans l’onglet ‘Avancé’ pour utiliser cette fonctionnalité. Dans la zone de texte, saisissez la chaîne d’URL des pages que vous ne souhaitez pas que le plugin mette en cache.
Par exemple, si vous avez un magasin e-commerce, alors vous pouvez exclure les pages que les internautes ne visitent pas souvent et enregistrer les ressources du serveur. Il peut s’agir de la page de commande, de la page de compte et de la page de remerciement.
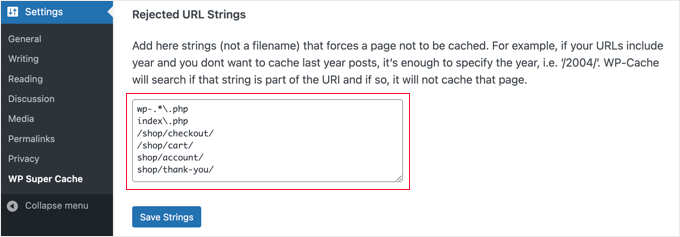
Lorsque vous avez terminé, n’oubliez pas de cliquer sur le bouton “Enregistrer les chaînes”.
Réglages de WP Super Cache pour qu’il fonctionne avec votre CDN
Si vous utilisez également un service de réseau de distribution de contenu (CDN) pour accélérer votre site, alors vous pouvez configurer WP Super Cache pour qu’il fonctionne avec lui. Sinon, vous pouvez passer cette section en toute sécurité.
Un CDN est un réseau de serveurs répartis sur différents Emplacements géographiques, qui aide à diffuser rapidement du contenu à vos internautes. Pour plus de détails, consultez notre infographie sur les raisons pour lesquelles vous avez besoin d’un CDN.
Astuce : Nous recommandons d’utiliser Cloudflare car c’est un fournisseur de CDN gratuit et facile à configurer. Consultez notre tutoriel sur la façon de configurer le CDN gratuit de Cloudflare sur votre site WordPress.
Pour configurer WP Super Cache afin qu’il fonctionne avec votre CDN, cliquez sur l’onglet CDN dans vos Réglages. Ensuite, cochez la case à côté de l’option “Activer le support CDN”.
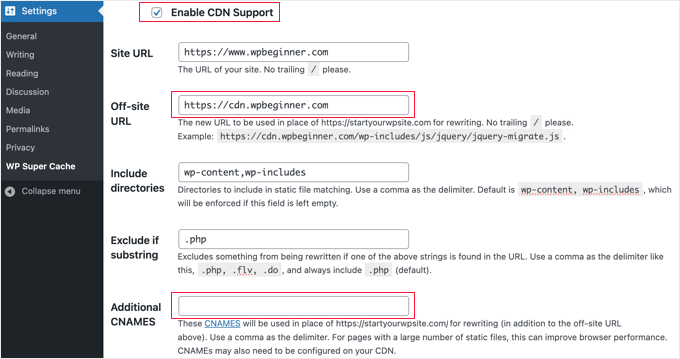
Vous devez ensuite saisir votre “URL inactif”. Il s’agit de la “zone d’extraction” de votre CDN, c’est-à-dire l’URL où vos fichiers sont stockés sur le CDN.
Le réglage dépend de votre service CDN, mais voici quelques astuces :
- Si vous utilisez Cloudflare, vous devez laisser ce champ vide. WP Super Cache détectera et fonctionnera automatiquement avec Cloudflare.
- Si vous utilisez un autre service CDN, vous devez saisir quelque chose comme :
https://cdn.wpbeginner.com.Confirmez que vous remplacez ‘WPBeginner.com’ par le nom de domaine de votre site. - En cas de doute, vous pouvez vous connecter à votre service CDN et vérifier le réglage du tableau de bord de votre compte pour “domaine”, “domaine CDN” ou “URL CDN”.
Si vous savez que votre CDN a plusieurs URL, vous pouvez les saisir dans le champ “CNAMES supplémentaires”, par exemple : http://cdn1.wpbeginner.com, http://cdn2.wpbeginner.com, http://cdn3.wpbeginner.com. Sinon, vous devez laisser ce champ vide.
Vous pouvez laisser les autres réglages par défaut. Dernier point, cochez la case “Passer les URL https pour éviter les erreurs de type “contenu mixte””, puis cliquez sur le bouton “Enregistrer les modifications”.
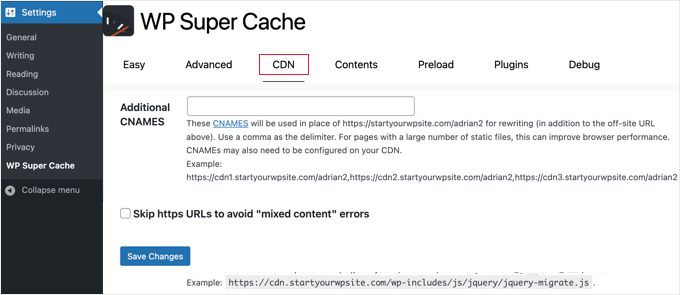
Votre site est désormais prêt à diffuser du contenu statique à partir d’un CDN.
Servir un site statique avec WP Super Cache
Le mode de préchargement dans WP Super Cache vous permet de créer des fichiers statiques super cache pour toutes vos publications et pages et de servir un site statique. De cette façon, votre contenu se chargera rapidement chaque fois que quelqu’un visitera votre site.
Un fichier statique en super cache aide à conserver les ressources du serveur, à servir un ancien site qui n’est plus mis à jour et à améliorer la vitesse du site en servant uniquement du contenu statique.
Pour commencer, rendez-vous dans l’onglet ‘Preload’ de l’extension WP Super Cache. Ensuite, vous pouvez définir le temps d’actualisation des fichiers de cache préchargés.
Par défaut, l’extension le définit à 600 minutes, mais vous pouvez diminuer le temps si vous publiez plusieurs articles chaque jour.
N’oubliez pas que le préchargement de l’ensemble de votre site WordPress prend un certain temps et consomme beaucoup de ressources de votre serveur. Vous pouvez le laisser à 0 si vous ne voulez pas que vos fichiers statiques expirent jamais, à moins que vous n’actualisiez manuellement le cache.
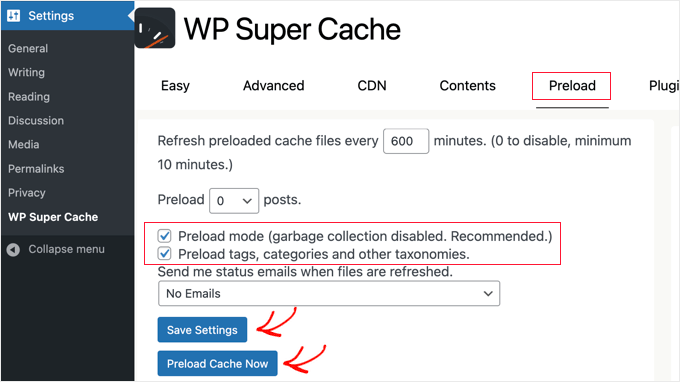
Confirmez ensuite que vous avez coché la case “Mode de préchargement (ramassage des ordures désactivé, recommandé)”. Vous pouvez également activer les préchargements pour différents identifiés, catégories et autres taxonomies sur votre site.
L’extension offre également une option pour recevoir des alertes par e-mail chaque fois que vos fichiers sont actualisés. Par défaut, il utilisera le réglage ” Aucun E-mail “, mais vous pouvez le modifier en choisissant une option dans le menu déroulant.
Lorsque vous avez terminé, enregistrez vos réglages, puis cliquez sur le bouton “Précharger le cache maintenant”.
Guides d’experts sur la mise en cache de WordPress
Nous espérons que ce guide vous a aidé à configurer WP Super Cache sur votre blog WordPress. Vous pouvez consulter d’autres articles similaires liés à la mise en cache sur WordPress :
- Comment corriger facilement l’avertissement de mise cache du navigateur dans WordPress
- Comment vider votre cache sur WordPress (étape par étape)
- Les meilleurs plugins de mise en cache WordPress pour accélérer votre site web
- LiteSpeed Cache vs. WP Rocket – Lequel est le meilleur ?
- Comment installer et configurer correctement WP Rocket dans WordPress
- Comment installer et configurer W3 Total Cache pour les débutants
- Le guide ultime pour booster la vitesse et les performances de WordPress
- Comment accélérer les performances de WooCommerce
Si vous avez aimé cet article, veuillez alors vous abonner à notre chaîne YouTube pour obtenir des tutoriels vidéo sur WordPress. Vous pouvez également nous trouver sur Twitter et Facebook.


Greg
Hi, I’d like to know whether your guidance to choose mod_rewrite to serve cache files still stands as opposed to using PHP or Legacy Caching. I notice since you published your article, WP Super Cache have changed their own recommendation from mod_rewrite to PHP.
Thanks in advance!
Greg
Dillon
Hi there. I’ve followed this tutorial to a T, and for the most part, everything works correctly, but I’m having two problems. First, when I make changes, they don’t appear on the site if I’m logged in. If I log out, they appear just fine. Second, I’m working on a WPMU network, and I only have the plugin installed on one site. But it’s caching the other sites on the network as well. How do I stop it from doing that? Thanks!
Belayet Hossain
This is an awesome guideline for new users.
It helped me a lot.
Thanks from the core of heart.
Sarah
Hi,
I followed your steps because my site was taking over 5s to load but after setting up the WP Super Cache my site wouldn’t load. At all. It was basic HTML – no content, no pictures, just the header…
So, I guess I’m wondering if there’s a laymen’s guide to literally all the terms you use cause I don’t understand websites or programming and I have a website for a start-up NGO so can’t really pay for any help at this point.
Or maybe you could direct me somewhere that will help me understand all this better? I’m a complete novice and confused easily!
Help!
Pedro Moreira
Hello,
I have a “conceptual doubt” about WP Super Cache, that I didn´t see answered neither in your site neither in other sites.
The question is: the structure of my site is finished. In basic terms, it is mainly a site of videos of football, which means that from this day on I will gradually add posts (that include the videos that I refered) and pages (of the teams).
Since that this will be a long and permanent process, I need right now to speed up my site because nowadays is very slow.
My doubt is: when I install and configue this plugin, what does that mean in terms of the updates that I will do in my site (post and pages that I add)?
I mean, if I cache the site today and tomorrow I add a new page or post, what do I have to do in order that these pages or posts will be also cached? – do I just have to require an update of the plugin? If so, how do I do that, is it possible to define that the plugin will update the cache for example once a week?
Thank you!
Best regards.
Bogdan
If i don„t use set up the CDN ,the wp super cache will be work properly ?
WPBeginner Support
Yes, it will work even without CDN.
Admin
Herman
I’m getting an error on the first step where you need to click on caching on and update. You mentioned the following in your article:
“WP Super Cache will fetch your WordPress site twice and will compare the time stamps of both pages. If the both time stamps match then this means that caching is working on your site now.”
This is the place where I get the error. I get a message that says:
Fetching to prime cache: OK
Fetching first copy of FAILED
Fetching second copy of : FAILED
I would be glad if you could help me out.
Sofor
Thank you so much, It works great for me.
Teddy
My site is a coupon site, so code is included on the coupon so it prints out by itself without lots of other junk that is on the page. If I use WP Super Cache, will that code be lost because it’s now a static page? Will people still be able to click on the coupon to print just the coupon?
WPBeginner Support
Hi Teddy,
You will have to test it out first on your computer or in a staging environment.
Admin
Alex
Thanks so much for the the help. Do i have to create a cname record to use the CDN service in WP super cache. Thanks
Stefan Andonov
Hi,
How to preload for several languages, I am using qtranslate, that seems impossible, right?
10x
Stefan
John Johnson
This is an ecommerce site using Exchange from iThemes. With WP Super Cache activated certain pages that need to be refreshed don’t get refreshed i.e. Empty Cart. When you Empty Cart it comes back with the same content or in other words it appears unemptied.
When I deactivate WP Super Cache the problem disappears. It was suggested that I Whitelist the pages that shouldn’t be cached. I am uncertain about how to do that. Any help would be appreciated.
Regards,
John
Dajuan
WP Beginner Staff, when a theme update is applied, or when other plugin updates are made, is WP Super Cache alerted to create new cached versions? Or does the plugin wait until “Expiry Time & Garbage Collection” or a manual cache deletion?
Iosif
Hello,
I am using WP Super Cache, but it seems that my images don’t get cached. Any ideas on how to configure this?
I did have a lazy load plug-in, but it conflicted with my theme, so I deactivated it…
shubhendu
I have just install wp super cache plugin by reading your article but nor js,css and image is not loading at my blog…plz help my site address is
If you dont want to publish is comment because i include my site link PLEASE reply to my email id.
Thanks.
WPBeginner Support
Seems like you have already resolved the issue.
Admin
madhavi jha
hi , i am regular reader of your site , i have setup WP Super Cache plugin as you guide in your blog , but its not working its show only 20/100
please guide me ,i have been tried to solve this problem since last 2 days , please guide me .
nitai roy
Hi,
I followed as you mentioned here. Everything has done perfectly but I could not find this option: “Enable Compression in WP Super Cache:”
Where is it please?
Also, Now how can I know whether it is working perfectly or not?
Thank you very much.
Patel Shoeb
How to Install and Setup WP Super Cache with CloudFlare CDN?
kurakaniz
after updating the plugin it says “.htaccess file may need to be moved” and this error too
A difference between the rules in your .htaccess file and the plugin rewrite rules has been found. This could be simple whitespace differences but you should compare the rules in the file with those below as soon as possible. Click the ’Update Mod_Rewrite Rules’ button to update the rules.
what to do please help
Ron
Same problem here.Anyone help
stephen
I installed everything just as you said but I am still getting 52sec load time and if I tried using gtmetrix I get an error saying the URL does not appear to be an HTML.home page . please help site is
Megan Good
This article was very helpful, and I was able to troubleshoot my issues based on your suggested settings. Thank you for the info!
Omprakash Jaiswal
wp super cache does not work
Permlink Structure Error
A custom url or permalink structure is required for this plugin to work correctly. Please go to the Permalinks Options Page to configure your permalinks.
Hammad
Thank you for your suggestions, I’m trying to apply these settings on my website now. Can you please advise if wp super cache supports minify settings.
I had wp3 total cache and had a score of 97/81 on gtmetrix, after installing wp super cache my score decreased to 82/68.
Imran
Was looking for some great guide for super cache plugin. Now I will try it on my test site.
Thanks for such a nice tutorial
Robert Connor
Some great tips-now i need to go back and fix my site
User
How do I get it to work for Mobile without changing the theme?
cezars
Any info for Rejected User Agents list from the plugin ?
herb
Installed it and got a lower grade E/D on Gtmetrix…switched to W3TC and it gave me and A/B grade.
efiga
Hi
i have a little question , when using this plugin to cashe pages , the google adsense ads will be cashed too ? ,it will show the same ads ?
thank you in advance
WPBeginner Staff
No your Google Ads will not be cached.
shadow
does nothing for me
avisdupublic.net
Hi, Thank you for this outstandly good article. However, I am facing several issues with WP S. Cache.
The website is : avisdupublic.net
1°) My Home page is a static one. However, when a new article is published, the /home must be changed (new article in the slider and so on). However, it is no the case! Moreover, when I just “update” this static page, by a strange miracle (not so strange because with the update, the cache-page is flushed), the /home becomes “normal”.
2°) From 1°), I decided to tick the Pages, Front page, Is_home in the rejected ones. However no changes appeared in the /home.
Do you have an idea where could be the problem ?
Bests,
(sorry for the poor english)
Farcas Gelu Danut
I’m sorry for my poor English language.
I use now WP Total Cache, CDN is Cloudflare, shared hosting.
Specialists working at hosting company I recommend using wp super cache to replace the WPTotal Cache. What is your opinion?
WP Total Cache internet is recommended, considered superior WP Super Cache.
I use Google translate for this comment. Is OK?
WPBeginner Support
Farcas, W3 Total Cache and WP Super Cache are both good plugins.
Admin
Nguyen Duc
Thanks for post, but i have a problem below:
Warning! Could not update /home/d2c45a95/public_html/wp-config.php! WPCACHEHOME must be set in config file.
Warning! /home/d2c45a95/public_html/wp-content/advanced-cache.php does not exist or cannot be updated.
1. If it already exists please delete the file first.
2. Make /home/d2c45a95/public_html/wp-content writable using the chmod command through your ftp or server software. (chmod 777 /home/d2c45a95/public_html/wp-content) and refresh this page. This is only a temporary measure and you’ll have to make it read only afterwards again. (Change 777 to 755 in the previous command)
3. Refresh this page to update /home/d2c45a95/public_html/wp-content/advanced-cache.php
If that doesn’t work, make sure the file /home/d2c45a95/public_html/wp-content/advanced-cache.php doesn’t exist:
1. Open /home/d2c45a95/public_html/wp-content/plugins/wp-super-cache/advanced-cache.php$wp_cache_file in a text editor.
2. Change the text CACHEHOME to /home/d2c45a95/public_html/wp-content/plugins/wp-super-cache/
3. Save the file and copy it to /home/d2c45a95/public_html/wp-content/advanced-cache.php and refresh this page.
How to fix it, bro
Joe Capone
I have Super Cache working…the contents show all of the pages in the cache. It has increased our site speed.
the site is insuringincome.com
For some reason, when I enter additional cnames and use http://content1.insuringincome.com,….
Comma separated from content1-content10 (confirmed that all cnames are created in CloudFront districution)….I get a 404 error when saving.
I have tried many different settings…nothing prevents the 404 from trying to save with additional cnames.
Thoughts?
WPBeginner Support
Please checkout WP Super Cache documentation on how to set this up.
Admin
Borislav
Hi Guys!
First sorry my English, because it is not very good!
I use wordpress and Boozurk theme version 2.02.
I have a little problem and i want little help!
The problem is: when i use my phone and surfing my site, sometimes the theme not switch to mobile view and everything in my site is with wrong view.
I also use WP super cashe plugin. When i activate the cashe and continue surf the site, then the theme not switch to mobile view and show me a desktop view of the site.
When i deactivate WP super cashe plugin and delete the cashe the view of the site on my phone is perfect. The theme switch to mobile view.
Is there any settings of WP super cashe plugin that i have to make, and when i make them the people who surf my site with mobile phones or tablets,
to surf mobile view of the site, not the cashe page of desktop view.
I hope you will understand me! Thank you!
WPBeginner Support
Borislav, it seems that your theme uses php to detect mobile users and then switches the theme. When you are using WP Super Cache, it displays the standard theme from the cache, so the part where your theme detects and displays mobile theme is not executed. Your theme’s developer can help you better in this regard, or you can also try WP Super Cache’s support tab.
Admin
pipdig
Really useful, thanks! We managed to get one of our website’s loading time down from 6+ seconds to 0.8 using a combination of WP super Cache and Cloudlfare’s Rocketloader. Amazing!
Ali
by using this i wen from 82 to 92 on google page speed test thanks http://www.3maniac.com
Thomas Frenkiel
I wanted to use mod-rewrite for a website that has WordPress installed in a subdirectory.
This seemed to cause a problem (only homepage was showing). What kind of thing is best to do in this case? Is there a way to use mod_rewrite on a sub directory?
Thanks in advance.
WPBeginner Support
There could be various reasons. There could be a conflict with .htaccess file in the parent directory or a comment missing # sign in your .htaccess file. You better post in plugin’s page under support tab.
Admin
Shantanu
Hi Sir ,
Thanks for the post. I have a question , When i update or publish a post or page it does not appear on the homepage. This happens due to Wp Super Cache. Please help !
WPBeginner Support
Shantanu, you should check your wp super cache settings. If everything seems to be setup correctly then you are probably viewing a cached page from your browser.
Admin
Shantanu
Thank You , So Much for the Help! My Blog now has a Rocking Speed.
Thanks Once again!
Muhammad Waqas Baig
Hi, I have tried settings you recommended but there is not speed improvements. Can you please guide me further. I used GTMetrix and here is my blog
http://www.pakfocus.com
WPBeginner Support
The server load and responsiveness is an important factor in site-speed. Leverage browser caching and try to minimize loading external scripts or images.
Admin
Sandra
Hey guys,
Thanks for the great blog. I just found it and I am definitely saving this one in my favorites! Keep up the good work.
Here’s my question:
When I try to access the WP Super Cache Settings I get the following message:
Permalink Structure Error
A custom url or permalink structure is required for this plugin to work correctly. Please go to the Permalinks Options Page to configure your permalinks.
—
I used these 2 methods to access the Settings:
1. Plugins -> WP Super Cache -> Settings
2. Settings -> WP Super Cache
But I still get the error message.
How can I access the Settings to install the plugin?
Your help would be greatly appreciated,
Sandra
WPBeginner Support
WP Super Cache requires that you use custom permalinks. We have a guide on how to enable custom permalinks or SEO friendly URL structure. Basically what you need to do is go to Settings » Permalinks and choose a custom link structure for your articles.
Admin
george
hi ,
i tried to use w3 total cache in my website as in all websites it was suggested as the best , but when i put in my site http://www.foodintolerance.gr everything went wrong!!!! i had a white blank screen everywhere site and admin panel , lost my mind until my provider had to make some changes to the .htaccess. i would recommend really big attention . will i have the same problems with the super cache for beginners??
thank you
WPBeginner Support
Yes you might have faced similar or some other problems with WPSuper-Cache as well. We understand that it is a bit complicated for beginners to setup a caching plugin. That’s why we have this step by step guide. As for blank screen we have some tips on how to fix WordPress white screen of death.
Admin
Pankaj Sinha
I used WP Super Cache and the performance in pingdom downgraded.
Earlier load time was 4 sec but now it is 27 sec.
I am new to wordpress so not sure if I should continue on this.
Please test samsunguser.com yourself.
Editorial Staff
It could be due to many things (plugins, hosting, etc).
Romeo Rjas
Can I use WP super cache for wp blog that host on VPS? My friend said that WP super cache can cause some problem when it’s installed in wp site on VPS hosted. Thank you
WPBeginner Support
yes you can.
Admin
Tomé Mendes
Hi there,
I used W3 Total Cache in the past, but for some reason I started having problems with it. Maybe the reason was a miss-configuration of the Plugin.
Anyway, I decided to allocate all the images and files of my website in a subdomain like files.domain.tld
So now I just want to know something. After applying this steps to my website it will create a cache of the main content of my domain. Posts, Categories, etc…
What about the files in the subdomain, how can I reduce load time of them? Should I apply CloudFlare only on the subdomain or whole website?
The website is: http://www.ridfick.com (if possible take a look of what can be done)
Thanks
Editorial Staff
The plugin will create a cache of your page content. However, browser caching won’t be setup properly because you have media files in a subdomain.
We don’t use cloudflare, so baring that in mind it would make sense to apply it to the whole site.
Admin
Qasim
Hi,
Thank you so much for this great tutorial, I am just confused on WP super cache CDN settings. Do you need a CDN network like MaxCDN to be used with WP super cache or WP CDN works alone, where you will get the CNAMEs URLs. Also do you recommend using the plugin with cloudflare.
Editorial Staff
The whole purpose of having CDNs is to utilize third-party cloud servers to reduce the load on your main server. Simply creating cname records on your main server won’t do much good. We don’t use Cloudflare, but you can if you like.
Admin
Abdullah Salisu
I don’t av any cache plugin installed on my blog. that explains why my blog load’s slow.
Now i know. WP Super Cache is gonne be my next plugin to install on my blog…
Thanks and kudos to the ceo.
Robert Anderson
Hi Guys thanks for the plugin but its way out of my league to install. It does show me just how much I have to learn . I keep all your emails so I wll have a go at this once I gain a bit more know-how. Keep up the great work lads.
Robert
Suresh Khanal
Hi Geremy,
I did everything except CDN, but whenever I enable WP Super Cache, the post content is not displayed. It displays only the title and comments. If I disable caching everything is fine again. I’m troubled with this problem and could not find any solution yet.
Jeremy Myers
I love WP Super Cache. I use pretty much the same settings you do to get my blog to load in less than 2 seconds. Still working on getting it down to less than 1 second, but that requires further tweaks…
Edward Black
Maybe you can describe in a few sentences, what the difference between WP Super Cache and W3 Total Cache is?
I use W3 Total Cache since my first WP-Project and it works ok. I started with only the basic settings and later I installed server modules like memcache… but a thing that never worked for me is the minification of css. It breaks every theme I ever used.
Edward