WP-config es uno de los archivos más potentes de su sitio WordPress, y juega un importante perfil en el funcionamiento de WordPress.
Aquí en WPBeginner, hemos estado jugando con WordPress durante años y hemos descubierto algunos trucos de configuración de WordPress muy útiles que la mayoría de los principiantes no conocen.
Tanto si tiene problemas de memoria como si necesita mejorar la seguridad o acelerar el flujo de trabajo de desarrollo, los retoques adecuados a la configuración de WP pueden transformar el funcionamiento de su sitio.
En este artículo, compartiremos algunos de los trucos de configuración de WordPress más útiles que le ayudarán a solucionar problemas, optimizar y proteger su sitio de WordPress.
¿Cómo utilizar estos trucos de configuración de WordPress?
WordPress viene con un potente archivo de configuración llamado wp-config.php. Se encuentra en la carpeta raíz de cada sitio de WordPress y contiene importantes ajustes de configuración.
Para obtener más información, consulte nuestra guía sobre cómo editar el archivo wp-config.php en WordPress.
Todas las mejores empresas de alojamiento de WordPress vienen con instalación de WordPress en 1 clic, lo que significa que nunca tendrá que editar el archivo wp-config.php durante la instalación. Esta es la razón principal por la que muchos usuarios no están familiarizados con el potente de este archivo.
Puede utilizar el archivo wp-config para diagnosticar, optimizar y proteger su sitio de WordPress.
El archivo wp-config.php es una potente herramienta, y un pequeño error en el código puede hacer que su sitio web sea inaccesible. Solo debes editar este archivo cuando sea necesario y crear siempre una copia de seguridad completa de WordPress antes de realizar cualquier cambio,
Dicho esto, vamos a echar un vistazo a algunos trucos prácticos de configuración de WordPress que puede utilizar en su sitio web de WordPress. Puedes usar los enlaces rápidos de abajo para saltar directamente a los trucos que más te interesen:
- The Basic WordPress Configuration Settings
- Adding Security Keys in WordPress
- Change WordPress Table Prefix
- Turn on Debugging in WordPress
- Changing Your Site or WordPress Address
- Override File Permissions
- Changing Post Revision Settings
- Changing WordPress Trash Settings
- Adding FTP/SSH Constants to WordPress Configuration
- Allow Automatic Database Repair
- Increase PHP Memory Limit
- Moving wp-content Directory
- Use Custom User Tables
- Enable Multi-Site Network
- Securing Your WordPress Configuration File
1. Los ajustes básicos de configuración de WordPress
Por defecto, sólo tiene que rellenar los ajustes de la base de datos durante la instalación de WordPress. Si no tiene un archivo wp-config. php, se le pedirá que cree uno rellenando la información de su base de datos.
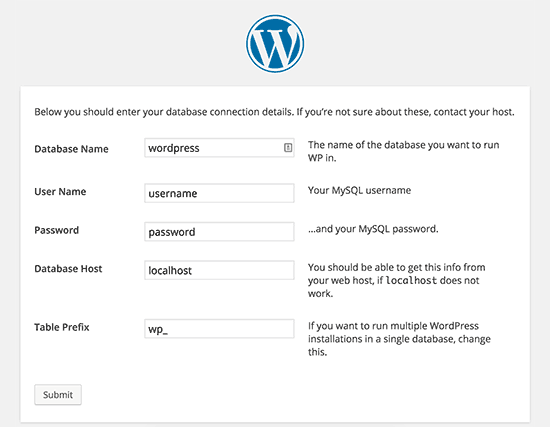
WordPress intentará guardar automáticamente estos ajustes generando un archivo wp-config.php. Sin embargo, si falla, tendrás que añadirlos manualmente.
Para ello, deberá conectarse a su sitio web mediante un cliente FTP. Una vez conectado, tendrá que cambiar el nombre del archivo wp-config-sample.php a wp-config.php.
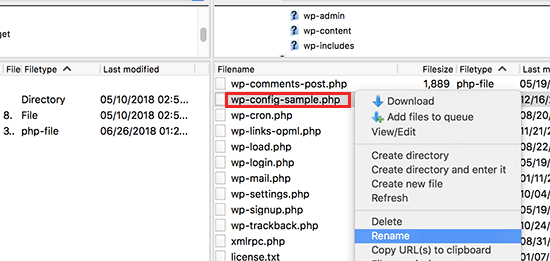
Después de eso, puede seguir adelante y editar el archivo wp-config.php recién creado. Tendrás que añadir la información de tu base de datos cambiando las siguientes líneas:
1 2 3 4 | define('DB_NAME', 'database-name');define('DB_USER', 'database-username');define('DB_PASSWORD', 'database-password');define('DB_HOST', 'localhost'); |
No olvides guardar los cambios y volver a subir el archivo al servidor.
2. Añadir claves de seguridad en WordPress
La instalación por defecto de WordPress añade automáticamente claves de seguridad a su archivo de configuración. Estas claves de seguridad se utilizan para añadir una capa de seguridad adicional a su login en WordPress y a la identificación de cookies.
Siempre puede regenerar las claves de seguridad si cree que alguien puede estar accediendo a su sitio web sin la debida identificación. Si cambia las claves de seguridad, saldrán todos los usuarios conectados.
1 2 3 4 5 6 7 8 | define( 'AUTH_KEY', 'put your unique phrase here' );define( 'SECURE_AUTH_KEY', 'put your unique phrase here' );define( 'LOGGED_IN_KEY', 'put your unique phrase here' );define( 'NONCE_KEY', 'put your unique phrase here' );define( 'AUTH_SALT', 'put your unique phrase here' );define( 'SECURE_AUTH_SALT', 'put your unique phrase here' );define( 'LOGGED_IN_SALT', 'put your unique phrase here' );define( 'NONCE_SALT', 'put your unique phrase here' ); |
Para más información, consulte nuestro artículo sobre las claves de seguridad de WordPress y cómo utilizarlas.
3. Cambiar el prefijo de la tabla de WordPress
Una instalación típica de WordPress por defecto añade un prefijo wp_ a todos los nombres de tabla de la base de datos de WordPress. Algunos expertos en seguridad de WordPress creen que cambiar el prefijo de la tabla puede hacer que su base de datos de WordPress sea más segura.
Para ello, debe cambiar la siguiente línea en la configuración de WordPress.
1 | $table_prefix = 'wp_'; |
Si usted está haciendo esto para un sitio web existente, entonces usted también tendrá que cambiar el prefijo de la tabla en su base de datos de WordPress. Para ello, consulta nuestro artículo sobre cómo cambiar el prefijo de la base de datos de WordPress.
4. Activar la depuración en WordPress
WordPress viene con una característica de depuración que le permite ver u ocultar los errores de WordPress en el modo de depuración. Para activar esta función, deberá añadir esta regla en su archivo de configuración de WordPress.
1 | define( 'WP_DEBUG', true ); |
También puede activar la depuración ocultando los errores de su sitio web y guardándolos en un archivo de registro. Para ello, añada las siguientes líneas a sus ajustes de configuración.
1 2 3 | define( 'WP_DEBUG', true );define( 'WP_DEBUG_LOG', true );define( 'WP_DEBUG_DISPLAY', false ); |
Esto creará un archivo debug.log dentro de la carpeta wp-content de su sitio web y almacenará todos los errores de depuración y avisos dentro del archivo de registro.
5. Cambiar la dirección de su sitio o de WordPress
Normalmente, puedes establecer tus URLs de WordPress y del sitio desde la página Ajustes ” General. Sin embargo, es posible que no pueda hacerlo si no tiene acceso a su sitio de WordPress, ve errores de redirección o acaba de trasladar su sitio.
En ese caso, puede cambiar las URL de su sitio y de WordPress a través del archivo wp-config.php añadiendo las siguientes líneas:
1 2 | define('WP_HOME', 'http://www.example.com');define('WP_SITEURL', 'http://www.example.com'); |
No olvide sustituir ejemplo.com por su propio nombre de dominio.
6. Anular permisos de archivo
WordPress le permite anular los permisos de archivo si su alojamiento tiene permisos restrictivos para todos los archivos de usuario. La mayoría de los usuarios no necesitan esto, pero existe para aquellos que lo necesitan.
1 2 | define('FS_CHMOD_FILE', 0644);define('FS_CHMOD_DIR', 0755); |
Para saber más acerca de los permisos de archivos, consulte nuestro artículo sobre cómo corregir el error de permisos de archivos y carpetas en WordPress.
7. Modificación de los ajustes de revisión de entradas
WordPress tiene una característica muy útil de revisión de entradas que le permite deshacer cambios en sus entradas y páginas volviendo a una versión anterior o a un autoguardado.
Puede desactivar o cambiar los ajustes de revisión de entradas a través del archivo de configuración. Aquí tiene diferentes ajustes de revisión de entradas que puede utilizar.
Puede cambiar la frecuencia con la que WordPress almacena un autoguardado como revisión añadiendo la siguiente línea:
1 | define('AUTOSAVE_INTERVAL', 120); // in seconds |
Algunos artículos de tu sitio pueden tener decenas de revisiones por entrada, dependiendo del tiempo que te haya llevado escribirlos. Si crees que esa característica te molesta, puedes limitar el número de revisiones por entrada.
1 | define('WP_POST_REVISIONS', 10); |
Si por alguna razón, desea desactivar la característica de revisiones de entradas por completo (no se recomienda en absoluto), puede utilizar el siguiente código para desactivar las revisiones de entradas.
1 | define( 'WP_POST_REVISIONS', false ); |
8. Cómo cambiar los ajustes de la papelera de WordPress
WordPress viene con una característica de papelera de reciclaje llamada Papelera. Cuando un usuario envía una entrada a la papelera, ésta queda almacenada en su sitio web durante los siguientes 30 días como papelera. Pasado ese tiempo, WordPress los borra automáticamente para siempre.
Puede cambiar este comportamiento modificando el número de días que desea conservar la papelera.
1 | define( 'EMPTY_TRASH_DAYS', 15 ); // 15 days |
Si no te gusta esta característica, puedes desactivarla añadiendo la función que aparece a continuación:
1 | define('EMPTY_TRASH_DAYS', 0 ); |
Nota: Usar cero significa que sus entradas serán borradas permanentemente. WordPress no le pedirá confirmación cuando haga clic en Borrar permanentemente. Cualquier clic accidental podría costarle…
Para obtener más información, consulte nuestro artículo sobre cómo limitar o desactivar la característica de vaciado automático de papelera en WordPress.
9. Añadir constantes FTP/SSH a la configuración de WordPress
Por defecto, WordPress le permite actualizar el núcleo de WordPress, temas y plugins desde el escritorio de administrador. Algunos alojamientos requieren una conexión FTP o SSH cada vez que intentas actualizar o instalar un nuevo plugin.
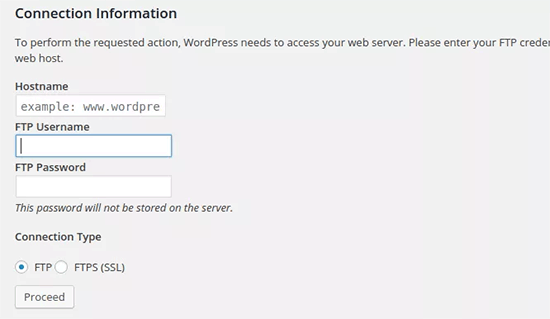
Usando los códigos, puedes establecer las constantes de FTP o SSH y no tener que preocuparte nunca más.
1 2 3 4 5 6 7 8 9 10 11 12 13 14 15 16 17 18 | // forces the filesystem method: "direct", "ssh", "ftpext", or "ftpsockets"define('FS_METHOD', 'ftpext');// absolute path to root installation directorydefine('FTP_BASE', '/path/to/wordpress/');// absolute path to "wp-content" directorydefine('FTP_CONTENT_DIR', '/path/to/wordpress/wp-content/');// absolute path to "wp-plugins" directorydefine('FTP_PLUGIN_DIR ', '/path/to/wordpress/wp-content/plugins/');// absolute path to your SSH public keydefine('FTP_PUBKEY', '/home/username/.ssh/id_rsa.pub');// absolute path to your SSH private keydefine('FTP_PRIVKEY', '/home/username/.ssh/id_rsa');// either your FTP or SSH usernamedefine('FTP_USER', 'username');// password for FTP_USER usernamedefine('FTP_PASS', 'password');// hostname:port combo for your SSH/FTP serverdefine('FTP_HOST', 'ftp.example.org:21'); |
Nota: No olvide sustituir la ruta de WordPress y ftp.ejemplo.com por la información de su propio alojamiento FTP.
10. Permitir la reparación automática de la base de datos
WordPress viene con una característica incorporada para optimizar y reparar automáticamente la base de datos de WordPress. Sin embargo, esta característica está desactivada por defecto.
Para activar esta característica debe añadir la siguiente línea a su archivo de configuración de WordPress.
1 | define('WP_ALLOW_REPAIR', true); |
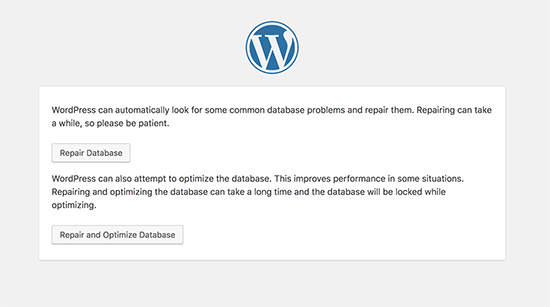
Después de añadir esto, debe visitar la siguiente URL para optimizar y reparar la base de datos de WordPress.
http://example.com/wp-admin/maint/repair.php
No olvides sustituir ejemplo.com por tu propio nombre de dominio. Verás una página sencilla con las opciones para reparar o reparar y optimizar la base de datos. No necesitas estar conectado para acceder a esta página.
11. Aumentar el límite de memoria PHP
Algunos de los errores más comunes de WordPress son causados por el agotamiento de la memoria PHP. Puede aumentar el límite de memoria PHP a través del archivo wp-config.php. Simplemente pegue el código de abajo:
1 | define('WP_MEMORY_LIMIT', '128M'); |
12. Mover wp-content Directorio
WordPress le permite mover su directorio wp-content. Algunos expertos creen que puede ayudar a reforzar la seguridad de WordPress.
Deberá añadir el siguiente código a su archivo wp-config.php:
1 2 3 4 | define( 'WP_CONTENT_DIR', $_SERVER['DOCUMENT_ROOT'] . '/blog/wp-content' );define( 'WP_CONTENT_URL', 'http://example/blog/wp-content');define( 'WP_PLUGIN_DIR', $_SERVER['DOCUMENT_ROOT'] . '/blog/wp-content/plugins' );define( 'WP_PLUGIN_URL', 'http://example/blog/wp-content/plugins'); |
No olvide sustituir ejemplo.com por su propio nombre de dominio.
13. Utilizar tablas de usuario personalizadas
Por defecto, WordPress guarda todos los datos de los usuarios en las tablas wp_users y wp_usermeta. Mediante la siguiente función, puede especificar la tabla en la que desea que se almacene la información de usuario.
1 2 | define('CUSTOM_USER_TABLE', $table_prefix.'my_users');define('CUSTOM_USER_META_TABLE', $table_prefix.'my_usermeta'); |
14. Activar red multisitio
Cada sitio de WordPress viene con una característica de multisitio incorporada que le permite crear varios sitios de WordPress utilizando la misma instalación. Para obtener más información, consulte nuestra guía completa sobre cómo instalar y configurar la red multisitio de WordPress.
Puede activar la funcionalidad multisitio añadiendo la siguiente línea a su archivo de configuración de WordPress:
1 | define('WP_ALLOW_MULTISITE', true); |
15. Cómo proteger el archivo de configuración de WordPress
Como puede ver, el archivo wp-config.php contiene ajustes de WordPress realmente importantes. Por defecto se encuentra en la carpeta raíz de WordPress, pero puede moverlo. Puede moverlo fuera de su directorio public_html, para que los usuarios no puedan acceder a él. WordPress sabe por defecto que debe buscar en otros directorios si el archivo no se encuentra en la carpeta raíz de WordPress.
También puede añadir el siguiente código a su archivo .htaccess para limitar el acceso a este archivo.
1 2 3 4 5 | # Protect wp-config.php<Files wp-config.php> order allow,deny deny from all</Files> |
Esperamos que este artículo te haya ayudado a aprender algunos trucos útiles de configuración de WordPress que no conocías. Quizás también quieras ver nuestra mega lista de los 57+ consejos, trucos y hacks de WordPress más buscados que puedes usar en tu sitio o nuestra selección de las mejores herramientas para freelancers, diseñadores y desarrolladores de WordPress.
If you liked this article, then please subscribe to our YouTube Channel for WordPress video tutorials. You can also find us on Twitter and Facebook.


tareq khury
hello and thanks for this important post .
my question is where i must add this codes , in the config.php file
but in which line exactly .
regards
WPBeginner Support
There is no specific line but it is normally best to add the code to the bottom so it is easy to find and remove should you want in the future.
Admin
Ali
Thanks alot. But i want to know something more detailed about point 9. Where to place this code and more?
WPBeginner Support
The code would go into your wp-config.php file
Admin
Gurjit Singh
Thanks for this useful post.
i was looking for this 10. Allow Automatic Database Repair.
Thank you very much.
Thanks and Regards,
Gurjit Singh
WPBeginner Support
Glad our article could help
Admin
Sunday
I rely on your tutorials for my website development. The problems here are that you did not state clearly where these codes will be pasted in the various environments. Looking forward to your response.
Sunny Sum
I want to increase my server timeout limit, where I can find that code???
Stu Rader
Wow really awesome. This helped so much.
I’m wresting with one thing setting up my own CDN (which the above took care of 98%:).
I’m trying to exclude a sub-folder on my CDN sub-domain as it’s throwing an access violation.
I’ve tried a half dozen NGINX CORS directives in a server block .conf with no joy.
I want to figure out how to use this file in the main domain rather than how it’s written below:
Access to Font at ‘https://cdn.mydomain.com/wp-content/themes/mytheme/includes/lib/assets/fonts/fontawesome/fontawesome-webfont.woff?v=4.7.0’ from origin ‘https://mydomain.com’ has been blocked by CORS policy: No ‘Access-Control-Allow-Origin’ header is present on the requested resource. Origin ‘https://mydomain.com’ is therefore not allowed access.
Thanks if you can point me to a fix or relevant info you may have !!
Stu
Hypez
They can verufy the information in the wp-config.php if the password or database names correspond and change them if not.
Gopal
My WordPress website adds weird numbers as suffix to every page URL. Why is it happening? I changed the permalinks settings to display post names; it didn’t help.
Could you please guide me?
Here are a few page urls of my site:
WPBeginner Support
Try these WordPress troubleshooting tips step by step and see if it resolves your issue.
Admin
Alex
I have this ‘issue’ – for me its down to backup buddy needing to be run in alternative WP cron mode. The backup buddy FAQ told me to add this:
define(‘ALTERNATE_WP_CRON’, true);
to my wp_config.php file which now adds random numbers etc to URLs.
Its this for me as removing it stops it but also stops backup buddy from working correctly.
David Pascal
I have always enjoyed reading contents on this site. Thanks for sharing this awesome tricks.
ugwu victor
I use useronline plugin…When am in the useronline dashboard I notice that some users want to access my default css, upload images link with their browser! So am scared may be they want to hack my site! Please any help on how to stop them
Exnius
Hey, amazint tricks, thanks a lot. Very useful!
Garratt Campton
WordPress Error Log –
How should I do this in a local environment?
I’m currently using DesktopServer (Xampp lite – Installs sites with .dev extension locally eg. “mysite.dev”) with SourceTree (Git) – However trying to figure out what the path I should be using to my error log file is proving difficult. Could I use a full URL path such as “http://mysite.dev/php_error.log” ? or does it need to be the system file path “C:/Users/Garratt/Documents/mysite.dev/php_error.log” ?
WPBeginner Staff
Yes.
German learning Munich
Hi thanks for the great summary!
I have a question: is any change in the wp-config immediately effective?
Angsuman Chakraborty
Yes, it is immediately effective
Nathan Pinno
Got a question: How do I transfer ownership of a site from one user to another? Like I set it up with my admin account, but I want to have another user be the main admin and do updates and posts. I doubt I can just set them as an admin and myself as a subscriber and be done with it, so what’s the correct route of doing so?
WPBeginner Staff
Yes that’s one way to do it. A WordPress site can also have multiple administrators.
If you also want to transfer them the ownership of domain, web hosting, and database then you will have to create a user account for them in your web hosting control panel. After that you can give them the complete control on domain, hosting, and database as well.
Nathan Pinno
They already have all that, I’m just helping them redevelop their website (cause it’s not a good look right now nor is it easy to update ATM). Found this awesome church theme for them (cause it’s my church’s website I’m working on), and wanted to see how difficult it would be to switch admins. Last time a site of mine had multiple admins, just the first admin (ID #1) could update the plugins, themes, and WP in general.
Anon
Im not too sure but usually u have to do it in your Terminal like : sudo adduser sudo.
john
After I got rid of the database error, now I dont have any errors but now I have just blank page with no source code ? Please help what to do now. Thnaks
Toufiq Hassan Shawon
Thanks, It helps me lot, why dont you add
define(‘WP_CACHE’, true);
roger
useful!
so, what about the Securing Your WP-Config File ? thank you
Oscar
Just a heads up, that the indicated GoDaddy Hostname doesn’t work (maybe at least not for everyone) and the $_ENV option didn’t either.
I found instructions on where to find my specific Hostname here:
http://support.godaddy.com/help/article/39/viewing-your-databases-details?locale=en
Maganizo
I can’t thank you more! You’ve touched on the heart of any online work in a very clear way! You’re great teachers indeed! It can’t be any better than this! Write more!
brad
Hey Guys
Great site, great info just found it. with the secure
Securing Your WP-Config File
where is the code that we need? please
Brad
Bon
is there any configuration in wordpress 3.5 so that the uploaded files will use the defined WP_HOME or WP_SITEURL? thanks
Heather Wood
Awesome. There is so much stuff about wordpress I didn’t even know. Like the repair database define code. this is one great article. I will have to bookmark this for sure.
yadicemil
Thanks for this useful tips.I!m a beginner and I have a wordpress.org web site.
I have followed your instructions and changed the wp-config file by copying the secure keys grabbed from the web site: https://api.wordpress.org/secret-key/1.1/salt/
After putting the new config file into the WP-Admin Folder in the server it gives an error “Parse error: syntax error, unexpected T_VARIABLE….”
That line is: “$table_prefix = ‘wp_’;” and it has never been changed.
How can I correct this error? Thanks.
wpbeginner
@yadicemil You are not supposed to put this in the wp admin folder.
Mark Hedley
Like it
marco
you rock man, thanks for the info
Tony Cosentino
Great information about such an important are as configuration. With all the pharma hacks going on recently the last tip is my favourite. Protecting that damn wp-config file seems to be the key to palace these days.
Thank you for the effort putting all of this information in one place for us all to benefit.
kind regards
Tony
Aidan
Cool, this is informative and always a good flashback if I forgot any of them.
Thanks for sharing!
Aminul Islam Sajib
What exactly does adding those # protect wpconfig.php… to .htaccess file do?
Do I have to do anything else after moving .htacess from public_html to root folder?
Editorial Staff
You will never move the .htaccess file anywhere. That file remains in your public_html folder or the folder where WordPress is installed… The code in that file will disallow all access to wp-config.php file from the web.
You can move the wp-config.php file to the root directory (one above public_html) to add an extra layer of security. One or the other would be fine… doing both is an overkill.
Admin
Andrew Nacin
For reference, 3.0 does not include more security keys, nor were 2.9 installs any less secure when it came to authentication.
The first four are keys. The last four are salts. The salts were missing from wp-config.php before 3.0, but we actually added salts a few versions ago. We added them to wp-config.php in 3.0 so we could easily populate them on install, but they are not necessary.
If salts are not defined (or remain the default, e.g. “Enter unique phrase here”), then WP simply generates random strings to use as salts and stores those in the database.
Also, for an error log, you should instead use these constants:
define( 'WP_DEBUG', true ); // Enables error reporting.

define( 'WP_DEBUG_DISPLAY', false ); // Hides the errors.

define( 'WP_DEBUG_LOG', true ); // Logs errors to wp-content/error.log (or use @ini_set('error_log') )
This has the added benefit of exposing PHP notices, which provide developers warnings about code that could be better or may have errors in it.
Editorial Staff
Thank You Andrew. Didn’t know about the SALT keys. Just saw it in 3.0 and thought it was a new addition.
Admin
Adam W. Warner
Very nice write up, and easy read for beginners. I’ll be sending people here to learn;)
Ozh
$_ENV{DATABASE_SERVER} ??
Syntax doesn’t look correct to me ($_ENV[‘stuff’] maybe but {stuff} I don’t think so) and I’ve just checked, couldn’t find any host I have access to that has this defined. Definitely not something common.
Other than this, nice roundup. Note that WP doesn’t look “in other directories” to find wp-config.php, it just goes one directory up (which is in most case out of the server document root).
gopalb
Thanks…. it’s really good tutorial…Can you write the detail step by step tutorial of “Securing Your WP-Config File” for us…
Editorial Staff
The last two steps are pretty easy to follow, but sure will add that one to the list
Admin
Carlos
Great article as always. I especially like the .htaccess file tip.
DaveK
Wow plenty there to get my teeth into, thanks WPB
Angie Bowen
Thanks so much for all of this great info. This is the side of WordPress I need to learn more about so I’m going to use this post as a springboard to really dive in.