En WPBeginner, utilizamos la CDN grande y rápida de Cloudflare para que nuestro sitio sea más rápido para los usuarios de todo el mundo. Esto nos ha ayudado a mejorar significativamente el rendimiento de WordPress, por lo que a menudo recomendamos Cloudflare a nuestros lectores.
Cloudflare es uno de los mejores servicios de CDN para WordPress disponibles en el mercado. Ofrecen una CDN gratuita que acelera tu sitio web y potentes características de seguridad para sitios web de pequeñas empresas.
Sin embargo, el proceso de configuración inicial de Cloudflare puede resultar difícil para los nuevos usuarios.
En esta guía, le guiaremos a través de una configuración completa de Cloudflare en WordPress para ayudarle a mejorar la velocidad de su sitio web.
¿Qué es una CDN?
Una CDN o red de distribución de contenidos es un sistema de servidores distribuidos que ayuda a entregar más rápidamente los archivos de su sitio web a los usuarios en función de su ubicación.
Normalmente, un servicio de alojamiento web sirve a los visitantes de su sitio web desde una única ubicación. Todos los usuarios acceden al mismo servidor, estén donde estén.
Esto puede causar un retraso en la entrega de contenidos a los usuarios que viven más lejos del servidor central de alojamiento de su sitio web.
Por eso, las CDN establecen varios servidores periféricos en distintos puntos del planeta.
Estos servidores CDN guardan copias del contenido estático del servidor de origen de su sitio web y lo presentan a los usuarios cuando visitan su sitio web WordPress.
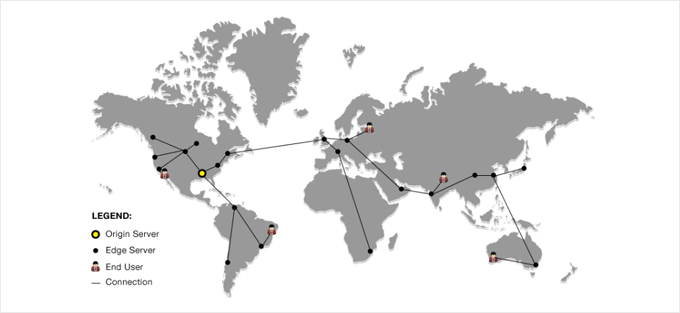
Cuando hay una solicitud de un usuario, el servidor CDN más cercano a la ubicación del usuario se encargará de gestionarla.
Por ejemplo, si alguien en EE.UU. quiere acceder a un sitio web alojado en el Reino Unido, un servidor CDN de EE.UU. atenderá esa petición, no el servidor principal del Reino Unido.
Con una CDN, todas las peticiones de los usuarios son gestionadas por los servidores CDN más cercanos. Esto reduce la distancia física entre los visitantes y el servidor de su sitio web.
Como resultado, una CDN mejora el rendimiento y la velocidad de su sitio web para todos los usuarios, independientemente de su ubicación geográfica.
Un sitio web más rápido también mejora la experiencia del usuario y puede dar a su sitio web un ligero impulso en las clasificaciones SEO. El uso de una CDN también reduce la carga de su servidor principal y evita que se bloquee durante los picos de tráfico.
Si desea obtener más información, consulte nuestra guía sobre por qué necesita una CDN para su blog de WordPress.
¿Qué es Cloudflare CDN?

Cloudflare es uno de los proveedores de CDN gratuitos más populares de Internet. Se trata de una gran red de servidores distribuidos por todo el mundo que almacena automáticamente en caché contenidos estáticos y ofrece contenidos dinámicos con rapidez.
Además de un servicio CDN, Cloudflare es también un cortafuegos de sitios web basado en la nube y un servidor proxy distribuido. Esto significa que supervisa todo el tráfico entrante a su sitio web y bloquea el tráfico sospechoso incluso antes de que llegue a su servidor.
Ofrece un plan básico gratuito adecuado para sitios web y blogs de pequeñas empresas y planes de pago a partir de 20 dólares al mes.
Cloudflare es una opción excelente para las pequeñas empresas que buscan una CDN gratuita. Sin embargo, si quieres aprovechar al máximo todas las características de Cloudflare, necesitarás el plan Business, que cuesta 200 dólares al mes.

Relacionado: Vea nuestra entrada sobre por qué WPBeginner cambió de Sucuri a Cloudflare.
Dicho esto, echemos un vistazo a cómo establecer Cloudflare Free CDN en WordPress. Puedes utilizar los enlaces rápidos de abajo para saltar a las diferentes partes del tutorial:
Establecer su cuenta de Cloudflare
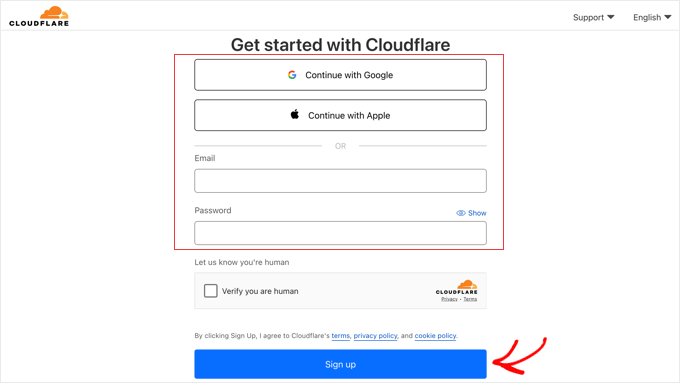
Para empezar, tienes que visitar el sitio web de Cloudflare y hacer clic en el botón “Empezar gratis”.

En la página siguiente, tienes que introducir tu dirección de correo electrónico y contraseña para crear una cuenta de Cloudflare. También puedes acceder con tus credenciales de Google o Apple.
Sólo tiene que introducir los datos obligatorios / requeridos / necesarios y, a continuación, hacer clic en el botón “Registrarse”.
Cuando termines de registrarte, podrás conectar tu sitio para empezar a enviar tu tráfico web a través de Cloudflare. Solo tienes que introducir tu sitio web en el campo ‘Introducir un dominio existente’.
Asegúrate de escribir solo el nombre de dominio de tu sitio, como ejemplo.com. No es necesario que escribas la URL completa ni ningún carácter adicional.
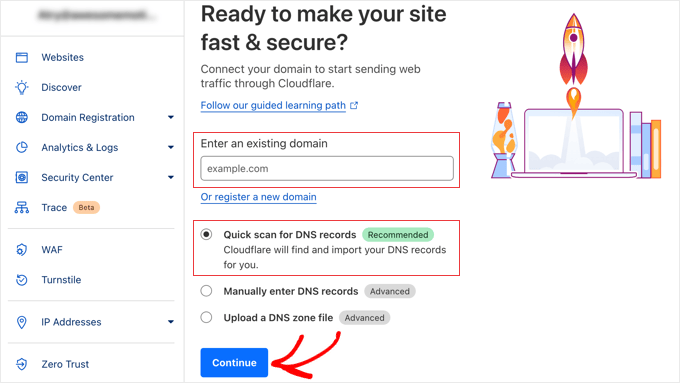
Asegúrese de que la opción “Exploración rápida de registros DNS” está seleccionada y, a continuación, haga clic en el botón “Continuar”.
En la siguiente pantalla, se le pedirá que elija el tipo de plan de Cloudflare que desea. Para este tutorial, elegiremos el plan gratuito de Cloudflare. A continuación, haga clic en el botón “Continuar”.
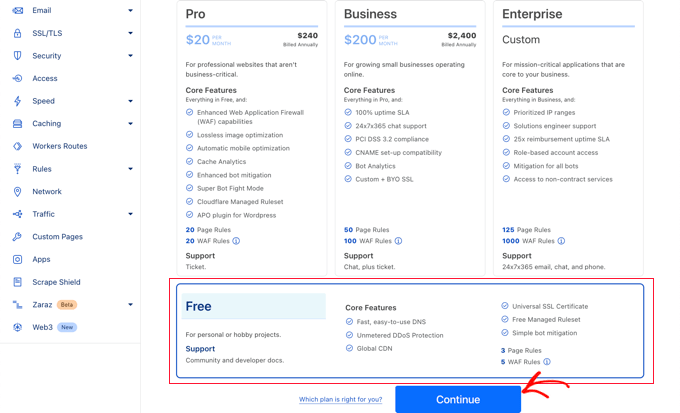
Después de eso, Cloudflare le mostrará un anuncio / catálogo / ficha de todos los registros DNS que sus sistemas encontraron. Estos también incluirán tus subdominios.
Los registros DNS que desea que pasen por Cloudflare deben tener un icono de nube naranja, mientras que los registros DNS que pasarán por alto Cloudflare tendrán un icono de nube gris.
Debes revisar la reseña / valoración para asegurarte de que tu dominio principal está activo en Cloudflare con un icono de nube naranja. Simplemente haga clic en el conmutador “Estado del proxy” para cambiar el estado.
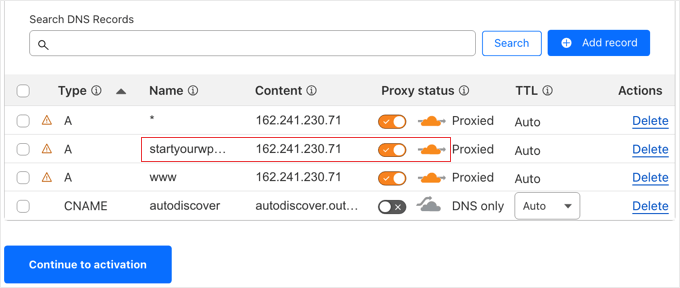
Una vez que haya verificado sus registros DNS, sólo tiene que hacer clic en el botón “Continuar con la activación”.
Durante el siguiente paso de su configuración, Cloudflare le pedirá que actualice sus servidores de nombres. Se le pedirá que cambie sus servidores de nombres a los nuevos asignados por Cloudflare.
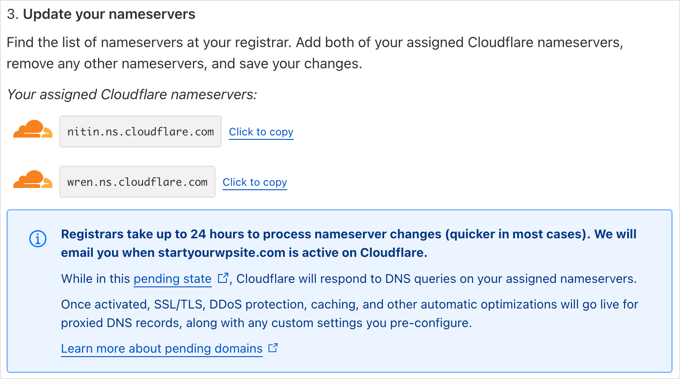
Nota: El cambio de servidores de nombre puede tardar algún tiempo en propagarse por Internet. Durante este tiempo, su sitio web puede resultar inaccesible para algunos usuarios.
Puede cambiar los servidores de nombres desde la cuenta de su registrador de dominios, como Dominio.com.
O, si ha obtenido un dominio gratuito de su proveedor de alojamiento web, tendrá que cambiar los servidores de nombres accediendo a su cuenta de alojamiento.
Por el bien de este tutorial, le mostraremos cómo cambiar los servidores de nombre desde el panel de control de Bluehost.
Aunque el proceso es similar en todas las empresas de alojamiento, siempre puede pedir a su proveedor de alojamiento instrucciones detalladas para su panel de control.
Una vez que haya accedido a su Escritorio Bluehost, vaya a la sección “Dominios” y haga clic en el botón “Ajustes” situado al lado del nombre de su dominio.

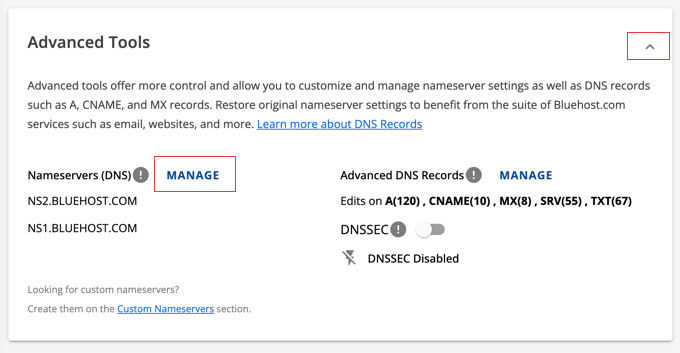
A continuación, desplácese hasta la sección de ajustes avanzados y expándala haciendo clic en la flecha situada a la derecha de la pantalla. Esto mostrará los ajustes DNS de su sitio web, incluidos los servidores de nombres.
A continuación de “Servidores de nombres (DNS)”, haga clic en el botón “Gestionar”.
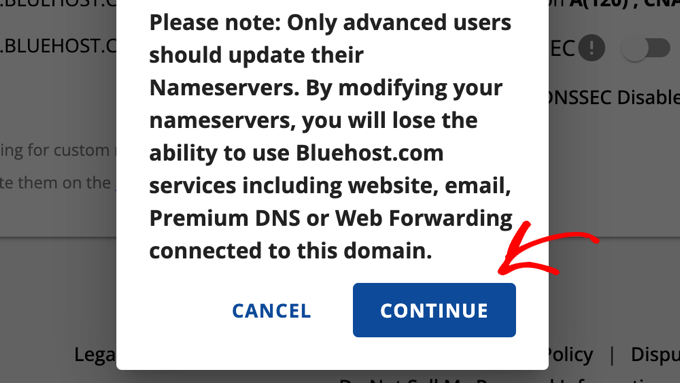
Aparecerá una advertencia de que solo los usuarios avanzados deben actualizar sus servidores de nombres.
Debe hacer clic en el botón “Continuar” para confirmarlo y pasar al paso siguiente.
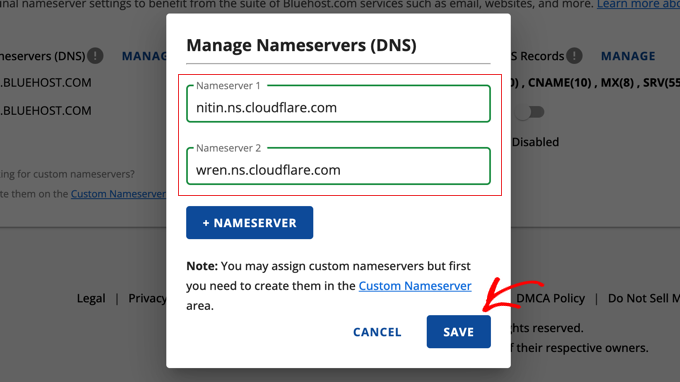
A continuación, debe introducir los servidores de nombres proporcionados por Cloudflare.
A continuación, haz clic en el botón “Guardar”.
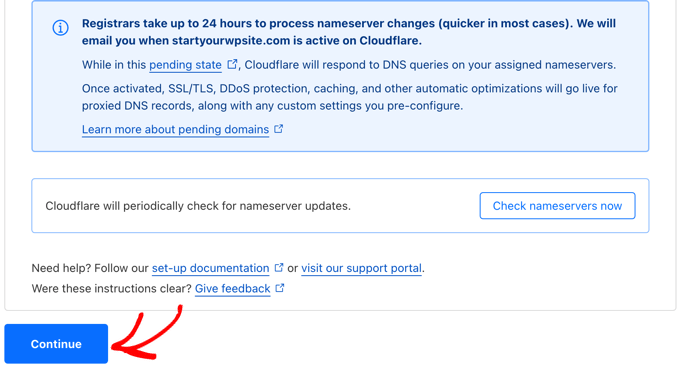
A continuación, vuelva a la página de configuración de Cloudflare y haga clic en el botón “Comprobar servidores de nombre ahora”. Cloudflare comprobará tus servidores de nombre periódicamente y te enviará un correo electrónico cuando estén activos.
Mientras tanto, puede hacer clic en el botón “Continuar” para finalizar la configuración.
Ya está. Tardarás unos minutos en actualizar los servidores de nombres de tu dominio y activar Cloudflare.
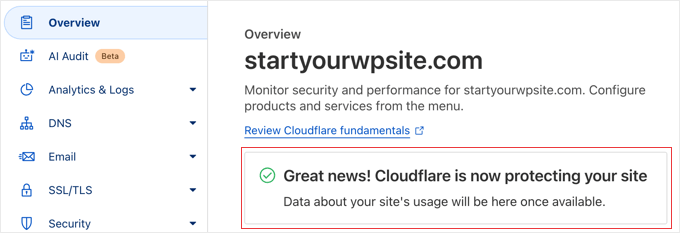
Una vez activado, verá el mensaje de correcto en su Escritorio de Cloudflare.
Nota: Las capturas de pantalla anteriores muestran el panel de control de Bluehost. Los ajustes de su servidor de nombres pueden ser diferentes si está utilizando un proveedor de alojamiento diferente.
Configuración de un ajuste importante de Cloudflare
Aunque Cloudflare ya está protegiendo tu sitio, tienes que establecer un ajuste importante mientras estás en el sitio web de Cloudflare. Una vez hecho esto, instale el plugin de Cloudflare en su sitio web de WordPress para finalizar el proceso de configuración.
Recomendamos configurar Cloudflare con reglas de página para que su área de administrador / administración de WordPress no pase por él. Esto evita posibles problemas de almacenamiento en caché que pueden afectar a la funcionalidad del administrador / administración.
Cloudflare le permite establecer tres reglas de página gratuitas. Si desea añadir más reglas de página, deberá pagar 5 dólares al mes por 5 reglas adicionales.
En primer lugar, debe hacer clic en la opción Reglas ” Reglas de página del menú de la izquierda de la página. Después, puede hacer clic en el botón “Crear regla de página”.
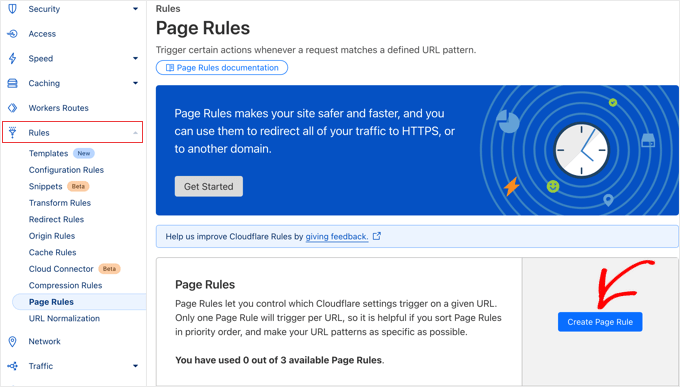
Ahora debe introducir los siguientes ajustes en la regla. Puede hacer clic en el botón “+ Añadir un ajuste” para añadir nuevas filas para ajustes adicionales:
- URL de la página: example.com/wp-admin*
- Nivel de caché – Bypass
- Desactivar rendimiento
- Desactivar aplicaciones
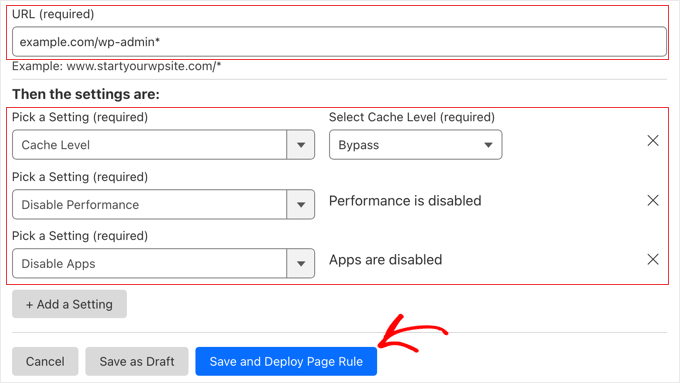
Cuando hayas terminado, asegúrate de hacer clic en “Guardar y desplegar” para añadir la nueva regla.
Una vez hecho esto, deberá completar la configuración de Cloudflare utilizando el plugin oficial de Cloudflare para WordPress.
Optimización de Cloudflare para WordPress mediante un plugin
Cloudflare ofrece un plugin dedicado para WordPress que permite realizar ajustes optimizados para WordPress con un solo clic. Integra las características de Cloudflare sin problemas con WordPress para ofrecer la mejor compatibilidad y funcionalidad.
El plugin le permite establecer rápidamente Cloudflare en su sitio de WordPress, añadir conjuntos de reglas de cortafuegos de aplicaciones web (WAF), purgar automáticamente la caché y mucho más.
Para empezar, instala y activa el plugin de Cloudflare en tu sitio web. Para obtener más información, consulte nuestra guía paso a paso sobre cómo instalar un plugin de WordPress.
Nota: Aunque este plugin lleva tiempo sin actualizarse, lo hemos probado y sigue funcionando correctamente. Para más información, consulta nuestra guía sobre si es seguro utilizar plugins de WordPress obsoletos.
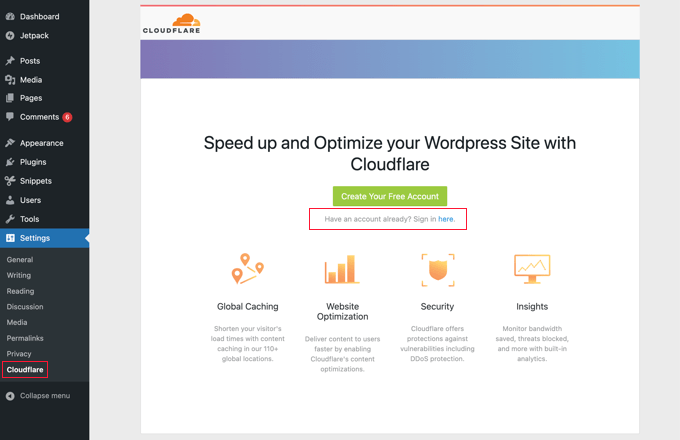
Una vez hecho esto, debe visitar Ajustes ” Cloudflare en su panel de administrador para establecer los ajustes de Cloudflare.
En la página de ajustes, verá un botón “Cree su cuenta gratuita” y una opción para acceder a las cuentas existentes. Simplemente haga clic en el enlace “Acceda aquí”.
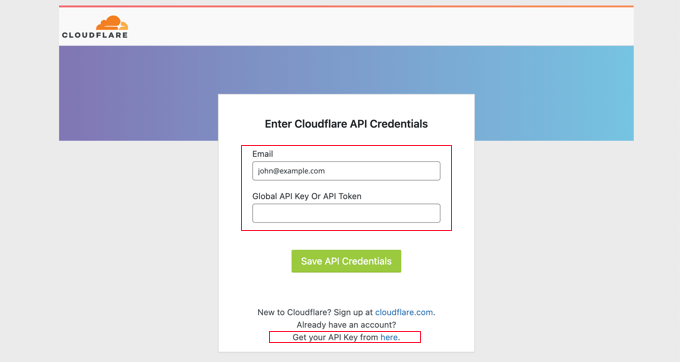
En la siguiente pantalla, deberá introducir su correo electrónico de Cloudflare y su clave API.
Haga clic en el enlace “Obtenga su clave API desde aquí”.
Aparecerá un mensaje / ventana emergente para el área de su cuenta en el sitio web de Cloudflare.
Asegúrese de que se encuentra en la página “Mi perfil” y, a continuación, haga clic en la pestaña “Tokens de API” de la barra lateral izquierda.
A continuación, vaya a la sección “Clave API global” y haga clic en el botón “Ver”.
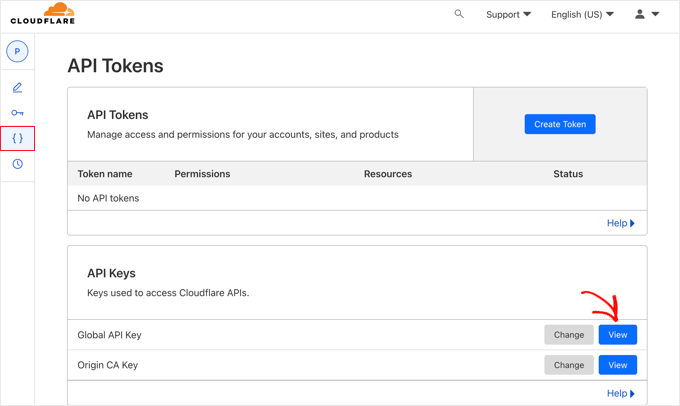
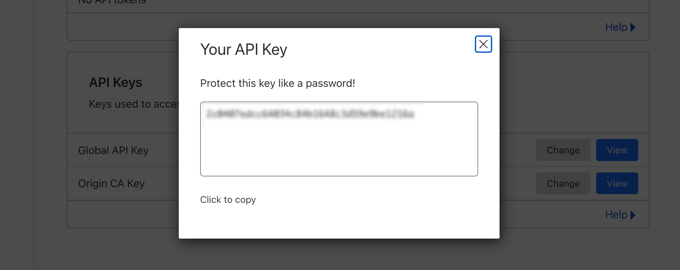
Esto abrirá un mensaje / ventana emergente y mostrará su clave API.
Basta con hacer clic en la clave para copiarla.
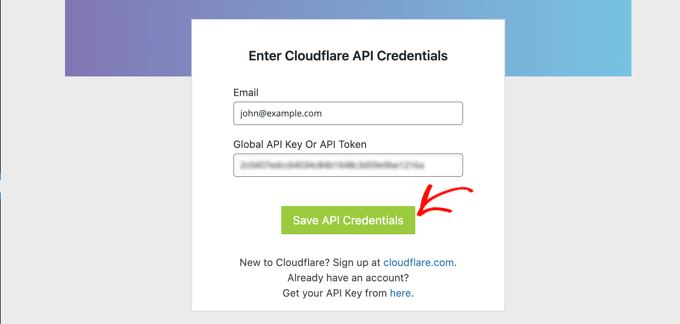
A continuación, debe volver a su escritorio de WordPress e introducir su dirección de correo electrónico y su clave API.
A continuación, haga clic en el botón “Guardar credenciales de API”.
A continuación, los ajustes de Cloudflare aparecerán en su panel de control.
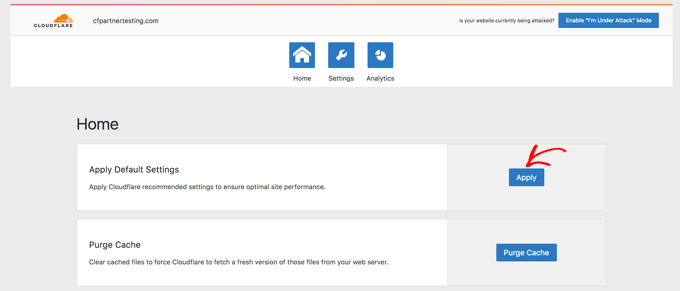
Desde aquí, puedes aplicar una optimización de WordPress con un solo clic, purgar la caché, activar la caché automática y mucho más.
Para optimizar su sitio de WordPress, haga clic en el botón “Aplicar” situado al lado de “Aplicar ajustes por defecto”. Esto ejecutará algunos cambios de configuración que Cloudflare recomienda para un rendimiento óptimo de WordPress.
A continuación, haga clic en la opción de menú “Ajustes”.
Aquí encontrará más ajustes de optimización del sitio.
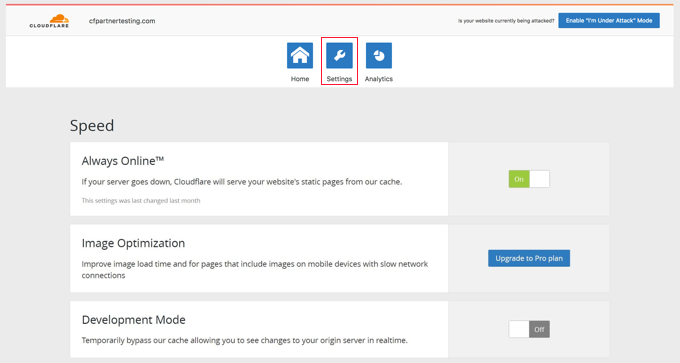
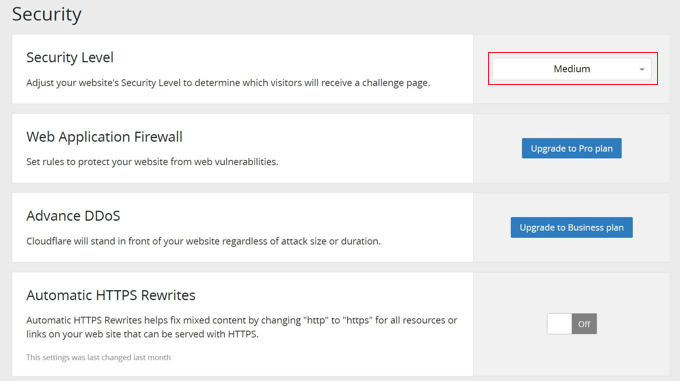
Puede desplazarse hacia abajo en esta pantalla para encontrar la sección “Seguridad”.
El nivel de seguridad es medio por defecto. Para mejorar la seguridad de su sitio web, puede seleccionar “Alta” en la lista desplegable.
¡Y ya está! Ya está.
Esperamos que este artículo te haya ayudado a establecer la CDN gratuita de Cloudflare en WordPress. También puedes consultar nuestra guía definitiva sobre cómo aumentar la velocidad y el rendimiento de WordPress y nuestra selección de los mejores plugins de caché para WordPress.
If you liked this article, then please subscribe to our YouTube Channel for WordPress video tutorials. You can also find us on Twitter and Facebook.


Andrew Hansen
My hosting plan through Host gator says it has cloudflare installed. Is that good, or should I uninstall it through the hosting plan and manually add it so i can customize my options?
WPBeginner Support
It would depend on how Cloudflare is set up on your account, if you have access to cloudflare’s settings then you can continue to use what is on your account without worrying.
Admin
Andrew Hansen
I do not have control over settings.
WPBeginner Support
Jus to be safe, check with your host as there may be a hidden settings area for Cloudflare in the hosting settings.
Andrew Hansen
I checked the information regarding cloudflare through Hostgator. you can manage what level caching (assets only, assets and web pages, or assets and web pages extended) and you can clear the cache, but hostgator says under the cons of using it “No option to customize – Currently, you cannot customize cache settings (for example, which content gets cached, the cache timing, etc.) for the CDN.”
Jiří Vaněk
I use Cloudflare DNS along with their CDN. The integration of Cloudflare CDN into the WP Rocket plugin, which I use for caching, is fantastic. The CDN can be linked with the caching plugin, allowing for the simultaneous clearing of both the website cache and the CDN cache with a single button in WP Rocket.
WPBeginner Support
Connections like that to help simplify the process are very helpful
Admin
Ralph
I plan on making website from europe server (cheaper) to US users and this guide is godsend! Even better it is possible to do it for free. Thank you for this detailed guide. It will definitely help me setting everything up as I never really understood how to do this. Every other guide was lacking details and was too general.
WPBeginner Support
Glad to hear our guide was helpful
Admin
Salman
Hi, I use the “WPS Hide Login” plugin. While creating a page rule for the login page should I use the default login URL or the new login URL which I am using with the help of the plugin?
WPBeginner Support
If the login page is on a different URL you would want to set the page rule for the active login page that users would visit.
Admin
Neal Umphred
Thanks for another useful how-to article!
Regarding the ‘Always Use HTTPS’ option, you wrote: “Some users have reported issues when using this setting with Cloudflare.”
What are those issues?
WPBeginner Support
The errors vary between sites so we don’t have a specific list of errors to point to at the moment.
Admin
Sohil Jain
If I setup comment on my main domain wil it will be setup automatically to subdomain too? Because I don’t want cloudflare setup to apply to subdomain as I only want on main domain. So where to click so that it will not apply to subdomain
Thanks
WPBeginner Support
There is an option in Cloudflare to exclude a subdomain so you wouldn’t need to worry about that.
Admin
Evindu Shavinda
I added Cloudflare to my website today. So, I had to remove my hosting’s nameservers & replace them with Cloudflare nameservers from my domain registrar.
This is the question – 1. So, how my hosting account still works? I have removed its nameservers from the domain registrar
Aftab
Don’t worry about hosting. Cloudflare doesn’t modify or change your hosting configuration. Your site will be hosted on your current host only. The reason why cloudflare asks you to change the nameserver because it passes your site through their DNS. It routes your web traffic through the Cloudflare network. So they can proxy your traffic through their network. Cloudflare offers security, ddos protection to all the sites that are configured with their nameservers. You don’t need to spend a single penny to configure your site through network. It’s a part of the free plan. No matter how many sites you have.
Nina Cen
When I tried to add the page rules for my wordpress login page, I got message “Not Acceptable! An appropriate representation of the requested resource could not be found on this server. This error was generated by Mod_Security.”
Is anything I did wrong? Or I just need to wait for a little while to try again?
WPBeginner Support
You would want to check with your hosting company for that specific error as that normally means they have a security rule set to prevent certain things on your site.
Admin
Shyam
I s there a way to turn off the second loading screen for security verification purposes and that CAPTCHA page which you have mentioned in the Cons of Cloudflare?
WPBeginner Support
You should be able to change the settings to remove that if you wanted but you would want to check with CloudFlare for the current method.
Admin
Lou
I’m setting up Cloudflare – thanks to your article! I’ve already got W3 super cache plugin – do I need both? Are they going to confuse each other? Total newb question I know!
WPBeginner Support
They have slightly different functions and there is an integration so the two can work with each other without an issue.
Admin
Faith Nte
Thank you for this guide. It helped me reduce the time my page loads
WPBeginner Support
Glad our guide was helpful
Admin
Muntaha
What if someone mistakenly adds the wrong parameters in page rules and then deployed it. Is there any way back to change page rules after deploying it?
WPBeginner Support
You can change your settings after setting them if you need to.
Admin
bali kratom
thanks for sharing this content
WPBeginner Support
You’re welcome
Admin
Will
Probably a noob question, but I have a lot of existing video and photo files on my site. Will they all be migrated to Cloudflare’s CDN or do I have to do that manually? I followed the setup steps, but my content still takes forever to load, and when I view its URL, it’s still showing my site’s URL and path.
WPBeginner Support
You shouldn’t need to transfer your content, for the slow loading you may want to reach out to CloudFlare for them to take a look
Admin
Brooke
Thanks so much for this, helps a lot!
Just to be clear, even though I’ve added my site to cloudflare, I still need to get an SSL cert separately? Cloudflare does not supply ssl cert?
Thanks again!
WPBeginner Support
You would want to take a look again under the Configuring Most Important Cloudflare Settings section for CloudFlare’s SSL
Admin
Ibraham Aali
Admin, kindly answer these question like
After changing the DNS, who is actually will my hosting provider? The hoster OR cloudflare and all editing can be done by same cpanel?
WPBeginner Support
Your hosting provider would still be your hosting provider.
Admin
Soumya
thank you very much, I was looking for a proper step-by-step Cloudflare set up! and TA DA!! you guys are savior.
It would be great if you publish about the best of cloudflare settings, from the plugin.
WPBeginner Support
Glad you found our article helpful
Admin
Alabura
Thank you for such a great publications, it really help me set up my cloud flare account easily. Keep the good work.
WPBeginner Support
You’re welcome, glad our guide was helpful
Admin
Bryan Wagar
Very helpful information and with the pictures for verification i could confirm everything instead of guessing, thankyou very much for compiling this! It is BRILLIANT
WPBeginner Support
You’re welcome, glad our guide could be helpful
Admin
PKV
superb guide, easy to follow thanks
WPBeginner Support
Glad our guide was helpful
Admin
randhir singh
I want to know which is the best CDN ? cloud Flare or max
WPBeginner Support
Hi Randhir,
At WPBeginner, we recommend MaxCDN. However, if you want to use the free CDN, then Cloudflare can be a good solution.
Admin
anurag saxena
If i will use cloudfare free version and will change the nameserver then it means my website will run on cloudfare server then how i can edit my website? through cloudfare or my present hosting provider? pls tell me detail.
andy
The only reason I use cloudflare because you can hide where you hosting the site.
Mehmet
i am wondering..
for cloudflare, we need to point the DNS to theirs..
so how we gonna use custom email set up using our own domain (which also need to point the DNS to the email provider) ?
as far as i know, we can’t use two DNS .. (actually we can, but it is expensive)
Aqib
I am using custom email and cloudflare. Cloudflare doesn’t affect my custom email working.
Abhi
If my domain is from go daddy and hostino is from inmotion hosting and I change my domain name server to my hosting now I want to join cloudfare to it then what can I do?
andy
I try to help answer. from godaddy change nameserver to cloudflare, and from cloudflare, set up your DNS and point to your in motion hosting ip address.
Syed Shan
After Setting Our Host DNS To Cloudfare DNS, Which bandwidth and storage will be used from our local hosting plan e.g godaddy, namecheap etc or Cloudfare ?
Haydrion Rayel
The reasons why I don’t use cloudflare is because of changing the nameservers and second like in this article : it blocks some of the legitime users and that is what I really hate.
I don’t use third party websites where I don’t have full control of it. I saw a couple of times there are you human google click on pictures and it takes forever.
MaxCDN is the only option because you only have to add a cname .. but still ..
Haydrion Rayel
The reasons why I don’t use cloudflare is because of changing the nameservers and second like in this article : it blocks some of the legitime users and that is what I really hate.
I don’t use third party websites where I don’t have full control of it. I saw a couple of times there are you human google click on pictures and it takes forever.
MaxCDN is the onlly option because you only have to add a cname .. but still ..
abhishek purohit
My site is on wordpress and running on godaddy vps server with ssl certificate but it has lots of page load time, now, should I go for cdn cloud flare free account if yes than what about all static IP given with vps account , they will not useable and is vps based site need cloud flare ?
Munna Hossain
Page loading time is an important issue to get good user experience. This LoudFlare helps us to increase the page loading. Can you tell me which one is better to improve page speed, plugin or CDN?
Iain
HI
Just to let you know
I have had a joomla website working on the Free plan and SSL
Not sure if your previous post is now outdated but it is possible.
Regards
Mircea Pop
You can use the provided Cloudflare SSL but you are unable to use your own SSL on free account
koushil
bro can we use this for blogspot blog ?
King Rayhan
of course why not
Ikechukwu
This was very helpful. Thanks.
munetsi
i am actually caught in between-
which provider should i choose for my site,
between cloudfare or maxcdn
Editorial Staff
We use MaxCDN for our sites.
Admin
SOTHEA
This is truly awesome tip. Anyways, I have a question. If my website contents and domain name are hosted in different hosting companies. In this case, I need to change Name Servers to CloundFlare for both. Am I correct?
Anubhav
Did you find the solution for this as i have different hosting provider and domain name provider is different .If you know the solution then please let me know
Ummi Mental
after changing the DNS, who is actually will my hosting provider? The hoster OR cloudflare and all editing can be done by same cpanel?
Captain Asif
Really very helpful article i have setup my wordpress site with cloudflare
Joe
What minification services do you recommend that work well with Cloudfare? This is for a WordPress site that may have potentially high traffic spikes out of the blue. Thanks
bobzyouruncle
I live at the bottom of Africa (Cape Town) with none of their servers close to me am I correct in thinking that Cloud Flare will slow down my website. Most of my traffic is local. I have the same issues with CDNs none of them are close to my location, Europe is the closest. Is my thinking correct?
Damon Billian
CloudFlare would add a little latency because we currently don’t have any data centers in SA just yet (being looked at). Visitors from SA would currently hit a data center in Europe.
On the other hand, if you have visitors from a lot of other locations (EU, America, Asia, etc.), then the site would be faster for them.
munetsi
was just checking ,looks like they have servers in johannesburg.
Adesanmi Adedotun
I have heard about cloudflare but have not tried to make use of it, bout talking about the fact that my site might be down during the propagation of my name server,how long could this take?
WPBeginner Support
It varies, it can take a few hours to a full day.
Admin
Einstein
You will not experience any downtime while you switch to Cloudflare if you do it correctly.
Damon Billian
You should not have any downtime at all switching to CloudFlare’s nameservers.
Robby McCullough
I am a huge fan of CloudFlare. At my shop, we do a lot of sites for professional photographers. CF does an amazing job at making image heavy pages load in a snap!
One tip, don’t forget about CF’s developer mode when you’re making changes. I’ve bashed my head against the wall for some time when my CSS changes weren’t showing up — CF was serving a cached page!
Boby
When my website has ‘heavy load’ CloudFlare will make the users access screenshot of the website.
Abhisek
Cloudflare breaks my site’s design. I have a off-canvas menu and Cloudflare’s rocketloader and minification breaks ,y site’s design. So, I have to stick with basic W3 Total cache. Besides Cloudflare actually speeds up your site.
Damon Billian
Those features are actually optional and easy to turn off. If you’re using a minify service already, then you don’t want to turn ours on as well (something eventually will break running two minify options at the same time). Rocket Loader would have the potential to impact JavaScript and jQuery & would generally impact something like widgets.
Joe
What WordPress theme were you using? That way we can know to avoid using that theme with Cloudfare.