¿Está planeando trasladar su sitio WordPress a una nueva empresa de alojamiento o a un servidor diferente? Es una decisión importante y, comprensiblemente, probablemente te preocupe la posible pérdida de datos y el tiempo de inactividad.
Según nuestra experiencia, esos son sin duda los mayores riesgos a la hora de cambiar de alojamiento web o migrar un sitio web. Sin embargo, puedes cambiar de host o servidor sin comprometer la experiencia del usuario ni el tiempo de actividad.
De hecho, cambiamos el sitio web de WPBeginner de HostGator a SiteGround en 2020. Por lo tanto, hemos navegado con éxito este proceso nosotros mismos sin afectar negativamente a nuestros lectores.
En este tutorial paso a paso, le mostraremos cómo migrar su sitio de WordPress a un nuevo proveedor de alojamiento de forma segura y sin tiempo de inactividad. También responderemos a las preguntas más frecuentes sobre cómo trasladar un sitio de WordPress a un nuevo proveedor de alojamiento.
Importante: Antes de empezar, queremos que sepas que muchas empresas de alojamiento de WordPress ofrecen un servicio de migración gratuito. Puede que no aparezca en su sitio web, así que lo único que tienes que hacer es preguntar. Por lo general, es gratuito, pero algunas pueden cobrar una pequeña cuota.
Dicho esto, veamos los pasos que vamos a seguir para trasladar WordPress a un nuevo servidor de alojamiento (sin tiempo de inactividad):
¿Preparados? Primeros pasos.
Paso 1: Elija su nuevo alojamiento para WordPress
Si usted está atascado con un alojamiento web lento, incluso después de optimizar la velocidad y el rendimiento de WordPress, entonces es el momento de mover su sitio de WordPress a un nuevo alojamiento que puede manejar su creciente tráfico.
A la hora de buscar un nuevo proveedor de alojamiento para WordPress, es importante elegir con cuidado para no tener que mudarse de nuevo en un futuro próximo.
Éstos son los que recomendamos:
- Para un alojamiento compartido fiable, recomendamos Bluehost. Están oficialmente recomendados por WordPress.org. Usando nuestro cupón Bluehost, los usuarios de WPBeginner obtienen hasta un 75% de descuento y un nombre de dominio gratis.
- Para un alojamiento compartido más rápido, recomendamos Hostinger. Se encuentran entre las mejores empresas de alojamiento de WordPress y ofrecen servidores más rápidos con un excelente soporte al cliente.
- Si está buscando alojamiento en la nube o proveedores de ubicación específica, le recomendamos que marque / compruebe SiteGround. Tienen centros de datos en tres continentes diferentes.
- Si está buscando alojamiento gestionado para WordPress, le recomendamos que marque / compruebe WP Engine. Es el mejor y más conocido proveedor del sector.
Después de comprar su nuevo alojamiento, NO instale WordPress. Lo haremos en un paso posterior.
Por ahora, su nueva cuenta de alojamiento web debe estar vacía, sin archivos ni carpetas en su directorio principal.
Paso 2: Establecer Duplicator para facilitar la migración
Lo primero que debe hacer es instalar y activar el plugin Duplicator en el sitio web que desea trasladar. Para más detalles, consulta nuestra guía paso a paso sobre cómo instalar un plugin de WordPress.
Duplicator es el mejor plugin de migración de WordPress del mercado. También viene con copias de seguridad programadas automatizadas, soporte de almacenamiento en la nube, restauración en 1 clic y migraciones inteligentes.
Nota: Duplicator también tiene una versión gratuita llamada Duplicator Lite. Se puede utilizar para mover su sitio web, pero tiene características limitadas en comparación con la versión pro.
Una vez que haya instalado y activado Duplicator, vaya a la página Duplicator ” Copias de seguridad en el área de administración de WordPress.
A continuación, haga clic en el botón “Añadir nuevo” situado en la esquina superior izquierda.
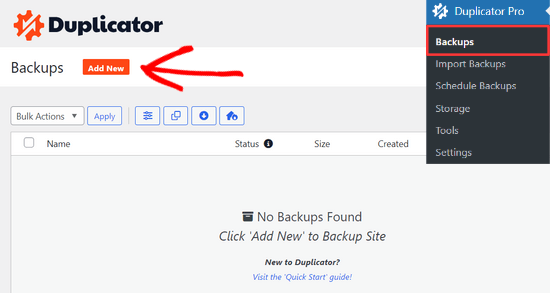
Esto iniciará el asistente de copia de seguridad de Duplicator.
En la siguiente pantalla, puede introducir un nombre para su copia de seguridad o puede utilizar las etiquetas dinámicas para crear automáticamente un formato de nombre, como la fecha y el título de su sitio.

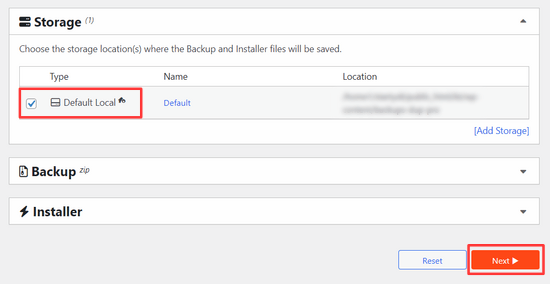
A continuación, puedes ampliar la sección “Almacenamiento” para seleccionar una ubicación de almacenamiento. Para este tutorial, utilizaremos la ubicación predeterminada, pero puedes añadir una nueva ubicación como Dropbox o Google Drive haciendo clic en el enlace “Añadir almacenamiento”.
Basta con hacer clic en el botón “Siguiente” para continuar.
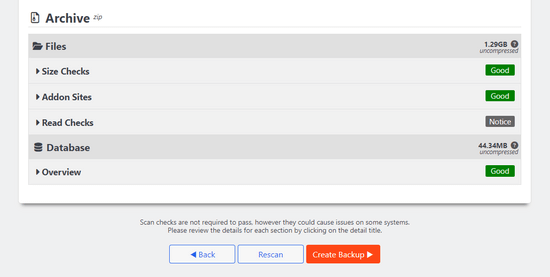
A continuación, Duplicator explorará su sistema para asegurarse de que todo está en orden para preparar el paquete.
Asegúrese de que los resultados del escaneado son correctos (todo debería indicar “Bien”) y, a continuación, haga clic en el botón “Crear copia de seguridad”.
El proceso puede tardar varios minutos en completarse, así que deja la pestaña abierta mientras el plugin hace su trabajo.
Una vez completado el proceso, verás opciones de descarga para el instalador y el paquete de archivo. Haz clic en el botón “Descargar” y selecciona la opción “Ambos archivos”.
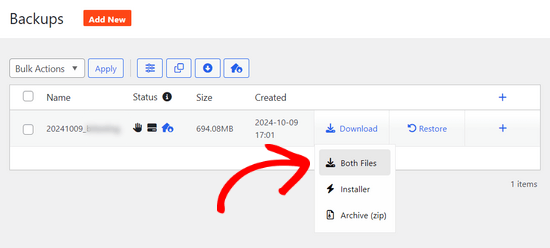
El archivo de almacenamiento es una copia de su sitio web completo, y el archivo de instalación automatizará el proceso de instalación por usted.
Paso 3: Importe su sitio WordPress al nuevo alojamiento
Ahora que ya has descargado tanto el archivo como el instalador, el siguiente paso es subirlos a tu nuevo alojamiento web.
Para ello, conéctese a su nuevo alojamiento web mediante FTP.
Si nunca lo has hecho, consulta nuestra guía para principiantes sobre cómo subir archivos a WordPress mediante FTP.
Normalmente, introducirías el nombre de dominio de tu sitio web como alojamiento al conectar tu cliente FTP.
Sin embargo, como tu nombre de dominio sigue apuntando a tu antiguo host, tendrás que conectarte introduciendo la dirección IP o el nombre de host de tu servidor.
Encontrará esta información en el Escritorio del panel de control de su nueva cuenta de alojamiento.
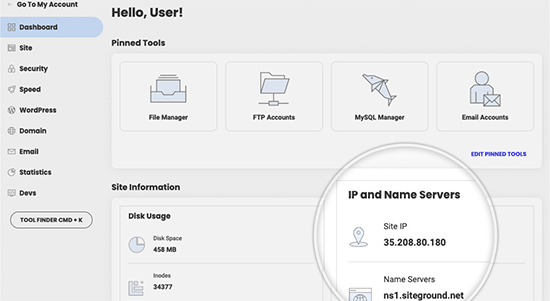
Si no se ha podido encontrar esta información, se puede pedir soporte a la nueva empresa de alojamiento web, y ellos le ayudarán.
Utilizando el cliente FTP, debe subir tanto el archivo installer.php como el archivo .zip al directorio raíz de su sitio web.
Suele ser la carpeta /username/public_html/.
De nuevo, si no está seguro, pregunte a su empresa de alojamiento web.
Asegúrese de que su directorio raíz está completamente vacío. Algunas empresas de alojamiento web instalan WordPress automáticamente cuando te registras.
Si tienes WordPress instalado en tu directorio raíz, entonces necesitas borrar WordPress primero.
Una vez hecho esto, deberá subir tanto el archivo zip como el archivo installer.php al directorio raíz de su sitio.
Paso 4: Cambiar el archivo de alojamiento para evitar tiempos de inactividad
Una vez que hayas subido ambos archivos a tu nuevo host, tienes que acceder al archivo installer.php en un navegador.
Normalmente, se puede acceder a este archivo utilizando una URL como ésta:
http://www.example.com/installer.php
Sin embargo, esta URL le llevará a su antiguo alojamiento web, y obtendrá un error 404. Esto se debe a que su nombre de dominio sigue apuntando a su antiguo alojamiento web.
Normalmente, otros tutoriales te dirán que cambies los servidores de nombres de tu dominio y lo apuntes a tu nueva empresa de alojamiento, pero eso es un error.
Si lo hace ahora, sus visitantes verán un sitio web roto cuando lo migre.
Le mostraremos cómo puede acceder temporalmente a su nuevo sitio en su ordenador sin que ello afecte a su antiguo sitio.
Esto se hace con el archivo de alojamiento de su ordenador.
El archivo de alojamiento puede utilizarse para asignar nombres de dominio a direcciones IP concretas. En otras palabras, le permite engañar a su ordenador para que piense que el sitio web se ha trasladado aunque no sea así.
Veamos cómo añadir una entrada para su nombre de dominio en el archivo de hosts para que apunte a su nueva empresa de alojamiento.
Estos cambios le permitirán acceder a los archivos de su nuevo alojamiento utilizando su propio nombre de dominio, mientras que el resto del mundo seguirá accediendo a su sitio desde el antiguo alojamiento. Esto garantiza un tiempo de actividad del 100%.
Lo primero que debe hacer es encontrar la dirección IP de su nuevo servidor de alojamiento web.
Para encontrarlo, necesita acceder a su Escritorio de cPanel y hacer clic en el enlace de expandir estadísticas en la barra lateral izquierda. La dirección de su servidor aparecerá como “Dirección IP compartida”.
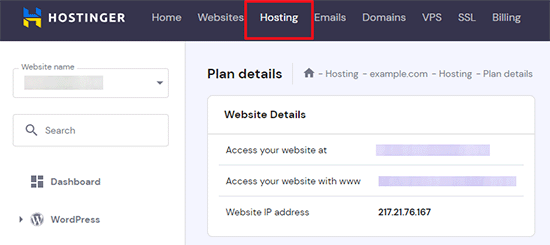
Por ejemplo, en Hostinger, encontrará la dirección IP de su servidor en los detalles de su plan de alojamiento.
Si utiliza un PC con Windows, deberá abrir la aplicación Bloc de notas con privilegios de administrador.
Basta con hacer clic en el botón “Inicio” y buscar la aplicación Bloc de notas. Haga clic con el botón derecho en el icono de la aplicación Bloc de notas y seleccione “Ejecutar como administrador”.
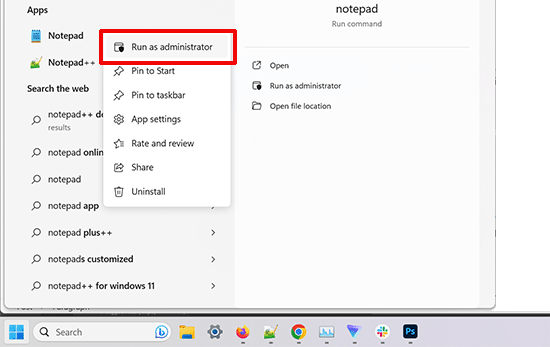
Aparecerá una indicación de UAC de Windows y deberá hacer clic en “Sí” para iniciar el Bloc de notas con privilegios de administrador.
En la pantalla Bloc de notas, vaya a Archivo ” Abrir y, a continuación, vaya a la carpeta C:\Windows\System32\drivers\etc. Desde esta carpeta, seleccione el archivo de alojamiento y abrirlo.
Si utiliza un Mac, deberá abrir la aplicación Terminal e introducir este comando para editar el archivo hosts:
sudo nano /private/etc/hosts
Tanto para usuarios de Windows como de Mac, en la parte inferior del archivo de alojamiento, debe introducir la dirección IP que ha copiado y, a continuación, el nombre de su dominio. Así:
192.168.1.22 www.example.com
Asegúrese de sustituir la dirección IP por la que copió de cPanel y example.com por su propio nombre de dominio.
Cuando hayas terminado, guarda los cambios.
Ahora puede acceder a sus archivos en el nuevo alojamiento utilizando su nombre de dominio en su ordenador.
Importante: No olvide deshacer los cambios realizados en el archivo de alojamiento una vez finalizada la migración (paso 6).
Paso 5: Creación de la base de datos MySQL en su nuevo alojamiento
Antes de ejecutar el instalador en el nuevo host, necesitará crear una base de datos MySQL en su nueva cuenta de hosting. Si ya has creado una base de datos MySQL, entonces puedes saltar al siguiente paso.
Crear una base de datos en cPanel
Vaya al Escritorio cPanel de su nueva cuenta de alojamiento, desplácese hasta la sección Bases de datos y haga clic en el icono “Bases de datos MySQL”.
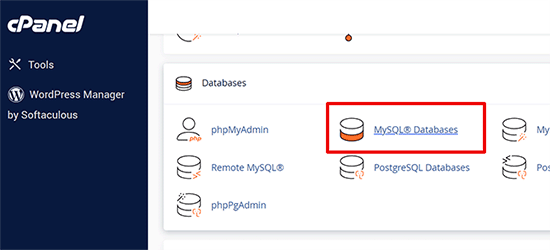
Verá un campo para crear una nueva base de datos.
Introduzca un nombre para la base de datos y haga clic en el botón “Crear base de datos”.

Después de crear la base de datos MySQL, debe desplazarse hasta la sección Usuarios MySQL.
A continuación, introduzca un nombre de usuario y una contraseña para su nuevo usuario y haga clic en el botón “Crear usuario”.
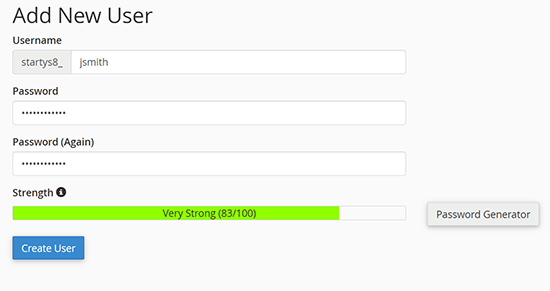
Después, tienes que añadir este usuario a tu base de datos. Esto le dará al nombre de usuario que acabas de crear todos los permisos para trabajar en esa base de datos.
Para ello, desplácese hasta la sección “Añadir usuario a una base de datos”. Simplemente seleccione el usuario de la base de datos que ha creado en el menú desplegable situado al lado del usuario, luego seleccione la base de datos y haga clic en el botón ‘Añadir’.
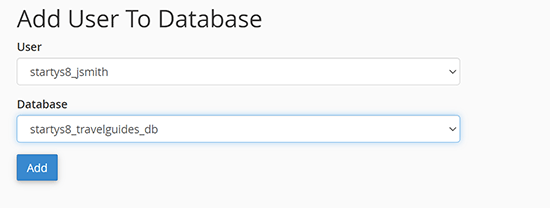
Su base de datos ya está lista para ser utilizada con WordPress. Asegúrese de anotar el nombre de la base de datos, el nombre de usuario y la contraseña. Necesitará esa información en el siguiente paso.
Paso 6: Iniciar el proceso de migración de la duplicadora
Ahora, estamos listos para ejecutar el instalador. Navegue hasta la siguiente dirección en la ventana de su navegador, sustituyendo ejemplo.com por su nombre de dominio:
http://www.example.com/installer.php
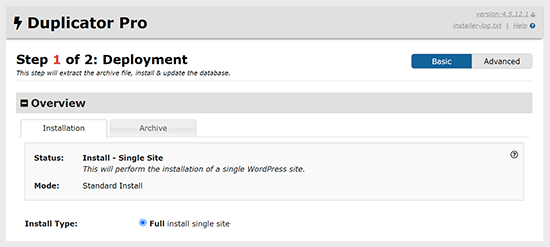
El instalador ejecutará unas cuantas pruebas y le mostrará ‘Aprobado’ a continuación de las pruebas de archivo y validación.
Debe marcar / comprobar la casilla de verificación de los términos y condiciones y continuar haciendo clic en el botón “Siguiente”.
Ahora, se le pedirá que introduzca su alojamiento MySQL, el nombre de la base de datos, el nombre de usuario y la contraseña.
Su alojamiento será probablemente localhost. A continuación, introduzca los datos de la base de datos creada en el paso anterior.
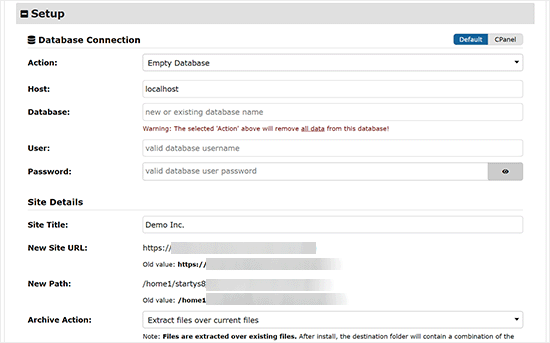
A continuación, el Duplicador debe marcar / comprobar que puede conectarse a la base de datos y que puede ejecutar la instalación.
Haga clic en el botón “Validar” de la parte inferior para continuar.

Si Duplicator puede conectarse, verá los resultados de la prueba como Pass.
Ahora puede marcar / comprobar la casilla de verificación de las condiciones y avisos y hacer clic en el botón “Siguiente”.
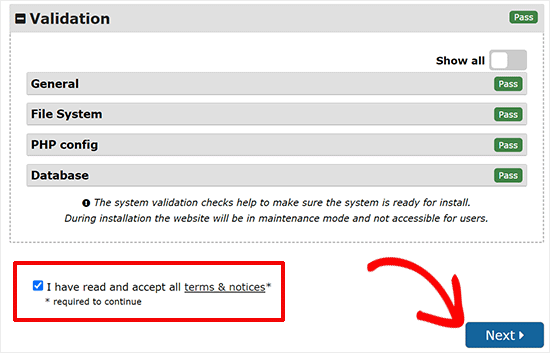
Haga clic en el botón “Siguiente” para continuar.
Duplicator importará su base de datos de WordPress desde el archivo zip a su nueva base de datos.
A continuación, le pedirá que actualice la URL o ruta del sitio. Como no va a cambiar los nombres de dominio, NO necesita cambiar nada aquí.
Basta con hacer clic en el botón “Siguiente” para continuar.
Duplicator ejecutará los pasos finales y le mostrará el botón de acceso.
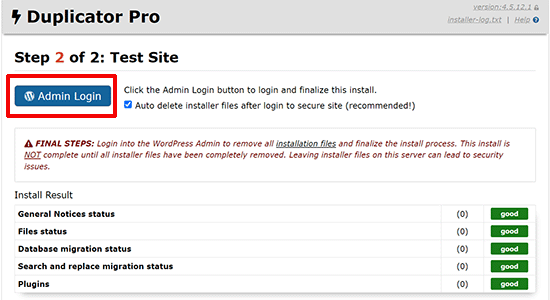
Ahora puede acceder a su sitio de WordPress en el nuevo alojamiento para asegurarse de que todo funciona según lo previsto.
Paso 7: Actualice sus servidores de nombres de dominio (DNS)
En este punto, has creado una copia completa de tu base de datos y archivos de WordPress en tu nuevo servidor de alojamiento, pero tu dominio todavía apunta a tu antigua cuenta de alojamiento web.
Para actualizar su dominio, debe cambiar los servidores de nombres DNS. Esto garantiza que los usuarios accedan a la nueva ubicación de su sitio web cuando escriban su dominio en sus navegadores / exploradores.
Si registró su dominio con su proveedor de alojamiento, lo mejor es transferir el dominio a un nuevo alojamiento.
Por otro lado, si utiliza un registrador de dominios como Domain.com, GoDaddy o Network Solutions, deberá actualizar sus servidores de nombres.
Necesitará la información del servidor de nombres DNS de su nuevo alojamiento web. Suelen ser un par de URL con el siguiente aspecto:
ns1.hostname.comns2.hostname.com
Por el bien de esta guía, le mostraremos cómo cambiar los servidores de nombres DNS con GoDaddy.
Para otros proveedores de alojamiento, consulte nuestra guía sobre cómo cambiar los servidores de nombres de dominio.
Dependiendo de su registrador de dominios o alojamiento web, las capturas de pantalla pueden tener un aspecto diferente. Sin embargo, el concepto básico es el mismo.
Debe buscar el área de gestión de dominios y, a continuación, buscar los servidores de nombres. Si necesita ayuda para actualizar los servidores de nombres, puede solicitarla a su empresa de alojamiento web.
Para GoDaddy, tienes que acceder a tu cuenta de GoDaddy y luego hacer clic en “Dominios”.
A continuación, haga clic en el botón “Gestionar” situado junto al nombre de dominio que desea modificar.

Vaya a la sección “Ajustes adicionales”.
A continuación, deberá hacer clic en “Gestionar DNS” para continuar.
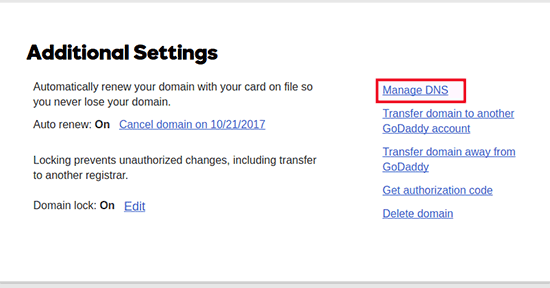
A continuación, desplácese hasta la sección “Servidores de nombres”.
Aquí, haga clic en el botón “Cambiar”.
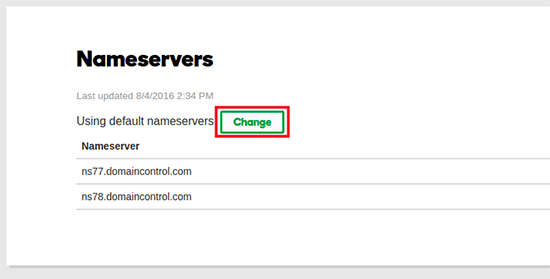
En primer lugar, deberá cambiar el desplegable de tipo de servidor de nombres de “Predeterminado” a “Personalizado”.
A continuación, puede introducir los datos de su nuevo proveedor de alojamiento en Servidores de nombres.
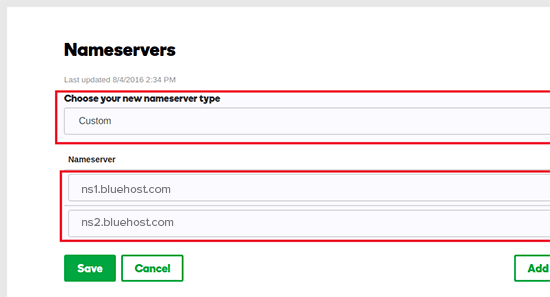
No olvides hacer clic en el botón “Guardar” para almacenar los cambios.
Ha cambiado correctamente los servidores de nombres de su dominio. Los cambios de DNS pueden tardar entre 4 y 48 horas en propagarse a todos los usuarios.
Dado que tiene el mismo contenido en su antiguo host y en el nuevo, sus usuarios no verán ninguna diferencia. La migración de WordPress será perfecta y sin ningún tiempo de inactividad.
Para mayor seguridad, le recomendamos que no cancele su antigua cuenta de alojamiento hasta 7 días después de la migración.
Preguntas frecuentes
Estas son algunas de las preguntas que se hacen muchos de nuestros usuarios al trasladar WordPress de un alojamiento a otro.
1. ¿Cómo puedo migrar mi sitio web WordPress a otro alojamiento?
Puede migrar su sitio web de WordPress trasladando los archivos y la base de datos de WordPress de su antiguo alojamiento al nuevo proveedor de alojamiento.
Algunas empresas de alojamiento también ofrecen servicios gratuitos de transferencia de sitios web, pero tendrás que preguntarles. También puedes hacerlo tú mismo transfiriendo archivos mediante un cliente FTP e importando la base de datos a través de phpMyAdmin.
2. ¿Puedo migrar mi sitio WordPress a otro proveedor de alojamiento?
Sí, puedes migrar tu sitio WordPress a otro proveedor de alojamiento.
3. ¿Puedo acceder a la nueva cuenta de alojamiento sin registrar un nombre de dominio?
Sí, puede acceder a una cuenta de alojamiento sin registrar un nombre de dominio.
El nombre de dominio y el alojamiento son dos servicios diferentes, y no es necesario registrar un nombre de dominio al darse de alta en un nuevo alojamiento. Para más detalles, consulta nuestra guía sobre la diferencia entre nombre de dominio y alojamiento web.
Algunos proveedores de alojamiento le pedirán que seleccione un nombre de dominio como primer paso al contratar el alojamiento. También te permitirán introducir un nombre de dominio si ya tienes uno.
4. ¿Tengo que transferir mi nombre de dominio al nuevo alojamiento?
No, no es necesario que transfiera su nombre de dominio al nuevo alojamiento. Sin embargo, la transferencia de su nombre de dominio a su nuevo alojamiento hará que sea más fácil de renovar y gestionar en el mismo tablero de instrumentos como su nueva cuenta de alojamiento.
Para más información sobre este debate, consulte nuestra guía definitiva sobre nombres de dominio y su funcionamiento.
5. ¿Cómo corregir el error de conexión a la base de datos en Duplicator?
Si aparece un error de conexión a la base de datos o un error de conexión a la base de datos en Duplicator, es probable que haya introducido información incorrecta para la conexión a la base de datos.
Asegúrese de que el nombre de la base de datos, el nombre de usuario de MySQL y la contraseña son correctos. Algunas empresas de alojamiento web no utilizan localhost como host para sus servidores MySQL. Si este es el caso, tendrá que pedir al personal de soporte de su alojamiento web que le proporcione la información correcta.
6. ¿Cómo puedo marcar / comprobar si mi sitio web se está cargando desde el nuevo alojamiento?
Hay varias herramientas en línea que le permiten ver quién aloja un sitio web. Una vez que haya transferido su sitio web al nuevo alojamiento, puede utilizar cualquiera de estas herramientas, y le mostrarán el nombre de la empresa de alojamiento web que aloja su sitio web.
Si no ha pasado mucho tiempo desde que migró su sitio web e hizo cambios en su servidor de nombres de dominio (DNS), es probable que su sitio aún se cargue desde su antiguo alojamiento. Los cambios de nombre de dominio pueden tardar hasta 48 horas en propagarse por completo.
7. ¿Tengo que borrar algún archivo o dato del antiguo alojamiento?
Cuando cambie de empresa de alojamiento, le recomendamos que conserve su antiguo sitio web durante al menos una semana. Después, puede borrar los archivos de su antiguo alojamiento web. Si cancelas tu cuenta, tu proveedor de alojamiento web borrará todos tus datos de acuerdo con su política.
8. ¿Cuánto tiempo debo mantener activa mi cuenta en el antiguo alojamiento?
Una vez que haya migrado su sitio web al nuevo alojamiento, y si no tiene ningún otro sitio web alojado con su antiguo alojamiento web, puede cancelar su antigua cuenta de alojamiento web.
Sin embargo, en algunos casos, es posible que ya les hayas pagado por el alojamiento anual. Deberías comprobar su política de reembolso para ver si tienes derecho a algún reembolso en caso de cancelación.
9. ¿Cómo traslado un sitio WordPress con SSL/HTTPS?
Deberá instalar un certificado SSL en su nuevo proveedor de alojamiento. Después de eso, puede seguir los mismos pasos mencionados anteriormente. Sólo asegúrese de que utiliza HTTPS en las URL, como https://example.com
10. Bonificación: Migración gratuita del sitio por su nuevo alojamiento
Si desea cambiar su alojamiento web, pero los pasos anteriores le parecen demasiado complicados, puede elegir los siguientes proveedores, que migrarán su sitio web por usted.
SiteGround, Hostinger y WP Engine ofrecen migración gratuita de sitios web para los usuarios de WPBeginner.
Esperamos que este tutorial te haya ayudado a trasladar WordPress a tu nuevo alojamiento sin ningún tiempo de inactividad. También puedes consultar nuestra selección de los mejores alojamientos baratos para WordPress o nuestra guía sobre los errores más comunes de WordPress y cómo solucionarlos, si te encuentras con algún problema durante la migración de WordPress.
If you liked this article, then please subscribe to our YouTube Channel for WordPress video tutorials. You can also find us on Twitter and Facebook.


Shane
In the next step, Windows users need to go to Programs » All Programs » Accessories, right click on Notepad and select Run as Administrator. A Windows UAC prompt will appear, and you need to click on Yes to launch Notepad with administrator privileges.
On the Notepad screen, go to File » Open and then go to C:\Windows\System32\drivers\etc. Select hosts file and open it.
I’m having trouble with this step. Can anyone shed any light?
WPBeginner Support
Hi Shane,
You just need to open the Notepad app as an administrator so that you can edit the hosts file.
Admin
Shane
Oh, just microfosft simple wordpad and then “run as administrator”?
Is that all I have to do?
Muhammed Shabeer
Thanks for the wonderfull trick. Exactly the trick was intented to migrate WordPress to new host, but I used for migrating from root to subdomain/subfolder. It done successfully with the plugin. Thank for sharing the trick.
Kenneth Aycox
Thank you for a wonderful product! worked perfect.
James Crow
Briliiant! Thanks so much, I’ve just moved a few sites without any problem at all.
Max
Sadly, this didn’t work for me either. I deleted all the website files as directed , uploaded to the installer.php file and package but when I went to website.com/installer.php I was served a 404 error: Not Found
The requested URL /installer.php was not found on this server.
I think it’s easier to just transfer the website the old fashioned way, as others have mentioned. No need for any scripts that might not work.
Max
Please disregard my comment. I later noticed the root folder was set to httpdocs. So created a folder, named it httpdocs and put the package and installer.php in there. Then the website.com/installer.php worked no problem. All went very smoothly thereafter.
Nandan Jha
Hello Max,
Actually it did work for me in the end. I am guessing that you moved the installer and archive to your new host , correct ?
Please look up the IP address from cpanel or equiv of the new host and try accessing via the IP address
http://IPAddress/installer.phpKB
Seems like a good tutorial, but I had no luck with it. There are also a few steps/screens in the Duplicator sequence that were different from mine. The end result was, I got a 404 error upon clicking Site Login – Login to finalize the setup in Step 4 of 4 of the Test Site screen. This differs substantially from the above. Top right corner there’s a version number of 1.2.30. Fairly certain I have the most up to date version of the plugin. If I use File Manager to view the contents of public_html I don’t see the normal list of wp files that I think I should see aside from a wp-snapshots directory, a few web.config files, some installer files and the archive.zip…oh and database.sql. So something has clearly gone wrong, but I’m at a loss to understand what. So…there it is.
Stephen Duffield
Let me guess, you tried to move from a WordPress.com site? Duplicator & Duplicator Pro wont work for wp.com sites. Nothing works unless you use one of two host sites that they recommend. Duplicator after lots of help, ended up giving me a refund.
Rob
Hey, Just wanted to say thanks for this tutorial. Went perfectly smoothly and would use this duplicator again
Nandan Jha
Great article.
Friends, How do I make it work for an Addon Domain. I took a new plan with GoDaddy and now need to move my sites there. What entry do I make in my hosts file to navigate to install.php ? Thank you,
Nandan Jha
I tried it with my AddOn Domain. It worked for me over a couple of iterations. The thing to take care of is to supply the right ‘domain name’ at Step 3 (or Step 4). The default value which it picks is ‘primarydomain.com/addondomain’. Delete the default value and put addondomain.com
Thanks.
Sean
I recently switched hosts and my original hosting plan has expired. I failed to create a back up before it expired. I do have a local copy of my site on my computer (I use Dreamweaver for FTP). Is there any way to recreate the site with the local files?
Thanks.
Dave Porter
Hi Sean,
Try using WayBack Machine – it takes snapshots of websites over time…
You may be able to grab the source code, images etc… and recreate it from that. I’ve had to do that a few times for clients who have come to me after they have lost contact with their developer…
HTH, Dave
Miki
Hi there,
I have used the Wayback machine and was able to make a copy of my site. Unfortunately I have found myself involved with an unsavory company that had other plans for my business (selling their services on my site) without full disclosure in the beginning. I am now tasked with finding a new programmer to finish the site although it is in wordpress. I do not have wordpress at this time as I was not developing the site; however my understanding from these posts is that if I move the site to another host, I should be able to access wordpress. Is that correct?
WPBeginner Support
Hi Miki,
Yes you can move an existing WordPress website to any other host.
Michael
update…
it works….
be careful with IP address information…. you should read the information carefully…
Thanks
Michael
No luck..
After change the host file, my browser shows message:
This site can’t be reached
example.com took too long to respond.
Search Google for idea inspirations
ERR_CONNECTION_TIMED_OUT
I did flush dns, net stop, dan net start and restart my computer & modem, still not working…
Navajo
I have another question:
In the text it says:
“At this point, you’ve created a complete copy of your WordPress database and files on your new hosting server. But your domain still points to your old web hosting account.
To update your domain, you need to switch your DNS nameservers. This ensures that your users are taken to the new location of your website when they type your domain into their browsers.
If you registered your domain with your hosting provider, then it’s best to transfer the domain to the new host.”
I thought that when i buy a new hosting space, i also and immediatly have to name a doman name. As in: buying a hosting space is always linken to buying a domain. So the new ip addres which i have uploaded my old site to, and which i have to link to my old doman name, already HAS a (newly bought) domain name.
Or can i buy a hosting space, ánd get an IP address which i can use in this tutorial, without it already having a domain name?
Regards, Navajo
WPBeginner Support
Hi Navajo,
It is a common misconception. Hosting and domain name are two different services and you can buy them from two different companies. On the same page where hosting companies offer you to register domain name, they also show another option to indicate that you already have a domain name and you can continue without registering a new one.
For more details please see our detailed guide on What is a domain name and how do domains work?
Admin
Uldis
this is really profound stuff. I was just scratching my head how to migrate client’s site without interruption while changing name servers. Eternally grateful!
Shadat
Hello, I face the database connection failed problem.
can you plz help me? plz
see the screenshots
Dave Porter
Shadat – this is quite an old article now – and you don’t give very much to go on – I would seek help from your hosting company, or get onto a WordPress discussion forum where there are active people who may be able to help you.
But if you are getting a database connection error message, it is generally because the database name/user or password is incorrect
I would try one of the backup tools like Duplicator and see if that works better for you.
Slade
Did you set up a new database and user on your new host?
You must make sure the database name and user and password are all correct for the new host.
Usually a database connection error is a simple oversight like a mispelling or something simple like that.
Michael Goriany
Thanks for this excellent tutorial
If I have well understood, the hosts file (Step 4) is providing for 100% uptime only for the Webmanager but not for the public
How can the DNS switchover time be shortened, or how can the downtime for the public be avoided ?
Slade
Editing the host file allows you to see your site at your new host. Until you update your dns nameservers the public will go to the old host.
The time it takes for dns changes to updare (propagate) is not something that can be controlled. However this guide is correct in providing a no down time solution.
What is happening on the backend that the public does not see is that your website is being hosted at two hosts. The nameservers tell the public which host they are viewing the site on. During the dns update process the users will still view the site at the old host until the propogation is complete.
Once the dns change officially kicks in the public will then be viewing the site at your new host.
Again, to provide the no downtime transfer you would need to change your host file on your local machine (tells your computer you want to view the site at the new host).
This allows you to do the actual install of your website on the new host.
Hope that helps
Lydia
i had to move a client’s site off our subdomain into their own hosting overnight and this REALLY REALLY saved my life! Especially as the domain needed to be repointed seamlessly! I only had trouble with the FTP, i dunno what was wrong with all the logins but i couldn’t get it working. Thankfully my hoster always has an awesome file manager on cpanel.
So yes, very nearly seamless, i’m just testing out the contact forms now which seems to need the DNS switchover time in order to function properly…
And one thing to add, Duplicator has changed the SQL database setup to Step 2 in their latest version, which really made me freak out a bit there.
Thanks very much for the detailed and extremely godsent tutorial!
Kurt
I’m getting ready to follow this tutorial. One question: I am switching servers but also am switching domain names. Should I change my website address in the WP admin settings before running duplicator or after? (Does the order matter?) Thanks!
Johel Fernandez
This tutorial worked out perfectly by April, 2017. ¡Thank you so much!
Ravijit
Hey,
I used this plugin so many times. even, once i used it for too. I really like this plugin but, the problem is it do not extract the big package. We’ve to manually unzip it or need to upload unzipped data to the new hosting.
Any fix for that? Reply as soon as possible.
Archit
Duplicator doesn’t work properly with GoDaddy’s cPanel Linux Hosting service. Script gets terminated even if the settings in php.ini are changed. Please suggest what to do to make Duplicator work there? If not possible, what would be the best alternative?
Hernan
Hi Archit,
I’ve just migrated a site to godaddy and it worked just fine. Which part failed?
best
Hernán
Susan Taunton
This GREAT tutorial successfully guided me through my very first migration of a WordPress site to a different host! Especially life saving was the instruction about changing “sudo nano /private/etc/hosts” in Terminal – worked like a charm. wpbeginner.com has the most succinct, articulate and smart tutorials, which I have come to depend on.
Thank you!!!!
Susan
Prinze
hi, pls have been having issues uploading my site to s new server using FTP client, my hosting company tried to give tutorials on how to transfer with no result.
the tutorials am getting from your site is abt using a duplicate plugin. my site is down, i can’t access my wp-admin to install the plugin.
i use a backup plugin when my site is up so i have a backup file from the plugin i used n also i did a cpanel backup from my old server.
pls, i need a tutorial hoe to upload my backup files to my new server, which one is best to upload?
the plugin backup or the cpanel backup…
pls help!
Greg Draven
What backup plugin did you use?
Ritadrik Chowdhury
Hi Sir,
I am stuck up with 3rd part which is verification part. I have changed the permalinks and I can see the dashboard as usual but the site is not running. Whenever I am clicking on “TEST SITE” it returns error 404: File Not Found. I tried their help documents. Made changes as usual but no luck. Can you please help me out?
saurabh shelar
Hello Sir. I am saurabh from India. I love your website. I have a blog about software review. And I saw your posts and observe that you edited image in microscope effect. This is really fantastic. Can you please tell me how you do this or please make tuts for this please.
Thank you.
WPBeginner Support
Hi Saurabh,
Thanks for the kind words. There are actually tons of tutorials already. Try searching for how to add magnifying glass effect in Photoshop.
Admin
Brad
Hello,
I have a situation where it would be ideal to have the database on separate hosting. Just because the host of the current site does not offer mysql. I cannot move the site (for a company)
Can I install wordpress on current hosting in a sub domain and have the database on another host? I have never used anything except “localhost” in the wp-config file? Thank you!
Sachin
php not supported they are giving reason?? what to do??
Samuel
Does it work on addon domain?
Because there is this step
“Make sure that your root directory is completely empty. If you have WordPress installed in your root directory, then you need to delete WordPress first”
While my primary domain is already up and running
Cory
This is a well put together article, nice job guys!
Just as an FYI for users reading through the comments, any comment pre-dated 12-6-2016 does not pertain to the article above or the Duplicator plugin specifically.
This article was originally written using the Backup Buddy plugin and has since been updated and rewritten using the Duplicator plugin. This should help clear-up any confusion should some of the comments not really make sense or refer to topics not covered in the article.
Mark Rudder
This is an excellent tutorial.
I also believe this is the easiest and fastest way to to migrate a site.
Migrating DB files and tables with phpMyAdmin is the long way around.
Using Duplicator or BackupBuddy is way less work and you are less prone to mistakes that way.
You need to change DNS no matter what method you choose, so that aspect can’t be counted as far as which method is best.
Changing TTL settings to 1 hour (3600 seconds) as Dave Porter pointed out is the only missing piece of the puzzle. (even though that is not essential to success)
Augusto
Nice article, guys!
I feel that the most critical point migrating a site to another host is the email service. If the default email solution provided by host need to be replaced, a lot of work will came.
Anyone want to share your workflow to do this kind of thing?
Thanks!
Frans Kemper
hello,
Would this procedure also work for sub domains?
I have an add on domain to transfer with about 10 related sub domains.
Thank you
Dave Porter
A few days before I move a domain, I go into the DNS settings and change the TTL settings to 1 hour (3600 seconds), so that the site will move quickly (and do it overnight – so the new location will show for everyone in the morning)
(I was expecting this to be mentioned in the article when I saw the title!)
And to answer Dave’s question you can have as many entries in your Hosts file as you want – I have a reseller account with my hosting company and I’m often working on 2 or more sites I am working on that are located on a different server. You can’t specify a sub-directory in the entry – the one entry will point to all locations for that domain – to do what you want to do you are better using sub-domains – so for example example.com is the main location, then you can have play1.example.com as a sub domains that will have it’s own hosts entry.
Harindepreet singh
I think you should make a video or attach screenshots
David in Mississippi
Another article – directly related to this one, but sufficiently different to warrant its own separate article – would be “Replacing A Legacy Website with a Fully-Developed WordPress Website.”
This has happened to me several times already. I have clients with older, legacy-type (non-WordPress) websites, and they ask me to convert their site to WordPress.
I have two methods I use to do this, and one of them involves building the brand new WordPress site on a temporary development URL. When it is done, I then need to transfer it to the existing URL for the client.
In other words, I develop it at DevelopmentSite, and when it is done, I then move it to ExistingLegacySite
I should think it would be easier to do this than the procedure outlined in your article above, but it would still be helpful for you to do an article on this type of migration.
Thanks.
Dave
Correct me if I’m missing something, but this ‘hosts file change’ will only work if you have a just one site on your plan at that new IP address. I have several low-usage sites I’m hosting on one plan. They are in subdirectories under phulic_html.
So doing this:
192.168.1.22 http://www.example.com
in the hosts file will not specify which of your 5 sites to point to. And it seems the only thing you can specify in the hosts file is an IP address and a URL.
You can’t do something like this:
192.168.1.22/sitea http://www.example.com
Am I wrong?
Felipe
I think this is correct, it won’t work for shared domains.
It is better explained here: the voted answer says “If you have shared hosting, this will make your site inaccessible by direct IP. In a shared hosting environment, the host (GoDaddy) will have multiple websites living at the same IP address. When a browser requests a website, the server relies on the domain name to determine which of the many websites to serve. Without a domain name, the server has no way to tell what the browser actually wants so you don’t get your website. To avoid this situation, you will need a host to give you exclusive use of an IP address.”
I think this should be highlighted in the article.
WPBeginner Support
Once you have added your domain name to your new host, your webserver knows that it is hosting domain name example.com and it’s root directory (Doesn’t matter if it is also hosting other domains as well). However, DNS servers take time to propagate so instead of sending your request to your new webserver, they will be sending users to old location for a while. The hosts file allows you to send your request directly to the new server. Hope this clears the confusion.
Admin
Matt Davis
Correct me if I’m wrong, but I believe you can type in (directly in the browser’s address bar) the IP address followed by a slash (/) and then the sub-directory of whichever site you’re trying to access. I would avoid changing the hosts file altogether. Most hosting companies I’ve used will also usually assign temporary URLs to each new website as well, so if that’s the case you could use that instead of the IP or messing with the hosts file.
Niko
That’s correct MATT. Temporary using the IP address instead of altering the hosts file seems like a better approach. However, both work fine.
Vyse
hello. good article but what about wp multisite?
Tanisia
I’ve tried for four hours to make these instructions work. The result? Now I can’t access my site at my old host. I tried following the directions on this 2-year-old article (will there be an update, since BackupBuddy has evolved?) and now everything is messed up.
I used FTP to upload the files, and edited the host file as instructed, but the ImportBuddy PHP script won’t run. It just shows me the code. I tried contacting Bluehost for assistance, and they were no help. So I tried setting all my other settings back to where they were before I started this odyssey, and now I can’t see my site at all. Not the Admin panel, nothing.
WPBeginner Support
Tanisia, please refer to our guide on what to do when you are locked out of WordPress admin area.
Admin
Tanisia
I’m back in at my old host – my servers needed to re-propagage from Bluehost, and it took longer than I had anticipated. I’m still left with BackupBuddy not working the way it’s supposed to. Again, do you have updated instructions from 2014, since there have been several updates to BackupBuddy since this was written? When I did the Notepad update in Windows 10, it looked different from what was described here, so I couldn’t be sure if that trick worked.
Thank you for answering back.
Fahim
If it was a primary domain , can i follow this Process? I need to move and that domain is Main/primary domain, how can i move,will u plz help me?
Mark
Just stuck i step 4, can i just simply addon domain and change dns in new host, ? Following that, C:\Windows\System32\drivers\etc. , there is nothing in my etc, nothing like hosts file, btw great tutorial easy to fallow, thanks
Jacob
I was hoping there would be an easier way to do it with a third party service, but I’m not about to shell out 80 bucks just to do that.
Ash
The backupbuddy steps in the new version have changed quite a bit. Nothing to be afraid of though. I was able successfully migrate from t1.micro on aws to t2.small instance. So far so good.
David
A few questions for you:
1. Isn’t there a SIMPLE way to back up one site (themes, child themes, plugins, and post data), then restore it to another site?
It truly should be as simple as (a) Backup To (dropbox mysite.zip), then (b) Restore From (dropbox mysite.zip).
2. Is it possible, perhaps even EASY, to develop a client’s WP site on your development server, then use Backup Buddy (or some other backup/restore program) to migrate it to the client’s site?
3. Does Backup Buddy, or any other backup/restore program you know of, give you the ability to restore to an existing WP installation? In other words, can you set it to restore everything except the WP core files?
Thanks for this article.
David in Mississippi
WPBeginner Support
Actually, in the article we have shown how BackupBuddy does exactly what you are asking for. You simply backup your site, download an archive file and an importer file. Upload these files to the new location and run the script. Hope this helps.
Admin
Ash
@David, with backupbuddy you can choose which files to leave out while backing up. So you can leave out the core WP files.
Robert
hi guys,
A friend just make me a new wordpress website and uploaded it to my hosting account. Now, I want to change the domain and hosting account and want to upload the website to the new hosting account.
My friend sent me the archive with all files of the website including database. How is possible to upload the website to my new host?
I appreciate your answer.
thank you
Ricardo Clarke
I actually just went through this process yesterday and need to transfer another site today. This is hands down the most thorough walkthrough I’ve seen. The 4 to 48 timeframe really helped ’cause I thought something went wrong, but the transfer just needed time to propagate across the interwebs.
WPBeginner Staff
As soon as you figure out that your new domain has regained the search positions for your old site. We hope that you have setup 301 redireccts on old domain otherwise search engines wouldn’t know that your old content has moved to the new domain permanently.
WPBeginner Staff
What’s the shorter way of doing this?
Sebastien
Hi there, thanks for your tutorial, here’s an other way of doing it… free.
1. Tools > export posts and pages from admin panel. If you also need the DB phpMyAdmin export tables from the db. Import them in the new db. Check for the extension of the tables to be the same (_wp for instance)
2. edit your virtual host config file, add what follows between your server {}
allow your_public_ip;
deny all;
3. Access the site by its ip. (make sure you set the ip of your new server instead of the url in phpmyadmin > wp_options > siteurl and home options)
4. Tools > import posts and pages
5. Change your DNS records at the old host.
6. Done. Use another plugin like UpdraftPlus to backup for free.
Ash
Tried UpdraftPlus. Didn’t do anything at all.
Rachel Charles
Clean and modern and Easy to modify!
Kate_H
Great guide. I can confirm these steps work brilliantly as I recently moved a 5 year old WP site from one domain to another domain and swapped web hosts as well.
The only difference I did was redirect the old site to the new site via the .htaccess as I wasn’t migrating the old domain name over at the time.
Out of curiosity how long would you leave it before deleting all the old content from the old domain and setting up a permanent URL redirect via your registrar?
zimbrul
I really hate Backup Buddy. In 80% of cases I got errors and their support is not that good. I’d rather move a site with Duplicator free WordPress plugin
WPBeginner Staff
Zimbrul, Duplicator is a nice plugin too. However, we have moved many WordPress sites using BackupBuddy and it has always worked flawlessly for us. That’s why we recommend it.
Jim
Fully agree. Duplicator has never let me down and I have backed up and installed to many websites to count. No need for a paid plugin.
Dennis Does Cricket
That’s a ridiculously long winded way of doing it.
Jonathan
I was looking for this. This already assumes knowledge of FTP etc. so why not just:
1. Copy over all files (download locally, upload to new server).
2. Export the DB (you can use Migrate DB free version if you can’t access the old hosts phpmyadmin or such). Also, if you’re moving from a different domain it replaces the urls etc.
3. Create a new DB on your new host, import the DB.
4. Transfer the domain.
Same result, no fiddling with installer scripts and such.
Matt Davis
This is how I would do it.. In addition, you would also need to edit your wp-config.php file with the new DB info (Specifically the database host entry, as I believe importing the old database will create the same database name, user and password on the new one). Also, I would avoid editing your hosts file and instead either use the IP address directly in your browser’s address bar followed by your sub-directory name (if needed) or use the temporary URL most hosters provide when a new account is set up.
The steps in this article are good for someone that doesn’t want to touch configuration files in their WordPress folders, or who want an all-in-one solution that gets them their site and DB in one step.