Muchos usuarios de WordPress prefieren trabajar en sus sitios web utilizando un servidor local en su ordenador. Esto le permite trabajar en su sitio web en privado antes de hacer los cambios disponibles en línea.
Con el tiempo, tendrá que trasladarlo a un servidor en vivo para que sea accesible a los visitantes en línea. Esta transición es crucial para garantizar que el sitio web funcione correctamente en el sitio activo.
Hemos trabajado en muchos sitios web locales, así que tuvimos que aprender la forma más fácil de transferir contenidos a sitios web activos.
En este artículo, proporcionaremos instrucciones paso a paso sobre cómo trasladar WordPress de un servidor local a un sitio activo.
¿Por qué trasladar WordPress de un servidor local a un sitio activo?
Construir su blog de WordPress en un servidor local es una forma segura de probar los cambios en su sitio web sin afectar a los visitantes.
Cuando haya terminado de perfeccionar su sitio web, el siguiente paso es pasar de su servidor local a un sitio activo.
Vamos a mostrarle dos formas de trasladar su sitio de un servidor local a un sitio activo.
El primer método utiliza un plugin de migración de WordPress y se recomienda para principiantes.
En el segundo método, le mostraremos cómo trasladar manualmente WordPress de un servidor local a un sitio activo.
Puede elegir el método que más le convenga:
Antes de migrar su sitio WordPress
Para migrar WordPress de un servidor local a un servidor activo, debe tener en cuenta algunos aspectos.
En primer lugar, suponemos que tiene un sitio de WordPress ejecutándose en un servidor local (también llamado localhost) en su ordenador y que tiene pleno acceso al mismo.
A continuación, tendrá que tener un nombre de dominio y alojamiento web.
Hemos oído innumerables historias de principiantes que empezaron con proveedores de alojamiento web malos o gratuitos y se arrepintieron. Según nuestra experiencia, elegir el proveedor de alojamiento correcto es fundamental para el éxito de cualquier sitio web.
Para facilitarte la decisión, te recomendamos Bluehost. Son una empresa de alojamiento de WordPress recomendada oficialmente, y están dando a los usuarios de WPBeginner un descuento exclusivo + dominio y SSL gratis.
Básicamente, puedes empezar por tan sólo 1,99 $ al mes.
Si quieres una gran alternativa a Bluehost, puedes mirar Hostinger. También están ofreciendo un descuento exclusivo a los usuarios de WPBeginner con un nombre de dominio gratis.
Si puedes permitirte pagar un poco más, entonces comprueba SiteGround. También tienen una oferta especial para los lectores de WPBeginner.
Si necesitas ayuda para establecer tu sitio web, sigue paso a paso nuestra guía sobre cómo crear un sitio web.
Por último, necesitará un programa FTP y saber cómo utilizarlo para subir el sitio de su servidor local al sitio activo.
¿Preparado? Empecemos a migrar su sitio de WordPress.
Tutorial en vídeo
Si prefiere instrucciones escritas, siga leyendo.
Método 1: Transferir WordPress del servidor local al sitio activo utilizando un plugin de migración (recomendado)
Este método es más fácil y recomendado para principiantes. Vamos a utilizar un plugin de migración de WordPress para mover WordPress desde localhost a un sitio en vivo.
Paso 1: Instalar y configurar el plugin Duplicator
En primer lugar, debe instalar y activar el plugin Duplicator en su sitio regional. Para más detalles, consulte nuestra guía paso a paso sobre cómo instalar un plugin de WordPress.
Consejo profesional: También hay una versión pro de Duplicator que ofrece copias de seguridad seguras, almacenamiento en la nube, restauración fácil del sitio y mucho más.
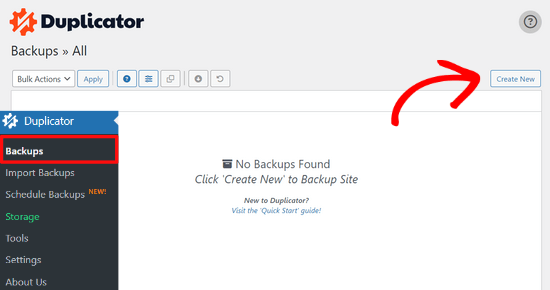
Tras la activación, debe ir a la página Duplicator ” Copias de seguridad y hacer clic en el botón “Crear nueva”.
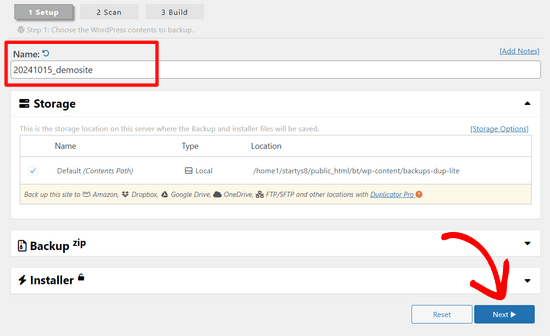
Aparecerá una pantalla en la que podrá asignar un nombre a la copia de seguridad.
A continuación, haga clic en el botón “Siguiente”.
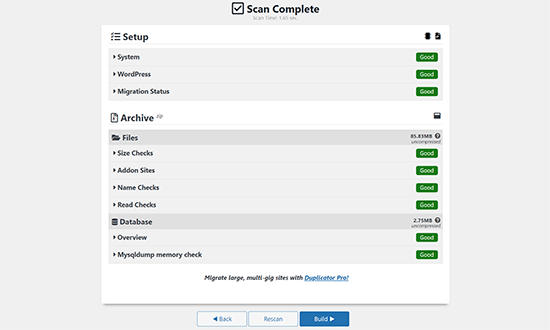
Duplicator realizará ahora algunas pruebas para ver si todo está en orden.
Si todos los elementos están marcados como “Bien”, haga clic en el botón “Construir”.
Este proceso puede tardar unos minutos, dependiendo del tamaño de su sitio web. Debe dejar esta pestaña abierta hasta que finalice.
Cuando termine, verá las opciones de descarga de los paquetes “Instalador” y “Archivo”. Haz clic en el botón “Descargar ambos archivos” para descargarlos en tu ordenador.
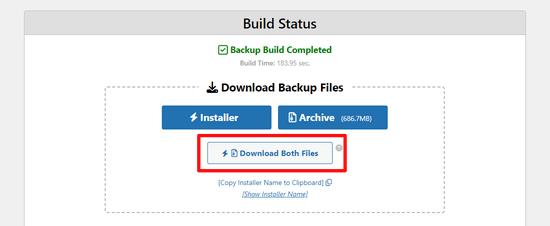
El archivo “Archivo” es una copia completa de su sitio WordPress. Incluye todos los archivos del núcleo de WordPress, así como sus imágenes, subidas, temas, plugins y una copia de seguridad de su base de datos de WordPress.
El archivo “Instalador” es un script que automatizará todo el proceso de migración descomprimiendo el archivo que contiene su sitio web.
Paso 2: Crear una base de datos para su sitio web WordPress en vivo
Antes de que pueda ejecutar el instalador o subir el sitio web WordPress desde localhost a su servidor de alojamiento, necesita crear una base de datos MySQL para su nuevo sitio web en vivo.
Si ya ha creado una base de datos MySQL, puede omitir este paso.
Para crear una base de datos, debe visitar el Escritorio cPanel de su cuenta de alojamiento. A continuación, localice la sección “Bases de datos” y haga clic en el icono “Asistente para bases de datos MySQL”.
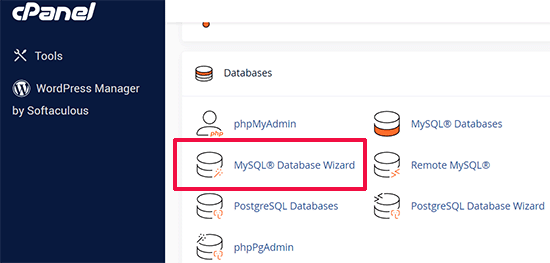
En la pantalla siguiente, hay un campo para crear una nueva base de datos.
Sólo tiene que dar un nombre a su base de datos y hacer clic en el botón “Crear base de datos”.

cPanel creará ahora una nueva base de datos para usted.
A continuación, introduzca un nombre de usuario y una contraseña para el nuevo usuario y haga clic en el botón “Crear usuario”.
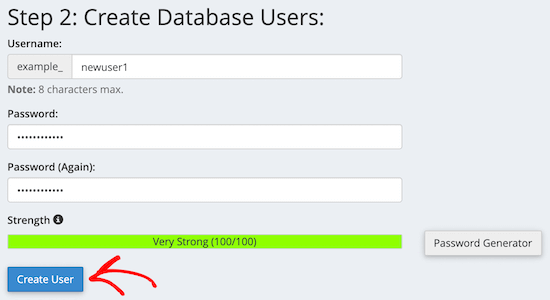
A continuación, tienes que añadir a la base de datos el usuario que acabas de crear.
En primer lugar, haga clic en la casilla de verificación “Todos los privilegios”.
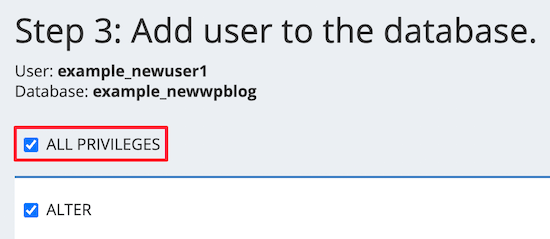
A continuación, desplácese hacia abajo y haga clic en el botón “Realizar cambios” para guardar los cambios.
Su base de datos ya está lista para ser utilizada con su sitio WordPress. Asegúrese de anotar el nombre de la base de datos, el nombre de usuario y la contraseña. Necesitará esta información en el siguiente paso.
Paso 3: Subida de archivos desde el servidor local al sitio web de WordPress.
Ahora tiene que subir los archivos y el instalador de su sitio local a su cuenta de alojamiento.
En primer lugar, conéctese a su sitio activo utilizando un cliente FTP. Una vez conectado, asegúrese de que el directorio raíz de su sitio web está completamente vacío.
Normalmente, el directorio raíz es la carpeta /home/public_html/.
Algunas empresas de alojamiento de WordPress instalan WordPress automáticamente cuando te registras. Si tienes archivos de WordPress allí, entonces necesitas borrarlos.
Después, puede subir los archivos archive.zip e installer.php desde Duplicator a su directorio raíz vacío.

Paso 4: Ejecutar el script de migración
Una vez subidos los archivos de migración, visite la siguiente URL en su navegador / explorador:
http://example.com/installer.php
No olvide sustituir “ejemplo.com” por su propio nombre de dominio.
Se iniciará el asistente de migración de Duplicator.
El instalador realizará algunas pruebas e inicializará el script.
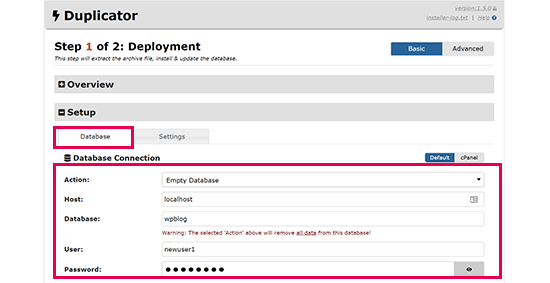
En la sección Configuración, se le pedirá que introduzca su alojamiento MySQL, el nombre de la base de datos, el nombre de usuario y la contraseña.
Su alojamiento será probablemente un alojamiento local. A continuación, introduzca los datos de la base de datos creada en el paso anterior.
A continuación, haga clic en el botón “Validar” para asegurarse de que los datos introducidos son correctos.
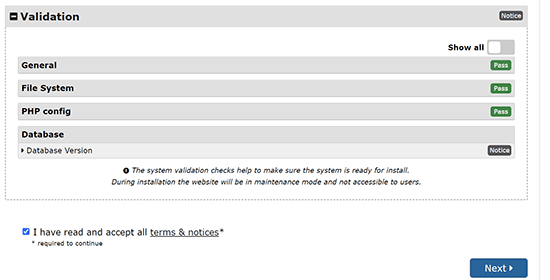
A continuación, haga clic en el botón “Siguiente” para continuar.
Duplicator importará la copia de seguridad de su base de datos de WordPress desde el archivo a su nueva base de datos.
También actualizará las URL que apuntan al sitio local y a su nuevo sitio activo.
Ahora puede hacer clic en el botón ‘Admin Login’ para acceder al área de administrador de WordPress de su sitio.

Una vez que acceda a su sitio activo, Duplicator limpiará automáticamente los archivos de instalación.
Eso es todo. Ha movido correctamente WordPress del servidor local a su sitio activo.
Método 2: Transferir manualmente WordPress del servidor local al sitio activo
En este método, le mostraremos cómo mover manualmente WordPress desde el servidor local a su sitio activo. Será útil si el primer método no funciona o si prefieres hacerlo manualmente.
Paso 1: Exportar la base de datos local de WordPress
Lo primero que tienes que hacer es exportar tu base de datos local de WordPress. Para ello utilizaremos phpMyAdmin.
Si no estás familiarizado con ella, entonces puede que quieras echar un vistazo a nuestra guía para la gestión de bases de datos de WordPress usando phpMyAdmin.
Sólo tienes que ir a http://localhost/phpmyadmin/ y hacer clic en tu base de datos de WordPress. A continuación, haz clic en el botón “Exportar” de la barra de menú superior.

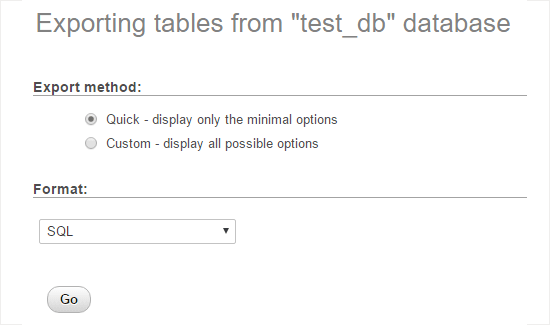
En la opción ‘Método de exportación:’, puede elegir ‘Rápido’ o ‘Personalizado’. Personalizado le proporcionará más opciones para exportar su base de datos.
Pero le recomendamos que elija “Rápido” y luego haga clic en el botón “Ir” para descargar su base de datos.
Paso 2: Subida de archivos de WordPress al sitio activo
Ahora, tendremos que mover todos los archivos de su sitio web al sitio en vivo.
Para empezar, abra su cliente FTP y conéctese a su cuenta de alojamiento web.
Una vez conectado a tu sitio, asegúrate de subir los archivos al directorio correcto. Por ejemplo, si quieres que el sitio esté alojado en ‘tu_sitio.com’, entonces querrás subir todos los archivos a tu directorio public_html.
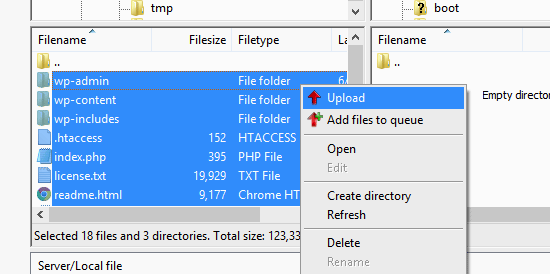
Ahora seleccione los archivos locales de WordPress y súbalos a su servidor.
Paso 3: Crear una base de datos MySQL en su sitio activo
Mientras tu cliente FTP está subiendo tus archivos de WordPress, puedes empezar a importar tu base de datos al servidor.
La mayoría de los proveedores de alojamiento de WordPress ofrecen cPanel para gestionar su cuenta de alojamiento, por lo que le mostraremos cómo crear una base de datos utilizando cPanel.
En primer lugar, debe acceder a su panel de control de cPanel y hacer clic en el icono “Asistente para bases de datos MySQL”, que se encuentra en la sección “Bases de datos”.

En la pantalla siguiente, puede crear una nueva base de datos.
Introduzca un nombre para la base de datos y haga clic en “Crear base de datos”.

cPanel creará automáticamente una nueva base de datos para usted.
A continuación, debe introducir un nombre de usuario y una contraseña para su nuevo usuario y, a continuación, hacer clic en “Crear usuario”.
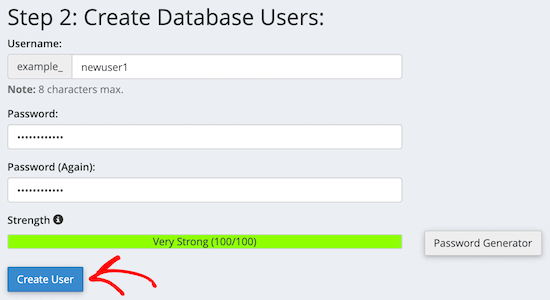
Después, tienes que añadir a la base de datos el usuario que acabas de crear.
En primer lugar, marque / compruebe la casilla de verificación “Todos los privilegios”.
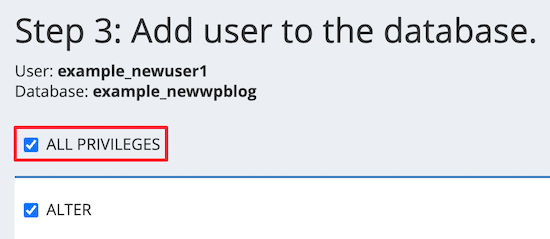
A continuación, desplázate hacia abajo y haz clic en “Realizar cambios” para guardarlos.
Ha creado correctamente una nueva base de datos para su sitio de WordPress.
Paso 4: Importar la base de datos de WordPress al sitio activo
El siguiente paso del proceso es importar su base de datos de WordPress.
Vaya a su Escritorio de cPanel, desplácese hasta la sección ‘Bases de datos’ y haga clic en ‘phpMyAdmin’.
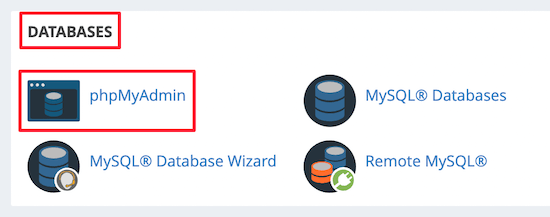
Esto le llevará a phpMyAdmin, donde debe hacer clic en la base de datos que acaba de crear. phpMyAdmin mostrará su nueva base de datos sin tablas.
A continuación, haga clic en la pestaña “Importar” del menú superior. En la página de importación, haga clic en el botón “Elegir archivo” y seleccione el archivo de base de datos del sitio local que guardó en el primer paso.
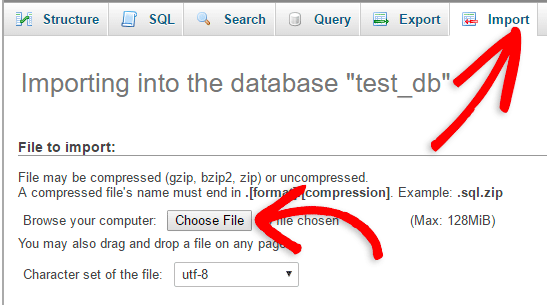
A continuación, haz clic en el botón “Ir” situado en la parte inferior de la página. Tu base de datos se importará automáticamente a phpMyadmin.
Paso 5: Cambiar la URL del sitio
Ahora, usted necesita cambiar la URL del sitio en su base de datos para que se conecte con su sitio de WordPress en vivo.
En phpMyAdmin, busque la tabla wp_options en la base de datos que acaba de importar.
Si ha cambiado el prefijo de su base de datos, entonces en lugar de wp_options, podría ser {new_prefix}_options.
A continuación, haga clic en el botón “Examinar” situado junto a wp_options. O bien, haga clic en el enlace en la barra lateral para abrir la página que tiene un anuncio / catálogo / ficha dentro de la tabla wp_options.
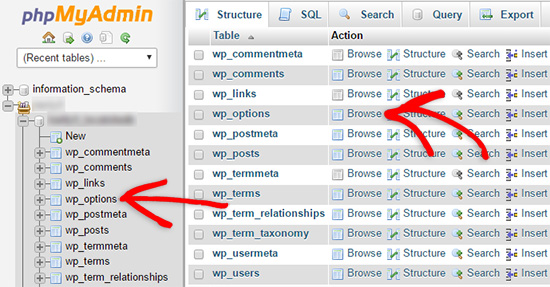
A continuación, en la columna options_name, debe buscar la opción siteurl.
A continuación, haga clic en el icono “Editar”.

Aparecerá una ventana en la que podrá editar el campo.
En el cuadro de entrada option_value, verá la URL de su instalación local, que será algo así como http://localhost/test.
Debe introducir la URL de su nuevo sitio en este campo, por ejemplo: https: //www.wpbeginner.com.
A continuación, puede guardar el campo al hacer clic en el botón “Ir”.
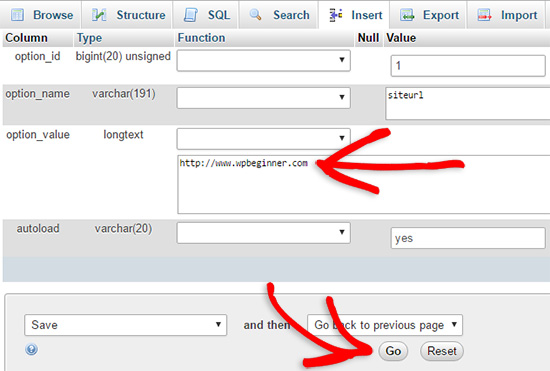
A continuación, debe seguir los mismos pasos anteriores para el nombre de la opción de inicio. El menú wp_options puede tener varias páginas. Normalmente, la opción de inicio estará en la segunda página.
A continuación, actualice la URL de inicio para que sea la misma que la URL de su sitio activo.
Paso 6: Establecer su sitio en vivo
Ahora que ha importado la base de datos y subido su contenido, es el momento de configurar WordPress.
En este momento, su sitio debería mostrar el error“Error al establecer una conexión con la base de datos“.
Para corregirlo, conéctese a su sitio web mediante un cliente FTP y abra el archivo wp-config.php.
Busque las siguientes líneas de código:
1 2 3 4 5 6 7 8 9 | // ** MySQL settings - You can get this info from your web host ** ///** The name of the database for WordPress */define( 'DB_NAME', 'database_name_here' );/** MySQL database username */define( 'DB_USER', 'username_here' );/** MySQL database password */define( 'DB_PASSWORD', 'password_here' );/** MySQL hostname */define( 'DB_HOST', 'localhost' ); |
Deberá indicar el nombre de la base de datos, el nombre de usuario y la contraseña que creó anteriormente.
A continuación, guarde el archivo wp-config.php y vuelva a subirlo al servidor de alojamiento de WordPress.
Ahora, cuando visite su sitio web, debería estar en directo.
Después de eso, tienes que acceder a tu panel de administrador de WordPress e ir a Ajustes ” General. A continuación, sin cambiar nada, desplácese hasta la parte inferior y haga clic en el botón “Guardar cambios”.
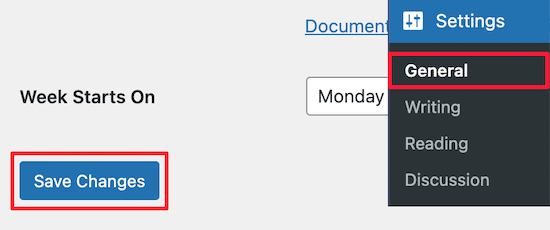
Así se asegurará de que la URL de su sitio se corrige en cualquier otro lugar en el que deba estar.
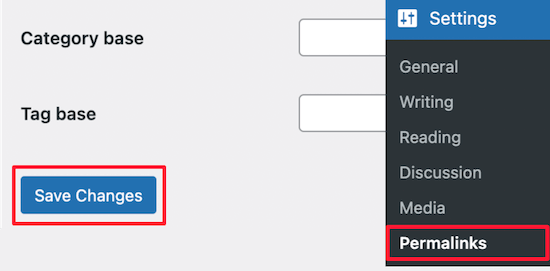
Una vez hecho esto, vaya a Ajustes ” Enlaces permanentes, desplácese hacia abajo y haga clic en “Guardar cambios” para asegurarse de que todos los enlaces de las entradas funcionan correctamente.
Paso 7: Corregir imágenes y enlaces rotos actualizando rutas
Siempre que traslade un sitio de WordPress de un dominio a otro o de un servidor local a un sitio activo, se encontrará con enlaces rotos e imágenes que faltan.
Le mostraremos dos formas de actualizar las URL. Puede elegir la que más le convenga.
1. Actualizar URLs usando el plugin Search & Replace Everything (Recomendado)
La forma más segura de corregir esto es mediante el uso de Search & Replace Everything. Es un potente plugin de WordPress que le permite realizar fácilmente tareas de actualización por lotes en su sitio web sin necesidad de escribir complejas consultas a la base de datos.
En primer lugar, debe instalar y activar el plugin Search & Replace Everything.
Una vez activado, vaya a la página Herramientas ” WP Search & Replace.
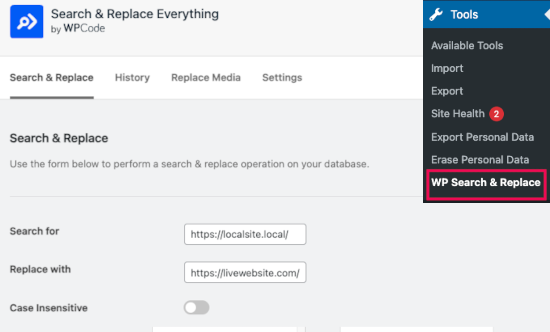
A continuación, introduzca la URL del sitio local en el campo “Buscar” y la URL del sitio activo en el campo “Sustituir por”.
Desplázate un poco y haz clic en “Seleccionar todo” debajo de las tablas. Esto asegura que el plugin buscará la antigua URL en cualquier parte de la base de datos.
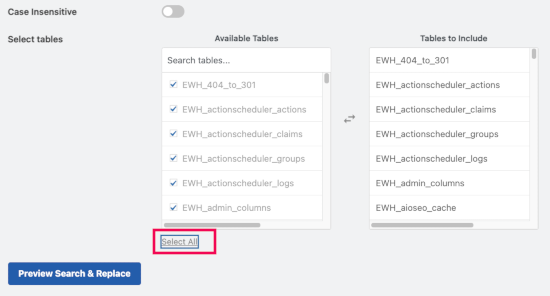
Ahora haga clic en el botón “Vista previa de Buscar y reemplazar” para continuar.
El plugin buscará en su base de datos todas las instancias de la URL antigua y previsualizará los resultados.
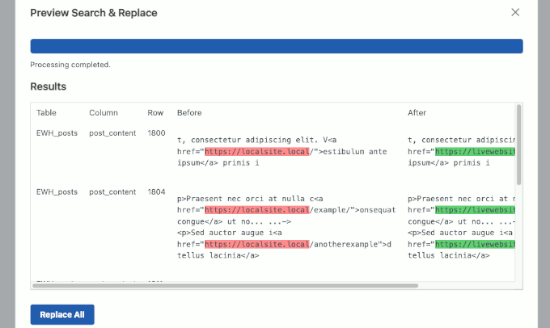
Si todo va bien, haz clic en “Reemplazar todo” para guardar los cambios.
Verás una advertencia acerca de los cambios que estás realizando. Haz clic en “Sí” para continuar.
El plugin actualizará la base de datos y sustituirá las URL locales por la URL actual de su sitio web.
2. Actualizar URL manualmente (Avanzado)
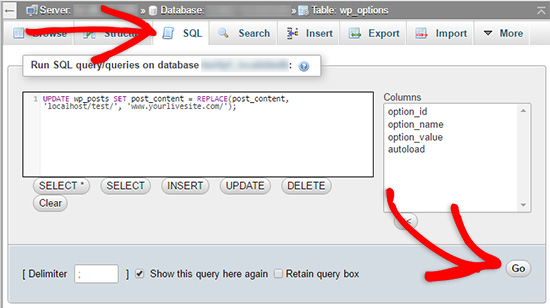
Otra forma de actualizar las URL es mediante la siguiente consulta SQL:
1 | UPDATE wp_posts SET post_content = REPLACE(post_content, 'localhost/test/', 'www.yourlivesite.com/'); |
Simplemente vaya a phpMyAdmin, haga clic en su base de datos y, a continuación, haga clic en “SQL” en el menú superior y añada la consulta anterior.
Asegúrese de cambiarla por la URL de su sitio local y del sitio activo y haga clic en el botón “Ir”.
Ya está. Ha migrado correctamente WordPress de su servidor local a un sitio activo.
Esperamos que tu sitio web esté funcionando correctamente. Si usted marca / comprobar cualquier error, puede consultar nuestra guía de errores comunes de WordPress para ayudar a diagnosticar problemas.
Esperamos que este artículo te haya ayudado a trasladar WordPress de un servidor local a un sitio activo. También puedes consultar nuestra guía sobre cómo trasladar un sitio activo a un servidor local o echar un vistazo a la lista de comprobación definitiva para la migración de sitios web para conocer los pasos prácticos de la migración de WordPress.
If you liked this article, then please subscribe to our YouTube Channel for WordPress video tutorials. You can also find us on Twitter and Facebook.


Axel
I love this entry, I use it as a checklist every time I make a migration.
WPBeginner Support
Hey Axel,
Glad you find it useful Don’t forget to join us on Twitter for more WordPress tips and tutorials.
Admin
Gary
I keep getting stopped at step 4. when I import my datatbase I get the following error
#1231 – Variable ‘character_set_client’ can’t be set to the value of ‘NULL’
I only have limited sql knowledge and never done anything like this before. any help/guidance would be greatly appreciated
Andrew
Hello,
So I got to step 6 without any issues until my website failing to become live. I went into my wordpress general setting and my site url was still a localhost. Am I suppose to change the site url before I upload it into the ftp program and into my host, or can i leave that as localhost? Or, do i change the site url in wordpress after i’ve uploaded my files into my hosting site?
This page was super helpful, thanks!
Daneesh
Hi. Thanks so much for this, excellent tutorial. I seem to have got stopped at Step 6. I am still getting a “Error establishing database connection” error. DO i need to change the hostname field in the config.php too? and what do i change that to?
Simon
Amazing, it worked, thank you.
sornanun
Thank you very much.
Annete Momanyi
Thank you for the article. I have managed to sort my problem after following these steps.
Arash
Hello there,
I have two questions and I’d be grateful if you could help me!
1) Why do I have two ht-docs and wp-content folders inside my WordPress folder?
2) When I move my WordPress website from a localhost to the live host, It’s possible to remove my localhost or should I keep it forever?
Thanks in advance!
Matze
1) By installing WordPress on your hosted server, these docs/folders will be automatically added. I think while uploading your files from local to live via FTP __ht-docs__ and __wp-content__ just weren’t replaced.
But please check your local files which are normally located in the WAMP/MAMP folders unter __htdocs__ . Are there also two copies of the datas? Then you should find out, which one is the right one …
2) At the time uploading your files from local to live, the local datas are a backup. After some weeks, changing and editing your live site on the server you can delete the locals.
But you should create a backup regular and store the datas local (Quote: “If you are doing this on a regular basis, then we highly recommend that you get BackupBuddy because it will make your life easy. You will thank us for that later”)!
Hope it helps
Starfleet Nnaemeka
Wow! What a wonderful tutorial , seriously i really appreciate the effort you guys brought out to write these tutorial. Thanks it really helped me to set up my website build on wordpress from localhost on wampserver.
Leo Laroche
i have followed all the steps, but when i type in my website the old website comes up. Can someone help me please.
rachel asakome
i have followed steps 1-5, but i am not sure where my site is. sorry it sounds really dumb but i am not great with technology. I have uploaded the files, but when i type in my website the old website comes up
Justas
server DNS address could not be found.
ERR_NAME_NOT_RESOLVED
I changed everything accordingly, but still can’t connect.
Carrie
Could you please explain on how to do this with webmatrix? I have a PC and my wordpress install on my local PC was with webmatrix. I do not have a MAC. Where on webmatrix do I export? I am confused about this. Also, you have create a db in cpanel my sql. Where do I save this new db? On the cpanel someplace or on my local pc hard drive and under what name? I have a domain with go daddy and a web hosting I purchased. They said to do a brand new fresh install of wordpress from there site…. why would I do this? I already have my wordpress via webmatrix on my local pc this is where the website I built resides. How do I get this on my web hosting? Confused on the db stuff and how to get my local wp files/db to my web host. Thank you.
Neo An
Very clear!
Thank you very much!
Milica
This is a great tutorial. Thanks a lot!
Amber
I have followed all of these steps and when I view my site it is showing my content like words and links but none of the decorative stuff or plugins etc. My menus are showing up as just a list of words as if I created a page without any real CSS. My CSS files are not missing so I do not know where the mess up is happening. I tried to do the part about fixing broken links and I am not 100% of what I should put after the localhost part. I used the name of the folder that my entire wordpress database/files/etc are in. I cannot seam to figure out what is going wrong.
Abdul
@AMBER and all those struggling with the same issue, the problem with the deployment process of WordPress’ database is due to the empirical replacement of your local URI with the live site’s URI as explained in this article at Step 7. If you just execute the UPDATE SQL statement as shown, you, most of the time, end up corrupting your database. Why? The reason is simple: WordPress has a way of serializing some metadata for its own convenience. This post explains it pretty well: nacin.com/2010/04/18/wordpress-serializing-data
If you look at this array:
array( ‘apple’, ‘banana’, ‘orange’ ),
when serialized it looks like this:
a:3:{i:0;s:5:”apple”;i:1;s:6:”banana”;i:2;s:6:”orange”;},
where:
– a:3 stands for “array of size 3”
– i:0; i:1; i:2 stand for “integer index 0; integer index 1; integer index 2″ respectively
– s:5:”apple” stands for “string, length 5, data=apple”
– s:6:”banana” stands for “string, length 6, data=banana”, etc.
As you can see, any serialized string is stored along with information about it’s length. So when you do a simple search and replace in your tables, all occurrences will be replaced indeed but the string’s length metadata won’t.
In the case your local URL’s length equals your live site’s URL length, then you’re lucky; if they don’t match then you’re in trouble.
The question now is: “How do I fix this?”. I’m happy to say that, fortunately, there are many plugins that can help you with this but one that’s really simple and good at it is “Better Search Replace”.
Simply install this plugin in your local WordPress installation and proceed as explained in this article. The only place where you can safely replace your local URL is in the wp_options table as explained at Step 5.
Once you’re done installing the plugin, in the admin panel, go to “Tools, Better Search Replace”, in the “Search” text box type your local site’s URL (e.g. http://localhost:12345) and in the “Replace with” text box, type your live site’s URL (e.g. http://www.example.com) and you should be ready to go. Just make sure you don’t include any trailing forward slash “/” in the URL (at the end like http://localhost:12345/ or http://www.example.com/)
I hope this explanation was useful and please let me know if it helped.
Happy coding!
Simon
Hi,
Brilliant article and very easy to follow.
However, as a WordPress virgin I am struggling with the whole concept of having a separate database from the website. I have created everything locally on my PC. But the local PHP Admin will allow me to use however many characters i like in naming my database but my remote server/host (123-reg) will only allow 9 (my original had 11) so…. the database name locally is different from the database name remotely. I have exported the database tables and imported them in to the remote database, renamed my wp-config to point to the new shorter database name with the correct user name and password but i am still getting the ‘Error establishing a database connection’
message. Any suggestions?
Could the fact that the tables are exported from a database with a different name from the one they are being imported to make a difference?
Gabriel
Hello I made all of your steps but I can see only a white page. It doesn’t notify me an error.
I upload everything in a subdirectory of my website. It’s because of that? Is there a solution?
Patrick Hasch
Great article, if the upload of zipped files doesn’t work try uploading .sql files instead.
Tony
I also faced the same problem.
John James
Hello. From your step 6, you said we should change database name, user and password. Are we supposed to change the hostname too?
WPBeginner Support
See step 3 to find out your hostname and use that instead.
Admin
John
Step 3 says nothing about host names.
WPBeginner Support
When you are creating a database on your webhost, you will be able to see the hostname. If you don’t then this means you are using localhost.
Mohd Hasan
i followed all steps but going to install.php page , someone can help me , i really need your help
Gabor
Hello!
i have 500 internal error on server.
I think the problem is with .htaccess.
Can u help in this?
Dawn
I am having this same issue. I followed every step exactly, I fixed the wp-config.php file and re-uploaded it, but now when I go to my live site it says,
“This page isn’t working
[my site] is currently unable to handle this request.
HTTP ERROR 500”
Dawn
I should have said that that is the error I get when I try to go to my wp-admin. When I go to the site itself it’s blank.
Axel
The solution for image references is to execute the following scripts on your DB:
(I can’t write the real scripts because wpbeginner.com thinks I’m doing SQL injection :\ )
UPDATE wp_posts to set the value of column guid to the value of function REPLACE(guid, ‘http://old.site.url’, ‘http://new.site.url’)
AND
UPDATE wp_postmeta to SET the value of column meta_value to the value of function REPLACE(meta_value, ‘http://old.site.url’, ‘http://new.site.url’)
Also don’t forget to check permissions for wp-content/uploads to ensure you can add more images.
Aimy
Hi,
Thanks for this. I did everything as you described. It seemed that everything went well apart the front page that shows nothing but just the navigation menu.
When I go to the page builder of the front page it shows that there is nothing added there.
Any advice?
Krishna
Dear wpbeginner owner
Its working for me !
thank you very much!
Philippe
Damn I’m so lucky wpbeginner exists, I’ve finally managed to get my website to work thanks to this post, I had to fight my way trough (there is an older database-version on my webhosts server) but I did it thanks to you guys!
Umai Hassan
URL Changing
I have changed the URL in wp_option table but only home page loads correctly other pages links are still set to localhost/something ??
What should I do to change all links??
Cos
Brilliant article – thanks! Got through the process without a hitch first-off :-)))
Dan Odaka
Hey, after doing all that, when I go to my site I get a page that shows me the index of wordpress and not my site. what do I do?
WPBeginner Support
This could happen due to an incomplete file transfer. Try to upload your WordPress files again.
Admin
Sonja
Hi. thank you very much for this post. It seems to be very helpful and I’ve tried to follow every step, but now that I’m done, when I go to my URL I get a “Server not found” error (The host shows me a preview with “under-construction” and their logo, which was online before I uploaded the data and database – shouldn’t I at least get that?). Do you have any ideas where I might have gone wrong, and is it best to delete everything and start again from scratch, or overwrite it, or look for any particular errors?
Thank you for any help!
WPBeginner Support
You may have installed WordPress outside your public directory.
Admin
Hugues Pinsonneault
im wondering if you have any recommendation for developing locally new functionalities on a local dev install, while the client can still do updates on the real database.
shah
Hi
Thankyou for the details, but i am still not able to get the path of images correct inspite of the changes done … i have my folders in public_html and have my db created …my live website is working fine except for the pic / logos
zarna
My wordpress site went live but my images are not getting replicated and they aren’t visible. Can you please guide me what should be the images folder structure while uploading it to live ??
Your help and guidance would be appreciable.. Thank you.
Coil McCoy
Great post !!!
Only the last part doesn’t worked for me, the pictures and links still missing !
Any clue?
thank you
Vinish Chaudhary
Hello,
All great beside this You don’t have permission to access / on this server.Don’t know why it is showing when I try to access my site.I have done all steps like you said but getting this error can anyone please help me to solve this problem.
Sudais
Instead of this long way,I use a plugin called wp all in one migration,I just need to import a single file using a plugin when I go live and all done,no playing with databases,etc.I think everyone should do that saves alot of time and handywork.
hiren
can u put the demo ..
thanks.
hiren patel.
Paul
Great article ! But I’m still stuck at the last step. Images aren’t showing on my website.
Well in fact they does, but only on my PC. Everybody else is getting a buggy website.
Farooq Bashir
Wow .. Great Article sir
Its Perfect Working.
Thanks
Bikram Ray
Hi,
No doubt; a very useful article. But I got stuck in the last step. I ran the SQL update query but still having issues regarding image path.
Just one thing; while uploading the file through FTP, I did not upload the wordpress folder (the test folder) rather I uploaded whatever inside it.. So in the server there is only the folders and files directly placed under ‘public_html ‘
Regards,
Bikram
Kay
DIDN’T WORK!!
Error
SQL query:
—
— Database: `wordpress`
—
CREATE DATABASE IF NOT EXISTS `wordpress` DEFAULT CHARACTER SET utf8 COLLATE utf8_general_ci;
MySQL said: Documentation
#1044 – Access denied for user ‘ksalim’@’localhost’ to database ‘wordpress’
WPBeginner Support
Please check your database name, mysql username and password.
Admin
Damilola
A very awesome article, it really made a project i was working on for a client already on my local machine easy to move to his server, i mean i literally tried to develop the website all over again and it was such a pain in the ass….Thank you
WPBeginner Support
Glad you found it helpful. Don’t forget to join us on Facebook for more WordPress tips and tutorials.
Admin
Tim Vincent
Thank you so much for this guide. I struggled doing this for some time before finding this. I followed it word for word and all seems to work. I am very grateful!
WPBeginner Support
We are glad you found it helpful. Don’ forget to follow us on Twitter for more WordPress tips and tutorials.
Admin
sonu
hello! syed
i want to ask you to from where i get the best free wordpress simple attractive theme which laterly i planned to upload on the live server….any help would be much appreciated….thanks…
WPBeginner Support
See our list of 37 simple WordPress themes you should try.
Admin
sonu
hello! syed
i want to ask you when we upload the worpress site from locahost to live server….i just want to ask the wordpress having lot of files and inside the wp-content/themes/… having three different types of theme like twenty fourteen,twenty thirteen ,so is it needed to upload all these themes or not….help would be much appreciated…..thnks…..
Ridhik
No,u just upload the theme folder that currently activated in your site.
Andres Paz Soldan
Thank you! This was very useful!
WPBeginner Support
Hi Andres, glad you found it useful.
Admin
Lellys
First of, thank you!
I did everything and my site is working, but when I need to login on my wp-admin, it show me a blank screen and nothing happens. Any idea?
paddy lutaaya
thank you for this article i have followed the steps and uploaded my website to c panel but it has failed to work it brings internal error please help me solve this thank you
WPBeginner Support
Please see our guide on how to fix internal server error in WordPress.
Admin
Phillip Pilkington
Allgreat advise except step 6. I have not got past this stage, the advice is not clear. My website shows the Error Establishing Database Connection. This next part doesn’t explain anything to me.
“To fix this, connect to your website using an FTP client and edit wp-config.php file. Provide the database name, user and password you created earlier in Step 3. Save the wp-config.php file and upload it back to your server. Visit your website, and it should be live now. ”
I am connect via ftp, then just edit the file….no, nothing happens from here.I open the file in aneditor but I don’t make any changes because it does not show anything about whatis expalined.
Regards,
Tyler Hall
Hey, I am currently transferring the files as we speak. Not sure if you found a solution yet (hopefully you have its been 15 days) but you should probably change the hostname: /** MySQL hostname */
define(‘DB_HOST’, ‘ ‘ your hostname before should have been your localhost or similar.
Himanshu
Thanks for the post. Really helped solve my problem. Although I faced some issues with database importing. After much effort, updating the phpmyadmin version fixed it for me. If possible you could also include common errors in each section, so that a beginner doesn’t get lost. As it happens, most likely you are going to face some error here and there. Other than that great post. Thanks.
WPBeginner Support
@Himanshu Thanks for the Feedback, we really appreciate it.
Admin
Ola
Hi,
Thanks for this, the steps are so direct and you made WordPress uploading fun.
Andy
Hi. When I go to my website it says Welcome to: yourwebsite.com
This Web page is parked for FREE, courtesy of GoDaddy.com. Do I have to register my domain? I just thought of a random website name to put in for the changing site url step 5. Also when I enter the local host site I get the message the webpage could not be found. What should I do?