Muchos usuarios de WordPress prefieren trabajar en sus sitios web utilizando un servidor local en su ordenador. Esto le permite trabajar en su sitio web en privado antes de hacer los cambios disponibles en línea.
Con el tiempo, tendrá que trasladarlo a un servidor en vivo para que sea accesible a los visitantes en línea. Esta transición es crucial para garantizar que el sitio web funcione correctamente en el sitio activo.
Hemos trabajado en muchos sitios web locales, así que tuvimos que aprender la forma más fácil de transferir contenidos a sitios web activos.
En este artículo, proporcionaremos instrucciones paso a paso sobre cómo trasladar WordPress de un servidor local a un sitio activo.
¿Por qué trasladar WordPress de un servidor local a un sitio activo?
Construir su blog de WordPress en un servidor local es una forma segura de probar los cambios en su sitio web sin afectar a los visitantes.
Cuando haya terminado de perfeccionar su sitio web, el siguiente paso es pasar de su servidor local a un sitio activo.
Vamos a mostrarle dos formas de trasladar su sitio de un servidor local a un sitio activo.
El primer método utiliza un plugin de migración de WordPress y se recomienda para principiantes.
En el segundo método, le mostraremos cómo trasladar manualmente WordPress de un servidor local a un sitio activo.
Puede elegir el método que más le convenga:
Antes de migrar su sitio WordPress
Para migrar WordPress de un servidor local a un servidor activo, debe tener en cuenta algunos aspectos.
En primer lugar, suponemos que tiene un sitio de WordPress ejecutándose en un servidor local (también llamado localhost) en su ordenador y que tiene pleno acceso al mismo.
A continuación, tendrá que tener un nombre de dominio y alojamiento web.
Hemos oído innumerables historias de principiantes que empezaron con proveedores de alojamiento web malos o gratuitos y se arrepintieron. Según nuestra experiencia, elegir el proveedor de alojamiento correcto es fundamental para el éxito de cualquier sitio web.
Para facilitarte la decisión, te recomendamos Bluehost. Son una empresa de alojamiento de WordPress recomendada oficialmente, y están dando a los usuarios de WPBeginner un descuento exclusivo + dominio y SSL gratis.
Básicamente, puedes empezar por tan sólo 1,99 $ al mes.
Si quieres una gran alternativa a Bluehost, puedes mirar Hostinger. También están ofreciendo un descuento exclusivo a los usuarios de WPBeginner con un nombre de dominio gratis.
Si puedes permitirte pagar un poco más, entonces comprueba SiteGround. También tienen una oferta especial para los lectores de WPBeginner.
Si necesitas ayuda para establecer tu sitio web, sigue paso a paso nuestra guía sobre cómo crear un sitio web.
Por último, necesitará un programa FTP y saber cómo utilizarlo para subir el sitio de su servidor local al sitio activo.
¿Preparado? Empecemos a migrar su sitio de WordPress.
Tutorial en vídeo
Si prefiere instrucciones escritas, siga leyendo.
Método 1: Transferir WordPress del servidor local al sitio activo utilizando un plugin de migración (recomendado)
Este método es más fácil y recomendado para principiantes. Vamos a utilizar un plugin de migración de WordPress para mover WordPress desde localhost a un sitio en vivo.
Paso 1: Instalar y configurar el plugin Duplicator
En primer lugar, debe instalar y activar el plugin Duplicator en su sitio regional. Para más detalles, consulte nuestra guía paso a paso sobre cómo instalar un plugin de WordPress.
Consejo profesional: También hay una versión pro de Duplicator que ofrece copias de seguridad seguras, almacenamiento en la nube, restauración fácil del sitio y mucho más.
Tras la activación, debe ir a la página Duplicator ” Copias de seguridad y hacer clic en el botón “Crear nueva”.
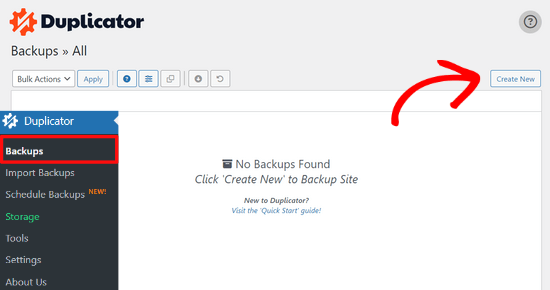
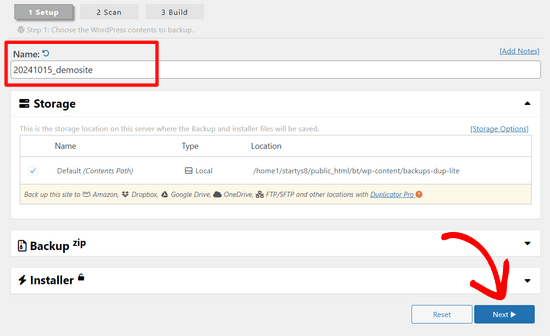
Aparecerá una pantalla en la que podrá asignar un nombre a la copia de seguridad.
A continuación, haga clic en el botón “Siguiente”.
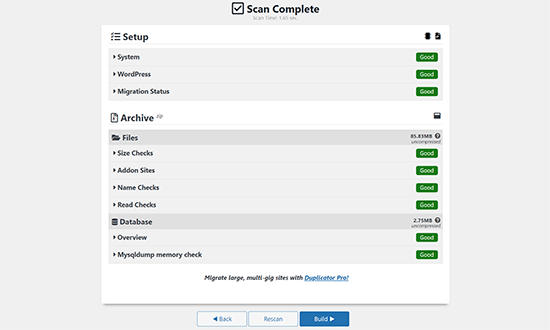
Duplicator realizará ahora algunas pruebas para ver si todo está en orden.
Si todos los elementos están marcados como “Bien”, haga clic en el botón “Construir”.
Este proceso puede tardar unos minutos, dependiendo del tamaño de su sitio web. Debe dejar esta pestaña abierta hasta que finalice.
Cuando termine, verá las opciones de descarga de los paquetes “Instalador” y “Archivo”. Haz clic en el botón “Descargar ambos archivos” para descargarlos en tu ordenador.
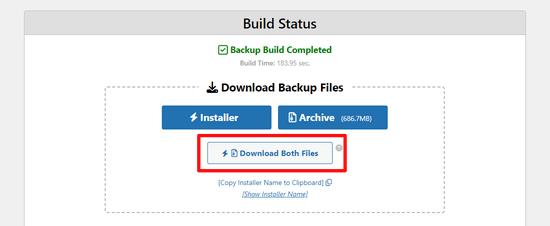
El archivo “Archivo” es una copia completa de su sitio WordPress. Incluye todos los archivos del núcleo de WordPress, así como sus imágenes, subidas, temas, plugins y una copia de seguridad de su base de datos de WordPress.
El archivo “Instalador” es un script que automatizará todo el proceso de migración descomprimiendo el archivo que contiene su sitio web.
Paso 2: Crear una base de datos para su sitio web WordPress en vivo
Antes de que pueda ejecutar el instalador o subir el sitio web WordPress desde localhost a su servidor de alojamiento, necesita crear una base de datos MySQL para su nuevo sitio web en vivo.
Si ya ha creado una base de datos MySQL, puede omitir este paso.
Para crear una base de datos, debe visitar el Escritorio cPanel de su cuenta de alojamiento. A continuación, localice la sección “Bases de datos” y haga clic en el icono “Asistente para bases de datos MySQL”.
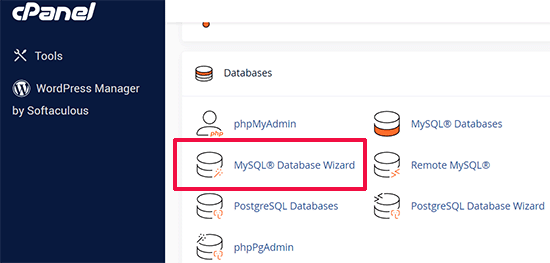
En la pantalla siguiente, hay un campo para crear una nueva base de datos.
Sólo tiene que dar un nombre a su base de datos y hacer clic en el botón “Crear base de datos”.

cPanel creará ahora una nueva base de datos para usted.
A continuación, introduzca un nombre de usuario y una contraseña para el nuevo usuario y haga clic en el botón “Crear usuario”.
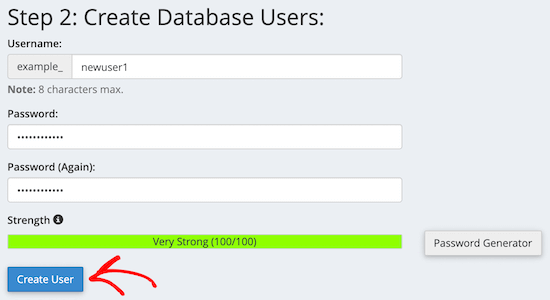
A continuación, tienes que añadir a la base de datos el usuario que acabas de crear.
En primer lugar, haga clic en la casilla de verificación “Todos los privilegios”.
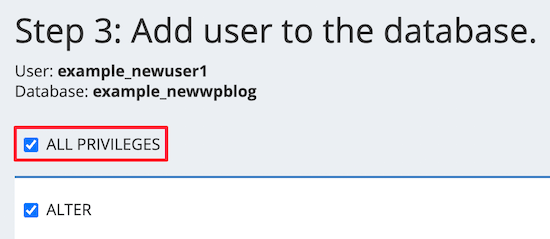
A continuación, desplácese hacia abajo y haga clic en el botón “Realizar cambios” para guardar los cambios.
Su base de datos ya está lista para ser utilizada con su sitio WordPress. Asegúrese de anotar el nombre de la base de datos, el nombre de usuario y la contraseña. Necesitará esta información en el siguiente paso.
Paso 3: Subida de archivos desde el servidor local al sitio web de WordPress.
Ahora tiene que subir los archivos y el instalador de su sitio local a su cuenta de alojamiento.
En primer lugar, conéctese a su sitio activo utilizando un cliente FTP. Una vez conectado, asegúrese de que el directorio raíz de su sitio web está completamente vacío.
Normalmente, el directorio raíz es la carpeta /home/public_html/.
Algunas empresas de alojamiento de WordPress instalan WordPress automáticamente cuando te registras. Si tienes archivos de WordPress allí, entonces necesitas borrarlos.
Después, puede subir los archivos archive.zip e installer.php desde Duplicator a su directorio raíz vacío.

Paso 4: Ejecutar el script de migración
Una vez subidos los archivos de migración, visite la siguiente URL en su navegador / explorador:
http://example.com/installer.php
No olvide sustituir “ejemplo.com” por su propio nombre de dominio.
Se iniciará el asistente de migración de Duplicator.
El instalador realizará algunas pruebas e inicializará el script.
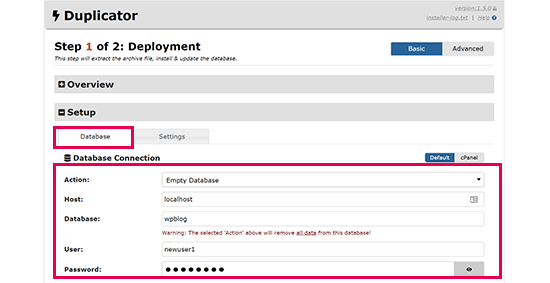
En la sección Configuración, se le pedirá que introduzca su alojamiento MySQL, el nombre de la base de datos, el nombre de usuario y la contraseña.
Su alojamiento será probablemente un alojamiento local. A continuación, introduzca los datos de la base de datos creada en el paso anterior.
A continuación, haga clic en el botón “Validar” para asegurarse de que los datos introducidos son correctos.
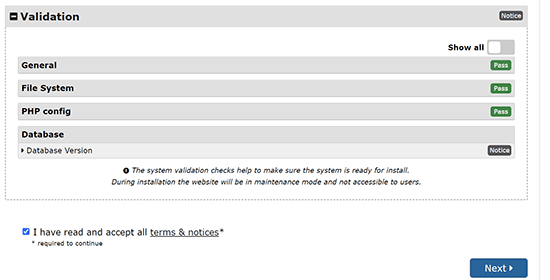
A continuación, haga clic en el botón “Siguiente” para continuar.
Duplicator importará la copia de seguridad de su base de datos de WordPress desde el archivo a su nueva base de datos.
También actualizará las URL que apuntan al sitio local y a su nuevo sitio activo.
Ahora puede hacer clic en el botón ‘Admin Login’ para acceder al área de administrador de WordPress de su sitio.

Una vez que acceda a su sitio activo, Duplicator limpiará automáticamente los archivos de instalación.
Eso es todo. Ha movido correctamente WordPress del servidor local a su sitio activo.
Método 2: Transferir manualmente WordPress del servidor local al sitio activo
En este método, le mostraremos cómo mover manualmente WordPress desde el servidor local a su sitio activo. Será útil si el primer método no funciona o si prefieres hacerlo manualmente.
Paso 1: Exportar la base de datos local de WordPress
Lo primero que tienes que hacer es exportar tu base de datos local de WordPress. Para ello utilizaremos phpMyAdmin.
Si no estás familiarizado con ella, entonces puede que quieras echar un vistazo a nuestra guía para la gestión de bases de datos de WordPress usando phpMyAdmin.
Sólo tienes que ir a http://localhost/phpmyadmin/ y hacer clic en tu base de datos de WordPress. A continuación, haz clic en el botón “Exportar” de la barra de menú superior.

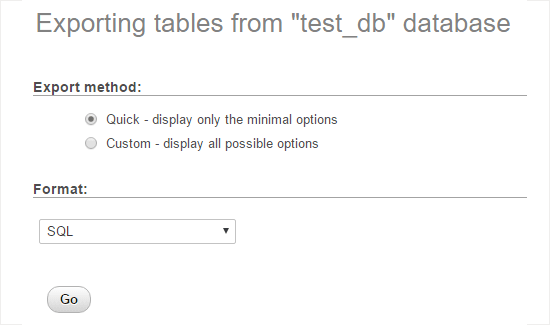
En la opción ‘Método de exportación:’, puede elegir ‘Rápido’ o ‘Personalizado’. Personalizado le proporcionará más opciones para exportar su base de datos.
Pero le recomendamos que elija “Rápido” y luego haga clic en el botón “Ir” para descargar su base de datos.
Paso 2: Subida de archivos de WordPress al sitio activo
Ahora, tendremos que mover todos los archivos de su sitio web al sitio en vivo.
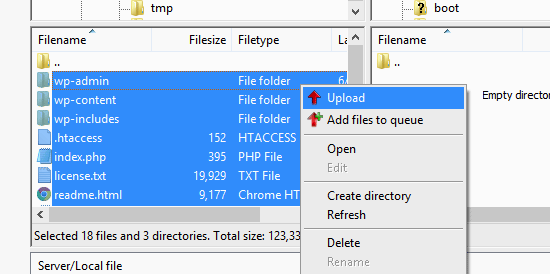
Para empezar, abra su cliente FTP y conéctese a su cuenta de alojamiento web.
Una vez conectado a tu sitio, asegúrate de subir los archivos al directorio correcto. Por ejemplo, si quieres que el sitio esté alojado en ‘tu_sitio.com’, entonces querrás subir todos los archivos a tu directorio public_html.
Ahora seleccione los archivos locales de WordPress y súbalos a su servidor.
Paso 3: Crear una base de datos MySQL en su sitio activo
Mientras tu cliente FTP está subiendo tus archivos de WordPress, puedes empezar a importar tu base de datos al servidor.
La mayoría de los proveedores de alojamiento de WordPress ofrecen cPanel para gestionar su cuenta de alojamiento, por lo que le mostraremos cómo crear una base de datos utilizando cPanel.
En primer lugar, debe acceder a su panel de control de cPanel y hacer clic en el icono “Asistente para bases de datos MySQL”, que se encuentra en la sección “Bases de datos”.

En la pantalla siguiente, puede crear una nueva base de datos.
Introduzca un nombre para la base de datos y haga clic en “Crear base de datos”.

cPanel creará automáticamente una nueva base de datos para usted.
A continuación, debe introducir un nombre de usuario y una contraseña para su nuevo usuario y, a continuación, hacer clic en “Crear usuario”.
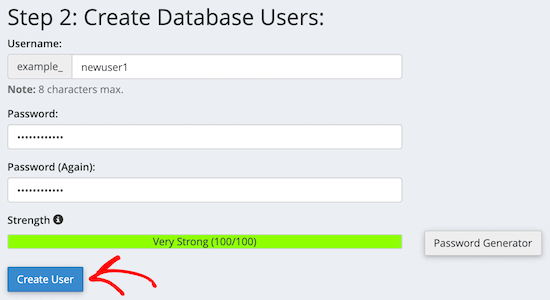
Después, tienes que añadir a la base de datos el usuario que acabas de crear.
En primer lugar, marque / compruebe la casilla de verificación “Todos los privilegios”.
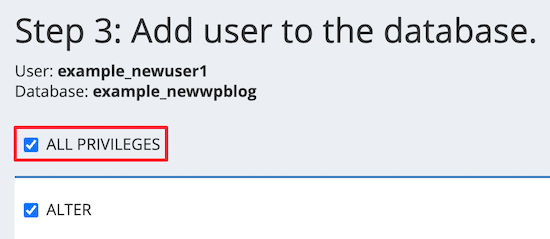
A continuación, desplázate hacia abajo y haz clic en “Realizar cambios” para guardarlos.
Ha creado correctamente una nueva base de datos para su sitio de WordPress.
Paso 4: Importar la base de datos de WordPress al sitio activo
El siguiente paso del proceso es importar su base de datos de WordPress.
Vaya a su Escritorio de cPanel, desplácese hasta la sección ‘Bases de datos’ y haga clic en ‘phpMyAdmin’.
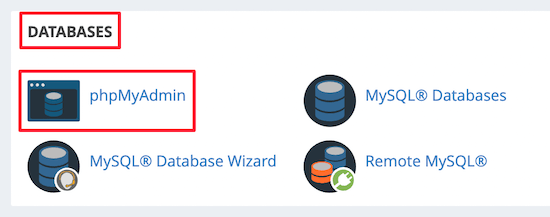
Esto le llevará a phpMyAdmin, donde debe hacer clic en la base de datos que acaba de crear. phpMyAdmin mostrará su nueva base de datos sin tablas.
A continuación, haga clic en la pestaña “Importar” del menú superior. En la página de importación, haga clic en el botón “Elegir archivo” y seleccione el archivo de base de datos del sitio local que guardó en el primer paso.
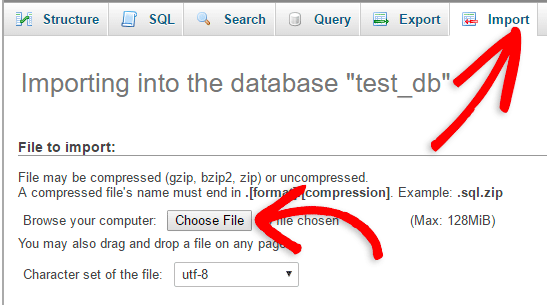
A continuación, haz clic en el botón “Ir” situado en la parte inferior de la página. Tu base de datos se importará automáticamente a phpMyadmin.
Paso 5: Cambiar la URL del sitio
Ahora, usted necesita cambiar la URL del sitio en su base de datos para que se conecte con su sitio de WordPress en vivo.
En phpMyAdmin, busque la tabla wp_options en la base de datos que acaba de importar.
Si ha cambiado el prefijo de su base de datos, entonces en lugar de wp_options, podría ser {new_prefix}_options.
A continuación, haga clic en el botón “Examinar” situado junto a wp_options. O bien, haga clic en el enlace en la barra lateral para abrir la página que tiene un anuncio / catálogo / ficha dentro de la tabla wp_options.
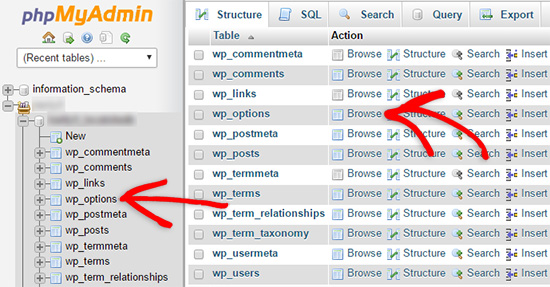
A continuación, en la columna options_name, debe buscar la opción siteurl.
A continuación, haga clic en el icono “Editar”.

Aparecerá una ventana en la que podrá editar el campo.
En el cuadro de entrada option_value, verá la URL de su instalación local, que será algo así como http://localhost/test.
Debe introducir la URL de su nuevo sitio en este campo, por ejemplo: https: //www.wpbeginner.com.
A continuación, puede guardar el campo al hacer clic en el botón “Ir”.
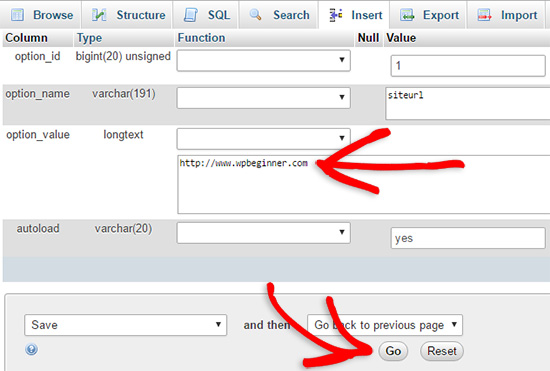
A continuación, debe seguir los mismos pasos anteriores para el nombre de la opción de inicio. El menú wp_options puede tener varias páginas. Normalmente, la opción de inicio estará en la segunda página.
A continuación, actualice la URL de inicio para que sea la misma que la URL de su sitio activo.
Paso 6: Establecer su sitio en vivo
Ahora que ha importado la base de datos y subido su contenido, es el momento de configurar WordPress.
En este momento, su sitio debería mostrar el error“Error al establecer una conexión con la base de datos“.
Para corregirlo, conéctese a su sitio web mediante un cliente FTP y abra el archivo wp-config.php.
Busque las siguientes líneas de código:
1 2 3 4 5 6 7 8 9 | // ** MySQL settings - You can get this info from your web host ** ///** The name of the database for WordPress */define( 'DB_NAME', 'database_name_here' );/** MySQL database username */define( 'DB_USER', 'username_here' );/** MySQL database password */define( 'DB_PASSWORD', 'password_here' );/** MySQL hostname */define( 'DB_HOST', 'localhost' ); |
Deberá indicar el nombre de la base de datos, el nombre de usuario y la contraseña que creó anteriormente.
A continuación, guarde el archivo wp-config.php y vuelva a subirlo al servidor de alojamiento de WordPress.
Ahora, cuando visite su sitio web, debería estar en directo.
Después de eso, tienes que acceder a tu panel de administrador de WordPress e ir a Ajustes ” General. A continuación, sin cambiar nada, desplácese hasta la parte inferior y haga clic en el botón “Guardar cambios”.
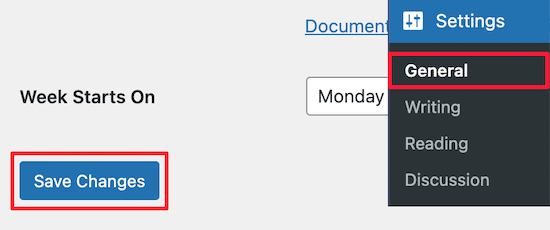
Así se asegurará de que la URL de su sitio se corrige en cualquier otro lugar en el que deba estar.
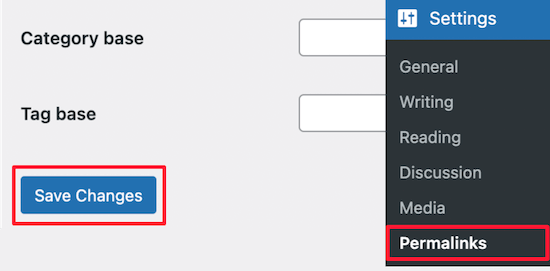
Una vez hecho esto, vaya a Ajustes ” Enlaces permanentes, desplácese hacia abajo y haga clic en “Guardar cambios” para asegurarse de que todos los enlaces de las entradas funcionan correctamente.
Paso 7: Corregir imágenes y enlaces rotos actualizando rutas
Siempre que traslade un sitio de WordPress de un dominio a otro o de un servidor local a un sitio activo, se encontrará con enlaces rotos e imágenes que faltan.
Le mostraremos dos formas de actualizar las URL. Puede elegir la que más le convenga.
1. Actualizar URLs usando el plugin Search & Replace Everything (Recomendado)
La forma más segura de corregir esto es mediante el uso de Search & Replace Everything. Es un potente plugin de WordPress que le permite realizar fácilmente tareas de actualización por lotes en su sitio web sin necesidad de escribir complejas consultas a la base de datos.
En primer lugar, debe instalar y activar el plugin Search & Replace Everything.
Una vez activado, vaya a la página Herramientas ” WP Search & Replace.
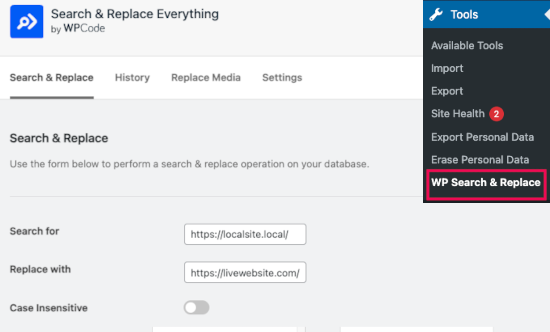
A continuación, introduzca la URL del sitio local en el campo “Buscar” y la URL del sitio activo en el campo “Sustituir por”.
Desplázate un poco y haz clic en “Seleccionar todo” debajo de las tablas. Esto asegura que el plugin buscará la antigua URL en cualquier parte de la base de datos.
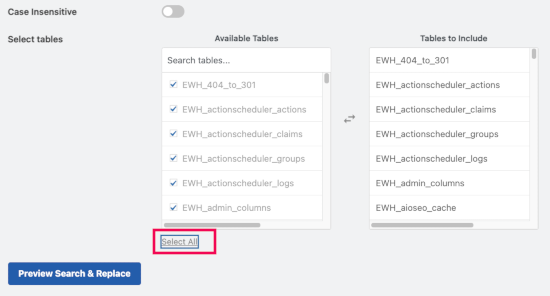
Ahora haga clic en el botón “Vista previa de Buscar y reemplazar” para continuar.
El plugin buscará en su base de datos todas las instancias de la URL antigua y previsualizará los resultados.
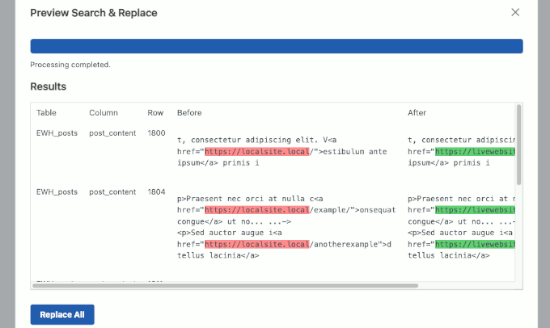
Si todo va bien, haz clic en “Reemplazar todo” para guardar los cambios.
Verás una advertencia acerca de los cambios que estás realizando. Haz clic en “Sí” para continuar.
El plugin actualizará la base de datos y sustituirá las URL locales por la URL actual de su sitio web.
2. Actualizar URL manualmente (Avanzado)
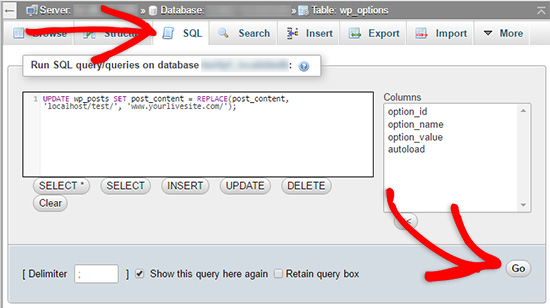
Otra forma de actualizar las URL es mediante la siguiente consulta SQL:
1 | UPDATE wp_posts SET post_content = REPLACE(post_content, 'localhost/test/', 'www.yourlivesite.com/'); |
Simplemente vaya a phpMyAdmin, haga clic en su base de datos y, a continuación, haga clic en “SQL” en el menú superior y añada la consulta anterior.
Asegúrese de cambiarla por la URL de su sitio local y del sitio activo y haga clic en el botón “Ir”.
Ya está. Ha migrado correctamente WordPress de su servidor local a un sitio activo.
Esperamos que tu sitio web esté funcionando correctamente. Si usted marca / comprobar cualquier error, puede consultar nuestra guía de errores comunes de WordPress para ayudar a diagnosticar problemas.
Esperamos que este artículo te haya ayudado a trasladar WordPress de un servidor local a un sitio activo. También puedes consultar nuestra guía sobre cómo trasladar un sitio activo a un servidor local o echar un vistazo a la lista de comprobación definitiva para la migración de sitios web para conocer los pasos prácticos de la migración de WordPress.
If you liked this article, then please subscribe to our YouTube Channel for WordPress video tutorials. You can also find us on Twitter and Facebook.


Thembi
Hi guys tearing my hair out. Original site on local server works well on local server. The live site on the remote server works well on the live server. When I move it to the local host it gives me this php error when installing plugins… i have read all blogs and issue not resolved for me. I tried both the duplicator and manual process but still get this php error
Warning: An unexpected error occurred. Something may be wrong with WordPress.org or this server’s configuration. If you continue to have problems, please try the support forums. (WordPress could not establish a secure connection to WordPress.org. Please contact your server administrator.) in C:\wamp\www\missflairword\wp-includes\update.php on line 457
WPBeginner Support
Seems like your localhost install is unable to connect to the internet. This could happen if Apache is blocked by your network’s firewall. You need to allow apache access to the internet from your windows firewall settings.
Admin
Checo
Wow guys, this Tutorial was excellent, precise and very well detailed!!! Thank you very much, you helped me publish my first locally developed wordpress site right on the deadline without any mistakes. Best regards!
Sam
someone should tell me when you see a better word for Genius, because that is what you guys are. your tutorials has made me a lil’genius.
Thanks guys
Silvia
Your tut is the best! I tried several times before and never was able to do it until now! genius! thanks!
Angela
What a LIFESAVER! I tried several other peoples suggestions and different plug-ins that are supposed to make it easy… Nothing worked until this! Thank you!
gaurav Royal
thankx a lot .. its working
Ken
I’ve followed all the steps given. When I access the live site I get everything I can without changing the media URLs.
I can’t do that yet because I can’t login to the admin area. i get the following errors on the screen above the login box and valid logins are not accepted (checked with myPHP):
Warning: session_start(): Cannot send session cookie – headers already sent by (output started at /home/cgbookss/public_html/wp-includes/functions.php:1) in /home/cgbookss/public_html/wp-content/plugins/event-commerce-wp-event-calendar/evntgen-scbooking.php on line 519
Warning: session_start(): Cannot send session cache limiter – headers already sent (output started at /home/cgbookss/public_html/wp-includes/functions.php:1) in /home/cgbookss/public_html/wp-content/plugins/event-commerce-wp-event-calendar/evntgen-scbooking.php on line 519
Warning: Cannot modify header information – headers already sent by (output started at /home/cgbookss/public_html/wp-includes/functions.php:1) in /home/cgbookss/public_html/wp-login.php on line 424
Warning: Cannot modify header information – headers already sent by (output started at /home/cgbookss/public_html/wp-includes/functions.php:1) in /home/cgbookss/public_html/wp-login.php on line 437
Have you any suggestions?
WPBeginner Support
Try deactivating all your plugins.
Admin
geoff
can’t seem to get the phpmyadmin to work locally. you seem to haven’t put that in, and the link you have provided to “explain” how to use the phpmyadmin, refers to that running on c panel not locally.
it would be good if you could explain, running phpmyadmin locally, through webmatrix for explain.
rodrigo
Was a great help, this tutorial. I had some 500 server errors fixed after editing the htaccess.php file. But I still have no access to the wp-admin dashboard? Anyone got the same emptiness on the backend link? what could be the fix?
Charlie
I have the same exact issue. Trying to find a solution for this but it seems like one isn’t mentioned here on this page, or in the comments.
hokka
I have troubles with my new site address. Everything else seems to work just fine.
In phpmyadmin if I change the siteurl to direct the site to the correct subfolder, the website content disappears when the “home” option value is correct. Then again if I also change my home-value into the same address as the files are in, meaning the same address as siteurl, then I see the content but the address is not what I wanted it to be. I’ve also tried to use Velvet Blues -plugin but nothing happened.
In my case the WordPress url is different from website url, so basically the changes won’t affect in admin panel Settings.
Thanks for this great tutorial.
JulioC
Not sure if was very lucky but in my case I followed all steps and everything worked perfect!!!
Thanks a lot!
WPBeginner Staff
The other part of making backups is restoring your sites from backups. cPanel does not make that part easy. Configurations may differ from one site to another. Sometimes user may even want to move to a web host that does not offer cPanel. For more advanced users who can troubleshoot these issues, cPanel backups can be a good option. But for most beginners it can be difficult. There are other backup options as well, take a look at our pick of 7 Best WordPress Backup plugins.
Joey
BackupBuddy seems to be a bit of an overpriced option when you can simply back up a WP site via Cpanel … are there any other benefits for using BackupBuddy when backing up via Cpanel is easy and free?
jeroen
Hi, I’m still struggling withe the migration of my local hosted WP multisite to a webserver. Replaced all the urls’s as far as I can tell but still the navigation doens’t work. Ik can enter the root which shows the homepage correctle but clicking a navigation link I get this error.
“Not Found
The requested URL /index.php was not found on this server.”
Although the paths of the menu links(shown on hover) look fine. Any Idea where to go look to solve this? Thanks in advance.
Tim
After importing the database, I tried to do step 5. However, when I click on wp_options, i do not have an edit spot. It says “current selection does not contain a unique column. Grid edit, checkbox, edit, copy and delete features are not available.”
Why is this happening?
Thank you
nirali
hello can anyone help me.. there is a image path error in hosting.. how to solve it?
WPBeginner Staff
You can find out your live site’s database information by vising phpMyAdmin through cpanel. Notice the database name, mysql host, mysql username, and password and then fill in that information in your live site’s wp-config.php file.
On your local site go to localhost/phpmyadmin/ to find out the correct database name.
allison ranieri
I completed all the steps and now my live site just says Error Establishing database connection and I cannot access my localhost at all – it is just a white screen. When in Step 6 it said to change your config.php file I accidentally changed the info in my local config file instead of the one updated through MySql but I figured that one out and changed the info back in my local file to what I thought it was before, but now when I go to localhost/wordpress (where I had previously gone before) it just shows a white screen. And my live site says Error Establishing Database Connection. So confused. Any help would be lovely.
WPBeginner Staff
Yes, you will be able to see the edit link after signing into your live site.
Prabhjot kaur
I want to ask something as if i upload my site as a live site then edit link will appear or not ?that are already shown in localserver.
Enoch Ramal
Almost there but I get this…
Parse error: syntax error, unexpected ‘define’ (T_STRING) in /home/klbensonsk/public_html/wp-config.php on line 31
vanyoattila
Hi, I have uploaded my first page with the help of this post and it has been working perfect since than. Now I have a problem with an other site. I went through all the critical points again and again but I have always the same issue. The site is working (with broken links) but I can’t log in to the admin site. I changed the database at phpmyadmin and the wp-config.php file also. They have the same username and same password so they have the same datas and yet I have the problem. How does it possible?
Sybrin
Hi there, my WordPress website has just moved to a new ip address, and I followed the steps at the bottom to fix broken links. It said that it fixed them but my website is still not displaying properly. Some images are displaying as broken images and some image sliders are not showing up at all. The website also seems a hell of a lot slower. How do I fix this all?
vinamr
Do i have to install WordPress through my cpanel? or do i straight away upload the files through ftp?
WPBeginner Staff
Contents of WordPress folder.
up
I have had a hard time finding an answer to a simple question: Do you upload the wordpress folder or the contents of the wordpress folder to public_html
Krizia Bianca
Thank you so much, this tutorial works fine for me! I uploaded my wordpress to a live site. And it run smoothly!
GSR
Hi. I’ve followed all the steps (I think so) and now I no longer have the error message about not having a database connection – instead I now just have a blank white screen. Can you tell me where I’ve gone wrong?
Malik Talib Hussain
Thanks a lot for such a descriptive guide,I have uploaded my site successfully using this guide.
John
Thanks for sharing this. It worked for me at a go.
Daniel
Is it normal that in the step 6, after I updated the wp-config.php file, instead of appearing the homepage of the site (as I viewed in localhost) it appears the installation process?
PD: I have completed all the previous steps.
duke
Very easy, some tips to remember, i have to wait a while to transfer local wordpress site to public_html because of the number of themes i am using.
I forget to grant access to the db user, so i did it and it worked.
All steps is important, the sql command works great.
I rename .htaccess to .htaccess_old and it works
then just update and save permalinks.
Very easy fix for everything.
BJH
Thanks for the tutorial.
Unfortunately it doesn’t work for me. I think that there are so many variables with something like this. Your steps work for you, with your scenario, but for someone else it can be very easy to end up with something else which stops the process working. Migrating wordpress is a real chore in my experience.
Lloyd
I have 30+ years of IT experience including design of large 1000+ user infrastructure, plus extensive hands on program coding.
I have used WordPress to create one site and I am really happy with the result.
However, I would have to say that for anything other than simply creating a single production site, WordPress is unbelievably complicated to use for anyone contemplating creating multiple sites, or creating a dev to prod environment. Absolute unmitigated nightmare.
Is there is anything that the WordPress developers could do to make the actual architecture easier to understand and use that would be great.
Matthew
Hi,
Great tutorial, thanks a bunch. I’m doing my first wp redesign for a client who already has a well established blog with posts images etc. I’ve exported all of her data into the local site, designed a new theme with new pages etc. While importing her posts locally and selecting the option to download attachments, the posts have appeared but none of the images and I’m about ready to upload everything to her server.
Do I just upload the theme files and in doing so will my modifications be present? Or do I need to upload everything as this tutorial suggests. She has over 2000 posts, an image for each, and I’ve got new images, pages, and layout.
If you can either make a tutorial for moving/importing a redesigned or newly designed blog into an existing blog with posts pages etc. Or point me in the right direction, That would be great.
The client won’t give me access to the server itself and insists on doing the ftp himself because he saw on the news that he could get his identity stolen or some such nonsense. I explained that he could set access restrictions on a separate login but he insists he do it.
And the don’t want me working directly on the site because they’re worried about downtime while I update and build it.
You can’t always be picky when it come to clients and I don’t really have a choice I’m just about done.
Emilio
Thank you for the tutorial!
But now that I’ve imported all my site, the logo isn’t showing and my Dashboard doesn’t show the theme functions, I run Divi from Elegant Themes.
Martin
I’ve imported my database and wordpress install, but none of my pages are showing when I login to the admin panel? I’ve activated the theme, but no pages? Please help!
WPBeginner Staff
Please go to the admin area -> Settings and make sure that you are using the correct Site Address and WordPress Address.
Christine
Good day.
Thanks for this easy to follow tutorial.
I managed all the steps and my site seems to be connected, except that my theme is missing. All the files are in place with their stylesheets, but the site seems to be displaying plain html.Has anyone else experienced this?
Not sure how to go about fixing it.
tawanda masvanhise
thanks for the great tutorial! l have a problem after doing all the steps; my website is displaying
Error establishing a database connection
how can i solve this problem?
Claudio Henrique Amorim
Thank you so much.
I’m definitely a wp beginner and this post was just of an wonderful help. Everything went on flawless.
I’m really enjoying working as a web designer and wp developer. And I hope I’ll get more and more of these kind of jobs, and more challenging ones. I learned so much while doing this very first one.
Thank you again.
WPBeginner Staff
Seems like your domain is not yet ready or you have uploaded WordPress in the wrong directory on your web server. Please contact your web hosting provider for support.
Elliot Lee
HELP!!
I have completed step 1 to step 6, but my site still displays:
Future home of something quite cool.
If you’re the site owner, log in to launch this site
If you are a visitor, check back soon.
Why is this happening???
Elliot Lee
I have completed step 1 to step 6, but my website still displays:
Future home of something quite cool.
If you’re the site owner, log in to launch this site
If you are a visitor, check back soon.
What could be the problem???
Elliot Lee
HELP!!! Why am I receiving this error in step 4?
SQL query:
—
— Database: `wordpress`
—
— ——————————————————–
—
— Table structure for table `wp_commentmeta`
—
CREATE TABLE `wp_commentmeta` (
`meta_id` bigint( 20 ) unsigned NOT NULL AUTO_INCREMENT ,
`comment_id` bigint( 20 ) unsigned NOT NULL DEFAULT ‘0’,
`meta_key` varchar( 255 ) DEFAULT NULL ,
`meta_value` longtext,
PRIMARY KEY ( `meta_id` ) ,
KEY `comment_id` ( `comment_id` ) ,
KEY `meta_key` ( `meta_key` ) ) ENGINE = InnoDB DEFAULT CHARSET = utf8 AUTO_INCREMENT =1;
MySQL said:
#1046 – No database selected
WPBeginner Staff
Before you can run this query you need to select the database you want to run it on. If you are using phpMyAdmin then select the database and then click on the SQL to run the query.
Elliot Lee
ok thanks
Thinh
Hi, thanks for a easy guide.
But I wonder how I can export to live when WordPress is already installed live? I redesigned the website from scratch, only thing is that I used the same theme. What would be the best way to get this live?
Thanks, keep up the good work!
PixelstoLife
Great tutorial, thanks for the help.
Like some others, the up_user updates don’t work and the links on my site are still calling the localhost. I’ve also been booted out as the admin user and cannot login to update permalinks etc.
I’ve found a tutorial to re-instate an admin user via phpmyadmin so I’ll give that a go and see if I can get back in!
Cheers
Ben
Great guide, but having a little bit of trouble and wondering if you can help.
I’ve done everything above, but when I try to go on to the …/wp-admin page I get this: ‘Warning: require(/home/username/public_html/wp-includes/pomo/mo.php): failed to open stream: No such file or directory in /home/username/public_html/wp-settings.php on line 76’
Any ideas?
lokesh
I m facing a prlessphp fatal error: load error: failed to find /home1/eminenta/public_html/server/Suman_Creations/wp-content/themes/theme49413/bootstrap/less/bootstrap.lesslessphp fatal error: load error: failed to find /home1/eminenta/public_html/server/Suman_Creations/wp-content/themes/theme49413/style.less oblem when i move my website from local server to live server