Muchos usuarios de WordPress prefieren trabajar en sus sitios web utilizando un servidor local en su ordenador. Esto le permite trabajar en su sitio web en privado antes de hacer los cambios disponibles en línea.
Con el tiempo, tendrá que trasladarlo a un servidor en vivo para que sea accesible a los visitantes en línea. Esta transición es crucial para garantizar que el sitio web funcione correctamente en el sitio activo.
Hemos trabajado en muchos sitios web locales, así que tuvimos que aprender la forma más fácil de transferir contenidos a sitios web activos.
En este artículo, proporcionaremos instrucciones paso a paso sobre cómo trasladar WordPress de un servidor local a un sitio activo.
¿Por qué trasladar WordPress de un servidor local a un sitio activo?
Construir su blog de WordPress en un servidor local es una forma segura de probar los cambios en su sitio web sin afectar a los visitantes.
Cuando haya terminado de perfeccionar su sitio web, el siguiente paso es pasar de su servidor local a un sitio activo.
Vamos a mostrarle dos formas de trasladar su sitio de un servidor local a un sitio activo.
El primer método utiliza un plugin de migración de WordPress y se recomienda para principiantes.
En el segundo método, le mostraremos cómo trasladar manualmente WordPress de un servidor local a un sitio activo.
Puede elegir el método que más le convenga:
Antes de migrar su sitio WordPress
Para migrar WordPress de un servidor local a un servidor activo, debe tener en cuenta algunos aspectos.
En primer lugar, suponemos que tiene un sitio de WordPress ejecutándose en un servidor local (también llamado localhost) en su ordenador y que tiene pleno acceso al mismo.
A continuación, tendrá que tener un nombre de dominio y alojamiento web.
Hemos oído innumerables historias de principiantes que empezaron con proveedores de alojamiento web malos o gratuitos y se arrepintieron. Según nuestra experiencia, elegir el proveedor de alojamiento correcto es fundamental para el éxito de cualquier sitio web.
Para facilitarte la decisión, te recomendamos Bluehost. Son una empresa de alojamiento de WordPress recomendada oficialmente, y están dando a los usuarios de WPBeginner un descuento exclusivo + dominio y SSL gratis.
Básicamente, puedes empezar por tan sólo 1,99 $ al mes.
Si quieres una gran alternativa a Bluehost, puedes mirar Hostinger. También están ofreciendo un descuento exclusivo a los usuarios de WPBeginner con un nombre de dominio gratis.
Si puedes permitirte pagar un poco más, entonces comprueba SiteGround. También tienen una oferta especial para los lectores de WPBeginner.
Si necesitas ayuda para establecer tu sitio web, sigue paso a paso nuestra guía sobre cómo crear un sitio web.
Por último, necesitará un programa FTP y saber cómo utilizarlo para subir el sitio de su servidor local al sitio activo.
¿Preparado? Empecemos a migrar su sitio de WordPress.
Tutorial en vídeo
Si prefiere instrucciones escritas, siga leyendo.
Método 1: Transferir WordPress del servidor local al sitio activo utilizando un plugin de migración (recomendado)
Este método es más fácil y recomendado para principiantes. Vamos a utilizar un plugin de migración de WordPress para mover WordPress desde localhost a un sitio en vivo.
Paso 1: Instalar y configurar el plugin Duplicator
En primer lugar, debe instalar y activar el plugin Duplicator en su sitio regional. Para más detalles, consulte nuestra guía paso a paso sobre cómo instalar un plugin de WordPress.
Consejo profesional: También hay una versión pro de Duplicator que ofrece copias de seguridad seguras, almacenamiento en la nube, restauración fácil del sitio y mucho más.
Tras la activación, debe ir a la página Duplicator ” Copias de seguridad y hacer clic en el botón “Crear nueva”.
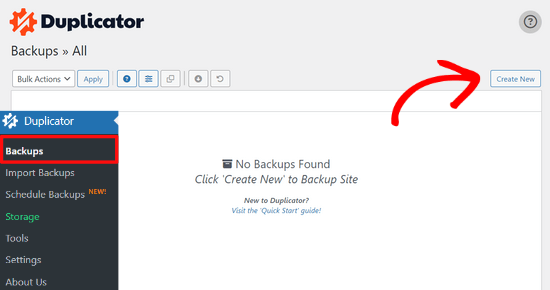
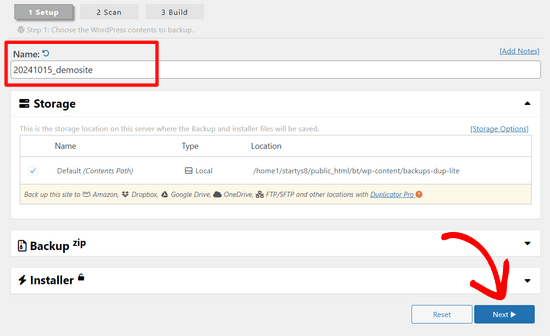
Aparecerá una pantalla en la que podrá asignar un nombre a la copia de seguridad.
A continuación, haga clic en el botón “Siguiente”.
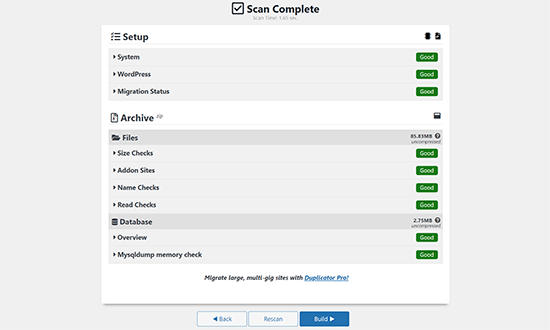
Duplicator realizará ahora algunas pruebas para ver si todo está en orden.
Si todos los elementos están marcados como “Bien”, haga clic en el botón “Construir”.
Este proceso puede tardar unos minutos, dependiendo del tamaño de su sitio web. Debe dejar esta pestaña abierta hasta que finalice.
Cuando termine, verá las opciones de descarga de los paquetes “Instalador” y “Archivo”. Haz clic en el botón “Descargar ambos archivos” para descargarlos en tu ordenador.
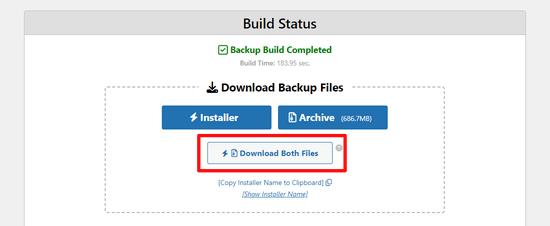
El archivo “Archivo” es una copia completa de su sitio WordPress. Incluye todos los archivos del núcleo de WordPress, así como sus imágenes, subidas, temas, plugins y una copia de seguridad de su base de datos de WordPress.
El archivo “Instalador” es un script que automatizará todo el proceso de migración descomprimiendo el archivo que contiene su sitio web.
Paso 2: Crear una base de datos para su sitio web WordPress en vivo
Antes de que pueda ejecutar el instalador o subir el sitio web WordPress desde localhost a su servidor de alojamiento, necesita crear una base de datos MySQL para su nuevo sitio web en vivo.
Si ya ha creado una base de datos MySQL, puede omitir este paso.
Para crear una base de datos, debe visitar el Escritorio cPanel de su cuenta de alojamiento. A continuación, localice la sección “Bases de datos” y haga clic en el icono “Asistente para bases de datos MySQL”.
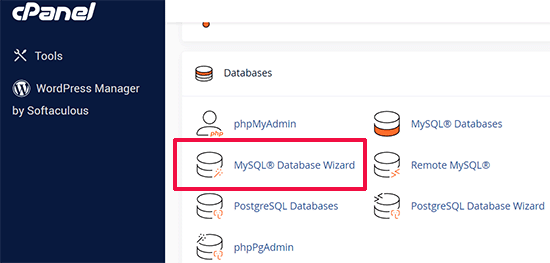
En la pantalla siguiente, hay un campo para crear una nueva base de datos.
Sólo tiene que dar un nombre a su base de datos y hacer clic en el botón “Crear base de datos”.

cPanel creará ahora una nueva base de datos para usted.
A continuación, introduzca un nombre de usuario y una contraseña para el nuevo usuario y haga clic en el botón “Crear usuario”.
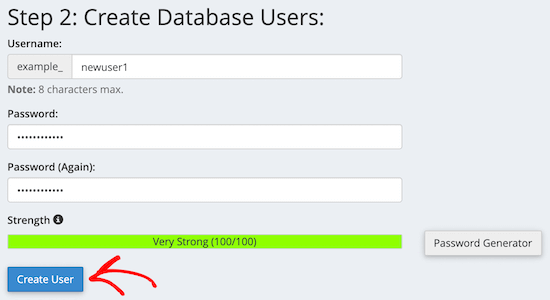
A continuación, tienes que añadir a la base de datos el usuario que acabas de crear.
En primer lugar, haga clic en la casilla de verificación “Todos los privilegios”.
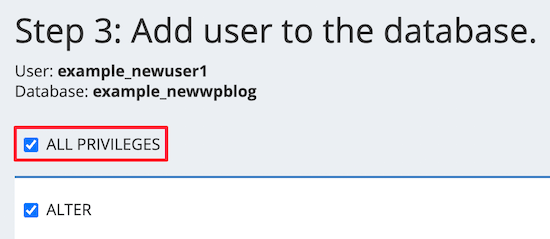
A continuación, desplácese hacia abajo y haga clic en el botón “Realizar cambios” para guardar los cambios.
Su base de datos ya está lista para ser utilizada con su sitio WordPress. Asegúrese de anotar el nombre de la base de datos, el nombre de usuario y la contraseña. Necesitará esta información en el siguiente paso.
Paso 3: Subida de archivos desde el servidor local al sitio web de WordPress.
Ahora tiene que subir los archivos y el instalador de su sitio local a su cuenta de alojamiento.
En primer lugar, conéctese a su sitio activo utilizando un cliente FTP. Una vez conectado, asegúrese de que el directorio raíz de su sitio web está completamente vacío.
Normalmente, el directorio raíz es la carpeta /home/public_html/.
Algunas empresas de alojamiento de WordPress instalan WordPress automáticamente cuando te registras. Si tienes archivos de WordPress allí, entonces necesitas borrarlos.
Después, puede subir los archivos archive.zip e installer.php desde Duplicator a su directorio raíz vacío.

Paso 4: Ejecutar el script de migración
Una vez subidos los archivos de migración, visite la siguiente URL en su navegador / explorador:
http://example.com/installer.php
No olvide sustituir “ejemplo.com” por su propio nombre de dominio.
Se iniciará el asistente de migración de Duplicator.
El instalador realizará algunas pruebas e inicializará el script.
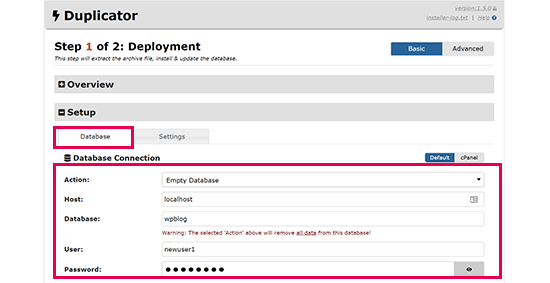
En la sección Configuración, se le pedirá que introduzca su alojamiento MySQL, el nombre de la base de datos, el nombre de usuario y la contraseña.
Su alojamiento será probablemente un alojamiento local. A continuación, introduzca los datos de la base de datos creada en el paso anterior.
A continuación, haga clic en el botón “Validar” para asegurarse de que los datos introducidos son correctos.
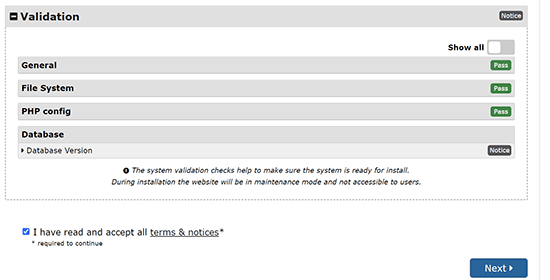
A continuación, haga clic en el botón “Siguiente” para continuar.
Duplicator importará la copia de seguridad de su base de datos de WordPress desde el archivo a su nueva base de datos.
También actualizará las URL que apuntan al sitio local y a su nuevo sitio activo.
Ahora puede hacer clic en el botón ‘Admin Login’ para acceder al área de administrador de WordPress de su sitio.

Una vez que acceda a su sitio activo, Duplicator limpiará automáticamente los archivos de instalación.
Eso es todo. Ha movido correctamente WordPress del servidor local a su sitio activo.
Método 2: Transferir manualmente WordPress del servidor local al sitio activo
En este método, le mostraremos cómo mover manualmente WordPress desde el servidor local a su sitio activo. Será útil si el primer método no funciona o si prefieres hacerlo manualmente.
Paso 1: Exportar la base de datos local de WordPress
Lo primero que tienes que hacer es exportar tu base de datos local de WordPress. Para ello utilizaremos phpMyAdmin.
Si no estás familiarizado con ella, entonces puede que quieras echar un vistazo a nuestra guía para la gestión de bases de datos de WordPress usando phpMyAdmin.
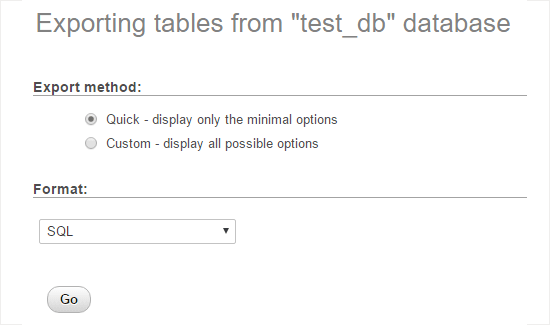
Sólo tienes que ir a http://localhost/phpmyadmin/ y hacer clic en tu base de datos de WordPress. A continuación, haz clic en el botón “Exportar” de la barra de menú superior.

En la opción ‘Método de exportación:’, puede elegir ‘Rápido’ o ‘Personalizado’. Personalizado le proporcionará más opciones para exportar su base de datos.
Pero le recomendamos que elija “Rápido” y luego haga clic en el botón “Ir” para descargar su base de datos.
Paso 2: Subida de archivos de WordPress al sitio activo
Ahora, tendremos que mover todos los archivos de su sitio web al sitio en vivo.
Para empezar, abra su cliente FTP y conéctese a su cuenta de alojamiento web.
Una vez conectado a tu sitio, asegúrate de subir los archivos al directorio correcto. Por ejemplo, si quieres que el sitio esté alojado en ‘tu_sitio.com’, entonces querrás subir todos los archivos a tu directorio public_html.
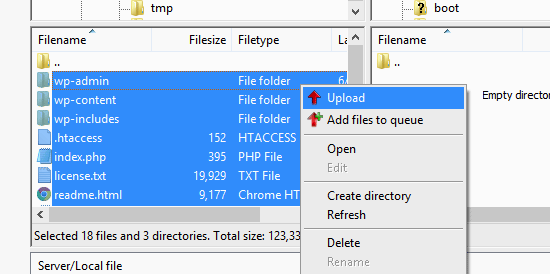
Ahora seleccione los archivos locales de WordPress y súbalos a su servidor.
Paso 3: Crear una base de datos MySQL en su sitio activo
Mientras tu cliente FTP está subiendo tus archivos de WordPress, puedes empezar a importar tu base de datos al servidor.
La mayoría de los proveedores de alojamiento de WordPress ofrecen cPanel para gestionar su cuenta de alojamiento, por lo que le mostraremos cómo crear una base de datos utilizando cPanel.
En primer lugar, debe acceder a su panel de control de cPanel y hacer clic en el icono “Asistente para bases de datos MySQL”, que se encuentra en la sección “Bases de datos”.

En la pantalla siguiente, puede crear una nueva base de datos.
Introduzca un nombre para la base de datos y haga clic en “Crear base de datos”.

cPanel creará automáticamente una nueva base de datos para usted.
A continuación, debe introducir un nombre de usuario y una contraseña para su nuevo usuario y, a continuación, hacer clic en “Crear usuario”.
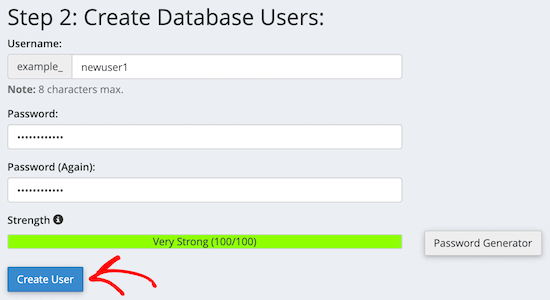
Después, tienes que añadir a la base de datos el usuario que acabas de crear.
En primer lugar, marque / compruebe la casilla de verificación “Todos los privilegios”.
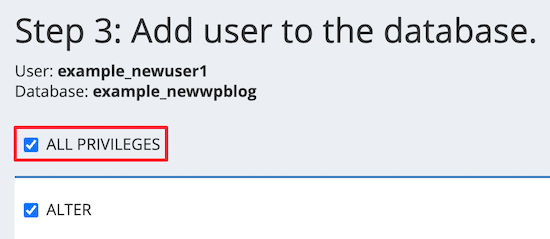
A continuación, desplázate hacia abajo y haz clic en “Realizar cambios” para guardarlos.
Ha creado correctamente una nueva base de datos para su sitio de WordPress.
Paso 4: Importar la base de datos de WordPress al sitio activo
El siguiente paso del proceso es importar su base de datos de WordPress.
Vaya a su Escritorio de cPanel, desplácese hasta la sección ‘Bases de datos’ y haga clic en ‘phpMyAdmin’.
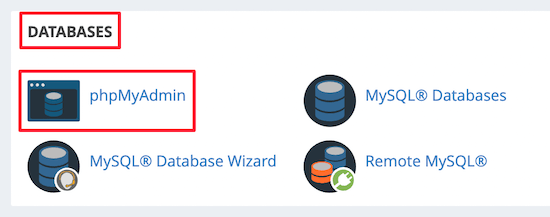
Esto le llevará a phpMyAdmin, donde debe hacer clic en la base de datos que acaba de crear. phpMyAdmin mostrará su nueva base de datos sin tablas.
A continuación, haga clic en la pestaña “Importar” del menú superior. En la página de importación, haga clic en el botón “Elegir archivo” y seleccione el archivo de base de datos del sitio local que guardó en el primer paso.
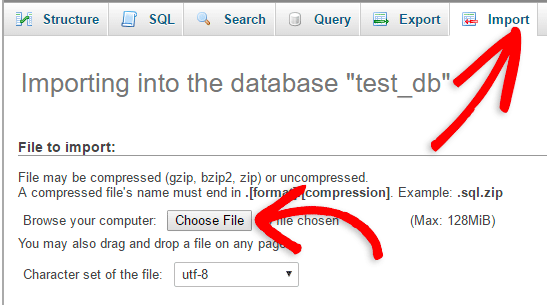
A continuación, haz clic en el botón “Ir” situado en la parte inferior de la página. Tu base de datos se importará automáticamente a phpMyadmin.
Paso 5: Cambiar la URL del sitio
Ahora, usted necesita cambiar la URL del sitio en su base de datos para que se conecte con su sitio de WordPress en vivo.
En phpMyAdmin, busque la tabla wp_options en la base de datos que acaba de importar.
Si ha cambiado el prefijo de su base de datos, entonces en lugar de wp_options, podría ser {new_prefix}_options.
A continuación, haga clic en el botón “Examinar” situado junto a wp_options. O bien, haga clic en el enlace en la barra lateral para abrir la página que tiene un anuncio / catálogo / ficha dentro de la tabla wp_options.
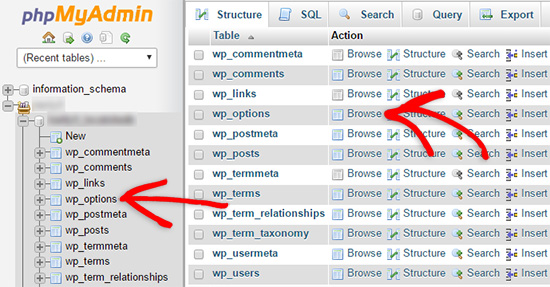
A continuación, en la columna options_name, debe buscar la opción siteurl.
A continuación, haga clic en el icono “Editar”.

Aparecerá una ventana en la que podrá editar el campo.
En el cuadro de entrada option_value, verá la URL de su instalación local, que será algo así como http://localhost/test.
Debe introducir la URL de su nuevo sitio en este campo, por ejemplo: https: //www.wpbeginner.com.
A continuación, puede guardar el campo al hacer clic en el botón “Ir”.
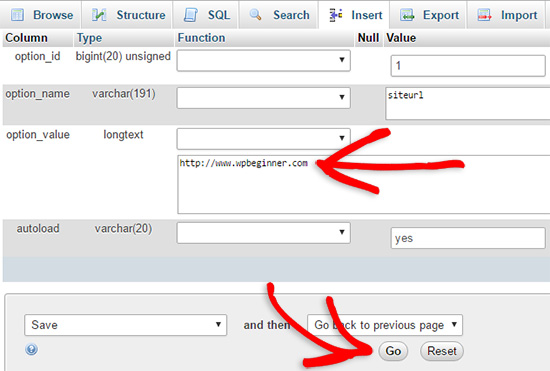
A continuación, debe seguir los mismos pasos anteriores para el nombre de la opción de inicio. El menú wp_options puede tener varias páginas. Normalmente, la opción de inicio estará en la segunda página.
A continuación, actualice la URL de inicio para que sea la misma que la URL de su sitio activo.
Paso 6: Establecer su sitio en vivo
Ahora que ha importado la base de datos y subido su contenido, es el momento de configurar WordPress.
En este momento, su sitio debería mostrar el error“Error al establecer una conexión con la base de datos“.
Para corregirlo, conéctese a su sitio web mediante un cliente FTP y abra el archivo wp-config.php.
Busque las siguientes líneas de código:
1 2 3 4 5 6 7 8 9 | // ** MySQL settings - You can get this info from your web host ** ///** The name of the database for WordPress */define( 'DB_NAME', 'database_name_here' );/** MySQL database username */define( 'DB_USER', 'username_here' );/** MySQL database password */define( 'DB_PASSWORD', 'password_here' );/** MySQL hostname */define( 'DB_HOST', 'localhost' ); |
Deberá indicar el nombre de la base de datos, el nombre de usuario y la contraseña que creó anteriormente.
A continuación, guarde el archivo wp-config.php y vuelva a subirlo al servidor de alojamiento de WordPress.
Ahora, cuando visite su sitio web, debería estar en directo.
Después de eso, tienes que acceder a tu panel de administrador de WordPress e ir a Ajustes ” General. A continuación, sin cambiar nada, desplácese hasta la parte inferior y haga clic en el botón “Guardar cambios”.
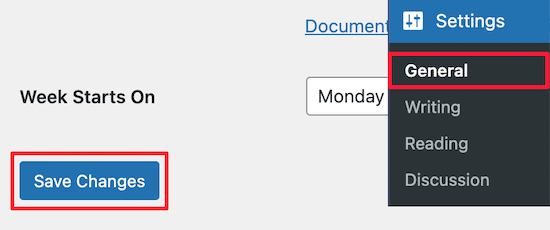
Así se asegurará de que la URL de su sitio se corrige en cualquier otro lugar en el que deba estar.
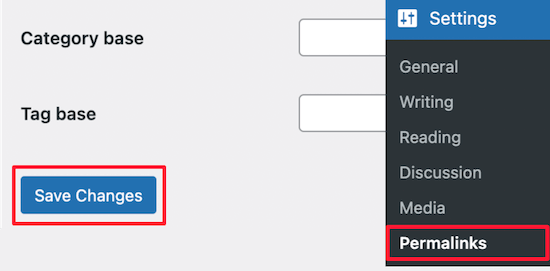
Una vez hecho esto, vaya a Ajustes ” Enlaces permanentes, desplácese hacia abajo y haga clic en “Guardar cambios” para asegurarse de que todos los enlaces de las entradas funcionan correctamente.
Paso 7: Corregir imágenes y enlaces rotos actualizando rutas
Siempre que traslade un sitio de WordPress de un dominio a otro o de un servidor local a un sitio activo, se encontrará con enlaces rotos e imágenes que faltan.
Le mostraremos dos formas de actualizar las URL. Puede elegir la que más le convenga.
1. Actualizar URLs usando el plugin Search & Replace Everything (Recomendado)
La forma más segura de corregir esto es mediante el uso de Search & Replace Everything. Es un potente plugin de WordPress que le permite realizar fácilmente tareas de actualización por lotes en su sitio web sin necesidad de escribir complejas consultas a la base de datos.
En primer lugar, debe instalar y activar el plugin Search & Replace Everything.
Una vez activado, vaya a la página Herramientas ” WP Search & Replace.
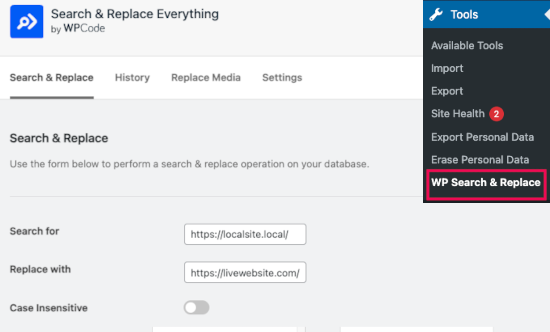
A continuación, introduzca la URL del sitio local en el campo “Buscar” y la URL del sitio activo en el campo “Sustituir por”.
Desplázate un poco y haz clic en “Seleccionar todo” debajo de las tablas. Esto asegura que el plugin buscará la antigua URL en cualquier parte de la base de datos.
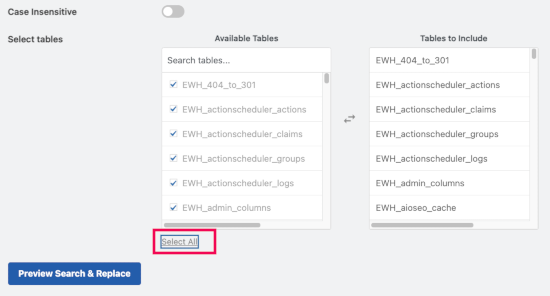
Ahora haga clic en el botón “Vista previa de Buscar y reemplazar” para continuar.
El plugin buscará en su base de datos todas las instancias de la URL antigua y previsualizará los resultados.
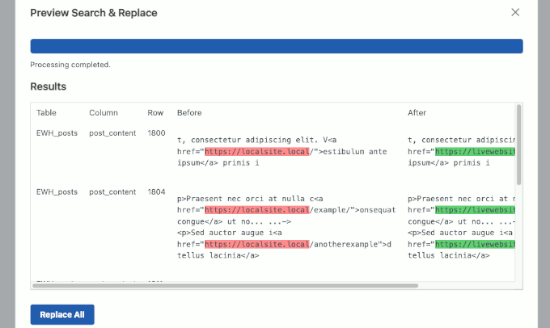
Si todo va bien, haz clic en “Reemplazar todo” para guardar los cambios.
Verás una advertencia acerca de los cambios que estás realizando. Haz clic en “Sí” para continuar.
El plugin actualizará la base de datos y sustituirá las URL locales por la URL actual de su sitio web.
2. Actualizar URL manualmente (Avanzado)
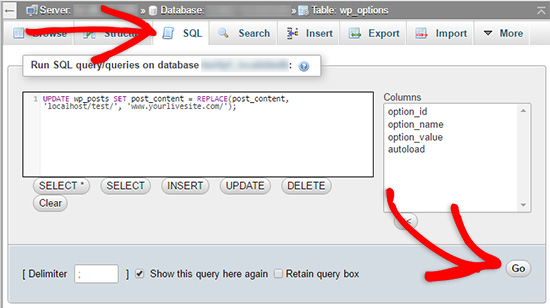
Otra forma de actualizar las URL es mediante la siguiente consulta SQL:
1 | UPDATE wp_posts SET post_content = REPLACE(post_content, 'localhost/test/', 'www.yourlivesite.com/'); |
Simplemente vaya a phpMyAdmin, haga clic en su base de datos y, a continuación, haga clic en “SQL” en el menú superior y añada la consulta anterior.
Asegúrese de cambiarla por la URL de su sitio local y del sitio activo y haga clic en el botón “Ir”.
Ya está. Ha migrado correctamente WordPress de su servidor local a un sitio activo.
Esperamos que tu sitio web esté funcionando correctamente. Si usted marca / comprobar cualquier error, puede consultar nuestra guía de errores comunes de WordPress para ayudar a diagnosticar problemas.
Esperamos que este artículo te haya ayudado a trasladar WordPress de un servidor local a un sitio activo. También puedes consultar nuestra guía sobre cómo trasladar un sitio activo a un servidor local o echar un vistazo a la lista de comprobación definitiva para la migración de sitios web para conocer los pasos prácticos de la migración de WordPress.
If you liked this article, then please subscribe to our YouTube Channel for WordPress video tutorials. You can also find us on Twitter and Facebook.


ANTONIO
Some days ago I posted I had used method #1 successfully. I am now trying again, from scratch, with no success.
I have two webs in one host (two subdomains: www and blog). one seats in /public/ and the other seats in /public_blog/.
(so, not a subfolder but a sibling, in my host provider). Both (www and blog subdomains) have a SSL.
I got to enter the WP admin area, clean the remaining files; posts and pages are listed, but clicking preview shows a blank page. No errors on the log
I don’t know how to trace and find out the steps (although I have the dup-installer-log.txt
thanks
WPBeginner Support
You would likely want to reach out to your hosting provider to ensure that the subdomain is set to the correct folder location for the most common reason for that issue.
Admin
Rob H
Brilliant tutorial.
I went with option 1. Got write through to point 4, but then on trying to launch WordPress, I received a “too many redirects”. Spent ages trying to figure out what I had done wrong, trying all the suggested for the error type and turned out not to be my fault. It wasn’t working because the database version I was using on Wamp was newer than the version on my hosting company 1and1 ionos.
I called up 1and 1 CS’s to ask if they could update the database version and it appears they must have had other complaints. 2 days later, database version updated and my local website transferred to the live site within minutes.
So…… database versions is another thing to consider if you get problems.
Thanks for such an excellent tutorial, I will use this method again in the future.
WPBeginner Support
Thanks for sharing your solution should anyone else run into this issue
Admin
Antonio
Perfect. I used method #1. Now the site (in server) is up and running.
But, then, when I add some posts, pages, menus in localhost,… how can I update the real site, without starting from scratch again?
thanks
WPBeginner Support
You could use the duplicator method to move the updated content over to your current site
Admin
Antonio
Thanks. I will try.
I didn’t notice my post was published yesterday, so I just wrote a new one asking the same question.
Sorry for the inconvenience.
WPBeginner Support
No worries
Bahadur
My website working fine on localhost but when i upload it to my live domain some of the Social button images are not showing can you help please ?
WPBeginner Support
We would first recommend reaching out to the support for the plugin you are using to ensure there isn’t a hiccup that is specific to transferring the content.
Admin
Luisa
Hi! I followed every step but once I get to step 4 and click on Admin Login I get an error saying “Too many redirects occurred trying to open […]. This might occur if you open a page that is redirected to open another page which then is redirected to open the original page”.
How can I fix that?
WPBeginner Support
For that error you would want to try the troubleshooting steps in our article here: https://www.wpbeginner.com/wp-tutorials/how-to-fix-error-too-many-redirects-issue-in-wordpress/
Admin
Anita Steen-van Meerveld
Hi, I’ve followed the instructions so far, and everything seems to go as it has, but the problem begins on step 4.
I’ve uploaded the migration files, after check the file is 1.2 gig.
After launching the installer.php the message is : file is 4k, please upload the complete file.
I am sure that the uploaded file is completely uploaded.
The process stops here, what can I do?
WPBeginner Support
You would want to reach out to duplicator’s support and let them know the error and they will be able to assist.
Admin
Jessica
Thankyou for this fantastic tutorial! I am building a new website locally but I already have a live site running that I will want to completely overwrite with the new one. Do I need to delete my whole live website before migrating? Both are running WordPress but are completely different themes… thanks!
WPBeginner Support
It would normally be best to remove the site you are replacing so you do not have unnecessary additional files on your server.
Admin
nurudeen
In my opinion I recommend you guys to please organize a complete video tutorial, it gonna be a great practical guide and more helpful and much easier, for it may allow to view in real doing until results achieve.. Thanks you guys for good job you are offering.
WPBeginner Support
Thank you for your recommendation
Admin
Reggie
Hi, I did this and now my slider/carousel does not work live but it shows and works on localhost. What can I do to fix this? Thank you.
WPBeginner Support
It would depend on what error you are running into at the moment. If you reach out to the slider plugin’s support they should be able to assist.
Admin
Gage
Hi I really appreciate the in depth explanation. I am completely finished with step 5, changed my URL and Home to my actual URL i am using, but now when I type in my URL it still gives me the “if you are the owner login to launch site”. Not sure what I’m missing but i dont get an error message.
WPBeginner Support
Hi Gage,
Please recheck if you uploaded WordPress files to the correct directory. If you are unsure, then ask your hosting provider and they will let you know which directory you should upload it to.
Admin
Vladimir
Thank. Very useful tutorial.
WPBeginner Support
Thank you
Admin
Tarun Bisht
Thanks for sharing the post, i will surely try.
WPBeginner Support
Glad our post can help you
Admin
Hazel beaver
I normally love your tutorials and have built my two personal websites with your help and guidance… But this is too complicated for me!
When I run Duplicator If doesn’t list all the entries as ‘good’. The size check and add on checks come back as having a warning. so I can’t get any further. My site isn’t that big.. but I think it’s trying to package everything ( including back-up and plugins that I assume I don’t need to migrate. Is there a way round this ( I’m trying to down load my live site to WAMP so I can work on using a new theme )
WPBeginner Support
As long as they are only warnings you should be able to continue, if you click on the section with the warning it should let you know different options on how to change from warning to good. You can also enable filters to ignore certain files/folders
Admin
Fahim
Good post.
WPBeginner Support
Thank you
Admin
Ravi gupta
Great! Thanks for sharing this information I am so very happy to read this information
WPBeginner Support
Glad you like our article
Admin
Rosa
Hi there! I’ve followed your instructions so far, and everything seems to go as it has, but I’ve stuck on Step 6.
I read: “To fix this, connect to your website using an FTP client and edit wp-config.php file. Provide the database name, user and password you created earlier in Step 3. Save the wp-config.php file and upload it back to your server. Visit your website, and it should be live now.”
Can you please be more specific? Where exactly do I find wp-config.php file and how do I edit it?
WPBeginner Support
You would find the wp-config file where your WordPress folders are which is normally in the public_html or www folder of your hosting. You would use a text editor such as notepad or similar to edit the content of the file
Admin
Hirr
Could be more helpful if you uploaded a video..
WPBeginner Support
Thank you for your recommendation, we’ll certainly take a look for a possible video
Admin
Mike
“Click on the Import tab in the top menu. On the import page, click on Choose File button and then select the database file you saved in Step 1.” I cannot locate this file – no idea where to even look.
WPBeginner Support
Hi Mike,
In the first step you would have saved a file to your computer. This is the file you need to import here.
Admin
Samad
Thank you very much for the information,
I have been doing these wrong in the past.
Jim Thorne
Fantastic how-to article. I followed it and easily migrated my site from localhost to the live server. Thanks for posting! I’m a newbie at moving a site, so I had to figure out some of the simplest things. One thing I had to discover was how to move the file folders from my computer to the host server using cPanel. After researching this, I discovered to ZIP the entire folder with all of its subfolders into a ZIP file and then upload that one file.
Christian
Fix Images and Broken Links by Updating Paths: How to update background images? The method mention in step 7, only work normal image not background images. So how to update images?
WPBeginner Support
Hi Christian,
You’ll have to manually update those.
Admin
Alex
Hi guys, great tutorial.
But when i try to access my site through the url, it asks me to re-install WordPress (i mean is shows me the wizard of the WordPress when it starts)
Plus, when you say go to the database and create a new user, mySQL doesn’t have an option.
Olaniyan
Hello please i followed all the steps but at the end of it all am getting an error message stating Erro In Establishing a database connection message
Steph
Hi, how do I proceed if there is no cPanel? Thank you in advance!
Jasonas
Hello! Great article. Just two things that I think would be cool to read on this subject.
1.Are there any tips of workflow in order to avoid the broken links, images etc. that you mention?
2.Also, I’ve read plugin reviews where users claim that some bad plugins will leave “trash code” (unusable code and files) after the uninstall/deletion of the plugin, which eventually makes their website slower. Is that true? If yes how could we, as beginners, detect that “trash code” (essentially the leftovers of plugins that we deleted) and remove it?
In my local website I try many plugins that I don’t intend to use and will end up deleting (like many others do), so I am interested in this.
Thank you in advance.
WPBeginner Support
Hi Jasonas,
1. You can follow the steps above in order they appear to avoid broken links.
2. You can view leftover data in your WordPress database by using phpMyAdmin. However, we don’t recommend beginners to do that unless they are certain that this data is slowing down their website.
Admin
Sally
Hi,
I have been building my site on the local server, I now want to move it over to a temporary Url on my WordPress which is installed on my hosting package to finish and then once ready it will be pointed to the domain name which currently hosts the old site, I have attempted the above steps but I get as far as step 1 and have no idea where the export file goes?
Sorry if this is a silly question but can’t seem to find it anywhere!
Any help would be much appreciated.
Thanks,
Sally
WPBeginner Support
Hi Sally,
Export file is automatically downloaded to your computer. Check your computer’s Downloads folder or any other folder where your browser usually stores downloaded files.
Admin
Sally
Hello,
Thanks, sorry can’t find it there at all. I emptied the folder and did it again but nothing appeared in there at all, hence asking the question.
All Safari downloads go into the normal download folder, so don’t know where it could be going. Going to give it a go with Duplicator and see if I get any further!
Thanks,
Sally
Sheuen
I think maybe you can try choose download custom instead of download quick, and then in output field, choose “Save output to a file” > Compression: > gzipped
JD Simpkins
Depending on your setup, it may not automatically download. It may open up in a new screen and you can then copy/paste it into a file and save yourself. Not sure if this is just a MAMP thing or what but when I migrated over to working on a Mac, this part of the steps changed.
Sally
Hi,
Your tutorials are great, thank you!
I have just been following this thread and not sure if what I am doing is wrong but I do Step 1 (Export) but no idea where the file that I am exporting goes?
I am running a local server on my Mac and have got stuck here, am I missing something?
I am trying to get my website from the local server to WordPress running on my hosting package with 123 Reg. This is going onto a temporary URL until I am ready to move onto the domain which has currently got the old website on it.
Any help will be much appreciated.
Many thanks
Sally
Ahmad Lone
Thank you so much.
Ismail
I have a wordpress website on live server, i want to replace it by another wordpress server that i created on localhost, i want to keep the same host and same domaine name. what should i do please ?
Sandy
This is very helpful. I want to ask about the next step. What if I continue to develop locally and want to sync changes from time to time ? Do you have a tutorial for that ?
DEAN O
I have an issue where my laptop died with localhost MAMP server. I have been able to extract the all the files from the hard disc but I can’t run a database export.
I have an laptop set up with XAMP.
Any thoughts?
Mauricio
Sunday evening.
The client wants the website.
I have tried Duplicator all day long, no way.
Problems with PHP and DB, just doesn’t work… until I get to your post.
Back to basics man, manually put the live on air.
Thanks for sharing.
Its the simpler idea yet we try to automate things and get less work done sometimes.
Had to share with you my truly akcnowledgment.
Nicely done
Stefan
Thank you! This guide is perfect. I use it every time I forget how I move wordpress from local to live!
Chell
I have recieved a complete WP “filesystem” through an FTP server from a supplier of mine, and I want to creat a new webpage with these files, but with my own domain.
Can I use this “walk-through” for this?
Sorry silly questions, but I have only worked on WP through a cloud solution
WPBeginner Support
Hi Chell,
You will also need the WordPress database not just the files. Once you have both database and WordPress files, then you will be able to upload them to your own domain name and import the database.
Admin
Scott
Hello. I have finished building my site on a local server and ready to move it to my live server. I am assuming that before I follow your steps, that I would need to install WordPress on my hosting account first. Is that correct? And if so, should I click the box that says “Automatically create a new database for this installation” ? If I do that, I will need to replace that database with the one from my local server, right? Or should I leave that box unchecked since I’m about to migrate a new database to it? Thanks.
WPBeginner Support
Hi Scott,
No, instead of installing WordPress you will be moving one from your local server to the live site. Similarly, you will export your local database and then import it on your live server’s hosting account using phpmyadmin via cpanel.
Admin
Bryn Why
Hi, after updating my wp-config.php file to reflect the database information, I am now presented with the below when accessing the live site:
Fatal error: Class ‘WP_Widget_Media’ not found in /home/…/wp-includes/widgets/class-wp-widget-media-audio.php on line 17
Manos Liakos
Dude, you are a life saver. That thing with the SQL query to change the links just saved me. I’ve been trying for 2 days straight to fix the site not displaying properly when accessing it from public ip through my domain name, even if “siteurl” and “home” were correctly configured. Thanks!
WPBeginner Support
Hi Manos,
Glad you found the solution. Don’t forget to join us on Twitter for more WordPress tips and tutorials.
Admin
Shreshta
Thank you in advance.
I have to upload the word press website from my local machine to the web server my company owns which sits in the same building as I work. My problem is I am not using any hosting services so I am not sure what to do when it comes to the file manager step for the database transfer. Just to be clear, how would I go if I were to upload the website from my local machine to the private company server without using a web hosting service.
Dimitris
Hello I am going to do this migration, but I have a question. What happened if i have to upload a website to a server but in my localhost this website is a part of multisite? How can I isolate this website from the local WordPress Network and finally upload it to a real web server?
Olumide
phpMyAdmin – Error
Error during session start; please check your PHP and/or webserver log file and configure your PHP installation properly. Also ensure that cookies are enabled in your browser.
session_start(): open(SESSION_FILE, O_RDWR) failed: No such file or directory (2)
The above is what i get and my site is not working please help.
WPBeginner Support
Hi Olumide,
If the error occurs on your live site, then please contact your hosting provider. If this happens on your local server, then this means your local server set up is not properly configured.
Admin
Angela
I just followed these steps to move a local site to active and none of my local site transferred over.
Olakorede O
Please i am having issues with step 7. i imputed the life site but what will i put for the local site? thanks
Dimitri
Thanks god for this article !
The Step 6 saved my life, it could not be found anywhere on the internet !!!
Kisses from France
Marlon
Hi WPBEGINNER SUPPORT et al,
Thanks I have found your article helping people out there. I hope I can find your favor to my problem. After having modifies by adding codes in functions.php (live site) i can’t view or access the website anymore, it always shows the message saying:
Notice: ob_end_clean(): failed to delete buffer. No buffer to delete in /home/dh_awey63/website/wp-content/plugins/nextgen-gallery/nggallery.php on line 92
ParseError thrown
syntax error, unexpected ‘ang’ (T_STRING)
I used to searched in google the message error and got some advices to access it thru FTP FileZilla client, but I can’t login successfully I always got an error in: “Response: 530 Login incorrect”. “Error: Critical error: Could not connect to server”. Is there a way i can edit the functions.php file to delete my comments there and put back the site in normal, I just don’t know if the web developer have configured ftp account, that freelance developer left his messy and lousy stuff in his web design and has gone out after he receives the payment. I am really new to this area and don’t know what to do. Please help. Thank you very much.
WPBeginner Support
Hi Marlon,
You can also access your WordPress files using the File Manager in cPanel under your web hosting account dashboard. Once you are connected to your site using file manager, you need to locate your functions.php file and undo the changes you made earlier.
Admin
Marlon
Hi WPBEGINNER SUPPORT,
Thank you for your prompt reply. I sad I really have no idea if the guy who build the site created a cpanel account, I really don’t know the login details if there’s any. That bad guy never replies my messages after he receives the money from us. Please help me what to do if there’s any available options. Please visit the website at rheumacares.ph. Thank you very much.
Victor
Hi, I’m with a problem in step 4. After importing my database I get an error message. I don’t now what I did wrong in the process and I don’t know how to fix it. Could you give me some advice? I’m posting the error message below
Thanks
Error
SQL query:
—
— Database: `meusite`
—
— ——————————————————–
—
— Table structure for table `wp_commentmeta`
—
CREATE TABLE `wp_commentmeta` (
`meta_id` bigint(20) UNSIGNED NOT NULL,
`comment_id` bigint(20) UNSIGNED NOT NULL DEFAULT ‘0’,
`meta_key` varchar(255) COLLATE utf8mb4_unicode_520_ci DEFAULT NULL,
`meta_value` longtext COLLATE utf8mb4_unicode_520_ci
) ENGINE=InnoDB DEFAULT CHARSET=utf8mb4 COLLATE=utf8mb4_unicode_520_ci
MySQL said: Documentation
#1050 – Table ‘wp_commentmeta’ already exists
WPBeginner Support
Hi Victor,
The table in your database already exists. If you do not have any content on your live site, then you can simply DROP all tables in your WordPress database and then try to import again.
Admin
Jonathan
Thank you for a fantastic article!
I have locally built a wordpress site which I would like to replace a site currently live online.
If I want to upload the local site to a test environment online, am I able to do this without the need to setup a new database? i.e. am i able to share the same database being used by the live site? If so how can I do this?
Cheers, Jon
Jon
Fantastically helpful article thankyou! I have been building a wordpress site locally to replace one that is hosted online.
I would like to move the locally hosted one to online in a test environment so that it does not replace the existing site.
You instructions suggest that I need to setup a new SQL database for which I will incur charges. Is there a way that I can upload the test site to the existing database without disturbing the live site? If so how?
Thanks,
Jon
WPBeginner Support
Hi Jon,
It is not recommended, but you can change the table prefix in the wp-config.php file of your test site to something unique. Use the same MySQL database as your live site. Doing so your live website’s database will have tables for different WordPress installs.
Admin
Jojo Esposa Jr
Can I use the Cpanel Softaculous installation of WordPress, then simply upload the sql database and the current theme I used? Uploading the entire wordPress files from my laptop to the live site using ftp takes very long since my internet connection is extremely slow, (2 mbps).
WPBeginner Support
Hello Jojo Esposa Jr,
Yes, you can do that.
Admin
Lyada Emmanuel
Hello i followed all the steps ,however when i open login page to wordpress i get this
Internal Server Error
WPBeginner Support
Hi Lyada,
Please see our guide on how to fix internal server error in WordPress.
Admin
Madison Duncan
Hello,
I am confused by step two. When I click on my FTP client account it prompts me to use Cyberduck, but then I am not sure which files to upload or where (how to I make sure it is on public html?). I completed step one, so are those the files that I am supposed to upload? I just don’t see all of those anywhere. Thanks!
WPBeginner Support
Hi Madison,
This tutorial is about moving a WordPress website built on local server (Your computer) to a live website. If you have a local server installed on your computer (programs like Wamp, MAMP, XAMP), then you will find local files on your computer. These are the files you need to upload.
The first step only exports your database. You will need it in Step 4.
Admin