Tras años construyendo sitios web con WordPress, hemos aprendido lo importante que es tener una configuración local de WordPress en tu ordenador.
Tener WordPress en tu máquina personal te permite experimentar con nuevas funciones sin poner en riesgo tu sitio web, profundizar en el desarrollo de WordPress e incluso crear sitios web completos antes de que salgan a la luz. Es como tener una caja de arena privada para todos tus proyectos de WordPress.
Si eres usuario de Windows, existen numerosas formas de configurar WordPress localmente. Pero lo hemos reducido a los dos métodos más sencillos. En esta guía, te mostraremos cómo instalar WordPress fácilmente en un ordenador con Windows, independientemente de la versión que estés utilizando.
¿Por qué debería instalar WordPress en Windows?
Si eres usuario de Windows, instalar WordPress localmente en tu ordenador te ofrece varias ventajas.
Una instalación local de WordPress crea un entorno de pruebas que no afecta a su sitio web. Esta configuración, a menudo llamada servidor local o localhost, es tu patio de recreo personal para WordPress.
Los desarrolladores de WordPress utilizan habitualmente instalaciones locales para su trabajo. Por ejemplo, pueden utilizarla para experimentar con nuevos plugins o temas o probar el sitio antes de actualizarlo al editor de bloques Gutenberg.
Pero no es sólo para los profesionales. Si eres nuevo en WordPress, una configuración local es perfecta para aprender. Puedes explorar funciones, probar temas y plugins, y experimentar libremente sin preocuparte de romper un sitio activo.
Es importante tener en cuenta que cuando instalas WordPress localmente en Windows, sólo tú puedes ver el sitio. Si quieres crear un sitio web público, necesitarás un nombre de dominio y alojamiento web.
Ahora, técnicamente, puedes instalar WordPress en Windows usando XAMPP, y hemos escrito un tutorial sobre ello antes.
Dicho esto, hemos encontrado 2 formas aún más sencillas que XAMPP para configurar un entorno local de WordPress, por lo que son ideales para principiantes o usuarios que necesitan crear un sitio local rápidamente. Puedes hacer clic en el enlace de abajo para saltar al método que te interese:
Método 1: Instalar WordPress en Windows con Studio (rápido y sencillo)
Para el primer método, utilizaremos Studio. Es un software local de WordPress hecho por Automattic, la empresa que gestiona y dirige WordPress.com, que es un constructor de sitios web basado en el software de WordPress.
Hablaremos primero de este método porque es mucho más rápido y sencillo de seguir, lo que lo hace perfecto para los principiantes.
En primer lugar, tienes que abrir el sitio web Studio by WordPress.com. A continuación, haz clic en el botón “Descargar para Windows”.
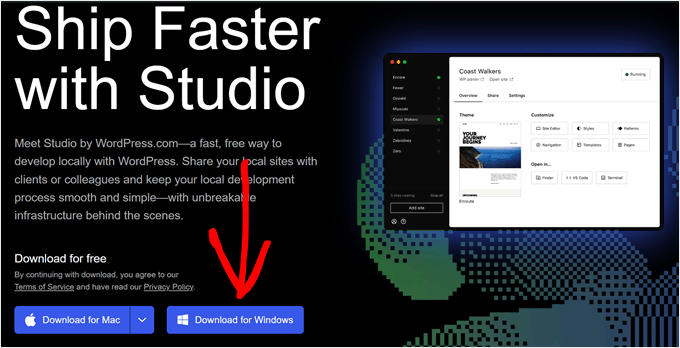
Una vez hecho esto, sólo tienes que abrir el archivo descargado para iniciar la instalación.
Aparecerá una ventana emergente que le indicará que se está instalando la aplicación.
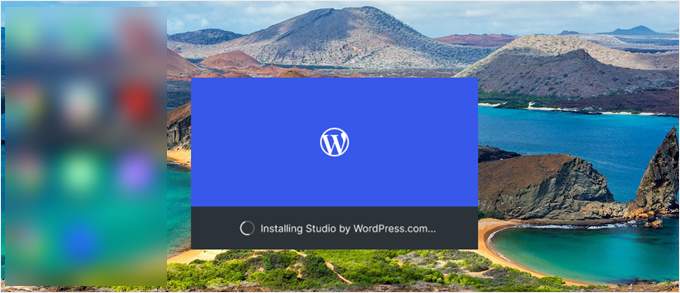
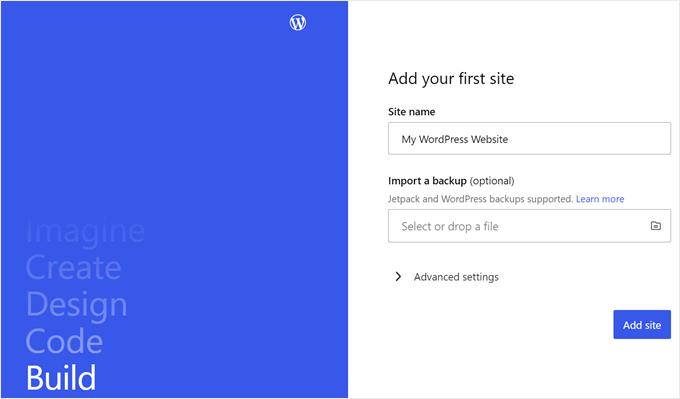
Una vez hecho esto, puede añadir su primer sitio.
Para ello, introduce el nombre de tu nuevo sitio local de WordPress y haz clic en “Añadir sitio”. Puedes nombrar el sitio como quieras siempre que te ayude a identificarlo fácilmente.
Ahora debería ver el escritorio de WordPress local.
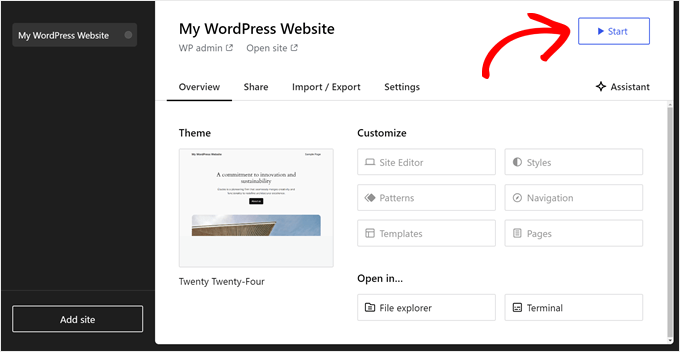
Para acceder a tu escritorio de WordPress y editar tu sitio web, sólo tienes que hacer clic en el botón “Inicio” situado en la esquina superior derecha. De este modo, podrá acceder a su sitio web local desde su ordenador.
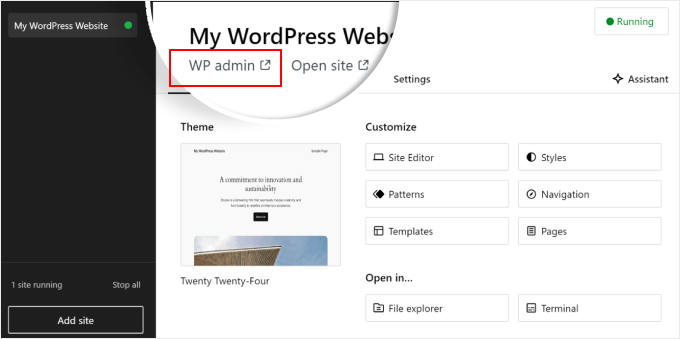
Una vez que el botón “Iniciar” cambie a “Ejecutando”, puede hacer clic en el enlace “WP Admin” en la parte superior izquierda de la página.
Esto le llevará a su página local de administración de WordPress.
Y eso es más o menos todo para la configuración. Vamos a explorar los otros ajustes que pueden ser necesarios a medida que construye su sitio web local.
Como puedes ver en la pestaña ‘Visión general’, puedes acceder inmediatamente al menú completo del editor de WordPress directamente desde el escritorio de Studio. También puedes hacer clic en “Explorador de archivos” para abrir las carpetas y archivos de tu sitio web de WordPress y hacer clic en “Terminal” para administrar tu sitio web mediante WP-CLI.
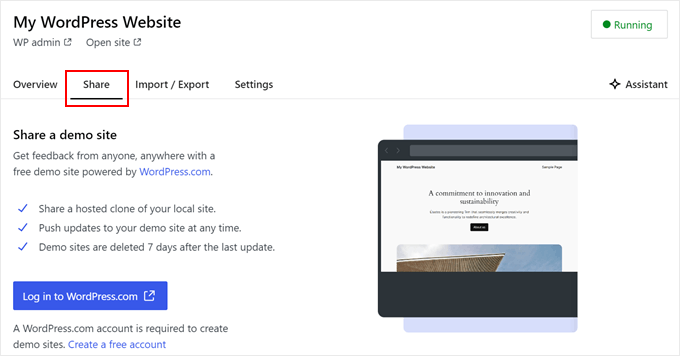
Si cambias a la pestaña “Compartir”, puedes acceder a tu cuenta de WordPress.com, clonar tu sitio web local y subirlo a los servidores de WordPress.com. Esto hará que el sitio clonado esté online temporalmente, lo que resulta útil para compartir sitios de demostración con tus clientes o miembros del equipo.
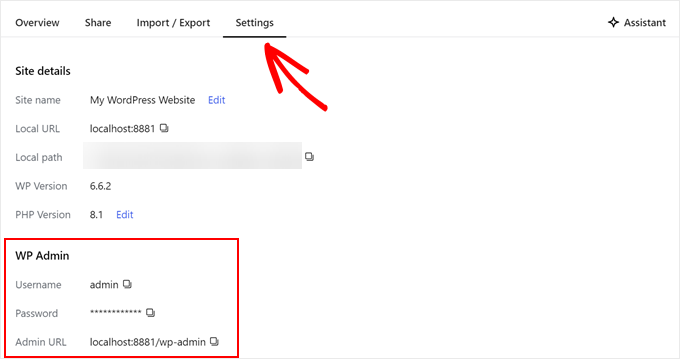
A veces, es posible que desee iniciar sesión en su sitio web local directamente a través de su navegador en lugar de utilizar Studio. En ese caso, necesita conocer sus credenciales de wp-admin.
Para encontrarlos, puede cambiar a la pestaña “Configuración” y encontrar allí su nombre de usuario, contraseña y URL de inicio de sesión de administrador de WordPress.
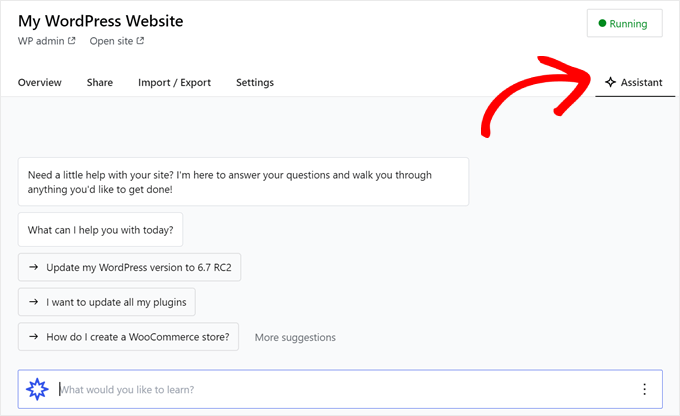
Otra característica interesante de Studio es su chatbot de inteligencia artificial integrado, con el que puedes comunicarte pulsando el botón “Asistente”.
Aquí puedes pedir ayuda a Studio para tareas como actualizar todos tus plugins a la vez, actualizar la versión principal de WordPress o crear código para un bloque personalizado.
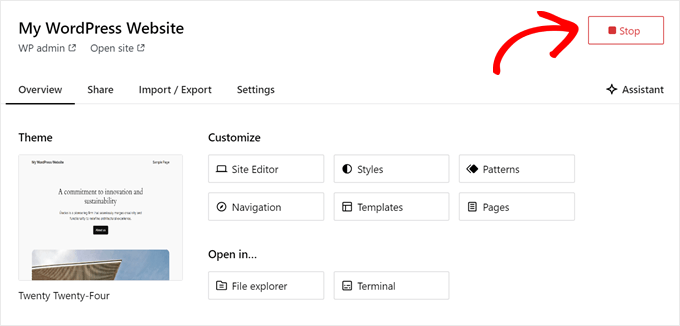
Cuando hayas terminado de trabajar en tu sitio local, sólo tienes que pasar el ratón por encima del botón “En ejecución” de la esquina superior derecha hasta que ponga “Detener”.
A continuación, haga clic en el botón para detener el sitio web.
Una desventaja de Studio es que no puedes configurar el entorno de WordPress a tu gusto. Esto significa que tienes que utilizar la versión de PHP, el servidor web y la base de datos que se han preseleccionado para ti.
Esto puede ser un inconveniente si necesitas probar tu sitio web o plugin con configuraciones de servidor específicas.
Si necesita un mayor control sobre su entorno local de WordPress o necesita que su configuración local coincida con una configuración específica del servidor en vivo, entonces puede consultar el siguiente método usando WP Local.
Método 2: Instalar WordPress en Windows Usando WP Local (Más Personalizable)
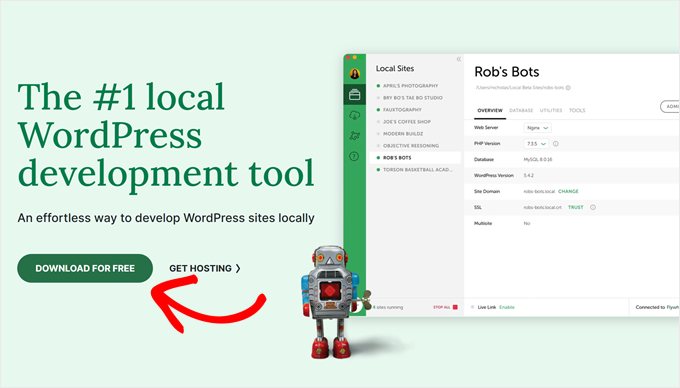
En primer lugar, debe descargar e instalar el software Local WP en su ordenador Windows. Simplemente vaya al sitio web de Local WP y haga clic en el botón “Descargar gratis”.
A continuación, aparecerá una ventana emergente en la que tendrás que seleccionar tu plataforma. Elige “Windows” en el menú desplegable.
A continuación, puedes introducir tus datos, como nombre y apellidos, dirección de correo electrónico laboral y número de teléfono, para descargar el software.
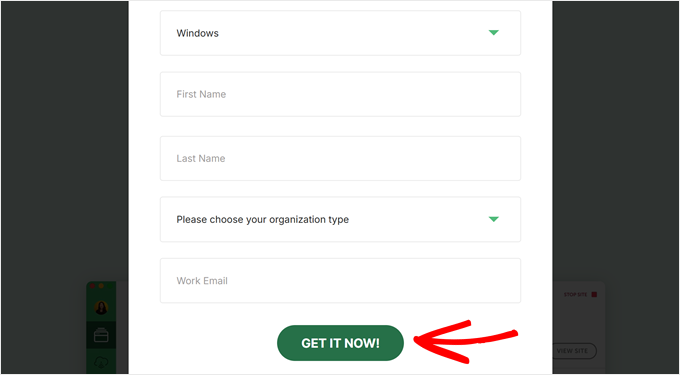
Una vez introducidos los datos, basta con hacer clic en el botón “Consíguelo ahora”.
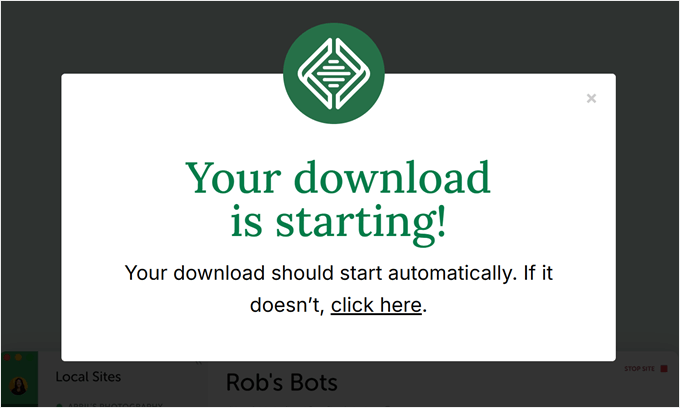
A continuación, el software se descargará automáticamente en tu ordenador. De lo contrario, puede hacer clic en el enlace “haga clic aquí” para iniciar la descarga.
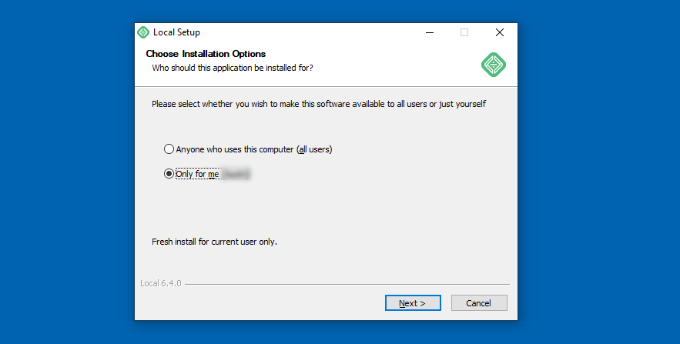
Una vez descargado el archivo, inicie el asistente de instalación.
Ahora, tendrás que seleccionar si quieres instalar el software para todos los usuarios o sólo para ti.
Una vez seleccionada una opción, pulse el botón “Siguiente”.
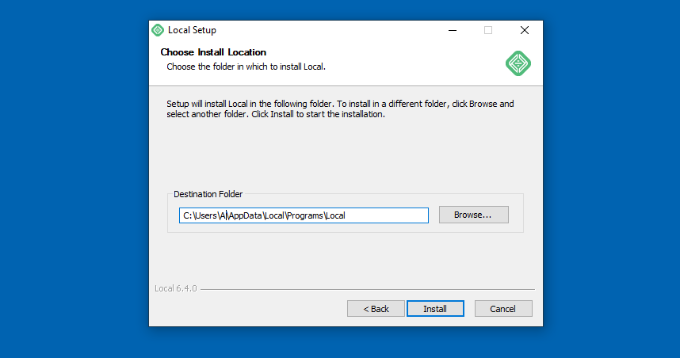
En el siguiente paso, puede seleccionar la “Carpeta de destino” donde se instalará el software.
Basta con hacer clic en el botón “Examinar” para establecer la ruta y, a continuación, hacer clic en el botón “Instalar”.
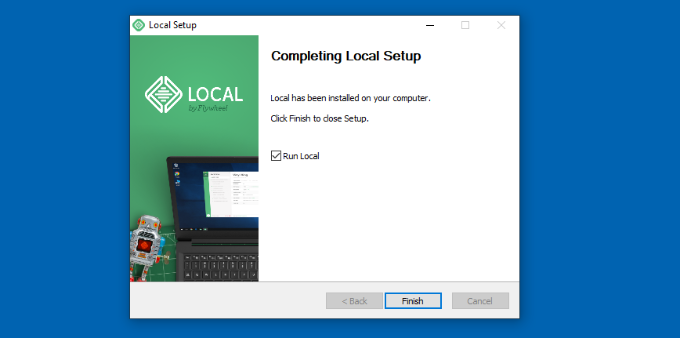
El software Local WP se instalará en tu ordenador Windows.
Una vez hecho esto, puede marcar / comprobar la casilla de verificación “Ejecutar localmente” y hacer clic en el botón “Finalizar” del asistente de configuración.
El software se iniciará ahora en su dispositivo Windows.
El siguiente paso es añadir un nuevo sitio web local. Para ello, basta con hacer clic en el botón “+” de la parte inferior.
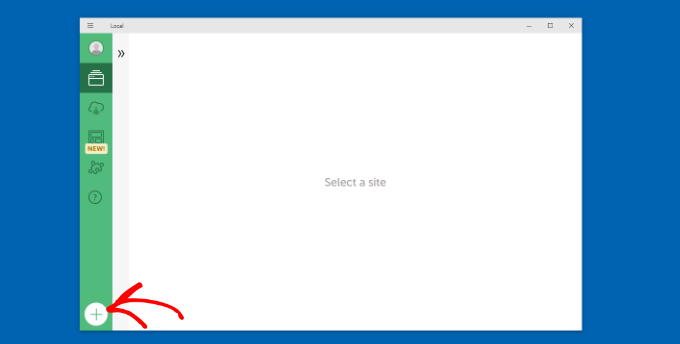
Después, puede crear un sitio en el software Local.
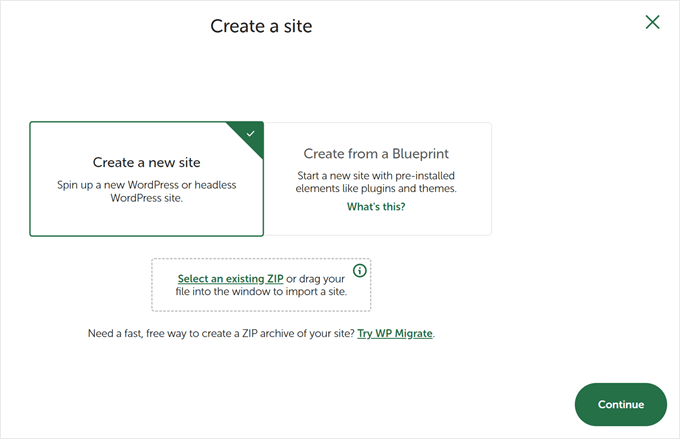
Seleccione la opción “Crear un nuevo sitio” y haga clic en el botón “Continuar”. También hay opciones para crear el sitio desde un plano o un archivo de sitio web existente, pero vamos a ir con la primera opción en aras de la demostración.
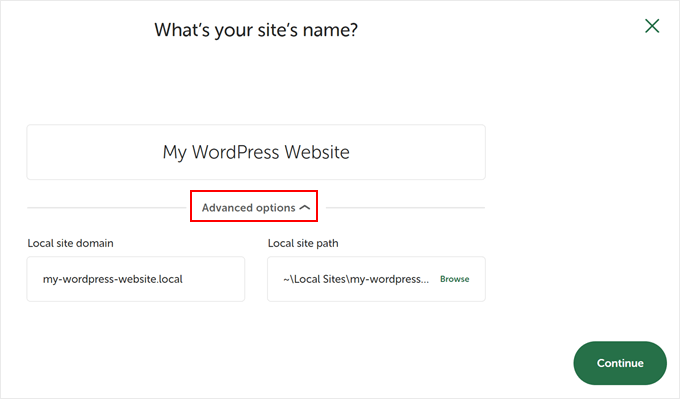
A continuación, puede introducir un nombre para su sitio web local, como “Mi sitio web WordPress”.
También hay opciones avanzadas en las que puede introducir el dominio del sitio local y la ruta del sitio local. Por defecto, el dominio utilizará el título de su sitio web, pero separado por guiones.
Una vez que haya terminado, simplemente haga clic en el botón “Continuar”.
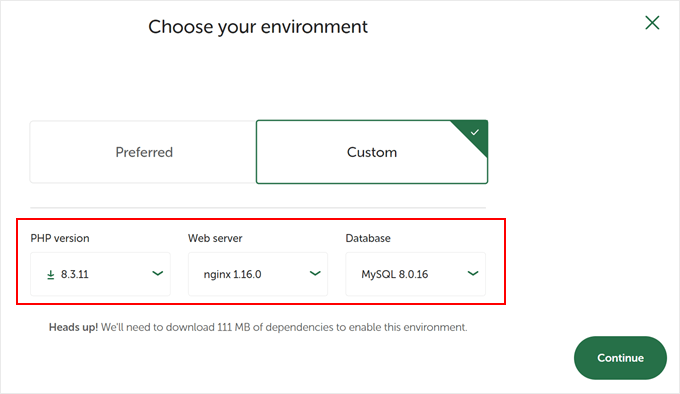
Después, tendrá que elegir un entorno para su sitio web local.
Puede utilizar el entorno ‘Preferido’, en el que el software seleccionará automáticamente la versión de PHP, el servidor web y la versión de MySQL. Por otro lado, también puedes seleccionar ‘Personalizado’ e introducir los detalles del entorno.
Local WP ofrece las últimas versiones de PHP. En cuanto al servidor web, puedes elegir entre Nginx o Apache. También puedes seleccionar entre MySQL o MariaDB para las bases de datos.
Tenga en cuenta que algunas versiones de PHP, servidores web y bases de datos requieren la descarga de algunas dependencias para que funcionen correctamente.
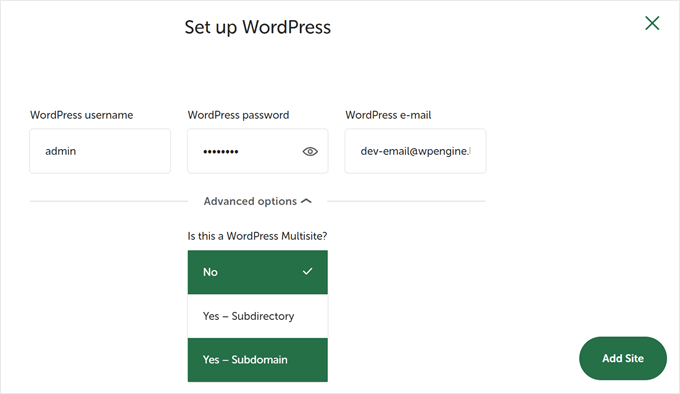
A continuación, puedes introducir un nombre de usuario y una contraseña de WordPress para tu sitio web local. Además, también tienes la opción de elegir una dirección de correo electrónico de WordPress en la que recibirás todas las notificaciones por correo electrónico.
Aparte de eso, hay una opción avanzada en la que el programa te preguntará si tienes una red multisitio de WordPress. Si no es así, haz clic en “No”.
Tras introducir estos datos, basta con hacer clic en el botón “Añadir sitio”.
El programa instalará WordPress y establecerá su sitio web.
Para iniciar el sitio web local, haz clic en el botón “Iniciar sitio” situado en la esquina superior derecha.
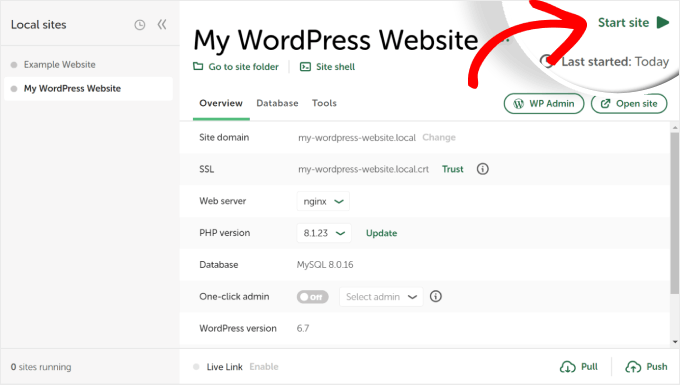
A continuación, haz clic en el botón “WP Admin” y verás la página de inicio de sesión del administrador de WordPress.
Sólo tiene que introducir el nombre de usuario y la contraseña que introdujo anteriormente al configurar el sitio web local y, a continuación, hacer clic en el botón “Iniciar sesión”.
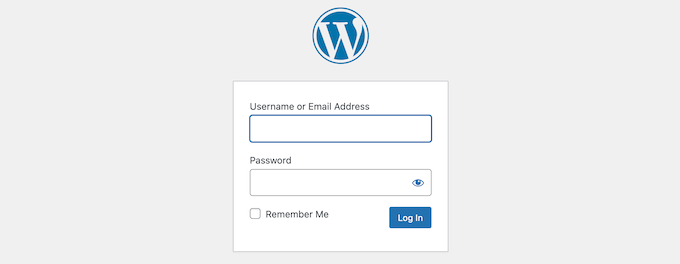
Ahora puede editar su sitio web local en su ordenador Windows.
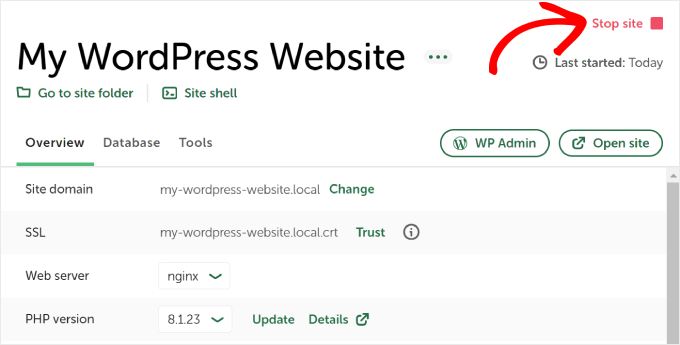
Cuando haya terminado, no olvide detener el sitio web desde el software WP local al hacer clic en el botón “Detener sitio”.
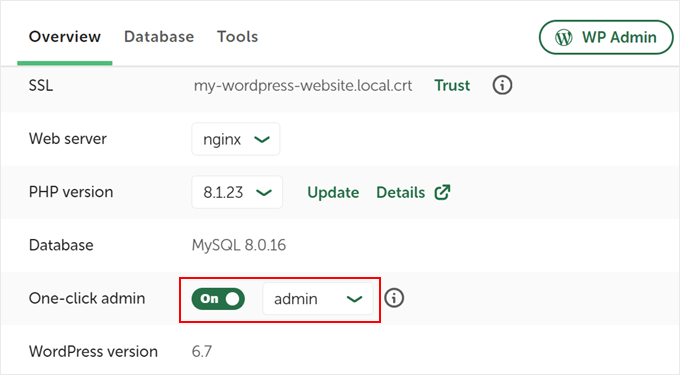
Consejo profesional: Si desea omitir el proceso de inicio de sesión, puede habilitar un inicio de sesión de administrador con un solo clic en Local WP.
Para ello, vuelve al panel de control de Local WP y activa el botón “One-click admin” hasta que aparezca “On”. A continuación, en el menú desplegable, seleccione el usuario administrador que puede utilizar esta función de inicio de sesión con un solo clic.
Alternativa: Utiliza WordPress Playground para probar temas, plugins y mucho más
WordPress Playground es una herramienta innovadora que te permite experimentar con WordPress directamente en tu navegador web. Es una caja de arena virtual donde puedes probar nuevos temas, plugins y funciones de WordPress sin afectar a ningún sitio web real.
WordPress Playground difiere de un entorno local de WordPress en varios aspectos clave.
En primer lugar, no requiere instalación en tu ordenador y se reinicia después de cada uso, a diferencia de las instalaciones locales permanentes. Puedes acceder a ella desde cualquier dispositivo con un navegador, mientras que las instalaciones locales están atadas a un ordenador.
Mientras que WordPress Playground es ideal para pruebas rápidas y aprendizaje, un entorno local de WordPress en su ordenador Windows ofrece más flexibilidad para proyectos de desarrollo a largo plazo.
Para obtener información detallada, consulte nuestra guía sobre cómo utilizar WordPress Playground en su navegador.
He instalado WordPress en mi ordenador Windows, ¿y ahora qué?
Ahora que ya tienes WordPress en tu ordenador, aquí tienes algunas cosas que puedes hacer:
- Aprenda trucos y consejos básicos de WordPress para utilizar mejor su sitio.
- Pruebe diferentes temas de WordPress para ver cómo puede quedar su sitio.
- Instale y pruebe los plugins imprescindibles de WordPress para añadir nuevas funciones a su sitio.
- Aprenda a solucionar errores comunes de WordPress por su cuenta.
- Pruebe diferentes creadores de páginas de arrastrar y soltar para que su sitio tenga un aspecto atractivo.
- Aprenda a restablecer la contraseña de administrador de WordPress en localhost para recuperar el acceso a su sitio.
- Establezca flujos de trabajo automatizados para facilitar la gestión de su sitio.
- Infórmese sobre la seguridad de WordPress para mantener su sitio a salvo de los piratas informáticos.
- Traslade su sitio local de WordPress a un servidor activo cuando esté listo para compartirlo con todo el mundo.
Esperamos que este artículo te haya ayudado a aprender cómo instalar WordPress localmente en un ordenador con Windows. Puede que también quieras ver nuestro artículo sobre cómo instalar WordPress localmente en un ordenador Mac y nuestra guía definitiva para crear un sitio de prueba de WordPress.
If you liked this article, then please subscribe to our YouTube Channel for WordPress video tutorials. You can also find us on Twitter and Facebook.


Leone Agoya
Thank you for this article. Very helpful and it works.
Vivek Sharma
Best tuts awesome explanation , best website
WPBeginner Support
Hey Vivek, glad you like our website. Don’t forget to join us on Twitter for more WordPress tips and tutorials.
Admin
Stephen Rea
Thank you… It feels great to be learning new powers.. WP and WAMP now on desktop… Now to learn WP !
Dave
Great walk through!!! Thanks for the assist!!!
Elaine
Wow, thanks sooo much. It helped me a lot.
Manuel
Absolutely outstanding! Had an issue with C++ 13 & 14 but it was so well explained and pointed me in the right direction that I was able to solve it and now I have a development WordPress environment on my Window 10 laptop. THANK YOU VERY MUCH
Jonathan
Do I need have basic in knowledge coreldraw and or photoshop to become a professional web designer.
Thanks for your sincere answer.
WPBeginner Support
It will help greatly. Specially Photoshop.
Admin
Karthik
Really useful and thanks very much..:)
Michael Gyori
Greaet tutorial, thanks!
One suggestion. Mention the Skype Port 80 issue right at the point when it would be encountered in your tutorial. Having it mentioned at the end was not helpful because I already spent considerable time trying to figure out what was going wrong. A simple note saying: “If your browser screen is blank when selecting phpMyAdmin, then you may have a conflict with Skype (see below).”
mark k
Thx for the tutorial – ran in to problems starting WAMP (blank page on localhost/phpmyadmin), on wins 10 www service was running stopping apache, so ran services.msc and stopped that.
Only other problem happened when wp tried to create config – by default it self completes txtBox with “password” so just remember to delete it. simple fix but had me stumped for 2 mins.
once again thx
Frank George
please i need urgent help as i would love to move my site live….i am running wordpress through my local host using Microsoft web matrix through IIS7…how do i do it please…i need help urgently!
ahmed
Hi
I have plant to installed WordPress on wamp windows based server.who is right person to contact if I find any problem. Please let me know.
Thanks in advance.
Ahmed
vijay
i installed wordpress using bitnami software.
i also tried using wamp both are awesome.
Johari
Thank you for simplifying the manual. The steps you provided are easy to follow. Keep posting great articles!
cornel
great job , thank you
Vikash Gupta
Thank you for providing nice guidance.
It worked for me excellently.
Ahmed
When i tried to start wamp, its giving me an error that vcruntime.dll is missing… Please any solution?
Mayur
After clicking on phpmyadmin showing error.
The webpage cannot be found
Plz help me..
Ruben Tahir
Trying to run phpMyAdmin for the first time, I am prompt to enter user name and password. I suppose there must be a default user name a password. What are they or how to setup my own?
Ruben Tahir
Just found out by simply googling. the username is root and no password.
You should mention that in your tutorial.
J Robinson
My WAMP-64 was installed some time ago on my D: drive. I just added WP. When I point the browser to http://localhost/wp-admin/ (changed the WP folder name back), I get:
Warning: require_once(D:\wamp64\www/wp-load.php): failed to open stream: No such file or directory in D:\wamp64\www\wp-admin\admin.php on line 31
and
Fatal error: require_once(): Failed opening required ‘D:\wamp64\www/wp-load.php’ (include_path=’.;C:\php\pear’) in D:\wamp64\www\wp-admin\admin.php on line 31
Should I just delete everything and start over, or is there a configuration to fix this?
manjeet kaur
hi sir I want to learn word press .can I learnt it online ? my future depend on it
Dipankar Ray
Thanks for the step by step info. However, I am not sure how to create a Database as very time I click on the Wamp icon and then phpMyAdmin, I am getting a blank new browser window with ‘http://localhost/phpmyadmin as the URL..
Therefore,I can’t proceed to the next step which is to click on Databases and thereafter create a database for WordPress.
Please help and point out if I am not on the right path.
Thanks.
WPBeginner Support
Try adding a slash at the end of URL like this:
http://localhost/phpMyAdmin/
Admin
Dipankar Ray
Thanks for your suggestion of using the URL above. I had overcome my previous issue and was able to proceed. However, after that I came across other issues like MySQL errors and decided to uninstall WAMP server from my computer.
By the way, my OS is Windows XP.
Now on trying to re-install after downloading this software I am receiving the following error message. ‘ Aestan Tray Menu has encountered a problem and needs to close.We are sorry for the inconvenience.’. This has happened over three times. Thanks.
Please help as I am not sure where I am erring.
WP Complete Beginner
Pretty sure that you have Microsoft IIS running which is causing this mess. Happened to me. Go to the WAMP > Apache > Test Port 80 option.
It will blurt out something like Port 80 wrong service is running. The real service that’s running is MS IIS X.0
Launch cmd as admin and type iisrest / stop in the command line.
Then go to WAMP > Apache > Service Administration > Install Service
Finally, Then go to WAMP > Apache > Service Administration > Start Service.
It should work! Let me know if my comment helped you.
Jun Allan
Thank you!
Fawaz
Thanks a lot. Had to fix some errors and finally it worked. Very nice guide through. Already bookmarked.
Vassilis
How do I establish 2 or more sites on the same server (if possible)?
Thanks in advance
Krishna
Really useful and worked perfectly. Thank you so much..
ART
I’m an advanced beginner using Vista SP2. I think I am running both 32 and 64 bit. I had a big problem with VCRunTime140.dll missing error. First I tried Wamp 64bit, then Wamp newest 32bit, then confirmed VCRunTime140.dll was installed in my Windows\System32 folder and confirmed my updated Firefox was in the Programs(86) folder. Still had the *.dll missing error. Then tried the older Wamp 32bit. Problem solved.
2 more errors I made were to copy the WordPress folder without extracting it. Then deleted where I copied it and properly extracted it before copying. But I copied it to Wamp instead of Wamp\www
After I deleted it from the second wrong location, I copied it to Wamp\www and things worked great after that.
Hopefully a little helpful to call out some beginner errors to prevent others’ headaches.
Visata requires Wamp Version 2.5
Recently Wamp and Google Maps versions or settings have changed. Vista SP2 cannot run the latest Wamp, Stay with Version 2.5, specifically MYSQL 5.6.XX (I found xx=17 but some places say xx=26 is available.)
Thank you so much for these instructions!! Other lists of instructions are very difficult and not very useful.
Vianney kirumira
Thank u so much guyz. really you have made my day!. At least
Iris India
Excellent ! Thanks for your step by step instructions
Sid
Probably being dumb, but how do i see my web site project again and work on my site? To open it again I selected the ‘wamp’ icon, it opened a dashboard where I could see my project folder, I double clicked to open it, but instead of my site I got a page that said error my page cannot be found. I could not see the wordpress dashboard when I selected the wamp icon or any option to open wordpress. Can you please advise? Thanks.
Michael
Type localhost/site-name in your browser. To view your admin type localhost/sitename/wp-admin
Nicko Johnson
After clicking on phpMyAdmin its saying the site can’t be reached. What could be wrong?
Sid
Just want to say thank you! I have never done anything like this before and your steps were very useful and easy to follow
NOURI
when I try to install WAMP, it gives me error msg
JP
I followed instructions, yet when I attempt to open the browser with:
http://localhost/mysite/
I get a 404 file not found. Any hints as to what is going on? Thanks.
WPBeginner Support
The mysite directory is not found in the WAMP web folder.
Admin
kittyket
and what do you have to do then?
WPBeginner Support
It depends. May be a user has installed WordPress in their htdocs or www directory. Or may be they created the mysite folder elsewhere and WAMP can’t find it in the www directory.
Maya
Struggled a bit with Wampserver installation but finally everything went smooth. Thanks for the step-by-step explanation.
WPBeginner Support
Glad you found it helpful.
Admin
puri shanker dhobi
how to open a php template in wordpess using wamp server
Gold
Thank you so much!!!! You’re all shades of amazing.. This tutorial was super super helpful. Everything worked perfectly. Thanks again!
veena
after wp_config file it is sudenly showing following error.
Error establishing a database connection
I have created a database , mysql , apache , php are all working, how find out solution for this?
Suzi
I was getting the same error because I was not using a password, and I forgot to remove the word “password” where it asks for MySQL password on the previous page!
Erling Bergan
I have followed the instructions, and everything has looked fine. I have clicked on the Wampserver icon, and then clicked on phpmyadmin. A browser window opens, but there is no phpMyAdmin in it. The web page is blank. Could you give me a hint of what may be wrong?
Suzi
I was having the same issues .. there are so many reasons that this could be happening. did you follow ALL of the instructions, including the VISUAL downloads and skype and port 80 issues? I got to the point where my icon was green and still would not work, so I uninstalled it and used the 32 bit version even though I have 64 bit on my pc. Then it worked!
Jimmy Karago
Thanks so much was lost but, this helped me a lot
soheib
thank youuuuu really helped!!!!!!!!
Mxolisi Maphosa
Thank you very much, this helped me so much.
ana
Great tutorial! It really helped me. I’ll be following you.
Jeremy
Hi, what if I have an instance of Acquia Dev Desktop (Drupal) on my local machine? Installing this wont be an issue?
Thanks
Paul Gomez
Hello, right now I am trying to set the WAMPserver, but in i see 4 versions 2 for 32 Bits and 2 for 64 Bits. Which of the two versions should I pick? I am a bit confused what the difference is from the 2 versions. I see the Apache, PHP and MySQL versions are different but I am not sure.
WPBeginner Support
They are basically the same. Most modern computers have 64bit architecture. If you are using an older machine then try 32bit version, other wise try 64bit version.
Admin
Paul Gomez
I understand, but that was not my question. Please read my original message.
Jason
This has to do with the size of the data types the processor can handle and the size of the memory addresses it can hold in it’s register. 64 bit applications can utilize more RAM because they can utilize exponentially more of those addresses, but unless you are writing your own ‘big data’ type of applications or using plugins that need the extra memory then it’s almost completely irrelevant to you. You won’t notice the difference either way, so just pick one.
Phil
Any answer on this? I have the same question. I know I want 64 bit, but what PHP version should I choose?
HV
The two 64bit installs have different software versions.
Apache : 2.4.17 MySQL : 5.7.9 PHP : 5.6.16 on one
and Apache : 2.4.9 MySQL : 5.6.17 PHP : 5.5.12 on the other.
The two 32 bit versions are similar
They are giving you options in case your development environment
needs a particular version of Apache, PHP or MySQL
Prasad Sagare
After clicking on phpmyadmin show error.
IIS 8.5 detailed error-404 not found.
Plz help me..
David
I get the same error 404 page when clicking phpmyadmin. Any resolution here? I do not have skype on this computer.
Luc
After numerous failures, this instruction worked just fine! Thanks.
dicegeorge
Thanks,
that worked without a hitch,
i’ve been wanting to do this for ages!
Michael
It is not clear to me whether I must set up a database first, or can I simply import my current live back up of the blog, and then work on it locally.
I sort of expected to import the existing word press blog to my local hard disk, and the import process will then create all the tables and the databases.
Thanks
Ron
Thank you. This great page of info REALLY helped !!!
Prashant Menase
Thank you for easy steps!!! Helped me lot! keep adding………….