Instalar WordPress en tu Mac te permite explorar sus funciones sin necesidad de un servicio de alojamiento web.
Conocerás cómo funciona WordPress y verás si es adecuado para tu proyecto. También es perfecto para probar temas y plugins antes de publicar tu sitio. Además, experimentar localmente te da la libertad de cometer errores y aprender.
Hemos experimentado mucho con sitios locales, tanto en computadoras Mac como Windows. Y en este tutorial, compartiremos 2 métodos sencillos para configurar WordPress en tu Mac.
Nota: ¿No usas Mac? También tenemos un tutorial sobre cómo instalar WordPress localmente en Windows.
¿Por qué instalar WordPress localmente en Mac?
Normalmente, necesitas una cuenta de alojamiento web y un nombre de dominio para crear un sitio web con WordPress.
Sin embargo, el software de WordPress principal se puede descargar gratis y se puede ejecutar localmente en tu computadora. Este sitio local de WordPress generalmente no estará disponible en Internet y solo se podrá ver en tu computadora.
La ventaja de este enfoque es que puedes practicar en privado el uso de WordPress, probarlo y ver qué tipo de sitios web puedes crear.
También puedes usar esta instalación local para probar diferentes temas y plugins de WordPress antes de instalarlos en tu sitio web activo.
¿Qué necesitas para instalar WordPress localmente en Mac?
WordPress está escrito principalmente en PHP, un lenguaje de programación del lado del servidor. Para ejecutar PHP, necesitarás software de servidor web y un sistema de gestión de bases de datos MySQL instalado.
Ahora, instalar todo este software de forma independiente y hacer que funcione entre sí suena como una tarea desalentadora.
Afortunadamente, existen herramientas de desarrollo gratuitas que facilitan su instalación como un solo paquete, incluso para los usuarios menos expertos en tecnología. Con eso en mente, aquí hay 2 métodos para instalar fácilmente WordPress localmente en una Mac sin habilidades especiales de administración de servidores:
- Método 1. Instala WordPress localmente en Mac usando Local WP (Recomendado)
- Método 2. Instala WordPress localmente en Mac usando MAMP
- Mover tu instalación local de WordPress a un sitio web en vivo
¿Listo? Pongamos WordPress en funcionamiento en tu computadora.
1. Instala WordPress localmente en Mac usando Local WP (Recomendado)
Local WP es una herramienta de desarrollo de WordPress que te permite configurar fácilmente un servidor local en tu computadora Mac. También puedes usar Local en Windows y Linux para configurar WordPress.
Primero, deberás visitar el sitio web de Local y hacer clic en el botón 'Download' (Descargar) en la esquina superior derecha de la pantalla.
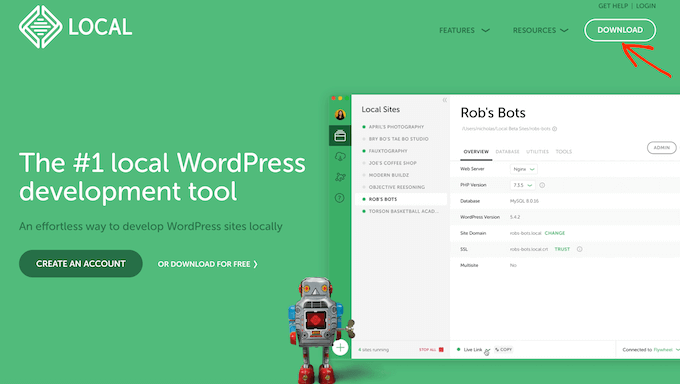
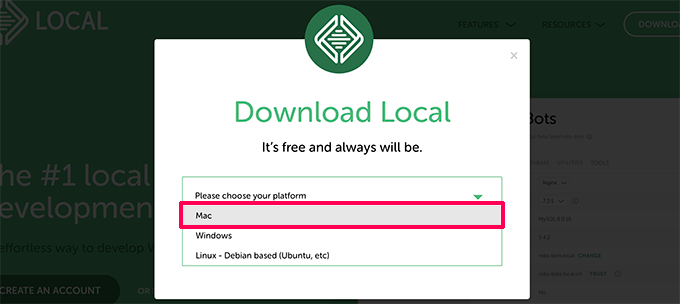
Esto abrirá una ventana emergente de Descarga de Local.
Aquí, elegiremos Mac como tu plataforma.
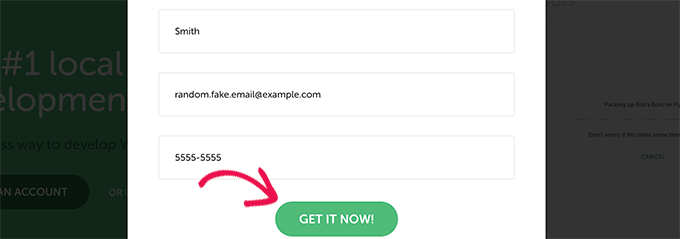
Local te pedirá que completes un breve formulario.
Después de escribir tu nombre, dirección de correo electrónico y número de teléfono, puedes continuar y hacer clic en el botón 'Get it Now' (Obtener ahora).
Esto descargará el archivo de instalación de Local a tu computadora. Puedes hacer doble clic para abrir el archivo descargado tan pronto como termine de descargarse.
Verás un asistente de configuración, que te guiará a través del proceso de instalación de Local en tu computadora.
Los usuarios de Mac solo necesitan arrastrar la aplicación Local a su carpeta de ‘Aplicaciones’.
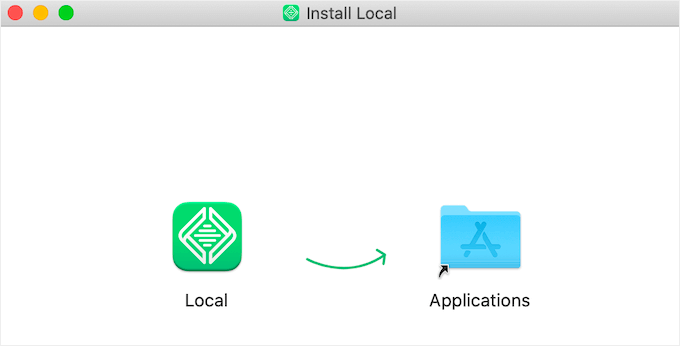
Una vez que la instalación haya finalizado, podrás iniciar la aplicación Local desde la carpeta de Aplicaciones.
Al iniciarla por primera vez, es posible que te hagan algunas preguntas y te pidan crear una cuenta gratuita de Local. Estos pasos son opcionales y puedes omitirlos si lo deseas.
Creación de un sitio web de WordPress en Local
Local facilita mucho la creación de un sitio web local y la instalación rápida de WordPress.
Para empezar, simplemente haz clic en el botón ‘Crear un sitio nuevo’ para continuar.
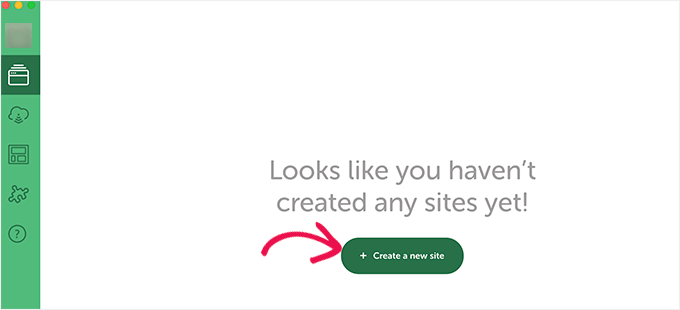
En la siguiente pantalla, deberás ingresar el nombre de tu sitio.
Después de eso, procede a hacer clic en el botón ‘Continuar’.

A continuación, se te pedirá que elijas tu plataforma.
Local te permite elegir qué versión de PHP, Apache y MySQL deseas usar.
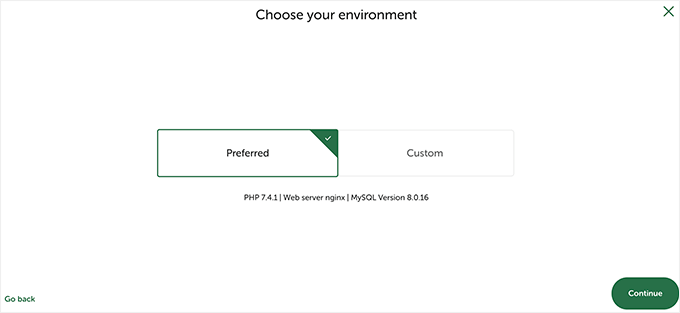
Si no estás seguro, elige la configuración ‘Preferida’ y haz clic en el botón ‘Continuar’.
Finalmente, deberás ingresar un nombre de usuario de WordPress y una contraseña. Luego, puedes hacer clic en el botón ‘Agregar sitio’.
Local ahora descargará e instalará WordPress para crear tu sitio web. Es posible que se te pida que ingreses tu nombre de usuario y contraseña de Mac para realizar cambios.
Una vez terminado, verás información sobre tu sitio recién creado con botones para visitar el área de administración de WordPress o ver tu sitio local.
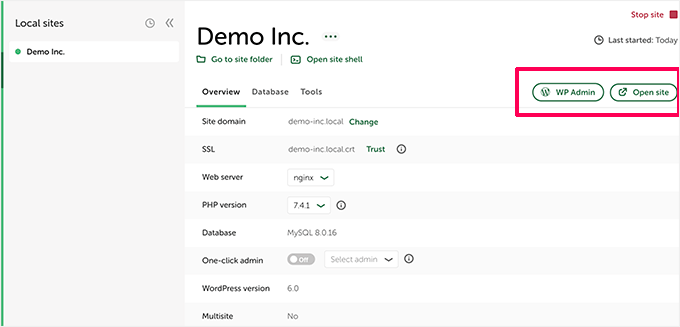
Ahora puedes visitar tu sitio web o iniciar sesión en el área de administración de WordPress.
Desde aquí, puedes usar tu sitio de WordPress alojado localmente de la misma manera que administrarías un sitio web en vivo.
Puedes instalar plugins y temas y diseñar tu sitio web como mejor te parezca.
2. Instalar WordPress localmente en Mac usando MAMP
MAMP es un programa popular que te permite ejecutar WordPress en tu computadora Mac.
Primero, visitemos el sitio web de MAMP. Aquí deberías ver la última versión de MAMP & MAMP Pro.
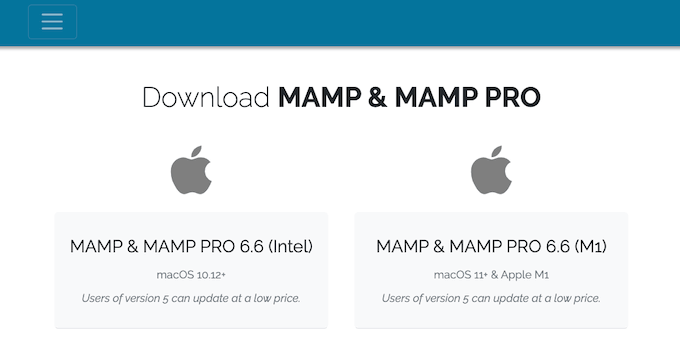
MAMP tiene descargas separadas para diferentes versiones del sistema operativo macOS.
¿No estás seguro de qué versión de macOS está instalada en tu computadora? Para averiguarlo, simplemente haz clic en el ícono de Apple en la barra de herramientas de tu computadora.
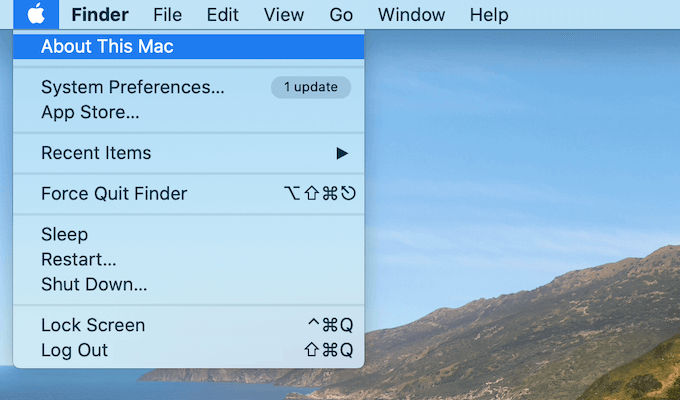
Luego puedes hacer clic en la opción ‘Acerca de esta Mac’.
Esto abrirá una ventana emergente que muestra mucha información sobre tu computadora, incluida tu versión de macOS.
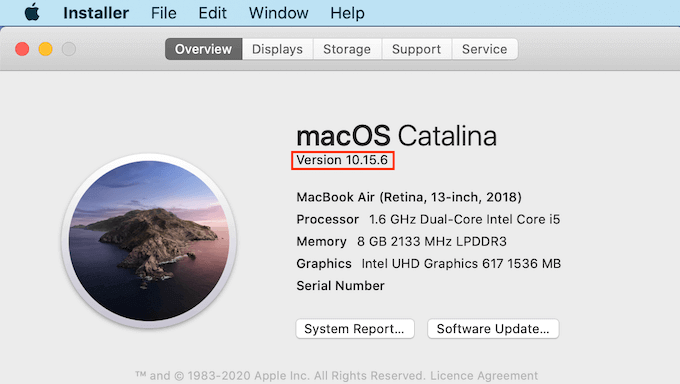
Ahora puedes descargar la versión correcta de MAMP para tu sistema operativo.
Una vez que tu descarga haya finalizado, haz doble clic en el archivo .pkg de MAMP. Esto iniciará el instalador de MAMP.

Ahora, simplemente sigue las instrucciones en pantalla para instalar MAMP.
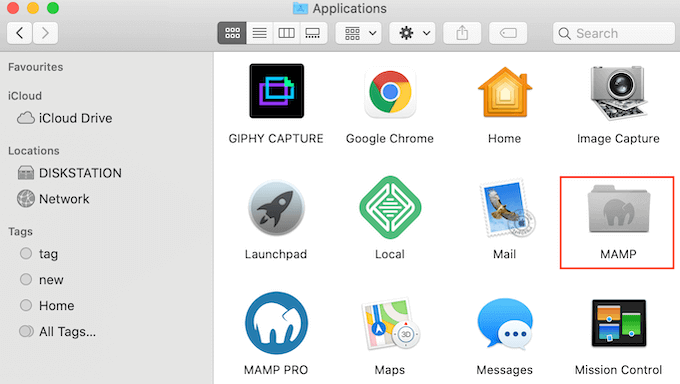
Después de instalar este programa, procede a iniciar MAMP abriendo la carpeta ‘Aplicaciones’ de tu computadora.
Aquí encontrarás 2 versiones de MAMP. MAMP Pro es la versión de pago, así que asegúrate de seleccionar la versión gratuita.
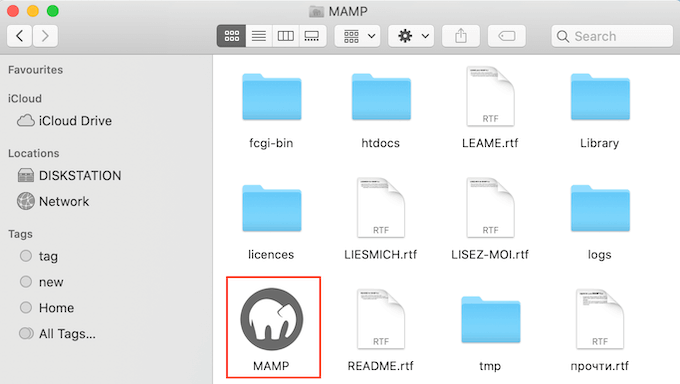
Dentro de esta carpeta de MAMP, encontrarás varios archivos, además de una aplicación MAMP.
Simplemente haz doble clic para iniciar la aplicación MAMP.
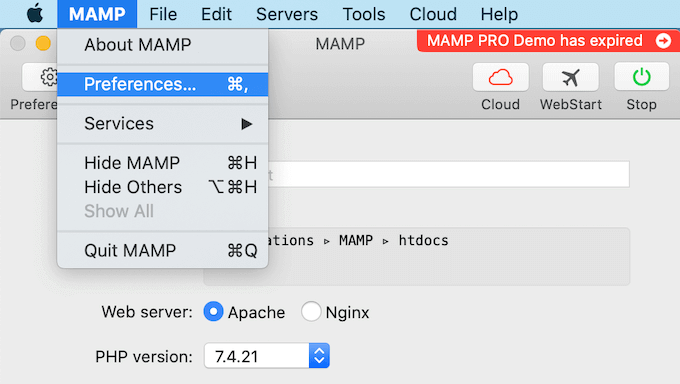
Antes de empezar, te recomendamos configurar algunas opciones para mejorar tu experiencia con MAMP.
Para hacer estos cambios, querrás hacer clic en ‘MAMP’ en tu barra de herramientas y luego seleccionar ‘Preferencias…’.
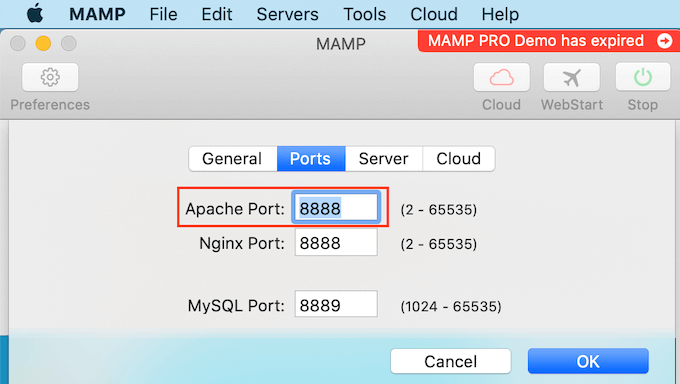
En la ventana emergente, querrás cambiar a la pestaña ‘Puertos’.
Ahora puedes verificar qué Puerto de Apache está usando MAMP. Recomendamos cambiar al Puerto de Apache 8888 si MAMP no está usando ya este puerto.
El siguiente paso es configurar tu carpeta raíz de documentos. Aquí es donde crearás y almacenarás todos tus sitios web locales de WordPress.
Por defecto, MAMP utiliza la carpeta /Applications/MAMP/htdocs/, pero puedes cambiarla a cualquier otra ubicación.
En el cuadro de diálogo ‘Preferencias…’, haz clic en la pestaña ‘Servidor’. Tu raíz de documentos debería ser visible ahora.
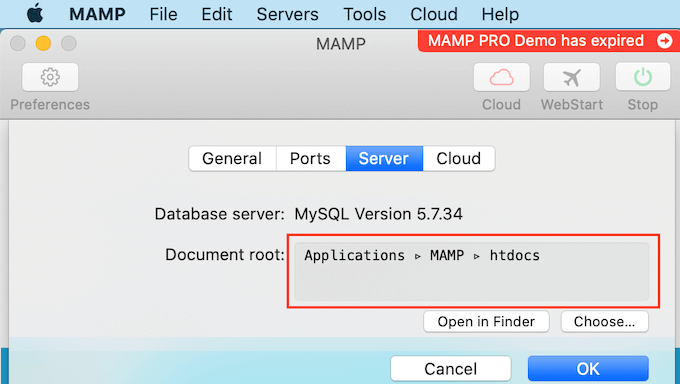
Para almacenar tus sitios en cualquier otra carpeta, haz clic en el botón ‘Elegir…’.
Esto abrirá una ventana emergente donde puedes elegir una nueva ubicación. También puedes crear una nueva carpeta para almacenar todos tus sitios web de WordPress.
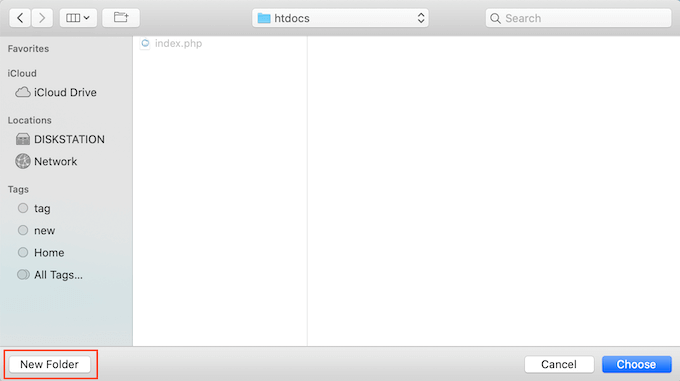
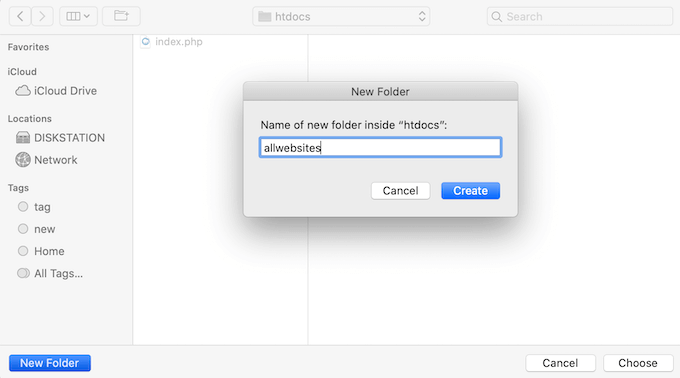
Puedes nombrar esta carpeta como quieras.
Para este artículo, almacenaremos nuestros sitios web en una carpeta llamada ‘allwebsites’.
Instalación de WordPress en MAMP
Ahora que has configurado MAMP, es hora de instalar WordPress en tu computadora Mac.
Primero, deberás visitar el sitio web de WordPress.org y descargar la última versión de WordPress Core.
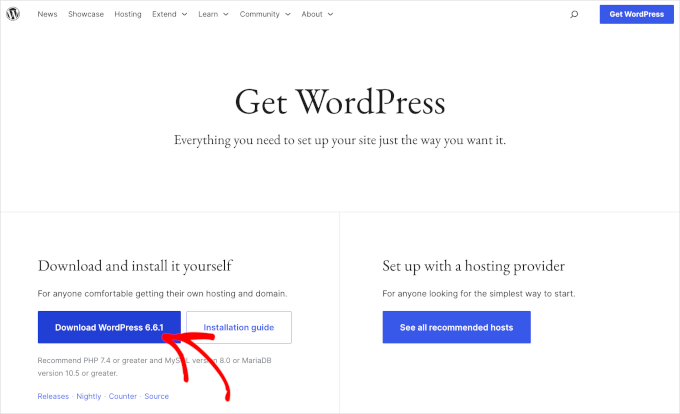
NOTA: Hay dos versiones de WordPress. Para más detalles, consulta nuestro artículo de comparación sobre WordPress.com vs. WordPress.org.
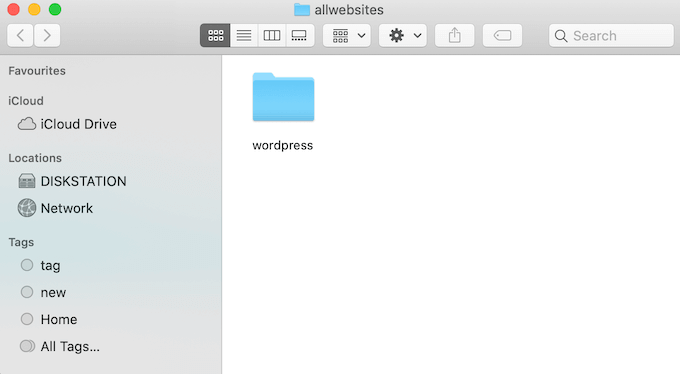
Después de descargar el archivo de WordPress.org, solo necesitas descomprimirlo. Esto creará una carpeta ‘wordpress’ descomprimida.
Ahora, simplemente copia esta carpeta en tu carpeta raíz de documentos de MAMP.
Dado que cambiamos la carpeta raíz de documentos, necesitamos copiar ‘wordpress’ en applications/MAMP/htdocs/allwebsites.
WordPress necesita una base de datos para almacenar todo su contenido y datos. Necesitarás crear esta base de datos antes de poder crear un sitio web local.
No te preocupes, no es tan difícil como suena.
En la ventana de MAMP ‘Preferencias…’, simplemente haz clic en el botón ‘OK’. Esto debería lanzar la aplicación MAMP en una nueva pestaña del navegador.
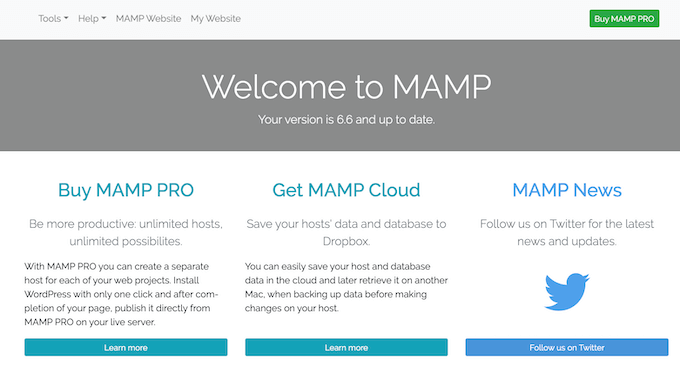
Tu próxima tarea es iniciar phpMyAdmin. Esta es una aplicación web para administrar la base de datos MySQL de tu sitio web.
En la barra de herramientas, naveguemos a Herramientas » phpMyAdmin.
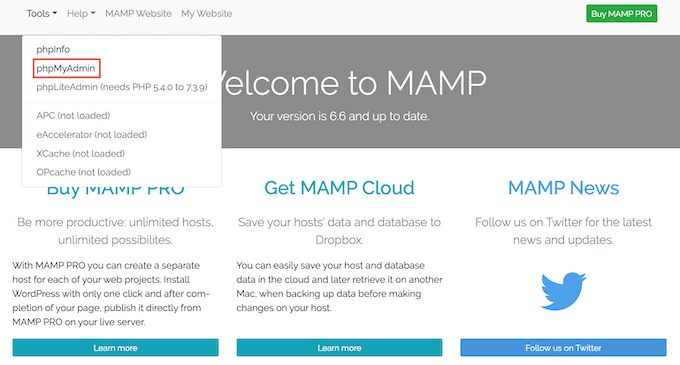
Esto abrirá phpMyAdmin en una nueva pestaña.
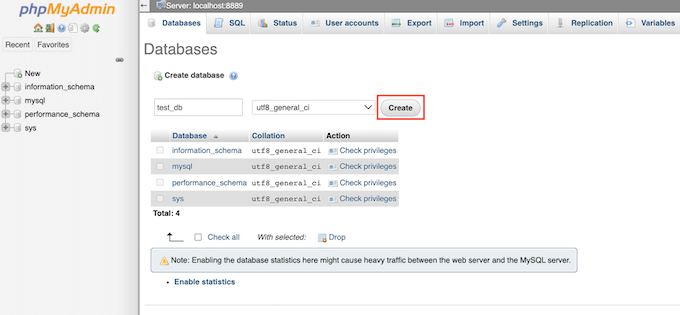
En el panel de control de phpMyAdmin, querrás ir a la pestaña ‘Bases de datos’.
Ahora puedes escribir un nombre para tu base de datos en el campo ‘Nombre de la base de datos’ con lo que quieras. Solo asegúrate de recordar el nombre, ya que lo usaremos en el siguiente paso.
Para este tutorial, llamaremos a nuestra base de datos ‘test_db’.
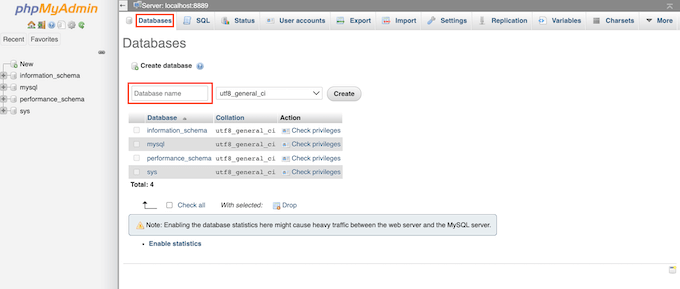
Después de escribir el nombre de tu base de datos, puedes hacer clic en el botón ‘Crear’.
PhpMyAdmin creará entonces tu base de datos.
Ahora, es hora de instalar WordPress.
En una nueva pestaña del navegador, simplemente ve a http://localhost:8888/. Si estás usando un puerto diferente al 8888, simplemente cambia esta URL para que mencione tu puerto.
Ahora deberías ver un enlace a la carpeta ‘wordpress’ que copiaste en tu carpeta de documentos raíz. Haz clic en este enlace. Esto abrirá el asistente de instalación de WordPress.
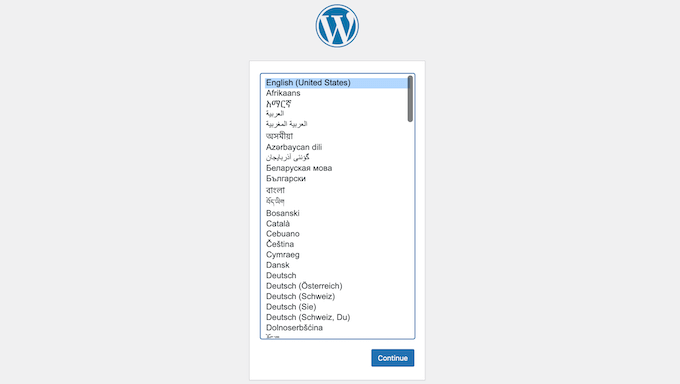
El asistente de instalación de WordPress comienza pidiéndote que elijas un idioma. Después de hacer tu elección, puedes hacer clic en el botón ‘Continuar’.
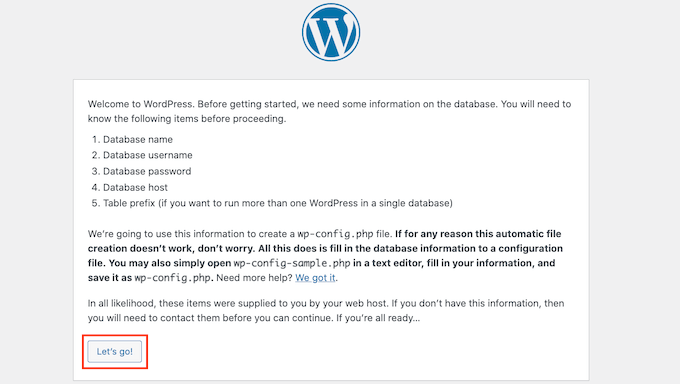
En la siguiente pantalla, WordPress te mostrará la lista de toda la información que necesita para completar la instalación.
Después de leer esta pantalla, haz clic en el botón ‘¡Vamos!’ para continuar.
El asistente de configuración ahora te pedirá la información de tu base de datos de WordPress. Para el nombre de la base de datos, simplemente escribe el nombre que creaste en el paso anterior.
Para ‘Nombre de usuario’ y ‘Contraseña’, simplemente escribe ‘root’.
Luego puedes escribir ‘localhost’ en el campo ‘Servidor de base de datos’. Localhost significa que la base de datos y el sitio web están alojados en el mismo servidor, que, en este caso, es tu computadora Mac.
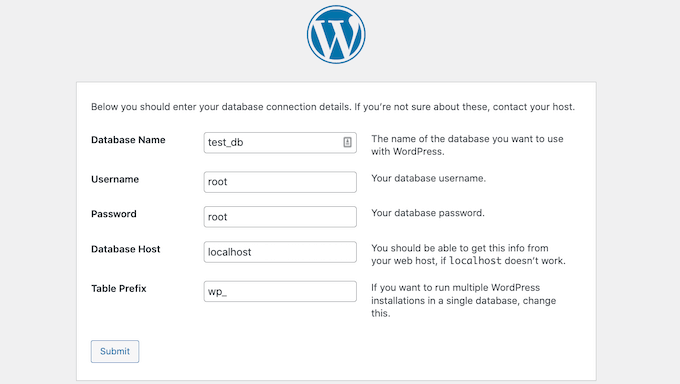
Después de escribir toda esta información, simplemente haz clic en el botón ‘Enviar’.
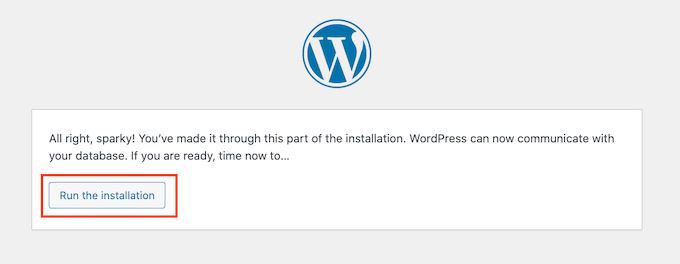
WordPress ahora se conectará a tu base de datos y creará un archivo de configuración para ti. Una vez que termine, verás un mensaje de éxito.
Para pasar al siguiente paso, puedes hacer clic en el botón ‘Ejecutar la instalación’.
En la siguiente pantalla, WordPress te pedirá que agregues un título para el sitio. Por ejemplo, podrías usar el nombre de tu negocio. La mayoría de los temas de WordPress muestran este título en la parte superior de tu sitio web.
Si no estás seguro sobre el título de tu sitio, no te preocupes. Puedes cambiar el título en tu panel de WordPress en cualquier momento.
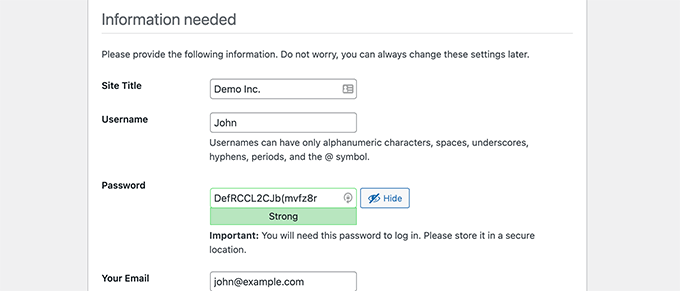
Luego necesitarás crear un nombre de usuario y una contraseña. Esta es la información de inicio de sesión que usarás para acceder a tu panel de WordPress.
También puedes escribir tu dirección de correo electrónico en el campo ‘Tu correo electrónico’. Esta es la dirección a la que WordPress enviará todos sus correos administrativos.
Después de completar este formulario, haz clic en el botón ‘Instalar WordPress’.

WordPress ahora ejecutará la instalación.
Después de unos momentos, deberías ver un mensaje de '¡Éxito!'.

Para ir directamente a tu pantalla de inicio de sesión de WordPress, haz clic en el botón 'Iniciar sesión'.
También puedes iniciar sesión en tu sitio web local de WordPress usando la siguiente URL: http://localhost:8888/wordpress/wp-login.php
Nota: Si estás usando un puerto Apache diferente, deberás cambiar la parte '8888' de esta URL.
Ahora puedes continuar e iniciar sesión en tu sitio de WordPress ingresando el nombre de usuario y la contraseña que creaste en el paso anterior.
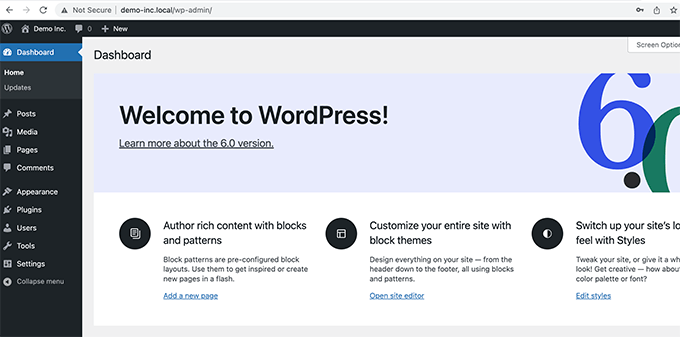
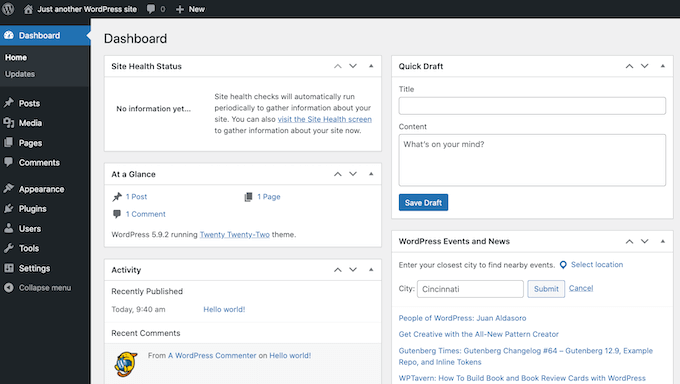
Esto te llevará al panel de control de WordPress.
Probando WordPress localmente en Mac
Una instalación local es perfecta para probar WordPress o desarrollar sitios web en tu computadora. Ahora que WordPress se está ejecutando localmente en tu Mac, aquí hay algunas cosas que quizás quieras probar:
- Experimenta con los mejores temas de WordPress.
- Intenta encontrar tu tema de WordPress perfecto.
- Prueba plugins esenciales de WordPress localmente.
- Aprende programación de WordPress creando tus propios plugins y temas personalizados.
Mover tu instalación local de WordPress a un sitio web en vivo
Una vez que hayas jugado con WordPress localmente, es posible que desees mover tu instalación de WordPress a un sitio web en vivo. Esta es la única forma en que otros podrán ver tu sitio web.
Para hacer eso, necesitarás comprar un nombre de dominio y alojamiento web.
Un nombre de dominio es la dirección de tu sitio web en Internet, y el alojamiento web es donde se almacenan los archivos de tu sitio web. Puedes pensar en el alojamiento web como el hogar de tu sitio web en Internet.
Para el alojamiento web, recomendamos Bluehost. Son una de las compañías de alojamiento más grandes del mundo y también están recomendadas oficialmente por WordPress.org.
Afortunadamente, Bluehost está ofreciendo a los usuarios de WPBeginner un descuento en el hosting, un certificado SSL gratuito y un nombre de dominio gratuito. Básicamente, puedes convertir tu instalación local de WordPress en un sitio web en vivo por $2.99 al mes.
Una vez que hayas comprado el alojamiento, quizás quieras ver nuestro artículo sobre cómo mover WordPress de un servidor local a un sitio web en vivo.
Esperamos que este artículo te haya ayudado a aprender cómo instalar WordPress localmente en Mac. A continuación, también puedes consultar nuestra guía sobre cómo crear un sitio web con WordPress o ver nuestra comparación de las mejores empresas de alojamiento de WordPress administrado.
Si te gustó este artículo, suscríbete a nuestro canal de YouTube para obtener tutoriales en video de WordPress. También puedes encontrarnos en Twitter y Facebook.


Personal de WPBeginner
Dado que no sabemos qué salió mal cuando eliminaste el sitio anteriormente. Te recomendamos que crees un nuevo sitio. Básicamente, repite todo el proceso de nuevo. Excepto que esta vez crea un nuevo directorio en tu carpeta raíz de documentos. Haz lo mismo con la base de datos MySQL. Luego instala WordPress en el nuevo directorio usando tu nueva base de datos MySQL.
Steve
¡Excelentes instrucciones! Pude configurar un sitio, pero necesité eliminarlo y empezar de nuevo. Eliminé la base de datos SQL y la carpeta del sitio anterior. Pero cuando WordPress intenta instalarse ahora, obtengo un gran registro de errores en el navegador que dice que una tonelada de archivos e información "ya existen". ¿Necesito deshacerme de algunos otros archivos instalados previamente y, de ser así, cuáles?
Minyan
Cuando escribo http://localhost/wordpress (nombro la carpeta de wordpress bajo la carpeta raíz de MAMP como wordpress), me muestra "404 no encontrado. La URL solicitada /wordpress no se encontró en este servidor". ¿Alguien puede decirme qué hice mal?
Schalk
Minyan,
¿Alguna suerte con tu problema de "404 no encontrado"??
ej
tengo el mismo problema. ¡por favor ayuda!
Ish
En lugar de escribir 'http://localhost/wordpress',
simplemente escribe 'localhost' en su lugar y debería llevarte a la página de wordpress.
Me funcionó, ¡espero que a ti también!
Gracias
Michelle Hamilton
Estas instrucciones son las mejores y más fáciles de seguir que existen. De hecho, las usé para ayudar a mi instructor a configurar Wordpress en su nueva Mac y las usé para configurarlo en la Mac que uso en mis prácticas. ¡¡¡Muchas gracias!!!
Michelle Hamilton
Estas son las mejores y más fáciles de seguir instrucciones que existen. De hecho, las usé para ayudar a mi instructor a instalar MAMP en su Mac. Ya las había usado para hacerlo para mis prácticas en las que estoy participando. ¡¡¡Gran trabajo!!!
Julie Valin
¡Muchas gracias por este tutorial paso a paso! Muy útil para este usuario de MAMP que es la primera vez que lo usa, cuando al principio me sentía abrumado. Ahora me siento informado y feliz, y siempre me gusta comentar en las publicaciones/tutoriales que realmente me han ayudado. ¡Felicidades!
Personal de WPBeginner
Puedes configurar un entorno de staging para un servidor en vivo. Échale un vistazo a nuestra guía sobre cómo crear un entorno de staging para un sitio de WordPress
Haley
Gracias por este tutorial – una pregunta rápida: estoy diseñando un sitio para un cliente que tendré que construir sin conexión usando MAMP, sin embargo, veo la nota sobre solo poder verlo en mi computadora. ¿Hay alguna manera de que mi cliente (ubicado en otro estado) pueda revisar el progreso sin ponerlo en vivo en su sitio?
Hannah
Oh Dios, muchas gracias al equipo de wpbeginner. Es la primera vez que uso MAMP y nada parecía decir 'Oigan, para todos ustedes, tontos, así es como se instala WordPress', simplemente asumía que lo sabríamos. *eternamente agradecido*
Frank
Demasiado fácil, chicos, ¡muchas gracias!
Alex Koch
Realmente aprecio tu ayuda. MAMP 3.0.3 viene con una interfaz ligeramente diferente y una configuración distinta – tienes que redirigir Apache a /bin/phpMyAdmin/ para configurar tu base de datos mysql para wordpress y LUEGO redirigir Apache a tu directorio raíz real localhost/mysitewahtever/ donde pusiste wordpress.
WordPress puede acceder a la base de datos de todos modos.
Rich
¡Gracias por esta guía fácil de seguir! Finalmente me animé a seguir adelante con un proyecto que casi he completado y esta guía realmente me ayudó. ¡Gracias de nuevo!
megan Dickson
Esto estuvo INCREÍBLE. SÚPER FÁCIL.
¡Gracias!
Tim Aldiss
Muy útil, gracias
Tom Nguyen
¿Es posible recibir correos electrónicos de WordPress instalado en un servidor local? Solo pregunto porque había instalado WordPress y olvidé mi contraseña de administrador. Hice clic en el enlace ¿Olvidaste tu contraseña? para iniciar el proceso de restablecimiento de contraseña, pero nunca recibí un correo electrónico.
Simplemente terminé yendo a la interfaz local de phpMyAdmin y restablecí la contraseña de esa manera.
Kate
Hice una suposición al instalar mamp/wordpress con el nombre de mi sitio web. El “nombre del sitio web” que usé para configurarlo siguiendo tu tutorial no es el nombre de mi sitio web que mi negocio posee actualmente y estoy rehaciendo. Pensé que si usaba ese, arruinaría el sitio actual. Entonces... ¿tengo que volver y poner mi nombre de sitio web “real” en los archivos de instalación o puedo simplemente cambiarlo a mi nombre de dominio actual cuando termine con el nuevo sitio de wordpress? ¡Gracias!
Leigh
hey
seguí los pasos... hasta la configuración de la parte de... nueva base de datos – usé test_db según el ejemplo
abriendo http://localhost/mysite en el navegador y obteniendo un 404.
debería decir…
WordPress te notificará que no pudo encontrar el archivo wp-config.php. !!!
…directorio configurado genial, a mysite
///usando puertos mamp predeterminados
¡gracias por la ayuda de antemano, amigo!
smiles
Kate
Supongo que el problema fue que nombré mi carpeta de wp que contiene todos mis archivos de wp en la carpeta hpdocs dentro de MAMP usando 2 palabras. Por lo tanto, puse un espacio entre ellas y cuando fui a poner la dirección localhost/midominio/wp-admin/ para encontrar mi panel de control, aparentemente tuve que agregar un %20 debido al espacio. ¡Parece que ahora funciona, así que creo que lo hice bien! Gracias de nuevo por la guía de tu sitio y tu rápida ayuda. ¡Realmente lo aprecio y he agregado tu sitio a mis marcadores y me he suscrito!
Kate
Well apparently it was so simple I was missing the part that I needed to put the _db after my new database I created Solved!
Kate
Me estoy cambiando de Drupal a WordPress y aprecio y valoro tus excelentes recursos y pasos detallados, viniendo de un novato sin experiencia ni conocimientos técnicos. Tengo el mismo problema que Jen tuvo arriba (12/12/2013). Estoy usando una Macbook Pro y llegué hasta tratar de averiguar si la base de datos que configuré en mi archivo wp-config existe. Hice los pasos que recomendaste (dice que todos los privilegios están concedidos en mi usuario root), pero ¿quizás lo estoy haciendo mal porque sigo recibiendo el mismo mensaje de error que ella? ¿Quizás necesito otra forma de explicar los pasos? Cerré Skype y me aseguré de que websharing no estuviera activado, pero eso no cambió nada. ¡Totalmente atascado!
Soporte de WPBeginner
Kate, una vez que inicies MAMP, necesitas ir a http://localhost/phpmyadmin y crear una nueva base de datos. Abre tu archivo wp-config.php e ingresa el nombre de la base de datos en la línea:
define('DB_NAME', 'TuNombreDeBaseDeDatosAquí');Haznos saber si esto resolvió tu problema.
Administrador
Daniel
Gracias por la guía.
Ahora he instalado WordPress en mi Mac y he creado un sitio web. ¿Cómo empiezo un nuevo sitio web?
Gracias Dan
Soporte de WPBeginner
Repite el proceso instalando WordPress en un nuevo directorio (carpeta) y creando una nueva base de datos.
Administrador
Syed
Estoy pasando por una pesadilla. Gracias a tus instrucciones, todo funcionaba bien hasta hoy, cuando hice clic en actualizar a la nueva versión de MAMP y procedí a la instalación, pensando que ocurriría en segundo plano.
Parece que la actualización ha borrado mis datos o los ha guardado en otro lugar. Por cierto, tenía una copia completa del disco principal en otra unidad (toda la carpeta MAMP). Puedo ver las carpetas y archivos en ambos lugares, pero cuando intento iniciar MAMP desde la otra unidad donde están las carpetas antiguas de MAMP, todavía arranca con la nueva versión y no puedo iniciar mi sitio.
No tengo forma de saber realmente qué hacer a continuación. Por favor, ayuda. Gracias
netyx
¡Gracias por la guía!
Tengo un problema. Creé una base de datos y luego el servidor de MySQL se bloqueó. Ya no funciona. ¿Alguien podría ayudarme, por favor?
arzu
very helpful, thank you
Art
¡Sí, amigo, esto fue muy útil, muchas gracias!
Derek
Gran tutorial. Gracias. Todo funcionó bien para mí hasta el final. Después de instalar WordPress con éxito, hice clic en “Ver sitio” y obtuve una pantalla blanca que dice “Tu sitio web” seguida de instrucciones sobre cómo hacerlo “en vivo”. No quiero hacerlo en vivo. Solo quiero trabajar en la creación de un tema localmente. Pero por alguna razón, no puedo ver el sitio.
¡Ayuda!
Gracias.
Ian
Guía perfecta, muy apreciada
Brandon
Pan comido. ¡Muchas gracias!
GH
Muchas gracias. Explicación muy útil.
Jen
Acabo de instalar MAMP y mis servidores no arrancan. ¿Alguna vez has tenido este problema antes? ¡Intenté reiniciar y releer los pasos, gracias!
Soporte de WPBeginner
revisa los registros de errores en el directorio donde instalaste MAMP
Administrador
Jen
¡¡POR FAVOR AYUDA!! NO ENCUENTRO RESPUESTA Y TENGO UNA FECHA LÍMITE.
Así que todo funcionaba hasta que hice clic en el botón 'abrir página de inicio'. Originalmente, solo se abrió un navegador web que solo decía:
Funciona
Luego, después de actualizar, me envió directamente a la pantalla de creación de configuración para WordPress y se saltó la sección de inicio de la base de datos. Cuando envié la información que incluye tu tutorial, dice:
"Pudimos conectarnos al servidor de la base de datos (lo que significa que tu nombre de usuario y contraseña están bien), pero no pudimos seleccionar la base de datos (nombre de mi base de datos)."
¿Qué hago para arreglar esto? Estuve leyendo en línea y dice que hay algunos problemas con Mac Mountain Lion, así que desactivé el uso compartido web, que fue la solución para este problema en todos los demás sitios. ¡Por favor, por favor, por favor, ayúdenme!
– Jen
Soporte de WPBeginner
Jen, abre tu archivo wp-config.php que se encuentra en el directorio raíz de tu instalación de WordPress. Mira las secciones de Base de datos, nombre de usuario de la base de datos y contraseña. Ve a phpmyadmin escribiendo
http://localhost/phpmyadminen el navegador. Asegúrate de que el nombre de la base de datos en tu archivo wp-config exista. También verifica que el nombre de usuario utilizado en el archivo wp-config tenga todos los privilegios haciendo clic en la pestaña Usuarios en phpmyadmin.Administrador
brad
Retiro mi victoria anterior, cuando terminé de trabajar en mi sitio, detuve los servidores y cerré MAMP. Cuando reinicié MAMP para trabajar en un nuevo proyecto unas horas después, no puedo acceder a ningún archivo en htdocs sin un error 404. Los foros de soporte de MAMP casi no tienen respuestas a este problema, ¿alguien aquí tiene este problema? ¿Alguna ayuda posible? No soy una persona técnica, solo un diseñador, así que esto es principalmente griego para mí.
Brad
¡Gracias por un tutorial sencillo y bien explicado! ¡Lo tuve funcionando en menos de 15 minutos!
Daniele
¡Gracias, chicos! ¡Realmente útil para un joven usuario de Mac como yo!
jeroen faber
¡Gran guía!
Una cosa: la siguiente línea en la guía:
“Abre una nueva ventana del navegador y escribe http://localhost/mysite.”
no me llevó a la pantalla de instalación de WordPress, solo escribir “localhost” en el navegador sí lo hizo.
¿Cometí algún error en la configuración o...?
Soporte de WPBeginner
parece que has instalado WordPress en tu directorio principal www, htdocs o web bajo tu instalación de Apache.
Administrador
Dee
¡Gracias por esto, fue realmente fácil de seguir y no tuve ningún problema!
Ton in 't Veld
Ya he creado muchos sitios con Dreamweaver. Ahora quiero configurar un blog de WordPress para mi esposa. Instalé MAMP. Hasta ahora todo bien. En las preferencias intenté iniciar los servidores. El servidor MySQL funcionó de inmediato, pero el servidor Apache no se pone en verde. Ya apagué Skype (como se aconsejó antes).
Muchas gracias por revisar mi problema.
Soporte de WPBeginner
A veces Skype se ejecuta en segundo plano, verifica en el monitor de actividad para asegurarte de que Skype no se esté ejecutando en segundo plano.
Administrador
George
Todo iba bien hasta que llegué a http://localhost:8888/wordpress. Por alguna razón, el servidor Apache no quería iniciarse con el puerto 80. Por favor, dime qué no estoy haciendo o qué estoy haciendo mal.
Gracias,
George
Personal editorial
Esto sucede si tienes Skype ejecutándose. Necesitas cambiar el puerto en Skype o cerrar Skype mientras usas Mamp.
Administrador
Justin
Eso era exactamente lo que necesitaba. Un obstáculo que tuve fue que "Compartir pantalla" estaba activado en las "Preferencias del Sistema" de mi Mac OSX. Estaba causando que se ejecutara un servidor Apache duplicado, lo que impedía que phpmyadmin o la "Página de inicio" funcionaran.
Personal editorial
Thanks for sharing that with us Justin. Hopefully it will help others who read the comments
Administrador
Jonas
Hi,
Followed your instructions an successfully installed WP. Many thanks
JaY Srivastava
Gracias por ahorrarme tiempo real, sabía cómo hacer eso en Windows, pero como uso mi Mac como mi computadora portátil principal de trabajo, me estaba resultando difícil probar sitios web.
Siempre he sido fan de wpbeginner, pero ahora supongo que ha crecido más.
¡Gracias de nuevo!
RW
He estado usando mi primera instalación de MAMP desde que leí este tutorial. Lo único con lo que estoy batallando es, portarlo a un sitio de producción en vivo. Supongo que tengo que exportar mi base de datos y luego importarla usando phpMyAdmin, pero obviamente, algunas cosas tendrán que cambiar. También tengo que subir manualmente todas las carpetas de subida.
¿Alguien tiene ideas de flujo de trabajo recomendadas?
Gracias,
Bob
Personal editorial
Si tienes BackupBuddy, entonces puedes crear fácilmente un archivo de respaldo completo e importarlo. Para hacerlo manualmente:
1. Instala WordPress en el sitio nuevo y copia/pega el directorio /wp-content/ del sitio anterior.
2. Importa todo el contenido usando phpMyAdmin
3. Cambia las opciones site_url y home_url en wp_options para que reflejen el sitio nuevo.
4. Inicia sesión en el sitio nuevo y ve a Configuración > General y haz clic en el botón de guardar.
5. Ve a Configuración > Enlaces permanentes y haz clic en el botón de guardar.
Administrador
RW
¡Perfecto! ¡Gracias! Nunca me encantó BackupBuddy porque no me funcionaba de manera confiable. ¡El enfoque manual parece simple! ¡Muchas gracias!
Bob
RW
He estado usando MAMP durante una semana y me encanta. ¡Hace que las pruebas sean mucho más rápidas!
Gracias,
Bob
Gautam Doddamani
i have been using XAMPP from a long time and its serving me well…it has the same functionality as MAMP and perfectly runs on a mac
Raihan
esta publicación es muy útil para mí. para esto guardé esta página
Gunstra
Gran tutorial, gracias.
Debbie
Finalmente, instrucciones concisas y paso a paso sobre cómo configurar WordPress. He seguido otras instrucciones y todavía me pierdo en qué hacer. ¡¡Muchas gracias!!
Christopher Anderton
Yo mismo estoy usando MAMP, sin embargo, hay una forma aún más sencilla de empezar a funcionar en poco tiempo usando MAMP Stack (http://bitnami.com/stack/mamp) y el módulo de WordPress (ver la sección de módulos en la página).
Luke
¡Definitivamente un proceso útil! Ojalá hubiera tenido este artículo la primera vez que intenté configurar esto. ¡Habría sido de gran ayuda!
¿Cuál es tu opinión sobre modificar el archivo hosts para permitir el uso de un nombre DNS para el sitio local (ejemplo.com en lugar de localhost)? ¿Buena práctica? ¿Mala práctica?
Personalmente, lo he encontrado útil al transferir un sitio que he desarrollado localmente a un servidor en vivo.
RW
Eso es muy útil. He leído sobre cómo hacer esto y creo que ahorrará mucho tiempo trabajando localmente en los sitios. Supongo que tiene que configurarse (o reconfigurarse) para diferentes sitios?
Gracias,
Bob