¿Estás investigando los anuncios de retargeting en Facebook? ¿Quieres instalar el píxel de Facebook en WordPress?
Configurar campañas de anuncios de Facebook dirigidas a personas que han visto tu contenido previamente es una excelente manera de generar más tráfico de regreso a tu sitio.
En este artículo, te mostraremos cómo agregar el píxel de Facebook en WordPress, paso a paso, para configurar anuncios de retargeting.
Por qué usar el píxel de retargeting de Facebook para aumentar tu alcance social
Syed Balkhi, nuestro fundador y CEO, publicó un estudio de caso sobre cómo aumentamos el tráfico de Facebook de WPBeginner en un 332% en 2015. Esto generó un interés abrumador de nuestros lectores, quienes querían saber cómo podían hacer lo mismo para sus sitios web.
Cuando impulsas publicaciones de páginas de Facebook usando anuncios de Facebook, puedes seleccionar una amplia gama de audiencias objetivo. El retargeting te permite acotar tu audiencia y obtener mejores resultados con menos gasto.
Puedes mostrar tus anuncios a personas que ya están interesadas en tu sitio web. Es mucho más probable que estas personas respondan a tus publicaciones promocionadas y anuncios en Facebook.
¿Qué es un píxel de retargeting de Facebook?
¿Has notado que después de visitar un sitio web, empiezas a ver sus anuncios en Facebook? Esto se llama retargeting o remarketing.
Esos sitios web utilizan la tecnología de retargeting de Facebook, comúnmente conocida como Píxel de Facebook o Píxel de Meta.
El píxel de retargeting no agrega nada visible a tu sitio web. Simplemente envía una cookie del navegador a tus visitantes.
Esto permite a Facebook hacer retargeting a los usuarios que visitan tu sitio web en Facebook.
Veamos cómo puedes agregar un píxel de retargeting de Facebook a tu sitio de WordPress.
- Paso 1. Creación de un píxel de retargeting de Facebook (Píxel de Meta)
- Paso 2. Instalación del píxel de Facebook en WordPress (+ Seguimiento de eCommerce)
- Paso 3. Creación de audiencias personalizadas usando el píxel de Facebook
- Paso 4. Mostrar tus anuncios a audiencias personalizadas usando el píxel de retargeting de Facebook
Paso 1. Creación de un píxel de retargeting de Facebook (Píxel de Meta)
Para que sea fácil, hemos creado un tutorial en video sobre cómo instalar un plugin de WordPress que puedes ver a continuación.
Sin embargo, si solo deseas seguir instrucciones escritas, puedes seguir nuestro tutorial paso a paso sobre cómo instalar el píxel de retargeting de Facebook en WordPress.
Primero, necesitas iniciar sesión en tu cuenta de Facebook y visitar la Meta Business Suite. Luego, haz clic en Todas las herramientas » Administrador de eventos.
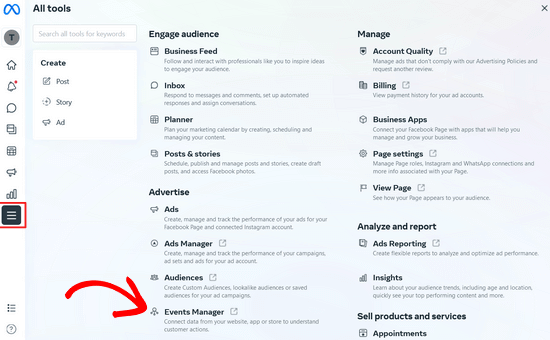
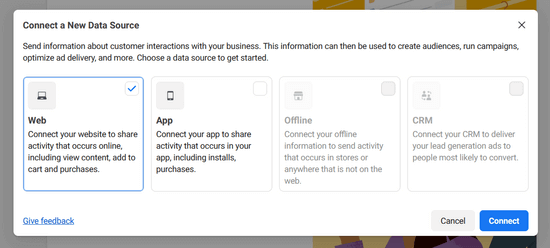
A continuación, haz clic en el botón '+ Conectar a fuentes de datos' en el menú de la izquierda y selecciona la opción 'Web'.
Después de eso, haz clic en el botón 'Conectar'.
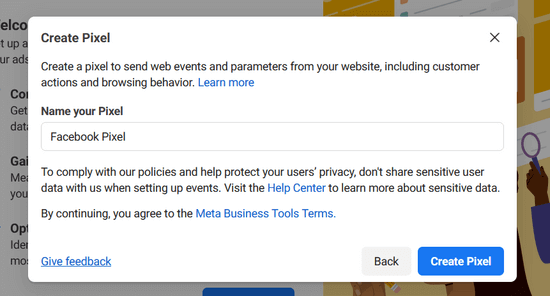
En la siguiente ventana emergente, necesitas ingresar un nombre para tu píxel, que puede ser el nombre de tu negocio o producto.
Luego, haz clic en el botón 'Crear píxel' para continuar.
A continuación, simplemente ingresa la URL de tu sitio web y haz clic en el botón 'Verificar' para ver si tu sitio es elegible para la integración con socios compatibles como WordPress y Shopify.
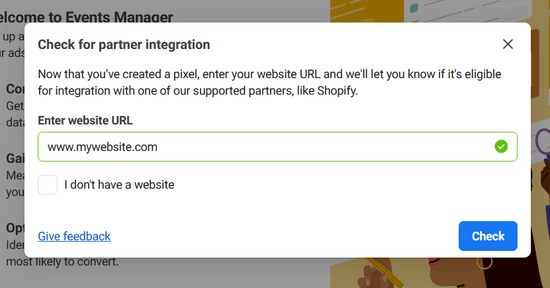
Si tu sitio es elegible para la integración, verás una marca de verificación verde y podrás hacer clic en el botón 'Siguiente' para continuar.
A continuación, necesitas elegir cómo conectar tu sitio web y enviar actividad a Facebook.
Para este tutorial, seleccionaremos la opción ‘Solo Meta Pixel’. Siempre puedes configurar la API de conversiones además de tu píxel más adelante.
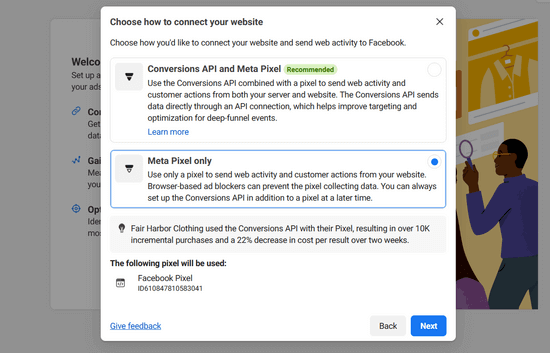
Haz clic en ‘Siguiente’ para continuar.
Ahora, necesitas seleccionar un método para agregar el código del píxel a tu sitio web.
Si otra persona se encarga de las cuestiones técnicas de tu sitio web, puedes enviarle el código del píxel por correo electrónico. De lo contrario, haz clic en el botón ‘Instalar código manualmente’ para instalarlo tú mismo.

Facebook te mostrará ahora el código del píxel que necesitas instalar en tu sitio de WordPress.
Simplemente haz clic en el botón ‘Copiar código’ para copiar el código del píxel, y te mostraremos cómo instalarlo en WordPress.

Paso 2. Instalación del píxel de Facebook en WordPress (+ Seguimiento de eCommerce)
Necesitas agregar el código del píxel de Facebook justo antes de </head> en tu tema de WordPress.
La forma más fácil de hacer esto es usando el plugin gratuito WPCode.
WPCode es el mejor plugin de fragmentos de código para WordPress. Facilita la inserción de código en los encabezados y pies de página de tu sitio de WordPress sin necesidad de editar los archivos de tu tema.
Para empezar, necesitas instalar y activar el plugin WPCode. Para obtener instrucciones paso a paso, consulta nuestra guía sobre cómo instalar un plugin de WordPress.
Después de instalar y activar el plugin, debes ir a la página Fragmentos de código » Encabezado y Pie de página.
Luego, simplemente pega el código del píxel de Facebook en el cuadro de Encabezado.

Cuando hayas terminado, no olvides presionar el botón ‘Guardar cambios’.
Consulta nuestra guía sobre cómo agregar código de encabezado y pie de página en WordPress para obtener instrucciones detalladas.
Con esto, has instalado exitosamente el píxel de Facebook en tu sitio web de WordPress.
Alternativa: Agregar el píxel de Facebook para WooCommerce con seguimiento de comercio electrónico
Si tienes una tienda en línea, puedes actualizar a la versión premium de WPCode para agregar píxeles de seguimiento de comercio electrónico y mejorar el rendimiento de tus anuncios.
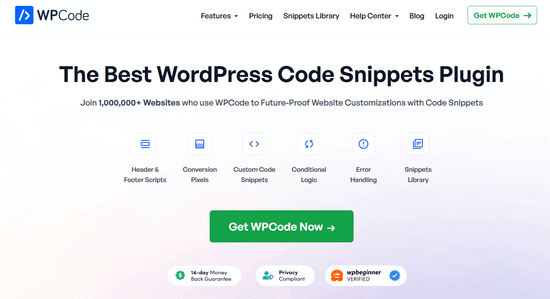
El complemento de píxeles de conversión de WPCode te permite agregar fácilmente píxeles de seguimiento de comercio electrónico para plataformas populares como Facebook, Google Ads, Snapchat, Pinterest y TikTok en 1 clic.
Se integra perfectamente con WooCommerce y Easy Digital Downloads, por lo que no se requiere configuración adicional.
Puedes elegir rápidamente qué eventos de comercio electrónico rastrear, como vista de página de producto, agregar al carrito, pago y compra, para que puedas entender mejor cómo funcionan tus anuncios y mejorar tu retorno de la inversión publicitaria (ROAS).
Primero, necesitas instalar y activar el plugin premium WPCode. Necesitas el plan Plus o superior para acceder al complemento de píxeles de conversión. Para obtener instrucciones paso a paso, consulta nuestra guía sobre cómo instalar un plugin de WordPress.
Después de eso, sigue las mismas instrucciones del paso #1 para crear un píxel de Facebook para WooCommerce.
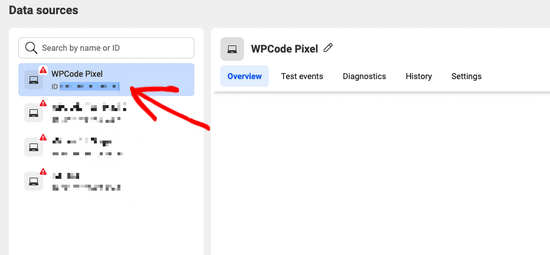
A continuación, copia el ID del píxel, que puedes encontrar en 'Fuentes de datos' en el Administrador de eventos de Facebook de tu cuenta de Facebook Business.
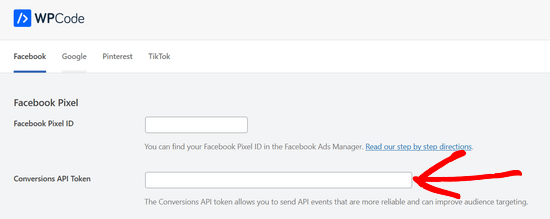
Luego, ve a Fragmentos de código » Píxeles de conversión desde tu panel de WordPress, y pega tu ID de píxel en el campo ‘ID de píxel de Facebook’.

Después de eso, necesitas agregar tu Token de la API de Conversiones de Facebook para configurar el seguimiento de eCommerce.
Para hacerlo, regresa a la pantalla de ‘Fuentes de datos’ desde el Administrador de eventos de Facebook y haz clic en tu píxel. Con tu píxel seleccionado, haz clic en la pestaña ‘Configuración’ y luego haz clic en el enlace ‘Generar token de acceso’.
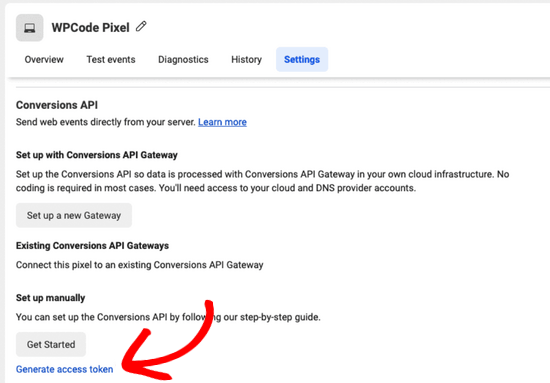
Después de hacer clic en el enlace, tu token de acceso se generará automáticamente. Simplemente copia el token de acceso y pégalo en el campo ‘Token de la API de Conversiones’ en WPCode.
Ahora, puedes desplazarte hacia abajo en la página para elegir qué tipo de eventos de eCommerce rastrear.
Por defecto, el seguimiento de todos los eventos está habilitado. Pero, si deseas desactivar el seguimiento de eventos para alguna de las opciones, simplemente cambia el interruptor a ‘Desactivado’.
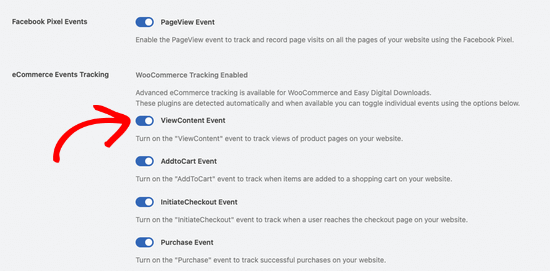
No olvides hacer clic en el botón Guardar cambios en la parte inferior de la página.
¡Listo! Has agregado exitosamente el píxel de Facebook para WooCommerce y estás listo para rastrear eventos de eCommerce.
Paso 3. Creación de audiencias personalizadas usando el píxel de Facebook
Ahora que has instalado exitosamente el Píxel de Facebook en tu sitio de WordPress, el siguiente paso es crear audiencias personalizadas para tus campañas de retargeting en Facebook.
Las audiencias personalizadas te permiten dirigirte a usuarios que ya conoces para tus anuncios de Facebook. Estos usuarios pueden ser visitantes de tu sitio web, usuarios a los que les gusta tu página o usuarios que se registraron en tu lista de correo.
Aquí te explicamos cómo crear audiencias personalizadas en Facebook.
Simplemente visita el panel de Meta Business Suite y ve a la sección Todas las herramientas » Audiencias.
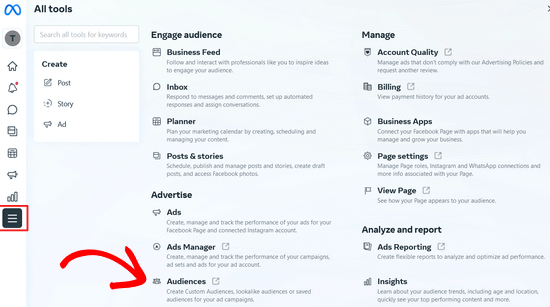
En la siguiente página, haz clic en el botón ‘Crear una audiencia personalizada’.
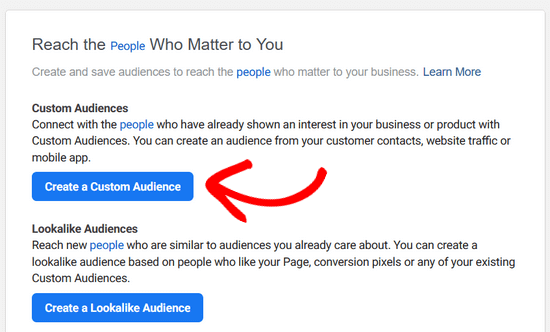
Esto abrirá una ventana emergente donde deberás elegir la fuente de audiencia a la que deseas dirigirte en Facebook.
Puedes elegir tu sitio web, lista de clientes, actividad de la aplicación y más. Para este tutorial, vamos a elegir la opción ‘Sitio web’.
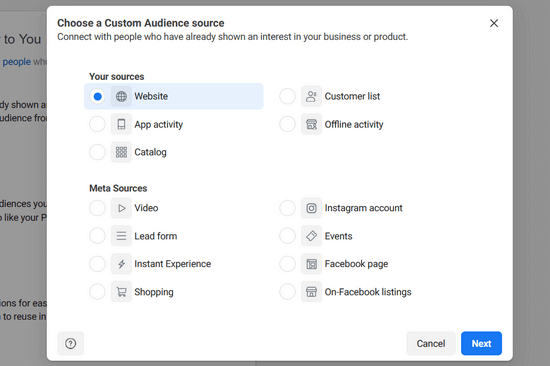
Después de eso, haz clic en el botón ‘Siguiente’.
Ahora Facebook te preguntará qué audiencia de sitio web quieres segmentar. Puedes elegir todos los visitantes del sitio web, personas que visitan páginas específicas o visitantes por tiempo de permanencia.
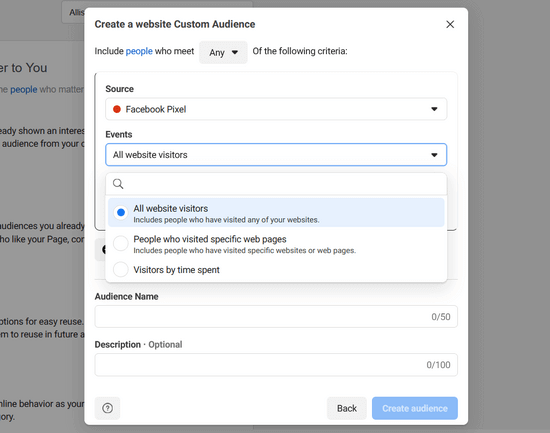
A continuación, debes elegir una duración de un número de días. Por último, debes proporcionar un nombre para la audiencia. Usa algo que te ayude a identificar fácilmente esta audiencia en tus estadísticas.
Una vez que hayas terminado, haz clic en el botón ‘Crear Audiencia’ para finalizar la creación de tu primera audiencia personalizada.
Repite el proceso para crear más audiencias personalizadas mediante el retargeting de Facebook.
Paso 4. Mostrar tus anuncios a audiencias personalizadas usando el píxel de retargeting de Facebook
La verdadera diversión comienza al interactuar con tus audiencias personalizadas utilizando anuncios de Facebook.
Empieza creando un nuevo anuncio en Facebook. Puedes lanzar diferentes tipos de anuncios para diferentes objetivos. Como promocionar las publicaciones de tu página, enviar tráfico a tu sitio web, aumentar conversiones, y así sucesivamente.
Dependiendo del objetivo que elijas, podrás seleccionar la audiencia objetivo en algún momento durante la creación del anuncio.
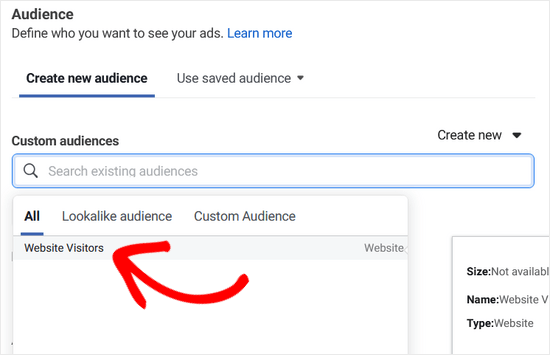
En la misma selección de audiencia, Facebook te mostrará una audiencia personalizada, y puedes seleccionarla para ser segmentada con tu campaña publicitaria.
Esperamos que este artículo te haya ayudado a instalar el píxel de remarketing/retargeting de Facebook en WordPress. También te puede interesar nuestra guía sobre cómo instalar y configurar comentarios de Facebook en WordPress y nuestras selecciones expertas de los mejores plugins de Facebook para WordPress para hacer crecer tu blog.
Si te gustó este artículo, suscríbete a nuestro canal de YouTube para obtener tutoriales en video de WordPress. También puedes encontrarnos en Twitter y Facebook.


crystal
¿Puedes hacer una versión actualizada de esto? Ahora FB tiene una opción de integración de socios. He intentado esta versión de hacerlo (descargando un plugin) y he intentado su forma de hacerlo a través de sus socios, y ninguna de las dos maneras me funciona.
Soporte de WPBeginner
Nos aseguraremos de echarle un vistazo
Administrador
Jeff Cope
Gracias por la publicación y, aunque necesita una actualización ya que Facebook ha cambiado los enlaces y el proceso, finalmente agregué el píxel a mi sitio web. Nota: con la mejora en el Personalizador de WordPress, ya no se necesita un plugin para agregar el código del píxel antes de /head.
Soporte de WPBeginner
Thank you for your feedback and we still recommend the plugin to ensure it is included on every page on the site
Administrador
Joseph Abokhai
Estaba usando el plugin Facebook para woocommerce que configura automáticamente un píxel de Facebook en un sitio web en particular.
Inicié una nueva cuenta de hosting y redirigí mis servidores de nombres de dominio para que apunten a la nueva cuenta de hosting.
Mi pregunta es, dado que cambié mi cuenta de hosting y comencé a construir el sitio desde cero, ¿el píxel seguirá adjunto a mi dominio?
Soporte de WPBeginner
Lamentablemente, para ese plugin, necesitarías consultar con el soporte del plugin para saber cómo manejan un cambio así.
Administrador
Andrew Wilkerson
Bueno, creo que está bien hecho, ¡gracias WpBeginner! Todavía no estoy seguro de qué debería hacer con el segundo fragmento de código de Facebook para rastrear a las personas que han ido a una página en particular. Hice clic durante más de 2 horas en FB y luego en mi sitio de wp, y me rendí como de costumbre.
Ni siquiera estoy seguro de cómo funciona esto, ¿dónde pone el plugin de encabezados y pies de página el código, en cada página? ¿Simplemente agrego el segundo fragmento de código de FB debajo de esto? necesita ir después del . ¿Va en la plantilla de página? ¿Plantilla de publicaciones? Estoy perdido como de costumbre, hasta que FB lo haga más fácil, no me molestaré. Seleccionar tus audiencias, demografía, países, eventos? y todo eso, es demasiado abrumador para la mayoría de los dueños de negocios. Aquellos que tienen dinero sobrevivirán en línea, pueden pagarle a alguien más para que lo haga, los negocios unipersonales como el mío eventualmente desaparecerán. No puedo ganar dinero perdiendo el tiempo en cosas como esta, así que empeora. Ya me caí de la primera página de Google después de 14 años allí, todo cuesta abajo a partir de aquí, me temo, es hora de hacer otra cosa.
Angie Sherbondy
¡Gracias! Seguí las instrucciones. Ya tenía instalados encabezados y pies de página y ya había código en la sección de encabezado, así que lo puse encima. ¿Está bien?
Gracias,
Angie
Shivam Bhateja
Sí, está bien. Usé el código de analytics y el código de píxel ambos en la sección de encabezados.
Shodkk
Ya, no hay problema en hacerlo. Está completamente bien, esto es solo un código.
Este código se carga cada vez que se ejecuta la página de tu sitio. No hay problema en eso, OK. Ambos códigos se ejecutan y envían los datos respetados de regreso a FB y Google por sus respectivos códigos.
Andre
Hola. Tengo una pregunta sobre el píxel de FB que no logro encontrar en ninguna parte. Shopify tiene una aplicación llamada Trackify que te permite segmentar eventos, por producto por ejemplo, y al hacerlo te permite dirigir súper específicamente a personas que han comprado un producto en particular sin configurar eventos personalizados. ¿Existe un plugin similar para Wordpress? Por favor, si pudieras ayudar, sería genial. Estoy desesperado buscando una solución.
Maryann
Me alegra mucho haber encontrado tu sitio. Muy útil e informativo.
Gracias
vinton samms
Muchas gracias por este tutorial. Realmente no sabía cómo usar el píxel de FB. Gracias de nuevo.
Vinton
Nathan
He instalado el píxel usando el plugin.
¿El píxel se colocará automáticamente en cada página?
Gracias
Claudio
Parece que Facebook ha cambiado algunos detalles para hacer esto desde que se escribió esta publicación. Ahora tienen un nuevo píxel que también incluye tener que copiar el código de evento. ¿Cómo/dónde hacemos esto en el contexto de este artículo y plugin?
Matthew
¿Cómo instalas el píxel para que se active al cargar la página dadas las restricciones del plugin?
Lo aclararé: Facebook afirma que si quieres que un evento se active al cargar la página, el código para ese evento específico debe pegarse DEBAJO de la etiqueta head.
El plugin que recomiendas, así como todos los demás que he visto disponibles para WP, no abordan este problema.
¿Recomendaciones?
John Henry Gaspay
¿También es posible agregar el código en el pie de página en lugar de en la cabecera? Por lo general, si es para fines de seguimiento, una mejor implementación sería en el pie de página, ya sabes, por motivos de SEO.
Pat
I went ahead and installed the pixel because i wanted more visits to my music site. I started filling in the remarketing stuff in FB, then I came to the part about paying! I didn’t realise I had to pay so I’ve uninstalled the remarketing pixel in WP and delete everything in FB that I’d filled out. I hope I don’t start getting demands for money. Maybe you could add a note to your article that there will be payment involved in FB marketing. I guess I should have realised.
Jim
¿No pensaste que tendrías que pagar por marketing o publicidad? ¿Dónde has estado durante los últimos mil años?
Michael
¿Hay alguna forma de usar un píxel de Facebook si estoy en wordpress.com?
Soporte de WPBeginner
Por favor, consulta nuestra guía sobre la diferencia entre WordPress.org autoalojado vs blog gratuito de WordPress.com.
Administrador
Alex
¡Gran artículo! Gracias
Uso WordPress en mi sitio; he logrado instalar el píxel de Facebook usando la "aplicación Insert Headers and Footers" y Facebook dice que está instalado correctamente.
En WordPress, ¿cuál es la mejor manera de instalar un código de evento estándar? Tengo una página de "gracias" que me gustaría usar como referencia de conversión; la página de gracias aparece después de que el espectador ha enviado un formulario.
¡Gracias!
Karl
También he instalado con éxito el código del píxel de Facebook a través de Insert Headers and Footers de WPBeginner, ahora quiero saber cómo agregar códigos de eventos estándar. ¿Alguien puede enseñarnos cómo? ¡Muchas gracias a WPBeginner por esto!
Terry Green
Agregué el píxel de retargeting de FB hace aproximadamente un mes a mi sitio de WP, y el Facebook Pixel Helper mostró que estaba instalado y funcionando. Ahora “escucho” que hay un nuevo Facebook Pixel, Y mi Facebook Pixel Helper muestra “no hay píxeles de Facebook” en mi sitio.
El artículo que leí va por todo el mundo y regresa sobre todo lo que no quiero saber. Lo único que quiero saber es cómo reemplazar el píxel. Eres una fuente confiable, así que pensé en preguntar... ¿hay un nuevo píxel? ¿Y puedo agregarlo (o reemplazar el anterior) tan fácilmente como la primera vez (con un plugin), o requerirá agregar código manualmente a cada página?
Nina
¿Cómo agregamos otras reglas, como estas Search fbq(‘track’, ‘Search’);
Add to cart fbq(‘track’, ‘AddToCart’);
Add to wishlist fbq(‘track’, ‘AddToWishlist’);
¿simplemente lo agregamos al código?
Yev
Necesito volver a copiar el píxel de Facebook si agrego eventos estándar/personalizados para el Seguimiento de Conversiones, para pegar el nuevo en el sitio web.
¿Eso significa que solo tengo datos de PageView hasta que actualice el código en el sitio web, o cualquier tipo de dato se remonta y se vuelve disponible siempre que haya tenido instalado el Pixel original/básico?
Darren
Hola,
He hecho esto y el píxel de Facebook está rastreando. Sin embargo, también estoy usando el formulario de registro con la API de Mailchimp y agregué los aspectos de Lead y Complete registration al píxel en el encabezado. Se están activando ya que el complemento de Chrome lo muestra, pero el formulario de registro no se activa como registro o registro completo. No estoy seguro de si estoy explicando bien mi problema. Así que en Business Manager y en el píxel puedo ver a la gente visitando mi sitio. Pero cuando se registran, el valor de lead o complete registration sigue siendo 0. ¿Alguna idea de por qué ocurre esto? ¡Usé el píxel de conversión antiguo de FB y eso estuvo bien, pero este nuevo es tan molesto!
Saludos
Ron Hudson
¡Guau! Muchas gracias por escribir esta publicación y grabar un video para ayudar a tu audiencia a implementar esta importante herramienta.
Soporte de WPBeginner
Me alegra que te haya resultado útil.
Administrador
Prakash Thakur
hola principiante de wp
Gran trabajo al hacer este artículo..
una sola pregunta…
¿puedo desinstalar ese complemento después de subir el script en la sección del encabezado???
Brendon Osborne
¡Gran video, súper simple y útil!
moon
Hola,
Necesito agregar el "Código del píxel de Facebook" en mi sitio de WordPress.
¿Puedo saber si este complemento es adecuado para ello?
Gracias
Elle Van Buren
Estimado autor, tengo una pregunta sobre la función "Agregar seguimiento de conversiones". Como usted indicó, si colocamos el píxel de Facebook en la sección del encabezado del complemento, ese fragmento de código estará en cada página. Pero si tengo una página de conversión, ¿cómo puedo aislar esa página en particular y agregar un evento personalizado como fbq('track', 'Lead'); en medio del píxel de Facebook?
Por lo general, con WordPress u otros CMS, una vez que algo está en el encabezado, está en todas las páginas. ¿Cómo ponemos algo diferente para una página en particular?
¡Gracias!
¡Tengo la misma pregunta exacta!
¡Tengo la misma pregunta! ¿Cómo puedo seleccionar una página en particular (Página de Gracias) y agregar un evento personalizado?
Marvin
Yo también tengo esta pregunta.
Stephen
¿Alguien ha obtenido una solución para esto?
Adrien
Todavía tengo esta pregunta pendiente... ¿alguna solución?
Saludos
Luke
¡GRACIAS!
Mucho más fácil de entender que las instrucciones oficiales de FB.
Hammad Afzal
Gran artículo, ¿puedo usar esta función de inmediato o primero tengo que comprar una campaña de anuncios de Facebook? Me refiero a publicidad pagada en Facebook.
Muchas gracias, Syed Balkhi, por una publicación genial.
Soporte de WPBeginner
Puedes ver información sobre tus visitantes de inmediato. Puedes ejecutar una campaña de pago más tarde.
Administrador
Hammad Afzal
Muchas gracias
fajar siagian
hola
quiero preguntar sobre esto
¿esto usa anuncios de Facebook primero? ¿te conviertes en usuario suscriptor de anuncios de Facebook?
gracias,
Kingsley
Genial, gracias por este tutorial
Angelica Costa
Esto es perfecto. Estoy empezando a experimentar con anuncios de Facebook.
Por otro lado, ¿hay alguna forma de saber de dónde provienen los visitantes de Facebook? A veces recibo muchos usuarios nuevos y no tengo idea de quién compartió un enlace a mi sitio web.