¿Alguna vez has intentado subir un archivo a tu sitio de WordPress y te has topado con un muro? Es muy frustrante cuando no puedes subir esa imagen, plugin o tema que necesitas. Nuestros lectores a menudo nos piden ayuda con problemas de carga de archivos porque pueden ralentizar tu flujo de trabajo.
A veces, estos límites de carga de archivos pueden detenerte inesperadamente al agregar contenido a tu biblioteca de medios o al instalar esos plugins y temas más grandes que necesitas. Es como estar atado de manos. ¡Y es aún más molesto cuando no sabes cómo solucionarlo!
Pero no te preocupes, estamos aquí para ayudarte. Nos encanta que WordPress sea una plataforma tan configurable, y a menudo hay múltiples formas de resolver el mismo problema.
En esta guía, te mostraremos las formas más fáciles de aumentar el tamaño máximo de carga de archivos en WordPress. Te ayudaremos a superar esas limitaciones para que puedas volver a hacer lo que amas: ¡administrar tu sitio web!
¿Por qué aumentar el tamaño máximo de carga de archivos en WordPress?
Tu proveedor de hosting de WordPress establecerá un tamaño máximo de carga de archivos predeterminado cuando te registres e instales WordPress. Tu proveedor de hosting define este límite, y generalmente varía de 2 MB a 500 MB.
Para la mayoría de los propietarios de sitios web de WordPress, este límite será más que suficiente.
Sin embargo, hay ocasiones en las que necesitarás aumentar este límite para no encontrarte con errores de carga.
Por ejemplo:
- Tienes un sitio web de fotografía y necesitas subir imágenes grandes.
- Tu portafolio de diseño o fotografía tiene imágenes grandes.
- Quieres instalar un tema o plugin de WordPress más grande.
- Quieres vender productos digitales como eBooks, fotos, videos y más.
- Actualizas contenido regularmente y agregas audio, fotos y más que exceden el límite actual.
Dicho esto, te mostraremos cómo puedes aumentar el tamaño máximo de carga de archivos en tu sitio de WordPress.
Nota: Ten en cuenta que mostrar muchos archivos grandes en tu sitio web puede ralentizar seriamente su velocidad y rendimiento. Por eso, normalmente recomendamos nunca subir videos a WordPress.
Dado que la mayoría de los usuarios tienen configuraciones de hosting de WordPress diferentes, cubriremos lo siguiente:
- Cómo verificar tu límite de tamaño máximo de carga de archivos en WordPress
- Método 1: Contacta a tu proveedor de hosting de WordPress
- Método 2: Crea o edita un archivo php.ini existente
- Método 3: Agrega código al archivo functions.php de tu tema de WordPress
- Método 4: Agrega código a tu archivo .htaccess
- Method 5: Use a WordPress Plugin to Increase File Upload Size
Cómo verificar tu límite de tamaño máximo de carga de archivos en WordPress
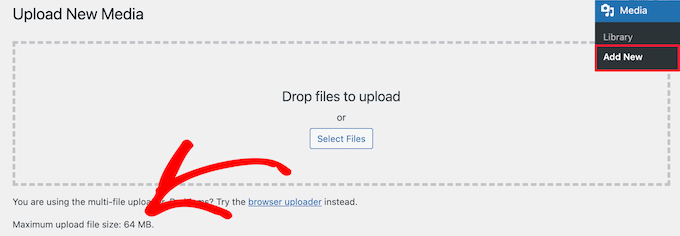
WordPress mostrará automáticamente el límite de tamaño máximo de carga de archivos cuando estés subiendo imágenes u otros medios.
Para verificar esto, simplemente ve a Medios » Añadir nuevo en tu panel de administración de WordPress, y verás el límite máximo de tamaño de archivo para tu sitio de WordPress.
Ahora que sabes cómo encontrar el límite de tamaño, te mostraremos cómo aumentar el tamaño máximo de carga en WordPress.
Método 1: Contacta a tu proveedor de hosting de WordPress
Una de las formas más sencillas de aumentar el tamaño máximo de carga de archivos en WordPress es contactar a tu proveedor de hosting de WordPress.
Esta es una tarea relativamente sencilla para su equipo de atención al cliente y se puede hacer en un par de minutos.
Para principiantes, esto puede ser mucho más fácil que agregar código a WordPress y editar archivos del servidor.
Simplemente dirígete al sitio web de tu proveedor de hosting, como Bluehost, e inicia sesión.
Luego, haz clic en el ícono de ‘Chat’ en la parte inferior de la pantalla. Después, puedes pedirle al personal de soporte que aumente el tamaño de carga de archivos en tu sitio de WordPress.
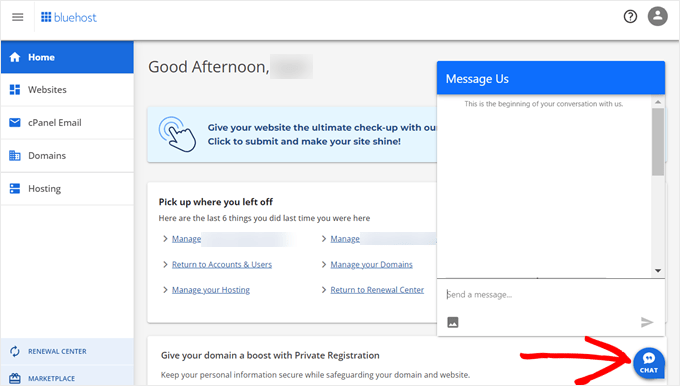
También puedes contactar al soporte desde el panel de control de tu cuenta de hosting.
Método 2: Crea o edita un archivo php.ini existente
Otra forma de aumentar el tamaño máximo de carga de archivos es creando o editando un archivo llamado php.ini. Este archivo controla muchas configuraciones para tu entorno de hosting de WordPress.
La mayoría de los proveedores de hosting de WordPress como Bluehost tienen un cPanel fácil de usar para ayudar a administrar tu sitio web.
Si tu proveedor de hosting web tiene un panel de control cPanel, entonces puedes aumentar el tamaño de carga de archivos a través de las herramientas integradas.
Nota: Lo siguiente es del cPanel de Bluehost. Sin embargo, la mayoría de los proveedores de hosting compartido tendrán pasos similares.
Encontrarás un botón de cPanel en la parte inferior de la pestaña Hosting en Bluehost.
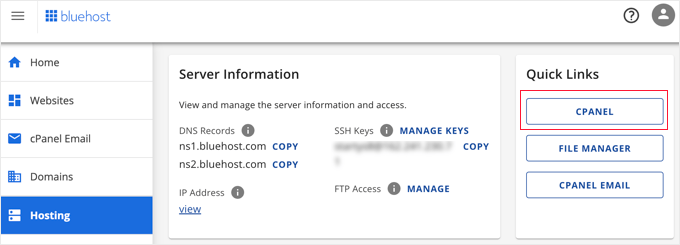
Al hacer clic en este botón se abrirá tu panel de control cPanel.
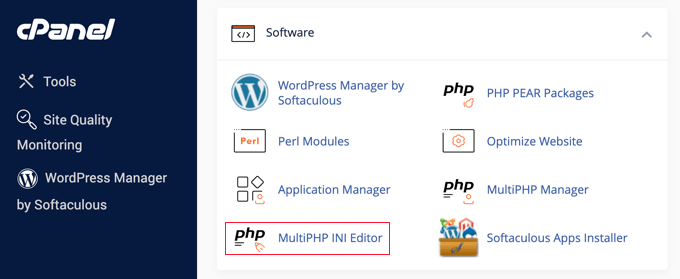
Ahora necesitas desplazarte hacia abajo hasta la sección Software y hacer clic en ‘MultiPHP INI Editor’.
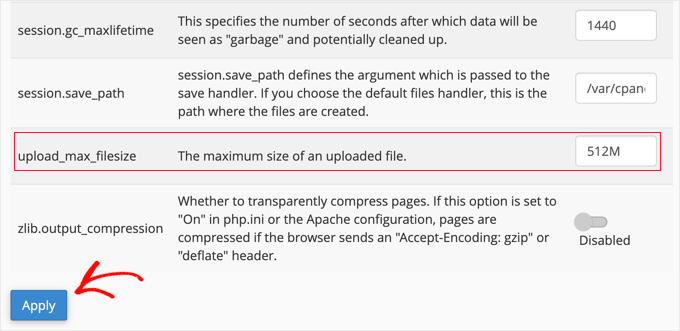
A continuación, desplázate hacia abajo hasta la sección etiquetada como ‘upload_max_filesize’ e introduce un nuevo tamaño de archivo máximo en el cuadro.
Luego, haz clic en el botón ‘Apply’.
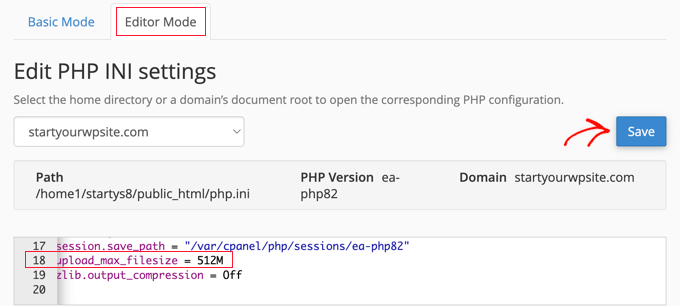
Alternativamente, puedes hacer clic en la pestaña del menú ‘Editor Mode’, y luego puedes cambiar el tamaño máximo de carga de archivos directamente en el editor.
Necesitas editar la sección ‘upload_max_filesize’ para aumentar tu tamaño de carga de archivos.
Una vez que hayas terminado, simplemente haz clic en el botón ‘Save’.
Editar php.ini agregando código
Si tu proveedor de hosting actual no ofrece la opción de cPanel, entonces necesitarás editar este archivo manualmente.
Para hacer esto, puedes usar un cliente FTP o la opción del administrador de archivos en el panel de control de tu hosting de WordPress.
Si estás usando hosting compartido, es posible que no veas el archivo php.ini en tu directorio de hosting. Si no ves uno, simplemente crea un archivo llamado php.ini y súbelo a tu carpeta raíz.
Luego, agrega el siguiente fragmento de código al archivo:
upload_max_filesize = 256M
post_max_size = 256M
max_execution_time = 300
Puedes modificar el límite de ‘256M’ al tamaño de archivo que necesites para tu blog de WordPress.
Método 3: Agrega código al archivo functions.php de tu tema de WordPress
Este método implica agregar código a tu archivo functions.php en tu tema de WordPress.
En lugar de editar el archivo directamente, te recomendamos usar WPCode. Es el mejor plugin de fragmentos de código que te permite agregar código a tu sitio web sin romperlo.
Si no has hecho esto antes, consulta nuestra guía para principiantes sobre cómo agregar código personalizado en WordPress.
Primero, necesitas instalar el plugin gratuito WPCode. Para más detalles, consulta nuestra guía paso a paso sobre cómo instalar un plugin de WordPress.
Al activarlo, deberías navegar a Fragmentos de código » + Añadir fragmento.
Deberás pasar el cursor del ratón sobre la opción ‘Añadir tu código personalizado (Nuevo fragmento)’ y luego hacer clic en el botón ‘+ Añadir fragmento personalizado’.

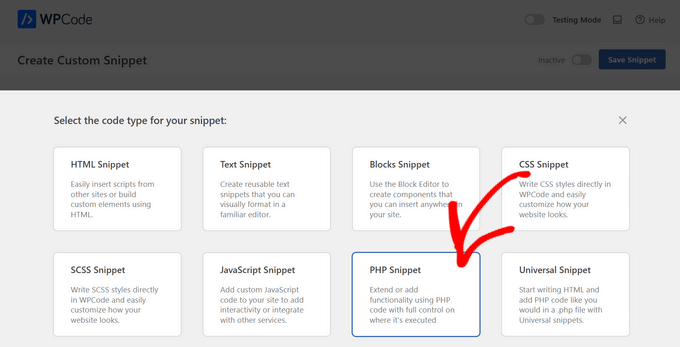
A continuación, debes elegir ‘Fragmento de PHP’ como tipo de código de la lista de opciones que aparecen.
En la siguiente pantalla, introduce un nombre para tu nuevo fragmento, que puede ser cualquier cosa para ayudarte a recordar para qué es el código.
Luego, puedes copiar y pegar el siguiente fragmento de código en ‘Vista previa del código’. Asegúrate de cambiar ‘256M’ al tamaño máximo de archivo que necesites:
@ini_set( 'upload_max_size' , '256M' );
@ini_set( 'post_max_size', '256M');
@ini_set( 'max_execution_time', '300' );
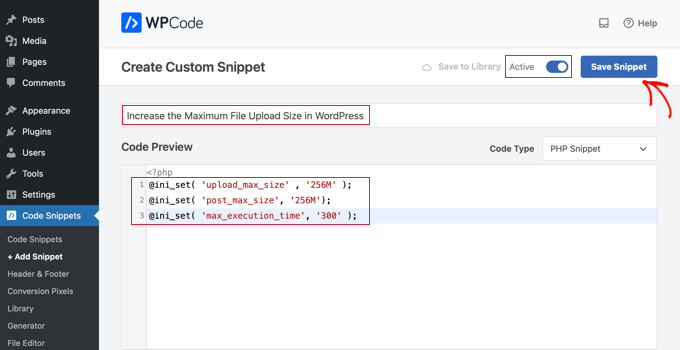
Finalmente, cambia el interruptor en la parte superior a ‘Activo’ y luego haz clic en el botón ‘Guardar fragmento’. El código se ejecutará ahora en tu sitio web.
Método 4: Agrega código a tu archivo .htaccess
Otra forma de aumentar el tamaño máximo de archivo es modificando el archivo .htaccess. Este archivo controla la configuración de alto nivel de tu sitio web.
Para hacer esto, necesitas iniciar sesión en el servidor de tu sitio web a través de FTP. Si no lo has hecho antes, consulta nuestra guía sobre cómo usar FTP para subir archivos a WordPress para principiantes.
Después de eso, necesitas localizar tu archivo .htaccess en la carpeta raíz de tu sitio web.

Si no puedes encontrar tu archivo .htaccess, es posible que esté oculto por tu administrador de archivos o cliente FTP. Para obtener más información, consulta nuestra guía sobre por qué no puedes encontrar el archivo .htaccess en tu sitio de WordPress.
A continuación, necesitas agregar el siguiente fragmento de código a tu archivo .htaccess:
php_value upload_max_filesize 256M
php_value post_max_size 256M
php_value max_execution_time 300
php_value max_input_time 300
Para aumentar aún más tu tamaño máximo de carga de archivos, simplemente cambia '64M' al tamaño que necesites.
Método 5: Usa un plugin de WordPress para aumentar el tamaño de carga de archivos
Otra forma en que puedes aumentar el límite máximo de carga de archivos es usando el plugin WP Increase Upload Filesize. Si no te sientes cómodo agregando código a WordPress, esta podría ser una buena opción para ti.
Lo primero que debes hacer es instalar y activar el plugin. Para más detalles, consulta nuestra guía sobre cómo instalar un plugin de WordPress.
Tras la activación, navega a Medios » Aumentar Límite de Carga en tu panel de administración de WordPress.
Esto te lleva a una pantalla donde puedes seleccionar un nuevo tamaño de carga de archivos en el menú desplegable 'Elegir Tamaño Máximo de Carga de Archivo'.
Luego, haz clic en el botón 'Guardar Cambios'.

Nota: El tamaño máximo de carga de archivos será establecido por su proveedor de hosting. Si necesita un límite de tamaño de archivo mayor al que aparece en el menú desplegable, deberá contactar a su proveedor de hosting y solicitar que aumenten el límite.
Tutorial en video
Si no le gusta seguir instrucciones escritas, puede ver nuestro tutorial en video en su lugar:
Esperamos que este artículo le haya ayudado a aumentar el tamaño máximo de carga de archivos en WordPress. También puede consultar nuestra guía sobre cómo agregar tipos de archivo adicionales para subir en WordPress y nuestras selecciones expertas de plugins y consejos para mejorar el área de administración de WordPress.
Si te gustó este artículo, suscríbete a nuestro canal de YouTube para obtener tutoriales en video de WordPress. También puedes encontrarnos en Twitter y Facebook.


Abduaziz
¡¡¡Muchas gracias!!! El método 3 me funcionó.
Soporte de WPBeginner
Glad our recommendation could help
Administrador
Alexander Gartley
Gracias, esto me ayudó a solucionar un problema con el límite de carga. Estoy en una instalación de red multisitio de WordPress, así que terminó siendo una configuración en la Configuración del Administrador de Red.
Al principio estaba confundido, porque mi configuración de PHP permitía cargas más grandes, pero estaba restringido en la Configuración de Red.
Soporte de WPBeginner
Thanks for sharing what solved the problem for you
Administrador
Ernesto
Hubiera sido genial si hubieras incluido el método .user.ini.
.user.ini subido en la carpeta raíz con el mismo valor/texto en tu php.ini editado
La mayoría de las veces, solo este método funciona para el hosting compartido.
ErnestPH
Soporte de WPBeginner
The php.ini file should work the same as the user.ini file unless your specific host ignores the php.ini but thank you for sharing your recommendation
Administrador
Mark
Esta es la única solución que funciona en mi servidor de hosting compartido. ¡Gracias Ernesto!
Tamir Davidoff
No me funciona.
He seguido esta guía y he revisado dos veces el archivo php.ini para asegurarme de que los cambios se guardaron. Cambié el archivo htaccess para aumentar los límites. Y también intenté modificar los archivos httpd-app.conf y php-settings.conf de phpMyAdmin. Todos estos archivos reflejan una carga máxima superior a 40m y mi sitio de WP no refleja ninguno de estos cambios. Estoy realmente frustrado aquí.
¡Por favor, ayúdame, gracias!
Soporte de WPBeginner
If you haven’t already, you would want to reach out to your hosting provider to ensure there is not a setting on their end that is overriding what you are setting
Administrador
rajesh
He intentado los 3 métodos y ninguno funcionó. Estoy intentando subir el tema newspaper a mi sitio de wordpress. Pero cada vez me muestra el archivo php.ini de tamaño máximo de carga.
Por favor, ayúdenme.
Soporte de WPBeginner
Deberías contactar a tu proveedor de hosting para asegurarte de que no tengan una configuración que esté anulando los cambios que hiciste.
Administrador
Adam Walsworth
Ten cuidado con los archivos php.ini ocultos. En mi configuración encontré 2 de ellos. El que encontré y que en realidad resolvió el problema estaba ubicado en
./etc/php/7.0/apache2/php.ini
modificar este archivo solucionó mi problema.
Soporte de WPBeginner
Gracias por compartir tu solución; con la ubicación de ese archivo, recomendaríamos a la mayoría de los usuarios que se pongan en contacto con su proveedor de hosting antes de buscar en ubicaciones como esa.
Administrador
Rafiq khan
Gracias amigo, he resuelto mi problema adoptando el método 2 editando mi archivo php.ini
¡Muchas gracias, estás trabajando genial!
Soporte de WPBeginner
Glad our article could help
Administrador
Carla
Ninguno de los anteriores me funcionó. De hecho, editar el archivo htaccess rompió mi sitio incluso después de eliminar el código anterior. Sobrescribir con un archivo nuevo solucionó el problema.
Tengo un servidor dedicado en Bluehost. Lo que me funcionó fue ir a la raíz de WHM, no a cPanel ni a acceso FTP. Busca MultiPHP INI Editor. Dale al menos 5 minutos para cargar si solo ves el título y el icono. Puedes configurar el tiempo de carga, el tamaño de publicación, etc. allí. Funciona al instante, incluso si tu sitio usa Cloudflare, sin ponerlo en modo de desarrollo ni borrar la caché. Espero que esto ayude a alguien.
Soporte de WPBeginner
Thank you for sharing what worked for you, should other users be on a dedicated server, if they reach out and let BlueHost know the need to increase the upload size then BlueHost can normally edit that for them
Administrador
Pezza
¡Excelente! ¡.htaccess funcionó para mí!
Soporte de WPBeginner
Thank you, glad our guide could help
Administrador
ReineR
¡El método htaccess funcionó para mí, gracias!
Soporte de WPBeginner
Glad our article could help
Administrador
Ahmed
Me funcionó
3. Método htaccess
necesitas hacer clic en (mostrar archivos ocultos para ver y editar este archivo).
Soporte de WPBeginner
Glad our article could help
Administrador
rahul
cuando intenté esto
No se pudo comunicar de vuelta con el sitio para verificar errores fatales, por lo que el cambio de PHP se revirtió. Necesitará cargar su cambio de archivo PHP por algún otro medio, como usando SFTP.
esto me pasó a mí
¿cuál es la solución para esto
Soporte de WPBeginner
Necesitarías usar FTP en lugar de WordPress para agregar el código: https://www.wpbeginner.com/beginners-guide/how-to-use-ftp-to-upload-files-to-wordpress-for-beginners/
Administrador
Ephraim
Había estado intentando el método php.ini pero nunca funciona, por favor, ¿cómo lo configuro?
¿O por favor, podrías decirme dónde pegarlo en function.php?
Soporte de WPBeginner
Normalmente usarías un editor de texto para configurar el contenido en el archivo php.ini. Para tu functions.php, normalmente debería ir al final para que se pueda eliminar más tarde según sea necesario. También es posible que desees consultar con tu proveedor de alojamiento si tienes problemas con estos métodos para ver si pueden ayudarte a aumentar el tamaño del archivo.
Administrador
Ivos G.
Ninguno me funcionó. Pero este lo arregló: agrega esta línea a tu .htaccess:
LimitRequestBody 104857600
Soporte de WPBeginner
Thanks for sharing your solution for this issue
Administrador
Achilleas
Estoy usando Nginx y ya había configurado correctamente los valores para php en el php.ini, pero lo que lo arregló fue poner el mismo valor en el bloque del servidor con la variable client_max_body_size xxxM;
Estoy escribiendo esto esperando que ayude a alguien.
Personal editorial
Thank you for sharing this with us
Administrador
RAHUL
Eso funcionó para mí, gracias
Soporte de WPBeginner
Glad our tutorial could help
Administrador
Adriana Sabo
Ninguna de las opciones me funcionó. No pasó nada cuando probé las dos primeras, y la última provocó un error 500. ¿Hay alguna manera en que puedas ayudar?
Carl
¡Muy útil, gracias!
Md. Rana
The third option is worked for me.
Soporte de WPBeginner
Hola Rana,
Me alegra que te haya funcionado. No olvides seguirnos en Facebook para más consejos y tutoriales de WordPress.
Administrador
Tom Allen
La explicación anterior está bien para sitios alojados, pero ¿qué pasa con nosotros que usamos localhost? Todavía no puedo entender el error de "upload_max_filesize" al descargar Updfaftplus desde WP Plugins o desde un archivo zip de descarga. Soy un principiante y necesito que me guíen en este proceso. Se agradece la ayuda.
crystal
hta access funcionó.
ustedes deben poner el código antes de #END Wordpress
si lo ponen después de #end wordpress entonces el sitio va a un error interno del servidor 500 en mi experiencia con godaddy hosting
Luis Felipe Lino
Gracias.
Jaime Lopes
En la mayoría de los sitios compartidos de cPanel que he configurado:
-cambiar .htaccess derriba todo el sitio (error interno 500)
-agregar archivos php.ini o php5.ini no hace nada
-no hay opción para elegir 'Software del sitio' en cPanel...
Joseph
Muchas gracias. El archivo .htaccess me funcionó
John S
¡Muchas gracias! El archivo .htaccess me funcionó!
Karina
Thanks you so much!!! The .htaccess version worked for me
Megan
¡Gracias! ¡Esto fue de gran ayuda! Ni siquiera podía subir plugins porque mi límite estaba preestablecido en 2MB... Ahora lo he subido a 64MB y puedo trabajar.
¡Gracias!
Okimi Solomon
Muchas gracias. La segunda opción me funcionó. Dios te bendiga
Benj
Modificar el archivo .htaccess me funcionó. Muchas gracias..
Martin Croker
En vidahost (ahora TSOhost).
Agregar el siguiente php.ini me funcionó... sin embargo (y todavía estoy un poco confundido por qué), simplemente ponerlo en la raíz http no funcionó – tuve que duplicar el archivo php.ini dentro de los directorios wp-admin y wp-include dentro de wordpress.
Kabelo
Muy útil. Muchas gracias.
Dwayne S
Estoy en HostGator y actualmente tengo problemas con el tiempo máximo de ejecución. Ocurrió hace unas semanas y el soporte de HostGator arregló el problema. Ahora ha reaparecido y el soporte me dice que no pueden arreglarlo porque estoy en un servidor compartido. El agente incluso bloqueó mi sitio al editar manualmente el archivo htaccess y no verificó si estaba funcionando o no. Sin embargo, recomendó un plugin que editaría el archivo htaccess con código para aumentar el límite, pero no funciona. Supongo que HostGator lo bloquea
Jessany
Agregué el código en la carpeta de funciones .php, y ahora WordPress no carga. ¿Cómo soluciono este problema??
Soporte de WPBeginner
Hola Jessany,
Puedes eliminar el código que agregaste accediendo a tu sitio web a través de FTP o Administrador de archivos en cPanel.
Administrador
bala
sube el código proporcionado arriba al archivo .htaccess, está funcionando
Caleb
Tengo hosting de GoDaddy y los contacté para que me ayudaran a aumentar el tamaño de carga de mis archivos. Fue pan comido — no tuve que crear ningún archivo, agregar código a mi tema, ni nada parecido. Así que para aquellos de ustedes que tienen GoDaddy o controles tipo cPanel, olvídense de trucos y simplemente usen sus configuraciones de administrador.
Aquí está lo que soporte me hizo hacer:
1. Ve a tu cPanel Admin (un panel de hosting similar podría funcionar de manera algo parecida)
2. Desplázate hacia abajo hasta 'Software' y haz clic en 'Seleccionar versión de PHP'
3. Haz clic en 'Cambiar a Opciones de PHP' en la esquina superior derecha ¡Y TADA! ¡Ahí están todas tus Opciones de PHP!
4. Simplemente baja y cambia 'post_max_filesize' y 'upload_max_filesize' a lo que quieras, aplica y guarda tus cambios, y ahora eres un propietario de sitio web seguro y feliz sin necesidad de codificar.
¡Buena suerte!
ZafB
Gracias, funcionó perfecto
Alissa
¡Gracias por publicar esto! ¡Funcionó genial!
Alejandra
¡Muchas gracias! ¡Realmente funcionó!
Paul Palmer
Solución brillante – ¡funcionó perfectamente y fácilmente! Muchas gracias.
Rich Perozich
Esto me funcionó, pero para poder encontrar estos archivos, tuve que llamar a GoDaddy, donde me guiaron a través de estos pasos o nunca habría podido navegar al cPanel Admin sin su ayuda.
1. Inicia sesión en GoDaddy
2. Haz clic en Mis productos en la parte superior izquierda
3. Debajo de Alojamiento web, haz clic en Administrar todo
4. Haz clic en Alojamiento web con Cpanel
5. Haz clic en el ícono de Cpanel Admin
6. Desplázate hacia abajo hasta Software y haz clic en Seleccionar versión de PHP
7. Haz clic en cambiar a opciones de PHP
8. En la parte inferior de la página, haz clic en el número upload_max_filesize y selecciona el número que desees como tamaño máximo de archivo.
9. Haz clic en Aplicar. Funciona. Ahora los tamaños de archivo se pueden cargar al máximo seleccionado.
Chris Sandford
Usuarios de Multisitio:
Si eres un tonto como yo, es posible que hayas intentado de todo sin éxito.
No olvides que si estás usando WordPress Multisite, debes cambiar la configuración de carga para sitios individuales.
Admin de Red > Configuración > Tamaño máximo de archivo de carga
Es posible que aún necesites usar los consejos de este artículo, pero sin cambiar la configuración de carga para multisite, no sabrás si está funcionando.
Stef Thoen
Eres mi héroe. He estado investigando este problema durante demasiado tiempo hasta que finalmente vi tu publicación. Muchas gracias.
Ron
¡Gracias por esto! ¡Esto debería estar en el cuerpo de este artículo!
Hitesh L.
¡FUNCIONÓ! ¡¡¡¡¡¡¡¡¡¡¡¡felicitaciones a ti!
Emanuel Pietri
Método 3 – con .htaccess – me funciona bien con el tema
Stefanos Kargas
¡Gracias! Cambié el archivo .htaccess y funcionó.
haadi
hola. muchas gracias. el tercer método me funcionó
Jim R
La opción 2 funcionó bien. Gracias por la información.
Tor Helge
Funcionó cuando hice el último con .htaccess
mara
¿Alguien aquí ha logrado que esto funcione con Godaddy? Son muy poco útiles. Sé que necesito crear el archivo php.ini (y lo hice), pero ninguna de las soluciones que publicaste funcionó. Cualquier ayuda es apreciada.
WangTuanJie
después del método 3, no pude ver el éxito.
Mahadi
¡¡Gracias, hombre!! ¡¡.htacces funcionó para mí!
Lynn
Wish you wouldn’t assume everyone looking for this solution knows what you mean by our “Theme Functions File” – do you mean functions.php? I’m not an expert, and I’m really good at following precise directions, and don’t want to even put a toe in the water of editing files if I don’t know EXACTLY what file you’re talking about! No clues were provided, like what other code I might look for in the file to know I’m in the right place, etc. So…this didn’t help me at all
Soporte de WPBeginner
Hola Lynn,
Sí, necesitas agregarlo al archivo functions.php de tu tema.
Administrador
Justin
Sí, pero ¿dónde va en el functions.php? ¿Al principio, al final, en medio? ¿Dentro de las comillas?
Soporte de WPBeginner
Hola Justin,
Al final.
jack
gracias, todos esos pasos me ayudaron
Alex
Gracias, el método 3 realmente me funcionó
php_value upload_max_filesize 64M
php_value post_max_size 64M
php_value max_execution_time 300
php_value max_input_time 300
vikram
HI
¿Usas hosting compartido?
shahrin
¡Genial! El método htaccess me funcionó. ¡Estoy tan aliviado, chicos! Gracias de antemano.
Samba Siva
.htaccess method worked for me
nelson
htaccess me funcionó, gracias
Sagar
php.ini me funcionó.
Saludos.
¡Gracias, hombre!
Mituka
Esto me funcionó.
Abre tu archivo .htacess con el bloc de notas.
Omite todo lo que veas y al final.
Pega lo siguiente y guarda.
php_value upload_max_filesize 64M
php_value post_max_size 64M
php_value max_execution_time 300
php_value max_input_time 300
Thomas
¿Dónde exactamente lo pegaste?
# BEGIN WordPress
RewriteEngine On
RewriteBase /
RewriteRule ^index\.php$ – [L]
RewriteCond %{REQUEST_FILENAME} !-f
RewriteCond %{REQUEST_FILENAME} !-d
RewriteRule . /index.php [L]
# END WordPress
php_value upload_max_filesize 64M
php_value post_max_size 64M
php_value max_execution_time 300
php_value max_input_time 300
¿Está antes de la declaración #END WordPress? (Me da un error cuando lo hago)
¿O debería ir después de la declaración #END WordPress?
Soporte de WPBeginner
Hola Thomas,
Necesitas pegarlo al final de tu archivo .htaccess, después de la línea #END WordPress.
Administrador