¿Alguna vez has intentado subir un archivo a tu sitio WordPress y te has topado con un muro de ladrillos? Es muy frustrante cuando no puedes subir esa imagen, plugin o tema que necesitas. Nuestros lectores a menudo nos piden ayuda con problemas de subida de archivos, ya que pueden llevar su flujo de trabajo a un rastreo.
A veces, estos límites de subida de archivos pueden impedirte añadir contenido a tu biblioteca de medios o instalar esos plugins y temas más grandes que necesitas. Es como estar atado de manos. Y es aún más molesto cuando no sabes cómo corregirlo.
Pero no te preocupes, estamos aquí para ayudarte. Nos encanta que WordPress sea una plataforma tan configurable, y a menudo hay múltiples maneras de resolver el mismo problema.
En esta guía, te mostraremos las formas más sencillas de aumentar el tamaño máximo de subida de archivos en WordPress. Te ayudaremos a superar esas limitaciones para que puedas volver a hacer lo que más te gusta: ¡dirigir tu sitio web!
¿Por qué aumentar el tamaño máximo de subida de archivos en WordPress?
Tu proveedor de alojamiento de WordPress establecerá por defecto un tamaño máximo de subida de archivos cuando accedas e instales WordPress. Tu proveedor de alojamiento define este límite, que suele oscilar entre 2 MB y 500 MB.
Para la mayoría de los propietarios de sitios web en WordPress, este límite será más que suficiente.
Sin embargo, hay ocasiones en las que necesitará aumentar este límite para no encontrarse con errores de subida.
Por ejemplo:
- Tienes un sitio web de fotografía y necesitas subir imágenes grandes.
- Su porfolio de diseño o fotografía tiene imágenes grandes.
- Quieres instalar un tema o plugin de WordPress más grande.
- Quieres vender productos digitales como libros electrónicos, fotos, vídeos, etc.
- Actualiza regularmente el contenido y añade audio, fotos y mucho más.
Dicho esto, vamos a mostrarle cómo puede aumentar el tamaño máximo de subida de archivos en su sitio WordPress.
Nota: Ten en cuenta que mostrar muchos archivos grandes en tu sitio web puede ralentizar seriamente su velocidad y rendimiento. Por eso, normalmente recomendamos no subir nunca vídeos a WordPress.
Dado que la mayoría de los usuarios tienen diferentes configuraciones de alojamiento de WordPress, cubriremos lo siguiente:
- How to Check Your Maximum File Upload Size Limit in WordPress
- Method 1: Contact Your WordPress Hosting Provider
- Method 2: Create or Edit an Existing php.ini file
- Method 3: Add Code to Your WordPress Theme functions.php File
- Method 4: Add Code to Your .htaccess File
- Method 5: Use a WordPress Plugin to Increase File Upload Size
Cómo comprobar el límite de tamaño máximo de subida de archivos en WordPress
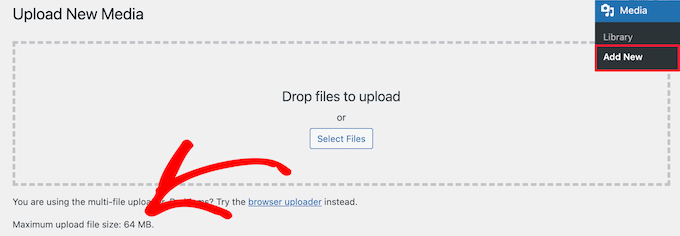
WordPress mostrará automáticamente el límite de tamaño máximo de subida de archivos cuando esté subiendo imágenes u otros medios.
Para comprobarlo, simplemente vaya a Medios ” Añadir nuevo en su panel de administrador de WordPress, y verá el límite de tamaño máximo de subida de archivos para su sitio WordPress.
Ahora que ya sabe cómo encontrar el límite de tamaño, vamos a mostrarle cómo aumentar el tamaño máximo de subida en WordPress.
Método 1: Póngase en contacto con su proveedor de alojamiento de WordPress
Una de las formas más sencillas de aumentar el tamaño máximo de subida de archivos en WordPress es ponerse en contacto con su proveedor de alojamiento de WordPress.
Se trata de una tarea relativamente sencilla para su equipo de atención al cliente y puede realizarse en un par de minutos.
Para los principiantes, esto puede ser mucho más fácil que añadir código a WordPress y editar los archivos del servidor.
Sólo tienes que ir al sitio web de tu proveedor de alojamiento, como Bluehost, y acceder.
A continuación, haga clic en el icono “Chat” situado en la parte inferior de la pantalla. A continuación, puede solicitar al personal de soporte que aumente el tamaño de subida de archivos en su sitio de WordPress.
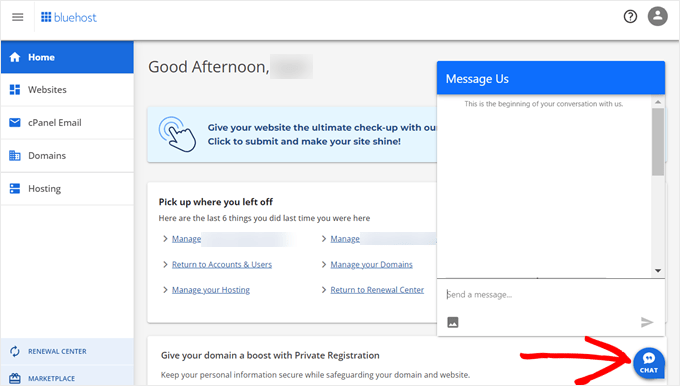
También puede contactar con el soporte desde el Escritorio de su cuenta de alojamiento.
Método 2: Crear o editar un archivo php.ini existente
Otra forma de aumentar el tamaño máximo de subida de archivos es creando o editando un archivo llamado php.ini. Este archivo controla una gran cantidad de ajustes para su entorno de alojamiento de WordPress.
La mayoría de los proveedores de alojamiento de WordPress, como Bluehost, disponen de un cPanel fácil de usar que te ayudará a gestionar tu sitio web.
Si tu alojamiento web tiene un Escritorio cPanel, entonces puedes aumentar el tamaño de subida de archivos a través de las herramientas integradas.
Nota: Lo siguiente es del cPanel de Bluehost. Sin embargo, la mayoría de los proveedores de alojamiento compartido tendrán pasos similares.
Encontrará un botón cPanel en la parte inferior de la pestaña Alojamiento en Bluehost.
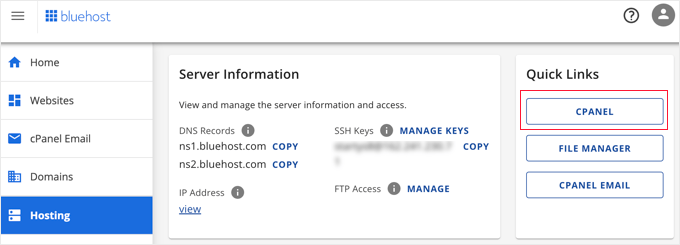
Al hacer clic en este botón se abrirá su Escritorio de cPanel.
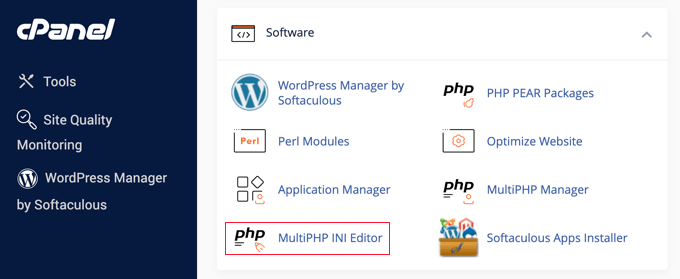
Ahora tienes que desplazarte hasta la sección Software y hacer clic en ‘MultiPHP INI Editor’.
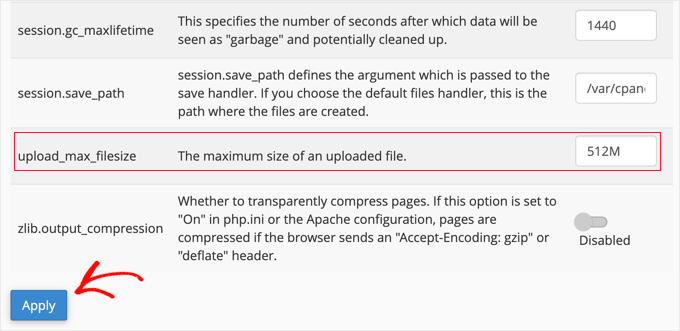
A continuación, desplácese hasta la sección “upload_max_filesize” e introduzca un nuevo tamaño máximo de archivo en la casilla.
A continuación, haga clic en el botón “Aplicar”.
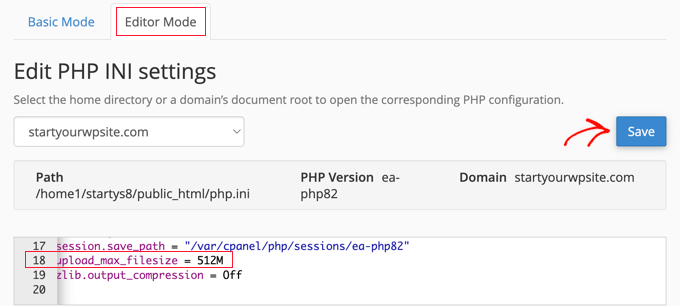
También puede hacer clic en la pestaña del menú “Modo editor” y, a continuación, modificar el tamaño máximo de subida de archivos directamente en el editor.
Tienes que editar la sección ‘upload_max_filesize’ para aumentar el tamaño de subida de tus archivos.
Cuando hayas terminado, sólo tienes que hacer clic en el botón “Guardar”.
Editar php.ini añadiendo código
Si su proveedor de alojamiento actual no ofrece la opción de cPanel, tendrá que editar este archivo manualmente.
Para ello, puede utilizar un cliente FTP o la opción de gestión de archivos de su panel de control de alojamiento de WordPress.
Si utiliza alojamiento compartido, es posible que no vea el archivo php.ini en el directorio de su alojamiento. Si no lo ves, simplemente crea un archivo llamado php.ini y súbelo a tu carpeta raíz.
A continuación, añada el siguiente fragmento de código al archivo:
1 2 3 | upload_max_filesize = 256Mpost_max_size = 256Mmax_execution_time = 300 |
Puedes modificar el límite de ‘256M’ al tamaño de archivo que necesites para tu blog de WordPress.
Método 3: Añadir código al archivo functions.php de su tema de WordPress
Este método consiste en añadir código al archivo functions. php de su tema de WordPress.
En lugar de editar el archivo directamente, recomendamos usar WPCode. Es el mejor plugin de fragmentos de código que te permite añadir código a tu sitio web sin romperlo.
Si no lo ha hecho antes, consulte nuestra guía para principiantes sobre cómo añadir código personalizado en WordPress.
En primer lugar, debe instalar el plugin gratuito WPCode. Para más detalles, consulta nuestra guía paso a paso sobre cómo instalar un plugin de WordPress.
Una vez activado, debe navegar a Fragmentos de código ” + Añadir fragmento.
Tendrá que pasar el ratón por encima de la opción “Añadir su código personalizado (nuevo fragmento)” y, a continuación, hacer clic en el botón “+ Añadir fragmento de código personalizado”.

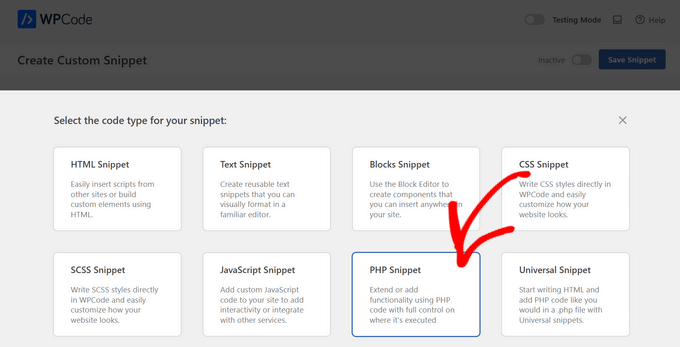
A continuación, debe elegir “Fragmento de código PHP” como tipo de código en la lista de opciones que aparece.
En la siguiente pantalla, introduzca un nombre para su nuevo fragmento de código, que puede ser cualquier cosa que le ayude a recordar para qué sirve el código.
A continuación, puede copiar y pegar el siguiente fragmento de código en ‘Vista previa del código’. Asegúrate de cambiar ‘256M’ por el tamaño máximo de archivo que necesites:
1 2 3 | @ini_set( 'upload_max_size' , '256M' );@ini_set( 'post_max_size', '256M');@ini_set( 'max_execution_time', '300' ); |
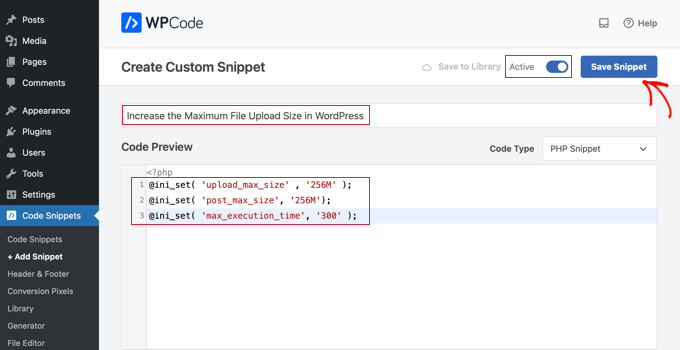
Por último, cambie el conmutador de la parte superior a “Activo” y, a continuación, haga clic en el botón “Guardar fragmento de código”. El código se ejecutará en su sitio web.
Método 4: Añadir código a su archivo .htaccess
Otra forma de aumentar el tamaño máximo de archivo es modificando el archivo .htaccess. Este archivo controla los ajustes de configuración de alto nivel de su sitio web.
Para ello, debe acceder al servidor de su sitio web a través de FTP. Si no ha hecho esto antes, consulte nuestra guía sobre cómo usar FTP para subir archivos a WordPress para principiantes.
A continuación, localice el archivo .htaccess en la carpeta raíz de su sitio web.

Si no puedes encontrar tu archivo .htaccess, entonces podría estar oculto por tu gestor de archivos o cliente FTP. Para obtener más información, consulte nuestra guía sobre por qué no puede encontrar el archivo .htaccess en su sitio de WordPress.
A continuación, debe añadir el siguiente fragmento de código a su archivo .htaccess:
1 2 3 4 | php_value upload_max_filesize 256Mphp_value post_max_size 256Mphp_value max_execution_time 300php_value max_input_time 300 |
Para aumentar aún más el tamaño máximo de subida de archivos, sólo tiene que cambiar ’64M’ por el tamaño que necesite.
Método 5: Utilizar un plugin de WordPress para aumentar el tamaño de la subida de archivos
Otra forma de aumentar el límite máximo de subida de archivos es usando el plugin WP Increase Upload Filesize. Si no te sientes cómodo añadiendo código a WordPress, entonces esta podría ser una buena opción para ti.
Lo primero que tienes que hacer es instalar y activar el plugin. Para más detalles, consulte nuestra guía sobre cómo instalar un plugin de WordPress.
Una vez activado, vaya a Medios ” Aumentar límite de subida en su panel de administrador de WordPress.
Esto le lleva a una pantalla en la que puede seleccionar un nuevo tamaño de archivo subido en el desplegable “Elegir tamaño máximo de archivo subido”.
A continuación, haz clic en el botón “Guardar cambios”.

Nota: El tamaño máximo de subida de archivos lo establece tu proveedor de alojamiento. Si necesita un límite de tamaño de archivo superior al que aparece en el desplegable, deberá ponerse en contacto con su proveedor de alojamiento y solicitar un aumento del límite.
Tutorial en vídeo
Si no te gusta seguir instrucciones escritas, puedes comprobar nuestro tutorial en vídeo:
Esperamos que este artículo te haya ayudado a aumentar el tamaño máximo de subida de archivos en WordPress. Puede que también quieras ver nuestra guía sobre cómo añadir tipos de archivo adicionales para ser subidos en WordPress y nuestra selección de plugins y consejos de expertos para mejorar el área de administración de WordPress.
If you liked this article, then please subscribe to our YouTube Channel for WordPress video tutorials. You can also find us on Twitter and Facebook.


Being Stealth
Adding php.ini file in wp-admin folder worked for me. Yahoooo thanks.
Mouad Chafai
Thanks php.ini method worked perfectly.
i’ve created the php.ini
wp-adminphp.ini
add lines:
upload_max_filesize = 64M
post_max_size = 64M
max_execution_time = 300
thanks for the article.
Saleh Shaukat
Thanks .htaccess worked for me perfectly !!.
Dan Rosenberg
PHP.INI method worked perfectly. Thanks!
Ben Peacock
Sorry please find this instead Login to the root machine type the following command nano /usr/lib/php.ini
find ; Maximum size of POST data that PHP will accept.
post_max_size = 2M change this to 64
Save and exit and then you should be able to upload what you need hope this helps
QuangPham
Thanks for the instructions on how to fix.
Voicu Ioan Virgil
Thanks, great tutorial !
Maria McCarthy
Adding the php.ini file to my wp-admin folder SPECIFICALLY worked for me as well! Thanks everyone! Only took me almost 4 hours to find a page that had the info which would work for me – lifesavers!
pete
found the php.ini worked in wp-admin network php.ini
Tabassum Javaid
htaccess method works fine for me. thanks
Mike
with some host ( godaddy ) for example, there may be some additional steps.
And to what php you are running. For godaddy with php5, rename php.ini to php5.ini and remember if you have accuracies running, you will have to temp. end them before the file will even take over, or wait awhile for it.
System Processes / End all
jaymz
Many thanks for the article. For self-hosted there’s another way as methods 2 and 3 didn’t work for me as the .htaccess change had no effect and neither did adding a php.ini file in /wp-admin. It was simply a case of finding the existing php.ini file for Apache. On Ubuntu I ran;
sudo find / -name php.ini
This found my ini file in /etc/php5/apache2/
All that was needed was to locate the parameters and update the values for;
upload_max_filesize
post_max_size
max_execution_time
Thanks for getting me there!
D Winzell
Thanks for writing this. The php.ini does need to be in the wp-admin directory to function correctly. Just checked my host (Vaurent) and they allows up to 105M file uploads so I am going to find something that size and see if it makes it’s merry way up to my blog.
Matt
I just want to add, using godaddy you cannot use the htaccess method, it will throw you into a 500 internal service error.
You must use the php.ini method. Only difference will be you have to have a php.ini and a php5.ini and the lines must be added to both. The files need to be in the root directory of where the wordpress install is, not in the wp-admin folder, outside of it.
Also if you have multiple wordpress installations This has to be done and placed into each directory that each wordpress installation is located.
GSJha
Very Good Post.
sandeep
php_value upload_max_filesize 64M
php_value post_max_size 64M
php_value max_execution_time 1500
php_value max_input_time 1500
i use these values in .htaccess and it works !
thanks
Thyme
So I did all of those and changed the php.ini in the /etc folder (my site is on mediatemple’s grid-service) and nothing was working but then I vaguely remembered there was something I had to change in the network settings if my installation was multisite and there it was. Ugh.
So yeah, if you’ve got a WordPress network, go to your network settings and change the max file size upload near the bottom of the page.
Alex
This is the only thing that worked for me, I tried all the options, I’m on 1&1
memory_limit = 32M
upload_max_filesize = 32M
post_max_size = 32M
file_uploads = On
** Size can be anything
The key was the “file_uploads” line
Place this in the /wp-admin/ folder.
Kristina
Worked for me! I’m on Bluehost.
Thanks for your post
Brandon
this worked for me after everything else hadn’t. I’m so relieved!
I’m also on 1&1. Once I added the “file_uploads = On” line to my php.ini file it worked like a charm!!
thanks!
Hafeez Ansari
Thank you Alex, This works for me in /wp-admin/ folder. Problem solved.
Jordan Miller
Thank you so much
Mike
Awesome! thanks Alex. I was limited to 2mb…really useful.
Sam
Alex you are the great! Your solution worked for me! Many thanks!
Johnny T
Genius! This worked for me! Just to clarify. Create a php.ini file in the wp-admin folder and only add the lines of code in Alex’s post. FTP this to your server and you’re good to go. Thanks Alex. You are a genius!
Luan
Thanks you Johnny and Alex! It was really helpful.
vanniee
what is the name of the file?
Togi Tan
But, it’s not working on free hosting. All methods I’ve tried. I think this might depend on server.
Duncan
Wow wow wow wow! Thank you for that clear comment that helped me get it to work. You are a star.
Nomo
Alex – Your post continues to be helpful. Very much appreciated!
Noor
Worked by .htaccess method. Salute man.
Bogdan
Great advice. My upload limit was 8MB and I only tried the htaccess trick and it worked, it increased to 64MB. I tested it and it is owrking beautiful! Thank you so much for your great advice!
VoidnessMD
Important thing to note: Using the php.ini method requires that the file be located in the wp-admin folder, not the root of your WP installation.
DJ
THANKS!! This sorted it out for me on my end
David Connolly
Superb… clear and the final solution worked.
a big thank you
Bongo
This website is the coolest for learning WP! Keep up the good work guys…more please…more! lol
Editorial Staff
Thanks for the kind words
Admin
Ido Schacham
Finally, a post that clearly explains how to change the memory limit in WP. Thanks!
mostafa
hi.
i successfully did it with the third method. my upload size was 8 M, but now its 64 M. for me its more than enough.
Thanks a million.
by the way i’m from Iran.
Rowan Evenstar
The creating a php.ini file and popping it on the route sorted it straight away!
Cheers, much appreciated!
assassinateur
thnx, but i am in a shared hosting so nothing work, i did put the php.ini in wp-admin and in the blog folder and in the homefolder and dodnt work also .htaccess didnt work changed the theme and didnt work
Arvind Kukreti
Adding code in .htaccess file might throw you 500 Internal Error… the best way is create a php.ini file and upload it in wp-admin folder
Stephen Afije
Waooo that was brilliant one there all i did was to create php.ini and uploaded to the wp-admin folder it worked like no other thing thanks
leo
htaccess method works fine for me. thanks
Andrew Lilly
Hi,
I have done all of the above and still wont let me import an 11mb xml file. i need it as its got 1500 products on i need to import.
I have spoken to my virtual server provider 1and1 and they said all i need to do is add the code to the .htaccess file but it doesnt seem to work
Please someone help
Editorial Staff
If none of the above works, then the only person who can help you is your host.
Admin
Ali Amer
It may be related to MIME Type. In that case, resolve it from cpanel
Dominique
None of this worked for me. I tried them all. I am using WPEngine to host.
Any suggestions?
Editorial Staff
Ask WPEngine to increase the limit for you.
Admin
Thad
The htaccess method worked for me. Thanks for the post. Good info, well presented.
Richard
php.ini option worked for me but on the php.ini file in /wp-admin directory
Mike
perfect – worked a treat – set to 200MB and works fine.
Matheus M.
In localhost work the .htaccess. But in host only php.ini. Thanks for help.
dan
Yes, php.in works in /wp-admin. thanks
marin
Thanks htaccess worked for me appreciate it.
Makarand Mane
I have hosting on mediatemple. First two methods are not worked me. Only htaccess methos is worked for me.
Thanks.
Gavin
I found that php.ini was hidden in the cgi-bin folder which some shared servers have in their root directories. I amended this as above (AND added a php5.ini jut in case) but until I’d amended this, nothing else worked. Thanks for the VERY useful thread!
Cath
Thanks Gavin, none of the other methods worked for me then I saw your comment, there were php.ini and php4.ini files were in the cgi-bin folder. I found the relevant code in both files – post_max_size = , and upload_max_filesize = , amended these and now all works fine.
Jarod Billingslea
Thank you very much for this article!
Void lon iXaarii
thank you so much! had tried so many solution and your .htaccess finally worked
Anthony
The only thing that worked for me was to create/edit a php.ini file and add the following:
memory_limit = 100M upload_max_filesize = 100M post_max_size = 100M file_uploads = On
and uploading it to the wp-admin folder.
Alan
Option 2 worked perfectly fine, though I had to place the php.ini file into the wp-admin folder instead of the root directory.
phpinfo was detecting the php.ini file in the root, but not WordPress.
I currently have WP 3.2 installed…
RPaterson
Thanks for that extra tip, this is what finally worked for mine
arun
thanks anthony, your method saved me a lot.
Quest The Wordsmith
This is exactly what worked for me as well.
RamiAlloush
Thx
Snowboard
thx for this post , but what is the default limit ?
almb1111
64 MB
kat1111
It was 8MB, but I got it to 192 MB @almb1111
kat1111
Ty for responding, I finally got some help with it, I needed to change the PHP to PHP-5.
kat1111
I am evidently newer than most here, I don’t understand which is “root” directory, is it Editor under the Appearance tab? Also, I don’t undertand how to get to hcaccess. Any help is appreciated.
jameserie
htaccess method works for me. – cheers!
nycxs
If you are using PHP5 the file should be called php5.ini and be in the root of the shared folders.
MyDreamDinZ
What is the highest limit for upload
can i set it to 1024M ?
alexlee.cs
The .htaccess method works for me. Thanks.
rajkanuri
Thanks for the code.. it is really helpful for me..
pranjalgupta2009
Yes ! putting php.ini also in wp-admin works for me. thanks
Snipsley
Thanks, but neither of this worked for me.
But I found the solution!
I had to place that php.ini to /public_html AND /public_html/wp-admin and it works!
Biju Subhash
ya..the same thing works me too..
Thanks Snisley
Trond
Great! This worked for me as well I run WordPress on an MS Server 2008 with IIS 7.5 from my host provider, btw
kenseneff
Worked for me as well. Thanks!
Kiran
Thanks dude. It’s works for me.
Rollie Osayan
Yes. It is also working here. thanks
Kaushik Biswas
At the end of a post, I want to display recent posts from that specific category under that post – how can I do this?