¿Te encuentras cambiando constantemente entre WordPress y un editor de fotos sólo para poner en escala de grises las imágenes antes de subirlas? Es un proceso tedioso e ineficaz editar cada foto individualmente de antemano.
Por suerte, tras años de experimentación con WordPress, hemos descubierto una forma sencilla de aplicar automáticamente una escala de grises a las imágenes durante su subida, lo que le ahorrará un tiempo muy valioso.
En este artículo, le mostraremos cómo aplicar una escala de grises a las imágenes en WordPress mientras las sube a su sitio, paso a paso.

¿Cuándo utilizar imágenes en escala de grises en WordPress?
Las imágenes en escala de grises solo contienen información acerca de la cantidad de luz que hay en la imagen. Los colores de la imagen muestran diferentes tonos de gris, que varían entre el blanco y el negro.
En determinadas situaciones, el uso de imágenes en escala de grises puede ser beneficioso para su sitio web WordPress. Por ejemplo, puede utilizarla para mejorar la legibilidad de los objetos mostrados en la imagen.
Por otro lado, las imágenes en escala de grises se utilizan habitualmente para el procesamiento de imágenes debido a su pequeño tamaño. Permite a los desarrolladores ejecutar operaciones complejas en menos tiempo.
Dicho esto, veamos cómo puedes convertir tus imágenes a escala de grises en WordPress cuando las subes.
Escala de grises de imágenes en la subida en WordPress
Cuando se trata de añadir imágenes en WordPress, tendría que editarlas antes de subirlas utilizando un software de edición de fotos como Photoshop y convertir las imágenes en color a escala de grises.
Si tienes que subir cientos o miles de imágenes, editarlas manualmente puede llevarte mucho tiempo.
Sin embargo, puede convertirlas automáticamente en imágenes en escala de grises al subirlas. Para empezar, todo lo que tienes que hacer es añadir el siguiente código al archivo functions.php de tu tema:
1 2 3 4 5 6 7 8 9 10 11 12 13 14 15 16 17 18 19 20 21 22 23 24 25 26 27 28 29 30 31 32 33 34 | add_filter('wp_generate_attachment_metadata','rb_bw_filter'); function rb_bw_filter($meta) { $path = wp_upload_dir(); // get upload directory $file = $path['basedir'].'/'.$meta['file']; // Get full size image $files[] = $file; // Set up an array of image size urls foreach ($meta['sizes'] as $size) { $files[] = $path['path'].'/'.$size['file']; } foreach ($files as $file) { // iterate through each image size // Convert image to grayscale credit to http://ottopress.com/2011/customizing-wordpress-images/ list($orig_w, $orig_h, $orig_type) = @getimagesize($file); $image = wp_load_image($file); imagefilter($image, IMG_FILTER_GRAYSCALE); switch ($orig_type) { case IMAGETYPE_GIF: imagegif( $image, $file ); break; case IMAGETYPE_PNG: imagepng( $image, $file ); break; case IMAGETYPE_JPEG: imagejpeg( $image, $file ); break; } } return $meta;} |
Una forma sencilla de añadir código a los archivos del tema es utilizar el plugin WPCode para WordPress.
Es el mejor plugin de fragmentos de código que te ayuda a ejecutar fragmentos de código sin necesidad de editar manualmente el archivo function.php de tu tema. De esta manera, usted no tiene que preocuparse de romper su sitio.

En primer lugar, tendrás que descargar e instalar el plugin gratuito WPCode en tu sitio. Si necesitas ayuda, sigue nuestra guía sobre cómo instalar un plugin de WordPress.
Nota: La versión gratuita de WPCode ofrece todo lo necesario para añadir fácilmente código personalizado en WordPress. Para obtener características más avanzadas como una biblioteca privada de fragmentos de código en la nube, fragmentos programados, píxeles de conversión y mucho más, puedes actualizar a WPCode Pro.
Una vez activado, puede dirigirse a Fragmentos de código ” + Añadir nuevo desde su escritorio de WordPress.
A continuación, vaya a la opción “Añadir su código personalizado (nuevo fragmento)” y haga clic en el botón “Usar fragmento”.

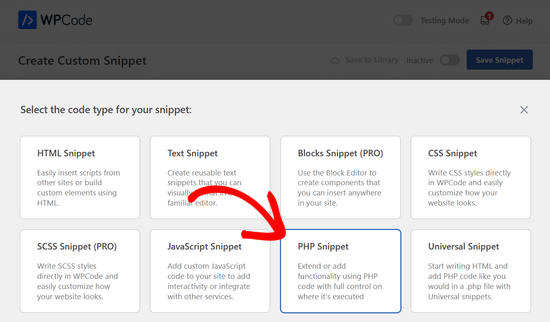
A continuación, debe seleccionar “Fragmento de código PHP” como tipo de código entre las opciones que aparecen.
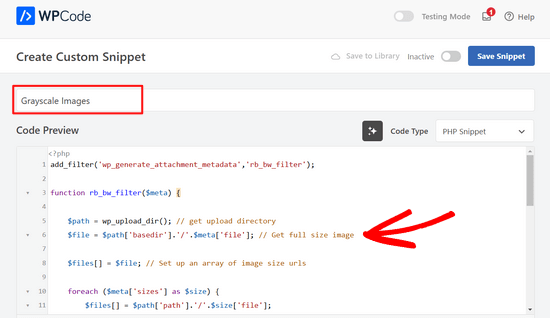
Ahora, en la página Crear fragmento de código personalizado, introduzca un nombre para el fragmento. Puede ser cualquier cosa que te ayude a recordar para qué sirve el código.
A continuación, pegue el código anterior en el área “Vista previa del código”.
Una vez introducido el código, puede desplazarse hasta la sección “Inserción”.
Aquí, puede dejar seleccionada la opción ‘Auto Insertar’. Esto insertará y ejecutará automáticamente el código por usted.

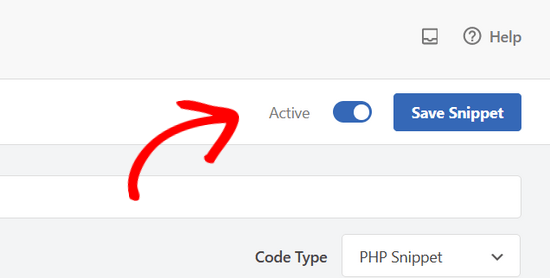
Por último, vuelva a la parte superior de la pantalla y cambie el interruptor de “Inactivo” a “Activo” y haga clic en el botón “Guardar fragmento”.
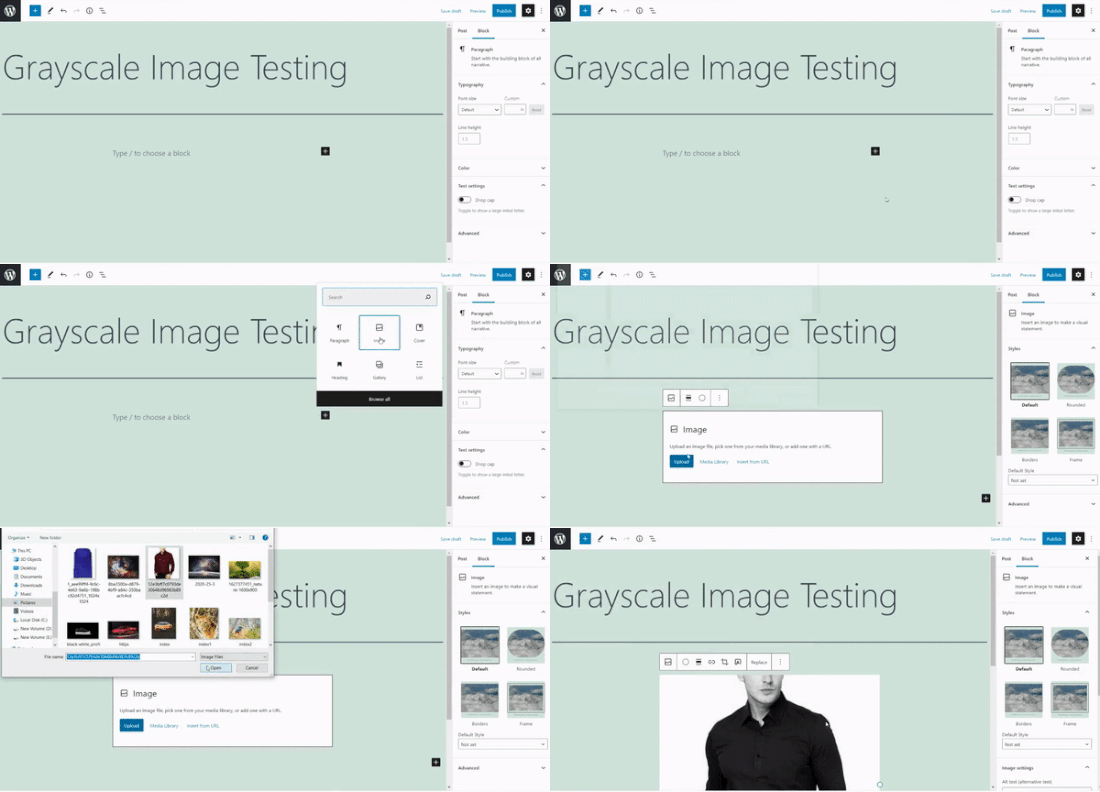
A continuación, puedes probar el código editando o añadiendo una nueva página. Cuando estés en el editor de WordPress, haz clic en el botón “+” y añade un bloque de imagen.
Ahora puedes subir cualquier imagen a tu blog de WordPress y se convertirá automáticamente en una imagen en escala de grises.
Esperamos que este artículo te haya ayudado a aprender cómo poner imágenes en escala de grises en WordPress. También puedes comprobar nuestra guía sobre cómo añadir el modo oscuro a tu sitio de WordPress y nuestras selecciones de expertos sobre el mejor software de diseño web.
If you liked this article, then please subscribe to our YouTube Channel for WordPress video tutorials. You can also find us on Twitter and Facebook.


Tomas Kapler
Great tip, i would just like to mention, that for many usages it might be better to simply do this via CSS filter, e.g.
img.bw {
filter: grayscale(1);
}
you can even e.g. show b/w by default and color on hover, or you can do animation from greyscale to full color and back, e.g.
img.bw {
filter: grayscale(0);
}
img.bw.grey {
filter: grayscale(1);
transition-property: filter;
transition-duration: 1s;
}
i also do not think, that wp_generate_attachment_metadata filter is the proper one, that should be used because of its calling in meta creation not only image creation and making second image manipulation, but the proper solution would be much longer, so i understand why it is done this way
rok
It works nice but when uploading, WP 4.3 throws error in media library.
i think have applied all fixes written in comments, but still error.
my code looks like this:
add_filter(‘wp_generate_attachment_metadata’,’themename_bw_filter’);
function themename_bw_filter($meta) {
$time = substr( $meta[‘file’], 0, 7); // <- get the correct time of the upload
$file = wp_upload_dir( $time ); // <- locates the correct upload directory
$file = trailingslashit($file[‘path’]).$meta['sizes']['slide-pic']['file'];
if( $file ) {
list($orig_w, $orig_h, $orig_type) = @getimagesize($file);
}
$image = wp_load_image($file);
imagefilter($image, IMG_FILTER_GRAYSCALE);
switch ($orig_type) {
case IMAGETYPE_GIF:
imagegif( $image, $file );
break;
case IMAGETYPE_PNG:
imagepng( $image, $file );
break;
case IMAGETYPE_JPEG:
imagejpeg( $image, $file );
break;
}
return $meta;
}
Kim
Will this change all pictures in word press to grayscale or only newly updates ones?
Tomaž Zaman
I know I’m a bit late to the discussion, but I just had the same problem with an error (that others report):
imagefilter() expects parameter 1 to be resource, string givenThis happens when you try to upload image through media modal while editing a post, older than the current month which apparently confuses WordPress which directory the original image is in and which directory it should save the grayscaled image in.
This is the solution:
<?php

add_filter('wp_generate_attachment_metadata','themename_bw_filter');

function themename_bw_filter($meta) {

  $time = substr( $meta['file'], 0, 7); // <- get the correct time of the upload

  $file = wp_upload_dir( $time ); // <- locates the correct upload directory

  $file = trailingslashit($file['path']).$meta['sizes']['themename-bw-image']['file'];

  list($orig_w, $orig_h, $orig_type) = @getimagesize($file);

  $image = wp_load_image($file);

  imagefilter($image, IMG_FILTER_GRAYSCALE);

  switch ($orig_type) {

    case IMAGETYPE_GIF:

      imagegif( $image, $file );

      break;

    case IMAGETYPE_PNG:

      imagepng( $image, $file );

      break;

    case IMAGETYPE_JPEG:

      imagejpeg( $image, $file );

      break;

  }

  return $meta;

}
endul
how to change, result filter image to specific folder/directory
geertvdheide
One addition: I’ve added a few lines to get around the issue of having two images with the same file name, caused by having two add_image_size calls with the same size. The additional code was found here:
http://bavotasan.com/2011/create-black-white-thumbnail-wordpress/
mklemme
@geertvdheide
If you wanted to add multiple size support, try what I use:
if ( function_exists( ‘add_theme_support’ ) ){
add_theme_support( ‘post-thumbnails’ );
set_post_thumbnail_size( 50, 50, true );
add_image_size( ‘medium-thumb’, 660, ”, true );
add_image_size( ‘large-thumb’, 960, ”, true );
add_image_size( ‘small-thumb’, 100, ”, true );
}
(The height is not defined, only the width.)
you would have to add the different names to make the function apply to them all:
[‘medium-thumb’ , ‘large-thumb’ , ‘small-thumb’] in the filter code.
Calling the thumbnail in your theme is the same listed in the article:
Mike Logan
Excellent idea, almost 10 years later this is still handy.
geertvdheide
Thanks for sharing this code! Except I’m running into a weird issue when trying to implement it. It’s related to the uploaded image’s size (pixel size, meaning its dimensions). Copied the code literally to my theme’s functions.php, and it works a charm with images larger than the size specified in the add_image_size call. But when using an image smaller than or equal to the size specified, the uploader in WordPress gives me errors and doesn’t process the image size (either from the media section of the admin environment, or from a specific post or page). The error:
Warning: imagefilter() expects parameter 1 to be resource, string given.
Ssome other stuff in the error as well, but this seems to be the main cause. The image data given to the imagefilter function must not be valid or doesn’t exist?
Any idea what’s causing this? The only real difference between my situation and a clean install is that I’ve also added a few other add_image_size calls for other purposes in my site. I’m also adding the same size twice (one black/white, one regular), but that doesn’t seem to be a problem with the larger images.
Ed Nailor
@GEERTVDHEIDE
and for others that need this:
When the script is converting the image to greyscale and the file uploaded does not fit the file size, this causes the script to break. To prevent this, simply add a quick if() conditional to make sure you have the $file.
$file = trailingslashit($file[‘path’]).$meta[‘sizes’][‘themename-bw-image’][‘file’];
if( $file ) {
list($orig_w, $orig_h, $orig_type) = @getimagesize($file);
——– remainder of code until ——–
return $meta;
}
This will check to make sure the file size you have requested exists before it tries to convert it.
Hope that helps!
frankiegershwin
@Otto42 Thanks for offering. I will.
Otto42
@frankiegershwin bummer! Feel free to email me directly for code help. otto@wordpress.org
frankiegershwin
@Otto42 thank you! I had a bit of a hard time, actually and had to undoe it will pick it up tomorrow. It’s a good way to mix it up onsite
Otto42
@frankiegershwin Lemme know if you need help. I added a way to do sepia tones too in my comments on the original post: http://t.co/avDNNEX
rodhk
@rodriguezhernan vaya idiotez de truco…. madremua tocar el codigo para eso
wpbeginner
@Otto Thanks for the comment Otto. Updated the post as well
Otto
Note that people should change “themename” to be the name of their theme instead.