Al configurar un sitio web WordPress, a veces la gente crea accidentalmente su sitio en una carpeta llamada ‘wordpress’. Esto puede hacer que la dirección de su sitio web tenga un aspecto extraño, con “/wordpress/” en medio. En lugar de http://www.yoursite.com/, puede parecer http://www.yoursite.com/wordpress/.
A lo largo de los años, muchos de nuestros lectores nos han preguntado cómo solucionar este problema. Tener /wordpress/ en la dirección de su sitio web puede parecer poco profesional y podría confundir a sus visitantes.
En este artículo, le mostraré cómo eliminar /wordpress/ de la URL de su sitio, haciendo que la dirección de su sitio web tenga un aspecto limpio y profesional, y sea más fácil de recordar para la gente.
Nota: El método mostrado en este tutorial también funciona para otros subdirectorios.
¿Por qué mi sitio web tiene /wordpress/ en su URL?
WordPress es bastante fácil de instalar, y la mayoría de las empresas de alojamiento de WordPress ofrecen instaladores rápidos de WordPress en sus paneles de control de alojamiento.
Sin embargo, algunos principiantes que instalan su sitio web WordPress manualmente pueden acabar instalándolo accidentalmente en un subdirectorio. La mayoría de las veces, este subdirectorio se llama ‘wordpress’.
Esto suele ocurrir porque los usuarios acaban subiendo la carpeta de wordpress que encuentran dentro de la descarga oficial de WordPress.org.
Veamos cómo corregirlo fácilmente y eliminar /wordpress/ de la URL de tu sitio. Vamos a cubrir tres métodos, y usted puede utilizar estos enlaces para saltar a la que desea utilizar:
Método 1: Empezar de nuevo con una nueva instalación de WordPress
Si acabas de instalar WordPress y no hay contenido en tu sitio web, puedes empezar de nuevo.
Simplemente borre la instalación actual y siga las instrucciones de nuestro tutorial de instalación de WordPress para reinstalar WordPress correctamente.
Si ya ha añadido contenido a su sitio web, existen dos formas sencillas de quitar /wordpress/ de la URL de su sitio. Los cubriremos en los Métodos 2 y 3.
Método 2: Cambiar la dirección de su sitio WordPress
Si ya tienes un sitio WordPress, este método es más fácil y rápido. El inconveniente de este método es que los archivos de medios, como las imágenes, seguirán utilizando /wordpress/ en su URL.
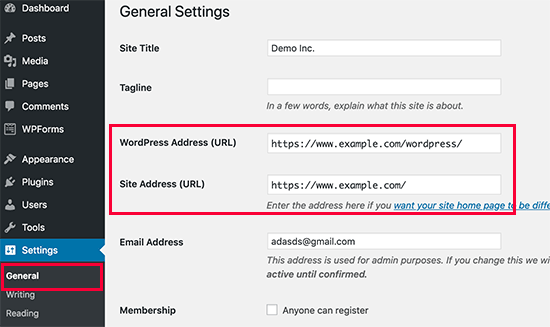
En primer lugar, debe acceder a su área de administrador de WordPress e ir a Ajustes ” General. Observará que los campos “Dirección de WordPress” y “Dirección del sitio” tienen la misma URL.
Debe cambiar la opción “Dirección del sitio” y dirigirla a su dominio raíz, por ejemplo, http://www.example.com y dejar la opción “Dirección de WordPress” como está.
Una vez hecho esto, haz clic en el botón “Guardar cambios” para guardar tus ajustes.
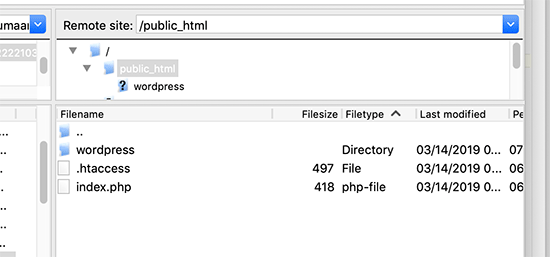
A continuación, debe conectarse a su sitio web mediante un cliente FTP. Una vez allí, vaya al directorio /wordpress/ y descargue los archivos .htaccess e index. php en su ordenador.
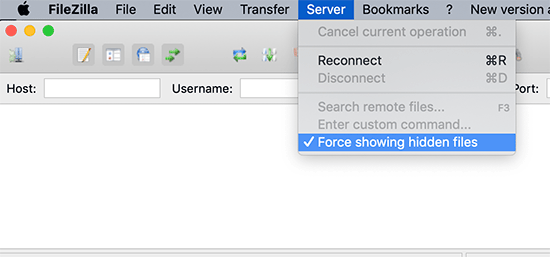
Si no se ha podido localizar el archivo .htaccess, puede ser necesario forzar al cliente FTP a mostrar los archivos ocultos. Si utiliza Filezilla, haga clic en Servidor en la barra de menús y seleccione la opción “Forzar mostrar archivos ocultos”.
Una vez que haya descargado ambos archivos en su ordenador, deberá abrir el archivo index. php en un editor de texto como el Bloc de notas. En este archivo, encontrará una línea como esta:
1 | require( dirname( __FILE__ ) . '/wp-blog-header.php' ); |
Esta línea carga el archivo wp-blog-header.php, obligatorio / requerido / necesario para cargar su sitio WordPress.
Lo que tiene que hacer ahora es introducir la ubicación correcta del archivo sustituyendo la línea existente por ésta:
1 | require( dirname( __FILE__ ) . '/wordpress/wp-blog-header.php' ); |
Guarde los cambios y suba los archivos index.php y .htaccess desde su ordenador a la raíz de su dominio mediante FTP.
La carpeta raíz es la carpeta principal con la carpeta ‘wordpress’ dentro, y normalmente se llama /www/ o /public_html/.
Eso es todo. Ahora puede visitar su sitio web utilizando el dominio raíz y todo funcionará correctamente.
1 | http://example.com |
Sin embargo, si necesita acceder al administrador de WordPress, tendrá que ir a wp-admin dentro del directorio ‘wordpress’ de la siguiente manera:
1 | http://www.example.com/wordpress/wp-admin |
Método 3: Mover WordPress al directorio raíz
Este método es más completo y moverá permanentemente su sitio WordPress del subdirectorio a la carpeta raíz de su sitio web.
Paso 1: Crear un paquete duplicador
En primer lugar, debe instalar y activar el plugin gratuito Duplicator en su sitio web. Para más detalles, consulta nuestra guía paso a paso sobre cómo instalar un plugin de WordPress.
Nota: Para este tutorial utilizaremos la versión gratuita de Duplicator. Sin embargo, puede actualizar a Duplicator Pro para obtener copias de seguridad ilimitadas, copias de seguridad programadas, importaciones de arrastrar y soltar, y mucho más.
Tras la activación, debe visitar la página Duplicator ” Copias de seguridad y hacer clic en el botón “Crear nueva”.
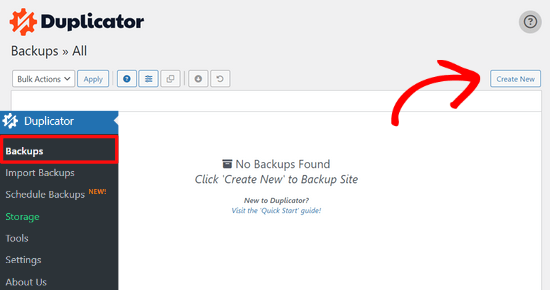
Esto iniciará el asistente de Duplicator, que creará un paquete instalador de su sitio web completo.
Puedes añadir un nombre para la copia de seguridad y hacer clic en el botón “Siguiente” para continuar.
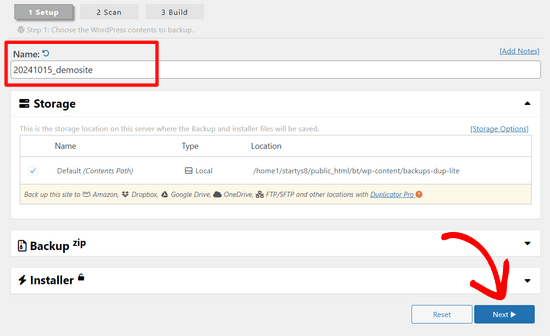
A continuación, el plugin realizará algunas exploraciones. Si todo se ve bien, entonces usted puede hacer clic en el botón ‘Build’ en la parte inferior.
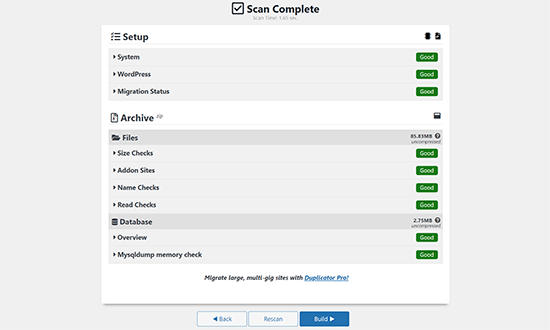
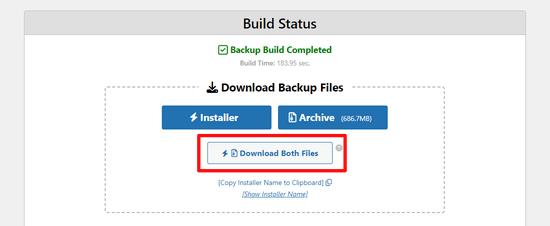
Duplicator creará ahora un paquete y le indicará que lo descargue junto con el script de instalación.
Descargue ambos archivos a su ordenador haciendo clic en el botón “Descargar ambos archivos”.
Paso 2: Crear una nueva base de datos para una nueva instalación de WordPress
Puede utilizar la base de datos de WordPress existente, pero es mejor crear una nueva para que su antigua base de datos esté a salvo y sin cambios. De esta forma, podrás volver a tu sitio sin muchas complicaciones si algo sale mal.
Debe visitar el Escritorio cPanel de su cuenta de alojamiento, desplazarse hasta la sección “Bases de datos” y, a continuación, hacer clic en el icono “Bases de datos MySQL”.

Después de eso, simplemente proporcione un nombre para su base de datos.
A continuación, haga clic en el botón “Crear base de datos”.

cPanel ahora creará una nueva base de datos para usted. Después de eso, es necesario desplazarse hasta la sección ‘Usuarios MySQL’.
A partir de aquí, deberá proporcionar un nombre de usuario y una contraseña para su nuevo usuario de la base de datos y hacer clic en el botón “Crear un usuario”.
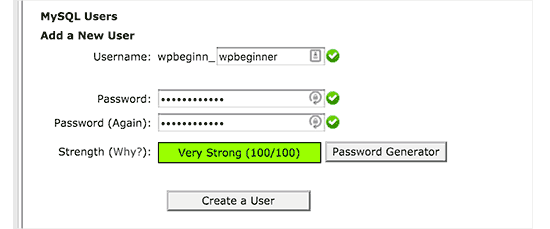
Ahora, necesita asignar permisos de base de datos al nuevo usuario.
Desplácese hasta la sección “Añadir usuario a la base de datos”. Seleccione el usuario de la base de datos que ha creado en el menú desplegable situado junto al campo “Usuario” y, a continuación, seleccione la base de datos. Por último, haga clic en el botón “Añadir”.

Su nueva base de datos ya está lista para ser utilizada en la nueva instalación de WordPress.
Paso 3: Ejecutar el asistente de duplicación
Ahora tiene que subir el paquete de Duplicator y el archivo de instalación que ha descargado antes al directorio raíz de su sitio web.
Este será el directorio que contiene la carpeta/wordpress/.
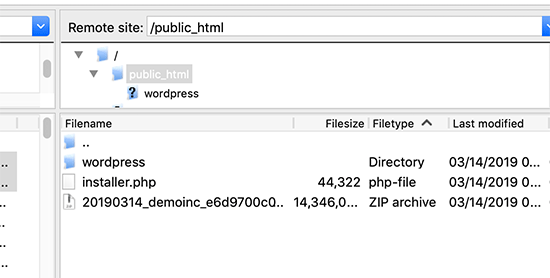
Una vez subidos ambos archivos, abra el script de instalación en una ventana del navegador. Deberá introducir la URL raíz de su sitio y anteponer /installer.php.
1 | https://example.com/installer.php |
Se abrirá el asistente de instalación de Duplicator.
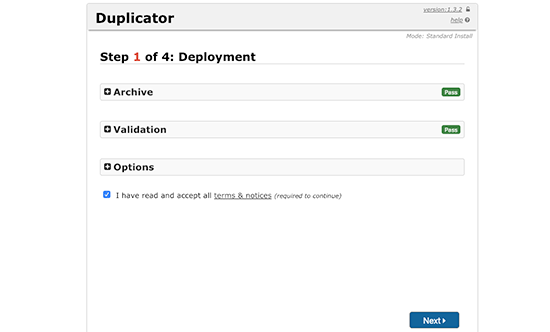
Marque la casilla de términos y condiciones y, a continuación, haga clic en el botón “Siguiente” para continuar.
A continuación, se le pedirá que proporcione la información de la base de datos. Introduce la información de la base de datos que creamos anteriormente en el paso 2.
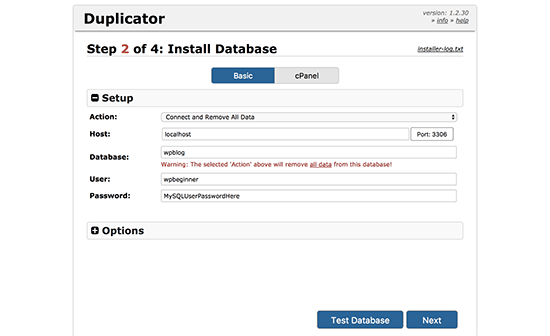
Después de introducir la información de la base de datos, haga clic en el botón ‘Siguiente’ para continuar. Duplicator descomprimirá la copia de seguridad de la base de datos de WordPress en la nueva base de datos.
A continuación, le pedirá que actualice la URL y la ruta del sitio. No necesitas hacer nada aquí, ya que detectará automáticamente la nueva URL y ruta. Sin embargo, si no lo hace, puede introducir manualmente los detalles aquí.
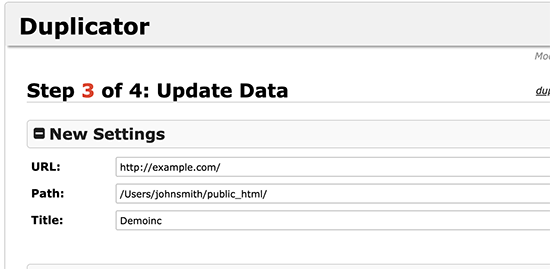
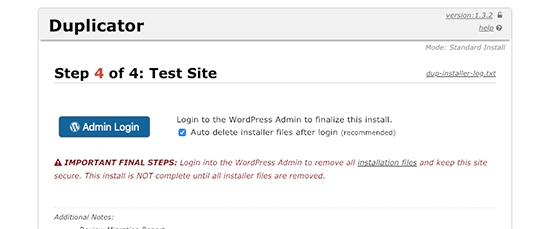
Duplicator finalizará la migración.
Podrá hacer clic en el botón “Admin Login” para acceder a su sitio web en la nueva ubicación.
Paso 4: Establecer redireccionamientos de subdirectorio a carpeta raíz
Enhorabuena, ha movido correctamente su sitio WordPress del subdirectorio a la carpeta raíz.
Ahora, es el momento de establecer las redirecciones para que sus usuarios y los motores de búsqueda puedan encontrar la nueva ubicación de su sitio web.
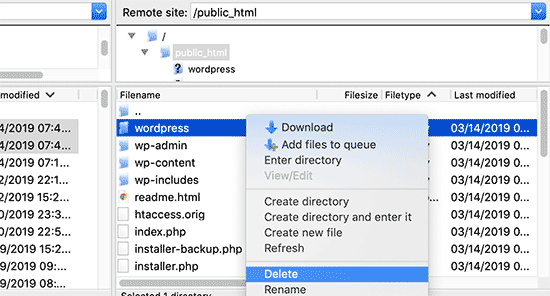
En primer lugar, debe conectarse a su sitio de WordPress mediante un cliente FTP y, a continuación, borrar la antigua carpeta /wordpress/.
A continuación, vaya al área de administrador de su sitio WordPress. Puesto que lo ha movido a la raíz de su sitio web, su URL de administrador de WordPress será así:
1 | https://example.com/wp-admin |
Ahora, necesitas instalar y activar el plugin Redirection. Para más detalles, consulte nuestra guía paso a paso sobre cómo instalar un plugin de WordPress.
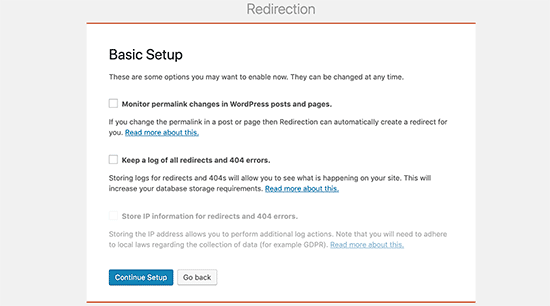
Una vez activado, debe visitar la página Herramientas ” Redirección. El plugin le mostrará un asistente de configuración. Simplemente haga clic en los botones “Continuar la instalación” y “Finalizar la instalación”.
A continuación, cambie a la pestaña “Redirecciones” y añada la nueva redirección.
En primer lugar, debe marcar la casilla “Regex” situada en la esquina del primer campo.
A continuación, vaya al campo “URL de origen” y añada https://example.com/wordpress/.* Seguidamente, vaya al campo “URL de destino” y añada https://example.com/$1.
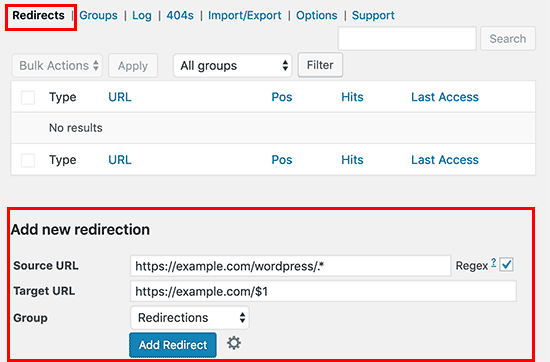
No olvide sustituir “ejemplo.com” por su propio nombre de dominio. A continuación, asegúrese de hacer clic en el botón “Añadir redirección” para guardar los cambios, y ya está.
Otra herramienta que puede utilizar para redirigir entradas y páginas es All in One SEO (AIOSEO). Te mostramos cómo redirigir a los visitantes que utilizan URL antiguas que contienen /wordpress/ a la nueva ubicación de tu sitio en nuestra guía para principiantes sobre cómo realizar redireccionamientos completos de sitios en WordPress.
Además, puede activar el seguimiento de errores 404 para detectar enlaces rotos y no perder posiciones en el ranking de palabras clave.
A partir de ahora, todos los usuarios que intenten acceder a su sitio web con /wordpress/ en la URL serán redirigidos automáticamente a las entradas correctas con su nueva URL raíz.
Guías de expertos sobre el cambio de URL en WordPress
Esperamos que este artículo te haya ayudado a aprender cómo eliminar /wordpress/ de la URL de tu sitio WordPress. Puede que también quieras ver otras guías relacionadas con el cambio de URL en WordPress:
- Cómo cambiar las URL de su sitio WordPress (paso a paso)
- Cómo actualizar fácilmente las URL al trasladar su sitio WordPress
- Cómo eliminar números de las URL de WordPress
- Cómo eliminar la fecha de las URL de WordPress
- Cómo eliminar la cadena v=XXXX de las URL de WordPress
- Cómo eliminar el slug padre de la URL de la página hija en WordPress
- Cómo cambiar el slug de la URL de búsqueda predeterminada en WordPress
- Cómo añadir una URL de inicio de sesión personalizada en WordPress (paso a paso)
- Guía para principiantes: Cómo encontrar la URL de inicio de sesión de WordPress
- Cómo cambiar correctamente WordPress de HTTP a HTTPS (Guía para principiantes)
If you liked this article, then please subscribe to our YouTube Channel for WordPress video tutorials. You can also find us on Twitter and Facebook.


Brenda
Thank you so much for this tutorial! So helpful.
I followed step #2 and all the pages on my site work now without the /wordpress in the URL, EXCEPT for the homepage. I updated the Site URL in Settings > General, but for some reason the homepage still redirects from mysite.com to mysite.com/wordpress.
Any idea why this might be happening? Thanks in advance!
WPBeginner Support
From the sound of the issue, we would recommend checking your index.php and htaccess are both in the correct folder for a likely reason.
Admin
Brenda
Thanks so much for your response. Figured out the issue!
WPBeginner Support
Glad to hear!
Adrian
Not sure if this related, on initial set up should you you use the www dot …. com or just your sitename dot… com
WPBeginner Support
That is a different situation that we cover in our guide below. WWW vs non-WWW is personal preference:
https://www.wpbeginner.com/beginners-guide/www-vs-non-www-which-is-better-for-wordpress-seo/
Admin
Lilly Walker
I followed Method 1: Change WordPress Site Address
changed the site address with out /mywpfolder
and downloaded the ht.access and the index file – (they dont match your eg but just added the /mywpfolder etc
and uploaded the htaccess and the index files back to the root directory
BUT
the correct front page came up and then clicked on a link it came up but clicked on a link then and it 404’d.
my guess is that some pages have urls manually put in but how do I search and replace these?
Alice K
Hi!
First, thank you very much!
I followed the second method, and now accessing the admin page works without adding “/wordpress” in the URL.
But when I try to access my website I still have to add “/wordpress” to the URL?!
Can anyone help? Where have I gone wrong?
WPBeginner Support
The site is likely active in the old location, you should should still be able to see your login if you go to yourdomain/wp-login.php
Admin
sginader
Thank you! I’m a WP novice so your step by step instructions was perfect. I do have a question – I followed Method 1 – does the redirect add to the site loading time? I ask because my site takes very long to load. Thank you!
WPBeginner Support
While it adds a small amount to the loading time, it shouldn’t add enough to be noticeable. If this increase in load time was recent then you may want to check with your host to ensure there isn’t something conflicting with the redirect you set up.
Admin
Nkosiyapha
This was very helpful. Thank you very much
WPBeginner Support
You’re welcome
Admin
Rachel
I have a question: if I use method 1, do I have to change all url links of my posts and images? My blog are actually inside a folder and I want to make a redirection to the root domain. It’s not clear…
WPBeginner Support
For the first method, you shouldn’t need to redirect your posts.
Admin
birgit van Munster
Hi, I made the change in the index.pho file as directed and moved the two files to the root directory, but I get this error message:
Parse error: syntax error, unexpected ” );’ (T_ENCAPSED_AND_WHITESPACE) in /data/40/5/47/114/5373603/user/6433782/htdocs/index.php on line 17
I think line 17 is exactly as described in the instructions, please help!
WPBeginner Support
You may want to ensure you copied the code correctly and pasted it on a new line. You may want to take a look at our article here: https://www.wpbeginner.com/beginners-guide/beginners-guide-to-pasting-snippets-from-the-web-into-wordpress/
Admin
Bella
Thank you so much! The guide I was reading didn’t mention the .htaccess part. This guide fixed the error on my site. Great work!
Bart
Hi!
Great tutorial, and my URL now redirects (woohoo!)
However when I go the settings tab and change the site title to the one without /wordpress, the site works fine except for the home page, which gives an error.
What am I missing here…?
TROP ICSU
Hi there!
I have my site hosted on my server. WordPress dir is located in /home/myuser/.
I tried to follow your steps by copying the updated index.php and .htaccess into same dir level where wordpress dir is. But no success.
Can you pl guide? Thank you.
Rachel
If I have a wordpress instance in a subdirectory and I just want to delete it and not move it, can I just delete the folder, or do I need to go through some kind of un-install procedure so it is removed from the database as well?
WPBeginner Support
Hi Rachel,
Yes you can delete it. However, we will still recommend to download it as a backup before deleting it.
Admin
Michael Hayman
Hey, so i had a go at this, and for some reason i am now faced with an HTTP 500 error.
Not sure where i went wrong, but i don’t seem to be able to get it back to normal.
Any ideas would be much appreciated.
I have tried resetting the index.php back to default as well as the .htacess file with no avail.
To make matters more difficult i get the same HTTP 500 message when trying to login to the wordpress admin as well.
Clarisse
Hi Michael,
My folder is called “/wp” instead of “/wordpress”, so probably yours too!
That might be the problem…
Louise
I had the same problem, and my folder was called wp. I just went back to the index.html file and changed it from wordpress to wp and problem solved! Such a helpful article, this was hanging over my head for months and so glad to have it fixed!
Gareth Botha
Hi Syed, many thanks for all these, I have been postponing my site for over a year now as it was simply too intimidating. I had however made the fault of installing wordpress to the subdomain /wp and set the entire site up. Just sorted it out with you tut above. I have however come across a new problem, my home/landing page no longer loads my blog posts. How do I resolved this? I also get a redirect error as well.
WPBeginner Support
Hi Gareth,
Good luck with your new website. Wish we could be more helpful, but it is up to the theme and your website settings. Please see our WordPress troubleshooting guide to figure out whats causing it.
Admin
Yan Xun
Hi, I followed these steps and my website is working fine. Only issue is now I can’t seem to load my theme’s UX Builder for my site.
does this method cause any issue if I am using a theme UX builder?
WPBeginner Support
Hi Yan Xun,
Here is what you can try. First create a backup of your website. After that Uninstall the UX builder by visiting the plugins page, now install and activate it again.
If it comes packaged with your theme, then again create a backup of your website. After that you need to download a fresh copy of your theme. Next, temporarily switch your WordPress site to a default WordPress theme like TwentySeventeen. Delete your old theme and then install it from the zip file you downloaded earlier.
Admin
Gina
Help! I followed your tutorial for removing wordpress. Now I can’t get into the site or admin.
Getting the following:
Warning: require(/home/content/09/8001609/html/wordpress/wp-blog-header.php) [function.require]: failed to open stream: No such file or directory in /home/content/09/8001609/html/index.php on line 17
Fatal error: require() [function.require]: Failed opening required ‘/home/content/09/8001609/html/wordpress/wp-blog-header.php’ (include_path=’.:/usr/local/php5/lib/php’) in /home/content/09/8001609/html/index.php on line 17
Marko
Done that, and ‘/wordpress’ from addressbar is gone, but Google still lists it with it in the search. For example:
WPBeginner Support
Hi Marko,
You will need to redirect those users. See our guide on how to setup redirects in WordPress.
Admin
Andrew
Thanks guys i love u <3
Priyanka
This tutorial is a life saviour. Thank you so much.
Beth
Thanks for your helpful website. I downloaded .htaccess and index.php. My index php says index.php4 The line on it says this: .htaccess disapears when I download it to the desktop. In ftp, they are located in the same folder as the wordpress1 folder is located. It appears to be the root directory. The site has the url with wordpress1 at the end of it. I’m not sure what to do, and don’t want to crash the site!
Thanks,
Beth
Lee Graham
Can I ask why you download .htaccess only to upload it again?, there is no mention of edting htaccess so why download in the first place ?
Brandi
I believe he’s asking us to download the one from the /wordpress/ subdirectory and then upload it to the / root (which is up one level). I hope that helps
Manpreet Kaur
HI,
Thankyou so much for these helpful tutorials my one problem is solved but there is one another. When I search on google and type my website address it shows index of link instead of my website name. When I click on that link it opens my website. Can anyone help me to display my website URL on google instead of index of URL.
Ariadne1985
THANK YOU SO MUCH!!!
I spent hours working on it (failure) and then found your site + explanation.
SUPERB!
Filip Kevely
1. I have moved my example.com WP installation into subfolder (let’s call it “secret-sub”).
2. Typing example.com/wp-login.php automatically re-directs me to example.com/secret-sub/wp-login.php :((
((Note: Visiting no other part of my web page shows this subfolder name as part of URL address; visitors see only example.com everywhere.))
Is this normal behaviour?
And if so – what’s actually the point of having your WP installation in “secret” subfolder – when basic /wp-login.php and /wp-admin brute attack re-directs to URL showing the “secret subfolder” name??
Any clear explanation will be very much appreciated. Thx.
WPBeginner Support
Hi Filip Kevely,
When you install another WordPress instance in a sub-folder it creates a conflict for WordPress permalinks. To fix that you need to add this code to your sub-folder site’s .htaccess file:
# BEGIN WordPress<IfModule mod_rewrite.c>RewriteEngine OnRewriteBase /secret-sub/RewriteRule ^index\.php$ – [L]RewriteCond %{REQUEST_FILENAME} !-fRewriteCond %{REQUEST_FILENAME} !-dRewriteRule . /secret-sub/index.php [L]</IfModule>#ENDWordPress1-click Use in WordPress
Don’t forget to replace secret-sub with the actual subfolder name.
Admin
Charlotte Tomic
How do you get rid of FEATURED CONTENT on your blog? I eliminated footers without a problem, but can’t get rid of featured content showing up on the blog front page.
Jade
Hi there, I am pulling my hair out…….I dont have the wordpress address url or the Site Address url under settings general! I have one site with nothing on it with my web address and then another site which I have fixed up with the same name but then wordpress.com at the end, any help would be greatly appreciated.
Arif
I have followed given the instruction but I am facing problem my website is not open correct and wp login penal is not coming please help me quickly.
Bright Bernard
Hello,
I successfully got rid of /wordpress from site URL following the instructions in the tutorial but once i installed yoast for seo , google shows the pages with /worpress in its search results.how can we remove that from google search results also?
Blane
Thank you! This works great!
Kala
Please help, I thought I had followed the steps correctly but am receiving this error when I type in my web domain:
Fatal error: require() [function.require]: Failed opening required ‘/home/melanieh/public_html/wordpress/wp-blog-header.php’ (include_path=’.:/usr/lib/php:/usr/local/lib/php’) in /home/melanieh/public_html/index.php on line 17
What did I do wrong?
Robel
Thank you man this work after so many hard work. Thanks again keep it up…..will come here for wordpress problem
Julius Decada
problem with 404, I resolve it in a longest manner, First I just open the post and click update, it works,.. although if you got a thousand post then you grow beard before you finish everything,..
second solution
another solution, although i never test this type of solutions in my active sites,
1. first thing first back-up your wordpress website,
2. when back-up is done, got to tools and click export, it will create xml file
3. delete all post,..
4. Import the xml file that you exported,. and and everythng go smoothly,..
Rodrigo Henriques
Thank you for the great tutorial. Worked perfectly!
rio
everything worked except my root domain name.
when I go to mydomain.com I get a 500 error, but all my links mydomain.com/contact mydomain.com/links look fie
Rodrigo Henriques
Hi,
have you checked if you REALLY have a “yourdomain/wordpress” directory?
Or a “yourdomain/wp” directory!
Because if you do you have to change the index.php editing accordingly ; )
Hope that helps,, it worked for me ; )
Marko Vojnovic
THANK YOU SO MUCH!!!!!!!
omkar
how to check whether i have a /wordpress or a /wp directory? and what following changes should i make then in the index.php file?
Tammie Radikopf
Thank you for this reply!! Your answer is what helped me solve my problem. I didn’t realize you couldn’t just use ‘wordpress’ as the tutorial said but needed to use the exact subdirectory name. it worked. Thanks!!
Vernon Harris
I was moving our word press site from the root folder to a sub folder and everything almost worked. The only exception was that I couldn’t find a way to remove the sub-folder from the domain URL. This site had the easiest instructions and was easy to follow. It worked perfectly the 1st time. Thank You!
WPBeginner Support
Hi Vernon,
Glad you found it helpful Don’t forget to join us on Twitter for more WordPress tips and tutorials.
Admin
rio
I followed the steps but now my website page isn’t working. And I cannot open my wordpress admin page either. Help?
Fadiah Karim
I followed the steps but now my website page isn’t working. And I cannot open my wordpress admin page either. Help?
Dan Kemble
You say upload the ht access file but you never say how to edit it?
Alexandra
I never leave comments but this post was just so clear and helpful that I have to say THANK YOU!!! :-)))
WPBeginner Support
Hi Alexandra,
Thanks, we are glad you found it helpful. Don’t forget to join us on Twitter for more WordPress tips and tutorials.
Admin