Tu sitio WordPress no envía correos electrónicos. Los formularios de contacto desaparecen y los avisos importantes nunca llegan. ¿Le resulta familiar?
No eres el único, y el problema no es WordPress en sí. Es la forma en que los sitios web suelen gestionar el envío de correo electrónico.
Hemos tratado con este mismo problema / conflicto / incidencia en WPBeginner. Es por eso que usamos y confiamos en WP Mail SMTP para manejar todos nuestros correos electrónicos de WordPress. Utiliza SMTP (el estándar de la industria para la entrega fiable de correo electrónico) para asegurarse de que sus correos electrónicos realmente lleguen a su destino.
En esta guía, le mostraremos exactamente cuál es la causa de sus problemas de correo electrónico y cómo corregirlos mediante SMTP, para que no vuelva a perderse ningún aviso importante.
¿Por qué no recibe correos electrónicos de su sitio WordPress?
La razón más común por la que faltan correos electrónicos es que su servidor de alojamiento WordPress no está configurado correctamente para utilizar la función PHP mail().
Aunque su alojamiento esté configurado para utilizarlo, muchos proveedores de servicios de correo electrónico, como Gmail y otros, utilizan diversas herramientas para reducir el Spam en el correo electrónico. Estas herramientas intentan detectar si un correo electrónico procede del lugar del que dice proceder.
Los correos electrónicos enviados por sitios web de WordPress no suelen superar esta prueba.
Esto significa que cuando se envía un correo electrónico desde su sitio de WordPress (desde un plugin de formulario de contacto, un aviso al administrador, etc.), es posible que ni siquiera llegue a la carpeta de Spam del destinatario, y mucho menos a la bandeja de entrada.
Por eso recomendamos no utilizar WordPress para enviar su boletín de correo electrónico.
Esta es también la razón por la que recomendamos a todo el mundo que utilice SMTP para enviar correos electrónicos en WordPress.
¿Qué es SMTP?
SMTP (Simple Mail Transfer Protocol) es el estándar del sector para el envío de correos electrónicos.
A diferencia de la función mail() de PHP, SMTP utiliza una autenticación adecuada, lo que conlleva una alta entregabilidad del correo electrónico.
WordPress tiene un plugin WP Mail SMTP que configura su sitio WordPress para enviar correos electrónicos usando SMTP en lugar de la función PHP mail().
Puede utilizarlo para conectarse con cualquier servicio SMTP popular como SendLayer, Brevo (antes Sendinblue), Gmail (Google Workspace), Amazon SES, etc.
Puede leer nuestra reseña / valoración de WP Mail SMTP si necesita más acerca de este plugin.
Dicho esto, veamos cómo corregir el problema de que WordPress no envía correos electrónicos. Puede utilizar los enlaces rápidos a continuación para navegar a través de este artículo:
Alternativa: Si utiliza WooCommerce y sus correos electrónicos de pedidos no se están entregando, a continuación, lea nuestra guía sobre cómo corregir WooCommerce no enviar el correo electrónico de pedido problema en su lugar.
Paso 1: Instalar el plugin WP Mail SMTP
Sea cual sea el servicio SMTP que elija, necesitará tener instalado el plugin WP Mail SMTP en su sitio. Esto te permite cambiar WordPress de usar la función PHP mail() incorporada a usar tu servicio SMTP.
Primero, instala y activa el plugin WP Mail SMTP. Si no estás seguro de cómo hacerlo, consulta nuestra guía paso a paso sobre cómo instalar un plugin de WordPress.
A continuación, haga clic en “WP Mail SMTP” en su escritorio de WordPress para establecer los ajustes del plugin.
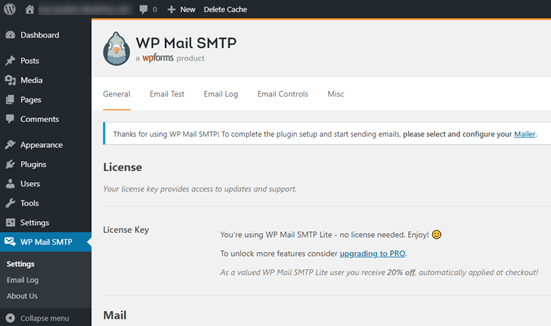
Tendrá que empezar por introducir el nombre y la dirección de correo electrónico de la empresa de la que desea que procedan los correos electrónicos de su sitio.
Asegúrese de utilizar aquí la misma dirección de correo electrónico que utilizará para su servicio de correo SMTP.
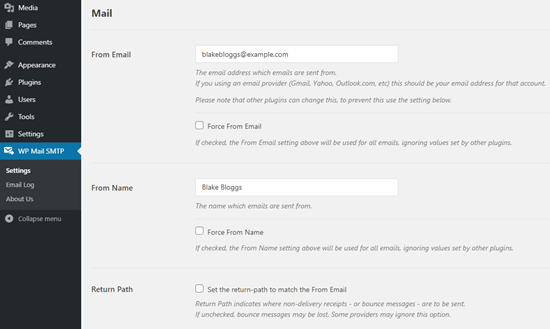
Puede elegir forzar que los correos electrónicos usen este nombre y dirección de correo electrónico, incluso si otros plugins, como WPForms, tienen ajustes diferentes. WP Mail SMTP anulará los ajustes de los otros plugins.
Después de eso, necesita elegir un servicio de correo SMTP para su sitio. Para este tutorial, vamos a establecer SMTP utilizando SendLayer.
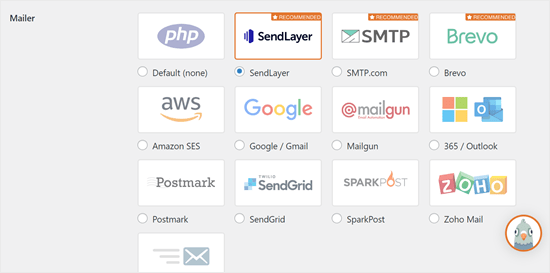
Para terminar de establecer WP Mail SMTP, necesitará crear una cuenta con SendLayer. Seguiremos con eso a continuación y luego volveremos para finalizar la configuración en WP Mail SMTP, así que asegúrese de mantener esta pestaña abierta.
Paso 2: Establezca su servicio de correo SMTP
SendLayer es un proveedor de servicios de correo electrónico fiable. Le permiten enviar un gran número de correos electrónicos con una alta capacidad de entrega.
Puede utilizar SendLayer para enviar hasta 200 correos electrónicos de forma gratuita, lo que es más que suficiente para que la mayoría de los sitios web pequeños empiecen a funcionar.
Pueden ser correos electrónicos de su formulario de contacto, detalles de nuevas cuentas de usuario, correos electrónicos de recuperación de contraseñas o cualquier otro correo electrónico enviado a través de su sitio de WordPress.
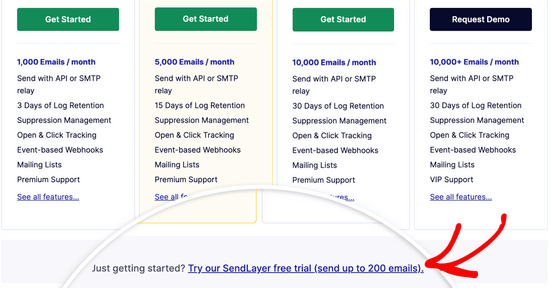
En primer lugar, deberá acceder al sitio web de SendLayer para crear una cuenta. En la página de Precios, haga clic en el enlace “Pruebe nuestro periodo de prueba gratuito de SendLayer (envíe hasta 200 correos electrónicos)” para establecer su cuenta.
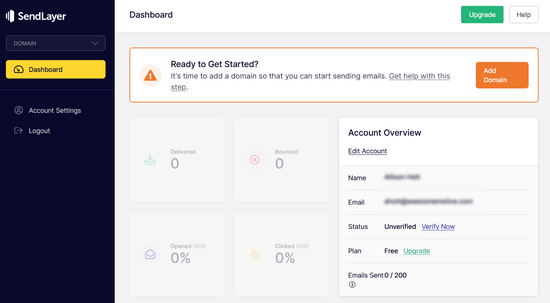
Una vez que haya creado una cuenta, verá su Escritorio de SendLayer.
Ahora que tiene una cuenta SendLayer, vamos a establecer su proveedor de correo electrónico con WordPress.
Paso 3: Conecte su sitio web WordPress con SendLayer
Antes de poder enviar correos electrónicos con SendLayer, debe autorizar su dominio.
Esto demuestra a los servidores de correo electrónico que usted es el propietario confirmado de su dominio de envío y que sus correos electrónicos se envían desde una fuente legítima.
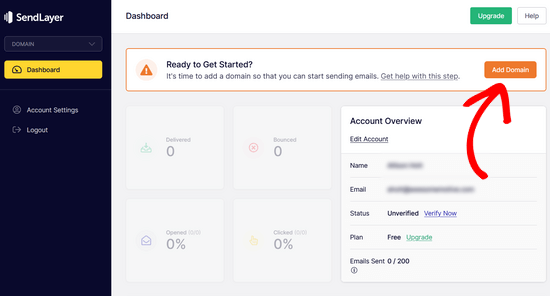
Para autorizar su dominio, haga clic en el botón naranja “Añadir dominio” del panel de SendLayer.
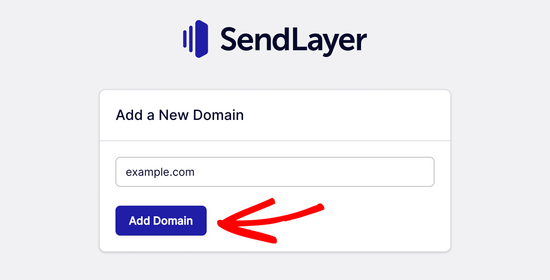
En la página siguiente, escriba su nombre de dominio en el campo correspondiente.
A continuación, haga clic en el botón “Añadir dominio”.
Nota: Con otros servicios de correo como Brevo (anteriormente Sendinblue), deberá establecer primero un subdominio para su sitio web. Sin embargo, SendLayer añadirá automáticamente el subdominio a los registros DNS del dominio remitente.
Por lo tanto, no es necesario añadir un subdominio adicional al registrar el dominio.
Una vez que haya añadido su dominio, SendLayer le mostrará 5 registros DNS que deberá añadir a los ajustes de registro DNS de su dominio.
Estas líneas de código permiten a SendLayer autorizar su nombre de dominio.
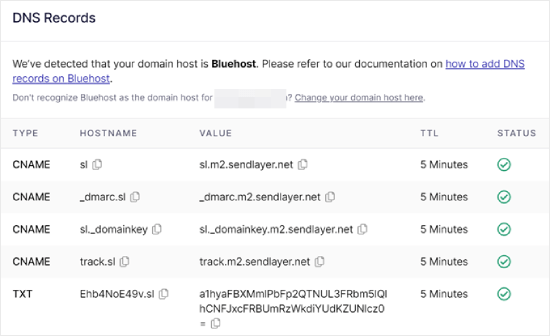
Tendrás que añadir estos registros DNS a tu sitio de WordPress. Puede parecer complicado, pero basta con copiarlos y pegarlos en el lugar adecuado.
Por el bien de este tutorial, vamos a demostrar nuestro ejemplo utilizando nuestra cuenta de alojamiento en Bluehost.
Si utiliza otras empresas de alojamiento o si sus DNS se gestionan en un registrador de dominios como Domain.com, Network Solutions o GoDaddy, siga sus instrucciones respectivas.
También puedes leer nuestra guía sobre cómo establecer WP Mail SMTP con cualquier alojamiento.
En primer lugar, abra una nueva pestaña del navegador y acceda a su cuenta de alojamiento de WordPress. A continuación, busque los registros DNS de su dominio.
En Bluehost, puede hacerlo accediendo a “Dominios”. A continuación, haga clic en “Ajustes” junto al dominio que desea conectar con SendLayer.
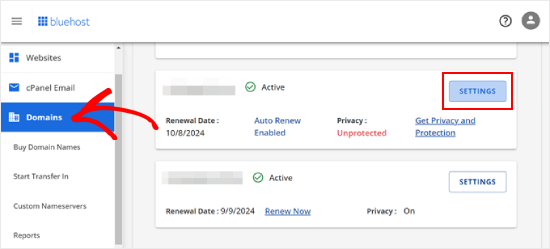
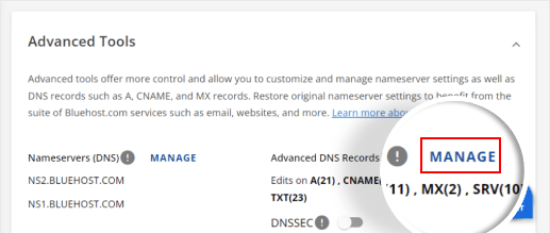
En la página siguiente, desplácese hasta la sección “Herramientas avanzadas”.
A continuación, haga clic en el botón “Gestionar” situado junto a Registros DNS avanzados.
Verás un mensaje de advertencia diciendo que los registros DNS deben ser editados por un usuario avanzado. No te preocupes acerca de este mensaje, ya que el proceso para esto es bastante fácil.
Siga adelante y haga clic en “Continuar” para continuar.
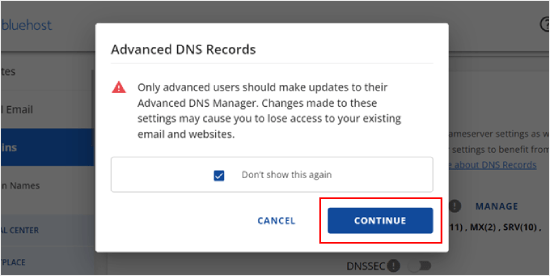
Llegará a la página Gestionar registros DNS avanzados.
Para empezar, haga clic en el botón “+ Añadir registro”.
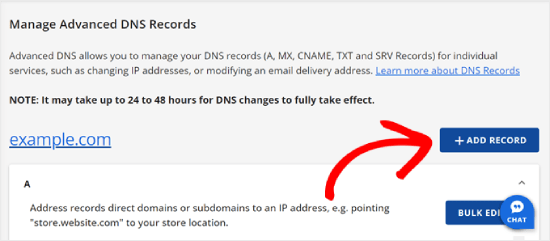
Ahora, empecemos a añadir los registros DNS que SendLayer ha proporcionado.
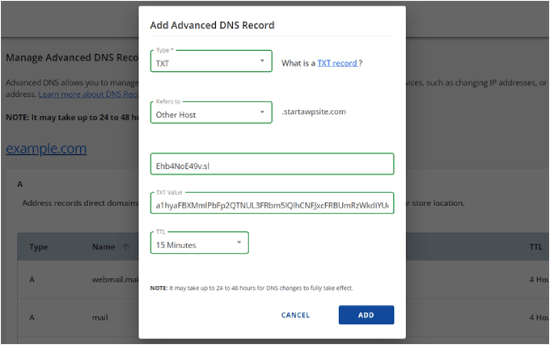
En primer lugar, seleccione el tipo de registro DNS. En este caso, utilizaremos CNAME para el primer registro.
En la sección “Se refiere a”, haz clic en “Otro alojamiento”. Más adelante elegirá esta misma opción para todos sus registros DNS.
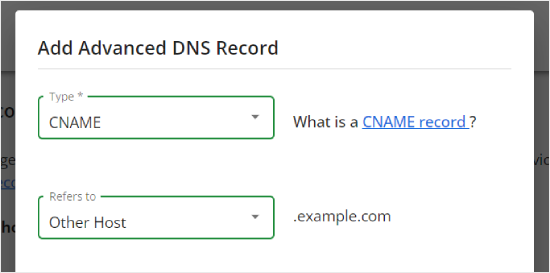
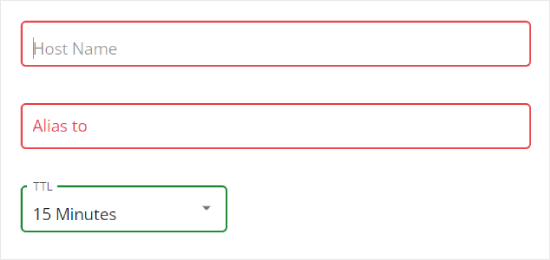
Desplazándose hacia abajo, verá tres campos: Nombre de host, Alias y TTL.
El Hostname debe rellenarse con el valor de ‘Hostname’ proporcionado por SendLayer. El Alias debe rellenarse con el valor de ‘Value’. En cuanto al TTL, puede dejarlo en 15 minutos.
La siguiente captura de pantalla muestra el aspecto de nuestra pantalla cuando añadimos nuestro primer registro CNAME.
Cuando hayas terminado, haz clic en “Añadir”.
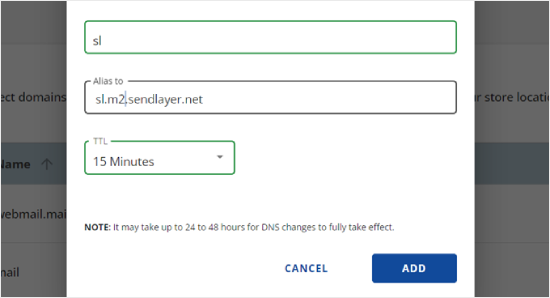
Puede repetir estos pasos para todos los registros DNS (tanto CNAME como TXT).
Al añadir el registro TXT, asegúrese de pegar el valor de ‘Hostname’ de SendLayer en el campo ‘Host Name’ y el de ‘Value’ en el campo ‘TXT Value’.
Esto es lo que parece:
Una vez añadidos los registros, vuelva a SendLayer y marque la casilla siguiente: “He añadido estos registros DNS y estoy listo para continuar”.
A continuación, pulse el botón “Verificar registros DNS”.
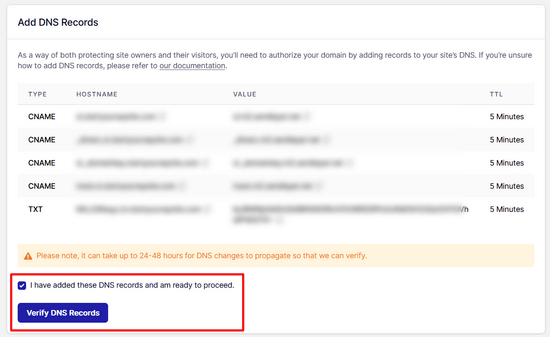
SendLayer puede tardar entre 24 y 48 horas en verificar sus registros. En nuestra experiencia, tardó varias horas.
Si no ocurre nada al hacer clic en ese botón, los registros aún no pueden verificarse. Puede comprobar más tarde si se han verificado accediendo a “Configuración” y navegando hasta la pestaña “Registros y ajustes DNS” desde su panel de SendLayer.
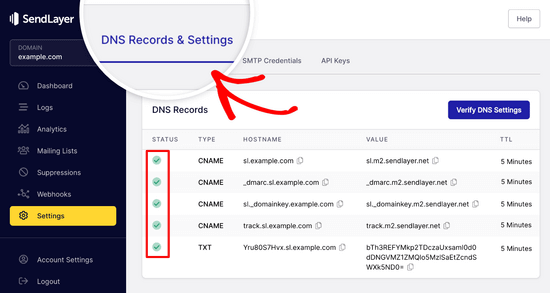
Aquí encontrarás un anuncio / catálogo / ficha con todos tus registros DNS. Una vez que tu dominio haya sido correctamente autorizado, verás marcas de verificación verdes junto a cada registro DNS en la columna “Estado”.
Puedes seguir con este tutorial mientras esperas a que se produzca la autorización.
Paso 4: Finalizar la configuración de WP Mail SMTP para utilizar SendLayer
Finalicemos la configuración. En primer lugar, vaya a su cuenta de SendLayer para encontrar su clave API.
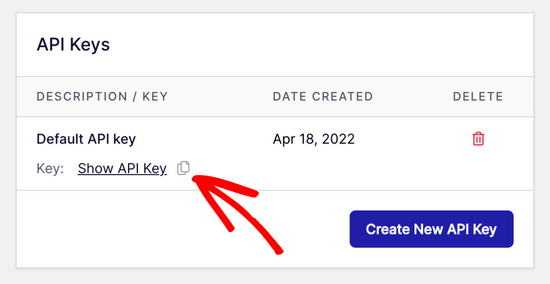
Desde el Escritorio de SendLayer, simplemente vaya a la página Ajustes “ Claves API. Aquí, verá una clave de API por defecto que se generó cuando autorizó su dominio en SendLayer.
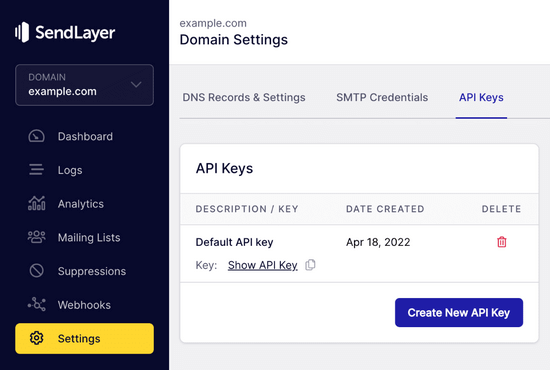
Puede copiar la clave API desde esta página al hacer clic en el icono de copia.
Así:
Una vez hecho esto, puede volver a la pestaña del asistente de configuración de WP Mail SMTP.
A continuación, pegue la clave API donde corresponda.

Enhorabuena. Ya lo has establecido todo. El último paso es enviar un correo electrónico de prueba para comprobar que todo funciona correctamente.
Vaya a WP Mail SMTP “ Herramientas. En la pestaña ‘Prueba de correo electrónico’, introduzca una dirección de correo electrónico a la que enviar un correo electrónico. Por defecto será el correo electrónico del administrador del sitio. Haga clic en ‘Enviar correo electrónico’.
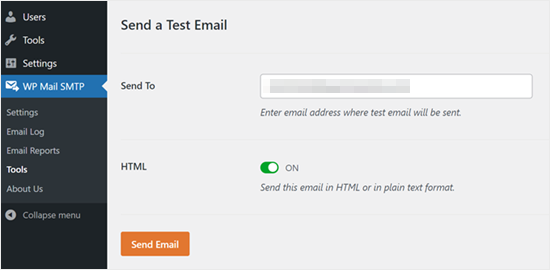
Debería aparecer el mensaje “El correo electrónico HTML de prueba se ha enviado correctamente”.
Marca / comprueba si ha llegado a tu bandeja de entrada. Tendrá este aspecto:
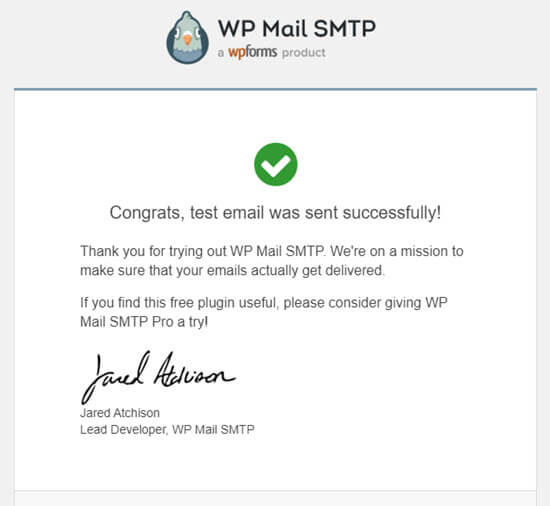
Nota: Si su cuenta de SendLayer aún no está activada, recibirá el mensaje: [permission_denied]: No se ha podido enviar correo electrónico. Su cuenta SMTP aún no está activada.
Formas alternativas de corregir el problema de que WordPress no envía correos electrónicos
Como puede ver en el anuncio / catálogo / ficha de opciones de envío del plugin WP Mail SMTP, no tiene por qué utilizar SendLayer. Aunque es nuestra principal recomendación gratuita, hay otras opciones que puede utilizar, incluyendo Microsoft 365, Gmail(Google Workspace), Amazon SES, etc.
Uso de Gmail o Google Workspace con WP Mail SMTP para corregir correos electrónicos de WordPress
Si tienes Gmail, puedes utilizarlo para enviar tus correos electrónicos. No necesitarás introducir tus datos de acceso / correo electrónico en WordPress cuando utilices el plugin WP Mail SMTP.
Para utilizar Gmail o Google Workspace, establece WP Mail SMTP como se muestra arriba, y luego haz clic en la opción “Google / Gmail” para tu servicio de envío.
A continuación, puede establecer los ajustes del servicio de envío utilizando la configuración de un clic de WP Mail SMTP.
Este método no requiere que crees tu propia aplicación, lo cual es mucho más sencillo. Solo tienes que acceder a tu cuenta de Gmail y hacer clic en “Guardar ajustes”.
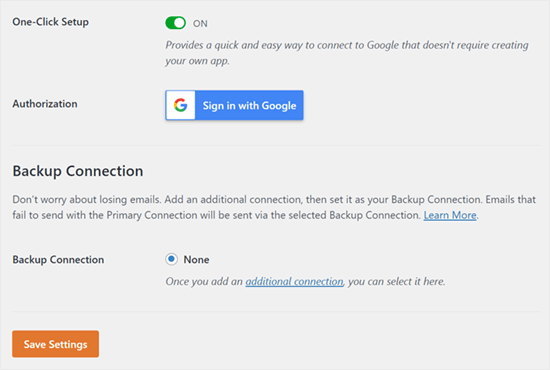
Sin embargo, existen un par de inconvenientes clave a la hora de utilizar tu cuenta profesional de Gmail o Google Workspace.
Una de ellas es que es posible que tengas que ponerte en contacto con tu alojamiento web para que instalen el certificado adecuado para que funcione.
Otra es que si cambias la dirección de correo electrónico en el futuro, tendrás que volver a pasar por todo el proceso. Esto incluirá la creación de una nueva aplicación web.
Uso de Microsoft 365 con WP Mail SMTP para corregir correos electrónicos de WordPress
Si utilizas Microsoft Office 365 o Outlook para tu cuenta de correo electrónico habitual, también puedes utilizarla para enviar correos electrónicos a través de WordPress. Sin embargo, no es una opción recomendable porque es menos segura.
Necesitarás establecer WP Mail SMTP como arriba, luego haz clic en la opción ‘365 / Outlook’ cuando elijas tu servicio de envío SMTP. A continuación, debes registrar una aplicación en Microsoft Azure para poder rellenar los campos que aparecen a continuación.
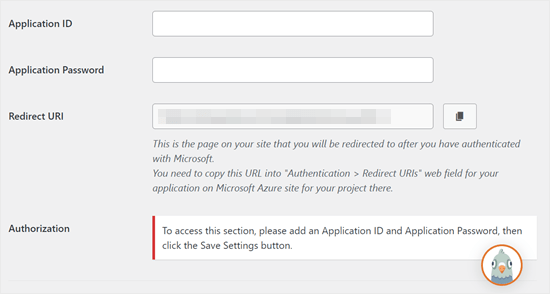
Para más detalles, consulte la guía detallada sobre cómo establecer Outlook con WP Mail SMTP.
Uso de Amazon SES con WP Mail SMTP para corregir correos electrónicos de WordPress
La plataforma Amazon AWS dispone de un Simple Email Service (SES) que puedes utilizar para corregir el problema del correo electrónico de WordPress.
Lo mejor de Amazon es que te permite enviar hasta 62.000 correos electrónicos al mes de forma gratuita. El inconveniente es que la configuración es un poco más complicada para los principiantes, por lo que no la recomendamos como nuestra opción preferida.
Pero como puedes imaginar, muchos profesionales y expertos utilizan Amazon SES para su servicio SMTP de correo electrónico de WordPress, así que no podíamos escribir un artículo sin mencionarlo.
Si está interesado en establecer Amazon SES con WordPress, consulte las instrucciones completas sobre cómo establecer Amazon SES con WordPress.
Sea cual sea el servicio de envío que decida utilizar, recuerde siempre utilizar la característica “Correo electrónico de prueba” para asegurarse de que los correos electrónicos se envían correctamente.
Asegúrese también de marcar / comprobar su bandeja de entrada y confirmar que ha recibido el correo electrónico de prueba.
Tutorial en vídeo
Si prefiere las instrucciones visuales, marque / compruebe este vídeo:
¿Experimenta otros errores en WordPress? Marcar / comprobar estas guías
WordPress no es perfecto, y es posible que de vez en cuando te encuentres con algunos errores comunes. Aquí tienes algunos tutoriales que puedes marcar / comprobar para solucionarlos:
- Cómo corregir el botón Añadir medios que no funciona en WordPress
- Cómo corregir un problema de subida de imágenes en WordPress (paso a paso)
- Cómo corregir el error de contenido mixto en WordPress (paso a paso)
- Cómo corregir el error 404 de las entradas de WordPress (paso a paso)
- Cómo corregir el error “Error de base de datos de WordPress: disco lleno”.
- Cómo corregir el error al establecer una conexión de base de datos en WordPress
- Cómo corregir el error “Lo siento, este tipo de archivo no está permitido por motivos de seguridad” en WordPress
- Cómo corregir el error 502 de pasarela incorrecta en WordPress
- Cómo corregir la búsqueda de WordPress no funciona
- Formulario de WordPress no funciona: 7 consejos para diagnosticar problemas
Esperamos que este artículo te haya ayudado a aprender cómo corregir el problema de que WordPress no envíe correos electrónicos. Puede que también quieras ver nuestra lista de los problemas más comunes del editor de bloques de WordPress o nuestra selección de los mejores plugins personalizadores de correo electrónico de WooCommerce.
If you liked this article, then please subscribe to our YouTube Channel for WordPress video tutorials. You can also find us on Twitter and Facebook.


Jiří Vaněk
Im using WP Forms paid version with WP Mail SMTP in free version and this combination work pretty well together.
Jiří Vaněk
Currently, the most problems that I have solved in the last year with sending emails on WordPress was the missing DNS record for SPF and DKIM. Specifically, it is most evident on the side of Google and Gmail, which rejects such emails. It is therefore a good idea to also focus on SPF and DKIM records for the domain.
WPBeginner Support
If the method in this guide does not work then that could certainly be something to check
Admin
Moinuddin Waheed
Sending emails and being hundred percent assured that it has got delivered is a must for any kind of online businesses.
This is where comes the role of this excellent plugin called wp SMTP mail which ensures that the email that has been sent has also been delivered to the recipient.
I have implemented wp mail SMTP to my websites and planning to use on all my wordpress websites.
Carol
The best answer so far! I have been looking for this answer for 1 year!
WPBeginner Support
Glad to hear our guide was helpful!
Admin
Abubakar Bala
Wow! WP Beginner is my number 1 go to destination for WordPress bugs. I have been facing serious issues with the issues discussed in this article. Thank you so much for these detailed solutions.
WPBeginner Support
Glad to hear our guide was helpful!
Admin
Joe
What is the purpose of setting up the mail1 subdomain?
Bren
Is there a code-only alternative? I’d like to avoid using plugins where possible.
WPBeginner Support
We do not have any beginner-friendly methods for adding SMTP without a plugin, for not using a plugin, we would recommend taking a look at our site below that covers common concerns for using multiple plugins and why they aren’t as prevalent as they seem:
https://www.wpbeginner.com/opinion/how-many-wordpress-plugins-should-you-install-on-your-site
Admin
Tim
I understand having to set up the WP Mail SMTP Plugin. That’s fabulous.
I suppose what I don’t understand is if I have SMTP with my hosting account and I can send through that, why use a third-party SMTP provider? Did I miss something? What benefit does the third-party provide? Thanks.
WPBeginner Support
It would be a personal preference if you use a third party as we recommend or some hosting providers do not have the option to use SMTP through them.
Admin
Qudus
Thank you for this great article.
I followed every step successfully until I got to AUTHENTICATE THIS DORMAIN.
when I clicked on manage domains, I couldn’t find any DNS record or TXT for me to add the codes from Sendinblue.
Please what do I do?
WPBeginner Support
If you do not see where you can add the records, you would want to reach out to your hosting provider and they should be able to assist.
Admin
Brittany Pelegrino
Thank you so much for this awesome article! I was wondering if you could advise on where you need to point your subdomain to when creating the DNS record?
WPBeginner Support
Unless your hosting provider requires it, you shouldn’t need to point the subdomain to a specific location on your site or anywhere at all other than the records from our guide.
Admin
Oscar
hey i have the setup correct the test email went through however the email from the contact form was sent to promotions. what can i do to fix this?
WPBeginner Support
That would be determined by the email provider being used and not something the plugin would change sadly.
Admin
Michael
Tnx a lot for your guide. After not less than 10 different attempts to make my emails functionable, this did it. THANKS!
WPBeginner Support
Glad our guide was helpful
Admin
Paul
What if email domain and web site domain are different? In your instructions and also the instructions of sendinblue it was confusing under which of the two domains am I putting the records, getting authorization, etc.
WPBeginner Support
You would want to set up Sendinblue for the domain that is in the email address
Admin
Paul
Excuse my SMTP ignorance but can I use Sendinblue for sending email from that email address from my wordpress account if I already have that email account functioning elsewhere (in my case outlook)?
WPBeginner Support
Yes, you can customize the address you send the email from in Sendinblue.
Admin
Marlene Elizabeth
It worked with the WP Mail SMTP Configuration perfectly. Literally just had to changed the E-Mail. Thanks.
WPBeginner Support
Glad our guide was helpful
Admin
Lisa
Two days trying to resolve wordpress not sending attachment bigger than 1mb; nothing works.
Resolved in 1 minute thanks to you.
WPBeginner Support
Glad our guide was helpful
Admin
Martin N
Is there any way to do this but without a plugin?
WPBeginner Support
We do not have a recommended method to set this up without a plugin.
Admin
eva
Hi,i follow your steps. but my WordPress still don’t send an email now. I think i set up WP Mail SMTP successfully and test my private email, but when my clients subscribed, placed an order, canceled, and order, i didn’t receive a notification, either my clients. i have checked with my host server several times, they don’t know how to help me, and only clients’ reset passwords email was sent successfully after their help. Now they think there are must be something wrong with my woo commerce plugin or my theme.
I don’t know how to deal with this problem now, can you give me your suggestion?
WPBeginner Support
You may want to check with the support for the plugin to ensure they don’t override the sending method for emails.
Admin
Harold
I was able to use sindInBlue and get it to work. Whenever a customer fills out my form, I get an email with all the customers information. They only problem I have is that I would like to send a “confirmation” email to my customers email address, stating that we received their email and will respond within 24 hours.
WPBeginner Support
You would want to check with the options in your contact form for that.
Admin
Scott
In the tutorial, there is the line “Open up a new browser tab and log back into your web hosting account. You need to find your domain and open up the DNS records. ”
Do I open up the DNS of my domain, or the newly created subdomain?
WPBeginner Support
You would open your primary domain’s DNS and add the records that Sendinblue has given you to that.
Admin
Victoria
I was really struggling with this issue and your article really helped – thank you!
WPBeginner Support
You’re welcome, glad our guide helped
Admin
Tulay Girard
Great tutorial. Thank you!
WPBeginner Support
You’re welcome
Admin
Tolu
I thought this guide would help as my issue seemed similar but after going through this guide, im still not sure how to fix my issue. I’ve been trying to change the Admin email so I can receive order details. when I try to change it says the new email will not be recognized until the confirmation email (sent to old) is accepted. But that confirmation email is nowhere to be found. How to I change the admin email?
WPBeginner Support
If the message is not caught in your spam folder when you resent it, we would recommend taking a look at our guide below:
https://www.wpbeginner.com/beginners-guide/how-to-change-the-wordpress-admin-email
Admin
Rudy Ramkissoon
I’m receiving emails from non gmail accounts and getting error. Like the following below.
Address not foundYour message wasn’t delivered to example@example.com because the domain example.com couldn’t be found. Check for typos or unnecessary spaces and try again.
What can cause this?
WPBeginner Support
If the user did not type in their email address correctly would be the most common reason.
Admin
J H
I followed this guide and got “test email sent successfully” but I didn’t receive an email on my email account, how come?
WPBeginner Support
There are multiple possible reasons, you may want to ensure that the email did not get caught in your spam folder for a starting point
Admin
Joel
Thank You so very much for the step by step guidance… Was using the same plugin earlier and it stopped working… Following your instructions, have signed up for Sendinblue & now it works like a charm.
I have always followed most of the instructions from your blog… Thank You
WPBeginner Support
Glad our guide was able to help
Admin
lori
Hello, I’m a little confused. When I set up our site I contacted the web host (BlueHost) and they set up our email accounts using G-Suite so that we could use @ourdomain for our emails. They said it would be complicated to do, so they set it up without explaining the details. We pay for each email account set up this way. After reading this post, I’m wondering if I’m also supposed to set up the WP Mail SMTP plugin. Do I need to go back and set up this plugin also for the best email performance, or would that not apply in our situation? Thank you.
WPBeginner Support
We would recommend using SMTP to send your emails still as having a custom email address does not change how WordPress sends emails.
Admin
John
Thanks for this but why do we need to create a subdomain?
WPBeginner Support
To ensure that connections going there are for email and not possible site visitors
Admin
Jack
This was super helpful, super easy to follow and fixed my issue Thanks!
WPBeginner Support
You’re welcome, glad our guide was helpful
Admin
Daniel
You guys really help me out . I really need this information.
WPBeginner Support
Glad we could help you with our guide
Admin
Bob
Thank you for the guidance..
WPBeginner Support
You’re welcome
Admin
Julie
Thank you for the guidance..
WPBeginner Support
You’re welcome
Admin
Peter
Thank you for the guidance.
WPBeginner Support
You’re welcome
Admin
Corinne
Followed along on how to fix the issue of WordPress not sending emails. Worked great until about half way through. What was on the website to what was actually happening totally off from each other. Did not successfully complete the task and not sure what to do next. Please update the help on the website. Thanks!!
WPBeginner Support
We will certainly take a look at what needs to be updated in this article.
Admin
Kate
Thanks for the tutorial, it has changed a bit in google dev since you wrote it but I got there in the end. And emails are being sent and received!
WPBeginner Support
You’re welcome, it’s difficult to keep up with Google’s changes but glad our article could still be helpful
Admin
Shahbaaz
I am not receiving WordPress password recovery emails or WordPress confirm emails. What should I do ? I am using Google cloud hosting trial. I am a beginner. Please help!
WPBeginner Support
It may be the method that WordPress is sending emails, you can change the method your site sends emails using our article here: https://www.wpbeginner.com/plugins/how-to-send-email-in-wordpress-using-the-gmail-smtp-server/
Admin
Carla
Hi there, thanks for this amazing tutorial and so well explained – However I’m still unable to overcome the problem on the main settings. I’m using contactform7 and forms aren’t working duo to this issue. I’m not receiving any email at all to be able to confirm the address change.
WPBeginner Support
If you set up SMTP properly and the emails are not sending correctly then you would want to reach out to your form’s support to ensure there isn’t an issue with the form itself.
Admin
Emmanuel
I am currently using Google Gmail setup and was able to follow the steps to create the Gmail api to connect the Client ID and Secret ID. I can test the redirection URL and login to Google all right. However, I’m unable to send a Test Email. All of sudden the “Force From Email” check box is also grayed out and uncheck. I can’t check that box. Please help
WPBeginner Support
For issues with the plugin, please reach out to the plugin’s support through the support forum and they should be able to assist.
Admin
Adi Hermanto
Thanks for brilliant tutorial mate, really did help solve an issue which wasted hours of my time.
WPBeginner Support
Glad our article could help solve the problem
Admin
Ankit
Thanks !!!
Which theme are you using?
WPBeginner Support
Hi Ankit,
We are using a custom theme made on top of Genesis framework.
Admin
Penina
Thank you for the tutorial. It works so well!
mudasir abbas turi
Hello dear thank you very much i got success
Pugazhendhi
I got an error message 403 forbidden at the last stage of setting up the gmail smtp.Can you suggest me something so that I can resolve it to send an email of the enquiry form that i have created using contact form 7.
Joel
I installed the WP Mail SMTP plugin and although you made a great effort to demonstrate connectivity with mailgun, your info was not necessarily dated with Godaddy’s cpanel. I decided to go with Sendgrid which was a much easier set process than mailgun.
brad
i successfully installed WP Mail SMTP and got the confirmation test email. However, I don’t know how to attach it to my website. The current contact form in zerif lite gives me an error message. Please advise. Thanks.
WPBeginner Support
Hi Brad,
Please contact your theme support. Alternately you can use WPForms Lite to add a contact form to your website.
Admin
Jason
I was able to set up WP Mail SMTP to work with Contact Form 7, but in all emails we receive they always show my gmail as the sender but not the real senders email. Is there anyway to fix this problem?
Josin
I get the following error when I try to authorize the plugin to send mails using Gmail.
“The Web server is configured to not list the contents of this directory or you do not have enough permissions to access the resource”
How can I tackle this error?
Alicia
I tried twice to follow these directions and everything was going according to plan… But then at the end… and error message! Anyone know what this means?
The OAuth client was not found.
Will
My problem is that wordpress won’t send emails to or from an address that is coming from my domain name. E.g. @domain.com. But it will send from any other email address type.
Md Sajid
i successfully setup my site, and it is working very well.
thanks for this nice and working tutorial..
i used gmail api first method..
SORRY FOR MY BAD ENGLISH