El error ‘413 Request Entity Too Large’ puede aparecer cuando intentas subir un archivo de tema o plugin en WordPress. Significa que el archivo es mayor que el límite máximo de subida de archivos permitido en su sitio web.
Llevamos varios años ayudando a los usuarios de WordPress a diagnosticar errores como éste, así que sabemos lo frustrante que puede llegar a ser.
En la guía de hoy, le mostraremos cómo diagnosticar el error ‘413: Request Entity Too Large’ aumentando el tamaño de subida del archivo.
¿Cuál es la causa del error WordPress 413 Request Entity Too Large?
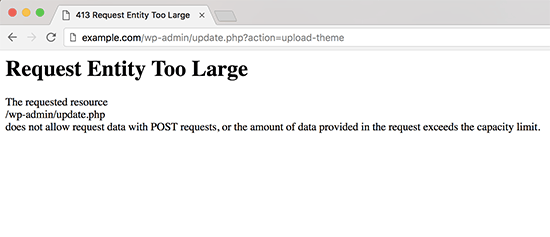
Este error suele producirse cuando intenta subir un archivo que supera el límite máximo de subida de archivos de su sitio web WordPress.
Su servidor web no podrá subir el archivo, y verá el mensaje de error ‘413 Request Entity Too Large’.
Normalmente, la mayoría de las empresas de alojamiento de WordPress tienen sus servidores configurados para que los usuarios de WordPress puedan subir fácilmente imágenes grandes y otros medios.
Sin embargo, a veces, este ajuste no es suficiente para subir archivos grandes de temas o plugins.
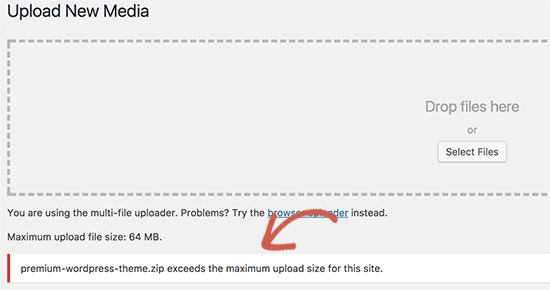
La configuración del servidor también puede impedir que subas archivos grandes a la biblioteca de medios. En este caso, verás un mensaje diferente en el que se indica claramente que el tamaño del archivo supera el límite máximo permitido.
Dicho esto, veamos cómo corregir el error de WordPress ‘413 Request Entity Too Large’.
Corrección del error 413 Request Entity Too Large en WordPress
Existen múltiples formas de corregir el error de entidad de petición demasiado grande en WordPress. Cubriremos todos estos métodos y podrás probar el que mejor te funcione.
Puede utilizar los enlaces rápidos que aparecen a continuación para saltar al método que desee utilizar:
Consejo de experto: ¿Prefieres no diagnosticar tú mismo? Nuestros servicios de soporte Premium WordPress pueden corregir el error 413 y cualquier otro problema en su sitio web WordPress.
Método 1: Aumentar el límite de tamaño del archivo subido usando WPCode (Recomendado)
Puedes editar directamente el archivo functions. php de tu tema. Sin embargo, desaconsejamos este método porque incluso los pequeños errores pueden romper tu sitio web.
Por eso recomendamos usar WPCode en su lugar. Es el mejor plugin de fragmentos de código de WordPress que te permite aumentar el límite de tamaño del archivo de subida sin editar directamente el archivo functions.php.
En primer lugar, tendrás que instalar y activar el plugin gratuito WPCode. Para más detalles, consulta nuestra guía sobre cómo instalar un plugin de WordPress.
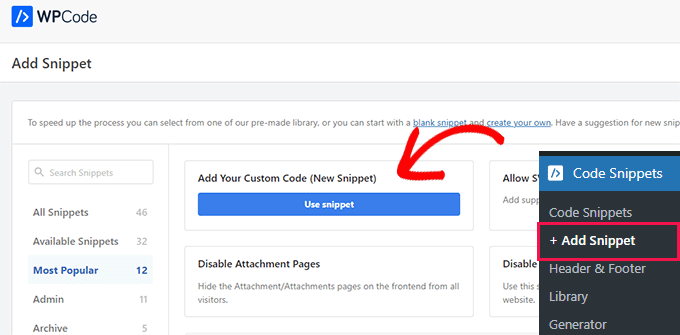
A continuación, debe ir a Fragmentos de código ” Añadir fragmento en la barra lateral del administrador de WordPress. A continuación, pase el ratón por encima de la opción “Añadir su código personalizado (nuevo fragmento)” y haga clic en el botón “Usar fragmento”.
Puede introducir un título para el fragmento de código en la parte superior para encontrarlo fácilmente.
Ahora debe introducir el siguiente código en la casilla “Vista previa del código”:
1 2 3 | @ini_set( 'upload_max_size' , '120M' );@ini_set( 'post_max_size', '120M');@ini_set( 'max_execution_time', '300' ); |
Asegúrese de seleccionar también “Fragmento de código PHP” en el menú desplegable “Tipo de código”.
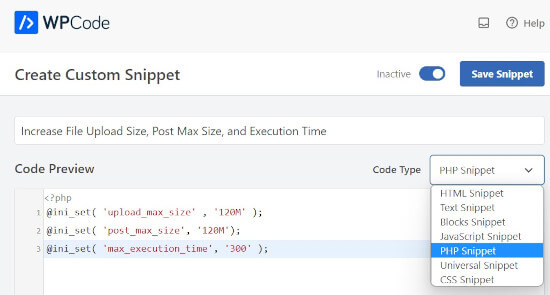
Puede aumentar los valores en upload_max_size y post_max_size para que sean mayores que el archivo que está intentando subir.
También tendrás que aumentar el max_execution_time al tiempo que crees que tardaría en subirse el archivo. Si no está seguro, puede intentar duplicar este valor.
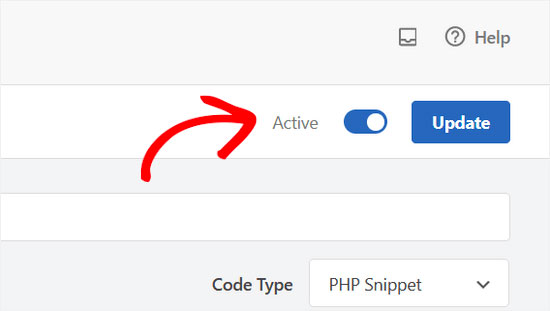
Por último, asegúrese de activar el fragmento de código de “Inactivo” a “Activo” en la parte superior de la página y haga clic en “Actualizar”. Esto ejecutará el fragmento de código en su sitio de WordPress.
Para más detalles, consulte nuestra guía sobre cómo añadir fácilmente código personalizado en WordPress.
Método 2: Aumentar el límite de tamaño del archivo de subida mediante el archivo .htaccess
Para este método, necesitará acceder y editar su archivo .htaccess usando un cliente FTP o la aplicación de gestión de archivos en el cPanel de su alojamiento web. Tenga en cuenta que no tendrá acceso a este archivo si su proveedor de alojamiento utiliza NGINX en lugar de un servidor Apache.
Para más detalles, consulte nuestra guía sobre cómo utilizar FTP en WordPress.
A continuación, añada el siguiente código al final del archivo .htaccess:
1 2 3 4 | php_value upload_max_filesize 64Mphp_value post_max_size 64Mphp_value max_execution_time 300php_value max_input_time 300 |
Puede cambiar cada uno de los valores numéricos para que sea mayor que el tamaño del archivo que está intentando subir. A continuación, asegúrese de guardar y volver a cargar el archivo .htaccess en su servidor.
Para saber más acerca de cómo aumentar el límite de tamaño de subida de archivos, consulte nuestra guía sobre cómo aumentar el tamaño máximo de subida de archivos en WordPress.
Método 3: Subir archivo manualmente vía FTP
Si el error 413 solo se produce al subir un archivo concreto, puede que le interese subirlo manualmente por FTP.
Si está intentando subir un tema de WordPress, consulte nuestra guía sobre cómo instalar un tema de WordPress y vaya a la sección ‘Instalar un tema de WordPress mediante FTP’.
Si está intentando subir un plugin, consulte nuestra guía sobre cómo instalar un plugin de WordPress y vaya a la sección ‘Instalar manualmente un plugin de WordPress mediante FTP’.
Para otros archivos, puede consultar nuestra guía sobre cómo subir manualmente archivos de WordPress mediante FTP.
Esperamos que este artículo te haya ayudado a aprender cómo corregir el error de WordPress ‘413 Request Entity Too Large’. Puede que también quieras aprender cómo corregir errores en WordPress y ver la selección de nuestros expertos sobre los plugins de WordPress imprescindibles para hacer crecer tu sitio web.
If you liked this article, then please subscribe to our YouTube Channel for WordPress video tutorials. You can also find us on Twitter and Facebook.


fykto
In instances where you get an immediate 413 response and you are certain the PHP file upload limits are set appropriately, check the web server (Apache or Nginx) settings on max allowed body size.
WPBeginner Support
Thank you for sharing another option to try, for most beginner users we would recommend reaching out to your host for checking if this can help!
Admin
Harry
I am getting it on one site in the admin side when trying to update a site
WPBeginner Support
If you continue to receive the error after trying our recommendations, we would recommend reaching out to your hosting provider and they can normally assist.
Admin
Kirsty
This is so frustrating. I’ve done the functions.php and amended and it still isn’t working.
I’ve never had an issue uploading this theme anywhere else
WPBeginner Support
Your host may be overriding any changes. If you reach out to your hosting provider they should be able to assist
Admin
Sally Pilkington
Hi, I think the code in Method 1 should go in the wp-config.php file, not the functions.php file as you suggested – could you check this? I think it would break functions.php and cause white screen…
WPBeginner Support
The code should still go in the functions.php and would not cause a while screen error.
Admin
Jakob
Hello,
I´m not that much into coding..
Where exactly should i put the code in the functions.php file, recommendod in the first solution? and are there any special signs needed? to start / end it f.e.?
Thanks
WPBeginner Support
For where to place the code, we normally recommend placing the code at the bottom of the functions.php file to make it easier to find. You should be able to directly copy the code and for our recommendations on this, you would want to take a look at our article here: https://www.wpbeginner.com/beginners-guide/beginners-guide-to-pasting-snippets-from-the-web-into-wordpress/
Admin
Ken
Since this is one of the first hits on Google, I will add this-
If you are using a CDN like Cloudflare and continue to receive error 413 after making the adjustments, bypass your CDN, either by turning it off, or adding an entry to your hosts file to bypass the CDN. Sometimes the CDN has a limit set below what you have and you are just ramming your head against a wall needlessly.
WPBeginner Support
Thank you for adding your recommendation
Admin
Sujal
I have tried even I have changed the limit and clearly showing the limit upto 5GB but couldn’t be uploaded ?? said same error ?? please help?
sachin
I got the following message while updating menu in WordPress dashboar.
[Request Entity Too Large
The requested resource
/wp-admin/nav-menus.php
does not allow request data with POST requests, or the amount of data provided in the request exceeds the capacity limit.]
Could you please tell me the solution for it.
WPBeginner Support
Hi Sachin,
Have you tried the solution described in the article?
Admin
Brian
The 413 error is a response from the web server, so you need to add a line to the configuration file. In my case it was nginx, so I added the following to nginx.conf in the html section of the file…
client_max_body_size 32m;
After that I restarted nginx and the upload worked.