Los tipos de contenido personalizados le permiten ir más allá de las entradas y páginas estándar. Le permiten crear diversos tipos de contenido adaptados a las necesidades específicas de su sitio.
Por ejemplo, los tipos de contenido personalizados le permiten transformar su sitio WordPress de una simple plataforma de blogs en un sólido sistema de gestión de contenidos(CMS).
Por eso utilizamos algunos tipos de contenido personalizados en nuestros sitios web. En esta guía, le mostraremos cómo crear fácilmente tipos de contenido personalizados en WordPress.

¿Qué es un tipo de contenido personalizado en WordPress?
En su sitio web WordPress, los tipos de entradas se utilizan para ayudar a distinguir entre los diferentes tipos de contenido en WordPress. Tanto las entradas como las páginas son tipos de contenido, pero tienen propósitos diferentes.
Por defecto, WordPress viene con algunos tipos de entradas diferentes:
- Entradas
- Página
- Adjunto
- Revisión
- Menú de navegación
Dicho esto, puede crear sus propios tipos de entradas, conocidos como tipos de contenido personalizados. Son útiles para crear contenido con un formato diferente al de una entrada o página estándar.
Supongamos que tiene un sitio web de reseñas / valoración de películas. En ese caso, probablemente querrías crear un tipo de entradas para “reseñas / valoraciones de películas”. También puedes crear tipos de contenido personalizados para porfolios, testimonios, productos, etc.
Además, los tipos de contenido personalizados pueden tener diferentes campos personalizados y su propia estructura de categorías personalizada.
En WPBeginner, por ejemplo, utilizamos tipos de contenido personalizados para nuestras secciones de Ofertas y Glosario para mantenerlas separadas de los artículos diarios de nuestro blog. Esto nos ayuda a organizar mejor el contenido de nuestro sitio web.
Muchos plugins populares de WordPress utilizan tipos de contenido personalizados para almacenar datos en su sitio web de WordPress. Los siguientes son algunos de los principales plugins que utilizan tipos de contenido personalizado:
- WooCommerce añade un tipo de contenido ‘producto’ a tu tienda online
- WPForms crea un tipo de entrada ‘wpforms’ para almacenar todos sus formularios
- MemberPress añade un ‘memberpressproduct’ tipo de contenido personalizado de entrada
Tutorial en vídeo
Si prefiere instrucciones escritas, siga leyendo.
¿Necesito crear tipos de contenido personalizados?
Antes de empezar a crear tipos de contenido personalizados en su sitio de WordPress, es importante evaluar sus necesidades. A menudo, puedes conseguir los mismos resultados con una entrada o página normal.
Si no está seguro de si su sitio necesita tipos de contenido personalizados, consulte nuestra guía sobre cuándo necesita un tipo de contenido personalizado o una taxonomía en WordPress.
Con esto en mente, echemos un vistazo a cómo crear fácilmente tipos de contenido personalizados en WordPress para su propio uso. Le mostraremos dos métodos y también cubriremos algunas formas de mostrar tipos de contenido personalizados en su sitio web de WordPress:
¿Preparados? Primeros pasos.
Creación manual de un tipo de contenido personalizado mediante WPCode
Crear un tipo de contenido personalizado requiere que añadas código al archivo functions. php de tu tema. Sin embargo, no recomendamos esto a nadie que no sea un usuario avanzado, ya que incluso un pequeño error puede romper su sitio. Además, si actualizas tu tema, el código se borrará.
En su lugar, vamos a utilizar WPCode, la forma más fácil y segura para que cualquiera pueda añadir código personalizado a su sitio web de WordPress.
Con WPCode, puedes añadir fragmentos de código personalizados y activar un montón de características de su biblioteca de código integrada y preconfigurada. En otras palabras, puede sustituir a muchos plugins dedicados o de un solo uso que puedas tener instalados.
En primer lugar, tendrás que instalar y activar el plugin gratuito WPCode. Para obtener instrucciones detalladas, marca / comprobar nuestra guía paso a paso sobre cómo instalar un plugin de WordPress.
Una vez activado, vaya a Fragmentos de código “ Añadir fragmento desde su escritorio de WordPress. A continuación, pase el cursor por encima de “Añadir su código personalizado (nuevo fragmento)” y haga clic en “Usar fragmento”.
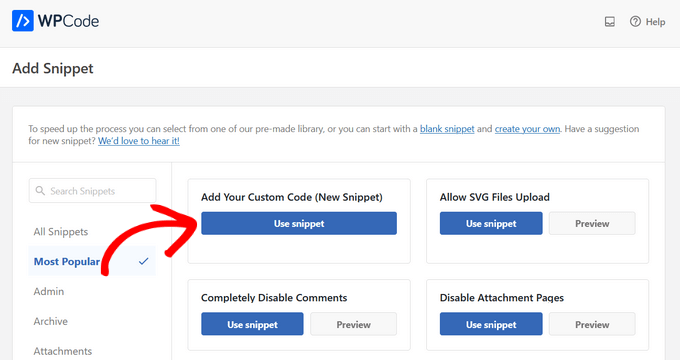
Se abrirá la pantalla “Crear fragmento de código personalizado”.
Ahora puede crear el título del fragmento de código y activar el conmutador.
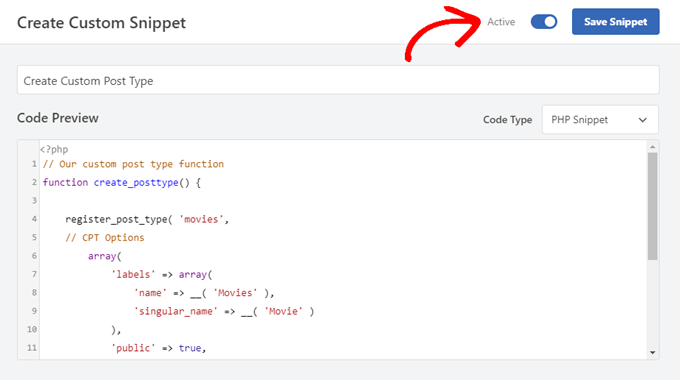
Después de eso, simplemente pegue el siguiente código en el área ‘Vista previa del código’. Este código crea un tipo de contenido personalizado básico llamado ‘Películas’ que aparecerá en la barra lateral del administrador y funcionará con cualquier tema.
1 2 3 4 5 6 7 8 9 10 11 12 13 14 15 16 17 18 19 20 | // Our custom post type functionfunction create_posttype() { register_post_type( 'movies', // CPT Options array( 'labels' => array( 'name' => __( 'Movies' ), 'singular_name' => __( 'Movie' ) ), 'public' => true, 'has_archive' => true, 'rewrite' => array('slug' => 'movies'), 'show_in_rest' => true, ) );}// Hooking up our function to theme setupadd_action( 'init', 'create_posttype' ); |
Si sólo desea un tipo de contenido personalizado básico, entonces sólo tiene que sustituir las películas y Películas con su propia CPT slug y el nombre y haga clic en el botón ‘Actualizar’.
Sin embargo, si desea aún más opciones para su tipo de contenido personalizado, debe utilizar el siguiente código en lugar del anterior.
El código siguiente añade muchas más opciones al tipo de contenido personalizado “Películas”, como el soporte para revisiones, imágenes destacadas y campos personalizados, así como la asociación del tipo de contenido personalizado con una taxonomía personalizada denominada “géneros”.
Nota: No combine estos dos fragmentos, o WordPress le dará un error porque ambos fragmentos registran el mismo tipo de contenido personalizado. Recomendamos crear un fragmento de código completamente nuevo utilizando WPCode para cada tipo de entrada adicional que desee registrar.
1 2 3 4 5 6 7 8 9 10 11 12 13 14 15 16 17 18 19 20 21 22 23 24 25 26 27 28 29 30 31 32 33 34 35 36 37 38 39 40 41 42 43 44 45 46 47 48 49 50 51 52 53 54 55 56 57 58 59 60 61 62 63 64 | /** Creating a function to create our CPT*/ function custom_post_type() { // Set UI labels for Custom Post Type $labels = array( 'name' => _x( 'Movies', 'Post Type General Name', 'twentytwentyone' ), 'singular_name' => _x( 'Movie', 'Post Type Singular Name', 'twentytwentyone' ), 'menu_name' => __( 'Movies', 'twentytwentyone' ), 'parent_item_colon' => __( 'Parent Movie', 'twentytwentyone' ), 'all_items' => __( 'All Movies', 'twentytwentyone' ), 'view_item' => __( 'View Movie', 'twentytwentyone' ), 'add_new_item' => __( 'Add New Movie', 'twentytwentyone' ), 'add_new' => __( 'Add New', 'twentytwentyone' ), 'edit_item' => __( 'Edit Movie', 'twentytwentyone' ), 'update_item' => __( 'Update Movie', 'twentytwentyone' ), 'search_items' => __( 'Search Movie', 'twentytwentyone' ), 'not_found' => __( 'Not Found', 'twentytwentyone' ), 'not_found_in_trash' => __( 'Not found in Trash', 'twentytwentyone' ), ); // Set other options for Custom Post Type $args = array( 'label' => __( 'movies', 'twentytwentyone' ), 'description' => __( 'Movie news and reviews', 'twentytwentyone' ), 'labels' => $labels, // Features this CPT supports in Post Editor 'supports' => array( 'title', 'editor', 'excerpt', 'author', 'thumbnail', 'comments', 'revisions', 'custom-fields', ), // You can associate this CPT with a taxonomy or custom taxonomy. 'taxonomies' => array( 'genres' ), /* A hierarchical CPT is like Pages and can have * Parent and child items. A non-hierarchical CPT * is like Posts. */ 'hierarchical' => false, 'public' => true, 'show_ui' => true, 'show_in_menu' => true, 'show_in_nav_menus' => true, 'show_in_admin_bar' => true, 'menu_position' => 5, 'can_export' => true, 'has_archive' => true, 'exclude_from_search' => false, 'publicly_queryable' => true, 'capability_type' => 'post', 'show_in_rest' => true, ); // Registering your Custom Post Type register_post_type( 'movies', $args ); } /* Hook into the 'init' action so that the function* Containing our post type registration is not * unnecessarily executed. */ add_action( 'init', 'custom_post_type', 0 ); |
Puede que haya notado que hemos establecido el valor jerárquico en false. Si desea que su tipo de contenido personalizado se comporte como páginas en lugar de entradas, puede establecer este valor en true.
Otro aviso a tener en cuenta es el uso repetido de la cadena twentytwentyone , que se denomina “Dominio de texto”. Si tu tema está preparado para la traducción y quieres que tus tipos de contenido personalizados sean traducidos, entonces tendrás que mencionar el dominio de texto utilizado por tu tema.
Puedes encontrar el dominio de texto de tu tema dentro del archivo style.css en el directorio de tu tema o yendo a Apariencia “ Editor de archivos de tema en tu panel de administrador. El dominio de texto se mencionará en la cabecera del archivo.
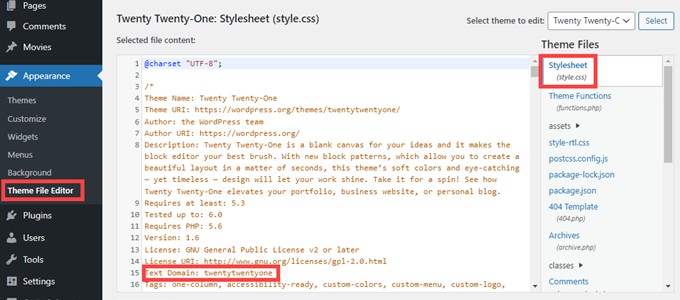
Simplemente sustituya twentytwentyone por el ‘Dominio de texto’ de su propio tema.
Una vez que estés satisfecho con los cambios, simplemente haz clic en el botón “Actualizar”, y WPCode se encargará del resto.
Creación de un tipo de contenido personalizado con un plugin
Otra forma fácil de crear un tipo de contenido personalizado en WordPress es usando un plugin. Este método se recomienda para principiantes porque es seguro y súper fácil.
Lo primero que tienes que hacer es instalar y activar el plugin Custom Post Type UI. Para más detalles, consulta nuestra guía paso a paso sobre cómo instalar un plugin de WordPress.
Una vez activado, tienes que ir a CPT UI ” Añadir / Editar tipos de entradas para crear un nuevo tipo de contenido personalizado. Usted debe estar en la pestaña “Añadir nuevo tipo de contenido”.
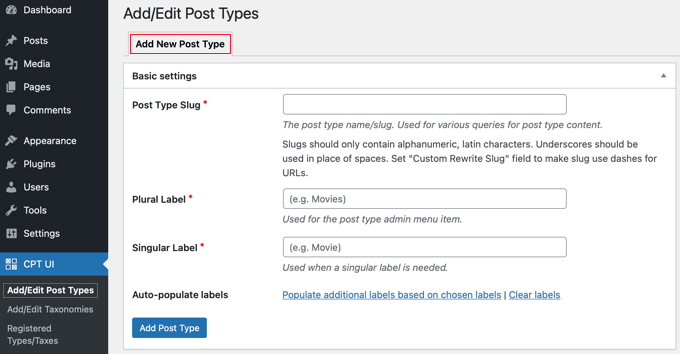
En esta área, tendrá que proporcionar un slug para su tipo de contenido personalizado, como ‘películas’. Este slug se utilizará en la URL y en las consultas de WordPress, por lo que solo puede contener letras y números.
Debajo del campo slug, debe proporcionar los nombres en plural y singular para su tipo de contenido personalizado.
Si lo desea, puede enlazar con el enlace “Rellenar etiquetas adicionales a partir de las etiquetas seleccionadas”. Esto rellenará automáticamente los campos de etiquetas adicionales de abajo y normalmente le ahorrará tiempo.
Ahora puede desplazarse hasta la sección “Etiquetas adicionales”. Si no enlazaste el enlace que mencionamos, tendrás que proporcionar una descripción para tu tipo de contenido y cambiar las etiquetas.
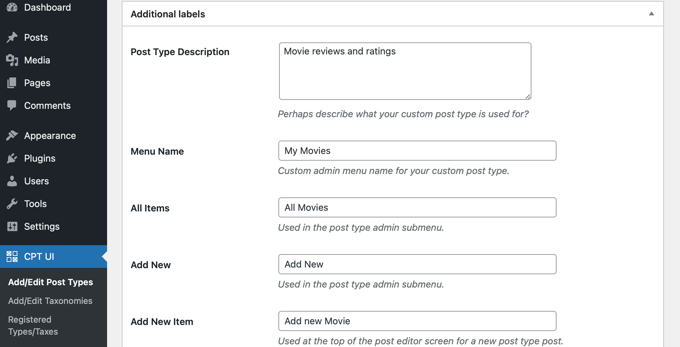
Estas etiquetas se utilizarán en toda la interfaz de usuario de WordPress cuando esté gestionando el contenido de ese tipo de entradas en particular.
Lo siguiente son los ajustes del tipo de entradas. Desde aquí, puedes establecer diferentes atributos para tu tipo de entradas. Cada opción viene con una breve descripción que explica lo que hace.
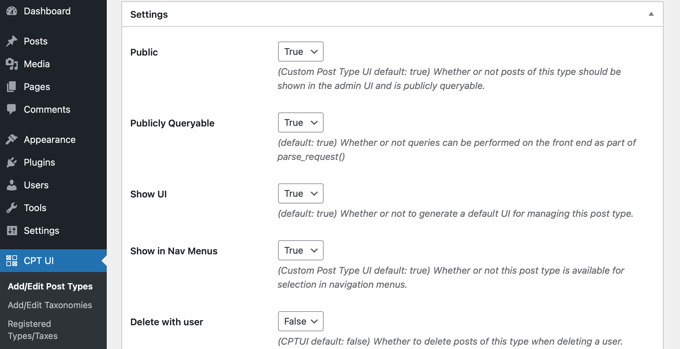
Por ejemplo, puede elegir no jerarquizar un tipo de entrada como las páginas u ordenar las entradas cronológicas al revés.
Debajo de los ajustes generales, verás la opción para seleccionar qué características de edición es compatible con este tipo de entradas. Simplemente marque / compruebe las opciones que desea incluir.
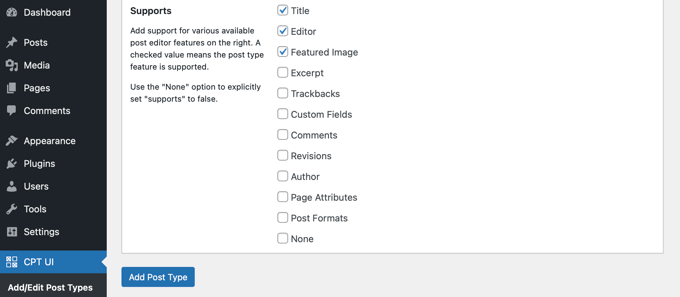
Por último, haga clic en el botón “Añadir tipo de entradas” para guardar y crear su tipo de contenido personalizado.
Eso es todo, ¡ha creado correctamente su tipo de contenido personalizado! Ahora puede seguir adelante y empezar a añadir contenido.
Visualización de tipos de contenido personalizados en su sitio web
WordPress viene con soporte integrado para mostrar tus tipos de contenido personalizados. Una vez que haya añadido algunos elementos a su nuevo tipo de contenido personalizado, es hora de mostrarlos en su sitio web.
Hay varios métodos que puedes utilizar, y cada uno tiene sus propias ventajas.
Visualización de tipos de contenido personalizados utilizando la plantilla de archivo por defecto
En primer lugar, sólo tiene que ir a Apariencia ” Menús y añadir un enlace personalizado a su menú. Este enlace personalizado es el enlace a su tipo de contenido personalizado.
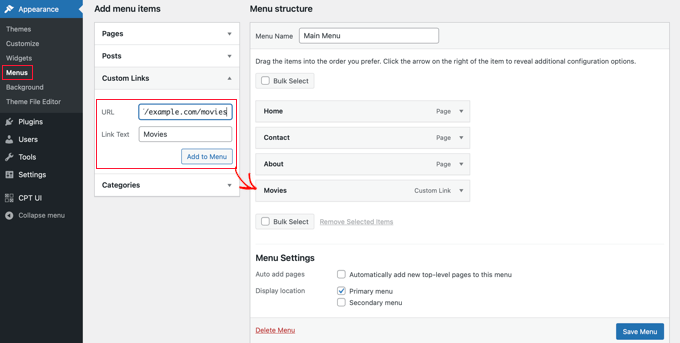
Si está utilizando enlaces permanentes SEO-friendly, entonces la URL de su tipo de contenido personalizado será probablemente algo como esto:
http://example.com/movies |
Si no está utilizando enlaces permanentes SEO-friendly, entonces su URL de tipo de contenido personalizado será algo como esto:
http://example.com/?post_type=movies |
No olvide sustituir “ejemplo.com” por su propio nombre de dominio y “películas” por el nombre de su tipo de contenido personalizado.
A continuación, puede guardar su menú y visitar el front-end de su sitio web. Verá el nuevo elemento de menú que ha añadido y, al hacer clic en él, se mostrará la página de archivo de su tipo de contenido personalizado utilizando el archivo de plantilla archive.php de su tema.

Creación de plantillas de tipo de contenido personalizado para entradas
Si no le gusta la apariencia de la página de archivo para su tipo de contenido personalizado, puede utilizar una plantilla dedicada para archivos de tipo de contenido personalizado.
Todo lo que tienes que hacer es crear un nuevo archivo en el directorio de tu tema y llamarlo archive-movies.php. Asegúrese de reemplazar “películas” con el nombre de su tipo de contenido personalizado.
Para empezar, puede copiar el contenido del archivo archive.php de su tema en la plantilla archive-movies. php y modificarlo para adaptarlo a sus necesidades.
Ahora, siempre que se acceda a la página de archivo de su tipo de contenido personalizado, se utilizará esta plantilla para mostrarla.
Del mismo modo, puede crear una plantilla personalizada para la visualización de una sola entrada de su tipo de registro. Para ello necesitas crear single-movies.php en el directorio de tu tema. No olvides sustituir ‘movies’ por el nombre de tu tipo de contenido personalizado.
Puede empezar copiando el contenido de la plantilla single. php de su tema en la plantilla single-movies. php y modificándola para adaptarla a sus necesidades.
Para obtener más información, consulte nuestra guía sobre cómo crear plantillas de entradas individuales personalizadas en WordPress.
Visualización de tipos de contenido personalizados en la página de inicio
Una de las ventajas de utilizar tipos de contenido personalizados es que mantienen los tipos de contenido personalizados separados de las entradas normales. Sin embargo, si lo desea, puede mostrar tipos de contenido personalizados en la página de inicio de su sitio web.
Simplemente añade este código como un nuevo fragmento de código utilizando el plugin gratuito WPCode. Consulte la sección de este artículo sobre la adición manual de código para obtener instrucciones detalladas.
1 2 3 4 5 6 7 | add_action( 'pre_get_posts', 'add_my_post_types_to_query' ); function add_my_post_types_to_query( $query ) { if ( is_home() && $query->is_main_query() ) $query->set( 'post_type', array( 'post', 'movies' ) ); return $query;} |
No olvide sustituir ‘películas’ por su tipo de contenido personalizado.
Consulta de tipos de contenido personalizados para entradas
Si está familiarizado con el código y desea ejecutar consultas de bucle en sus plantillas, a continuación le explicamos cómo hacerlo. Consultando la base de datos, puede recuperar elementos de un tipo de contenido personalizado.
Deberá copiar el siguiente fragmento de código en la plantilla donde desee mostrar el tipo de contenido personalizado.
1 2 3 4 5 6 7 8 9 10 11 12 13 14 15 | <?php $args = array( 'post_type' => 'movies', 'posts_per_page' => 10 );$the_query = new WP_Query( $args ); ?><?php if ( $the_query->have_posts() ) : ?><?php while ( $the_query->have_posts() ) : $the_query->the_post(); ?><h2><?php the_title(); ?></h2><div class="entry-content"><?php the_content(); ?> </div><?php endwhile;wp_reset_postdata(); ?><?php else: ?><p><?php _e( 'Sorry, no posts matched your criteria.' ); ?></p><?php endif; ?> |
Este código define el tipo de contenido y el número de entradas por página en los argumentos de nuestra nueva clase WP_Query. Luego ejecuta la consulta, recupera las entradas y las muestra dentro del bucle.
Visualización de tipos de contenido personalizados en widgets
Usted notará que WordPress tiene un widget por defecto para mostrar entradas recientes, pero no le permite elegir un tipo de contenido personalizado.
¿Qué pasaría si quisieras mostrar las últimas entradas de tu tipo de contenido recién creado en un widget? Por suerte, hay una manera fácil de hacerlo.
Lo primero que tienes que hacer es instalar y activar el plugin Custom Post Type Widgets. Para más detalles, consulta nuestra guía paso a paso sobre cómo instalar un plugin de WordPress.
Una vez activado, simplemente ve a Apariencia ” Widgets y arrastra y suelta el widget ‘Entradas recientes (tipo de contenido personalizado)’ en una barra lateral.
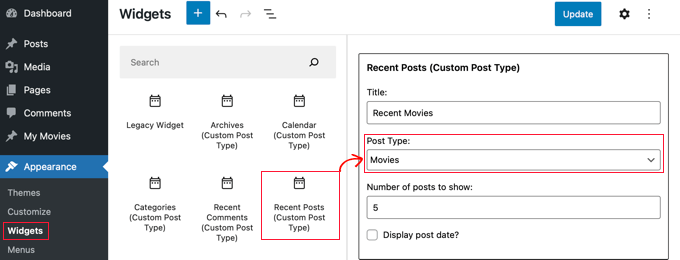
Este widget te permite mostrar entradas recientes de cualquier tipo de contenido. Debe seleccionar su tipo de contenido personalizado en el menú desplegable “Tipo de entrada” y seleccionar las opciones que desee.
Después, asegúrese de hacer clic en el botón “Actualizar” de la parte superior de la pantalla y visite su sitio web para ver el widget en acción.

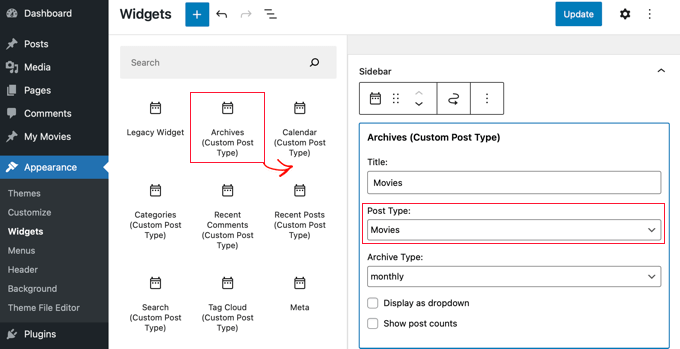
El plugin también proporciona widgets de tipo de contenido personalizado que muestran archivos, un calendario, categorías, comentarios recientes, búsqueda y una nube de etiquetas.
Así que no dudes en explorar y elegir el que necesites.
Esperamos que este tutorial te haya ayudado a aprender cómo crear tipos de contenido personalizados en WordPress. A continuación, es posible que también desee aprender cómo crear una página de archivo personalizado en WordPress o comprobar nuestra lista de páginas importantes que cada blog de WordPress debe tener.
If you liked this article, then please subscribe to our YouTube Channel for WordPress video tutorials. You can also find us on Twitter and Facebook.


R Davies
You have a syntax error in your second (more detailed) example, code does not work in latest WordPress 7.4.3
) Warning: call_user_func_array() expects parameter 1 to be a valid callback, function ‘custom_post_type’ not found or invalid function name
Any chance of an update / correction?
WPBeginner Support
Hi R Davies,
We checked and it worked perfectly.
Admin
Archit
Is the comma at the end if the supports array (in the options for the custom post type) deliberate?
Robert Stuart
On line 31? Yes, that’s normal PHP code.
“The comma after the last array element is optional and can be omitted. This is usually done for single-line arrays, i.e. array(1, 2) is preferred over array(1, 2, ). For multi-line arrays on the other hand the trailing comma is commonly used, as it allows easier addition of new elements at the end.”
saurabh
How to enable ‘Post Settings’ in Custom_Post_type (using Custom Post Type UI Plugin)?
Arias
Hello, I have been having problems with this plugin.
It has disabled the option to create categories and tags,
I have been looking for an example to place them manually but I still have not found anything.
I am trying to undo if with this method I can fix the problem but I would greatly appreciate your help.
stormonster
In your $args array, on the ‘taxonomies’ index, add ‘category’ and ‘post_tag’.
That should do the trick.
John D
Way too much coding. WordPress need to keep things more simple.
Ilija
This is why I use my own CMS where I can create new post types in a fraction of a second directly through cms itself. Without any coding, unfortunately big agencies want WordPress developers and have to learn it, seems so complicated..
Sarah A
Hi, i’ve succeded to display group of CPT with a specific design in a pop-up when you click on a image like the first one But it opens a new page and when you click out of the pop-up to quit you don’t return to the homepage, and i don’t want that. I want all on the homepage.
I’ve put the code of the CPT to display as the pop-up on “single-chg_projet.php” and open and close the pop-up with javascript. I’ve already tried to put all the code of single-chg_projet.php on the index, but it display nothing. Or i may be failed somewhere. Please help me. Thanks
Ghulam Mustafa
Hi,
Thanks for the great code. Just a minor correction to the code. The endwhile; statement is missing before else: statement in the Querying Custom Post Types section =)
Tony Peterson
THIS! Please update your code to reflect this syntax error as it caused me a bit of heartache until I found Ghulam’s comment. It’s working now.
Arkanum
Yes! True. It’s miss befire wp_reset_postdate();
The cycle while does not end
Azamat
Typo: “When doi I need a custom post type?”
WPBeginner Support
Thanks for notifying us We have updated the article.
Admin
Jhon
hey, can you guide me in the process of making a custom glossary like you have on your site?
WPBeginner Support
We use a custom fields and a custom template to display Glossary terms.
Admin
Anil Reddy
I want to create list type for posts in the category page for my website
david ben oren
how do i clone a post type which has a speicifc table in it, i need to create a seperate post type for other tables.
betty
How do I add a custom field to a Post Type?
WPBeginner Support
Please see our guide WordPress Custom Fields 101.
Admin
Megan
I’ve downloaded the plugin and want to add two custom post types. 1. Fanfiction for all of my writings and 2. Fanart for all of my art.
For Fanfiction – I want the ability to link chapters together into a story and be able to upload chapters to a story as I write them.
For Fanart – I’d like to have the focus be on an image (obviously) with a description underneath it
Is this article what I need or this something completely different?
Thanks,
Megan
Zubair Abbas
Hi,
I simply copied the code to my site’s functions.php. The new post type is visible in the dashboard but when I try to see a post after publishing it, a blank page appears. Later I realised that even the default posts are not opening.
When I remove the code from functions.php everything works fine again.
Please help
Thanks,
Zubair Abbas
Jouke Nienhuis
If you see a blank page, it often means that you forgot a character. The fact that you see the posts if you delete your custom code, confirms that you have a typo. Check for semi-colons ” ; ” and the opening and closing brackets.
To see exactly where you made a mistake, you could edit the wp-config file. Look for ERROR REPORTING and set this value to true. After that test again and there you get an error and a line with the omission.
Alex
I have created the CPT and is working beautifully, but Google cannot find it even after updating sitemaps, using SEO plugins or fetching on Google Webmaster Tools. Any thoughts on why is that happening?
WPBeginner Support
It takes Google sometime to start showing new content in search results. Just to be on safe side, check your SEO plugin settings to make sure you are not blocking indexing of your CPTs or CPT archive pages.
Admin
Amunet
Creating Custom Post Type can be easy especially with a plugin. The real trick is to show them on the page. Usually you need quite advanced custom development or theme specific plugins like that for Avada.
Unfortunately there is no universal way to display CPT in WordPress.
WPBeginner Support
Actually, there are straight forward and standard ways to display CPTs in WordPress. We have mentioned one in the article above.
Admin
Jouke Nienhuis
Like the author said, but I will repeat the answer.
In a nutshell create a link in your navigation menu
Advanced answer in a nutshell: create an archive page and a single page
Chuck
Great article. How can you modify single post CPT post info based on the custom taxonomy? For instance:
Date | Author | Series | Book | Topic
This is easy to write but I want to figure out how to display a modified post info if one the missing taxonomy of Series, like:
Date | Author | Book | Topic
Otherwise the default post info displays as:
Date | Author | | Book | Topic
borahan
I want to diplay specific category posts for current user in page. How can i do it?
Moazam Ali
Dear,
Thanks for the post. I want to make a library of ebooks and want to use custom post type and portfolio to show the thumbnails of books in front end. Can you please guide how i can do that?
Sharon Wallace
Hello All,
This is a great plugin. I’m trying to get the taxonomy to show on the page. I created one called Presenters. You can see it here.
How can I make that happen?
Thank you
WPBeginner Support
Please take a look at how to create custom taxonomies in WordPress. Hope this answers your question.
Admin
Sharon Wallace
Hello,
Thank you for your response. It still isn’t working but you’ve pointed me in the right direction. I will continue to play with it.
Have a wonderful day.
Dave S.
Hi,
I have created a form (using ArForms plugin) which I need it to be turned into a Post-Type. Do you have any suggestions as to how to accomplish this please?
Thank you.
Mark Greenway
Thanks for this, exactly what I needed to know to help me get to grips with custom post types.
Mark.
shashik
Thanks dear..it’s very useful..
Graham
Thank you! Just what I was looking for. It’s amazing how many times I find wordpress work-arounds and then forget how I do them and keep having to come back.
Much appreciated!
Ram
Very useful! Thank you….
MELAS
Dear,
I don’t have a lot of knowledge about coding. How can I see on the specific page theses Custom post types and taxonomies?
Thanks in advance!
MELAS
Mike Ritter
Is there an error? Shouldn’t the function be `create_post_type`?
WPBeginner Support
No mike, it is not a core function. You can define this function anyway you want.
Admin
Vera
Hello,
Thank yo for this beautiful tutorial.
I have gone and done everything as you said.
Two things I do not understand:
1.
You have specified taxonomy “genre”. Where is that set up? What if I want to make the actual genres underneath that? How do I make them? Where do I see them?
2.
I would like to make the menu links to the “Movies” and underneath – sublinks to “Genres”. I can see the “Movies” in the Menu section, each post, like pages. Don’t really need that, but I won’t mind. How to see the “Genres” in there?
Thank you,
Vera
WPBeginner Support
Seems like you have successfully created your custom post type, i.e. Movies. The next step is to create custom taxonomy, Genres. A taxonomy is a way to sort content in WordPress. Categories and tags are two default taxonomies that come built in with WordPress and are by default associated with ‘Posts’. Please see our tutorial on how to create custom taxonomies in WordPress. Follow the instructions in that tutorial to create your custom taxonomy Genres and associate it with the post type movies. Your custom taxonomy will appear below the Movies menu in WordPress admin area.
Admin
Hamed 3daJoo
I do All Of This but when i want to public a post by this post type my post types redirects to main page (i Just coppied your code without any changes)
for example i write this post with Movies post type
please help me ilove post type but i can’t use it correctly
Ciprian
Have you tried re-saving the permalinks structure?
Cheers!
Aaron
Excellent post! Thanks for the content.. helped a lot.
antonio
hi i’m trying to add the snippet of code fort the post type movie… i copied it into functions.php but when i refresh the page nothing is shown. i’m using the twenty fourteen theme… what can be wrong?
ashish shestha
How to display Csutom post type in front End??
Fahd
Hi, Custom post types on my wordpress website were working fine from last 2 years. But what happend is when I change the title of post and click update it save other changes too. But if I keep the post title same and make changes in the post, it doesn’t save it. Any recommendations please?
WPBeginner Staff
Please check out this tutorial on how to show/hide text in WordPress posts with toggle effect.
Arup Ghosh
Thanks for the info.
Arup Ghosh
I want to create a custom post type coupons with reveal coupon option and the code will link to the store url, can you tell me how can I do that. I don’t have much knowledge about coding.
Isaías Subero
Great articule. How can I add icons to custom post types on the wordpress back-end just like it is shown on the picture?
Jouke Nienhuis
it is one of the arguments ($args) when defining the custom post type.
Add ‘menu-icon’ => ‘dashicons-cart’ to the $args list.
WordPress uses built-in dashicons, but you can also use your own icons.
More information on this link:
Johan
Hi, the excerpt and the custom fields data is not displaying in the front end… any idea of why this is happening?
Bill Querry
I forgot to mention, prreferably via code for my functions.php file since that’s where the curernet CPT are defined.
Bill Querry
I am looking at a way to add categories to some existing custom post types. Anyone able to point me in the right direction?
Jouke Nienhuis
You can add new taxonomies to an existing Post Type (custom or not) just by filling in the right post-type when you write the function to create it. Category is just a taxonomy name which includes all posts with a category.
If you want to make a new category, just click on category on the menu and create a new one.
Examples of categories are Boats if your post is about boats or planes if your post is about planes. More categories is also possible, just select or add them in the right sidecolumn when you are writing your new post or editing one.
A post type is not attached or linked to a specific category, a post is.
Robey Lawrence
I just tried to use the snippet under
Querying Custom Post Types,
and figured out it needs a before the reset.
YassinZ
Thanks for the clean handy article
I just want to use the text editor in the custom post
so that I can use html tags,
Yassin
thanks for such an awesome clear tutorial
but I’m faceing a problem in displaying the CPT I’m using SEO friendly permalinks when I direct to may website/movies the CPT are duplicated
Aris Giavris
Very useful! Thank you.
I would like to add to every tag of my posts one of the following signs: +, -, +/-. May I?
If so, then I would like to have the choice to represent the signed tags as follow: all the +tags, all the -tags, all the +/-tags.
I think I am questioning a lot of things.
Placid
Hi,
I am having a hard time implementing a custom post type correctly. I have searched for a solution for a long time but couldn’t find any. Here’s what I did:
1. Freshly installed WordPress in my local wamp server (enabled apache rewrite_module first).
2. Using default theme (twenty fourteen). No plugins installed.
3. Changed permalinks to “Post name”
4. In the plugins folder, created a folder named pr_custom_posts and inside that, created a file named pr_custom_posts.php. In the file I created a custom post type. The code is as follows:
register_post_type();
//flush_rewrite_rules();
}
public function register_post_type () {
$args = array(
‘labels’ => array (
‘name’ => ‘Movies’,
‘singular_name’ => ‘Movie’,
‘add_new’ => ‘Add New Movie’,
‘add_new_item’ => ‘Add New Movie’,
‘edit_item’ => ‘Edit Movie’,
‘new_item’ => ‘Add New Movie’,
‘view_item’ => ‘View Movie’,
‘search_items’ => ‘Search Movies’,
‘not_found’ => ‘No Movies Found’,
‘not_found_in_trash’ => ‘No Movies Found in Trash’
),
‘query_var’ => ‘movies’,
‘rewrite’ => array (
‘slug’ => ‘movies/’,
‘with_front’=> false
),
‘public’ => true,
‘publicly_queryable’ => true,
‘has_archive’ => true,
‘menu_position’ => 10,
‘menu_icon’ => admin_url().’/images/media-button-video.gif’,
‘supports’ => array (
‘title’,
‘thumbnail’,
‘editor’
)
);
register_post_type(‘jw_movie’, $args);
//flush_rewrite_rules();
}
}
add_action(‘init’, function() {
new PR_Movies_Custom_Post();
//flush_rewrite_rules();
});
?>
The Good Thing: The CPT is showing in my admin panel and I can add and view movies there.
THE PROBLEM: I cannot preview the movies in the front end (By clicking the “view” in the CPT in admin panel). It shows in the front end only when I set permalink to default (http://localhost/wp02/?p=123).
What I have tried:
1. Go to permalink, keep permalink settings to “Post name” and Save changes.
2. Use flush_rewrite_rules() in several places (one by one) in my code. Please see the commented out parts in the code above.
3. Created a menu item as:
URL: http://localhost/wp02/movies
Navigation Label: Movies
This creates a menu item in the front end but shows “Not Found” when “Movies” link is clicked.
This is driving me crazy. Can anyone please help on this? I would really appreciate.
kikilin
I was going crazy too with the same “Not Found” issue, until I tried this: go to Settings > Permalinks and then re-save your settings. I had switched my setting to Default, and then changed it to Post Name (for my project’s needs). After that, links were working as expected.
WPBeginner Staff
Yes sure we will try to make a video tutorial soon. Please subscribe to our YouTube Channel to stay updated.
rehan
Helpfull tutorials and posts thanks
ceslava
Another easy way is just duplicate the archive.php and rename it to archive-movies.php and the same for single.php -> single-movies.php
Then you can make tweaks to the php files for your theme.
Best regards
Mladen Gradev
lol the plugin looks super useful, thanks.
Achilles Khalil
Very hard to display. please can you make a video tutorial ?
Mik
Hi, I’ve been reading and following your posts for so long now, you are amazing, and targeting those missing stuff of beginners… Thank you.
Davide De Maestri
This plugin should be okay, but after every upgrade they’ve got some bug. Due to exporting field, or while migrating from local to remote etc… So It’s better to hand-write the code and put into functions.php