Cada vez que subes una imagen, WordPress genera automáticamente múltiples copias en diferentes tamaños. Los temas y plugins pueden añadir aún más.
Sin embargo, estos tamaños por defecto no siempre se adaptan a sus necesidades. Quizá sean demasiado grandes y ralenticen tu sitio, o demasiado pequeños y pierdan impacto.
En WPBeginner, sabemos lo importante que es tener imágenes de tamaño perfecto que mejoren el diseño de tu sitio web. Así que, que no cunda el pánico – te ayudaremos a resolver estos problemas.
En este artículo, te mostraremos cómo crear tamaños de imagen adicionales en WordPress y utilizarlos en tu sitio web. Al final del mismo, tendrás tamaños de imagen personalizados para satisfacer tus necesidades exactas, ya sea para miniaturas, imágenes destacadas o una estructura / disposición / diseño / plantilla única. 🎨

¿Por qué crear tamaños de imagen adicionales en WordPress?
Normalmente, los temas y plugins populares de WordPress crean automáticamente tamaños de imagen adicionales. Por ejemplo, tu tema puede crear diferentes tamaños para usarlos como miniaturas en tus páginas de archivo o páginas de inicio personalizadas.
Sin embargo, a veces, estas imágenes pueden no cumplir perfectamente sus requisitos. Por ejemplo, puede que desee utilizar diferentes tamaños de imagen en un tema hijo o en un diseño de cuadrícula.
Para ello, tendrá que crear tamaños de imagen adicionales en WordPress y luego llamar a la imagen correcta cuando sea necesario.
Con esto en mente, vamos a mostrarle cómo crear tamaños de imagen adicionales en WordPress. He aquí un resumen rápido de todos los consejos que vamos a cubrir en este artículo:
¿Preparados? Empecemos.
Registro de tamaños de imagen adicionales para su tema
La mayoría de los temas de WordPress son compatibles con imágenes destacadas, también conocidas como miniaturas de entradas.
Sin embargo, si está creando un tema de WordPress personalizado, tendrá que añadir soporte para las imágenes destacadas.
La mayoría de los expertos en WordPress recomiendan añadir los siguientes fragmentos de código personalizados al archivo functions.php de su tema.
1 | add_theme_support( 'post-thumbnails' ); |
Sin embargo, no es del todo fácil de usar para principiantes, ya que corres el riesgo de romper tu sitio por un pequeño error. En su lugar, recomendamos añadir los fragmentos personalizados utilizando WPCode.

WPCode es un potente plugin de fragmentos de código que simplifica la adición de código personalizado a WordPress, utilizado por más de 2 millones de propietarios de sitios web. Ejecuta fragmentos de código como si estuvieran en los archivos del tema, por lo que las personalizaciones están preparadas para el futuro y son fáciles de gestionar, incluso para los principiantes.
✏️ Nota: Muchos de nuestros socios de marca confían en WPCode para añadir fragmentos de código personalizados a sus sitios web. Hemos visto de primera mano lo sencillo y potente que es, por lo que lo recomendamos encarecidamente. ¿Quieres saber más? Comprueba nuestra reseña / valoración completa de WPCode.
La buena noticia es que la versión gratuita de WPCode te permite añadir tus fragmentos de código personalizados. Así que vamos a instalar y activar el plugin. Si necesitas ayuda, entonces puedes ver las instrucciones paso a paso en nuestra guía sobre cómo instalar un plugin de WordPress.
Después de la activación, puedes ir a Code Snippet ” + Add Snippet desde tu escritorio de WordPress. A continuación, haz clic en el botón “Añadir código personalizado (nuevo fragmento)”.
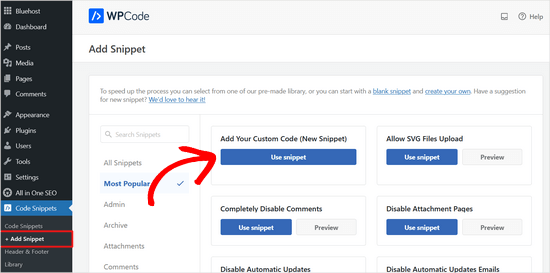
En la siguiente pantalla, usted nombrará su fragmento de código personalizado. Por ejemplo, puedes llamarlo ‘Post Thumbnail Support’.
A continuación, puede copiar y pegar este código en el área “Vista previa del código”:
1 | add_theme_support( 'post-thumbnails' ); |
Este es el aspecto que podría tener en el editor:
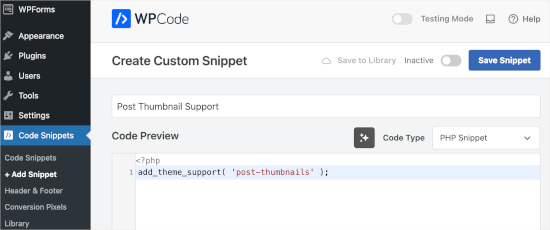
Después de eso, asegurémonos de cambiar el tipo de código a ‘PHP Snippet’.
A continuación, puedes cambiar el conmutador de “Inactivo” a “Activo” y hacer clic en “Guardar fragmento”.
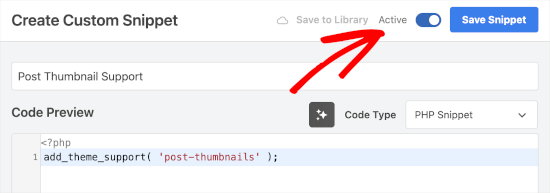
Una vez que haya añadido la compatibilidad del fragmento de código personalizado con las miniaturas de las entradas, puede registrar tamaños de imagen adicionales mediante la función add_image_size().
Una vez más, abramos el editor de fragmentos de código personalizado de WPCode dirigiéndonos a Fragmento de Código ” + Añadir Fragmento. Después de eso, vamos a elegir el botón ‘Añadir su código personalizado (nuevo fragmento)’.

A continuación, puede llamar a este fragmento de código ‘Tamaños de imagen adicionales’.
Luego, en el editor de código, utilizarás la función add_image_size con el siguiente formato:
1 | add_image_size( 'name-of-size', width, height, crop mode ); |
He aquí algunos ejemplos de cómo podría ser la función completa:
1 2 3 | add_image_size( 'sidebar-thumb', 120, 120, true ); // Hard Crop Modeadd_image_size( 'homepage-thumb', 220, 180 ); // Soft Crop Modeadd_image_size( 'singlepost-thumb', 590, 9999 ); // Unlimited Height Mode |
Hemos especificado 3 tamaños de imagen diferentes para WordPress. Cada uno tiene diferentes modos, como recorte duro, recorte suave y altura ilimitada. Puedes elegir uno en función de tus necesidades.
Aquí está la vista previa en el editor de código:
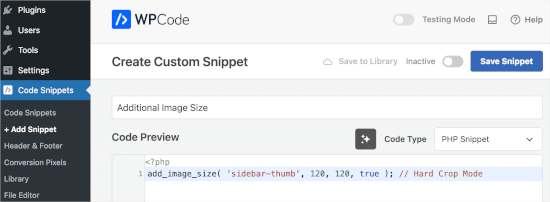
No olvides cambiar el tipo de código a “PHP”, cambiar de “Inactivo” a “Activo” y hacer clic en el botón “Guardar”.
Con esto en mente, veamos cómo utilizar cada modo en tu propio blog o sitio web de WordPress.
1. Modo de recorte duro
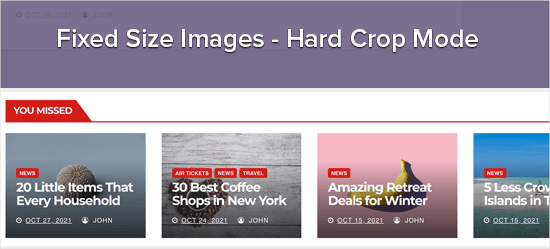
En el ejemplo anterior, hemos utilizado un valor ‘true’ después de la altura. Esto le dice a WordPress que recorte la imagen al tamaño exacto que definimos, que es 120px por 120px en este caso.
Esta función recortará automáticamente la imagen por los lados o por arriba y por abajo, dependiendo de su tamaño. De esta forma, te aseguras de que todas tus imágenes estén proporcionadas y se vean bien en tu sitio web de WordPress.
2. Modo de recorte suave
Como puede ver en nuestro ejemplo de recorte suave, no hemos añadido un valor “verdadero” después de la altura:
1 | add_image_size( 'homepage-thumb', 220, 180 ); |
Esto se debe a que el modo de recorte suave está activado por defecto.
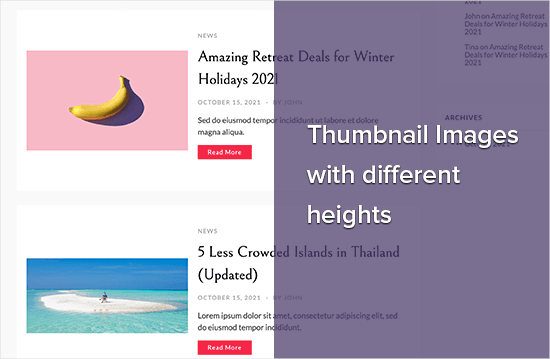
El recorte suave cambia el tamaño de la imagen proporcionalmente sin distorsionarla, por lo que es posible que no obtenga las dimensiones exactas que desea. Normalmente, el recorte suave coincide con las dimensiones de anchura, pero las dimensiones de altura pueden ser diferentes en función de la proporción de cada imagen.
He aquí un ejemplo:
3. Modo de altura ilimitada
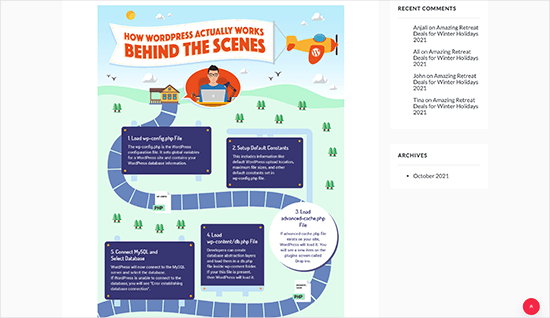
A veces, es posible que tenga imágenes largas que desee utilizar en su sitio web limitando su anchura. Por ejemplo, puede que haya creado una infografía para el sitio web de su empresa. Las infografías suelen ser muy largas y normalmente más anchas que el contenido.
El modo de altura ilimitada le permite especificar una anchura que no rompa su diseño sin limitar la altura.
Mostrar tamaños de imagen adicionales en su tema de WordPress
Una vez que haya añadido más tamaños de imagen a su sitio web, es hora de mostrarlos en su tema de WordPress.
Simplemente abra el archivo del tema en el que desea utilizar un tamaño de imagen diferente y, a continuación, añada el siguiente código dentro del bucle de la entrada:
1 | <?php the_post_thumbnail( 'your-specified-image-size' ); ?> |
Es posible que desee añadir un poco de estilo para que la imagen encaje perfectamente con el resto de su sitio. Sin embargo, esto es todo lo que necesita para mostrar tamaños de imagen adicionales en su tema.
Regeneración de tamaños de imagen adicionales
La función add_image_size( ) sólo crea tamaños adicionales cuando usted carga una nueva imagen. Esto significa que cualquier imagen que suba antes de crear la función add_image_size( ) no tendrá los nuevos tamaños.
Para solucionar este problema, debe regenerar las miniaturas de su sitio web WordPress utilizando Perfect Images. Este plugin también regenerará las imágenes destacadas y las imágenes retina y actualizará los metadatos multimedia.
En primer lugar, tendrás que instalar y activar el plugin. Si necesitas ayuda, consulta nuestra guía sobre cómo instalar un plugin de WordPress.
Tras la activación, puede ir a Medios “ Perfect Images.
Perfect Images escaneará ahora la biblioteca multimedia de WordPress, por lo que es posible que tenga que esperar unos instantes hasta que termine.
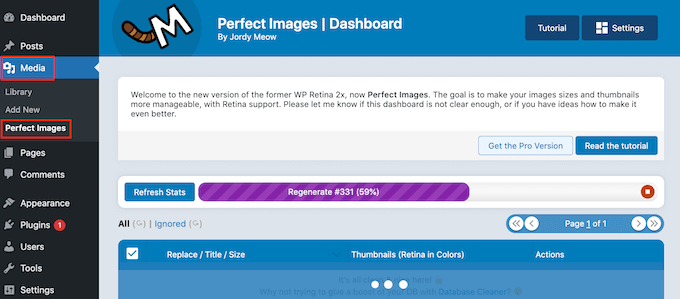
Una vez que haya terminado, deberás abrir el menú desplegable que muestra por defecto “Acciones masivas” y seleccionar “Regenerar todas las entradas”.
Perfect Images regenerará ahora todas tus miniaturas.
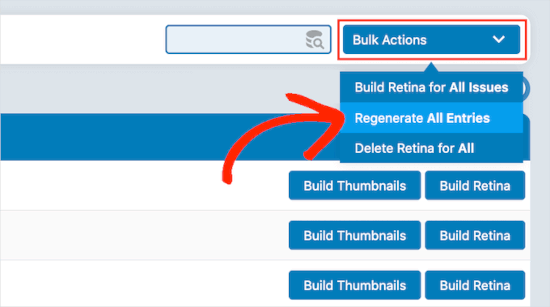
Para más información sobre este tema, consulte nuestro artículo sobre cómo regenerar nuevos tamaños de imagen.
Activar tamaños de imagen adicionales para el contenido de sus entradas
Aunque haya añadido nuevos tamaños de imagen, sólo puede utilizarlos en el tema de WordPress y no en el contenido de la entrada.
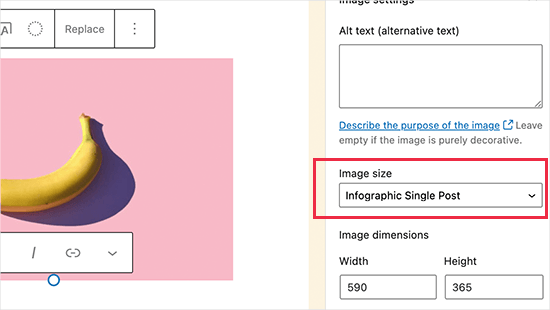
Para que estos nuevos tamaños estén disponibles en el editor de contenidos de WordPress, debe registrar el siguiente código en WPCode:
1 2 3 4 5 6 7 8 | function wpb_custom_image_sizes( $size_names ) { $new_sizes = array( 'homepage-thumb' => 'Homepage Thumbmail', 'singlepost-thumb' => 'Infographic Single Post' ); return array_merge( $size_names, $new_sizes );}add_filter( 'image_size_names_choose', 'wpb_custom_image_sizes' ); |
Simplemente repita el mismo proceso para añadir un código de fragmento personalizado que hemos compartido. A continuación, no te olvides de activar y guardar el fragmento después de añadir el código.
Ahora, cuando subas una imagen a WordPress, verás todos los tamaños personalizados en ‘Tamaño de imagen’. Ahora puede cambiar el tamaño de la imagen cuando trabaje en cualquier página o entrada.
Consejo adicional: Corrección del problema de carga de imágenes en WordPress
Si tiene un problema con la carga de imágenes, quizá le interese saber cuál es la causa. Con WordPress, esto puede suceder por diferentes razones.
En primer lugar, los distintos navegadores gestionan las subidas a su manera, por lo que lo que funciona en un navegador puede no funcionar en otro.
La caché de tu sitio también podría estar causando problemas. Si está desactualizada, puede interferir con la subida, por lo que vaciarla podría ayudar.
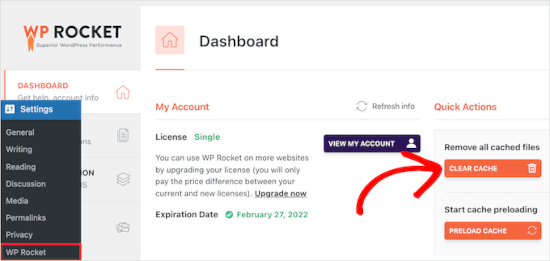
A veces, los plugins y los temas también pueden ser el problema.
Algunos plugins pueden interferir en el proceso de subida sin que te des cuenta. Algunos temas no están bien codificados y pueden causar conflictos cuando intentas subir imágenes.
Para obtener consejos de solución de problemas, puede leer nuestra guía sobre cómo solucionar problemas de carga de imágenes en WordPress.
Esperamos que este artículo te haya ayudado a aprender a crear tamaños de imagen adicionales en WordPress. También puedes consultar nuestra selección de los mejores plugins de WordPress para gestionar imágenes o nuestra guía sobre cómo cambiar el tamaño de imágenes grandes.
If you liked this article, then please subscribe to our YouTube Channel for WordPress video tutorials. You can also find us on Twitter and Facebook.


Jiří Vaněk
Thanks for the tutorial, I’m trying to do the same thing using another tutorial but it didn’t work. This works perfectly.
axel
That was easy, thanx.
Something harder:
How do i get rid of old, unused thumbnail sizes?
(best without a plugin)
Kind regards
axel
WPBeginner Support
We cover how you can remove the unused image sizes in our article below:
https://www.wpbeginner.com/wp-tutorials/how-to-prevent-wordpress-from-generating-image-sizes/
We recommend plugins to simplify the process, if you’re worried about the number of plugins on your site, we would recommend taking a look at our article below:
https://wpbeginner.com/opinion/how-many-wordpress-plugins-should-you-install-on-your-site/
Admin
B Toro
Very simple and helpfull
WPBeginner Support
Glad our guide was helpful
Admin
JKLYN
Quite helpful tutorial. But how to set class for image??
Kim
Thanks WPBeginner, this worked a treat!
Thiago
Hi,
Great article! However, I still do not understand the usefulness of hard crop tool; I uploaded an image with 306×165, and after that I created two custom sizes: 256×148 (Soft Crop) and 256×148 (Hard Crop), however, as you can see in this print taken from the post: [http://prnt.sc/eromp3] both Options remain the same. I created a file in Photoshop containing 256×148 and I dragged the original image without resizing anything, and the result you can see in example 4 of the image above. So, my question is this: should image 2 not look like the image generated by Photoshop?
Follows below the code used on functions.php:
//Soft Crop used in example 2
if ( function_exists( ‘add_image_size’ ) ) {
add_image_size( ‘new-size8’, 256, 148 );
}
add_filter(‘image_size_names_choose’, ‘my_image_sizes8’);
function my_image_sizes8($sizes) {
$addsizes = array(
“new-size8” => __( “New Size8”)
);
$newsizes = array_merge($sizes, $addsizes);
return $newsizes;
}
////Hard Crop used in example 3
if ( function_exists( ‘add_image_size’ ) ) {
add_image_size( ‘new-size9’, 256, 148, true, array( ‘center’, ‘center’ ) ); //(cropped)
}
add_filter(‘image_size_names_choose’, ‘my_image_sizes9’);
function my_image_sizes9($sizes) {
$addsizes = array(
“new-size9” => __( “New Size9”)
);
$newsizes = array_merge($sizes, $addsizes);
return $newsizes;
}
Thanks in advance!
Kevin
This works great, but on thing that always bothers me is that if someone uploads an image that is smaller than one of your cropped sized then that image will not be created, which ruins the layout if you wanted equal height images
Matt Rock
Struggling with the same issue, Kevin (uploading smaller image does not create cropped size). I understand why this might make sense (system will not produce unnecessary images), but a low/poor resolution would look better than an ill-cropped one…
gonza
Thanks for the info
you help me so much!
Sakshi
I write this code can.
Actually i want to set the post thumbnail size for the banner image.Which i was uploading through featured image in the background please suggest me.
Aakash
Hi,
I m new in wordpress,and accept i have many problems,and the first is,i created lot of post in wordpress,suppose A B C D,and when i update this in my website they look like first is D and then c and then b and then a means when i upload first they are show in last.if any solution that first they look in series not DCBA like ABCD…plz help
Daniel Knoflicek
awsome… so helpfull for a lot of gallery plugins…
Lavinia Manzanarez
Excellent! I read the use of this function on the Codex of WordPress but sometimes I need a step by step thing, thank you!
WPBeginner Staff
Yes it is possible.
Farmer John
I too want to do the same as Ali Rohan wants to do. can you kindly elaborate pleas.. ‘coz i tried to implement the method explained by you but could not succeed. I can’t understand where I am doing wrong. How do I link the text of resolution to image file?
Ali Rohan
Thanks for nice article.
I wanna start a wallpapers website in wordpress so is it possible that when i upload one big wallpaper then it auto resized to many resolutions for users. For example when i upload 1920×1280 wallpaper then it must be resized to 1024×768, 800×600 etc resolution … so users can easily view and download desired size wallpaper ?
Aayush
Hi Dear. i need your urgent help. i have a problem with the images size. actually i am using a plugin WP Gallery Custom Links. i have uploaded lot of images in a post but every images has a different height and width so they are appearing with different different sizes. i want to set them with the same size which i want to set. please tell me any idea to solve this problem.
Here
I just needed to say thanks for saying this. You’re right on.|
Shoaib
Excellent explanation
Andrew
I’ve set this up and it’s working splendidly minus the suggestion MIKE LITTLE made above – the thumbnail is changed and it shows up that way in the backend in the media gallery – but on the frontend where my loop is – the image thumb is still what WP defaults to – i’ve even run REGEN THUMBS and it still doesn’t fix the issue – anyone else having this problem or know the fix???
WPBeginner Support
Look at your loop and use
<?php the_post_thumbnail('your-specified-image-size'); ?>instead ofthe_post_thumbnail()Admin
Tomasz
Nice tutorial!
Please check out the plugin which allows to manually crop the registered image sizes:
http://wordpress.org/plugins/manual-image-crop
WPBeginner Support
Thanks, looks like a nice plugin. We will look into it.
Admin
Marc C
Good tutorial – many thanks WPBEGINNER.
I too was having the problem of not being able to crop the new registered image sizes but the plugin posted by TOMASZ does the job nicely – thanks TOMASZ!
Robbe Clerckx
Still helpfull after all this time :). Thank you.
Danny
Thank you for this very clear and helpful tutorial. It saved me a lot of time since the WP documentation is very cryptic.
lydia karanja
I have a wordpress account but I did not know how to manage it but now I know all thanks to this tutorial, thank you very much for helping people understand more on how to create and manage their websites.
andy19at
@jezThomp Great if your images work
jezThomp
@andy19at Link…?
andy19at
@jezThomp A link? I didn’t post it cos it didn’t work.
jezThomp
@andy19at http://t.co/YvmiX9hR
mikelittle
You say: “The downside of hard cropping is that you cannot control which part of the image is displayed.” Not true.
When you have uploaded an image and before you insert into post, you can click on ‘edit image’ and from there change the thumbnail or the whole image, scale, rotate, or flip the image , and for the thumbnail select the exact portion of the image you want.
wpbeginner
@mikelittle Thanks for the correction Mike. Just edited the article
clelandillustration
I can’s seem to get the custom crop to work for new image sizes. The custom crop will work for the default “thumbnail” size version, but that crop won’t apply to new image sizes. It seems the crop is still uncontrollable for custom image sizes.
Brent Norris
good insight into the edit flow…
TdGon
Good article ..and photos to go along with it too…nice. I saw in a few places how to do this but they did not explain it as well as you do here. I am off to try it out.
Thanks a lot ! (0.o)
PaulDeWoutersd'Oplinter
excellent explanation for a confusing topic. and very useful plugin
mssbee
Great tutorial! Thanks for explaining the different crop options. It really helped me to understand how they work.
tjhakan
Nice tutorial. good job
defries
Nice round up of what can be done with just the default featured image feature. One extra tip: you can also set the width of your content area as a featured image and define that same width in Settings > Media. This way you can select a featured image to use in your theme and it will be automatically the maximum size of the content area.
Also great having those values in there for <a href=”http://codex.wordpress.org/Embeds”>oEmbed</a>.
Ordinary Randomness
Thanks for this tutorial, I was wondering why sometimes I had images that were not cropping to the size I had coded.