Las entradas manuales en los medios sociales pueden consumir mucho tiempo y energía. Por eso llevamos mucho tiempo utilizando herramientas de automatización de medios sociales en nuestros sitios web.
La automatización de los medios sociales puede ahorrarle mucho tiempo al realizar tareas repetitivas. Un calendario de entradas coherente mantiene la participación de su público y aumenta su alcance al compartir contenidos en varias plataformas.
Afortunadamente, herramientas como IFTTT, Zapier, Uncanny Automator y ClickSocial te permiten compartir automáticamente las publicaciones de tu blog de WordPress en plataformas como Facebook, Twitter, LinkedIn, Instagram, etc.
Dicho esto, navegar por estas herramientas puede resultar desalentador. Y por eso estamos aquí.
En este artículo, vamos a estudiar cómo establecer estas herramientas de automatización para que pueda automatizar su marketing en medios sociales y liberar algo de espacio para otras tareas.
¿Por qué automatizar WordPress y los medios sociales?
La automatización de su sitio web WordPress y sus cuentas de medios sociales elimina la necesidad de compartir manualmente el contenido en estas plataformas.
Puedes programar fácilmente entradas para publicarlas en varios medios sociales al mismo tiempo sin tener que acceder a ellas y compartirlas individualmente.
Por ejemplo, si tiene que hacer un anuncio importante en su sitio web, puede automatizar WordPress y los medios sociales para que el anuncio se publique en todas las plataformas sociales a una hora programada.
Esto le ahorrará tiempo y esfuerzo, potenciará su presencia en los medios sociales y aumentará la visibilidad de su sitio web.
Además, la automatización de WordPress con los medios sociales también puede mejorar el SEO de su sitio mediante el aumento de las señales de los medios sociales, tales como gustos, acciones y comentarios.
Con esto en mente, te mostraremos cómo automatizar fácilmente WordPress con medios sociales usando IFTTT, Zapier y Uncanny Automator. Puede utilizar los enlaces rápidos a continuación para saltar al método que desea utilizar:
¿Preparados? Vamos allá.
Método 1: Automatizar WordPress y los medios sociales con IFTTT (gratis)
IFTTT (If This Then That) es un servicio web gratuito que ayuda a los usuarios a automatizar tareas basadas en la web. Utiliza applets para conectar dos o más aplicaciones y dispositivos.
Por ejemplo, puede utilizar un applet de Twitter para conectar su cuenta de Twitter a su sitio web de WordPress.
Si estás buscando una forma gratuita de automatizar los medios sociales y WordPress, entonces este método es para ti.
Crear una cuenta IFTTT
Para automatizar tu sitio web WordPress y los medios sociales, necesitarás crear una cuenta en IFTTT.
En primer lugar, debes visitar el sitio web de IFTTT y hacer clic en el botón “Comenzar” situado en la esquina superior derecha de la pantalla.
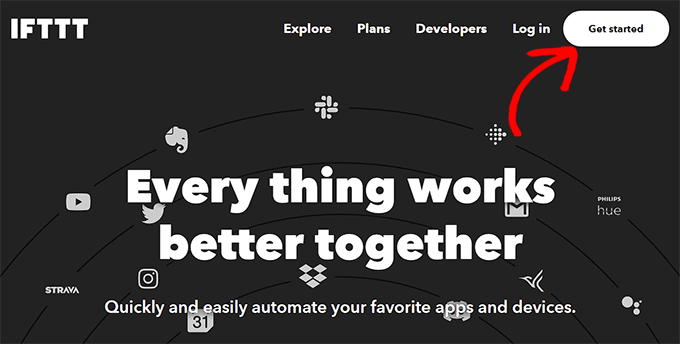
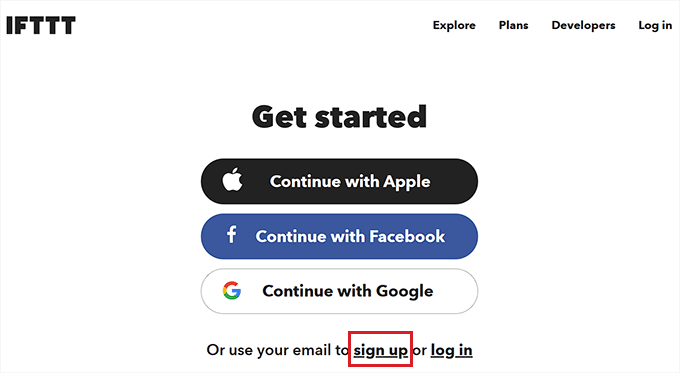
Esto le dirigirá a una nueva página, donde tendrá que enlazar el enlace “Registrarse”.
A continuación, proporciona tus credenciales de correo electrónico para crear una cuenta en IFTTT.
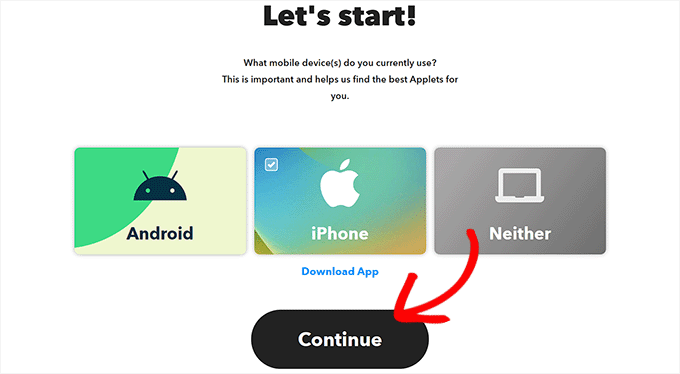
Una vez hecho esto, aparecerá la página “Comencemos”, en la que tendrás que seleccionar el tipo de dispositivo móvil que utilizas actualmente.
Sólo tiene que elegir una opción y hacer clic en el botón “Continuar”.
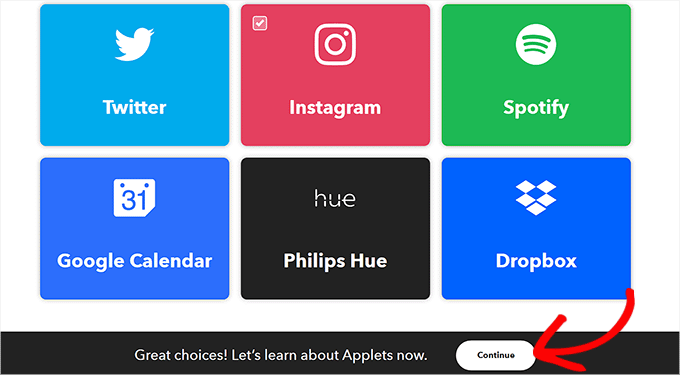
Después, debe seleccionar las plataformas de medios sociales que utiliza con frecuencia para personalizar mejor su página “Explorar”.
Cuando haya terminado, haga clic en el botón “Continuar” para seguir adelante.
Establecer un applet IFTTT
Ahora que su cuenta está lista, accederá a la página “Explorar”, donde podrá seleccionar el applet que más le convenga.
Para este tutorial, vamos a automatizar WordPress y Facebook.
Para ello, sigue adelante y haz clic en el applet ‘WordPress to FB Page’ de la lista.
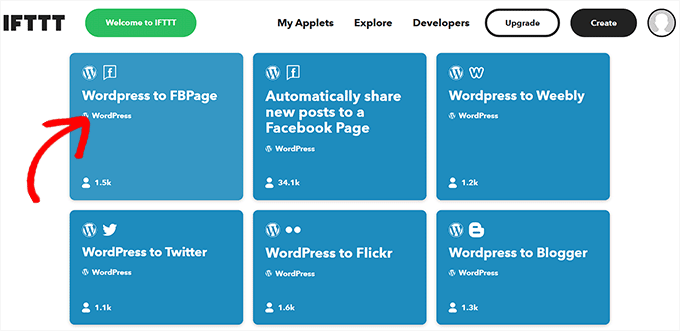
Aparecerá la pantalla “WordPress to FB Page”.
A continuación, sólo tienes que activar el conmutador “Conectar”.
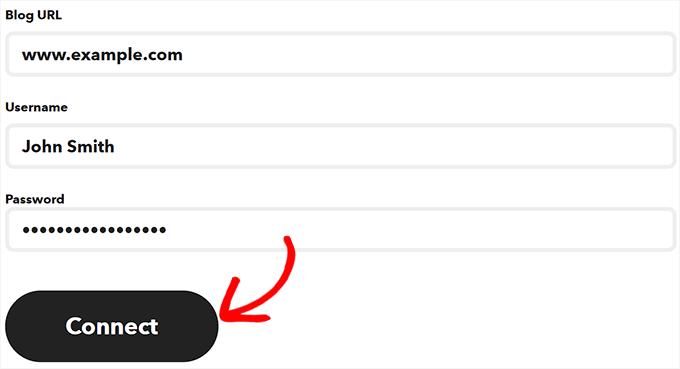
Esto le llevará a una nueva página, donde tendrá que proporcionar la URL de su blog de WordPress, nombre de usuario y contraseña.
Una vez que hayas terminado, haz clic en el botón “Conectar” para integrar WordPress con IFTTT.
Una vez conectado su sitio web WordPress, será redirigido a la pantalla “WordPress to FBPage”.
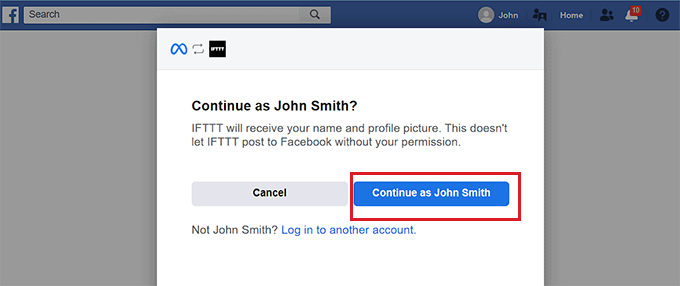
Aquí, simplemente vuelve a conmutar el interruptor “Conectar”. Esto te dirigirá a la plataforma de Facebook, donde deberás dar permiso para conectar tu cuenta de Facebook con IFTTT.
Simplemente haga clic en el botón “Continuar” si está seguro.
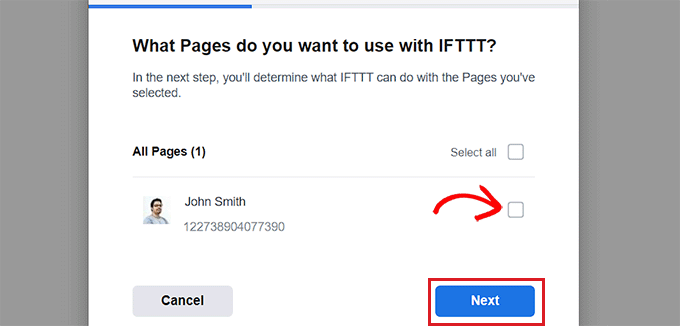
A continuación, se te preguntará acerca de las páginas que deseas conectar con IFTTT. Sigue adelante y selecciona la página de Facebook en la que compartirás las entradas de tu blog de WordPress.
Una vez hecho esto, haga clic en el botón “Siguiente”.
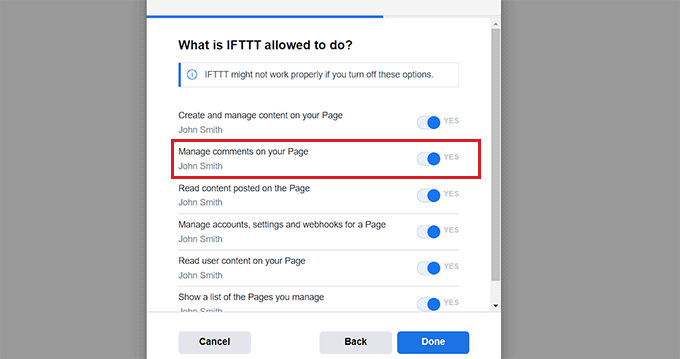
A continuación, sólo tienes que seleccionar todas las acciones que IFTTT puede realizar en tu página de Facebook.
Por ejemplo, si desea que IFTTT gestione los comentarios de su página, conmute el interruptor situado junto a la opción “Sí”. A continuación, haz clic en “Listo”.
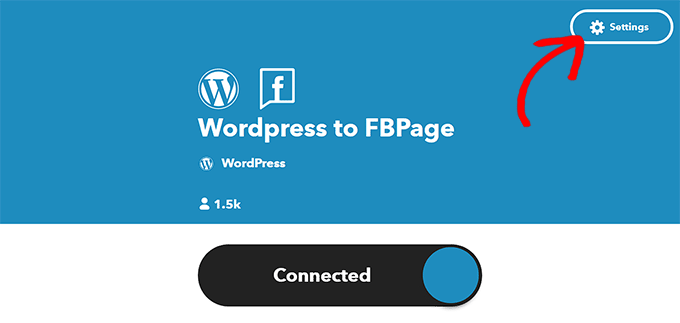
Ahora verás la pantalla “WordPress to FBPage”, donde el conmutador mostrará que tu sitio web WordPress y tus páginas de Facebook están conectadas.
Desde aquí, sólo tienes que hacer clic en el botón “Ajustes” de la parte superior.
Accederá a la página “Crear”.
Establecer ‘Si esto’ y ‘Entonces aquello’
Aquí puedes configurar las acciones que quieres que IFTTT realice en tu página de Facebook cuando ocurra algo en tu sitio web de WordPress.
A continuación, haga clic en el botón “Añadir” situado junto a la opción “Si esto”.
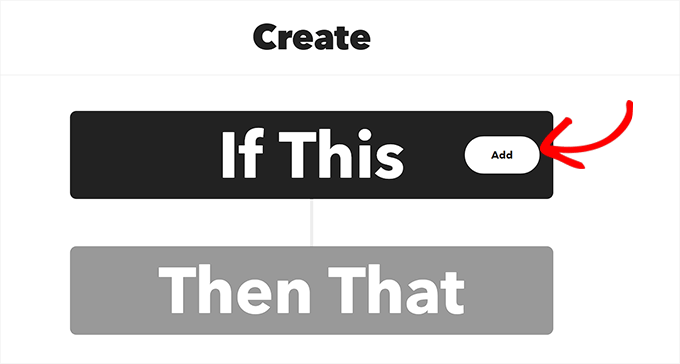
A continuación, sólo tienes que elegir WordPress como servicio en la página “Elegir un servicio”.
Esto te dirigirá a la página “Elegir un Activador”. Aquí, solo tienes que seleccionar cuándo quieres que se active el Trigger. Este activador alertará a IFTTT cuando se produzca una acción en tu sitio web.
Por ejemplo, si quieres que un Trigger se active cada vez que añades una nueva entrada, simplemente elige esa opción.
También puede crear su propio activador. Para ello, basta con hacer clic en el botón “Crear activador”.
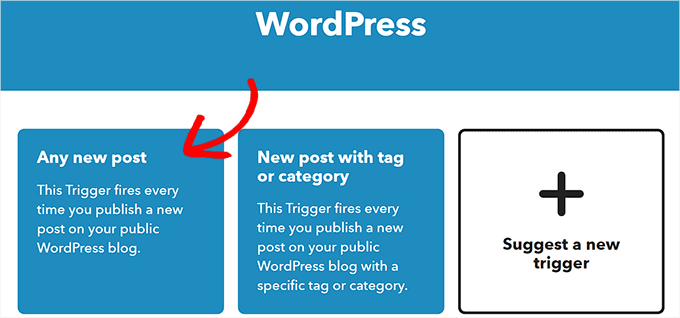
Ahora que el activador está listo, se le redirigirá a la página “Crear”.
A continuación, haga clic en el botón “Añadir” situado junto a la opción “A continuación”.
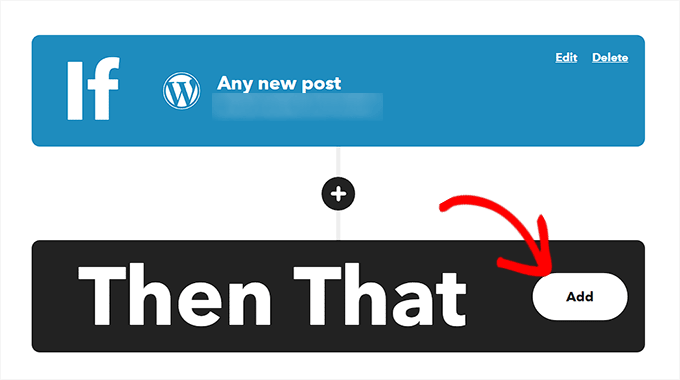
A continuación, sólo tienes que elegir “Páginas de Facebook” en la página “Elegir un servicio”.
Ahora debes seleccionar una Acción. Esto es lo que IFTTT hará en tu página de Facebook cuando se produzca una acción determinada en tu sitio web de WordPress.
Por ejemplo, puedes decirle a IFTTT que comparta el enlace de la entrada de WordPress en tu página de Facebook una vez que se haya publicado una nueva entrada en tu sitio web.
A continuación, haga clic en el botón “Crear acción”.
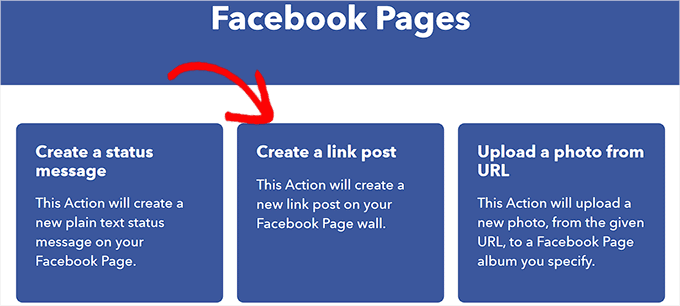
Una vez que haya creado correctamente una acción IFTTT, verá la página “Crear”.
Haz clic en el botón “Guardar” para almacenar tus ajustes.
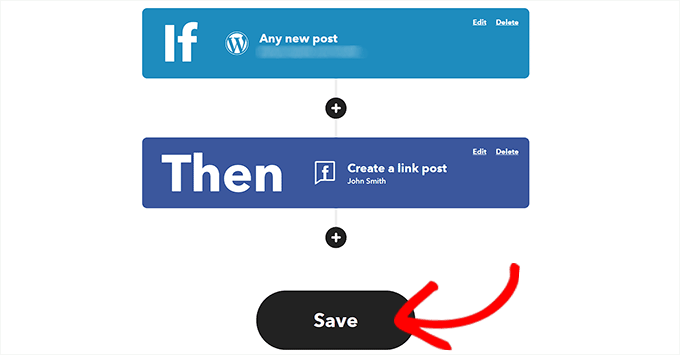
Ya has automatizado correctamente WordPress y Facebook con IFTTT.
Método 2: Utilizar Zapier para automatizar WordPress y los medios sociales
Si quieres automatizar medios sociales y WordPress usando Zapier, entonces este método es para ti.
Zapier es una herramienta de automatización basada en la nube que permite a los usuarios conectar varias aplicaciones web, como Gmail, Trello, Slack, Facebook, Twitter, etc.
También ofrece una biblioteca de flujos de trabajo de automatización predefinidos, conocidos como “Zaps”, que puede personalizar aún más para adaptarlos a sus necesidades.
Establecer Zapier
Para automatizar WordPress y los medios sociales, primero tendrás que instalar y activar el plugin Zapier para WordPress en tu sitio web. Para obtener más instrucciones, consulta nuestra guía paso a paso sobre cómo instalar un plugin de WordPress.
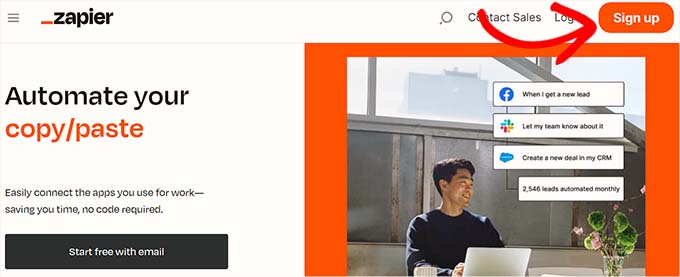
Después, debe visitar el sitio web de Zapier y hacer clic en el botón “Registrarse” en la esquina superior derecha de la pantalla para empezar a crear una cuenta.
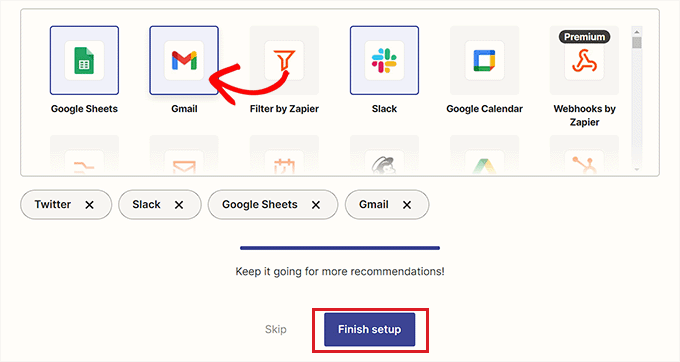
Una vez que hayas introducido tus credenciales, verás la página “¿Qué aplicaciones utilizas?
Aquí, simplemente selecciona las aplicaciones que utilizas y haz clic en el botón “Finalizar configuración”. Como mínimo, tendrás que elegir WordPress y las plataformas de medios sociales que quieras conectar a tu sitio web.
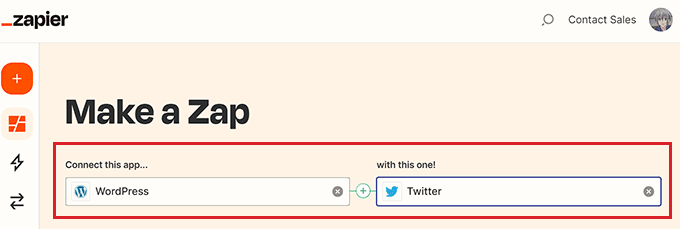
Ahora accederás a tu Escritorio Zapier. Busca y añade WordPress en la opción “Conectar esta aplicación…”.
A continuación, añade la plataforma de medios sociales que deseas conectar con WordPress en la opción “¡Con ésta!”.
En este tutorial, conectaremos WordPress con Twitter.
Hacer un Zap
A continuación, debe seleccionar un activador para WordPress en el menú desplegable. Cuando se produzca una acción concreta en su sitio web de WordPress, este activador indicará a Zapier que realice una acción en Twitter.
Una vez hecho esto, elige la acción que quieres que Zapier lleve a cabo en el menú desplegable “¡Entonces haz esto!”.
Por ejemplo, si desea crear un tweet cada vez que publique una nueva entrada en WordPress, deberá seleccionar estas opciones.
Una vez que hayas terminado, haz clic en el botón “Probar” para crear un Zap.

Conecta tu sitio WordPress y tu cuenta de Twitter a Zapier
A continuación, verá el editor de Zapier.
Debes expandir la pestaña ‘WordPress Trigger’ y luego hacer clic en el botón ‘Acceder’ para conectar WordPress y Zapier.
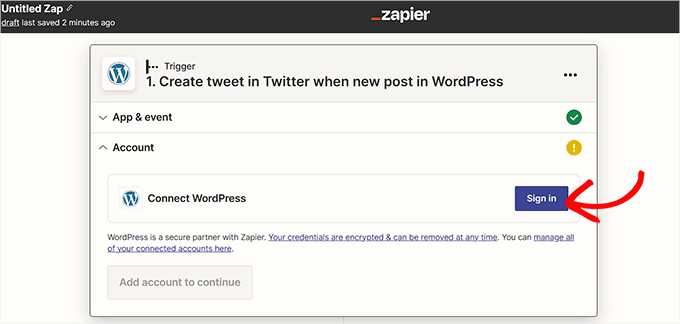
Se abrirá la página “Conectar una cuenta” en una nueva ventana.
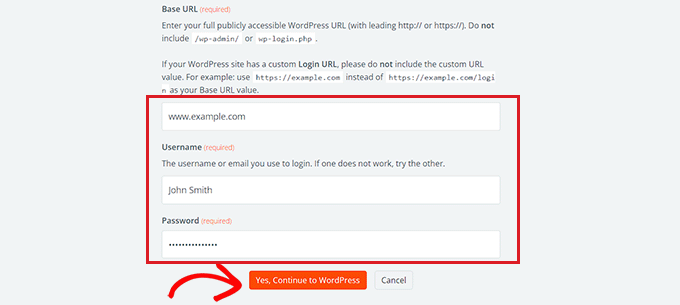
Introduce el nombre de usuario, la contraseña y la URL de tu sitio de WordPress. A continuación, haz clic en el botón “Sí, continuar con WordPress” para seguir adelante.
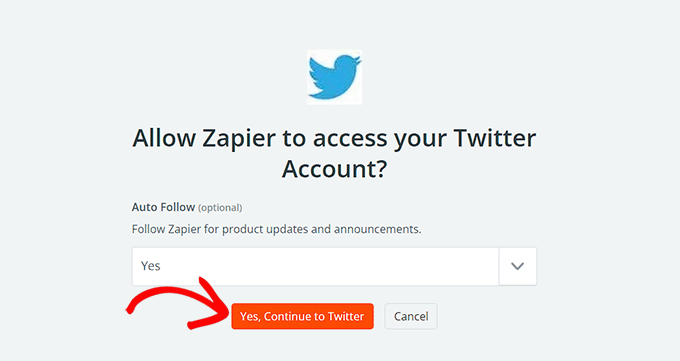
Cuando tu sitio web WordPress esté conectado, despliega la pestaña “Twitter” y haz clic en el botón “Acceder”.
Volverás a ver la página “Conectar una cuenta”, donde tendrás que dar permiso a Zapier para que se conecte a tu cuenta de Twitter.
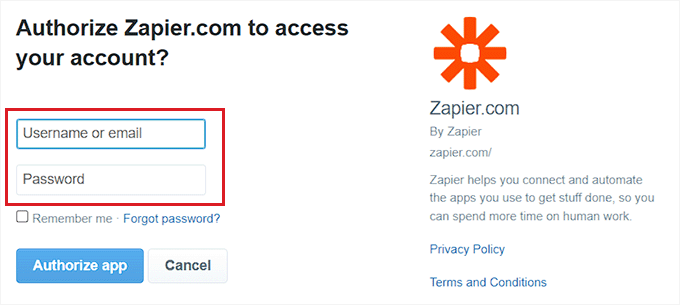
Sólo tienes que indicar el nombre de usuario y la contraseña de tu cuenta de Twitter y hacer clic en el botón “Autorizar aplicación”.
Zapier conectará tu cuenta de Twitter con tu sitio web de WordPress.
Personalice su Zap
A continuación, puede utilizar el menú desplegable “Mensaje” para seleccionar el contenido del tweet que se publicará cada vez que publique un nuevo artículo.
Por ejemplo, si quieres añadir el enlace de la entrada, la fecha y el nombre del autor en el tuit, sólo tienes que elegir estas opciones en el menú desplegable.
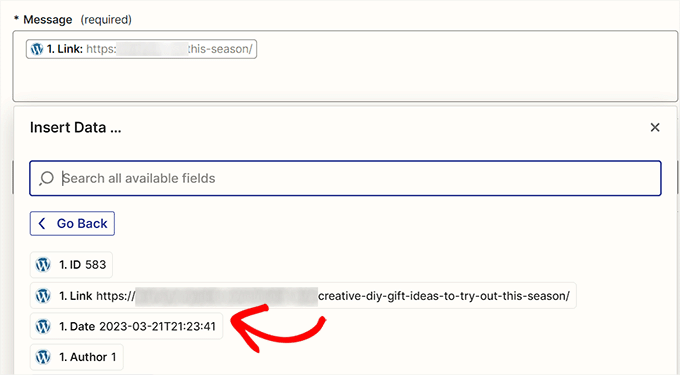
A continuación, haga clic en el botón “Continuar” para seguir avanzando.
Después, cambia a la pestaña “Ajustes” de la barra lateral de la izquierda. Puedes empezar introduciendo un nombre para el Zap que has creado.
A continuación, escriba una descripción y elija una zona horaria para el Zap.
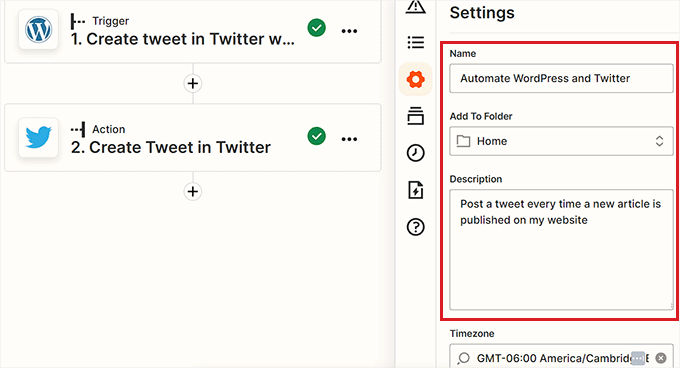
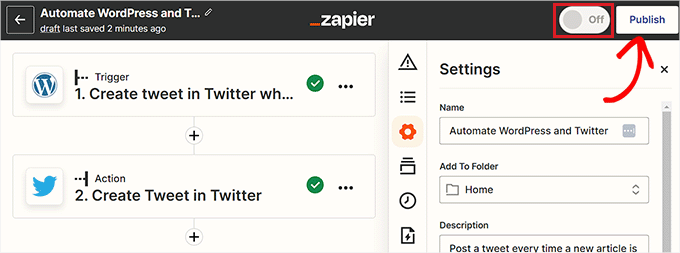
Por último, conmuta el interruptor de la parte superior a “Activado” y haz clic en el botón “Publicar” para crear y activar tu Zap.
Ha automatizado correctamente WordPress y Twitter.
Relacionado: Consulta nuestra ficha con los mejores plugins Zapier para WordPress.
Método 3: Automatizar WordPress y los medios sociales con Uncanny Automator (Recomendado)
Establecer Uncanny Automator
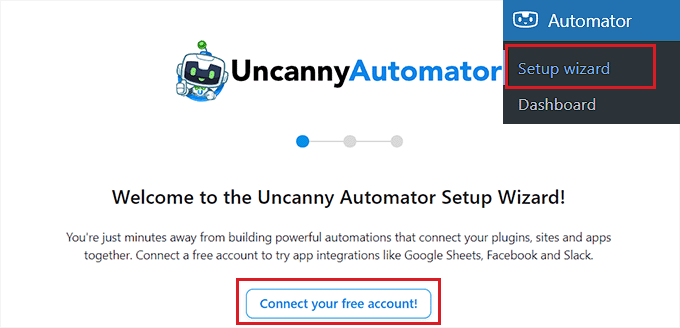
Se abrirá la página “Acceder” en una nueva ventana.
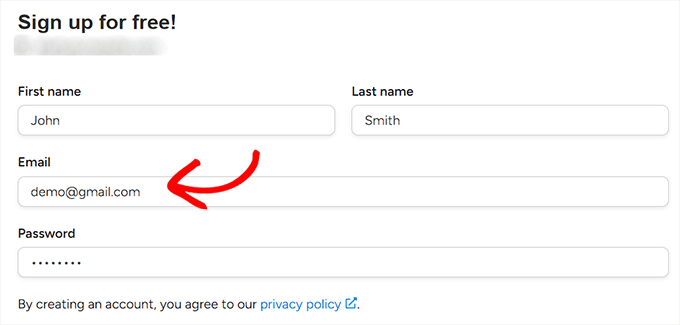
Aquí, sólo tiene que proporcionar sus credenciales para crear una cuenta gratuita de Uncanny Automator y, a continuación, hacer clic en el botón “Registrarse” situado en la parte inferior.
Elija un activador de Uncanny Automator
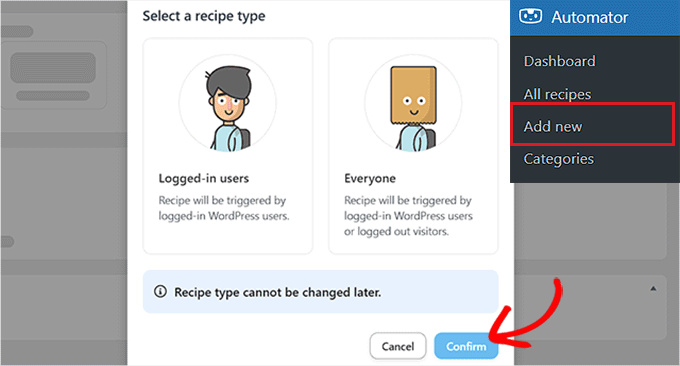
A continuación, visite la página Automator ” Añadir nuevo desde la barra lateral del administrador de WordPress. Automator le preguntará si la receta que desea crear debe ser activada solo por los usuarios conectados o por todos los que visiten su sitio.
Haga clic en el botón “Confirmar” después de elegir una opción.
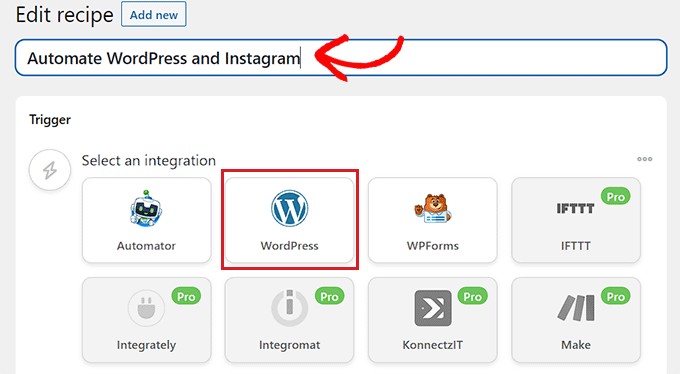
Después, puedes empezar añadiendo un título para la receta. Por ejemplo, si quieres automatizar WordPress e Instagram, entonces puedes usar eso como nombre de la receta.
A continuación, seleccione la opción “WordPress” en la sección “Activador”.
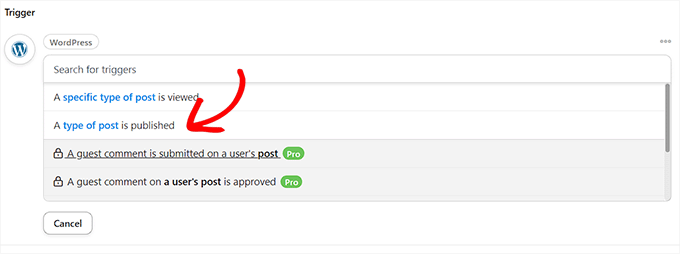
Ahora, debe seleccionar un Trigger para WordPress.
Por ejemplo, si quieres que una entrada de Instagram se publique cada vez que publiques una nueva entrada en WordPress, elige la opción “Se publica un tipo de entrada” del menú desplegable”.
Conecta Uncanny Automator a Instagram
Tras seleccionar un activador, haga clic en el botón “Añadir acción” para abrir la lista de integraciones.
Para este tutorial, vamos a automatizar WordPress e Instagram.
Elige la opción “Instagram” de la lista.
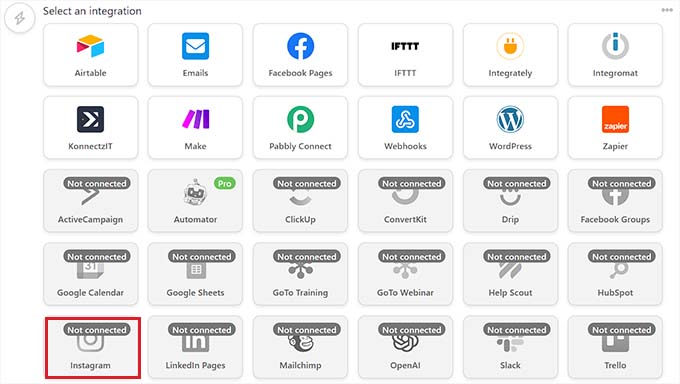
Aparecerá un mensaje / ventana emergente en su pantalla.
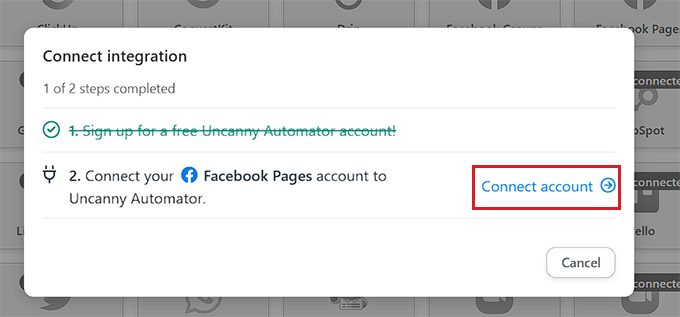
Ten en cuenta que solo puedes enlazar una cuenta de empresa de Instagram que ya esté vinculada a una página de Facebook. Tampoco podrás conectarte a una cuenta personal de Instagram.
Ahora, sigue adelante y haz clic en el enlace “Conectar cuenta” para integrar Instagram con Uncanny Automator.
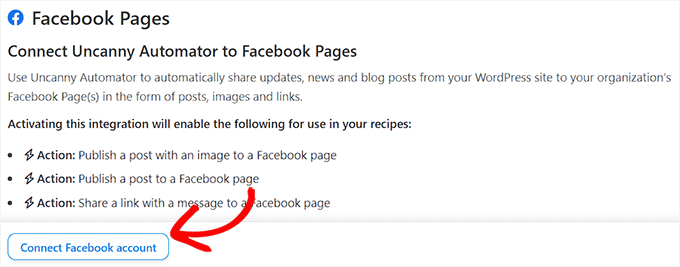
Se abrirá la página “Conectar una cuenta” en una nueva ventana.
Aquí, basta con hacer clic en el botón “Conectar cuenta de Facebook” para seguir adelante.
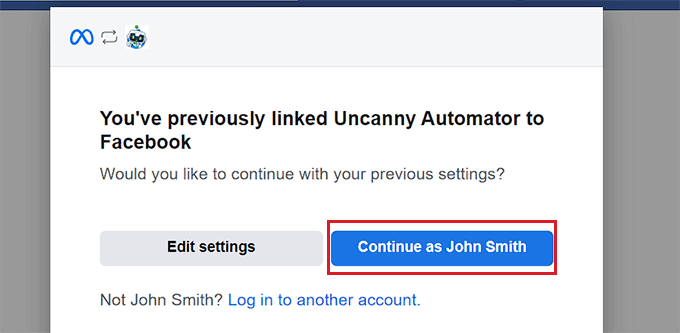
A continuación se te redirigirá al sitio web de Facebook, donde deberás proporcionar tus credenciales de acceso. Se te preguntará si quieres continuar con el mismo ID.
Sólo tienes que hacer clic en el botón “Continuar” para conectar Facebook a Uncanny Automator.
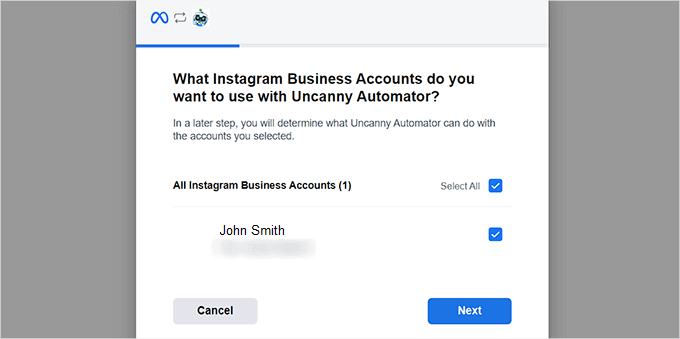
A continuación, tienes que seleccionar la cuenta de Instagram de empresa enlazada a tu cuenta de Facebook.
A continuación, haga clic en el botón “Siguiente” para continuar.
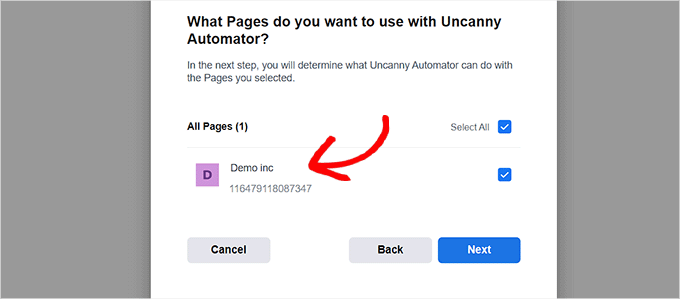
Después, debes seleccionar una página de Facebook. Sólo tienes que elegir una y hacer clic en el botón “Siguiente”.
Asegúrate de elegir la página conectada a tu cuenta de empresa de Instagram. De lo contrario, el proceso no funcionará.
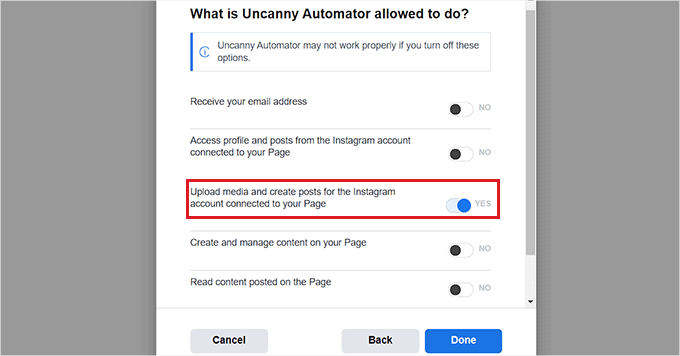
A continuación, tendrás que elegir todas las acciones que Uncanny Automator puede realizar en tu página de Instagram.
Por ejemplo, si quieres darle permiso para crear entradas en tu cuenta de Instagram, sólo tienes que conmutar el interruptor situado junto a esa opción.
A continuación, haz clic en el botón “Listo”.
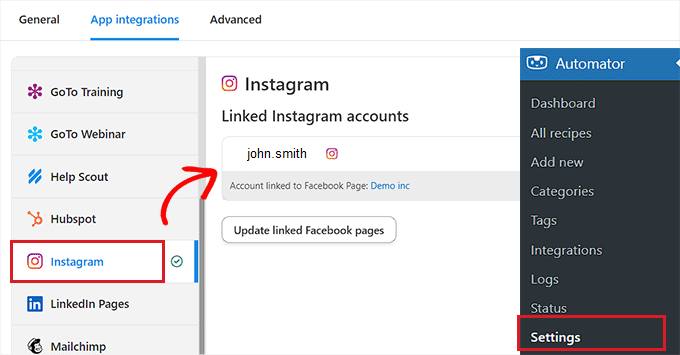
Ahora serás redirigido a la página de “Ajustes” de Automator en tu escritorio de administrador de WordPress. Una vez allí, ve a la pestaña “Instagram” de la columna de la izquierda.
Aquí verás la cuenta de empresa de Instagram conectada a tu página de Facebook.
Si la cuenta de Instagram no aparece en la pantalla, significa que algo ha ido mal y tienes que repetir el proceso.
Ahora puedes salir de esta ventana y dirigirte a la página emergente “Conectar integración” y volver a enlazar “Conectar cuenta”. Esto integrará Instagram con Uncanny Automator y tu sitio web WordPress.
Elija una acción de Uncanny Automator
Ahora, es el momento de elegir la acción que quieres que Uncanny Automator realice en Instagram cuando ocurra algo en tu sitio web WordPress.
Por ejemplo, si quieres publicar una foto en Instagram cada vez que se publique un artículo, elige la opción “Publicar una foto en una cuenta de Instagram Business”.

A continuación, escribe la URL o el ID de la biblioteca de medios de la foto que quieres publicar en Instagram.
Puede cambiar la URL de la foto desde el escritorio de WordPress cada vez que publique una nueva entrada.
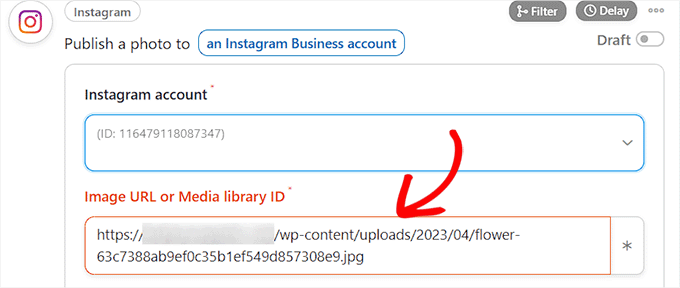
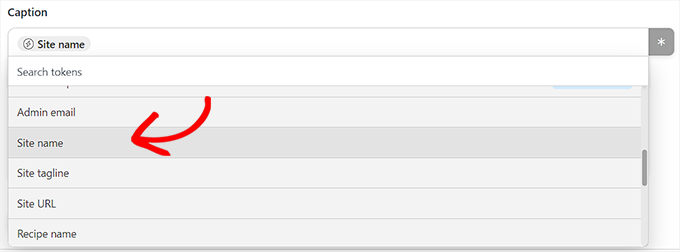
A continuación, debes redactar una leyenda que se publicará junto con tus entradas. Sólo tienes que elegir las opciones que más te gusten en el menú desplegable.
Puede añadir el nombre del sitio, la dirección de correo electrónico, la URL del sitio web, la fecha y otros datos de la lista de opciones.
Cuando hayas terminado, haz clic en el botón “Guardar” para almacenar los cambios.
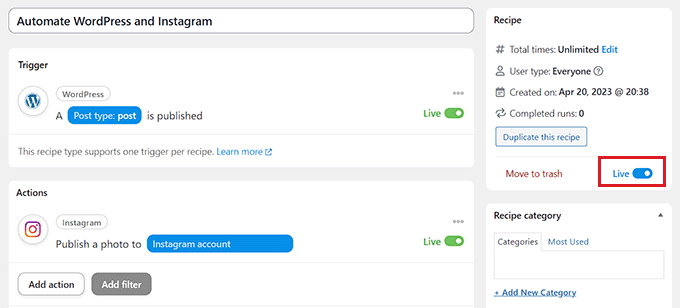
Por último, dirígete a la sección “Receta”, en la esquina derecha de la pantalla, y cambia el conmutador a “En directo”.
Ya has automatizado correctamente WordPress e Instagram.
Método 4: Utilizar ClickSocial para automatizar WordPress y las redes sociales
Si buscas un método más sencillo para automatizar WordPress y las redes sociales, también puedes utilizar ClickSocial.
ClickSocial es una de las mejores herramientas de programación de redes sociales. Puede utilizarla para programar fácilmente publicaciones en redes sociales directamente desde el escritorio de WordPress. También incluye una función para compartir automáticamente tus publicaciones antiguas de WordPress de forma regular.
Configurar ClickSocial
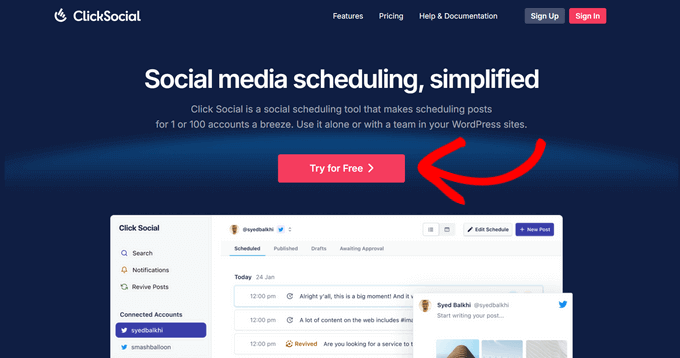
En primer lugar, tienes que visitar el sitio web de ClickSocial y hacer clic en el botón “Probar gratis” para registrarte.
A continuación, debe instalar y activar el plugin gratuito ClickSocial en su sitio de WordPress. Si necesitas ayuda, consulta nuestra guía sobre cómo instalar un plugin de WordPress.
Una vez activado el complemento, deberá volver a su cuenta en el sitio web de ClickSocial para generar una clave API.
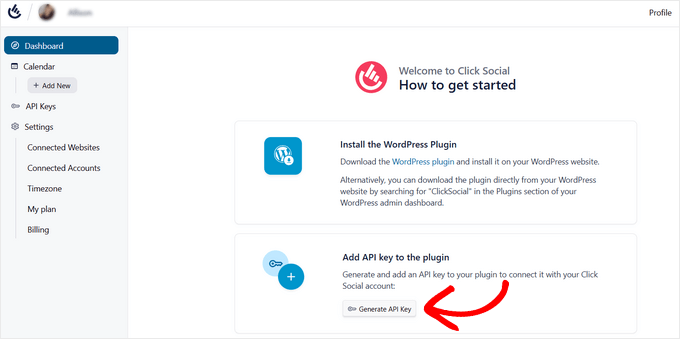
Para ello, haga clic en el botón “Generar clave API” del panel de ClickSocial.
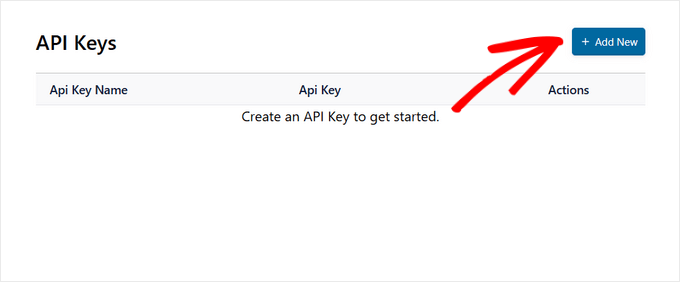
En la página siguiente, haga clic en el botón “Añadir nuevo”.
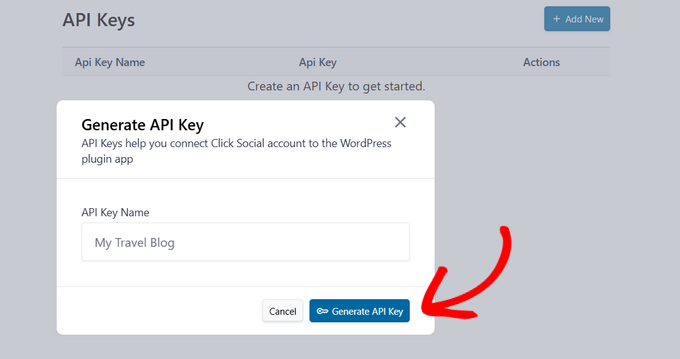
Se abrirá una ventana emergente en la que podrá introducir un nombre para su clave API, como el nombre de su sitio web, por ejemplo.
A continuación, haga clic en el botón “Generar clave API”.
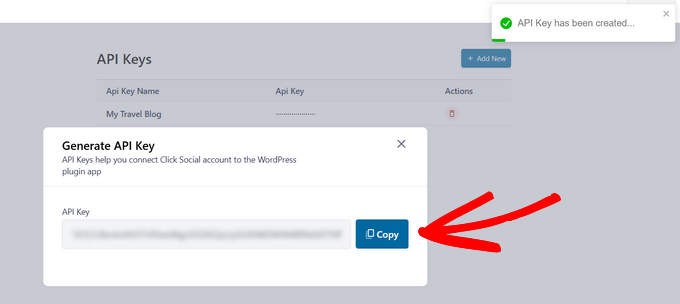
Ahora ha creado correctamente una clave API. Recuerda mantenerla segura porque es esencial para conectar tu sitio WordPress.
Haga clic en el botón “Copiar” para copiar la clave API y, a continuación, vuelva a su sitio de WordPress.
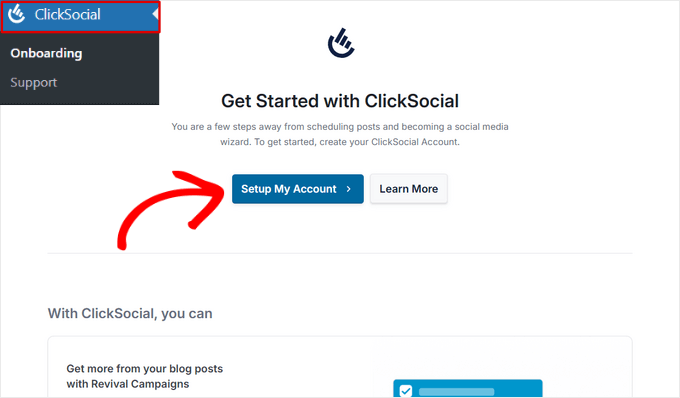
En el escritorio de WordPress, haga clic en el elemento de menú ClickSocial y, a continuación, en el botón “Configurar mi cuenta”.
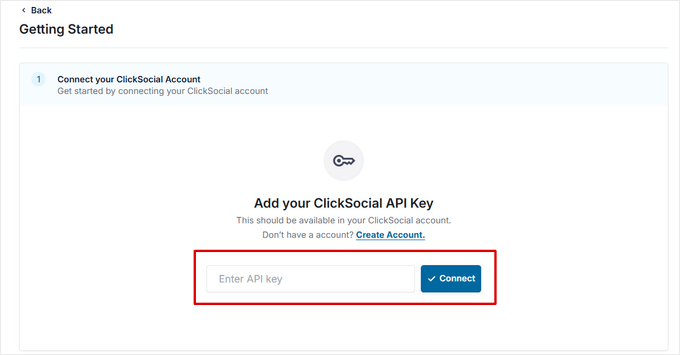
A continuación, sólo tienes que pegar la clave API que has copiado antes en el campo y hacer clic en el botón “Conectar”.
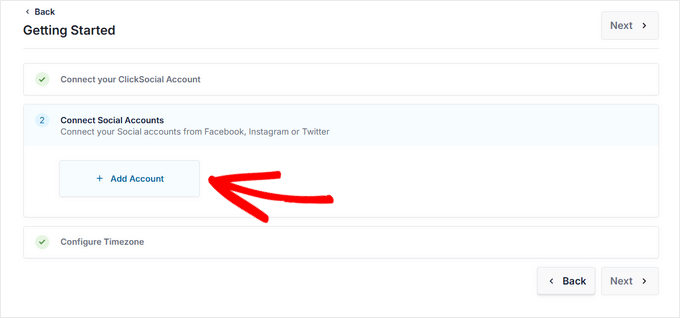
Una vez hecho esto, puedes empezar a conectar tus cuentas de redes sociales pulsando el botón “Añadir cuenta”.
Con ClickSocial, puede conectar su sitio web con las redes sociales más populares, como Facebook, Instagram y Twitter/X.
Para este tutorial, seleccionaremos la opción Twitter para conectarlo.
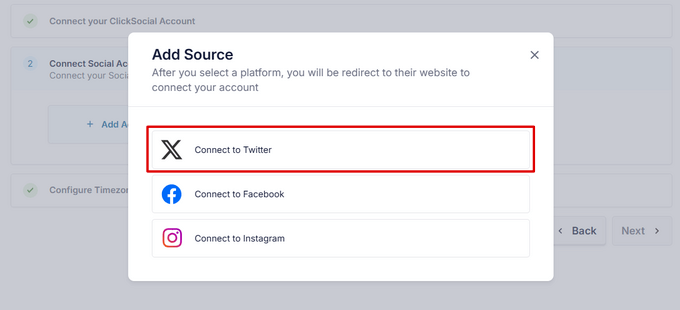
A continuación, el complemento te redirigirá al sitio web de Twitter, donde deberás acceder a tu cuenta y hacer clic en el botón “Autorizar aplicación”.
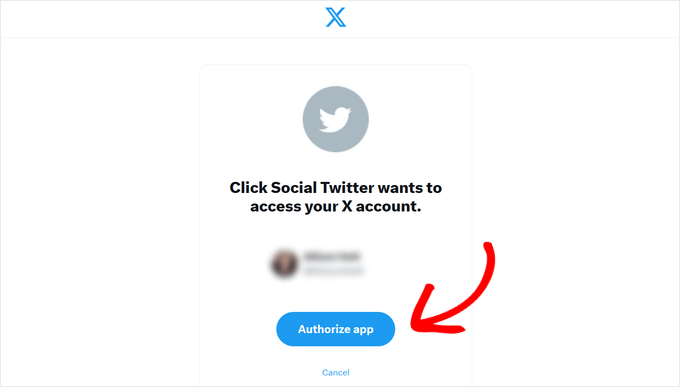
Después, serás redirigido de nuevo a tu sitio web. Si lo deseas, puedes repetir el proceso para conectar otras cuentas de redes sociales.
Una vez conectadas tus cuentas de redes sociales, puedes elegir la zona horaria en la que se programarán tus publicaciones. Para este tutorial, utilizaremos la zona horaria de nuestro sitio de WordPress.
A continuación, haz clic en el botón “Finalizar la configuración”.
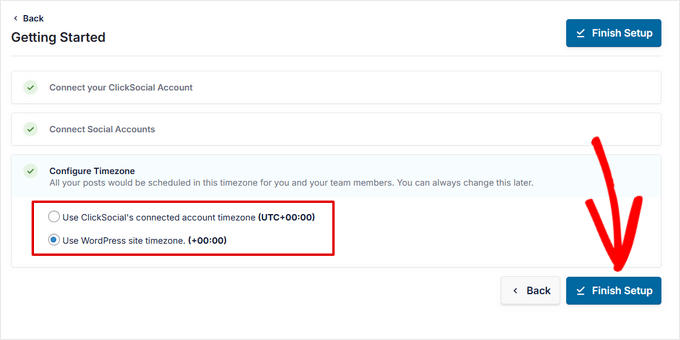
Crear una campaña de reactivación en ClickSocial
Ahora que ClickSocial está configurado, puede crear una campaña de reactivación para compartir automáticamente sus antiguas publicaciones de WordPress.
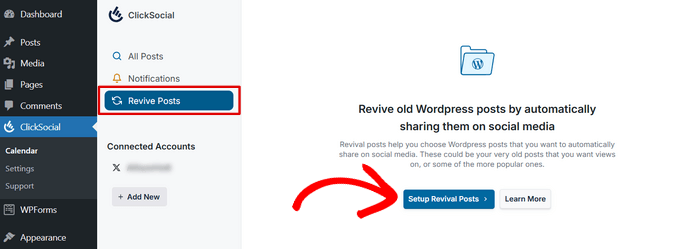
Para ello, ve a la pestaña “Reactivar entradas” y haz clic en el botón “Configurar entradas de reactivación”.
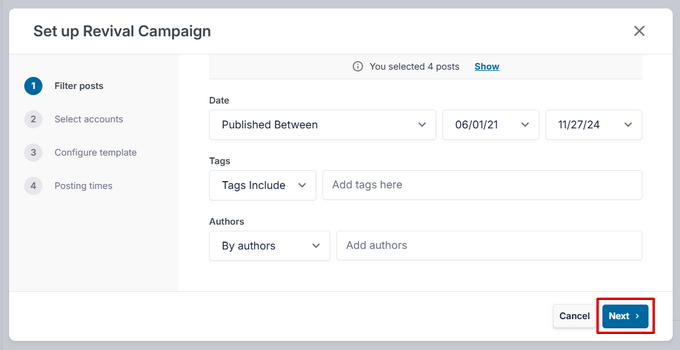
En el primer paso, puedes configurar filtros para decidir qué publicaciones quieres compartir automáticamente en las redes sociales.
Puedes filtrar por fecha, etiquetas y autores. Cuando estés satisfecho con los filtros, haz clic en el botón “Siguiente” para continuar.
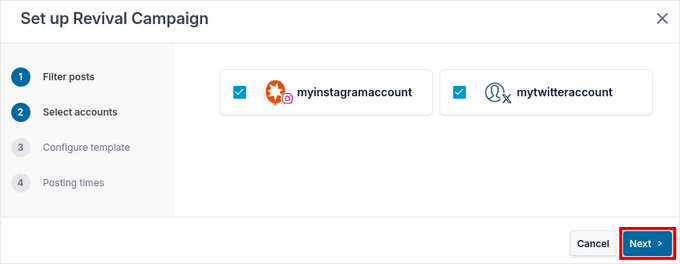
A continuación, seleccione las cuentas de redes sociales en las que desea publicar. Si lo desea, puede seleccionar varias cuentas.
Pulse el botón “Siguiente” para continuar.
Después, puedes crear una plantilla de publicación, que es el texto que acompañará a tus publicaciones en las redes sociales.
Puedes escribir manualmente el contenido de la entrada, así como insertar contenido dinámico como el título de la entrada, el extracto, un enlace corto a la entrada y categorías como hashtags.
Una vez que su plantilla esté lista, haga clic en el botón “Siguiente”.
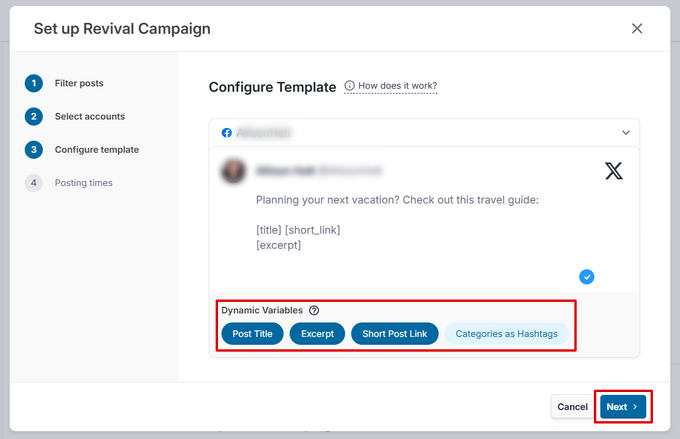
Nota: Si ha seleccionado varias cuentas en las que publicar, deberá crear una plantilla distinta para cada plataforma. Para ello, haz clic en la flecha hacia abajo situada junto al nombre de la cuenta.
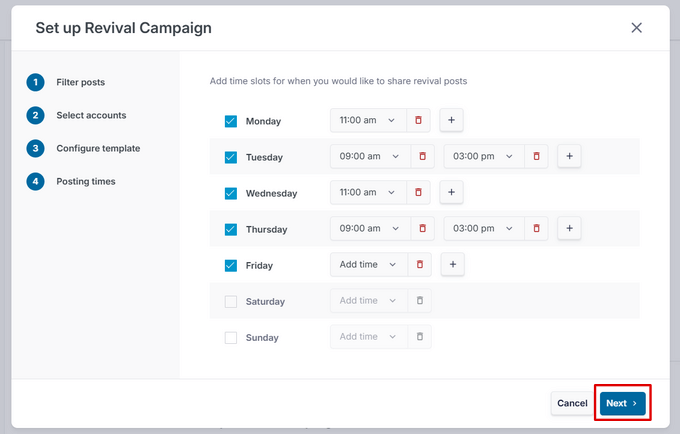
Por último, puedes seleccionar los días y horas concretos en los que quieres que se compartan tus publicaciones. Puedes añadir varias horas de publicación al día haciendo clic en el icono “+ Añadir”.
Cuando estés satisfecho con tu calendario de publicación, haz clic en el botón “Siguiente”.
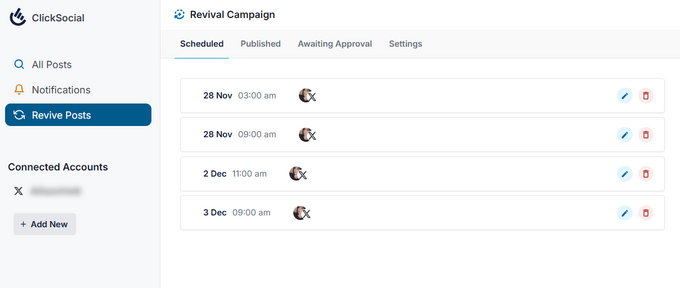
Ahora accederás a la pestaña “Programado”, donde podrás ver las publicaciones que se compartirán automáticamente en las redes sociales.
Esperamos que este artículo te haya ayudado a aprender a automatizar WordPress y las plataformas de redes sociales mediante IFTTT, Zapier, Uncanny Automator y ClickSocial. A continuación, puede que también quieras ver nuestro tutorial sobre cómo añadir inicios de sesión sociales a tu sitio web de WordPress o nuestras selecciones de expertos de los mejores plugins de redes sociales para WordPress.
If you liked this article, then please subscribe to our YouTube Channel for WordPress video tutorials. You can also find us on Twitter and Facebook.


Mrteesurez
Website Automation is worth give an attention. It helps one automation and share website contents to your different social handles, this will save your time and energy.
Can this also work for custom post type ??
WPBeginner Support
It can, you would want to ensure you include the custom post type in an RSS feed for IFTTT to be able to see it.
Admin
THANKGOD JONATHAN
I have been using free Zapier to automate my social media post but today I have get an alternative.
I will need to try IFTTT. Base on this tutorial as I see it will be easier to use than Zapier.
Moinuddin Waheed
This is so powerful and easy to use in yet free. IFTTT is hands down the best social media automator free plugin to use.
Others are paid options and are of course worth having but for beginners who are just starting out and have a tight budget, this ifttt is the best option to go with to automate the social media posts and pages.
Matthew Carney
I have set everything up but I want ifttt to pull posts from a categorie but when i use the link “https://domain.name/local-news/feed/” it doesn’t pull but if i ask it to pull site wide “https://domain.name/feed/” it pulls everything. im so confused i dont know why it wont work
Andrew B.
Ok so just the normal site URL mysitename.com nothing special like the link to the backend for it to log in correct? Im new to all this stuff only had website for just over a month. Thanks again for your time and assistance.
WPBeginner Support
Unless it asks for a specific URL then you would go to your primary site URL
Admin
Andrew B.
Awesome thank you for the help greatly appreciated.
Andrew B.
I have a bluehost wordpress website. I just created my if this then that account. I want to connect my website blog to post on social media.
It said to enter the blog URL. So i used mysitename.com/blog/ and it said it was not a valid blog URL.
What other URL would it be if not my site name/blog?
WPBeginner Support
IFTTT would normally need the URL for your site and not the blog page of your site.
Admin
Emmanuel Ajayi
NIce one. Thank you.
WPBeginner Support
You’re welcome
Admin
Jen
Hi,
Is there a way to set up IFTT with a third party plugin? For instance my calendar plugin. Everytime I Post, I would like for it to post to my socials .Just like it does for my WordPress Posts currently.
Thanks!
WPBeginner Support
You would want to check with that plugin’s support for if it has the ability to work with IFTTT
Admin
Chinecherem Somto
this is great! i have searched for this for a long time, thanks to WPBeginner
WPBeginner Support
You’re welcome, glad our article could help
Admin
Rohit Singh
Hello admin.
I’ve read this article but i wanted to know that i own a website but whenever i am checking the seo stats it’s showing me that social count 0. How to increase the social count. Kindly reply me please.
WPBeginner Support
Your users may not be sharing your content yet, you can add social icons on your site using one of the plugins in: https://www.wpbeginner.com/plugins/best-social-media-plugins-for-wordpress/
if you do not have shares currently.
Admin
Terri Scheffler
I set up IFTTT to post my WordPress blog entries to the FB page. It works great, and was so easy to do!
One problem. The ‘logo’ appearing with each post comes from my WP page. It’s far too big, and gets truncated, and looks stupid. I went into the media library, created a thumbnail on my ‘logo’ graphic, and hoped it would pick that up instead. It didn’t.
Is there any way I can get IFTTT to pick up the thumbnail graphic instead of the larger one that appears at the top of the blog? Please be gentle, I am a newbie. But I have gotten so much good info from this site, appreciate it!
marc
why do the wordpress apps in ifttt not post the featured image from the wordpress post in the social media you chose. I have so many posts that will post to lnkedin or facebook but do not post the image along with it. Am I doing something wrong?
Simran
Thank you for the tips. It took a while for the ifttt to work for my wordpress but Finally it did.
Tom
Does anyone know how to post a bunch of already published wordpress posts on facebook ?
I have a lot of old posts on a blog that I would like to gradually post on FB (with a pace of 2-5 a day).
Daretoeatapeach
Though ITTT has many services the problem is few of them are detailed enough to be useful. For example, there’s no way to tell it which of my Tumblr blogs to post to, nor can I have it send only certain categories to Tumblr, so the Tumblr option is useless, even though I’ve been seeking a solution to send my posts to Tumblr. Every other time I try to use ITTT I find the lack of detailed options for the services they provide doesn’t meet my needs.
Sadiq Ali Baloch
Hello
please tell me
how to connect twitter accounts to my f.b pages?
Benson
Very terrible to connect self hosted WordPress blog with IFTTT. And suggestion will be greatly appreciated. Only WordPress.com is connecting. Ah! My head is heavy.
markwoff
Trying to use IFTTT to push WP posts to tumblr. I get ‘external image/image not found’ message on tumblr. How might I fix this? Thanks in advance…
Ann Murugi
I have a blog,when i try sharing my links on twitter it states’ the site might be automated’
How can i fix this?
Katia
thanks! very helpful!
Tony
Thank you so much for this post. I’ve heard that plugins for auto sharing to social media can slow down a WordPress site pretty badly, so this is way better. IFTTT is brilliant, and the video combined with the instructions were extremely helpful.
WPBeginner Staff
It actually depends on what CMS or software the other website is using to publish content.
poonam
This is really a awesome article but my question is how can I automatically post to some non wordpress sites every time I publish a new blog post in my wordpress site. Is that possible to do. Its really helpful for me if you will write about this. thanks
Marco Miomac
How to post old WordPress posts to twitter using IFTTT?
Fabula
Hej there.
I am using the IFTTT now for some time. Thanks for telling me that this exists! =)
But I have a problem, when it comes to posting images on Facebook or Twitter from my WordPress-Blog. I always have a featured image set for my posts, but if I want to create an image post on the social media, it always tells me there that the image does not exit.. Is there a trick to make it work?
I even tried making my blog post an image post, but that did not work either.
And can I adjust the recipes so that I just type in what he should show, or is that limited to what they give me (For example what I want to post in my posts, like imageURL and so on)
Thanks for the help!
WPBeginner Staff
You will enter your website’s url in IFTTTT
http://www.example.com
IFTTT will still get your blog feed. Make sure you have activated Twitter channel and given IFTTT permission to tweet on your behalf. After that try publishing a post and then come back to IFTTT and manually run the recipe. See if it shows you any error.
darkhorse85
I can’t activate my WordPress BLOG as a channel:
[On IFTTT.com]
When I attempt activate WordPress posts as channel from my blog URL “mywebsite.co.uk/blog” it will not work.
IFTTT.com activate on WordPress posts as channel by typing “mywebsite.co.uk” it does indeed activate (but does not tansfer the posts from my blog page to Twitter).
Please
let me know I know if you have good idea what going wrong here thanks.
WPBeginner Staff
Seems like your site is setup with a static front page and a separate page for blog posts. In cases like this, your blog’s URL is still the root domain not the blog page. Sometimes it may take IFTTT a while to get your new post and tweet it. You can also try running a recipe manually and see if it triggers the action or shows any error.
You will also need to activate the Twitter channel and give IFTTT permission to post on your behalf.
darkhorse85
Yes I do have a mutli-page site where my blog is not the font page. My front page is my Home page should be a static page and page named Blog should be categorised as a blog.
I must admit I don’t fully follow what it is you are saying and am unsure where to go from here.
Q1: What address should enter use activate and use my WP blog?
Q2: How would I run a recipe “manually”
Please kindly advise. Thanks
Adam Kaan
I had a nightmare for weeks trying to resolve this problem in the end I found out to use my feed to set it up. For example mine is put whatever your site url is and then add forward slash feed try and use that address to set it up on ifttt
Sheridan
Hi really cool post !
is it possible for IFTTT to make a bitly link (shotend link) under the sent post, so the readers come back to my site, or does this tool do such a thing – maybe I just have to make the bitly link (shotend link) in my WP POST before letting IFTTT send to the social platforms – somebody know if I am right or wrong?
thanks for answering !
Sheridan
Tim Buttle
I’ve recently created a ‘recipe’ on IFTTT that means whenever I retweet, it comes up on the blog on my WordPress site. However if I click on the link that comes up on WordPress, it doesn’t take me to the original Twitter feed (rather to a sub-page on my WordPress site). How can I get the link to take me from my site back to Twitter?
Might be a stupid question, and many thanks for any help! Tim.
Lav Singh
How to post old WordPress posts to twitter using IFTTT? (Twitter account created after publishing some WordPress posts)
toddbot
I recently set up ifttt to post to wordpress whenever I load a video to youtube. Is there a way to build the short code [publicize off] into the recipe so it will not post to the other sites I have linked to wordpress?
Pundi
I almost pull my hair with my wp plugin.. thank you for this article. I have to join IFTTT
Robin Rico
I just discovered this little gem of a site. Love it! One recipe I used was fb fan page to wordpress. I have a client who prefers to post everything in fb vs. her blog. Problem solved!!
Joanne Marcinek
Great post. Thank you.
I love IFTTT but I am trying to use it with a WordPress.com blog that I have marked as private (using it as a personal journal). However, I would like to access the RSS via IFTTT for backup.
I am getting this error when I try to link to the blog RSS: Not a valid feed url, missing feed title
Do you think this is because the blog is marked private? Or is there something else going wrong? (I tried your suggestion to enable XML-RPC, but I don’t see that option in my settings.
Thank you!
Editorial Staff
Yes it is because your blog is set to private.
Admin
B
Then why does it ask for the WordPress username and password. Privacy settings shouldn’t matter…
darkhorse85
Acutally I think it may just be because you version of WordPress has XML-RPC automatically enabled. Google search this to check: “WordPress (enter the version you use)” followed by “XML-RPC automatically enabled” and see what
comes up!
I use WordPress 4.0 on a wordpress.org site and that solved my
XML-RPC dilema.
Mattia
When I try to connect WordPress to IFTTT it says:
Live channel fields value is not a valid WordPress url
Unable to verify WordPress credentials. Please try again.
Am I missing something? Thanks
Dan Deeble
It doesn’t seem to work with my wordpress.com blog, unless of course I am doing something completely retarded.
Can anyone verify this please?
Thanks
Dan
Editorial Staff
It should work fine. You can also use the RSS method.
Admin
Julien Maury
Thanks a lot for making my blogging life easier !
Zimbrul
This is quite cool. The backup to Dropbox or Google drive is good but my question is: how the backup of any post looks like? I think I should try for myself, shouldn’t I.
The problem (at least until recently) was for the Facebook to work nicely with WordPress and grab the featured image or the image in the post as well as the excerpt. I wonder how this service pulls out the excerpt and the post image?
Editorial Staff
If you have the proper og: tags defined, then Facebook will pull the image. As for per post backup, it stores the post as PDF.
Admin
Tom Hermans
The other way around it’s even more useful, that it fetches yr social media blurbs, and archive them in YOUR own space. WordPress is all about owning and controlling your own content, and that way you can preserve, bundle, and display all yr tweets, fb status updates etc. in one centrally managed hub.
For a personal blog, it doesn’t get any more personal than that.
Editorial Staff
Totally agreed. It pulls from RSS, FB, Twitter, and all sorts of places.
Admin
Charles
I use IFTTT to auto tweet and facebook all my new posts on my blog. It’s good, but my only complaint is that it only activates once every 30 minutes.
Manveet Singh
I already use IFTTT with Google Drive to backup my blog posts, and it works amazingly.
There’s only one thing that I have been trying to find a solution though. When I update an already published post, how to get a backup of that! Still trying to figure out
Shea Bunge
At this time, IFTTT does not support Google+, and therefore your “WordPress to Google+” recipe suggestion is invalid.
Birgit
This is really AWESOME, wow! Thanks for that great tip!
I wonder whether it’s possible to replace the good old feedburner mail subscription with IFTTT?
I’ve only found the possibility, to create a receipe at IFTTT to send my/any feed to my (!) e-mail address. But how to offer the own blog visitors the possibility for a mail subscription to get the newest posts (as in normal RSS)? Isn’t that possible with IFTTT or has anybody another suggestion?
Editorial Staff
No that is not possible with IFTTT. You would have to use a service like MailChimp or Aweber.
Admin
Shea Bunge
While email subscriptions are not possible with IFTTT, you can use the Jetpack Email Subscriptions plugin.
Lawrence
For Twitter, Facebook, LinkedIn, and Tumbler, I’ve found that Jetpack’s Publicize tool has worked very well.
I had been using IFTTT for all of the above and switched over to Jetpack.
Editorial Staff
Yes, there are cool plugins in WordPress that can do the job as well. But if you are only going to use Jetpack for that feature, then you might as well just use IFTTT. Again, Jetpack offers a lot more that everyone might not need/want.
Admin
zimbrul
I heard that Jetpack is quite “heavy” on a WordPress site…
Matt Litherland
I have literally skim read this, and it looks great. I’m hoping when i get time later tonight to read it fully that it fulfils what im after. Posting blog posts to facebook or twitter automatically is something i’ve wanted to build into my themes for a while