He aprendido que cuanto más fácil se lo pongas a la gente para compartir tus contenidos en Internet, más los compartirán. Y cuando se trata de compartir en las redes sociales, Twitter (X) sigue siendo una de las plataformas más potentes para dar a conocer tu contenido.
Por eso el equipo de WPBeginner está activo en Twitter, ¡y nos aseguramos de que nuestro contenido sea fácil de compartir! 🙌
Es más, en mi opinión, hacer que tu contenido sea compartible en Twitter no es sólo un buen complemento para una estrategia de marketing sólida, es algo innegociable. Esto se debe a que puede tener un impacto mayor en tu negocio de lo que imaginas.
¿Cómo? Compartir en Twitter no sólo amplía tu alcance. También envían señales positivas a los motores de búsqueda, mostrándoles que la gente encuentra valioso tu contenido.
En esta guía, le mostraré 2 métodos sencillos para añadir botones de compartir y retweet de Twitter en WordPress (sin código obligatorio / requerido / necesario).

¿Por qué añadir botones para compartir y retuitear en Twitter en WordPress?
Según la investigación de estadísticas de marketing del equipo de WPBeginner, Twitter (X) tiene más de 250 millones de usuarios activos mensuales. Eso lo convierte en un lugar ideal para promocionar tu sitio web.
Sin embargo, compartir tus contenidos en los medios sociales solo llega a los usuarios que ya siguen tu cuenta. Si quieres llegar a un público nuevo, tienes que conseguir que compartan y retuiteen tus contenidos.
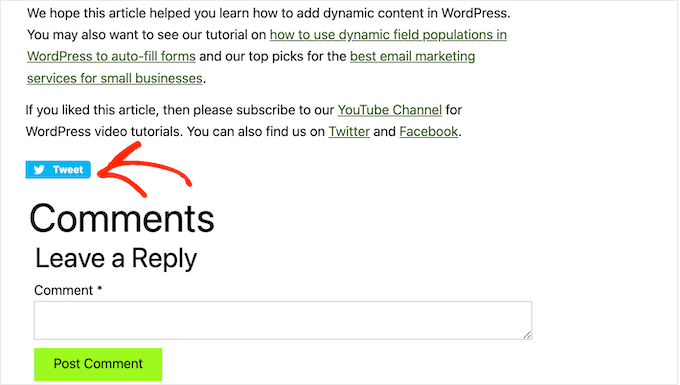
Esto puede aumentar el tráfico de su blog al presentar su marca a personas que tal vez no conozcan su sitio web. Volver a publicar su contenido es también una potente forma de prueba social. Cuando alguien comparte una entrada o un tuit con sus seguidores, suele verse como un respaldo.
Dicho esto, vamos a ver lo fácil que es añadir botones de compartir y retwittear de Twitter en WordPress. Simplemente usa los enlaces rápidos de abajo para saltar directamente al método que quieras usar:
🧑💻 Consejo profesional: ¿Estás buscando una forma de hacer que el contenido de tus entradas sea tuiteable en WordPress? Comprueba nuestra guía sobre cómo añadir casillas “Click to Tweet” en WordPress.
Método 1: Cómo añadir un botón para compartir en Twitter en WordPress con Novashare
En mi experiencia, la forma más sencilla de añadir un botón de compartir de Twitter (X) a WordPress es utilizando el plugin Novashare. Es uno de los mejores plugins de medios sociales para WordPress que te permite añadir todo tipo de botones de compartir a tu sitio. Esto incluye LinkedIn, Facebook y X.
💡 Nota: El equipo WPBeginner hizo una extensa investigación sobre este plugin, y usted puede encontrar todo acerca de él en nuestra completa reseña Novashare.
A diferencia de otros plugins voluminosos, Novashare se centra en el rendimiento y funciona a la perfección con muchos temas populares de WordPress. Esto lo hace perfecto para los propietarios de sitios que se preocupan por la velocidad de la página, el estilo y la simplicidad.
Paso 1: Instalar y activar Novashare
El primer paso es instalar y activar el plugin.
Deberá adquirir el plugin de Novashare en el sitio web oficial de Novashare.

A continuación, sólo tiene que finalizar el proceso de compra para acceder al Escritorio de Novashare.
A continuación, verá la confirmación de su compra, donde encontrará la clave de licencia de Novashare, así como el archivo .zip.
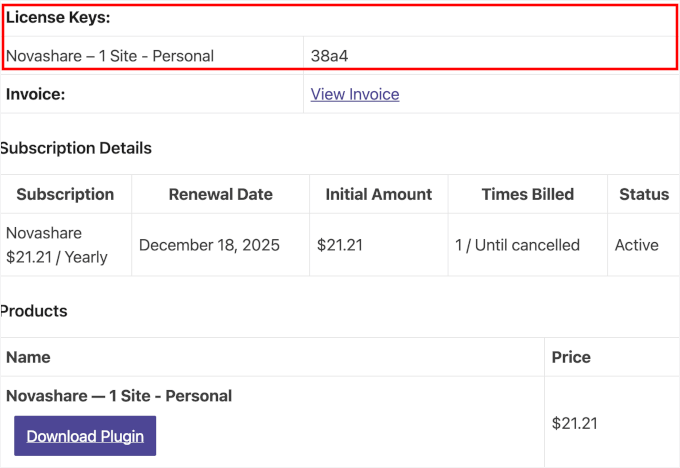
Sólo tienes que descargar el archivo, copiar la clave de licencia y guardarla en un lugar seguro.
A continuación, en el área de administración de WordPress, vaya a Plugins ” Añadir nuevo para instalar el plugin.
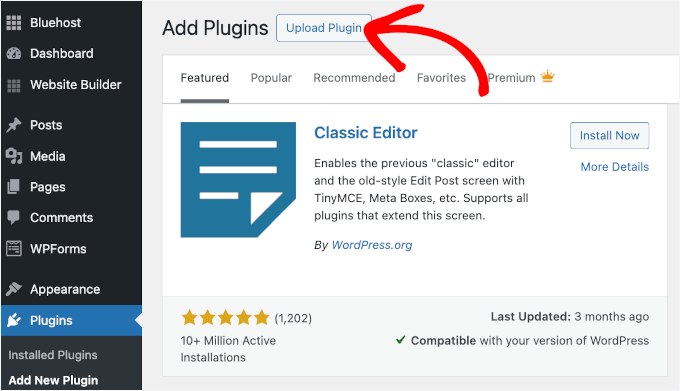
Puede subir el archivo .zip de Novashare y hacer clic en “Instalar ahora” para iniciar el proceso, seguido de “Activar”. Si necesita ayuda, consulte nuestra guía sobre cómo instalar un plugin de WordPress.
Tras la activación, deberá activar su clave de licencia. Para ello, dirígete a Ajustes ” Novashare.
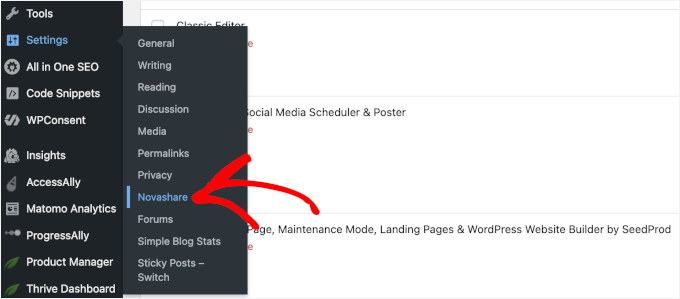
En la pantalla siguiente, puede hacer clic en “Licencia”.
Después, basta con introducir la clave en el campo y hacer clic en “Guardar licencia”.
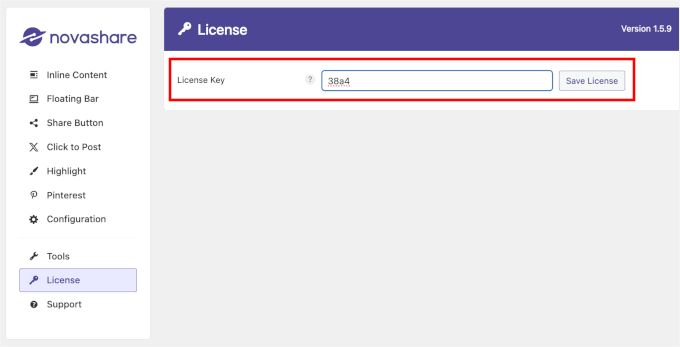
Una vez hecho esto, ya está listo para crear su botón para compartir en Twitter con Novashare.
Paso 2: Cree su botón para compartir en Twitter
Para crear botones para compartir medios sociales en Novashare, puede trabajar en el submenú “Contenido integrado” o “Barra flotante”.
¿Se pregunta qué significa eso? He aquí las principales diferencias:
- Contenido integrado: Por defecto, estos utilizan el tamaño medio y muestran el botón en la parte superior o inferior (o ambas) – dependiendo de lo que elijas. También puedes colocarlos en cualquier parte de la página mediante un bloque o shortcode.
- Barra flotante: Aparecen en la parte izquierda de la pantalla en ordenadores de sobremesa y se pegan a la parte inferior en móviles. Utilizan por defecto el tamaño de botón pequeño, pero su ubicación puede variar dependiendo del tamaño de la pantalla.
Para esta guía, voy a utilizar el estilo ‘Contenido integrado’, así que activaré el conmutador para activarlo.
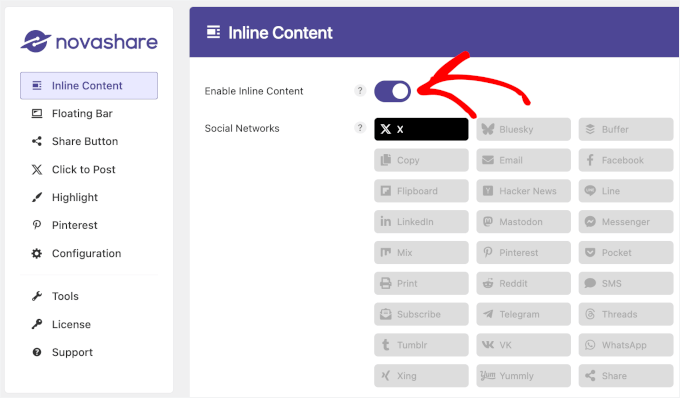
También puede ir a la pestaña Barra flotante y activarla.
Una vez que hayas activado tu botón de compartir preferido, busca la sección “Redes sociales” debajo de él. Aquí, sigue adelante y haz clic en el icono X para seleccionarlo.
Ya está. Pero antes de guardar este ajuste, querrás personalizar tu botón de compartir de Twitter.
Paso 3: Personalizar la apariencia del botón Compartir:
Si se desplaza hacia abajo en la pestaña “Contenido integrado”, encontrará varias opciones para personalizar el aspecto del botón para compartir de Twitter (X) y el lugar de su sitio en el que aparece.
En la sección “Mostrar”, puedes elegir qué tipos de entradas mostrarán el botón para compartir en Twitter. Sólo tienes que marcar / comprobar las casillas que desees. Por ejemplo, para este tutorial, lo activaré para “Entradas”.
A continuación, puede decidir dónde aparecerá el botón: encima del contenido, debajo del contenido o tanto encima como debajo del contenido.
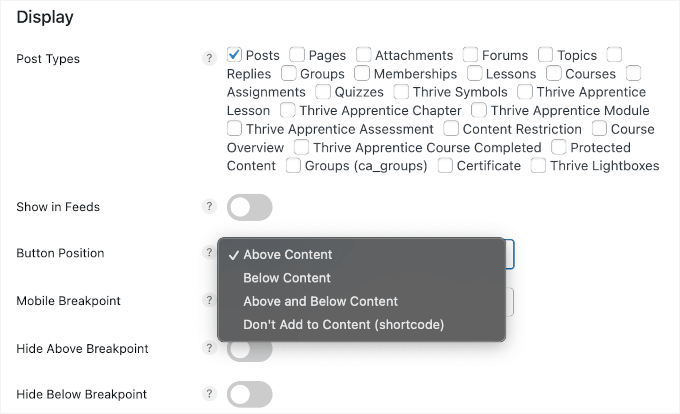
La característica “Mostrar en feeds” también permite mostrar botones dentro de feeds RSS.
La opción “Punto de ruptura móvil” establece cuándo se activa el estilo móvil, por ejemplo, 1200px. Por su parte, el ajuste “Ocultar por encima/por debajo del punto de ruptura” controla la visibilidad de los botones en función del tamaño de la pantalla.
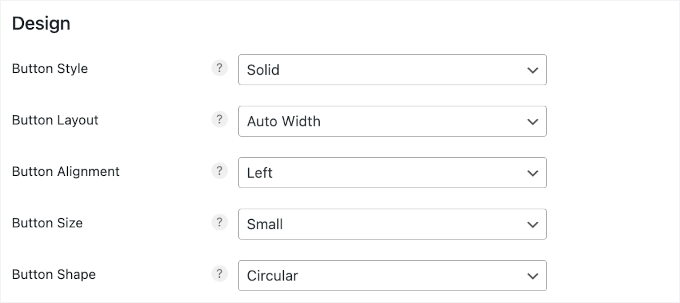
Más abajo en la página, encontrará la subsección “Diseño”. Aquí encontrará lo que puede personalizar:
- Estilo de botón: Sólido, Inverso, Etiqueta con borde, Botón con borde, Etiqueta mínima, Mínimo
- Disposición de los botones: Ancho automático, 1-6 columna(s)
- Alineación de botones: Izquierda, Derecha, Centro
- Tamaño del botón: Pequeño, mediano, grande
- Forma de botón: Cuadrada, Redondeada, Circular
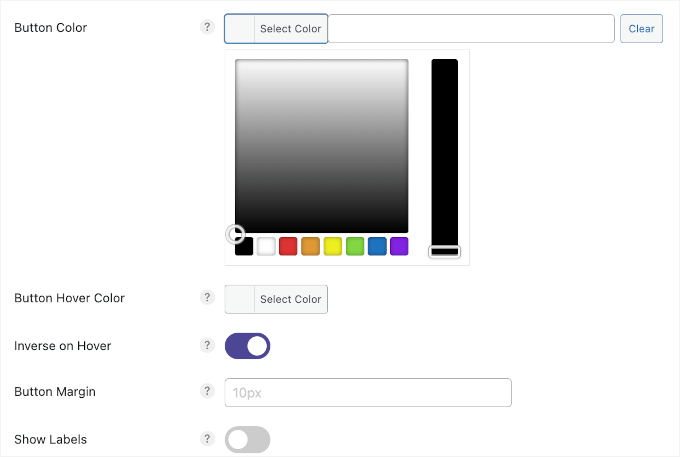
Después, puede que quieras cambiar el color del botón. Si es así, simplemente desplázate por la herramienta de selección de color para elegir un color.
Para este tutorial, he activado la característica “Invertir al pasar el cursor” para que el botón parezca más interactivo. Esto añade un efecto de inversión, en el que los colores del botón cambian al pasar el cursor por encima, lo que indica a los usuarios que pueden hacer clic en él.
Para hacerlo aún más interesante, puedes elegir el color del botón al pasar el cursor con la herramienta de selección de color. También hay ajustes para ajustar el margen del botón y la visualización de la etiqueta.
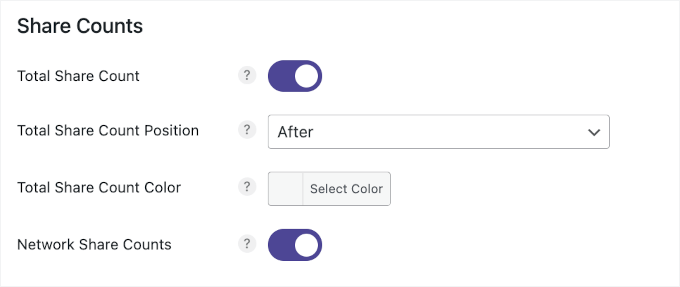
Justo debajo de la subsección “Diseño”, encontrarás “Compartir cuenta”.
Aquí puedes mostrar el número total de compartidos en todas las redes. Y luego, es posible que desee cambiar donde aparece, como antes o después de los botones. También puede retocar el color para que coincida con su sitio de WordPress.
¿Quieres mostrar también las participaciones por plataforma? No dudes en activar “Recuento de participaciones en la red”.
Dicho esto, ten en cuenta que algunas plataformas de medios sociales ya no son compatibles con / dar soporte a los datos de recuento. Por lo tanto, es posible que no muestren un número.
Por último, encontrará la subsección“Llamada a la acción“.
Le permite añadir una breve etiqueta de texto para orientar a los lectores sobre la función del botón, como “Compartir esta entrada” o “Twittear ahora”.
También puede personalizar el tamaño y el color de la fuente para adaptarlos al estilo de su sitio.
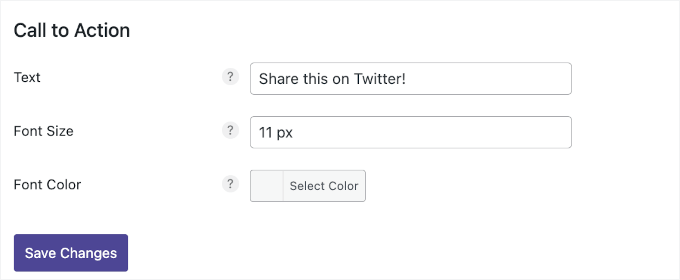
Después de hacer los ajustes, puedes hacer clic en el botón “Guardar cambios”.
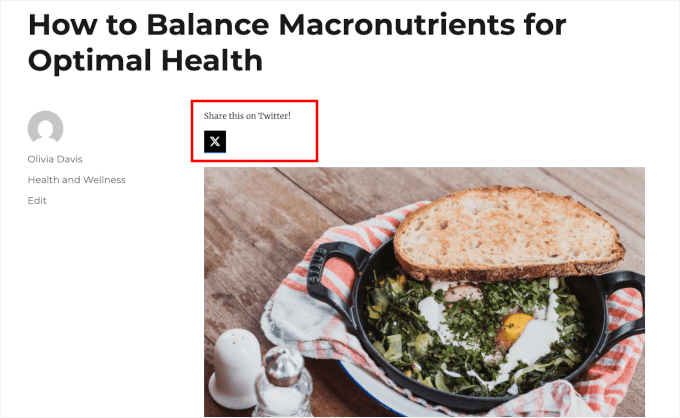
Y ya está. Novashare mostrará inmediatamente el botón de compartir de Twitter (X) en tus entradas. He aquí un ejemplo de mi sitio web de prueba:
Método 2: Cómo permitir que los usuarios retuiteen tus tweets en WordPress con Smash Balloon
Si desea añadir un simple botón de compartir a una página o entrada, Novashare es una buena opción. Sin embargo, también puede animar a los visitantes a retuitear sus tuits recientes. Así conseguirás más participación y difundirás aún más tu contenido.
La mejor manera de conseguir más retweets es mediante el uso de Smash Balloon Twitter Feed Pro. Este plugin de Twitter Feed te permite añadir todo tu feed de Twitter (X) a cualquier página, entrada o área preparada para widgets.
💡 Nota: Para más información acerca del plugin, marca / comprueba la reseña completa de Smash Balloon del equipo de WPBeginner.
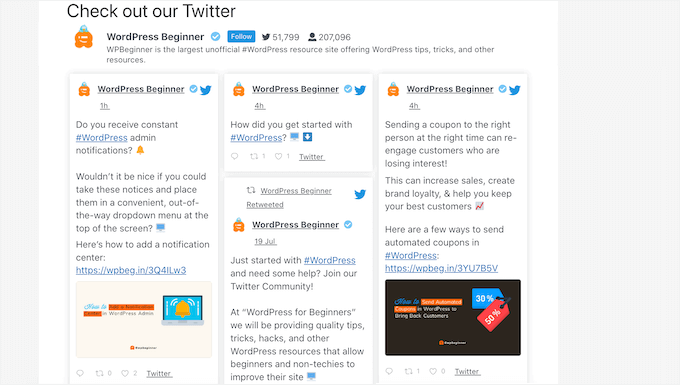
Cada tuit tiene su propio menú de acciones de Twitter.
Esto significa que los visitantes pueden reenviar un tuit simplemente haciendo clic en el botón “retuitear”.
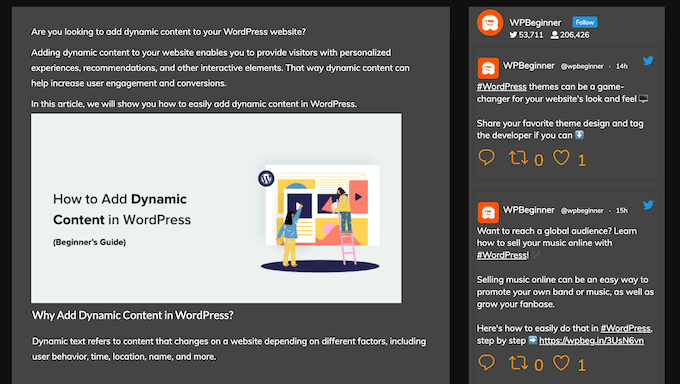
Y lo que es mejor, el feed se actualiza automáticamente, por lo que siempre hay nuevos tweets con los que los visitantes pueden participar. Esto puede ayudar a mantener su sitio fresco e interesante, incluso para los visitantes frecuentes.
📌 Nota: En realidad hay una libre Smash Balloon Twitter Feed plugin disponible. Sin embargo, voy a utilizar la versión Pro, ya que viene con más características, como más plantillas de alimentación y la capacidad de mostrar hashtag feeds.
Paso 1: Establecer Twitter Feed Pro
Primero, necesitarás instalar y activar Smash Balloon’s Twitter Feed Pro. Si necesitas ayuda, consulta la guía de WPBeginner sobre cómo instalar un plugin de WordPress.
Una vez instalado el plugin, dirígete a Twitter Feed ” Ajustes. Ahora puedes introducir tu clave de licencia de Smash Balloon en el campo ‘Clave de licencia’.
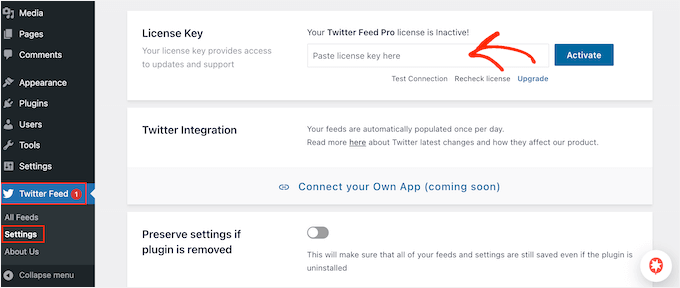
Puedes encontrar esta información en el correo electrónico de confirmación que recibiste cuando compraste Smash Balloon y en tu cuenta de Smash Balloon.
Después de añadir su clave de licencia, siga adelante y haga clic en el botón “Activar”.
Paso 2: Crear un feed de Twitter en directo para WordPress
Una vez hecho esto, ya está listo para crear un feed de Twitter personalizado. Para empezar, ve a Twitter Feed ” Todos los feeds y haz clic en el botón “Añadir nuevo”.
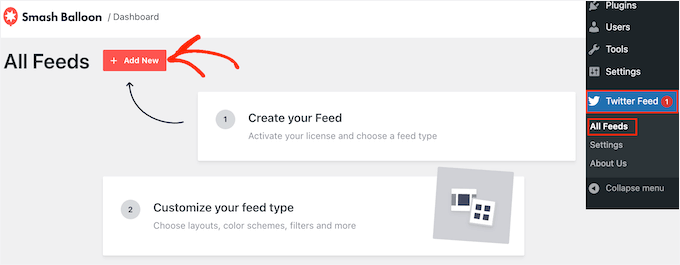
Si es la primera vez que añades un feed de Twitter con Smash Balloon, se te pedirá que verifiques tu dirección de correo electrónico.
Para ello, basta con hacer clic en el botón “Conectar” y seguir las instrucciones que aparecen en pantalla.

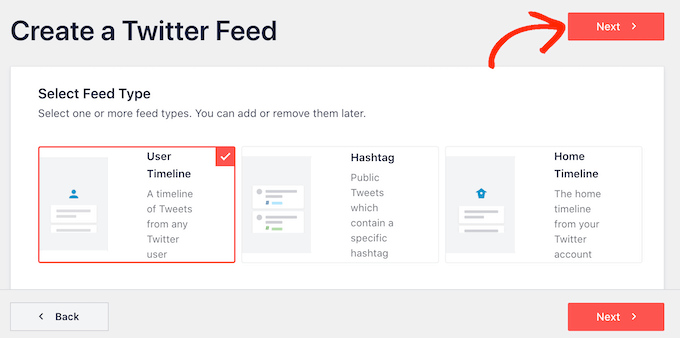
Una vez hecho esto, volverás a la página del plugin. Smash Balloon mostrará ahora todos los diferentes tipos de feeds de Twitter que puedes crear.
Como quieres más retweets, sólo tienes que seleccionar “Cronología de usuario” y hacer clic en “Siguiente”.
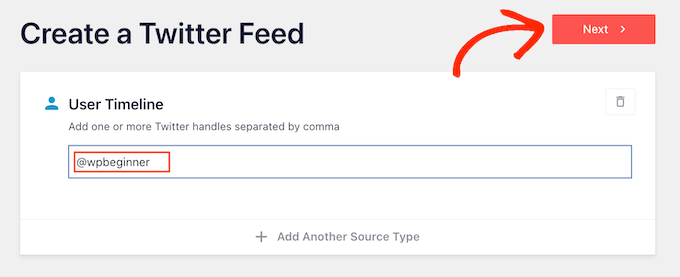
En la pantalla siguiente, tienes que escribir el símbolo @ seguido del nombre de tu cuenta de Twitter (X).
Cuando estés listo, haz clic en “Siguiente” para abrir el editor principal de Smash Balloon.
A continuación, puede elegir la plantilla que desea utilizar en su feed de Twitter.
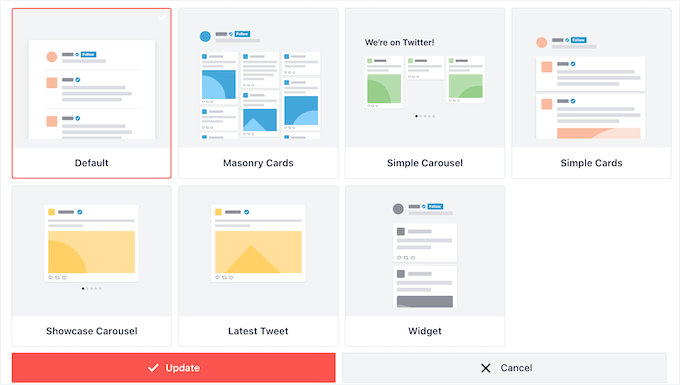
Por ejemplo, puedes mostrar tus tweets en un carrusel / control deslizante adaptable seleccionando “Carrusel simple”. Si solo quieres promocionar tu tuit más reciente, puedes seleccionar la plantilla “Último tuit”.
Utilizaré la plantilla ‘Por defecto’ para este tutorial, pero puedes elegir cualquier plantilla que desees.
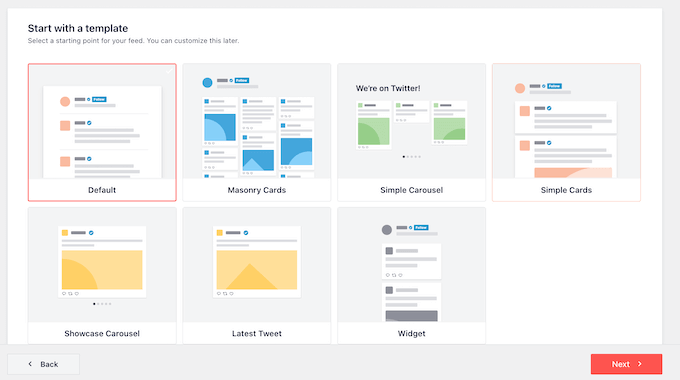
Una vez tomada su decisión, haga clic en “Siguiente”.
Smash Balloon mostrará ahora una vista previa del feed de medios sociales, listo para que lo personalices.
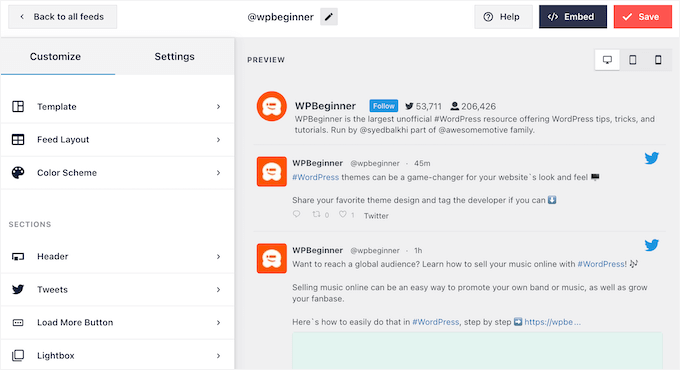
Paso 3: Personalizar su Twitter Feed de WordPress
¿No está satisfecho con el aspecto de la plantilla? Para cambiarla, seleccione “Plantilla” en el menú de la izquierda.
A continuación, puede hacer clic en el botón “Cambiar”.
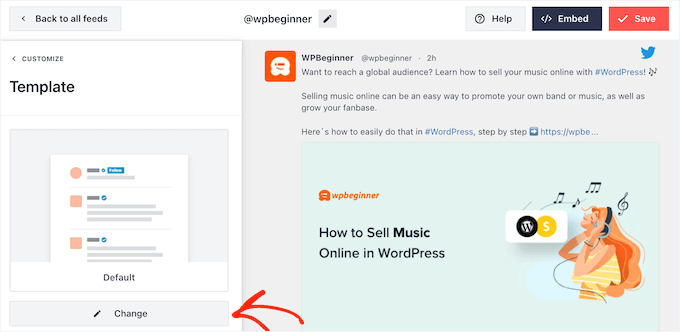
Se abre una ventana emergente en la que puede elegir una nueva estructura / disposición / diseño / plantilla.
Basta con seleccionar una nueva plantilla y hacer clic en “Actualizar”.
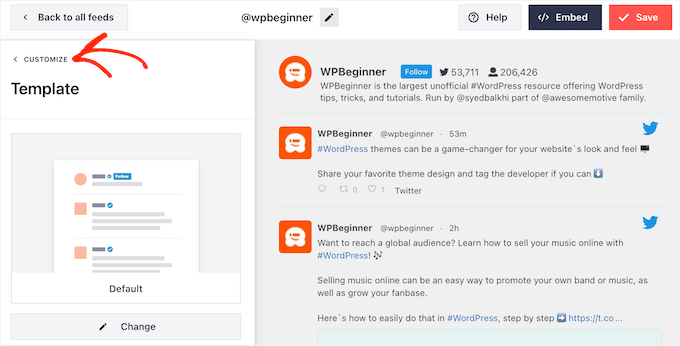
Una vez hecho esto, deberá enlazar el enlace “Personalizar”.
Volverá a los ajustes principales de Smash Balloon.
La siguiente opción del menú de la izquierda es “Disposición del feed”, así que haga clic.
Aquí puede cambiar la altura del feed de Twitter y el número de tweets que el visitante ve inicialmente. También puede cambiar entre una estructura / disposición / diseño / plantilla de cuadrícula, mosaico o carrusel.
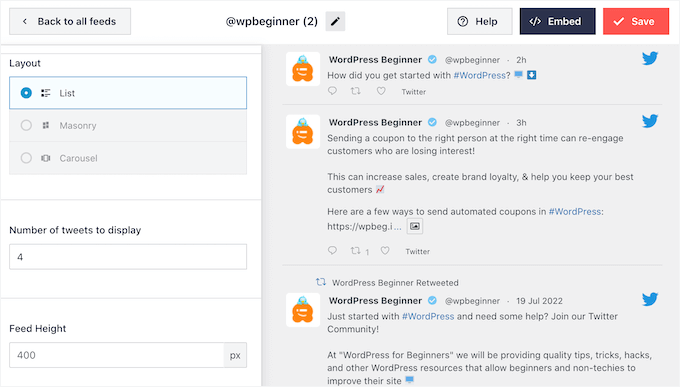
A medida que realice cambios, la vista previa se actualizará automáticamente, de modo que podrá probar distintos ajustes para ver qué le parece mejor.
Dependiendo de la estructura / disposición / diseño / plantilla que utilices, podrás cambiar el número de columnas que Smash Balloon muestra en ordenadores de sobremesa, tabletas y dispositivos móviles.
Los teléfonos inteligentes y las tabletas suelen tener pantallas más pequeñas y menos capacidad de procesamiento, por lo que es posible que desee mostrar menos columnas en los dispositivos móviles. Esto puede ayudarte a mantener tu sitio adaptado a dispositivos móviles.
Para personalizarlo en función del dispositivo, sólo tiene que utilizar los menús desplegables de la sección “Columnas”.
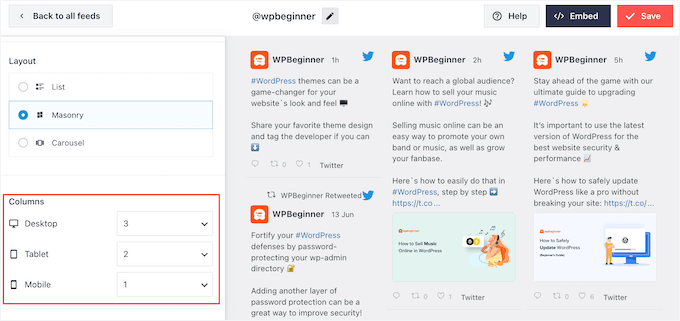
Cuando esté satisfecho con cómo se ha establecido la disposición del feed, vuelva a hacer clic en el enlace “Personalizar” para regresar a la pantalla principal de ajustes.
Aquí puedes hacer clic en “Combinación de colores”.
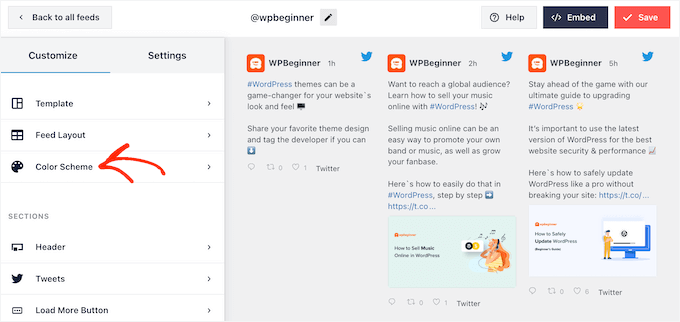
Por defecto, Smash Balloon utiliza los colores heredados de su tema de WordPress, pero puede cambiar a un esquema de color ‘Claro’ u‘Oscuro‘ en su lugar.
Otra opción es crear su propia combinación de colores seleccionando “Personalizado” y utilizando después los controles para cambiar el color de fondo, cambiar el color del texto, etc.
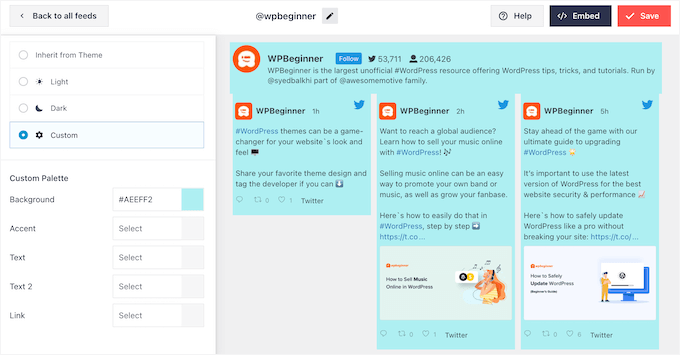
Cuando esté satisfecho con los cambios, vuelva a enlazar con “Personalizar”. De nuevo en la pantalla principal de ajustes, deberá hacer clic en “Cabecera”.
Por defecto, Smash Balloon añade una cabecera “Estándar” al feed, que muestra un botón “Seguir” y tu biografía de Twitter, si está disponible.
Si quieres ocultar la biografía de Twitter, haz clic para desactivar el conmutador “Mostrar biografía”.
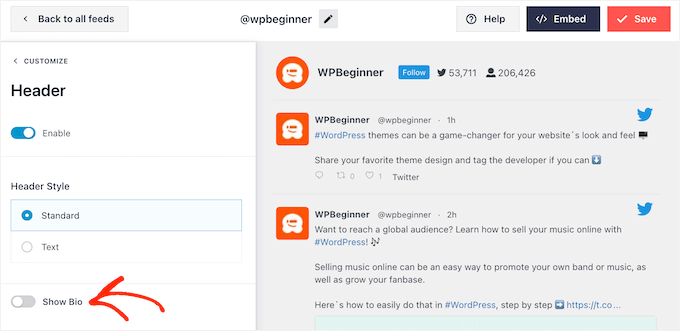
Otra opción es seleccionar “Texto”, que añade una cabecera “Estamos en Twitter” al feed.
Puedes sustituirlo por tu propio mensaje escribiéndolo en la casilla “Texto”.
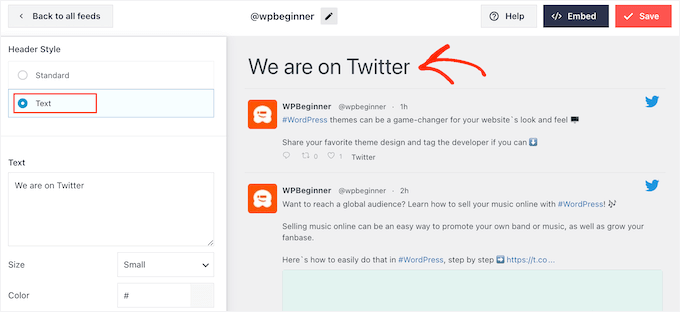
Cuando estés satisfecho con el mensaje, puedes cambiar el tamaño y el color de la cabecera.
A continuación, vuelve a la pantalla principal de ajustes de Smash Balloon y selecciona “Tweets”. Aquí puedes elegir entre “Estilo de tuit” y “Editar elementos individuales”.
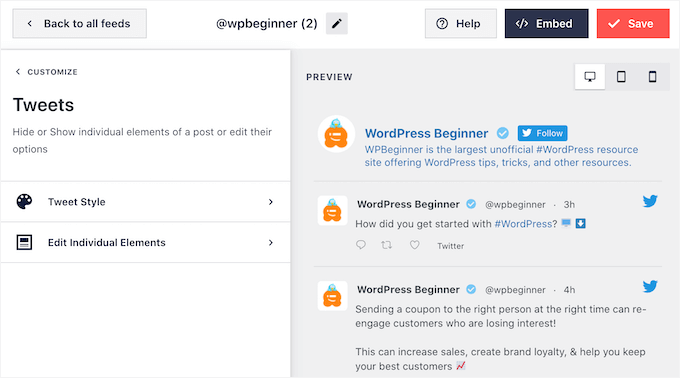
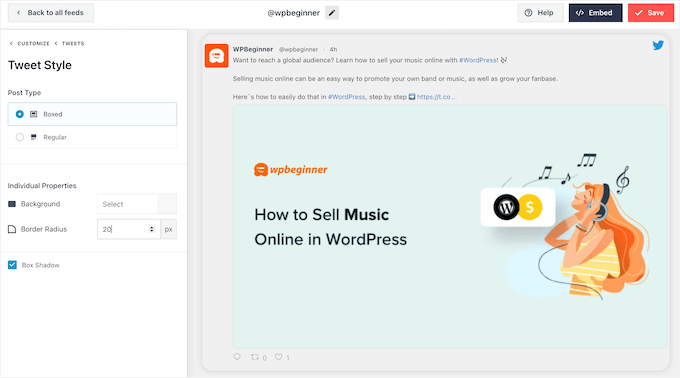
Si selecciona “Estilo Tweet”, podrá elegir entre una estructura / disposición / diseño / plantilla en recuadro o normal.
Si eliges “En recuadro”, puedes crear un fondo de color para cada tuit. También puedes aumentar el radio del borde para crear esquinas curvas o añadir una sombra de recuadro.
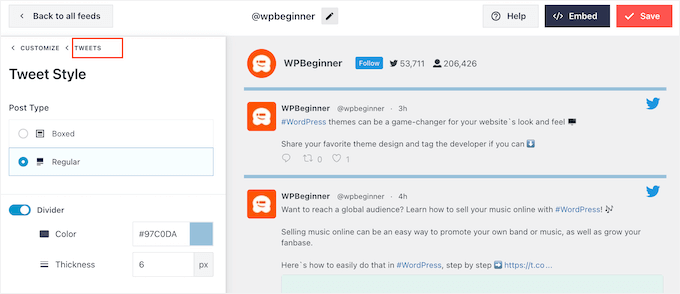
Si eliges “Normal”, puedes cambiar el grosor y el color de la línea que separa las entradas de los distintos medios sociales.
Cuando estés satisfecho con los cambios, simplemente haz clic en “Tweets”.
Vuelve a la pantalla anterior.
Esta vez, puede hacer clic en “Editar elementos individuales”.
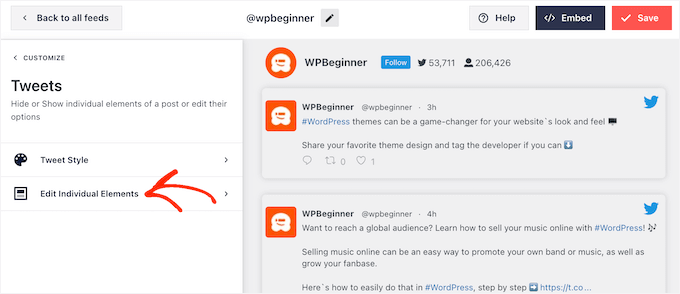
Ahora verás todo el contenido que Twitter Feed Pro incluye en cada tweet, como el autor, el texto del tweet, el logotipo de Twitter y mucho más.
Para conseguir el mayor número posible de retweets, es una buena idea hacer que el icono de retweet destaque. Para ello, haz clic en la flecha que aparece a continuación de “Acciones de Tweet”.
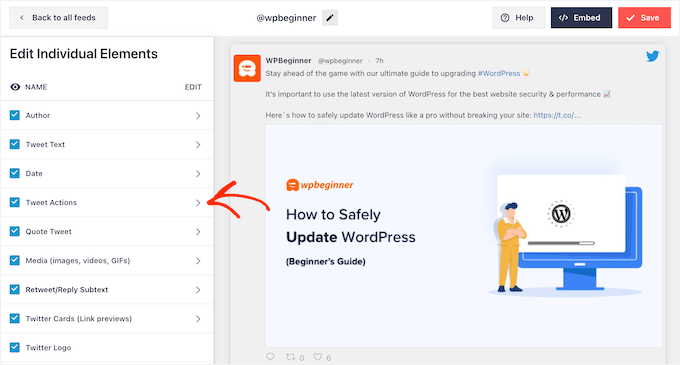
Aquí, puedes agrandar las acciones del tuit utilizando el desplegable “Tamaño” y cambiar el color.
Ten en cuenta que Smash Balloon aplicará estos cambios a todas las acciones del tweet y no sólo al icono de “retweet”.
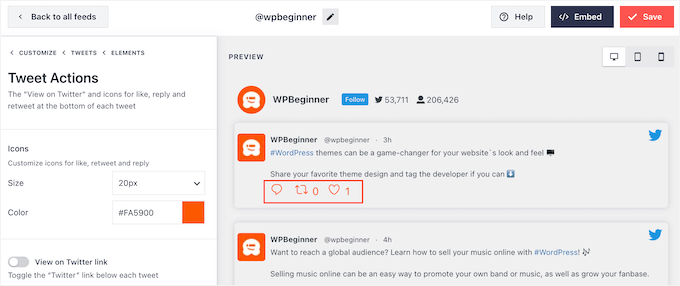
Cuando estés satisfecho con el aspecto de las acciones de tuit, sólo tienes que hacer clic en el texto “Elementos”.
Volverá a la pantalla anterior.

Simplemente repita este proceso para personalizar cualquiera de los otros elementos individuales.
También puede ocultar un elemento desmarcando su casilla.
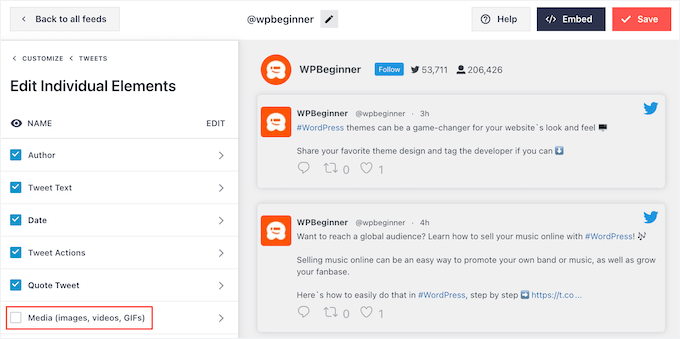
Ocultar contenido innecesario es otro truco que puede ayudar a que la acción de retweet destaque.
Cuando estés satisfecho con el aspecto de los tuits, puedes volver a la pantalla principal de ajustes de Smash Balloon y seleccionar “Cargar más botón”.
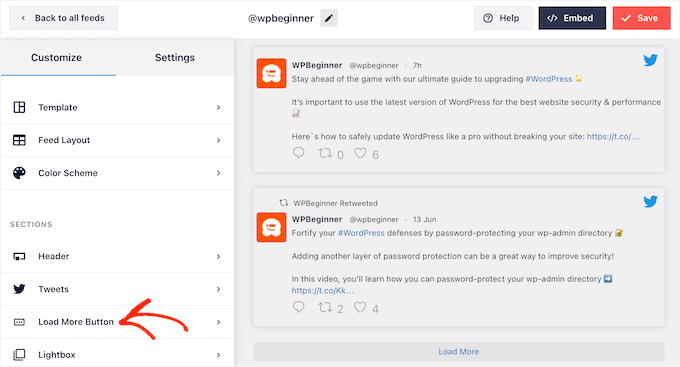
Dado que es un botón tan importante, puede personalizarlo cambiando su color de fondo, el estado del cursor, la etiqueta, etc. para adaptarlo al diseño de su sitio.
También puedes sustituir el texto predeterminado “Cargar más” por tu propio mensaje escribiéndolo en el campo “Texto”.
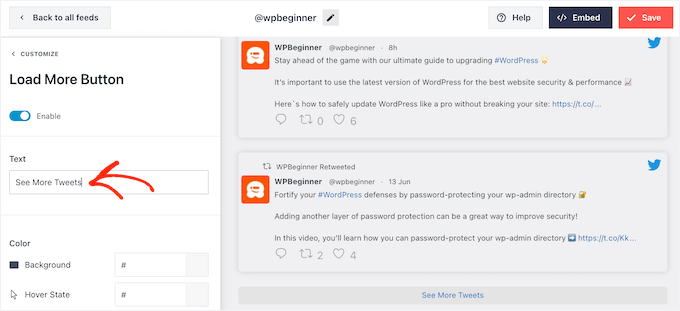
Otra opción es activar un desplazamiento infinito para que los nuevos tweets aparezcan automáticamente cuando los visitantes lleguen al final del feed. Esto anima a los visitantes a explorar más de sus tweets y puede conseguir algunos retweets adicionales.
Para activar esta característica, basta con hacer clic en el carrusel / control deslizante “Desplazamiento infinito” para que pase de gris (desactivado) a azul (activado).
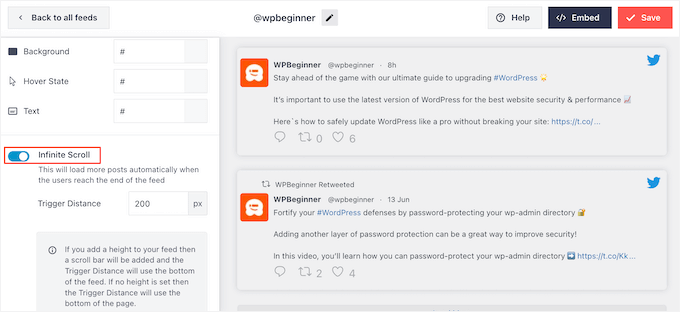
También puedes cambiar la ‘Distancia de activación’, que indica a Smash Balloon cuándo cargar nuevos tweets. Sin embargo, los ajustes por defecto deberían funcionar bien para la mayoría de los sitios web de WordPress.
Después, la última opción de la pantalla principal de ajustes de Smash Balloon es “Caja de luz”.
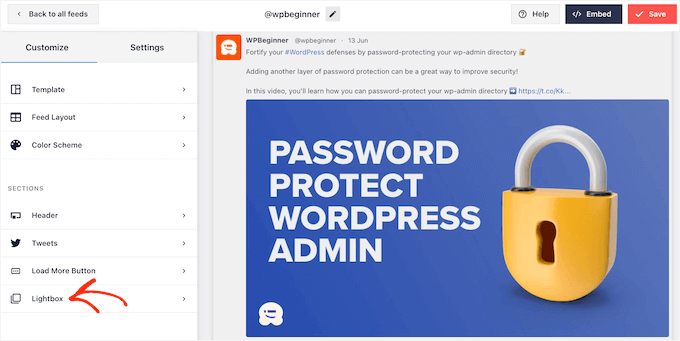
Por defecto, Twitter Feed Pro permite a los visitantes desplazarse por las imágenes y vídeos del feed en una caja de luz emergente.
De este modo, puede conseguir más retweets, ya que los visitantes pueden ver más de cerca las imágenes del feed y ver sus vídeos sin salir del sitio web.
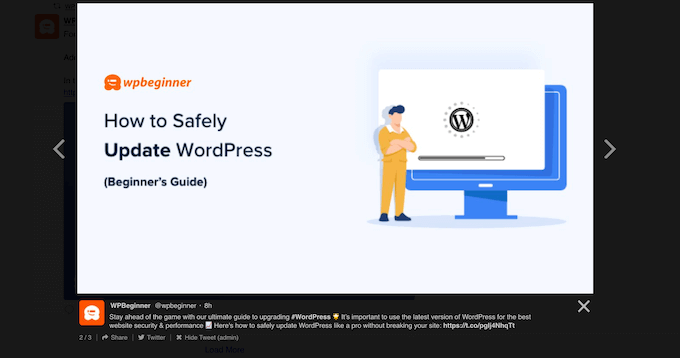
Teniendo esto en cuenta, recomiendo dejar la caja de luz activada / activa.
Sin embargo, si desea desactivar esta característica, sólo tiene que hacer clic en el conmutador azul “Activar” para que se vuelva gris.
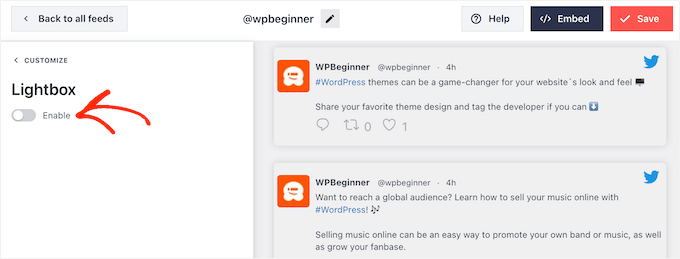
Cuando estés satisfecho con el aspecto del feed de Twitter, no olvides hacer clic en “Guardar”. Una vez hecho esto, ya puedes incrustar el feed de Twitter y los botones de retweet en tu sitio web WordPress.
Paso 4: Añade tu feed de Twitter a WordPress
Puedes añadir el feed de Twitter a tu sitio web utilizando un shortcode o el bloque Twitter Feed. Dado que es el método más sencillo, veamos primero cómo añadir el feed a cualquier página o entrada utilizando el bloque Smash Balloon.
Si has creado más de un feed, tendrás que buscar el código del feed que quieras incrustar.
Para obtener esta información, vaya a Twitter Feeds ” Todos los feeds y copie el código de la columna “Shortcode”. Tendrás que añadir este código a tu sitio, así que anótalo.
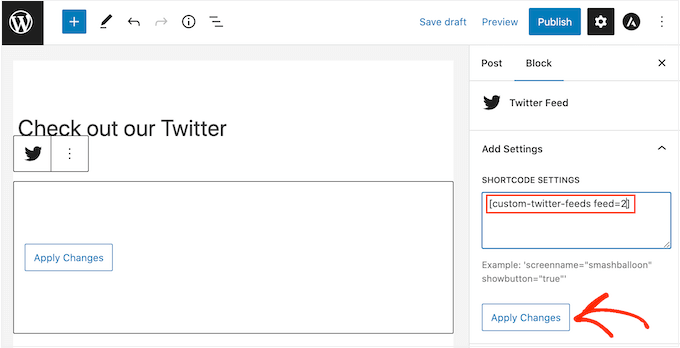
En la siguiente imagen, deberá utilizar [custom-twitter-feeds feed=2].

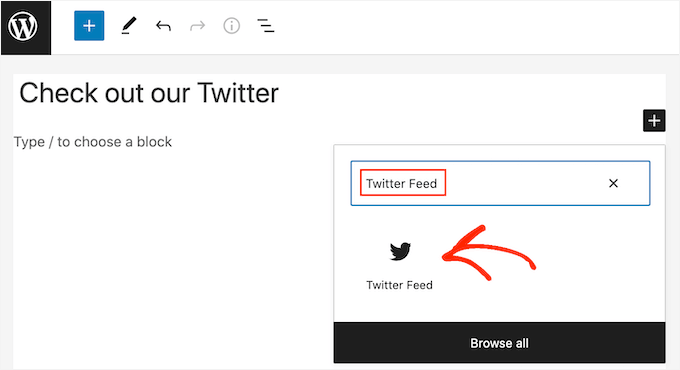
Después, sólo tienes que abrir la página o entrada en la que quieras incrustar el feed de Twitter. A continuación, haz clic en el icono ‘+’ para añadir un nuevo bloque y empieza a escribir ‘Twitter Feed’.
Cuando aparezca el bloque adecuado, haz clic para añadirlo a la entrada del blog.
Por defecto, el bloque mostrará uno de tus feeds de Twitter. Si desea utilizar un feed diferente, busque “Ajustes de shortcode” en el menú de la derecha.
Sólo tiene que añadir el shortcode y hacer clic en “Aplicar cambios”.
El bloque mostrará ahora tu feed de Twitter y sólo tendrás que publicar o actualizar la entrada para que aparezca en tu sitio web.
Otra opción es añadir el feed a cualquier zona preparada para widgets o elemento de diseño de todo el sitio, como la barra lateral. Esto permite a los visitantes retuitear tus últimas entradas desde cualquier página de tu sitio web.
Si utilizas un tema en bloque, puedes añadir el bloque Twitter Feed directamente a una de tus plantillas o partes de plantilla en el editor de sitio completo, utilizando el mismo método que he mostrado para una página o entrada.
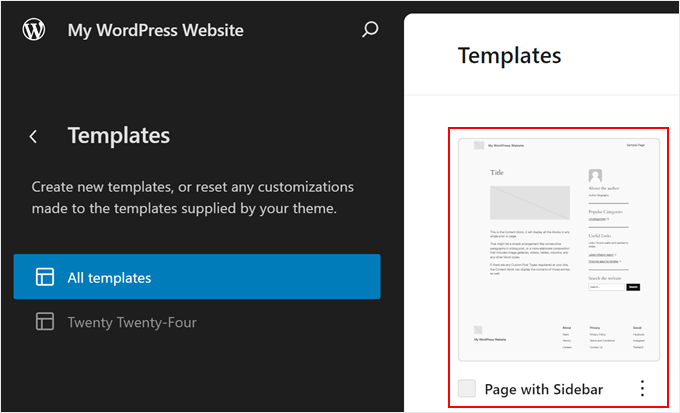
Para obtener instrucciones detalladas sobre cómo hacerlo, consulte nuestra guía para principiantes sobre la edición de sitios completos en WordPress.
Si no está utilizando un tema de bloque, tendrá que ir a Apariencia ” Widgets en el escritorio de WordPress y luego hacer clic en el botón azul ‘+’.
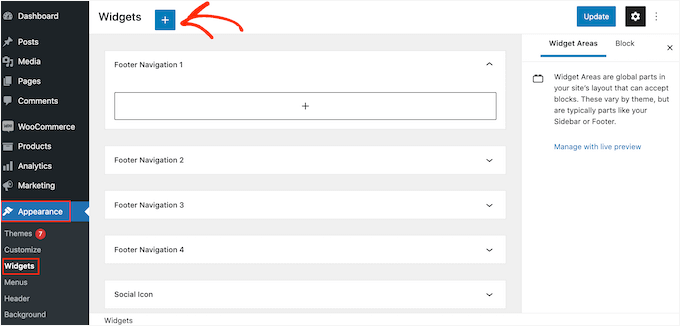
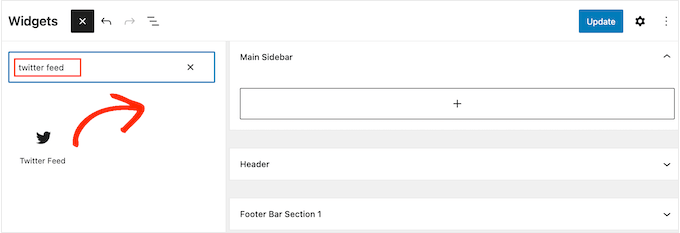
Una vez hecho esto, tienes que escribir “Twitter Feed” para encontrar el widget adecuado.
A continuación, arrástralo a la zona en la que quieras mostrar los botones de feed y retweet.
El widget mostrará uno de los feeds que hayas creado con Smash Balloon.
Para mostrar un feed de Twitter diferente, escriba el código del feed en el cuadro “Ajustes del shortcode” y haga clic en “Aplicar cambios”.
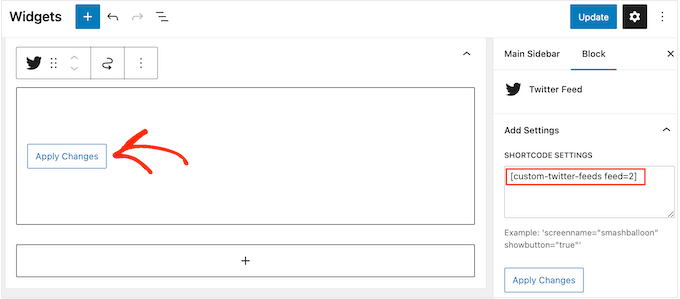
Ahora puede hacer clic en el botón “Actualizar” para activar el widget. Para obtener más información, consulte nuestra guía práctica sobre cómo añadir y utilizar widgets en WordPress.
Por último, puedes incrustar los botones de feed y retweet en cualquier página, entrada o zona preparada para widgets mediante un shortcode.
Sólo tienes que ir a Twitter Feed “ Todos los feeds y copiar el código en la columna ‘Shortcode’. Ya puedes añadir el shortcode a cualquier zona de tu sitio que esté preparada para widgets.
Para más información, consulte nuestra guía detallada sobre cómo añadir un shortcode en WordPress.
Consejo adicional: Compartir en Twitter con ClickSocial
ClickSocial es el mejor plugin de programación de medios sociales para WordPress. Te permite programar y publicar entradas en Twitter (X) directamente desde tu escritorio de WordPress.
Puede añadir su cuenta de Twitter, escribir una entrada con el editor intuitivo de la herramienta y publicarla inmediatamente o programarla para más tarde con opciones como añadir a la cola o personalizar la hora.
También es compatible con la reactivación de entradas antiguas de WordPress, para que puedas volver a compartir automáticamente tu contenido perenne en Twitter sin mover un dedo.
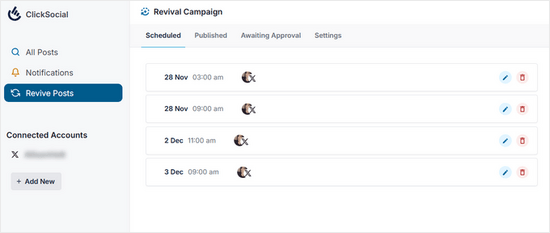
Para obtener más información, compruebe nuestra guía sobre cómo programar entradas de WordPress para los medios sociales.
Más formas de utilizar Twitter en WordPress
¿Quieres aprovechar al máximo tu perfil de Twitter (X) para promocionar tu sitio web en WordPress? ¿O quizás quieres añadir más contenido de Twitter a tu sitio? Si es así, marca / comprueba estas guías a continuación:
- Guía para principiantes sobre cómo añadir Twitter Cards en WordPress
- Cómo corregir imágenes rotas de Twitter Card en WordPress
- Cómo promocionar tu página de Twitter en WordPress con una ventana emergente
- Cómo mostrar el recuento de seguidores de Twitter y más en WordPress
- Cómo añadir un botón de pago con Tweet para la descarga de archivos en WordPress
Esperamos que este artículo te haya ayudado a añadir botones para compartir y retwittear en Twitter en WordPress. También puede marcar / comprobar nuestro artículo sobre las últimas estadísticas de medios sociales que los bloggers deben saber y nuestra guía para principiantes sobre cómo iniciar un canal de YouTube para su negocio.
If you liked this article, then please subscribe to our YouTube Channel for WordPress video tutorials. You can also find us on Twitter and Facebook.


Jiří Vaněk
I can only recommend buttons for Twitter and Facebook. They will increase your reach and possibly backlinks. Additionally, creating profiles for your website where people can find you and where you can provide more information is a great way to make yourself known. I have it implemented on my website as well; I would just appreciate some statistics. How many times has someone clicked on the button and made a tweet, and for which article, so I can have a better overview.
WPBeginner Support
To help track that we would recommend taking a look at our guide for how to track button and link clicks with MonsterInsights below:
https://www.wpbeginner.com/wp-tutorials/how-to-track-link-clicks-and-button-clicks-in-wordpress/
Admin
Jiří Vaněk
So, I understand it well that a similar thing cannot be done using Google Analytics, for example, and an external plugin such as Monster Sight is required for this? I ask because I try to use as few plugins as possible and use them for as many things as possible. That’s why I thought if I could solve a similar thing, for example, using Google Analytics.
WPBeginner Support
It is possible but you would need to manually set up the markup in Google Analytics to add to your button which is why we recommend the plugin
Konrad
Adding Twitter share and retweet buttons can indeed boost your social media presence. One thing to consider is the placement of these buttons for maximum engagement. It’s beneficial to conduct A/B testing to determine the most effective positions on your site. Additionally, make sure the buttons are clearly visible but not intrusive to the user experience.
THANKGOD JONATHAN
This post has opened my eyes.
I was reluctant to create a twitter account because I think I will not have the time to engage compared to other social sites I love using.
But now I thing I will give it a try after reading this article.
jafar
thank man
RandyDueck
Thanks for the quick response. I’m not a programmer, do you know where I can get a peice of code and paste it in? Re: Count, I’m thinking then that when testing, If I use the tweet button to post to post to my own page, then twitter doesn’t tink it’s legit? However, I have another twitter acc’t that I tried tweeting to and it didn’t increase. Is there a way I can test it to see that it’s working? How do I know it’s a legit tweet or not? I’m surpirsed that Twitter seems difficult compared to FB @wpbeginner
wpbeginner
@RandyDueck Twitter uses the new t.co shortner which only shorten links for their algorithm to make sure it is not SPAM… then it pastes the unshortened version… You have to utilize another API and write a bit of custom code to get the custom short URLs to work there…As far as the count, twitter button only shows count that it thinks are legit.
RandyDueck
Thanks for this great little code snippet. I want the twitter button to be in the post excerpt and below the title of the single-post page. the code works fine. gives the correct title etc. however, it does not shorten the link, and after tweeting, the tweet count doesn’t go up. the site is thinkactloveloseweight.com Thank your response
KatrinaMoody
Gretchen – all links should trace back to your permalink – so your permalink should be the source URL, not your short link … make sense? YOu can’t yet change the URL shortener if you use the official Tweet button ( I looked into it because I wanted to do a shortlink).
Adding this so long after the original was posted because others might have that question!
KatrinaMoody
I thought I would note that some themes change the value for the title and post url – meaning that the code will tweet with your code in quotes. I got a couple questions on Twitter over that one. I just found the different variables that worked for my site and replaced them. So …
Line three: data-url=””
was changed to %permalink% – which was my theme’s replacement
Line five: data-text=””
was changed to %post-title% – again my theme’s replacement
I wouldn’t have been able to do this without your tutorial! Thanks SOOOO much! You are now my go-to resource!
idowebmarketing
@wpbeginner @idowebmarketing Okay, there are two locations of this code, and I had only updated one!
wpbeginner
@idowebmarketing @wpbeginner data-via is the only thing that needs to be modified in order to make the change.
idowebmarketing
@wpbeginner @idowebmarketing Thanks – I added new blog posts to two of my blogs yesterday after implementing the updated code, however it still recommended wpbeginner on both. Is there any section of code that also needs to be updated?
wpbeginner
@idowebmarketing On old posts it takes twitter while to figure it out. On new posts it should be fine.
idowebmarketing
My blog is still recommending wpbeginner and I have updated the code. Here is the edited code:
<script src=”http://platform.twitter.com/widgets.js” type=”text/javascript”></script> <a href=”http://twitter.com/share” data-url=”<?php the_permalink(); ?>” data-via=”idowebmarketing” data-text=”<?php the_title(); ?>” data-related=”imnewsdaily:Daily updates from the internet marketing industry” data-count=”vertical”>Tweet</a>Any idea what I am doing wrong?
Richard
Thank you for posting this!! I have been trying to slove this problem for about three days now…
do you have the same code for the facebook like button?
Gretchen
I use the WP-generated shortlinks when tweeting about my posts, and have had troubles with those always showing in my Tweet count. The final bit of code on this site seems to work, though if you click to view the search results in Twitter it only shows the links to the actual permalink, not the links to the shortlink as well: http://bavotasan.com/tutorials/adding-tweet-button-wordpress/ It’s too bad WordPress and Twitter don’t count those as the same link somehow…
Zakir
I can add javascript in header but it will degrade YSlow rating, currently it is B rating. I really work hard to make B from D. I opened a ticket to twitter technical team, they just sent me email providing some links which may help me to get my answer or open a new ticket if not. Thats so stupid. Twitter people think we didn’t see other answers! thats so frustating. Linkedin doing quite well , their share button updates within a minute.
Deepanshu
hello sir sir how do i use this for pages ? i was able to do it for posts
Zakir
In my above mentioned website, i used your code, index.php, single.php and other php file within loop.
I can click the twitter tweet button and it shows count number, but if i refresh the page, that value goes away. Now after may be 1 hour if i check that article page, i can see the new count value. e.g. before i clicked the button it was 0, after almost 1 hour it shows 1. My question is why it took 1 hour to update. it should be updated immediately isn’t it?
Now in front page which index.php, i used the code and again i used in single.php. User clicks an article from index.php and comes article page which is in single.php. The problem: count value is not synchronising the count from the index.php to single.php. I check it later it is but after almost 1 hour. so it is synchronising after almost 1 hour.
Why? any idea.
Recently I changed the .htaccess file to add expire headers to get some speed. i am getting that but today i removed that line and back to default .htaccess file. Do you think its something with .htaccess where caching is controlled by hour, minutes, seconds, months or even year. Even though if I enable caching, the twitter java script which is twitter server can’t force to use caching.
Now I am not sure where I should look for to get immediate count value. client wants to see immediate count and synchronise with article page.
Please check the http://www.bizgene.com to get an idea.
Any clue or idea will be a great favour.
I used following code for tweet count button:
<a href="http://twitter.com/share" class="twitter-share-button"
data-url="”
data-via=”bizgene”
data-text=””
data-count=”horizontal”>Tweet
Zakir
Editorial Staff
Zakir, We think this is a common bug going on with twitter API. We have been noticing a similar thing with our tweetmeme button regarding the count. It synchornizes the count almost after 20 – 30 minutes. Perhaps try adding the script part in your head codes and then display the a href part where you want the button to display might help.
Admin
Simon
I don’t get it. Using the data url link/button above gives just a t.co link and nothing else. Has something changed there or why doesn’t it output the values?
Editorial Staff
Note, to get the_title(); or the_permalink(); you have to place this code inside the loop. If you place it outside a loop, then it will not give you a desired value.
Admin
coz
ARGH. This is what I tried but im replacing the greater-than/less-than symbols with brackets so it will hopefully show:
[?php the_title(); ?] #[?php the_category(‘,’); ?]
coz
um… last comment isn’t displaying the php… sorry. This is what i tried: (hopefully this will work)
#
coz
For DataText, im looking to add the title and category of the post as a hashtag. I can’t seem to figure out how to do it, being that I’m not too familiar with php.
I tried: >>> data-text=” #”
but that didn’t work. Any idea of how to do this?
S.Pradeep Kumar
Nice tutorial. Finally I implemented that button on my blog. It will be nice if you can make a tutorial on how to customize it. I hate the default color. : |
Calítoe.:. (Cristina MJ)
I’ve noticed that the count displays horizontally even if one specifies data-count=”vertical”. Does anyone know what’s wrong with that?
NG
I’m having the exact same problem. Any idea how to fix it?
Editorial Staff
Refresh the page… This usually happens when the twitter script is not loading fine. Try placing the twitter script part in the head section.
Admin
CharityHisle
I think I’ll stick to the tweetmeme version until the plugin is completely developed with all of the options for placement.
Rarst
There isn’t much sense in filling out every setting, most of them work just fine without being set and will pick things like current URL and page title by default.
Non-standard tag attributes will not validate (at least not as XHTML Transitional in my experience so far). Query arguments may not look as tidy, but they are more established and reliable.
Konstantin
Alternatively, you could use WordPress’ very own add_query_arg() function, to create the url.
Nice post though, and quick, too.
Editorial Staff
Yup, we had to put it out quick because a lot of our twitter users said they wanted it.
Admin
Amie
Is there any chance I don’t have “The Loop” because I keep looking for this (or even a part of it) in my index file and it’s not there. Gah, I was hoping this would be easy!
Editorial Staff
That really depends on what theme you are using. Every theme must have the loop to show the recent posts. You can try Otto’s plugin.
Admin
DJ NightLife
I used to have Topsy buttons… was about to switch for the official button but… It seems this version have a problem recognizing the real count of tweets. I had a post of 52 tweets and now it shows 8.
Otto
They’re only counting tweets since July.
BTW, the new tweet button is fully supported by my Simple Twitter Connect plugin for WordPress. Just so you know.
http://ottopress.com/wordpress-plugins/simple-twitter-connect/
Editorial Staff
Thanks Otto for updating your plugin. Your work is truly awesome Jut added the link in the post.
Admin
Ted Thompson
Helpful article, many thanks!
josemv
Excellent, thanx !
Any chance to include custom url shorteners, such as cli.gs or bit.ly ?
Editorial Staff
No, twitter is using their very own service to verify the quality of link that is being tweeted.
Admin