
Animar a la gente a que comparta tus contenidos en los medios sociales es una forma estupenda de aumentar tu audiencia y hacer que la gente se interese por tu negocio.
Pero la realidad es que la gente solo compartirá tus contenidos si se lo pones fácil.
Utilizamos botones de compartir en redes sociales en el blog WPBeginner para que nuestros lectores puedan compartir nuestro contenido con un simple clic, así que sabemos de lo que hablamos. 🤓
Según nuestra experiencia, Pinterest es una plataforma fantástica para atraer tráfico a tu sitio de WordPress, especialmente si publicas contenido visual como fotos, infografías e ilustraciones digitales.
Si añades un botón “Pínchalo” a tu sitio de WordPress, tus visitantes podrán compartir rápidamente imágenes u otros contenidos visuales en sus tableros de Pinterest. Además, ¡puede tener muchas ventajas! Piensa: más visitas, más comentarios y más ofertas. 💥
En este artículo, le mostraremos cómo añadir el botón ‘Pin It’ de Pinterest a WordPress.
¿Por qué añadir el botón “Pin It” de Pinterest en WordPress?
Pinterest es una popular plataforma de medios sociales que permite a los usuarios enlazar sitios web y otros contenidos visuales mediante la creación de tableros.
Cuando los usuarios añaden tu contenido a su tablero de Pinterest, ayudan a otras personas a descubrir tu sitio web. Pinterest es una fuente de tráfico especialmente importante si tienes un sitio web de fotografía, un blog de moda o cualquier otro tipo de blog con muchas imágenes y vídeos.
Añadir un botón “Pin It” a su sitio web puede animar a los visitantes a compartir su contenido en Pinterest.
Nota: Pinterest cambió oficialmente el nombre del botón ‘Pin It’ por ‘Guardar’ en 2016. Sin embargo, muchas guías y plugins de WordPress siguen usando ‘Pin It’, por lo que en esta guía usamos el nombre original. Además, ¡suena más pegadizo!
Dicho esto, vamos a ver cómo puedes añadir un botón ‘Pin It’ de Pinterest en WordPress. Simplemente utilice los enlaces rápidos a continuación para saltar directamente al método que desea utilizar:
Método 1: Añadir el botón “Pin It” de Pinterest a las entradas (Fácil)
La forma más fácil de añadir un botón de Pinterest a su sitio de WordPress es mediante el uso de Novashare. En nuestra opinión, es uno de los mejores plugins de medios sociales para WordPress.
Le permite añadir fácilmente un botón de Pinterest a su sitio, junto con botones para todas las demás redes sociales importantes. Hemos probado Novashare para un montón de diferentes casos de uso, y nos gusta mucho lo fácil que es de usar. Para obtener más información acerca de este plugin, consulte nuestra reseña / valoración completa de Novashare.
Para empezar, tienes que visitar el sitio web de Novashare y elegir un plan. A continuación, tendrás que instalar y activar el plugin. Si necesitas ayuda, consulta nuestra guía sobre cómo instalar un plugin de WordPress.

Tras la activación, debe navegar a la página Ajustes ” Novashare en su escritorio de WordPress para activar su licencia.
Sólo tiene que hacer clic en la pestaña “Licencia”, pegar la clave de licencia que le dieron cuando compró el plugin y, a continuación, hacer clic en el botón “Guardar licencia”.

Una vez activada la licencia, puedes añadir un icono de Pinterest a tu sitio web y cualquier otro icono de redes sociales que desees. Puedes añadir estos iconos en línea con tu contenido o como barra flotante.
Aquí utilizaremos la primera opción (pero siga leyendo para obtener más información acerca de las barras flotantes).
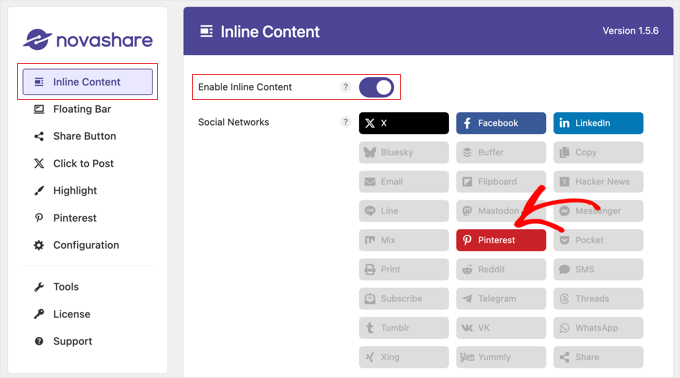
Solo tienes que ir a la pestaña “Contenido integrado” de Novashare y activar el conmutador “Activar contenido integrado”. A continuación, haz clic en el botón de Pinterest para que se vuelva rojo.
En este punto, también puede activar cualquier otra red social que desee añadir a la barra del botón de compartir en redes sociales.
Después, puede desplazarse hacia abajo y utilizar las opciones disponibles para configurar la barra de botones.
Hay ajustes para mostrar la barra de botones en entradas, páginas y más. También puedes personalizar el color y el diseño de los botones.
Incluso puede añadir etiquetas a los botones y mostrar un recuento de cuántas veces se ha compartido la entrada actual en los medios sociales.
Cubrimos todas estas opciones y barras flotantes en detalle en nuestra guía sobre cómo añadir botones sociales para compartir en WordPress.
Cuando hayas terminado de personalizar el botón “Pin It”, desplázate hasta el final de la página. Aquí, haz clic en el botón “Guardar cambios” para establecer los nuevos ajustes.
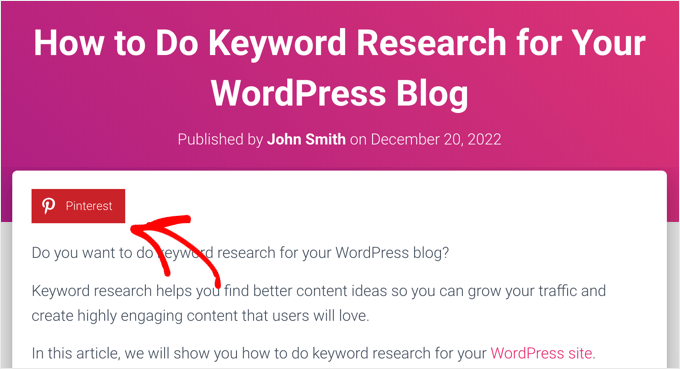
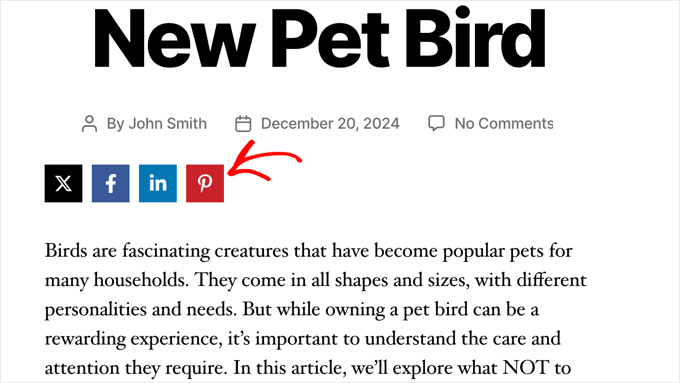
Ya puedes visitar tu sitio web de WordPress para ver el botón de Pinterest en acción.
Método 2: Añadir el botón “Pin It” de Pinterest a las imágenes (de forma sencilla)
¿Tienes un blog de moda, fotografía o gastronomía? Entonces, quizá quieras añadir un botón de Pinterest sobre estas imágenes. De este modo, los visitantes podrán compartir su contenido simplemente pasando el cursor sobre la imagen que desean pinear.
El plugin Novashare que utilizamos en el método 1 también puede añadir un botón “Pin” de Pinterest al pasar el cursor sobre cualquier imagen de tu sitio.
Una vez adquirida la licencia e instalado el plugin, tal y como explicamos en el Método 1, dirígete a Ajustes ” Novashare y haz clic en la pestaña “Pinterest”.
Ahora, active la opción “Activar Image Pins” y seleccione los “Tipos de entradas” donde desea mostrar el botón.

A continuación, puede personalizar la posición, la forma y el color del botón. Los otros ajustes por defecto funcionarán bien para la mayoría de los sitios web.
Si lo prefieres, puedes mostrar el botón de Pinterest sobre las imágenes en todo momento, no sólo al pasar el cursor sobre una imagen. Para ello, tendrás que activar la opción “Mostrar siempre”.

Algunos propietarios de sitios web tienen algunas imágenes que no quieren que se compartan. En ese caso, puede escribir los nombres de los archivos en el campo “Imágenes excluidas”.
Cuando estés satisfecho con los ajustes, asegúrate de hacer clic en el botón “Guardar cambios”. A continuación, Novashare empezará a mostrar el botón Pin en las imágenes.

Método 3: Añadir el botón ‘Pin It’ de Pinterest usando un shortcode personalizado
A veces, es posible que desee controlar exactamente dónde aparece el botón “Pin It” en su sitio. Por ejemplo, puede que quieras mostrar el botón de Pinterest en una página de destino de un anuncio específico o dentro del contenido de la entrada.
En ese caso, una opción es crear el botón utilizando código y luego colocarlo en cada página o entrada utilizando un shortcode personalizado. Esto te da la libertad de mostrar el botón “Pin It” en diferentes lugares, pero tendrás que añadirlo a cada página o entrada manualmente.
La forma más fácil de añadir código personalizado a WordPress es utilizando WPCode. Le permite añadir PHP personalizado, CSS, JavaScript y mucho más a su sitio web.
Varias de nuestras marcas asociadas utilizan este plugin para gestionar fragmentos de código en sus sitios, y todas nos han informado acerca de lo mucho que les gusta. Para más información, consulta nuestra reseña / valoración completa de WPCode.
También puedes utilizar WPCode para crear shortcodes personalizados, por lo que es perfecto para añadir un botón “Pin It” a tu sitio web.
En primer lugar, deberá instalar y activar el plugin gratuito WPCode. Para más información, consulte nuestra guía paso a paso sobre cómo instalar un plugin de WordPress.
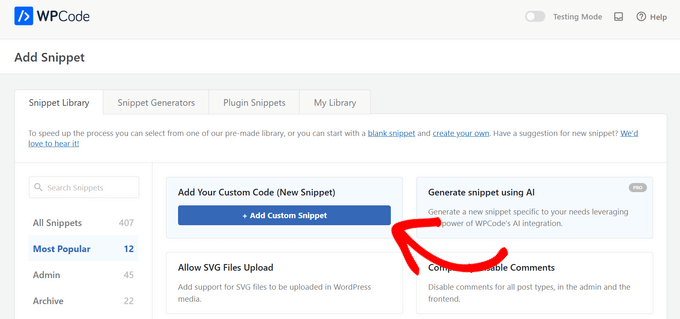
Una vez activado el plugin, vaya a Fragmentos de código ” Añadir fragmento.

Aquí verás todos los fragmentos de código que WPCode puede añadir a tu sitio. Estos incluyen fragmentos de código que te permiten añadir botones sociales a WordPress y mostrar tus iconos sociales en una barra lateral.
Ahora, debe pasar el ratón por encima de la opción “Añadir su código personalizado (nuevo fragmento)” y hacer clic en el botón “+ Añadir fragmento de código personalizado” cuando aparezca.
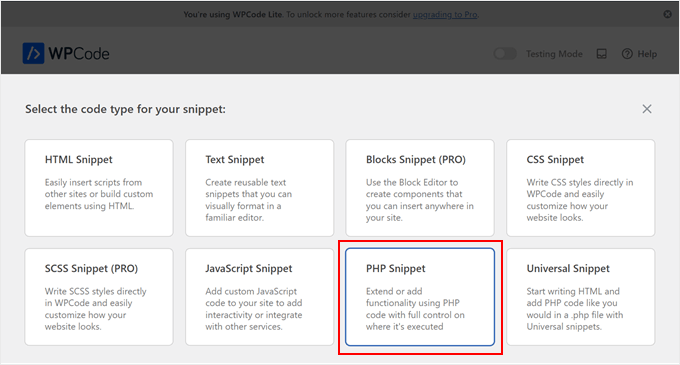
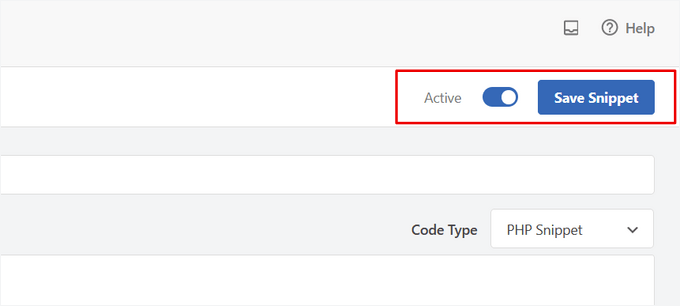
A continuación, va a añadir PHP a WordPress, por lo que debe seleccionar ‘PHP Snippet’ como tipo de código.
En la pantalla siguiente, escriba un título para el fragmento de código.
Esto es sólo para tu referencia, así que puedes usar lo que quieras. Para este tutorial, vamos a escribir ‘Pinterest Pin It Button’.
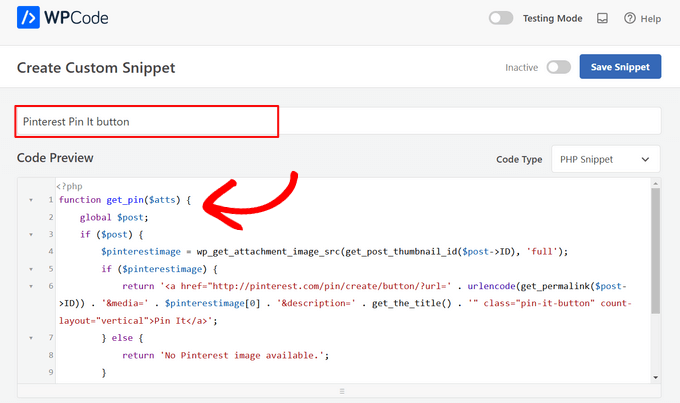
Una vez hecho esto, basta con pegar lo siguiente en el editor de código:
1 2 3 4 5 6 7 8 9 10 11 12 13 14 | function get_pin($atts) { global $post; if ($post) { $pinterestimage = wp_get_attachment_image_src(get_post_thumbnail_id($post->ID), 'full'); if ($pinterestimage) { return '<a href="http://pinterest.com/pin/create/button/?url=' . urlencode(get_permalink($post->ID)) . '&media=' . $pinterestimage[0] . '&description=' . get_the_title() . '" class="pin-it-button" count-layout="vertical">Pin It</a>'; } else { return 'No Pinterest image available.'; } } else { return 'No post found.'; }}add_shortcode('pin', 'get_pin'); |
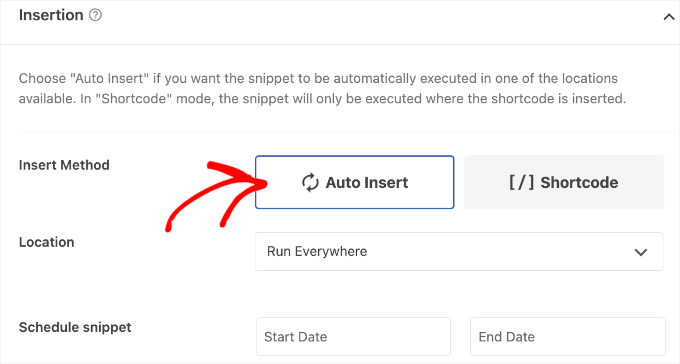
Después, desplácese por la página hasta la sección “Inserción”. Aquí, puedes mantener el método por defecto de ‘Inserción automática’ para asegurarte de que el código se ejecuta en todas partes.
Si aún no está seleccionada, seleccione “Ejecutar en todas partes”.
Por último, desplácese a la parte superior de la pantalla y haga clic en el carrusel / control deslizante “Inactivo” para que aparezca “Activo”.
A continuación, basta con hacer clic en el botón “Guardar fragmento” o “Actualizar” para que el fragmento de código pase a estar activo.
Ahora puedes añadir un botón “Pin It” a cualquier página, entrada o widget de WordPress utilizando el shortcode [pin].
Para obtener instrucciones paso a paso sobre cómo colocar el shortcode, consulte nuestra guía sobre cómo añadir un shortcode en WordPress.
![use the [pin] shortcode in your WordPress posts](https://www.wpbeginner.com/wp-content/uploads/2019/06/pinterest-add-shortcode.png)
Después de añadir este código, los visitantes verán un botón “Pin It” en cualquier página o entrada que tenga una imagen destacada.
Si la página no tiene una imagen destacada, aparecerá el mensaje de error “No hay imágenes de Pinterest disponibles”.
Cómo añadir el botón “Pin It” de Pinterest con el editor de sitio completo
Si está utilizando uno de los temas más recientes activados por bloques, puede añadir un botón “Pin It” en cualquier lugar de su tema de WordPress utilizando el shortcode personalizado.
Esta es una forma sencilla de añadir el botón a todas las páginas y entradas. También puede añadir el botón “Pin It” a las áreas que no se pueden editar con el editor de contenido estándar de WordPress, como la plantilla de la página 404 de su sitio.
Para empezar, vaya a Temas “ Editor en el escritorio de WordPress.
")
Por defecto, el editor de sitio completo mostrará la plantilla de inicio de su tema.
Para añadir un botón “Pin It” a otra página, seleccione “Plantilla” o “Partes de plantilla” en el menú de la izquierda.

Ahora puede seleccionar la plantilla que desea editar.
En este ejemplo, le mostraremos cómo añadir un botón “Pin It” a la plantilla de página única de su sitio. Sin embargo, los pasos serán similares independientemente de la plantilla que elija.

WordPress mostrará ahora una vista previa de la plantilla o parte de la plantilla.
Para editar esta plantilla, sigue adelante y haz clic en el pequeño icono del lápiz.

Una vez hecho esto, haz clic en el icono azul “+” de la esquina superior izquierda.
En la barra de búsqueda que aparece, escribe ‘Shortcode’.

Cuando aparezca el bloque adecuado, arrástrelo y suéltelo en la estructura / disposición / diseño / plantilla.
Ahora puede escribir el shortcode Pin en el bloque.

A continuación, basta con hacer clic en “Guardar” para que el nuevo shortcode se active.
Ahora, si visitas tu sitio web WordPress, verás el botón “Pin it” en acción.
Método 4: Añadir el botón ‘Pin It’ de Pinterest usando código y FTP
Otra forma de añadir un botón de Pinterest a tu sitio web sin necesidad de plugins es añadir código directamente a los archivos de tu tema. Sin embargo, este método es solo apto para usuarios técnicos.
Editar los archivos del tema directamente puede causar muchos errores comunes de WordPress, y perderás todo el código personalizado cuando actualices el tema de WordPress. Teniendo esto en cuenta, siempre recomendamos usar WPCode en su lugar.
Sin embargo, si utiliza este método, entonces usted tendrá que empezar por hacer una copia de seguridad completa de WordPress de su sitio. Esto le ayudará a restaurar su sitio en caso de que algo se rompe por accidente.
Una vez hecho esto, conéctese a su alojamiento WordPress mediante un cliente FTP y vaya a la carpeta /wp-content/themes/.
A partir de aquí, debe abrir la carpeta de su tema actual y localizar el archivo footer.php.
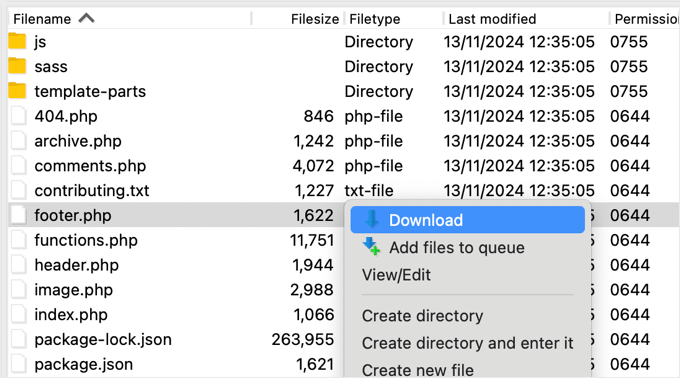
A continuación, basta con hacer clic con el botón derecho del ratón en ese archivo y seleccionar “Descargar” en el menú. Esto descargará el archivo footer.php a su ordenador.
Ahora, tienes que abrir el archivo footer. php con un editor de texto plano como el Bloc de notas y pegar el siguiente script justo antes de la etiqueta </body>.
1 2 3 4 5 6 7 8 9 10 11 12 13 14 15 16 17 18 19 | <script type="text/javascript">(function() { window.PinIt = window.PinIt || { loaded:false }; if (window.PinIt.loaded) return; window.PinIt.loaded = true; function async_load(){ var s = document.createElement("script"); s.type = "text/javascript"; s.async = true; s.src = "https://assets.pinterest.com/js/pinit.js"; var x = document.getElementsByTagName("script")[0]; x.parentNode.insertBefore(s, x); } if (window.attachEvent) window.attachEvent("onload", async_load); else window.addEventListener("load", async_load, false);})();</script> |
Una vez hecho esto, hay que guardar el archivo y volver a subirlo a la carpeta del tema actual.
A continuación, localice el archivo de plantilla en su tema donde desea añadir el botón. Normalmente, este será el archivo single.php, pero puede variar dependiendo de tu tema de WordPress. Si no estás seguro, puedes consultar nuestra guía para principiantes sobre la jerarquía de plantillas de WordPress.
Para editar el archivo de plantilla, sólo tiene que descargarlo de la carpeta de temas y abrirlo para editarlo.
Tendrás que elegir la ubicación donde quieres mostrar el botón ‘Pin It’. Muchos sitios web muestran los botones para compartir en redes sociales directamente debajo del título de la entrada, pero puedes utilizar cualquier ubicación que desees.
Después de elegir una ubicación, basta con añadir el siguiente código:
1 2 | <?php $pinterestimage = wp_get_attachment_image_src( get_post_thumbnail_id( $post->ID ), 'full' ); ?><a href="http://pinterest.com/pin/create/button/?url=<?php echo urlencode(get_permalink($post->ID)); ?>&media=<?php echo $pinterestimage[0]; ?>&description=<?php the_title(); ?>" class="pin-it-button" count-layout="vertical">Pin It</a> |
El fragmento de código anterior añade la imagen destacada, el título, la descripción y la URL de la entrada en el parámetro URL para compartir.
Este fragmento de código también añadirá un botón de compartir vertical a todas tus entradas. Si desea mostrar un botón de compartir horizontal en su lugar, simplemente cambie la sección count-layout="vertical"> por count-layout="horizontal">.
Cuando esté listo, guarde el archivo y vuelva a subirlo a su tema directamente mediante FTP.
Bonificación: Guías adicionales acerca de WordPress y los medios sociales
¿Te interesa saber más acerca de cómo utilizar WordPress con los medios sociales? Marca / comprueba estas guías para principiantes:
- ¿Ha muerto Pinterest? Cómo aumentar el tráfico de Pinterest a tu blog
- Cómo verificar tu sitio WordPress en Pinterest (paso a paso)
- Cómo publicar automáticamente en Instagram desde WordPress
- Los mejores plugins de WordPress para Facebook para hacer crecer tu blog
- Estadísticas de los medios sociales (Lista definitiva para blogueros)
If you liked this article, then please subscribe to our YouTube Channel for WordPress video tutorials. You can also find us on Twitter and Facebook.


")
Jiří Vaněk
Thanks for the php snippet. I tried it on one of the sites and it works like a charm. You have saved me some space between plugins. Good job.
Alison
Hi. I just added shared counts and the Pinterest add-on plugins recently. They seem to work fine, but I notice they haven’t been updated in several years nor have they been tested with my version of WordPress. Should I be looking for a new plugin or are they still ok to use?
WPBeginner Support
The shared count plugin was updated 2 months ago and it should still be working well, for the warnings we would recommend taking a look at our article below for why you shouldn’t be very concerned
https://www.wpbeginner.com/opinion/should-you-install-plugins-not-tested-with-your-wordpress-version/
Admin
Julie
I’m looking to add an individual graphic pin that I’ve custom designed to the travel blog post it belongs to (like the best things to do in Jaipur). Is that what this article is covering or is it just the literal Pinterst “Button” that looks like the Pinterst logo? Sorry to be co fixed with this technicality, but an image or two would make this much clearer what specifically the “button” you are referring to is….thank you in advance…
WPBeginner Support
This is for the Pinterest pin it button, the second screenshot in the article should be what you are looking for as an example.
Admin
Ellen
It works!! thankyou
WPBeginner Support
Glad our guide could help
Admin
Kara
After I installed the plugin, it never showed up in the settings.
WPBeginner Support
You would want to ensure you activate the plugin as well.
Admin
Jais
Thanks. It works.
WPBeginner Support
You’re welcome, glad it worked for you
Admin
laira
hi wpbeginner, I follow your codes, may i know if i will still pin the images on my pinterest boards? or it will automatically pin there? Im still a beginner in this platform. thank you
WPBeginner Support
The button when used would add it to your board.
Admin
Lorraine Reguly
Thanks for the code. I just added it to my author site. (I have no idea how the Pinterest button shows up on my images on my business site, but it does.)
Now my author site is all set up!
Thanks, Syed.
P.S. I just followed you on Pinterest.
WPBeginner Support
Hey Lorraine,
Thanks for following us on Pinterest. You can also find us on Twitter and Facebook.
Admin
RB
this is work !! thanks
and
I wonder…
how can I change icon? Icon is still same when change code
Thales
I did the last option, adding the short code to my theme’s functions.php file. It worked, but I couldn’t save my posts as draft anymore. Then I removed the code and it is not working. My site is still online, but I cannot log in into my site anymore. The following message appear:
Warning: Cannot modify header information – headers already sent by (output started at /home/peque107/public_html/wp-content/themes/himmelen/functions.php:2) in /home/peque107/public_html/wp-includes/pluggable.php on line 1224
Please help!
Emma steave
Thanks. Its great
Carissa
Does this only apply for wordpress.org blogs? I have a wordpress.com blog and I am not sure if I can add this plugin to it?
Thank you!
WPBeginner Support
Yes it is for WordPress.org. Please see our guide on the difference between self hosted WordPress.org vs free WordPress.com blog.
Admin
Ruth
I have a problem. I followed the instructions and came up with this error:
Parse error: syntax error, unexpected ‘<' in /home/cmomb/butfirstwehavecoffee.com/wp-content/themes/notepad/functions.php on line 18
Now I cannot get rid of it. Could someone advise. My site is now down.
WPBeginner Support
Open the functions.php file in a text editor like notepad. Go to line 18. You probably have <?php tag there that you don’t need. Delete it and also delete the ?> closing tag
Admin
Ian Harris
Thanks for this firstly
I am struggling to position the element. It is seeming to always sit in the top left of the div.
Is it possible to position it and also change the bg image to own custom one.
Thanks
Paradise Found Around
Great tutorial, as usual. I was wondering though if there was a way to modify it to use a custom button in place of the starboard one that automatically comes up.
Thanks,
Mark
mark taylor
Good tutorial, i have put it on my site without any problems, i then tested it and it worked, but it still says 0 after i pinned.
Mark
vrinda
I tried so many plugins… they don’t work with infinite scroll and nextgen gallery…. but with some changes this script solved my issue.. thanks
Michael
Hello,
I just want to ask if I could change the size of the “pin it” button? Because it seems that it was a little bit small.
Regards,
Michael
Editorial Staff
You could use the pin count layout vertical or horizontal. Other than that, no you cannot change the size.
Admin
Jenny
This code just recently stopped working. I had it on my site and it was working great and recently images appear to be working but then when you go view the pinboard there is no image set. Other times when trying to pin it 502 error that comes from the Pinterest site. Any ideas?
Editorial Staff
Probably server errors on Pinterest’s end. We have this code running on our other sites.
Admin
Ido Schacham
There’s a bug in the code. The generated href for the pin it button should include ‘url=’, currently it’s missing the equals sign.
Editorial Staff
Fixed the shortcode code for that. Thanks for reporting it
Admin
jess
For wordpress users..adding the pin it or any other social media is easy! Under dashboard, go to setting, click on sharing and they all appear- click on what you want to add!
Editorial Staff
You are referring to WP.com sites. This tutorial is for self-hosted WordPress sites. Two different things.
Admin
Jen M
THANK YOU! I have been searching for how to do this for 2 days & downloaded something & that didn’t work, I was about to give up & then THANKFULLY read your comment. I appreciate someone making it as EASY as it really is, how come wordpress can’t do that?
Jenn K
Ooh, thanks for the tip! Exactly what I was looking for
Nick
Is there a way to customize this so you can select a custom image for the pin-it button ?
Editorial Staff
If you mean a custom image for your article, then yes you can. Look at the &media tag in the second code.
Admin
Husein Yuseinov
Hi,
I need to implement this code but in header file, but postthumbnail returns error?!
wpbeginner
@Husein Yuseinov You have to call the thumbnail code within your post loop. In order to call it in your header.php file, you must utilize the global variable.
https://www.wpbeginner.com/wp-themes/how-to-display-custom-fields-outside-the-loop-in-wordpress/
Husein Yuseinov
@wpbeginner Thanks for the fast respond, but I’m not a coder, and it’s hard for me to understand you.
wpbeginner
@Husein Yuseinov Ok… so here is what you do. Add the following line above $pinterestimage line inside the PHP tags:
global $wp_query;
$postid = $wp_query->post->ID;
Then replace $post->ID with $postid and it will work. Also after the code, you may want to end wp_reset_query();
This is the best we can do. What you are asking for requires coding. If you are unable to do this, then shoot us an email. We can help you out for a small fee.
robthecomputerguy
What in the world is going on with the “animhut blog” button on thee next 3 comments?
wpbeginner
@robthecomputerguy I think they just liked our comments, and livefyre is showing their profile.
robthecomputerguy
@wpbeginner Oh that’s fascinating – that didn’t even occur to me – thanks for the follow up!
FuturePocket
I tried adding this… it worked but when you click on “Pin it” and it opens the window in a new browser and you actually submit the pin, it just reloads the newly opened window and the pin isn’t submitted. Decided not to implement it until they’ve fixed their bugs.
Phil Derksen
If you don’t want to mess with adding code, I created a Pin It button plugin you can try out.
http://wordpress.org/extend/plugins/pinterest-pin-it-button/
(or just search for “pinterest pin it” under plugins)
Jean Oram
I used the ‘follow me’ code on the Pinterest Goodies page and pasted it into the ‘text’ widget on my WordPress blog. The button now appears right after my mini bio. It works quite well.
Editorial Staff
For any advanced theme framework like Thesis, Genesis, Headway etc, you have to add these codes via functions.php file using the framework appropriate hooks. We cannot possibly cover all the theme frameworks out there. Most theme framework blogs have instructions on how to do customize the themes.
Admin
wpbeginner
Your method seems a bit tedious because you would have to do it for each image.
Ruby
@wpbeginner It’s not ideal, but it’s really not much more than you have to do to post the image anyway. I’m still looking for a great option (plugin ideally) that a) works on my theme and b) is easy. Luckily, due to the popularity of Pinterest, I’m confident someone will have one up and running soon!
wpbeginner
Make sure you set $pinterestimage[0] otherwise it will return an array. Other than that not sure why you are getting the error.
merrittsgret
@wpbeginner It’s working now, thanks to the shortcode code you gave us. Thank you so much!
Now to get it to align with everything else via CSS… (http://ylcf.org/2012/01/tomorrow-2/) Ah, the joys.
wpbeginner
@merrittsgret Yeah, you might have to utilize the !important tag in some cases.
dave2
Any idea on how to change it from featured image to first image?
wpbeginner
@dave2 Use a variation of this snippet:https://www.wpbeginner.com/wp-themes/how-to-set-a-default-fallback-image-for-wordpress-post-thumbnails/
animhut blog
@wpbeginner @dave2 Thank you for the tutorial ! i need that for my another photography site
Gretchen
It works, but it shows the text “array” before the Pin It button. I’m calling it via my functions.php, like so “echo $pinterestimag…..<?php;" Could that be why?
Heidi at CrockPotLadies
I cannot seem to get it to work. I put the first code in my footer.php before the closing body tag and then added the other code into my single php after my other sharing buttons provided by po.st. Yet when I look at a post on my site (http://crockpotladies.com/recipe-categories/entrees/crockpot-chicken-enchiladas/) I do not see a Pin It Button. Any suggestions?
wpbeginner
@Heidi at CrockPotLadies We can see the button in the next line after the Subscribe to feed etc links.
wmwebdes
Only just started to hear about Pinterest – looks as though it is really taking off.
Thanks for the tut.
Ruby
Thanks for this. I recently tried a similar method but it doesn’t seem to work with my WordPress.org theme, so I came up with my own work-around and posted it here: http://www.tomaytotomaaahto.com/tools-and-tutorials/how-to-turn-your-images-into-pinterest-pin-it-buttons-wordpress
YeahThatsKosher
How do you get this to integrate with an existing WP plugin like Digg Digg or Sociable?
wpbeginner
@YeahThatsKosher You would have to ask the developers to do so for you.