¿Quieres añadir estilos personalizados en el editor visual de WordPress? Añadir estilos personalizados te permite aplicar formato rápidamente sin cambiar al editor de texto. En este artículo, le mostraremos cómo añadir estilos personalizados al editor visual de WordPress.
Nota: Este tutorial requiere conocimientos básicos de CSS.
Por qué y cuándo necesita estilos personalizados para WordPress Editor Visual
Por defecto, el editor visual de WordPress viene con algunas opciones básicas de formato y estilo. Sin embargo, a veces puede necesitar estilos personalizados propios para añadir botones CSS, bloques de contenido, descripciones cortas, etc.
Siempre puede cambiar del editor visual al de texto y añadir HTML y CSS personalizados. Pero si utilizas regularmente algunos estilos, entonces sería mejor añadirlos al editor visual para que puedas reutilizarlos fácilmente.
Esto te guardará o ahorrará tiempo, según contexto. También le permitirá utilizar los mismos estilos en todo su sitio web.
Y lo que es más importante, podrás retocar o actualizar fácilmente los estilos sin tener que editar las entradas de tu sitio web.
Dicho esto, echemos un vistazo a cómo añadir estilos personalizados en el editor visual de WordPress.
Método 1: Añadir Estilos Personalizados en el Editor Visual Usando Plugins
Lo primero que debe hacer es instalar y activar el plugin TinyMCE Custom Styles. Para más detalles, consulte nuestra guía paso a paso sobre cómo instalar un plugin de WordPress.
Una vez activado, debe visitar la página Ajustes ” Estilos personalizados de TinyMCE para establecer los ajustes del plugin.
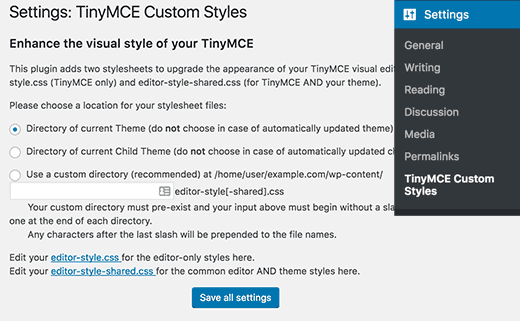
El plugin permite elegir la ubicación de los archivos de hojas de estilos. Puede utilizar las hojas de estilos de su tema o tema hijo, o puede elegir una ubicación personalizada propia.
Después, tienes que hacer clic en el botón “Guardar todos los ajustes” para guardar los cambios.
Ahora puedes añadir tus estilos personalizados. Tienes que desplazarte un poco hacia abajo hasta la sección de estilos y hacer clic en el botón Añadir nuevo estilo.
Primero tienes que introducir un título para el estilo. Este título aparecerá en el menú desplegable. A continuación, debe elegir si se trata de un elemento integrado, de bloque o selector.
Después añade una clase CSS y luego añade tus reglas CSS como se muestra en la siguiente captura de pantalla.
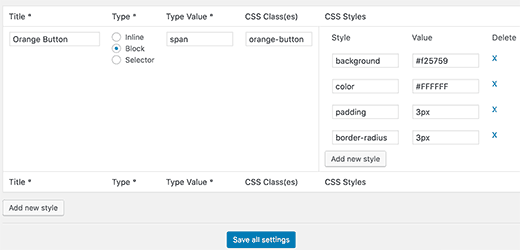
Una vez que haya añadido un estilo CSS, simplemente haga clic en el botón “Guardar todos los ajustes” para guardar los cambios.
Ahora puede editar una entrada existente o crear una nueva. Notarás un menú desplegable de Formato en la segunda fila del editor visual de WordPress.
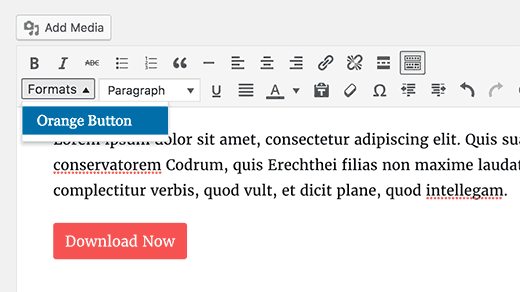
Simplemente seleccione algún texto en el editor y luego seleccione su estilo personalizado en el menú desplegable Formatos para aplicarlo.
Ahora puede ver una vista previa de su entrada para comprobar que sus estilos personalizados se han aplicado correctamente.
Método 2: Añadir manualmente estilos personalizados al editor visual de WordPress
Este método requiere que añada manualmente código a sus archivos de WordPress. Si es la primera vez que añade código a WordPress, consulte nuestra guía sobre cómo añadir fragmentos de código desde la web a WordPress.
Paso 1: Añadir un menú desplegable de estilos personalizados en el Editor Visual de WordPress
En primer lugar, añadiremos un menú desplegable de Formatos en el editor visual de WordPress. Este menú desplegable nos permitirá seleccionar y aplicar nuestros estilos personalizados.
Necesitas añadir el siguiente código al archivo functions. php de tu tema o a un plugin específico del sitio.
1 2 3 4 5 | function wpb_mce_buttons_2($buttons) { array_unshift($buttons, 'styleselect'); return $buttons;}add_filter('mce_buttons_2', 'wpb_mce_buttons_2'); |
Paso 2: Añadir opciones de selección al menú desple gable
Ahora tendrá que añadir las opciones al menú desplegable que acaba de crear. A continuación, podrá seleccionar y aplicar estas opciones desde el menú desplegable Formatos.
Para este tutorial, vamos a añadir tres estilos personalizados para crear bloques de contenido y botones.
Deberá añadir el siguiente código al archivo functions. php de su tema o a un plugin específico del sitio.
1 2 3 4 5 6 7 8 9 10 11 12 13 14 15 16 17 18 19 20 21 22 23 24 25 26 27 28 29 30 31 32 33 34 35 36 37 38 39 40 41 42 43 44 45 | /** Callback function to filter the MCE settings*/function my_mce_before_init_insert_formats( $init_array ) { // Define the style_formats array $style_formats = array( /** Each array child is a format with it's own settings* Notice that each array has title, block, classes, and wrapper arguments* Title is the label which will be visible in Formats menu* Block defines whether it is a span, div, selector, or inline style* Classes allows you to define CSS classes* Wrapper whether or not to add a new block-level element around any selected elements*/ array( 'title' => 'Content Block', 'block' => 'span', 'classes' => 'content-block', 'wrapper' => true, ), array( 'title' => 'Blue Button', 'block' => 'span', 'classes' => 'blue-button', 'wrapper' => true, ), array( 'title' => 'Red Button', 'block' => 'span', 'classes' => 'red-button', 'wrapper' => true, ), ); // Insert the array, JSON ENCODED, into 'style_formats' $init_array['style_formats'] = json_encode( $style_formats ); return $init_array; } // Attach callback to 'tiny_mce_before_init' add_filter( 'tiny_mce_before_init', 'my_mce_before_init_insert_formats' ); |
Ahora puede añadir una nueva entrada en WordPress y hacer clic en el menú desplegable Formatos en el editor Visual. Notarás que tus estilos personalizados son ahora visibles bajo formatos.
Sin embargo, seleccionarlos no hace ninguna diferencia en el editor de entradas en este momento.
Paso 3: Añadir estilos CSS
Ahora el paso final es añadir reglas de estilo CSS para sus estilos personalizados.
Tendrás que añadir este CSS a los archivos style.css y editor-style.css de tu tema o tema hijo.
1 2 3 4 5 6 7 8 9 10 11 12 13 14 15 16 17 18 19 20 21 22 23 24 25 26 27 28 29 30 31 32 33 34 35 36 | .content-block { border:1px solid #eee; padding:3px; background:#ccc; max-width:250px; float:right; text-align:center;}.content-block:after { clear:both;} .blue-button { background-color:#33bdef; -moz-border-radius:6px; -webkit-border-radius:6px; border-radius:6px; border:1px solid #057fd0; display:inline-block; cursor:pointer; color:#ffffff; padding:6px 24px; text-decoration:none;}.red-button { background-color:#bc3315; -moz-border-radius:6px; -webkit-border-radius:6px; border-radius:6px; border:1px solid #942911; display:inline-block; cursor:pointer; color:#ffffff; padding:6px 24px; text-decoration:none;} |
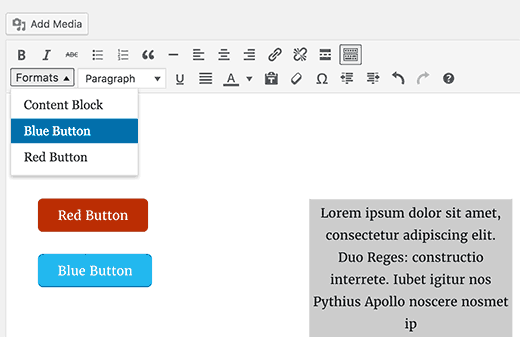
La hoja de estilos del editor controla la apariencia de tu contenido en el editor visual. Marque / compruebe la documentación de su tema para averiguar la ubicación de este archivo.
Si tu tema no tiene un archivo de hoja de estilos del editor, siempre puedes crear uno. Simplemente crea un nuevo archivo CSS y nómbralo custom-editor-style.css.
Tienes que subir este archivo al directorio raíz de tu tema y añadir este código en el archivo functions.php de tu tema.
1 2 3 4 | function my_theme_add_editor_styles() { add_editor_style( 'custom-editor-style.css' );}add_action( 'init', 'my_theme_add_editor_styles' ); |
Eso es todo. Has añadido correctamente tus estilos personalizados en el editor visual de WordPress. No dudes en jugar con el código añadiendo tus propios elementos y estilos.
Esperamos que este artículo le haya ayudado a aprender cómo añadir estilos personalizados al editor visual de WordPress. Puede que también quieras ver nuestra guía sobre cómo añadir estilos personalizados a los widgets de WordPress.
Si te ha gustado este artículo, entonces suscríbete a nuestro canal de YouTube para ver tutoriales en vídeo sobre WordPress. También puedes encontrarnos en Twitter y Facebook.


Toufic Ahemmed
This guys are awesome. they help me most of the time. thank you very very much.
WPBeginner Support
Glad we could help
Admin
Aslan French
This article should be updated with Gutenberg in mind, as this kind of functionality has been added to the Rich Text API recently.
WPBeginner Support
Hi Aslan,
Thanks for the suggestion. We will definitely look into older articles once Gutenberg is out.
Admin
Mehrdad
Thanks a lot.
This article really helped me.
sabbi
This adds classes to a p-tag doesnt it?
Is there a way to even create own tags?
Or another thing:will a chosen custom Format overwrite a previously chosen h-tag with a p? Would be necessary to prevent a client from getting in trouble when hes clicking around in the default AND custom styles.
Britany
Unfortunately this didn’t help me at all. Is there an article that explains what each of the fields you have to fill in mean?
All I need is a way to apply the same formatting to quotes on my podcast show notes pages. Each quote is the the same font (that I have set-up as a headline style), bolded, and centered.
I get tired of manually applying each part of the format to every quote and just a way to click one button and be done.
Syams
Please, tell me how to add a new font to WP visual editor.
Moya Nicholson
Thank you. Really helpful.
stanley
I need to modify my theme WP
hell me please
Sandy Connolly
THANK YOU FOR THIS!!! OMG!!!! How helpful upon handing a site over to a client who wants to be able to add his/her own content based on our design!
Marcin
Hi, I develop WordPresses every day and do everything with WP but this piece of code is one of the most useful I’ve seen for long time… It is exactly what default WYSIWYG is (now I can say: was) missing! It allows to do some stunnig things inside content field. Thank You for sharing!
Foxglove
I have been using this plugin for a while now, but it is no longer available from wordpress.org — apparently no longer updated or supported. Is anyone aware of any alternatives other than the manual method you describe?
Lisa McMahon
Here’s an updated/forked version of the original plugin mentioned in the article: TinyMCE Custom Styles
WPBeginner Support
Hey Lisa, thanks for pointing this out. We have updated the article with the updated/forked version.
Admin
Shubha Das
I want to add p instead of span. But when I change block name span to p, it doesn’t work.
‘title’ => ‘Note’,
‘block’ => ‘p’,
‘classes’ => ‘note’,
‘wrapper’ => true,
MacKenzie
I found this really helpful and I feel like I almost have it but it isn’t quite working yet. My text gets properly tagged with the span and class tags in the editor when selected – but none of the styles I put in the style sheet are being applied to the published note.
Frank
I always become nervous and feel like vomiting if some customer needs wordpress tweaks. Coll, this style pulldown BUT, as someone said before, completely useless if styles cannot be withdrawn afterwards and only add up, add up, add up…
I’m used to these half baked sulotions in wordpress – normally there’s also a complementary half-baked solutions to half repair the first one. But here?
Now HOW would you suggest TO REMOVE CUSTOM STYLES added via the styles pulldown. Code view is in no way acceptable for my client?
I’d be unbelievably lucky if someone has found a way to do that and would share this knowledge (and for putting the catastrophe called wordpress out of my reach for( i hope) a very long time).
Thanks a lot in advance!
Frank
Chris
Click on the style in the pulldown again. Done.
Shafi ken
Thanks for the helpful tutorial. Thanks
K Shazzad
Whole tutorial worked flawlessly for me. Thanks a bunch
Stef
I tried out this plugin but realized, that when you change a custom style, It won’t update those you inserted already. You have to go back and reinsert them, because the feature adds the style inline and not via stylesheet
Phil
Thanks for the helpful tutorial. Is there any performance penalty in using the plugin rather than hand-coding it? Thanks,
WPBeginner Support
No, but for reusing elements this method is quite handy. It is also useful, if you are building a site for a client and want them to be able to add things from the visual editor.
Admin
Sei
Thanks for the tutorial!
Is there a way to add two markups at once? Like, getting something like text
Sei
Okay, your comments converts HTML. I mean, I’d like to get both ‘h1’ and ‘span’ markups around my text by clicking on only one style.
Lily
I’ve managed to do the custom classes and the elements do show with the right classes in the text editor and on the page, but the class isn’t applied in the visual editor which makes it very unclear whether it’s worked or not for the user. Is there any way to fix that?
Bonnie Dasher-Andersen
I’ve added two custom styles. When I go to edit a page, I have two Format menus, each one with the same entries (the two styles that I created). When I try to apply these styles, nothing happens. I can see the tag in the Text view, but when I view the page – the style hasn’t been applied.
Any suggestions? Need to figure this out for a client who will be updated this WP site and is not very savvy.
Marcello
I had the same problem, where the tags weren’t applied to code. Fixed it by setting ‘wrapper’ to ‘false’. I don’t know the technical reasons, just tested and it worked. Hope it helps!
hugotom
I had the same problem that the style sheet is not recorded.
Solution
If you already have this recording style sheets in the functions.php file should add right there stylesheet custom-editor-style.css
Example:
function styles_theme(){
wp_enqueue_style(‘bootstrap_css’, get_template_directory_uri() . ‘/sources/bootstrap/bootstrap.min.css’);
wp_enqueue_style(‘main_css’, get_template_directory_uri() . ‘/style.css’);
wp_enqueue_style(‘theme_css’, get_template_directory_uri() . ‘/custom/css/theme.css’);
wp_enqueue_style(‘editor_css’, get_template_directory_uri() . ‘/custom-editor-style.css’); // HERE
};
Raphael Landau
I’ve used this and also had the issue where the style/class is implemented to the entire Paragraph. This is because you set the style format as “block”. (‘block’ => ‘span’,).
Quickly visiting the official WordPress codex, discovers much more options for style formatting.
http://codex.wordpress.org/TinyMCE_Custom_Styles
Since span is an inline style be default, you should replace ‘block’ with ‘inline’, and viola! You’re styling should work as expected.
so in short:
array(
‘title’ => ‘Your Title’,
‘inline’ => ‘span’,
‘classes’ => ‘your-class’,
‘wrapper’ => true,
),
nemaha
Hi,
great tutorial, thanks for that! I, too, have the problem, that style (a span) is applied to the whole paragraph. What I intend to do: Write a headline and format it as heading 1, then mark only one specific word within that headline to add a custom style. Any update on how to fix this? Thanks!
bekee
i, too, have the problem where it applies the style to the whole paragraph, not just the selected element. any update on this? thanks!
Debbie
Having the same issue. Highlight one word, but takes effect on entire paragraph.
James
I find a couple of problems. It does seem to work, but not as expected. Will not do for someone who does not know code.
1. Highlight a single word in a paragraph to add a but the is added to the entire paragraph, not just the highlighted word.
2. No way to remove the css without editing code. My client does not do code! Even tried to make a class of .nothing but the new class is only added to any others, does not replace existing class.
WPBeginner Staff
See our guide on how to fix common image issues in WordPress.
Sheikh Zuhaib Siddiqui
Hey I have an error in add media. When I try to upload any media, there is only continue loading and not showing up any media and can upload media……………Let me know what the mistake here???
But this is working fine …………just error in media uploader. please provide me this solution.
Marlice
Hi. Thank you for this great tutorial. I have a problem with content that is already in the editor. If I mark a word or a part of text and choose a style (for example “blue button” – from your code) it wraps not only the marked word or part of text. Instead it marks the whole content and put a span with the class .blue button on it. I tried it several times with other pages and posts – always the same: if the content was already there and I marked it, then the whole content get the span class. This does not happen if I wrap a new edited text in the page/post – than everything works fine. Does anybody has this phenomen too?
Thank you,
Ute
John-Henry Ross
Hi. I tried this method and it works like a charm, exactly what I was looking for, thank you. I just want to find out if there is a way to add styles to a subfolder instead of just adding it under a format button. E.g. add a headings subfolder with all heading stylings, add div submenu with div stylings, etc.
dave
Thanks!
It’s great to show 2 methods, too… my clients cower in fear at handling any code.
I will sometimes use custom fields to “force” safe additional styles, but the TinyMCE can be handled by some people, so I’ll kee that in mind.
Ciao, Dave
WPBeginner Staff
you do not need to add the dot in
classes’ => ‘.alert-blue’,
It should be
classes’ => ‘alert-blue’,
Jeff Gaudette
Sadly, this didn’t work. I removed the period, but still nothing applies in the editor. I know you’re not a help desk, but here’s a screenshot if you’re interested: http://screencast.com/t/JI0zMvcH
Thanks for all the great stuff you put out!
WPBeginner Staff
Can you paste the code you added in your functions.php file. Also paste the CSS you are using for these buttons.
Jeff Gaudette
Sure. Functions:
/*
* Callback function to filter the MCE settings
*/
function my_mce_before_init_insert_formats( $init_array ) {
// Define the style_formats array
$style_formats = array(
// Each array child is a format with it’s own settings
array(
‘title’ => ‘Alert’,
‘block’ => ‘span’,
‘classes’ => ‘entry p.alert-blue’,
‘wrapper’ => true,
),
array(
‘title’ => ‘Alert Blue’,
‘block’ => ‘p’,
‘classes’ => ‘alert-blue’,
‘wrapper’ => true,
),
array(
‘title’ => ‘Blue Button’,
‘block’ => ‘span’,
‘classes’ => ‘alert-blue-button’,
‘wrapper’ => true,
),
);
// Insert the array, JSON ENCODED, into ‘style_formats’
$init_array[‘style_formats’] = json_encode( $style_formats );
return $init_array;
}
// Attach callback to ‘tiny_mce_before_init’
add_filter( ‘tiny_mce_before_init’, ‘my_mce_before_init_insert_formats’ );
CSS
.alert-blue{
background: none repeat scroll 0 0 #E7F4FD;
border: 1px solid #C5D7E3;
color: #3A5971;
font-size: 18px;
line-height: 24px;
text-align: center;
margin: 0 0 15px !important;
padding: 15px 25px;
width: auto;
}
WPBeginner Staff
Did you add the CSS in your stylesheet?
Make sure that the style rules you add in your CSS match the classes you add in the Callback function to filter the MCE settings.
Kemi O
TinyMCE Advanced Professsional Formats and Styles is only supported up to WP version 3.6.1
Keely Worth
I avoid the Visual Editor like the plague! Only use it if I have to switch to it to use a theme’s built-in shortcode button. Otherwise – never use it.
Blair2004
I have tried first method, new style are available but, while i’m selecting one, nothing happens…
Jeff Gaudette
I am trying to do this with a block and having no luck. Code is:
array(
‘title’ => ‘Alert Blue’,
‘block’ => ‘p’,
‘classes’ => ‘.alert-blue’,
‘wrapper’ => true,
),
It works when I use span, but this necessitates a span class, which I can’t use.
When i use the above code, nothing happens in the wp editor. I select the text, click the Alert Blue formatting option and nothing happens: http://screencast.com/t/dijujZ2ZdqBy
Any advice?