Una página personalizada le permite utilizar una estructura / disposición / diseño / plantilla diferente del resto de su sitio web. Muchos sitios de WordPress utilizan diseños de página personalizados para sus páginas de ventas, páginas de destino, páginas de seminarios web, etc.
A lo largo de los años, hemos creado muchas páginas personalizadas en WPBeginner para diferentes propósitos. Las hemos utilizado para mostrar diferentes ofertas en plugins y servicios de hosting, ofrecer servicios Pro para ayudar a los usuarios con WordPress, mostrar diferentes productos y mucho más.
Según nuestra experiencia, existen múltiples formas de crear páginas personalizadas. Hemos utilizado constructores de páginas como SeedProd para algunos de nuestros proyectos. Además, también puedes utilizar el editor de bloques o los editores de sitios completos para añadir páginas personalizadas a tu sitio.
En este artículo, le mostraremos cómo crear fácilmente una página personalizada en WordPress.
¿Por qué crear una página personalizada en WordPress?
Cada vez que crea una nueva página, su tema de WordPress controla el aspecto de esa página mediante un archivo de plantilla.
Esta plantilla page.php afecta a todas las páginas individuales que crees en WordPress. Sin embargo, es posible que no desee utilizar siempre el mismo diseño.
Las páginas de destino suelen tener un contenido diferente al de las páginas normales, como una gran imagen principal o una llamada a la acción (CTA). Esto significa que a menudo tienen un aspecto completamente diferente del resto de su sitio web.
Sin embargo, intentar crear diseños únicos utilizando la plantilla de página estándar puede llevar mucho tiempo. También estás limitado por la plantilla page.php, y puede que no seas capaz de crear el diseño exacto que deseas. Esto puede dificultar la obtención de buenos resultados. Por ejemplo, si estás creando una página de ofertas, puede que no consigas muchas conversiones debido a un mal diseño de la página.
Dicho esto, veamos cómo puede crear una página personalizada en WordPress, con la estructura / disposición / diseño / plantilla y contenido exactos que desee. Simplemente utilice los enlaces rápidos a continuación para saltar directamente al método que desea utilizar.
- Method 1. How to Create a Custom Page in WordPress Using the Block Editor (No Plugin Required)
- Method 2. How to Create a Custom Page Using the Full-Site Editor (Block-Based Themes Only)
- Method 3. Create a Custom Page in WordPress using SeedProd (Recommended)
- Method 4. Using Thrive Architect to Create a Custom Page in WordPress
Método 1. Cómo Crear una Página Personalizada en WordPress Usando el Editor de Bloques (No Requiere Plugins)
El editor de bloques facilita el diseño de sus propias plantillas utilizando las herramientas con las que ya está familiarizado.
Esta es una buena opción si planeas reutilizar el mismo diseño en varias páginas, ya que puedes simplemente aplicar la misma plantilla. Si quieres crear un diseño completamente único, otra opción es crear la página de forma normal y luego editar su diseño utilizando el editor de sitio completo, que veremos en el Método 2.
Ten en cuenta que estos métodos sólo funcionan con temas basados en bloques como ThemeIsle Hestia Pro o Twenty Twenty-Three. Si no tienes un tema basado en bloques, te recomendamos que utilices un constructor de páginas.
Para empezar, abre cualquier página o entrada. A continuación, seleccione la pestaña “Página” en el menú de la derecha y haga clic en el texto situado junto a “Plantilla”.
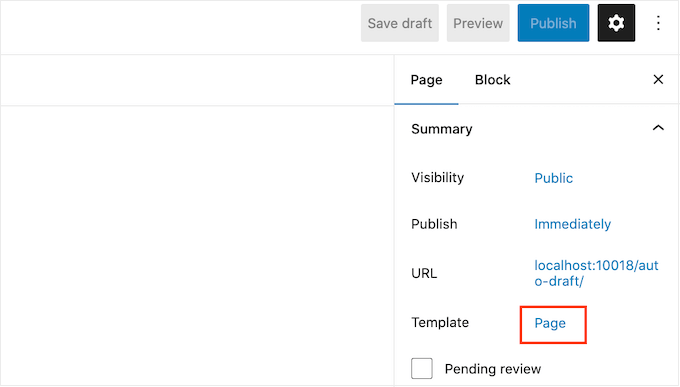
Las opciones que vea pueden variar dependiendo de su tema de WordPress, pero el texto normalmente mostrará ‘Página’, ‘Plantilla por defecto’ o similar.
En la ventana emergente que aparece, haga clic en el icono “Añadir plantilla”.

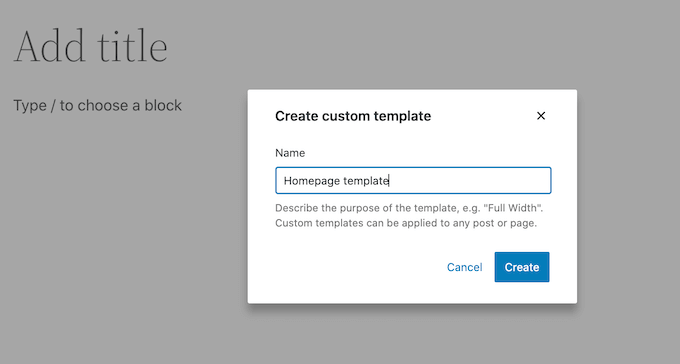
En la ventana emergente que aparece, escriba un nombre para la plantilla y haga clic en “Crear”.
El nombre es sólo para tu referencia, así que puedes usar el que quieras.
Esto inicia el editor de plantillas, que funciona de forma similar al editor de contenido de WordPress.
Para añadir bloques al diseño de la página personalizada, basta con hacer clic en el botón azul “+”. A continuación, puede arrastrar y soltar para añadir bloques.
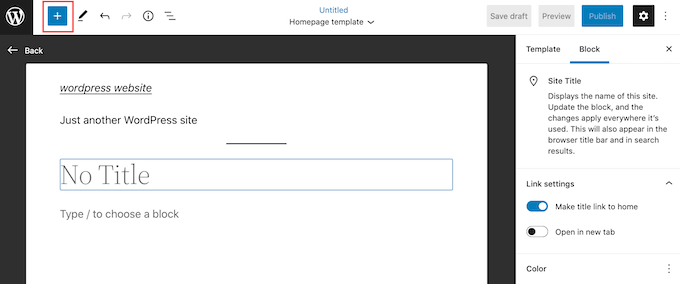
Puede añadir contenido a un bloque o cambiar su formato utilizando las conocidas herramientas de edición de entradas de WordPress. Por ejemplo, puedes escribir texto en un bloque “Encabezado”, aplicar formato de negrita o cambiar el texto de H2 a H3.
También puede crear una página personalizada utilizando patrones. Los patrones son colecciones de bloques que suelen utilizarse juntos, como un anuncio / catálogo / ficha.
Los patrones que verá variarán en función de su tema de WordPress, pero puede ver qué patrones están disponibles al hacer clic en la pestaña “Patrones”.
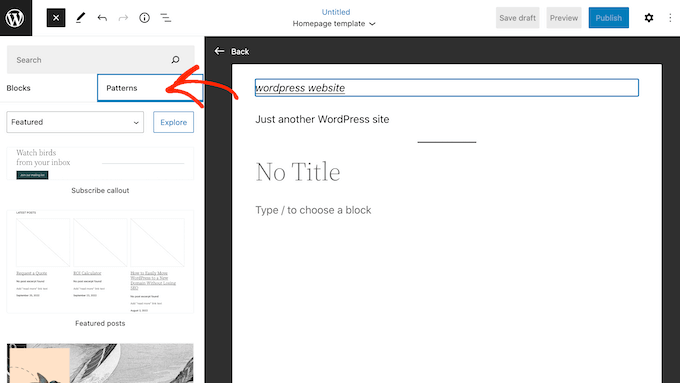
Puede arrastrar y soltar un patrón de bloques en su disposición o hacer clic en el patrón para añadirlo a la parte inferior de su plantilla. Cuando estés satisfecho con el aspecto de la plantilla, haz clic en el botón “Publicar” y, a continuación, en “Guardar”.
Ahora puede aplicar esta plantilla a cualquier página. Sólo tiene que abrir la página en el editor y, a continuación, hacer clic en el texto situado junto a “Plantilla”.
En la ventana emergente que aparece, seleccione la plantilla que acaba de crear.
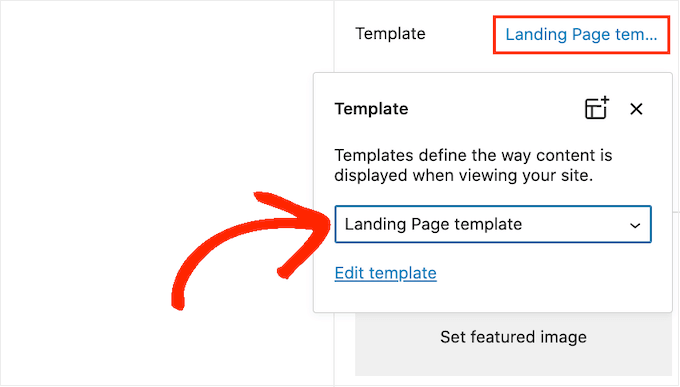
Una vez hecho esto, puede añadir contenido a la página, como a cualquier otra página de WordPress.
Método 2. Cómo crear una página personalizadautilizando el editor de sitio completo (solo temas basados en bloques)
Si utilizas un tema basado en bloques, también puedes crear una página personalizada utilizando el editor de sitio completo. Esto le permite cambiar el diseño de una página individual, sin necesidad de crear una plantilla personalizada.
Teniendo esto en cuenta, es una buena opción si quieres crear un diseño completamente único que no reutilizarás en ninguna otra página.
Para añadir una nueva página, ve a Páginas “ Añadir nueva página. A continuación, puede escribir un título, añadir categorías y etiquetas, subido una imagen destacada, y hacer cualquier otro cambio que desee.
Cuando estés satisfecho con la página básica, guarda los cambios y dirígete a Apariencia “ Editor.
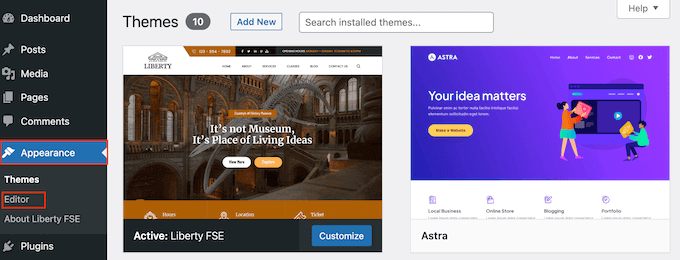
Por defecto, el editor de sitio completo muestra la plantilla de inicio de su tema.
En el menú de la izquierda, haga clic en “Páginas”.
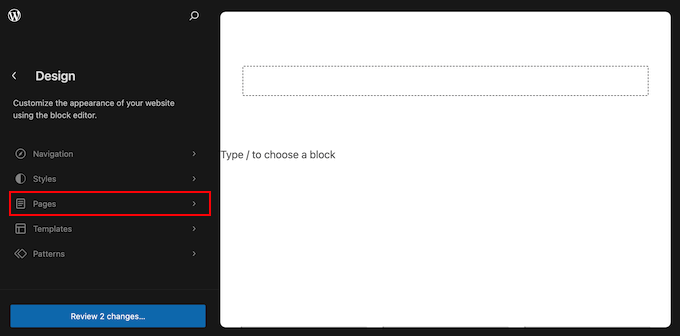
Ahora verá todas las páginas que ha creado en su sitio web WordPress.
Sólo tiene que encontrar la página que desea rediseñar y darle un clic.
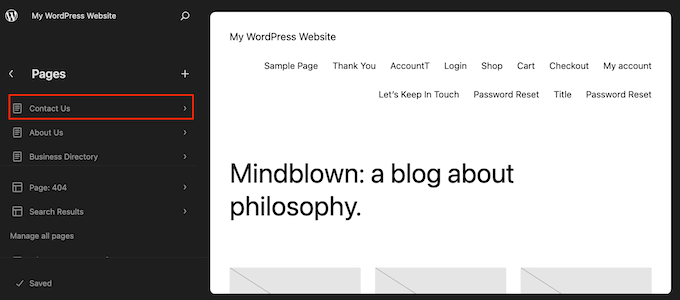
WordPress mostrará ahora una vista previa del diseño.
Para editar esta plantilla, haga clic en el icono del lápiz pequeño.
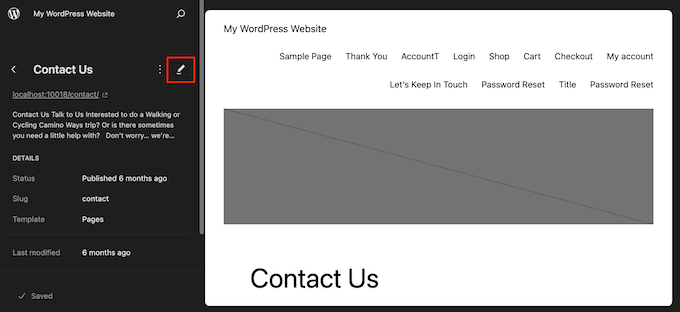
Ahora puede editar la disposición de la página utilizando las herramientas del editor del sitio completo. Por ejemplo, puede hacer clic en el botón azul “+” para añadir nuevos bloques, o hacer clic para seleccionar cualquier bloque que desee personalizar.
Cuando estés satisfecho con los cambios realizados, haz clic en el botón “Guardar”.
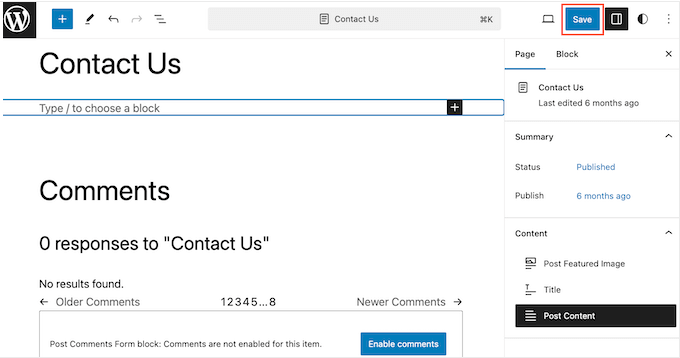
Ahora, si visita esta página en su sitio web, verá el nuevo diseño de la página en acción.
Método 3. Crear una página personalizada en WordPress usando SeedProd (Recomendado)
En el pasado, usted creaba una página personalizada escribiendo código, lo que no era muy fácil para los principiantes. Si cometiste un error con tu código HTML, CSS o PHP, entonces podría causar errores comunes de WordPress o incluso romper tu sitio por completo.
Por ello, le recomendamos que utilice un maquetador de páginas.
SeedProd es el mejor constructor de páginas de arrastrar y soltar para WordPress. Viene con más de 350 plantillas, lo que le permite crear páginas personalizadas sin escribir ningún código.
Si está utilizando una página personalizada para obtener más conversiones, entonces SeedProd funciona con muchas herramientas populares de terceros que ya puede estar utilizando para obtener conversiones. Esto incluye los mejores servicios de marketing por correo electrónico, WooCommerce, Google Analytics, y más.
Primero, necesitas instalar y activar SeedProd. Para más detalles, consulte nuestra guía paso a paso sobre cómo instalar un plugin de WordPress.
Nota: También hay una versión gratuita de SeedProd que le permite crear páginas personalizadas sin importar su presupuesto. Sin embargo, para esta guía, vamos a utilizar SeedProd Pro ya que tiene muchas más plantillas y se integra con todos los mejores servicios de email marketing.
Después de activar el plugin, SeedProd le pedirá su clave de licencia.

Encontrará esta información en su cuenta del sitio web de SeedProd. Después de introducir la clave, haga clic en el botón “Verificar clave”.
Elija una plantilla de página personalizada
Una vez hecho esto, vaya a SeedProd ” Páginas de destino y haga clic en el botón “Añadir nueva página de destino”.
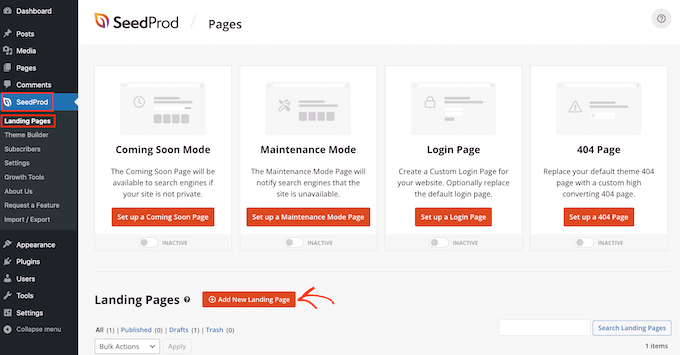
Ahora puede elegir una plantilla para su página personalizada.
Las plantillas de SeedProd están organizadas en diferentes tipos de campaña como “lead”,“squeeze” y“coming soon“. Puede hacer clic en las pestañas de la parte superior de la pantalla para filtrar las plantillas en función del tipo de campaña.
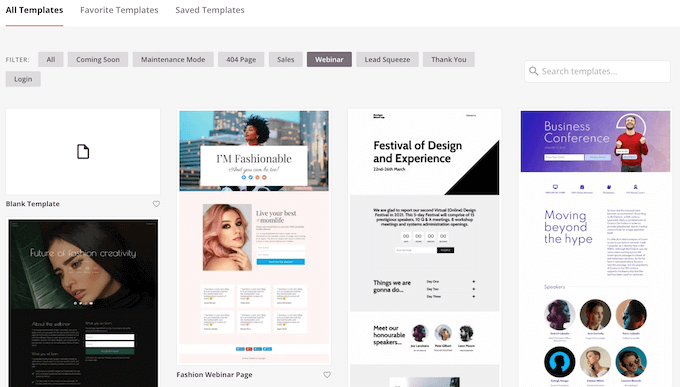
Si quiere empezar desde cero, SeedProd también dispone de una plantilla en blanco que puede utilizar.
Para ver más de cerca cualquier diseño, sólo tiene que pasar el ratón por encima de esa plantilla y luego hacer clic en el icono de la lupa.
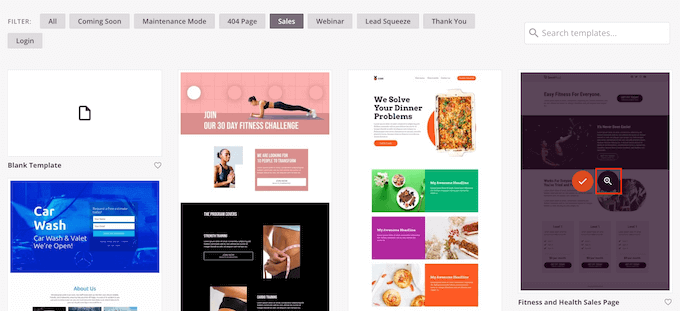
Cuando encuentres un diseño que te guste, haz clic en ‘Elegir esta plantilla’. Estamos utilizando la plantilla ‘Página de Ventas del Curso’ en todas nuestras imágenes, pero puedes utilizar cualquier plantilla que desees.
A continuación, escriba un nombre para la página personalizada. SeedProd creará automáticamente una URL basada en el título de la página, pero usted puede cambiar esta URL a cualquier cosa que desee.
Una URL descriptiva también ayudará a los motores de búsqueda a entender de qué trata la página para que puedan mostrarla a los usuarios adecuados, lo que mejorará su SEO en WordPress.
Para que su página personalizada tenga las máximas posibilidades de aparecer en los resultados de búsqueda relevantes, puede añadir las palabras clave que falten en la URL. Para más información, consulta nuestra guía sobre cómo realizar búsquedas de palabras clave.
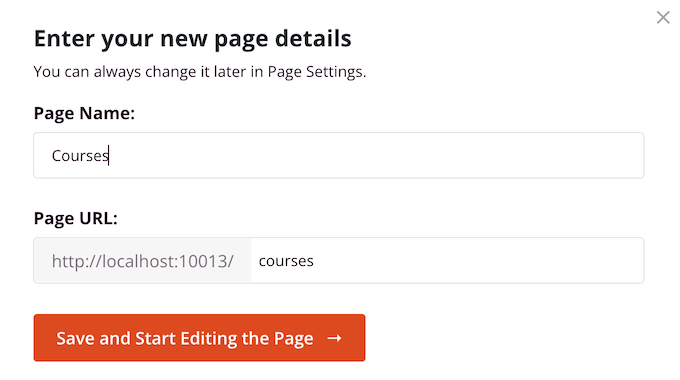
Cuando esté satisfecho con la información introducida, haga clic en el botón “Guardar y empezar a editar la página”.
Diseñe su página personalizada
SeedProd abrirá la plantilla elegida en su sencillo editor de arrastrar y soltar. Verá una vista previa en vivo de su página a la derecha, y algunos ajustes de bloque a la izquierda.

Para personalizar un bloque, basta con hacer clic para seleccionarlo en el editor de páginas. La barra de herramientas de la izquierda mostrará todos los ajustes de ese bloque.
En la siguiente imagen, estamos cambiando el texto dentro de un bloque ‘Titular’.
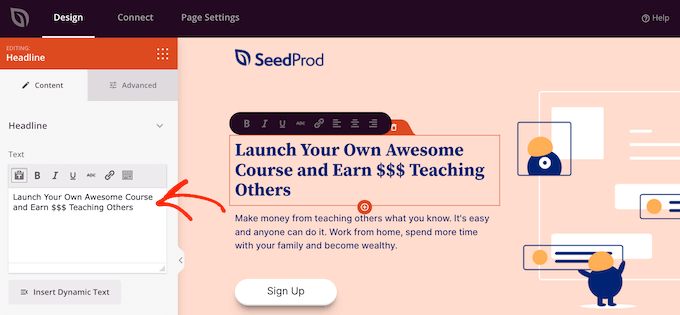
Puede dar formato al texto, cambiar su alineación, añadir enlaces, etc., utilizando los ajustes del menú de la izquierda.
También es fácil editar imágenes utilizando el maquetador de páginas de SeedProd. Simplemente haga clic en cualquier bloque de ‘Imagen’ y utilice los ajustes para añadir texto alternativo, subir una nueva imagen, o hacer cualquier otro cambio.
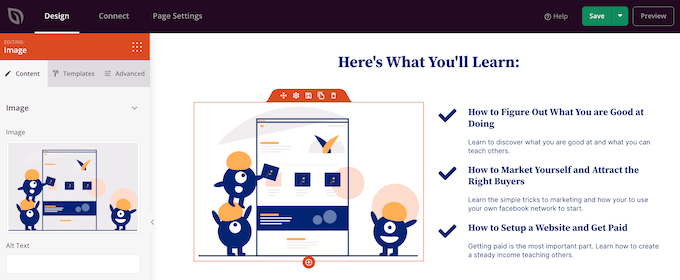
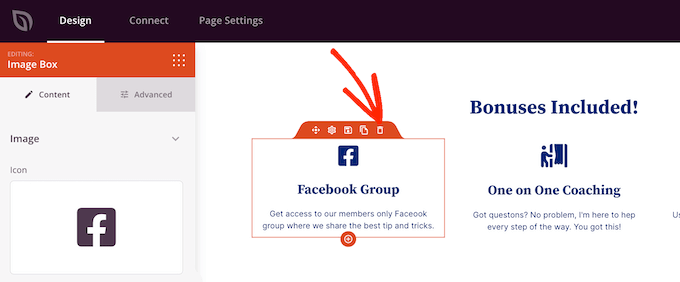
Si desea eliminar un bloque de la página personalizada, sólo tiene que hacer clic para seleccionarlo.
A continuación, haga clic en el icono de la papelera de la minibarra de herramientas.
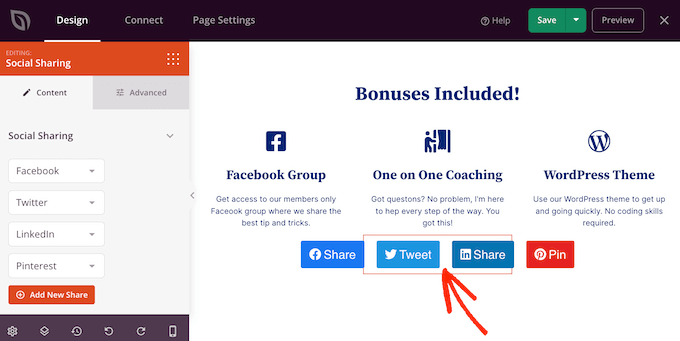
Para añadir nuevos bloques a tu diseño, sólo tienes que buscar un bloque en el menú de la izquierda y arrastrarlo al editor.
A continuación, puede hacer clic para seleccionar el bloque y realizar cualquier cambio en el menú de la izquierda.
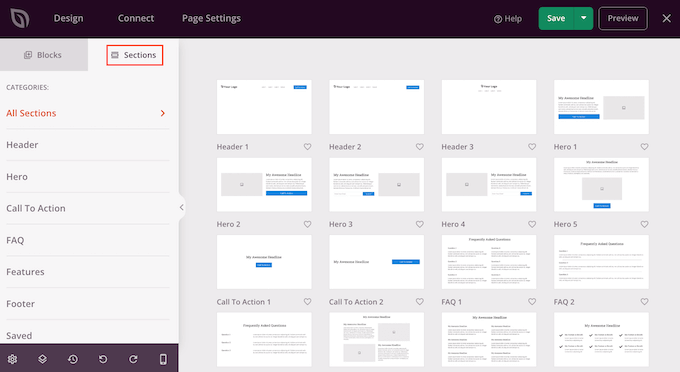
SeedProd también viene con “Secciones”, que son filas y plantillas de bloques que pueden ayudarle a crear una página personalizada, rápido. Por ejemplo, si usted está diseñando una página de destino de Google Ad, entonces usted podría utilizar SeedProd’s ready-made Hero, Call To Action, o características de las secciones.
Para ver todas las secciones disponibles, basta con hacer clic en la pestaña “Secciones”.
Para ver más de cerca una sección, pase el ratón por encima y haga clic en el icono de la lupa.
Cuando encuentre una sección que desee añadir a su diseño, sólo tiene que pasar el ratón por encima y hacer clic en el pequeño icono “+”.
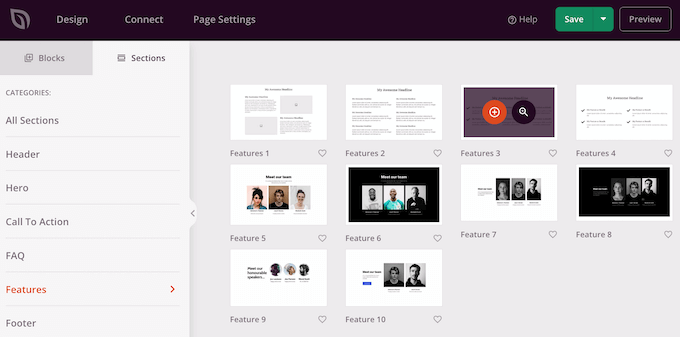
Esto añade la sección a la parte inferior de su página. Puede mover tanto las secciones como los bloques por el diseño arrastrando y soltando.
Si te equivocas o cambias de opinión, no te preocupes. Puedes deshacer el último cambio haciendo clic en el botón “Deshacer” situado en la parte inferior de la barra de herramientas de la izquierda.
Aquí también encontrarás un botón para rehacer, historial de revisiones, navegación por la disposición y ajustes globales.
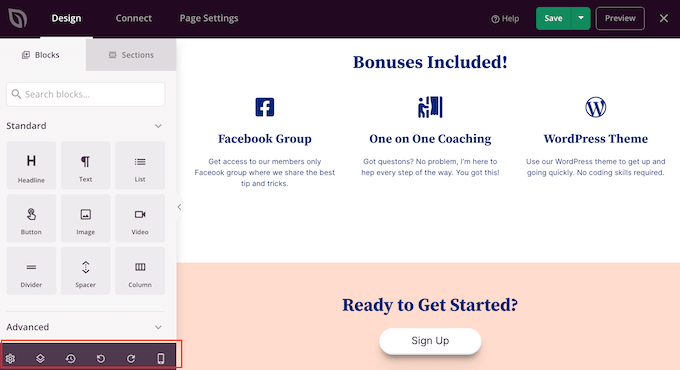
Estos botones adicionales facilitan la creación de una página personalizada en WordPress.
En la parte inferior de la barra de herramientas, también encontrará un botón de vista previa móvil que le permitirá ver la versión móvil de la página personalizada.
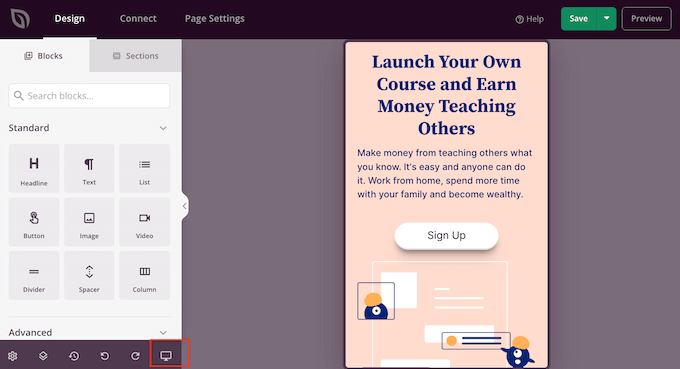
Esto puede ayudarle a diseñar una página personalizada que se vea tan bien en los dispositivos móviles como en su ordenador.
Cuando esté satisfecho con la página personalizada, es hora de publicarla; para ello, haga clic en la flecha desplegable situada junto a “Guardar” y, a continuación, seleccione la opción “Publicar”.
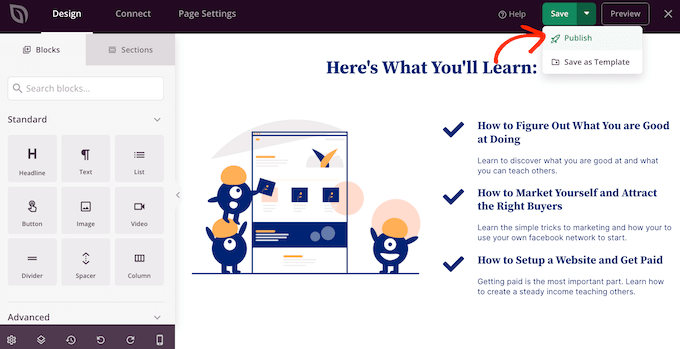
Su página personalizada aparecerá en su blog de WordPress.
Si desea editar la página personalizada en cualquier momento, sólo tiene que ir a SeedProd ” Páginas de destino en su escritorio de WordPress. A continuación, puede encontrar la página que desea cambiar y hacer clic en su enlace “Editar”.
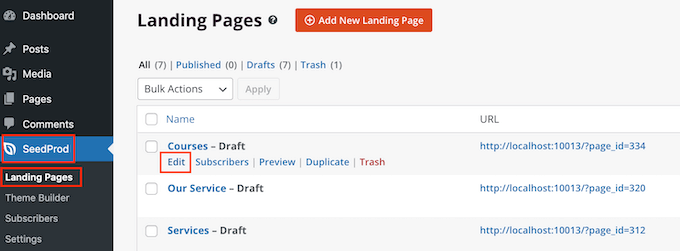
Esto abrirá el diseño en el editor de SeedProd, listo para que usted haga sus cambios.
Método 4. Usar Thrive Architect para crear una página personalizada en WordPress
También puedes crear una página personalizada utilizando Thrive Architect. Thrive Architect es otro popular constructor de páginas de arrastrar y soltar para WordPress.
Incluye más de 300 plantillas de diseño profesional pensadas para ayudarle a conseguir más conversiones.

Primero, necesitas instalar y activar el plugin Thrive Architect. Para más detalles, consulta nuestra guía paso a paso sobre cómo instalar un plugin de WordPress.
Una vez activado, ve a Páginas ” Añadir nuevo en tu escritorio de administrador de WordPress para crear una página personalizada. A continuación, haz clic en el botón “Iniciar Thrive Architect”.
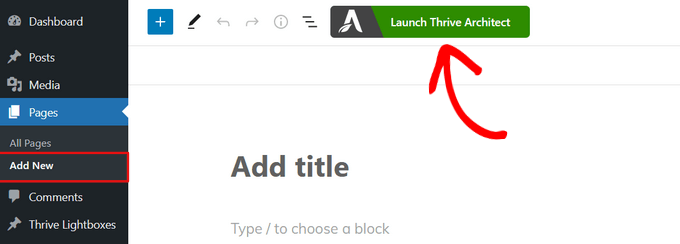
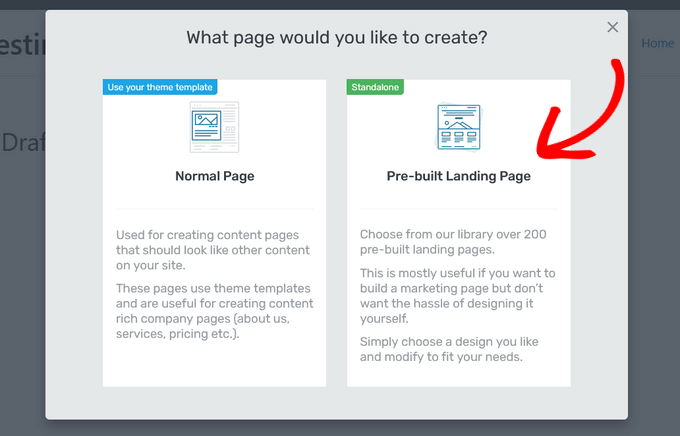
A continuación, puede elegir si desea crear una página normal o una página de destino preconstruida.
Recomendamos hacer clic en ‘Pre-built Landing Page’ ya que te da acceso a todas las plantillas de páginas de aterrizaje de Thrive. Estas plantillas son totalmente personalizables, por lo que puedes ajustarlas para que se adapten a tu sitio web WordPress.
Cuando encuentres un conjunto que te guste, sólo tienes que hacer clic para seleccionarlo.
En la siguiente imagen, estamos seleccionando ‘Smart Landing Page Sets’.
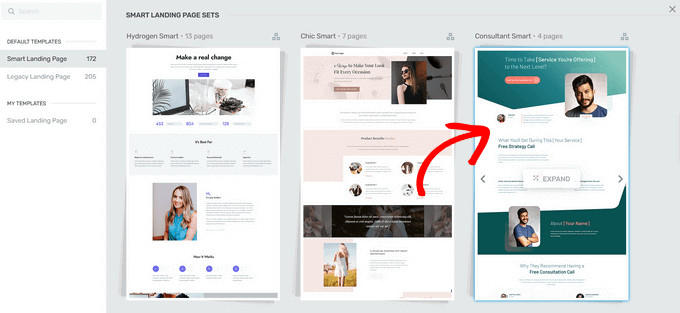
En la pantalla siguiente, tiene que elegir una plantilla específica del conjunto.
Seleccione una plantilla al hacer clic sobre ella y luego pulse el botón “Aplicar plantilla”.
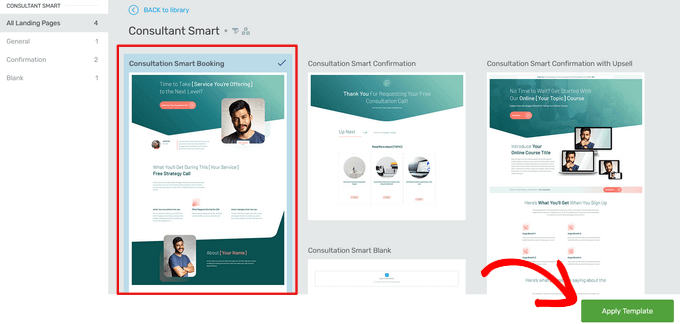
Esto abrirá la plantilla en el Editor de Thrive Architect. Desde aquí, puedes personalizar fácilmente la plantilla de página para que coincida con tu blog, sitio web o tienda online.
Por ejemplo, puede cambiar el “encabezado” al hacer clic en él y luego escribir su propio mensaje personalizado.
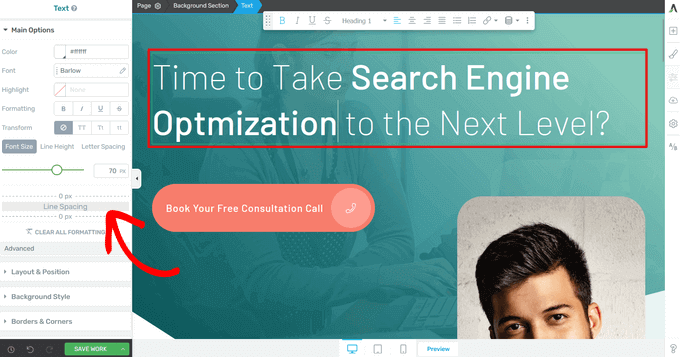
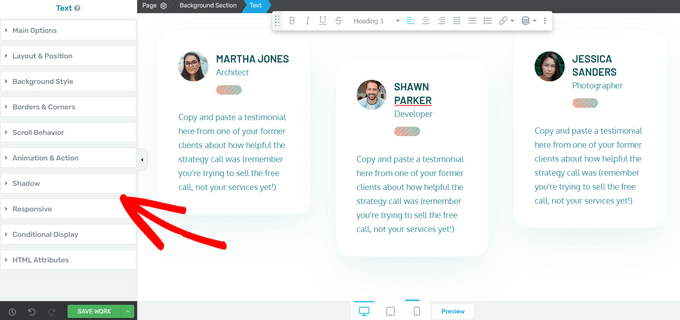
Ahora verás todas las opciones de personalización en el menú de la izquierda. Aquí puedes cambiar la tipografía, el tamaño de letra, el color, el formato y mucho más.
Desde el panel izquierdo, también puede establecer otros ajustes para su página personalizada, como la disposición, el estilo de fondo, los bordes, las animaciones y el comportamiento de desplazamiento, por nombrar sólo algunos.
Similar a los bloques de SeedProd, Thrive Architect viene con muchos elementos pre-construidos que puedes añadir a tu página personalizada.
Para añadir un nuevo elemento a la página, haga clic en el botón “Añadir elemento (+)” situado a la derecha de la pantalla.
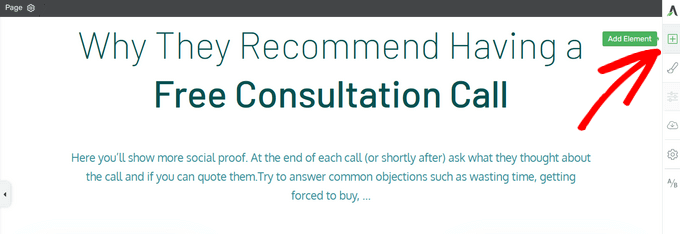
Ahora puede elegir entre elementos como imágenes, botones, formularios de generación de clientes potenciales, tablas de precios, temporizadores de cuenta atrás y mucho más.
Para añadir un elemento, sólo tienes que arrastrarlo desde el menú de la derecha y soltarlo en tu página.
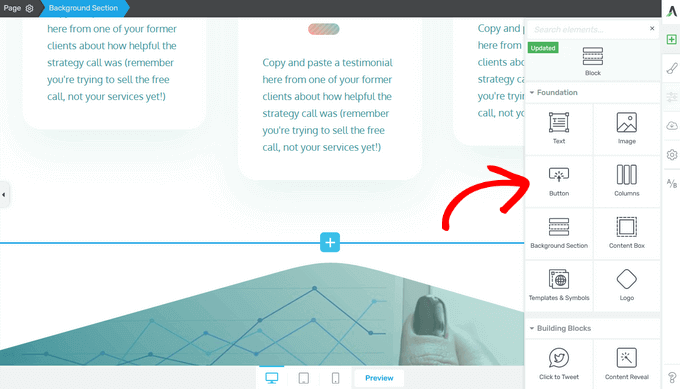
De nuevo, puedes editar cualquiera de los nuevos elementos que añadas a tu página al hacer clic sobre ellos.
Cuando esté satisfecho con el aspecto de la página, haga clic en la flecha (^) situada junto al botón “Guardar trabajo”. A continuación, haz clic en la opción “Guardar y volver al editor de entradas”.
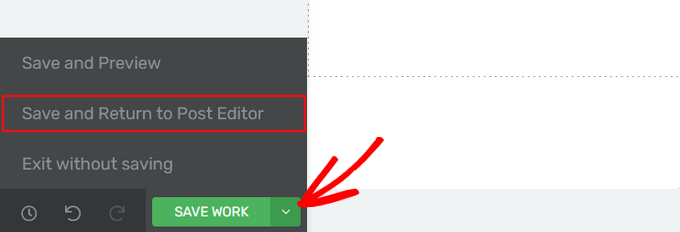
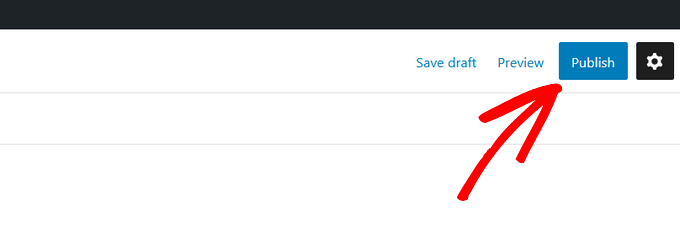
A continuación, puede guardar la página como borrador o publicarla para que aparezca en su sitio web de WordPress.
Una vez publicada su página personalizada, puede visitar su sitio para verla en acción.
Esperamos que este artículo te haya ayudado a aprender cómo crear una página personalizada en WordPress. También puedes consultar nuestra guía sobre cómo crear una página de aterrizaje con WordPress y cómo dividir el título de una entrada o página en WordPress.
If you liked this article, then please subscribe to our YouTube Channel for WordPress video tutorials. You can also find us on Twitter and Facebook.


NG SHAIKH
Dear WPB Team,
I created the template named MyTemplate.php and copied it into /wp-content/themes/ directory. The template is not reflected in drop down menu of Page Attribute -> Templets. Please guide.
Is it necessary to use FTP server for this? Please guide.
Thanks.
NG SHAIKH
NG SHAIKH
Kudos to WPBeginner Team. This is an excellent article which can give guidance to a beginner from the scratch. What a help!
However, if there is further guidance as to how to remove sidebar, create and add custom sidebar and where to put PHP code or HTML.
With lot of regards and love,
NG SHAIKH
Ajay
Hi great tutorial!
One question… I am adding new HTML template files that use css and js files etc. How can I link these files in my template file? I added the files to the same directory as the other stylesheets and assets but no luck. They do not render on the new template page. Any ideas?
Thanks!
The Last One
Im confused.. i hink this site has written years ago, but if i do understand it, you cannot do custom pages anymore in wordpress unless you have some sort of subscription?
i was trying to “edit” my wordpress site but all feature was missing.
Rob
Thanks – once again – how to remove header/footer/sidebar?
Thanks
Editorial Staff
Remove get_sidebar(), get_footer(), and get_header().
This will break all the styling because your stylesheet won’t load. So you need to make sure that wp_head() and wp_footer() are added in your template.
Fore more customization help, you may want to look here:
https://codex.wordpress.org/Theme_Development
Admin
Jeff
thanks great help
Deepan
Thanks for this tutorial,this tutorial help me to understand the concept easily.Good Work keep continuing like this.
-Deepan
tony kh tan
Thank you for this tutorial. I use cPanel to add the customPage.php onto wp-content/.. and it works. Without using FTP.
Njoroge Mathu
Thanks for the great article. Tried the steps and it works perfect. Seems like the file ‘CustomPageT1.php’ has to always be uploaded into the active theme folder or if working offline with wamp save it in wamp/www/wordpress/wp-content/themes/active theme.
Amit Prasad
Great Article. Exactly what I was looking for. Keep up the good work pal!
Osvaldo
This article, pure and simple, works like charm to me!!!
Jean-Charles de Geekarts
So it works perfectly bur when I put the file in a plugin file (because it make more sense) it doesn’t work. Do you have anyidea on what to do to make it work.
Thanks anyway for all your great tutorial
Ronny
Great work, guys. Thank you very much. But one question please… How do i make this custom template pull posts from one particular category or categories? I’ve been building websites with wordpress for a while now but, this one seems knotty to me. I know there’s a plugin that does this, but I’ll rather go with the custom template method. Thanks, again…
Chadly
hey guys, is their a plugin you recommend for WP that creates great looking pages like this:
You know, the pages that have the arrows pointing to things and almost a hand drawn look about the page.
Thanks…
irfan
Sir my websites homepage is in the form of custom link in wordpress menu and is not present in all pages also.I am a totaly newbie in website development so kindly help to convet this custom link into a page.
2:kindly also help to remove read more from posts.
Thanks
Irfan
website Address:www.fishysms.com
karlonc
Does this tutorial still apply to the newest wordpress?
Also will it keep any of the attributes of the theme you are using?
WPBeginner Support
Yes, it applies on latest WordPress and will keep all attributes of the theme you are using.
Admin
Musarrof
Please give details more and write it easily with screenshot. new word-press user cant understand your reading tutorial.
WPBeginner Support
Thanks for your feedback. Please let us know which part you did not understand and we will try to explain it.
Admin
Carol H.
I didn’t understand this part…
Once you have completed editing this file save it and upload it in your theme directory (/wp-content/themes/yourthemedirectory/) where files like single.php and index.php are located.
How does one upload to one’s theme directory? (I have a wordpress.com site; does this have anything to do with this?)
WPBeginner Support
Yes, you cannot upload files on WordPress.com sites. Please take a look at our guide on the difference between WordPress.com and Self hosted WordPress.org sites.
vinay
Hi,
where do we find the pages that were created with the add-new page link in wordpress.could someone help me out to figure out the pages.Thanks in advance
terance perera
go to appearance -> editor -> then you can see page templete or page.php
Joanna Gasdogas
oops. please ignore previous note.
Thank you for these instructions.
I have followed all your instructions, I believe correctly. However when I go to my WP editor to add content to this new template, nothing shows up on the page. It remains as a completely blank page.
kuldeep
how to create a simple template in wordpress
Joanna Gasdogas
Thank you for this. I followed all the instructions. I have a blank template now. But when I go to my wp editor to add content, the content doesn’t appear in the new page.
Samsher
Hey plz upload snap shot..
Marow95
How can I change the url ?
I mean instead of “blog/?page_id=2” , I want it to be “blog/about” .
Thanks in advance
WPBeginner Staff
Check out our guide on how to create SEO friendly URL Structure in WordPress.
Asim
Checkout Permalinks at the very beginning of the page.
Kikky
hallo, thanks for the post on creating a custom template, its helped greatly. But i have some issues i need answers to, this is my first time at wordpress and on the site i’m creating, i already have a custom template as the home page and then i have another page (with the theme’s initial homepage look, which is a custom page). the challenge i’m having now is : i want the custom template page i designed to load first but the theme’s custom page keeps coming up instead. i figured there’s some sort of conflict going on since they both have thesame url …so, preeeetyyy please, how do i get through this huge problem…thanks
WPBeginner Support
Seems like you resolved your problem. In this case, you could have specifically told WordPress to use a template for a specific page. For example if you wanted to create a custom template for http://www.example.com/home-2 then you name your template file to be page-home-2.php. You can also use a page’s id in the template, like page-33.php will only work on page with 33 as the unique id.
Admin
Pol Alvarez
Hi! I have always coded my webpages from scratch but now I need to add one to a wordpress website. I mean I have good html/css and this kind of stuff but little of wordpress.
I have followed the instructions and succesfully uploaded the file. The problem is that it is not listed on the template dropdown. I am not sure whether this happens because the file I created is not valid or any other problem. My file is composed of your header
and then following it a normal webpage (opening with etc…) without any styles now external files (just to check it out).
What am I doing wrong? any help would be appreciated.
Thanks you are my last resort!
WPBeginner Support
Pol, we can provide you some tips to troubleshoot.
Please study the file page.php in your theme’s directory. Your custom page template should follow the same structure as page.php except the header part where you need to insert your own template name so that it can distinguished.
Make sure that you have uploaded your template to the right directory. It should be in /wp-content/themes/your-theme-name/ folder.
Let us know if this helped.
Admin
Ansar
I have a problem with this.when i add new page there is no option of template in page attributes. I’m using wordpress 3.8.1
And also what is the name given to the page we are newly creating
ReNet
This is Great! BUT HELP!
I created a template that pulls in a form, I currently have it with a Captcha but want to remove the captcha and use WordPress’ password protect functionality for this page so I can speedup multiple form entries.
The issue is that WordPress displays the template’s content before entering the password.
Your help would be greatly appreciated.
WPBeginner Support
ReNet, thats because the password protect functionality implements password on the contents of the post/page that is protected not on your template. So the form you want to hide should be executed inside the post. You can create a shortcode for that and add it to your post/page.
Admin
Sean
Thanks for this – who knew it could be so simple!
Troy
Ok so I think Im missing a step or two…
1) I opened up a blank text document, copied this “1” into the first line of the notepad
2) Saved it to my desktop and loaded it into the proper wp-admin//themes/mythemedirectory/
3) Got it to show up on wordpress. Then I copied and pasted my html code for my splash page that I created in dreamweaver into the text(html) portion on wordpress.
4) Saved it as a draft and when I previewed it I get a bunch of strange text.
Can you explain to me what steps am I forgetting or missing. I think its something with the other php markups? or maybe where I post my html code. Im looking to have splash page without any menus or anything else besides my splash page coding. Any help or assistance would be greatly appreciated. The information you provided has gotten me farther then any of the other blogs Ive looked at so thank you very much!
WPBeginner Support
It seems like you are trying to design a page in Dreamweaver and trying to import it in WordPress. This will not work. Because your page already has a structure and style defined by your WordPress theme.
Admin
Troy
thanks for the reply. Can I just take the html body from dreamweaver and paste it into the theme?
WPBeginner Support
No it will still have the similar effect.
Surya
You can do that but try pasting the code in notepad first and then copying it again to WordPress. This usually eliminates some unwanted things like DOM.
niharika
I have one question please……………. help me. I want to store marks of student in Mysql database and once user go to the result page he has to enter his roll no and class, then he see his result. I have done this project but I really don’t know how to go through it in wordpress i.e where to write html and php coding in wordpress.
I am using WordPress.org on my localhost.
WPBeginner Support
For that you will have to create your own custom solution using Custom Post Types, Custom Fields, and User Meta Data. If you look around you might find some WordPress plugin that already does all that.
Admin
Andrea
Thanks for the post – this was exactly what I was looking for, and so helpful!
Stuart Alsop
Thank you sooooo much for this tutorial. solved a big headache for me! Keep up the good work!
Darren
This page is fantastic! Thank you! I was messing around a little (a lot) with plugins when I did a search, came across this page, and figured this is way better than the other methods I was looking at to do something.
One thing is that in the article, it isn’t immediately obvious that the code should be put on the page before being uploaded. I mistook it as inputting the code on the ‘add a new page’ text box. Second time I tried it, I stuck the code in the text file (also, it isn’t obvious that they should choose all files, and change the text file extension to .php), and it worked like a charm. You can even add blog1 / blog2 / etc… to get multiple themes up there if you so need.
Thank you!
Tim Reeves
THANK YOU SO MUCH!!!!!!!!!!!!!!!!!!!!!!!!!! I have been trying to figure this out for 3 months now, came across your tutorial up and running with my new page template in 5 minutes.. I completely
understand some of the comments above, as when you are first starting out everything is so confusing. But when you get a grasp of things it is so easy. AGAIN YOU ARE A LIFE SAVER,SCHOLAR,AND A GENTLEMAN !!!! : )
lucas
This is suppose to be for beginners? I can’t even pass the first step “You can start out by calling WordPress header and footer”
what does it mean? whoever wrote this article has forgotten that is writing for beginners who tend to be clueless.
I tried to call header and footer but nobody answer, maybe i got the wrong number.
A screen shot will be quite useful.
Editorial Staff
I think you misunderstood the site. WPBeginner caters for beginners of all level. This article is in the Themes category, and this is for beginner theme designers. The article clearly says that you need to have HTML / CSS knowledge before you can do this.
We do have a beginners guide category – https://www.wpbeginner.com/category/beginners-guide/
Instead of being really sarcastic, sending 2 separate emails and leaving a comment, you should consider being more polite. We do not get paid to write these tutorials. It is a kind gesture for the community, and many folks have learned from our site. It would be one thing to be pissed off, if you paid for something, and you didn’t receive it. This site is entirely FREE. We try to help as many folks as we can without charging a dime.
-Syed
Founder of WPBeginner
Admin
eduardo
thaaaaannnksssssssss im a front end developer and i consider myself a wp beginner i found this article really helpful
Markus Freeman
I’ve tried this and it worked like a charm, but the there’s one problem. The Posts didnt show, only the sidebar. what could be the problem?
Thanks,
Markus
Editorial Staff
That means that there is something wrong with the code in your template.
Admin
James
I tried this too and like above only the sidebar shows. What could be wrong with the code in my template?
Joe
Try copying the WordPress hook ( if statement) from the page.php file. Then paste it into the new file.
Karla Porter Archer
Thanks for this tutorial.
I’m trying to do this in order to create the author page (https://www.wpbeginner.com/wp-tutorials/how-to-display-an-author-list-with-avatars-in-wordpress-contributors-page/).
I’m using a child theme. Does this file get added to the main theme file directory or the child theme?
Karla Porter Archer
I just tried it in the main theme and it finally showed. So I’m assuming the answer is ‘main theme’ and that I haven’t broken it
Editorial Staff
No this file has to be added in the child theme directory. While it would work in the main genesis folder, it is best practice to never modify anything in the parent theme.
Admin
Karla Porter Archer
ah – thanks — that was my original presumption, but it didn’t show the template as an option for the page, so I second-guessed myself. I obviously didn’t add it correctly then, so off to try again!
Max Garcia Jr
WITHLOVEASH31 posted a question on 10/24/2011. Could one of the Editor’s please respond. I’d really like to know. I could really use this feature. Thanks in advance!
Editorial Staff
We didn’t reply because they also commented right after that they figured it out. You have to use FTP to login and upload a new theme file.
Admin
LJSkool
Completely newbie here. I was fine right up until you got to “begin creating a custom page by opening a blank file in your text editor”. Um, yeah…. Would that be the “editor” link under “Appearances” within my site? How do I “open” this? My purpose to have a page with all my blog posts on one page. My theme does not do this. Thanks!
Editorial Staff
Hey Jackie,
Yes this article does require prior HTML/CSS knowledge. Text Editor can be Notepad, Dreamweaver, Notepad++ etc.
Admin
Ruth
this is the first help page that’s helped me without creating another set of problems.
It worked! I never built a php page before and I pasted everything in exactly
Thank you!
Taika
“Since you have already written down all the text and settings in the php file, simply name the page and leave the content area blank”
How to do that ? My WP does not allow me to leave the content blank, it requires to type something on title before it lets create/edit page name, then if I type something, name the page and remove the text leaving it blank and publish it publishes whatever I typed on title before I removed the text…any advice ? Thanks,
Taika
withloveash31
Oh never mind. I figured it out
withloveash31
I was following your guide and everything went well until this- “upload it in your theme directory (/wp-content/themes/yourthemedirectory/) where files like single.phpand index.php are located.” This might stupid but how do i upload the file to my theme directory? I did find a page under the name “Editor” where single.php, index.php etc are located, i just don’t know how to upload the file i created. Please help :S
nola
Excellent! I thought this would be a hard process. You explained it simply. I still need to work out a few things with how my theme displays the custom template, but now I’ve learned something new. Thank you!
saro.verhees
Really awesome, exactly what i was looking for. Thanks
scarab
great post. This information was just what I was looking for. It took me about 40 minutes but I built a ‘squeeze’ page just like I wanted.
I still need to do some of the header work but is minor in my opinion.
Thanks
Nina
Brilliant!
Alex Batista
How to create a custom page in WordPress and put it how default?
Editorial Staff
https://www.wpbeginner.com/wp-themes/how-to-create-a-custom-homepage-in-wordpress/
Use the page link above.
Admin
Frank
freakin phantastic blog! This may be the best project site on the web…
Marc Shaw
Hey, I read a lot of blogs on a daily basis and for the most part, people lack substance but, I just wanted to make a quick comment to say GREAT blog!…..I”ll be checking in on a regularly now….Keep up the good work!
– Marc Shaw
Missy
Hi,
I’m on here now trying to do this. Let me see if I can pull it off.
MOMO
Excellent tutorial. cheers guys.
Momo