La ley GDPR de la Unión Europea requiere consentimiento explícito antes de almacenar datos del usuario, y tu sección de comentarios de WordPress no es una excepción.
Muchos usuarios de WordPress han preguntado sobre cómo hacer que su sección de comentarios cumpla con el GDPR. Afortunadamente, hemos implementado sistemas de comentarios que cumplen con el GDPR en numerosos sitios de WordPress, y te mostraremos exactamente cómo hacerlo.
En este artículo, te mostraremos cómo agregar una casilla de verificación de opción de privacidad para comentarios GDPR a tu sitio web de WordPress.
¿Por qué agregar una casilla de verificación de opción de privacidad para comentarios en WordPress?
El Reglamento General de Protección de Datos (GDPR) tiene como objetivo dar a los ciudadanos de la UE un mayor control sobre sus datos personales.
Cuando se introdujo esta ley, cambió la forma en que muchas organizaciones abordaban la privacidad de los datos. Para más información sobre este tema, consulta nuestra guía definitiva sobre el cumplimiento de WordPress y GDPR.
Si no cumples con el GDPR, podrías ser multado o incluso enfrentar tiempo en prisión. Es por eso que es importante hacer que tu sitio web cumpla con el GDPR, incluido tu formulario de comentarios.
Un formulario de comentarios recopila información personal de los visitantes, incluidos sus nombres, direcciones de correo electrónico y, opcionalmente, URLs de sitios web. WordPress también almacena esta información en una cookie del navegador, para que pueda completar automáticamente la información del autor del comentario en el futuro.
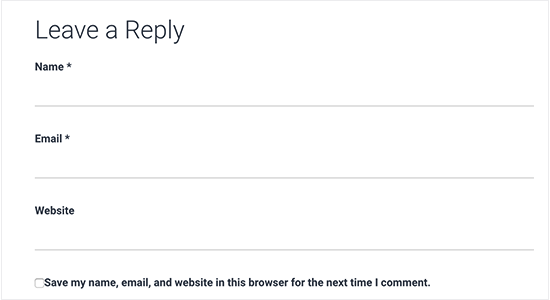
Por defecto, el formulario de comentarios de WordPress muestra una casilla de verificación de opción de privacidad para comentarios.
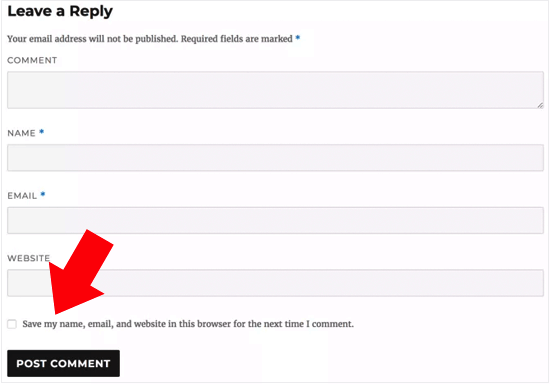
Sin embargo, si no ve esta casilla en su sitio web, es posible que esté deshabilitada por su tema de WordPress.
Publicación relacionada: Cómo crear formularios de contacto que cumplan con el RGPD en WordPress
Cómo habilitar la casilla de verificación de opción de privacidad para comentarios en WordPress
Antes de crear su propia casilla de privacidad para comentarios, es una buena idea verificar si su tema ya tiene esta función integrada.
Primero, verifiquemos que tanto su tema como el núcleo de WordPress estén actualizados yendo a Panel de control » Actualizaciones.
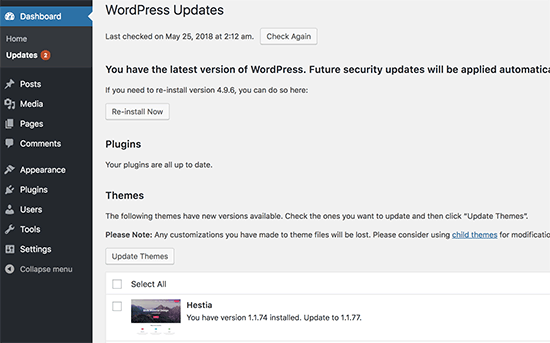
Si hay actualizaciones disponibles, proceda a instalarlas. Si necesita ayuda, consulte nuestra guía sobre cómo actualizar WordPress de forma segura.
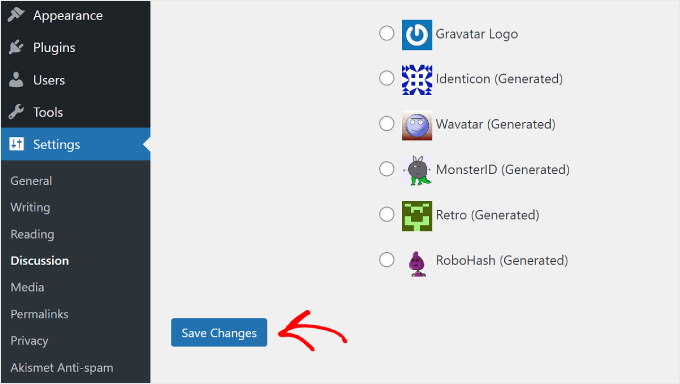
Después de eso, vaya a Ajustes » Discusión y desplácese hasta 'Otras configuraciones de comentarios'. Aquí, marque la casilla junto a 'Mostrar la casilla de opción de cookies para comentarios...'.

Hecho esto, simplemente haz clic en ‘Guardar Cambios’ para almacenar tu configuración.
Ahora, puede visitar su sitio web de WordPress para ver si estos cambios han agregado la casilla de consentimiento de cookies que faltaba.
Si está completamente actualizado y aún no puede ver la casilla de verificación de privacidad de comentarios, esto significa que su tema está anulando el formulario de comentarios predeterminado de WordPress.
Teniendo esto en cuenta, recomendamos pedirle al desarrollador del tema que solucione este problema abriendo un ticket de soporte. Para obtener consejos, consulta nuestra guía sobre cómo pedir soporte de WordPress correctamente.
Otra opción es agregar tú mismo la casilla de verificación de privacidad de comentarios a tu tema de WordPress. Hay varias formas de hacerlo, así que usa los enlaces rápidos a continuación para ir directamente al método que deseas usar:
- Método 1: Usa el formulario de comentarios de Thrive Comments (Recomendado)
- Método 2: Agrega la casilla de verificación GDPR a tu tema de WordPress con código
- Método 3: Reemplaza el formulario de comentarios de tu tema con el formulario predeterminado de WordPress
- Consejo adicional: Mejora el cumplimiento de GDPR con MonsterInsights y WPConsent
Método 1: Usa el formulario de comentarios de Thrive Comments (Recomendado)
La forma más fácil de agregar una casilla de verificación de privacidad de comentarios es reemplazar tu formulario de comentarios actual con el de Thrive Comments.
Thrive Comments es un plugin de comentarios de WordPress que viene con todo tipo de funciones para aumentar la participación en tus comentarios. Además de un formulario de comentarios personalizable, el plugin también incluye funciones para:
- Permitir a los usuarios dar 'me gusta' y 'no me gusta' a los comentarios
- Destacar o enterrar comentarios de WordPress
- Redirigir a los comentaristas a otra entrada del blog después de que dejen un comentario
La razón por la que este método es el más fácil es que no necesitas modificar el código en los archivos de tu tema para agregar la casilla de verificación. Todo lo que necesitas hacer es instalar el plugin, habilitar la función GDPR, y eso es todo.
Dicho esto, no hay una versión gratuita del plugin, por lo que puede sentirse como una inversión. Puedes aprender más sobre Thrive Comments en nuestra reseña de Thrive Themes.
El primer paso es instalar Thrive Comments. Para hacer esto, puedes ir al sitio web de Thrive Themes y obtener un plan de pago.

A continuación, simplemente inicia sesión para ir al panel de tu cuenta.
En esta página, haz clic en 'Descargar e instalar el plugin Thrive Product Manager'.
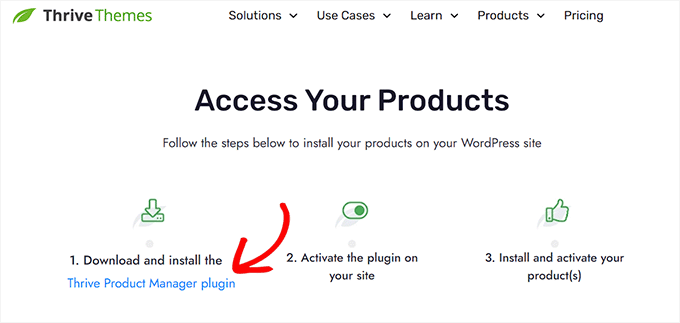
Ahora, simplemente instala el plugin Thrive Product Manager en tu sitio de WordPress. Para más detalles, consulta nuestra guía sobre cómo instalar un plugin de WordPress.
A continuación, simplemente ve a la página Product Manager desde tu área de administración de WordPress y haz clic en 'Iniciar sesión en mi cuenta'.

Ahora te encuentras en el panel de Thrive Product Manager.
En esta etapa, procede a seleccionar Thrive Comments. Luego, haz clic en el botón ‘Instalar productos seleccionados’.
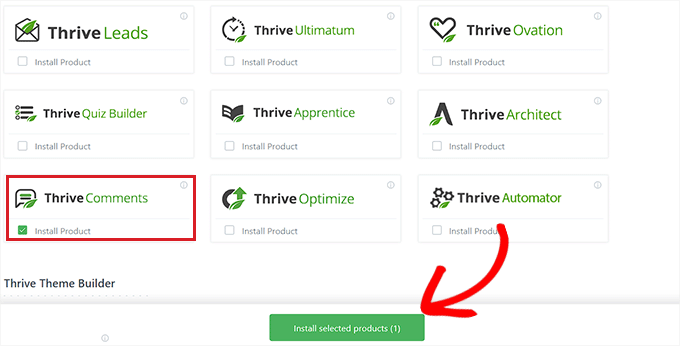
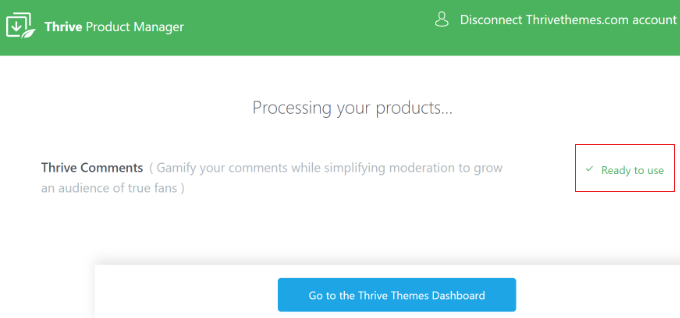
Cuando la instalación termine, verás un mensaje que dice ‘Listo para usar’.
Simplemente haz clic en el botón ‘Ir al panel de Thrive Themes’ en la parte inferior.
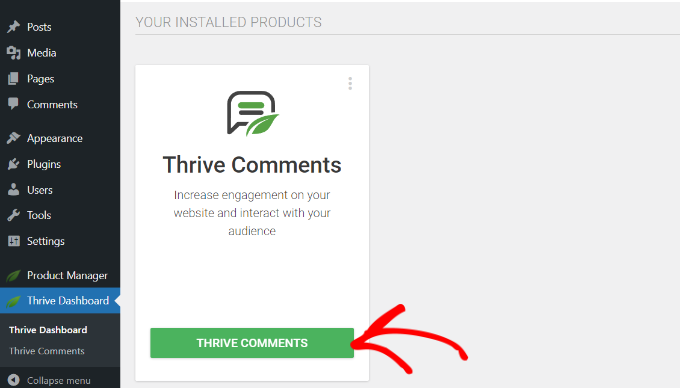
Ahora verás todos tus plugins instalados en la suite.
Haz clic en el botón ‘Thrive Comments’ para empezar a usar el plugin.
En la siguiente página, abre el menú ‘Configuración General’.
Luego, activa la sección Thrive Comments para todo tu sitio web y marca la casilla que dice ‘Habilitar consentimiento GDPR’.
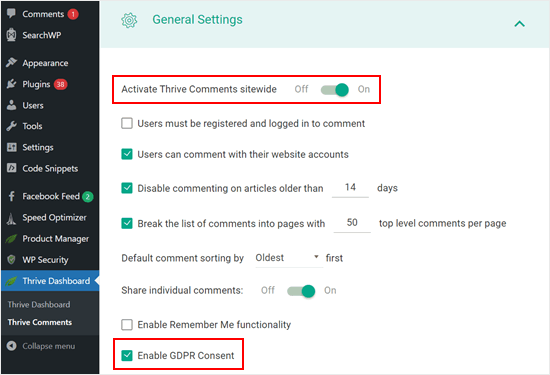
Con eso hecho, puedes previsualizar tu sección de comentarios.
Como puedes ver, el formulario de comentarios predeterminado ha sido reemplazado y ahora hay una casilla de consentimiento que dice: ‘Al usar este formulario, aceptas el almacenamiento y manejo de tus datos por parte de este sitio web’.
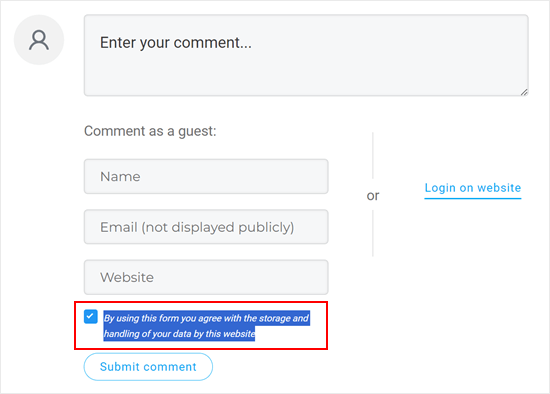
Eso es todo. Además, siéntete libre de experimentar con otras configuraciones de Thrive Comments para mejorar aún más tu sección de comentarios.
Por ejemplo, puedes permitir que los usuarios se suscriban a los comentarios de WordPress y notificarles sobre respuestas a sus comentarios.
Ahora, entendemos si sientes que usar un plugin de comentarios de pago solo para agregar esta casilla parece excesivo.
En ese caso, te recomendamos probar los siguientes dos métodos. Ambos implican algo de codificación personalizada, pero te guiaremos a través del proceso para que puedas agregar la casilla de privacidad con éxito, incluso si no tienes experiencia en codificación.
Nota: Antes de seguir los tutoriales a continuación, te recomendamos encarecidamente hacer una copia de seguridad de tu sitio web por si acaso hay errores inesperados. Puedes usar un plugin de copias de seguridad como Duplicator.
Método 2: Agregar una casilla de verificación GDPR a tu tema de WordPress Con código
Este método debería funcionar para la mayoría de los temas de WordPress. También mantendrá intacto el estilo y el diseño del formulario de tu tema.
Primero, necesitas conectarte a tu sitio de WordPress usando un cliente FTP como FileZilla, o puedes usar el administrador de archivos de tu cPanel de alojamiento de WordPress. Si eres cliente de SiteGround, entonces puedes usar el administrador de archivos en el panel de Site Tools.
Si esta es tu primera vez usando FTP, entonces puedes ver nuestra guía completa sobre cómo conectarte a tu sitio usando FTP.
Una vez que estés conectado, necesitas ir a /wp-content/themes/ y abrir la carpeta de tu tema actual de WordPress.
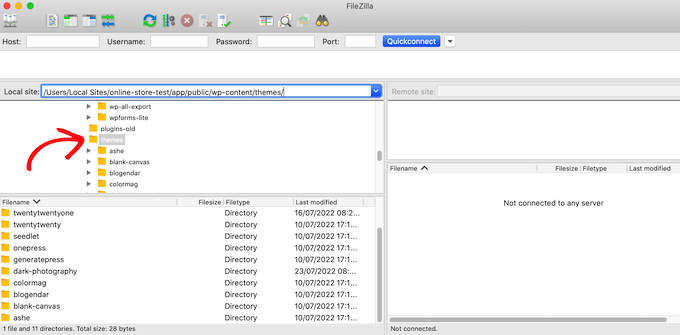
Necesitarás encontrar el código que está anulando el formulario de comentarios predeterminado de WordPress. Normalmente, encontrarás esto en el archivo comments.php o functions.php en la carpeta de tu tema.
Después de abrir uno de estos archivos, busca cualquier código que tenga el filtro comment_form_default_fields. Los temas usan este filtro para anular el formulario de comentarios predeterminado de WordPress.
Tendrá líneas para todos los campos de tu formulario de comentarios. Cada tema es diferente, pero aquí tienes un ejemplo del código que buscas:
$comments_args = array(
            // change the title of send button
            'label_submit'=> esc_html(__('Post Comments','themename')),
            // change the title of the reply section
            'title_reply'=> esc_html(__('Leave a Comment','themename')),
            // redefine your own textarea (the comment body)
            'comment_field' => '
            <div class="form-group"><div class="input-field"><textarea class="materialize-textarea" type="text" rows="10" id="textarea1" name="comment" aria-required="true"></textarea></div></div>',

            'fields' => apply_filters( 'comment_form_default_fields', array(
                'author' =>'' .
                  '<div><div class="input-field">' .
                  '<input class="validate" id="name" name="author" placeholder="'. esc_attr(__('Name','themename')) .'" type="text" value="' . esc_attr( $commenter['comment_author'] ) .
                  '" size="30"' . $aria_req . ' /></div></div>',

                'email' =>'' .
                  '<div><div class="input-field">' .
                  '<input class="validate" id="email" name="email" placeholder="'. esc_attr(__('Email','themename')) .'" type="email" value="' . esc_attr(  $commenter['comment_author_email'] ) .
                  '" size="30"' . $aria_req . ' /></div></div>',

                'url' =>'' .
                  '<div class="form-group">'.
                  '<div><div class="input-field"><input class="validate" placeholder="'. esc_attr(__('Website','themename')) .'" id="url" name="url" type="text" value="' . esc_attr( $commenter['comment_author_url'] ) .
                  '" size="30" /></div></div>',
                )
            ),
        );

    comment_form($comments_args);   ?>
En este código, notarás que el filtro comment_form_default_fields se utiliza para modificar los campos de autor, correo electrónico y URL.
Muestra cada campo usando el siguiente formato:
'fieldname' => 'HTML code to display the field',
'anotherfield' => 'HTML code to display the field',
Ahora, agregaremos el campo de casilla de verificación de opción de privacidad de comentarios al final del bloque de código antes de la línea comment_form($comments_args); ?> .
Así es como debería verse el código ahora, pero puedes simplemente copiar y pegar el código del comentario // Ahora agregaremos nuestra nueva opción de casilla de verificación de privacidad:
$comments_args = array(
            // change the title of send button
            'label_submit'=> esc_html(__('Post Comments','themename')),
            // change the title of the reply section
            'title_reply'=> esc_html(__('Leave a Comment','themename')),
            // redefine your own textarea (the comment body)
            'comment_field' => '
            <div class="form-group"><div class="input-field"><textarea class="materialize-textarea" type="text" rows="10" id="textarea1" name="comment" aria-required="true"></textarea></div></div>',

            'fields' => apply_filters( 'comment_form_default_fields', array(
                'author' =>'' .
                  '<div><div class="input-field">' .
                  '<input class="validate" id="name" name="author" placeholder="'. esc_attr(__('Name','themename')) .'" type="text" value="' . esc_attr( $commenter['comment_author'] ) .
                  '" size="30"' . $aria_req . ' /></div></div>',

                'email' =>'' .
                  '<div><div class="input-field">' .
                  '<input class="validate" id="email" name="email" placeholder="'. esc_attr(__('Email','themename')) .'" type="email" value="' . esc_attr(  $commenter['comment_author_email'] ) .
                  '" size="30"' . $aria_req . ' /></div></div>',

                'url' =>'' .
                  '<div class="form-group">'.
                  '<div><div class="input-field"><input class="validate" placeholder="'. esc_attr(__('Website','themename')) .'" id="url" name="url" type="text" value="' . esc_attr( $commenter['comment_author_url'] ) .
                  '" size="30" /></div></div>',

// Now we will add our new privacy checkbox opt-in

                'cookies' => '<p class="comment-form-cookies-consent"><input id="wp-comment-cookies-consent" name="wp-comment-cookies-consent" type="checkbox" value="yes"' . $consent . ' />' .
                                             '<label for="wp-comment-cookies-consent">' . __( 'Save my name, email, and website in this browser for the next time I comment.' ) . '</label></p>',
                )
            ),
        );

    comment_form($comments_args);   ?>
Después de hacer este cambio, asegúrate de guardar y subir el archivo de vuelta a tu cuenta de hosting de WordPress.
Cuando hayas terminado, puedes visitar tu blog de WordPress para ver los cambios en acción.
Método 3: Reemplaza el formulario de comentarios de tu tema con el formulario predeterminado de WordPress
Este método simplemente reemplaza el formulario de comentarios de tu tema con el formulario de comentarios predeterminado de WordPress.
Este método puede cambiar la apariencia del formulario de comentarios, por lo que no es el mejor método si deseas mantener el estilo y el diseño del formulario. Sin embargo, después de realizar este cambio, siempre puedes estilizar tu formulario de comentarios usando CSS personalizado.
Al igual que en el método anterior, el primer paso es conectarte a tu servidor usando FTP o abrir el administrador de archivos de tu host.
Después de eso, abre el archivo comments.php y busca una línea con la función comment_form(). Tu tema tendrá un argumento, función o plantilla definida que utiliza para cargar el formulario de comentarios personalizado de tu tema. La línea comment_form se verá algo así:
<?php comment_form( custom_comment_form_function() ); ?>
Necesitarás reemplazar esta línea con la siguiente:
<?php comment_form(); ?>
Una vez que hayas hecho eso, guarda tus cambios.
Ahora, si visitas tu sitio web, verás el formulario de comentarios predeterminado de WordPress con la casilla de verificación de opción de privacidad de comentarios.
Consejo adicional: Mejora el cumplimiento de GDPR con MonsterInsights y WPConsent
Habilitar una casilla de verificación de opción de privacidad de comentarios es una forma de hacer que tu sitio web cumpla más con el GDPR. Si recopilas otros datos y quieres asegurarte de que tu sitio web cumpla con el GDPR, te recomendamos instalar MonsterInsights.
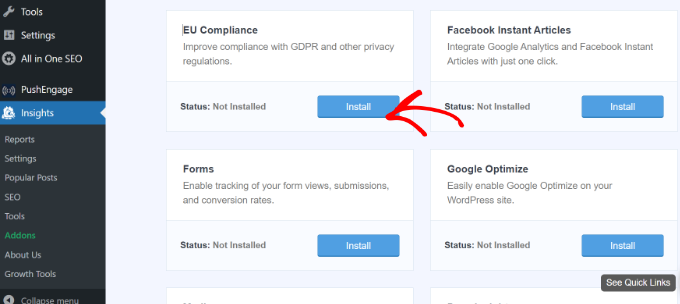
MonsterInsights es un plugin que facilita la conexión de tu sitio web con Google Analytics. No solo eso, tiene un complemento de Cumplimiento de la UE para que tu seguimiento cumpla con el GDPR.
Con esto, MonsterInsights esperará el consentimiento del usuario para rastrear sus actividades en lugar de hacerlo cuando llegan a tu sitio.
Para más información sobre MonsterInsights, puedes leer nuestra reseña de MonsterInsights.
Otra herramienta esencial para el cumplimiento del GDPR es WPConsent, que se encarga de la gestión del consentimiento de cookies en todo tu sitio web. Es uno de los mejores plugins de WordPress para el cumplimiento del GDPR del mercado.
Este plugin escanea automáticamente toda tu instalación de WordPress para detectar cookies de scripts de terceros, funciones principales de WordPress y plugins, incluso encontrando cookies ocultas que podrías no conocer.
Una vez detectado, puedes crear automáticamente un popup de consentimiento de cookies personalizado que evita que estos scripts rastreen la actividad del usuario hasta que se otorgue permiso explícito.

Usar tanto MonsterInsights como WPConsent junto con tu casilla de verificación de privacidad de comentarios crea un sistema integral de cumplimiento de GDPR que te protege a ti y a tus usuarios.
Esperamos que este artículo te haya ayudado a aprender cómo agregar la casilla de opción de privacidad de comentarios de GDPR en WordPress. También te puede interesar nuestra guía para principiantes sobre cómo moderar comentarios en WordPress y nuestro artículo sobre cómo permitir a los usuarios reportar comentarios inapropiados en WordPress.
Si te gustó este artículo, suscríbete a nuestro canal de YouTube para obtener tutoriales en video de WordPress. También puedes encontrarnos en Twitter y Facebook.


Jiří Vaněk
Vivo en la República Checa, que está sujeta a la ley GDPR y es una ley bastante compleja y completa. En lo que respecta a los sitios web, ahora tenemos que ser muy, muy cuidadosos sobre cómo manejamos los datos que el usuario envía al sitio web. Estas guías son geniales porque ayudan a las personas a preparar mejor su sitio web para esta ley y a no olvidar nada. Gracias por la guía, realmente hay que tener mucho cuidado con el GDPR y estas guías son de gran ayuda.
Kris
Lo que no entiendo o quizás me estoy perdiendo es cómo poner la casilla de Política de Privacidad como la que tienes en tus comentarios. Algo como, "al usar este formulario aceptas que recopilemos y almacenemos datos según nuestra política de privacidad". Nadie parece tener esta información, solo la casilla de comentario habitual que es fácil de hacer.
Soporte de WPBeginner
Si entiendo lo que buscas hacer, puedes cambiar el texto editando el texto en la línea 29 de nuestro código anterior que actualmente dice 'Guarda mi nombre, correo electrónico y sitio web en este navegador para la próxima vez que comente.' al reemplazar, asegúrate de mantener las comillas simples.
Administrador
Stephen Ho
¡Gracias!
mike carpenter
Logré que esto funcionara y verifiqué que la cookie se creara como se esperaba, pero cuando navego fuera de la página del blog y regreso a ella, esperaba que los valores del formulario se autocompletaran con los valores almacenados en la cookie, ¡pero esto no sucede y los campos quedan en blanco! Creo que asumí que la línea $commenter = wp_get_current_commenter(); y las líneas subsiguientes esc_attr( $commenter[‘comment_author_url’] ) etc. recuperarían los valores de campo almacenados de la cookie. ¿Me he perdido algo, o estoy entendiendo mal la forma en que se supone que funciona la casilla de verificación?
Sefket
¿Tienes uno para formularios de contacto?
Soporte de WPBeginner
Hola Sefket,
Por favor, consulta nuestro artículo sobre cómo crear formularios que cumplan con el RGPD en WordPress.
Administrador
Tara
Normalmente encuentro muy buena información en tu sitio, pero tengo que decir que en este caso, esto no es exacto para estar listo para el RGPD, necesitas obtener el consentimiento para guardar sus datos para el comentario/correo electrónico/nombre/ip, etc. en la base de datos de tu sitio web, independientemente de si eligen guardar sus datos en una cookie para comentar más rápido en un momento posterior.
Usé CSS para ocultar esta marca de verificación e instalé un plugin de RGPD, desafortunadamente ahora ese plugin no está avisando a las personas que tienen que marcar para dejar su comentario, así que ahora estamos perdiendo comentarios. Lo que también es frustrante es que aparece para todos los usuarios sin opción de mostrar solo para la UE. Otra frustración es que al ocultar la marca de verificación agregada por WordPress, ahora los usuarios no ven "tu comentario está en espera de moderación".
parijatak ayurveda
Gracias por compartir la información.
Mirko
¿Qué pasa si no quiero que los comentaristas almacenen una cookie con sus datos personales en absoluto? ¿Hay alguna forma de desactivar todo el proceso y ocultar este consentimiento de cookies para siempre?
Euforia
¿Qué pasa si el código ya está en mi tema? Todavía no aparece, pero tiene todos los campos allí.
Peter
Gracias por la guía,
pero todo lo descrito no parece ser posible si es una página de wordpress.com (gratis/sin plan).
No hay actualizaciones y no hay nada en la configuración para agregar una casilla de verificación de consentimiento o cualquier otro código específico. Lo único en la configuración, que implica una posibilidad de lograr el cumplimiento del RGPD, es agregar una breve información, que los datos se proporcionarán y se almacenarán en automaticc con un enlace a su descargo de responsabilidad de privacidad. Además, no se pueden usar complementos ni acceso a través de FTP.
—
¿Alguna sugerencia sobre cómo incluir una casilla de verificación de consentimiento para los usuarios que solo utilizan la solución gratuita de wordpress.com?
¿O ni siquiera es necesario debido al hecho de que el acceso del usuario al espacio web solo es posible a través de la página de configuración de WordPress, bastante limitada, o por cualquier otro medio?
Soporte de WPBeginner
Hola Peter,
Por favor, contacta con el soporte de WordPress.com, ellos podrán ayudarte mejor.
Administrador
Bryan
Hola, pude agregar esto en mi tema y funciona, pero hay un problema. Marco la casilla de consentimiento. La próxima vez, mi nombre y correo electrónico se rellenan, pero tengo que marcar la casilla de consentimiento de nuevo. En el tema predeterminado de WP, si marco recordar nombre, la casilla de los campos de correo electrónico una vez, la próxima vez viene marcada por defecto. ¿Hay un problema con mi tema o este código se puede mejorar?
Jim
¡Hola! ¡Gran instrucción! También estoy tratando de que algunos sitios cumplan con el RGPD.
Tenía curiosidad sobre los sitios web de Genesis, no pude encontrar este código ni en comments.php ni en functions.php, así que primero intenté cargar el código del Método 1 a través de Simple Hooks después del formulario de comentarios, luego usé el código que le diste a Mateja en mi functions.php. Ambos me dieron una casilla de verificación pero... ¿se supone que debe hacer algo más? ¿Hay algún lugar donde pueda ver si un comentarista ha marcado esta casilla? Gracias de antemano por cualquier ayuda.
Jim
Elisa
Desafortunadamente no puedo aplicar ninguna de las soluciones mencionadas ya que no se encuentra ningún CSS. Contacté a la compañía de la que obtuve mi tema, espero que puedan ayudar.
Alexander
Hola,
El Método 1 y el Método 2 no me sirvieron.
No pude encontrar el código que necesitaba editar.
Estoy usando la plantilla "publisher" (themeforest).
¿Me puedes decir cómo configurar la plantilla "publisher"?
Gracias
Soporte de WPBeginner
Hola Alexander,
Desafortunadamente, no es posible que ofrezcamos una solución para cada tema, ya que utilizan métodos diferentes. Lo mejor sería contactar al desarrollador de tu tema para obtener soporte.
Administrador
Samantha
También recibí el mensaje "Undefined variable: consent" cuando intenté hacer esto, aunque la casilla de verificación apareció junto con el mensaje.
Vicdayo
¿Qué pasa si estoy usando el sistema de comentarios de Facebook en mi blog?
Mateja
Hola, deshabilité el formulario de comentarios de Jetpack y ahora puedo ver la casilla de verificación. Todo bien. PERO, no me gusta cómo se ve el texto... guarda mi nombre, dirección, etc.... Me gustaría insertar mi propio texto con un enlace a la política de privacidad... ¿es posible? ¿y cómo lo hago? Gracias
Soporte de WPBeginner
Hola Mateja,
Puedes probar este código en el archivo functions.php de tu tema. Podrás cambiar el texto de la etiqueta para la casilla de verificación de consentimiento.
function wpb_comments_privacy($arg) { $arg['cookies'] = '<p class="comment-form-cookies-consent"><input id="wp-comment-cookies-consent" name="wp-comment-cookies-consent" type="checkbox" value="yes"' . $consent . ' />' . '<label for="wp-comment-cookies-consent">' . __( 'Save my name, email, and website in this browser for the next time I comment.' ) . '</label></p>'; return $arg; } add_filter('comment_form_default_fields', 'wpb_comments_privacy');1-click Use in WordPress
Administrador
Inayatali
Muchas gracias.
Soporte de WPBeginner
You’re welcome
Kamran Khan
Gracias, señor. He aplicado el primer método. Funciona, pero después de insertar el código, algunos elementos del código también se muestran con la casilla de verificación y el mensaje, lo cual eliminé manualmente. ¿Está bien? Ahora funciona bien, pero la casilla de verificación aparece encima del mensaje y no en línea. ¿Cómo puedo poner en línea tanto la casilla de verificación como el mensaje?
Soporte de WPBeginner
Hola Kamran,
No, probablemente falte algo en el código. Lo más probable es una comilla o una etiqueta de inicio o fin de php. Revisa cuidadosamente el código para asegurarte de que todas las comillas estén cerradas y el código esté formateado correctamente.
Para el estilo, necesitarás usar CSS personalizado para ajustar el campo.
Administrador
Carey
Ok, soy ignorante sobre cómo agregar código. Estoy usando el tema K2, que no parece tener el formulario de comentarios actualizado. Instalé Code Snippets, pero no entiendo, ¿sabe dónde poner el fragmento? Miré el código de comentarios en los archivos del tema, pero no se parece en nada a tu ejemplo aquí. De hecho, tiene 189 líneas de código para comentarios. ¿Solo agrego tu código de "nueva opción de casilla de verificación de privacidad" a snippets y hago clic en activar y se inserta en el lugar correcto? Tan confundido...
Soporte de WPBeginner
Hola Carey,
Si te resulta difícil editar los archivos del tema, pídele a tu autor del tema que publique una actualización.
Administrador
Brian Sanderson
¡Hola! No tengo el código anterior en tu artículo, tal cual, pero sí tengo el siguiente código en el archivo comments.php. El código incluye los 4 campos;
¿Podrías por favor aconsejarme cómo se podría editar mi código? Gracias de antemano.
Soporte de WPBeginner
Hola Brian,
Depende del resto del código en tu tema. Desafortunadamente, no podemos cubrir todas las formas posibles en que un tema puede mostrar un formulario de comentarios. Deberás contactar a tu autor del tema para obtener soporte.
Administrador
Mark Corder
Thanks for this – I know it was quick work on your part too!
Thomas
Intenté usar esto y recibí el siguiente aviso en lugar de la casilla de verificación:
Variable indefinida: consent
Entonces, ¿no la definiste? ¿Cómo lo hago?
Mark Corder
Vaya… A mí sí me está funcionando. Solo necesito alinear la casilla y la etiqueta para que coincidan con el resto de mi formulario…
Thomas
Solo para que todos sepan, abrí el archivo comments-template.php de la carpeta wp-includes y encontré esto:
$consent = empty( $commenter[‘comment_author_email’] ) ? ” : ‘ checked=”checked”‘;
Agregar esto a lo anterior define el consentimiento y, al hacerlo, eliminará el aviso si tienes la depuración activada.
Tienes que agregarlo antes de $comments_args = array. Todo esto depende de cómo tengas configurada tu plantilla.
Espero que ayude.