Un menú bien diseñado puede marcar una gran diferencia. Puede mejorar el aspecto general de su sitio, facilitar que los visitantes encuentren lo que buscan e incluso animarles a hacer clic en determinadas páginas.
Aquí en WPBeginner, hemos visto todo tipo de formas creativas para dar estilo a los menús, por lo que queremos compartir lo que funciona mejor para diferentes situaciones.
En este artículo, le mostraremos cómo dar estilo a su menú de navegación de WordPress de 5 maneras diferentes.
¿Por qué estilizar el menú de navegación de WordPress?
El menú de navegación de WordPress es la hoja de ruta de su sitio web y guía a los visitantes a las páginas más importantes. Aparece en la parte superior de la mayoría de los sitios web, por lo que es un lugar privilegiado para captar la atención e influir en la forma en que los usuarios exploran su contenido.
Estilizar el menú de navegación va más allá de darle un aspecto atractivo. Puede mejorar significativamente la experiencia de usuario de su sitio web y, a su vez, impulsar su optimización para motores de búsqueda (SEO).
Si el diseño de su menú es difícil de usar, los visitantes pueden tener dificultades para encontrar lo que buscan y marcharse frustrados. En cambio, un menú claro y visualmente atractivo puede animarles a hacer clic en las distintas secciones y pasar más tiempo en su sitio.
Como resultado, puede aumentar las visitas a su sitio y reducir su tasa / tarifa de rebote.
Esta guía desglosará diferentes métodos para dar estilo a su menú de navegación, dependiendo de su tema de WordPress y su nivel de comodidad. Puede utilizar los enlaces rápidos a continuación para navegar a través de este tutorial y encontrar el método que mejor funcione para usted:
- Method 1: Customize Your Navigation Menu With Full-Site Editor (Block Themes)
- Method 2: Customize Your Navigation Menu With Theme Customizer (Classic Themes)
- Method 3: Customize Your Navigation Menu With a Page Builder Plugin (Recommended)
- Method 4: Customize Your Navigation Menu With Visual CSS Editor (More Customizable)
- Method 5: Customize Your Navigation Menu With Code (Advanced)
Método 1: Personalice su Menú de Navegación con el Editor de Sitio Completo (Temas en Bloque)
Si estás usando un tema de bloques y quieres dar estilo al menú de navegación de tu sitio usando el Full-Site Editor, este es el método para ti.
En primer lugar, diríjase a su escritorio de WordPress y vaya a Apariencia ” Editor.
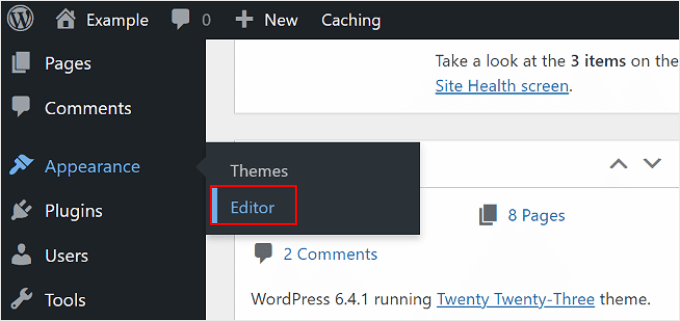
Aquí verás opciones para personalizar distintas partes del tema de tu bloque.
Sigue adelante y haz clic en “Navegación”.
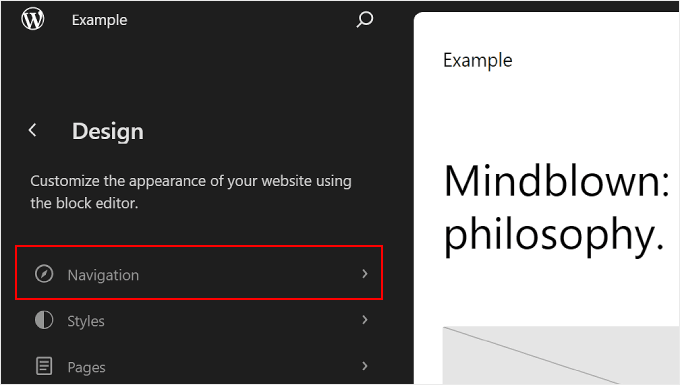
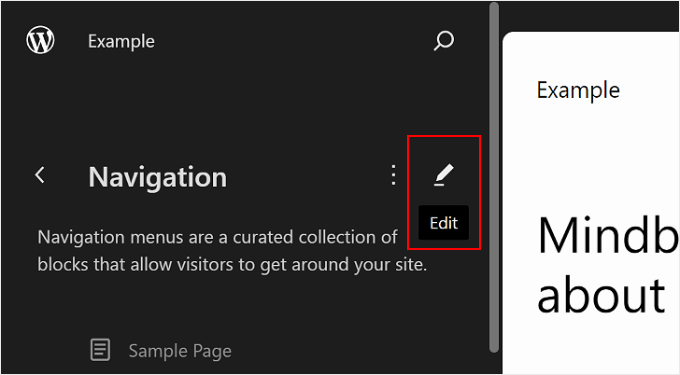
En la página siguiente, haga clic en el icono del lápiz “Editar”.
Se abrirá el editor de bloques, donde podrá editar su bloque de navegación.
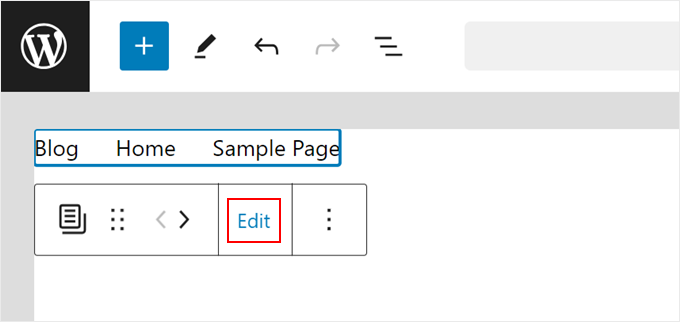
Una vez en el editor de bloques, haga clic en el bloque “Lista de páginas” que muestra las páginas de su sitio web WordPress como elementos del menú de navegación.
A continuación, haga clic en “Editar”.
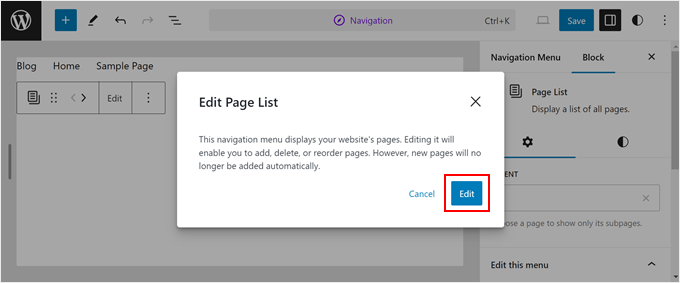
Aparecerá una ventana emergente que le indicará que ya puede editar el bloque Lista de páginas. Puede editar, quitar / eliminar, reordenar y añadir nuevos elementos / artículos al bloque.
Haga clic en “Editar” para continuar.
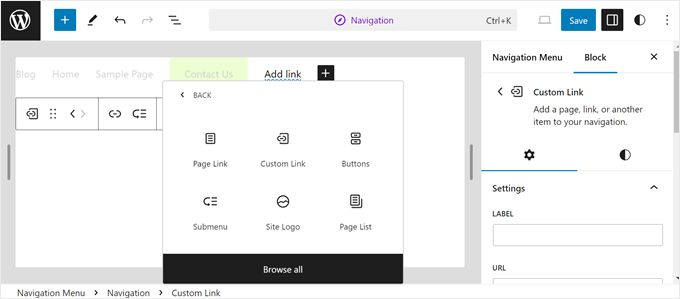
El editor de bloques para el menú de navegación funciona como cuando editas una página o una entrada. No dudes en añadir otros elementos al menú, como enlaces personalizados, un botón de llamada a la acción, un formulario de búsqueda, el logotipo del sitio y muchos más.
Si desea profundizar en la gestión de menús con el editor completo del sitio, marque / compruebe la sección sobre cómo editar su menú de navegación en nuestra guía de edición completa del sitio. En esa sección también se habla de crear submenús.
Ahora, pasemos a la estilización. Haz clic en cualquier bloque para empezar.
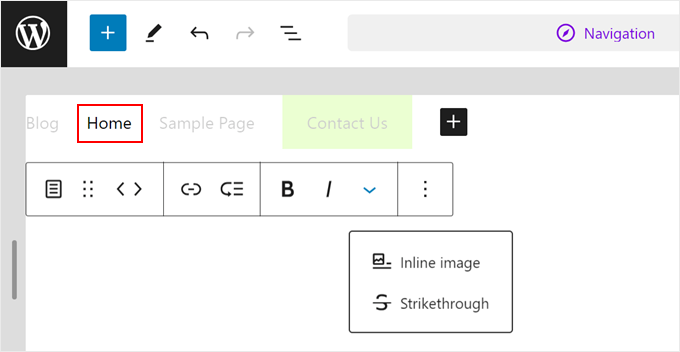
Dependiendo del bloque, la barra de herramientas puede ofrecer algunas opciones de personalización. Por ejemplo, si selecciona un enlace de página, puede ponerlo en negrita, cursiva, tacharlo y reordenarlo si es necesario.
Puede utilizar estas herramientas para destacar un elemento del menú del resto.
En el panel de ajustes de la derecha, cambia a la pestaña “Bloque” y, debajo de ella, ve a la pestaña “Estilos”.
Aquí puede personalizar el color, la tipografía, las dimensiones, los bordes y las sombras de su bloque.
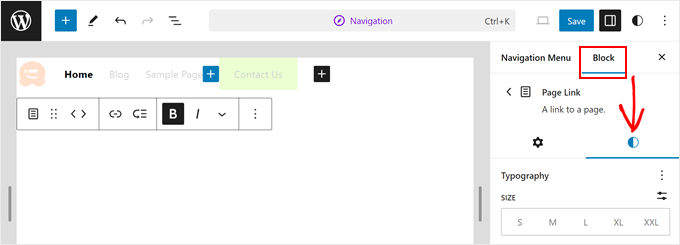
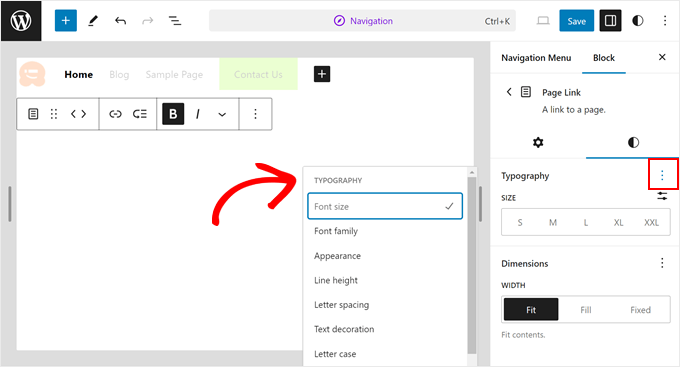
Los bloques tienden a tener ajustes de Estilos por defecto. Por ejemplo, si está enlazando una página, es posible que solo vea opciones como “Tamaño de fuente” y “Anchura”.
Pero no te preocupes. Basta con hacer clic en el menú de tres puntos situado junto a estas opciones para activar más posibilidades de personalización, como cambiar la familia de fuentes y el espaciado entre letras.
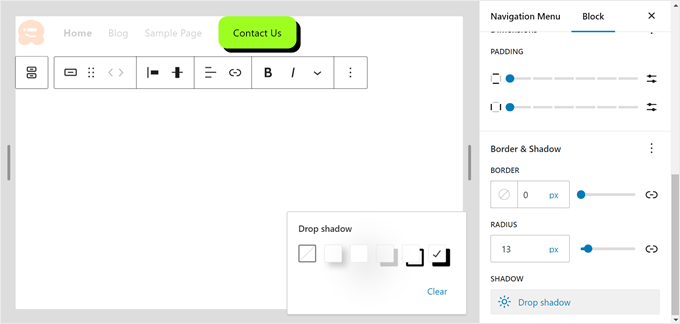
Del mismo modo, si tiene un bloque Botón en su menú de navegación, al hacer clic en él aparecerán opciones para personalizar su estilo, texto, color de fondo, tipografía, dimensiones, borde e incluso sombra.
Puede leer nuestra guía sobre cómo añadir un botón de llamada a la acción para obtener más información.
Si quieres cambiar el color de fondo de tu menú de navegación, tendrás que hacerlo editando la plantilla de cabecera de tu tema.
Para abrirlo, basta con hacer clic en el campo de búsqueda de comandos de la parte superior que dice ‘Navegación’. A continuación, escribe “Cabecera” y pulsa la tecla Intro.

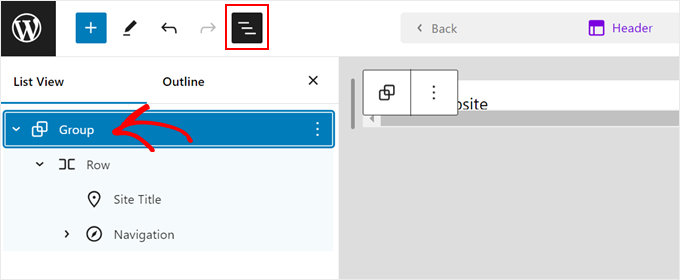
Ahora, abra la vista de lista y seleccione Grupo.
Este grupo está formado por el título del sitio y el menú de navegación de su cabecera.
A continuación, abra la pestaña “Estilos” de la barra lateral de ajustes del bloque y haga clic en “Fondo” en la sección Color.
Después, sólo tiene que elegir un color de fondo para su plantilla de cabecera.
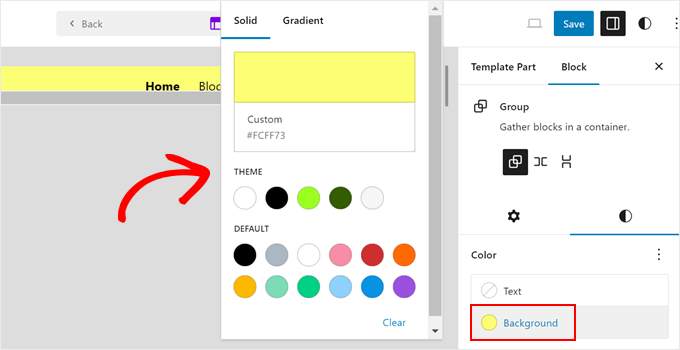
Una vez que esté satisfecho con el estilo de su menú de navegación, simplemente haga clic en el botón “Guardar” y su nuevo menú y cabecera aparecerán en su blog o sitio de WordPress.
Este es el aspecto de nuestro menú de navegación en nuestro sitio de demostración:
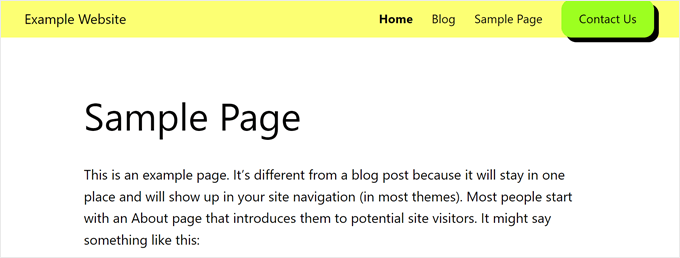
Tenga en cuenta que las opciones de estilo que tendrá dependerán de las opciones de estilo generales de su tema específico.
Si desea personalizar los estilos globales de su tema, haga clic en el botón “Estilos” situado en la esquina superior derecha.
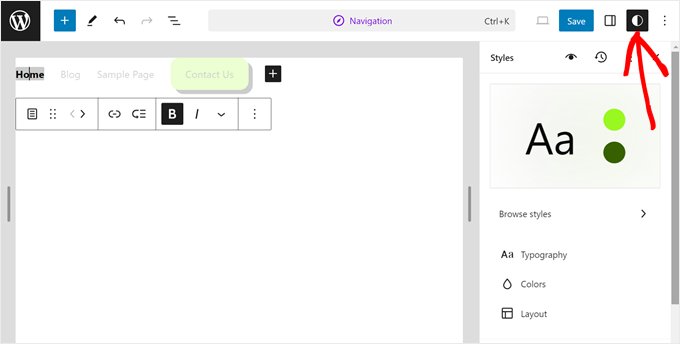
Desde aquí, puede cambiar la tipografía, los colores y la disposición de todo el sitio web.
Nota: Recuerde que los cambios que realice aquí afectarán no solo a su menú de navegación, sino también a otras partes de su tema.
Para más información, marque / compruebe la sección sobre cómo cambiar los estilos globales de su sitio web en la guía de edición completa del sitio.
Método 2: Personalice su Menú de Navegación con el Personalizador de Temas (Temas Clásicos)
Este método es para usuarios con temas clásicos de WordPress que quieran personalizar su menú de navegación utilizando el Personalizador de temas integrado.
Al igual que con el método anterior, nos centraremos en dar estilo a la apariencia del menú en lugar de gestionar los propios elementos del menú.
Si quieres aprender a crear menús y gestionarlos en temas clásicos, comprueba nuestra guía sobre cómo añadir un menú de navegación en WordPress. Cubre la creación de menús con el Personalizador, asignándolos a diferentes ubicaciones de menú, y la adición de menús como widgets.
Para utilizar el Personalizador de temas, diríjase a su escritorio de WordPress y vaya a Apariencia ” Personalizar.
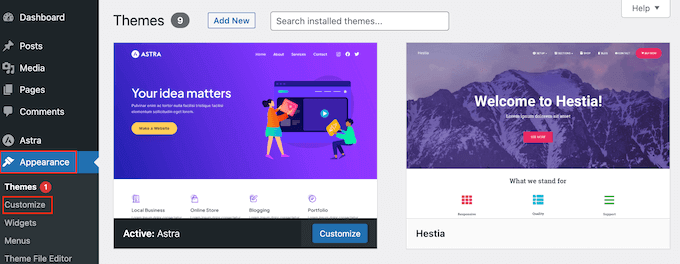
Aquí verás opciones para personalizar varios aspectos de tu tema, que dependerán del tema que estés utilizando. En la mayoría de los casos, los temas de WordPress tienen una opción de “Menús”, pero los desarrolladores de terceros también pueden añadir otros ajustes.
Por ejemplo, el tema Astra tiene un maquetador de cabeceras dedicado para personalizar el menú. Asegúrate de consultar la documentación de tu tema para ver si añade ajustes especiales para el menú.
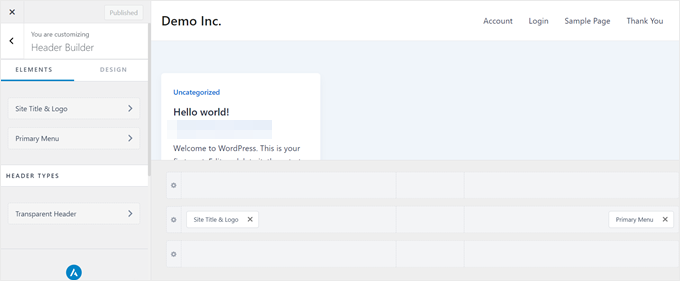
Si tu tema no tiene estas opciones de personalización, no te preocupes. Podemos personalizar el menú con CSS personalizado.
En primer lugar, haga clic en la sección “Menús”.
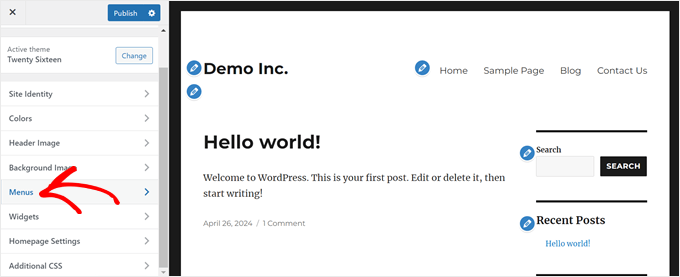
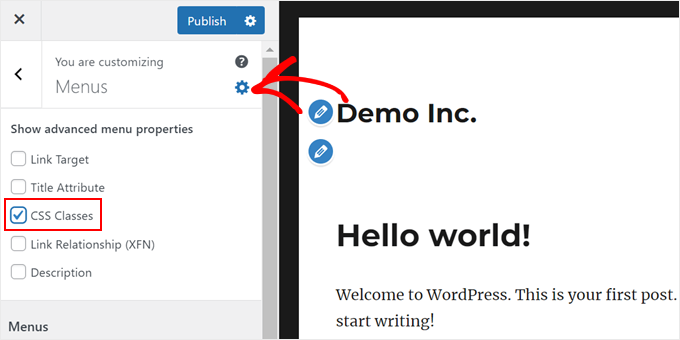
En la página siguiente, haz clic en el engranaje “Ajustes” y selecciona “Clases CSS”.
Esto le permite asignar una clase CSS única a cada elemento del menú, lo que le permitirá aplicarles un estilo individual más adelante.
A continuación, desplázate por el panel.
A continuación, abre tu menú principal.
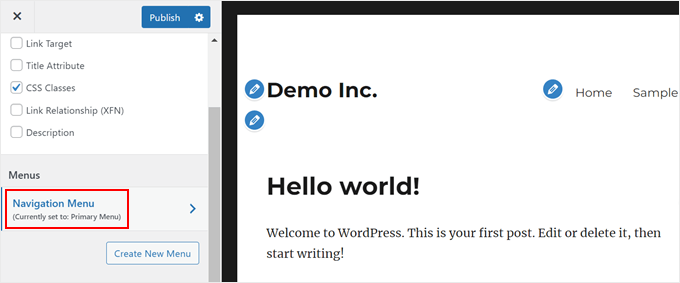
Lo que debe hacer ahora es encontrar el elemento / artículo del menú que desea modificar y hacer clic para expandirlo.
Verás una nueva opción para añadir una clase CSS personalizada. En el ejemplo siguiente, solo estamos añadiendo la clase CSS contact-us a nuestra página Contact Us.
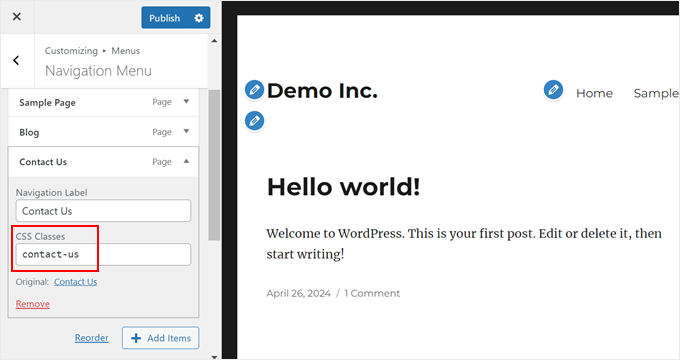
Una vez que haya asignado las clases CSS a los elementos del menú, vuelva al menú principal en el Personalizador de temas.
A continuación, haga clic en “CSS adicional”.
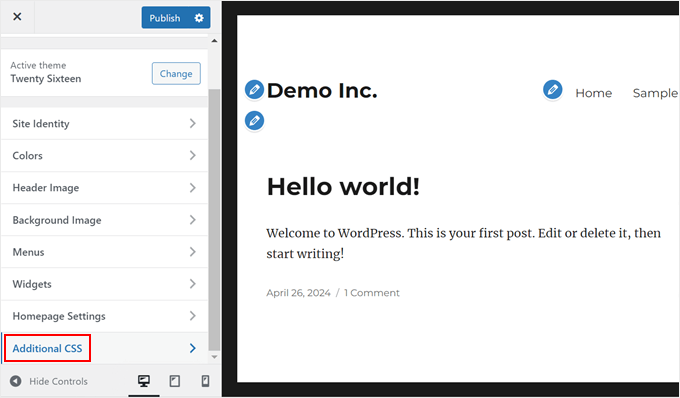
Aquí puedes añadir código CSS personalizado para dar estilo a tu menú de navegación.
Exploremos algunos ejemplos, y no dudes en cambiar las clases CSS y el código hexadecimal de colores:
Cambiar el color de fondo del elemento del menú
El siguiente fragmento de código cambia el color de fondo del elemento de menú con la clase CSS contact-us a verde (#E3FFA8) y añade esquinas redondeadas (border-radius: 5px):
1 2 3 4 | .contact-us { background-color: #E3FFA8; border-radius: 5px;} |
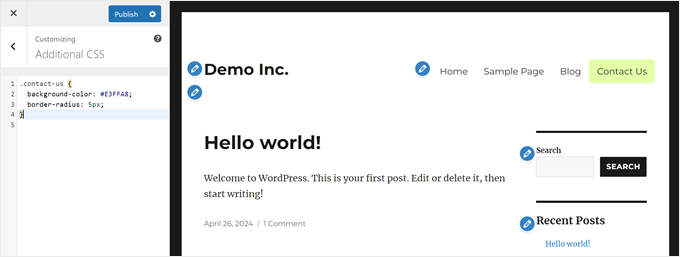
Cambiar el color por defecto del enlace del menú
Este fragmento de código cambia el color de todos los enlaces del menú principal(#primary-menu-li a) a rojo (#ff0000):
1 2 3 | .primary-menu li a { color: #ff0000; } |
Tenga en cuenta que la clase CSS para el menú principal de su tema puede ser diferente de la nuestra.

Para ver cuál es la clase CSS del menú principal de tu tema, puedes utilizar la herramienta inspeccionar alrededor de tu área de menú de navegación.
A continuación, busca un código HTML que diga ‘menú’ o ‘navigation-menu’. Al lado debe haber una clase CSS que lo defina.

Añadir efectos al pasar el cursor a los elementos del menú
Este fragmento de código se dirige a todos los elementos del menú dentro de la lista del menú principal(#primary-menu li) y añade un efecto hover:
1 2 3 4 5 | .primary-menu li a:hover { background-color: #a6e4a5; color: #666; border-radius: 5px; } |
Cuando un usuario pasa el cursor sobre el elemento del menú, el color de fondo cambia a verde claro (#a6e4a5), el color del texto cambia a gris oscuro (#666) y se añaden esquinas redondeadas (border-radius: 5px).
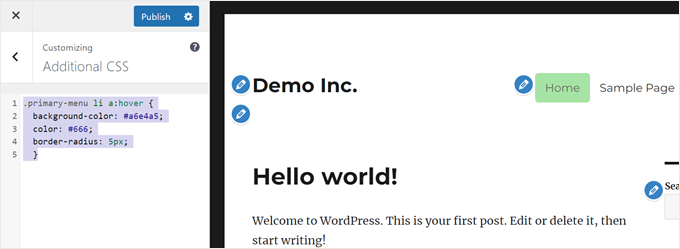
Crear menús de navegación transparentes en WordPress
Este fragmento de código CSS puede hacer que su menú de navegación sea transparente:
1 2 3 | #site-navigation { background-color:transparent; } |
Si utiliza este efecto, se fundirá con la imagen de fondo para dar a su sitio web un aspecto limpio y moderno.

Si quieres más inspiración, puedes consultar nuestras guías a continuación:
- Cómo añadir la primera y última clase CSS a los elementos del menú de WordPress
- Cómo resaltar un elemento / artículo del menú en WordPress
Recuerda, estos son sólo algunos ejemplos para empezar. Si desea utilizar estos mismos métodos, pero no puede encontrar la sección CSS adicional, echa un vistazo a nuestra guía práctica sobre cómo corregir la falta de tema Personalizador problema.
Método 3: Personaliza tu menú de navegación con un plugin maquetador de páginas (recomendado)
Este método es perfecto para quienes desean tener un mayor control sobre la apariencia de su menú de navegación, pero siguen prefiriendo una experiencia fácil de usar para principiantes. También es una gran opción si todavía estás en las primeras etapas de la construcción de su sitio web y no lo han puesto en marcha todavía.
Un plugin maquetador de páginas le permite diseñar visualmente la disposición de su sitio web utilizando la funcionalidad de arrastrar y soltar sin necesidad de escribir ningún código. Esto lo hace ideal para principiantes.
En esta sección, usaremos SeedProd como nuestro plugin maquetador de páginas. SeedProd ofrece una interfaz fácil de usar e incluye bloques y características adicionales para hacer que su menú de navegación se destaque.
Nota: Utilizaremos SeedProd Pro, ya que la característica de maquetador de temas solo está disponible en la versión Pro. Sin embargo, no dude en utilizar la versión gratuita para explorar cómo es SeedProd.
Paso 1: Instalar y activar SeedProd
En primer lugar, instale y active el plugin SeedProd en su sitio web WordPress. Puedes leer nuestra guía sobre cómo instalar un plugin de WordPress para más información.
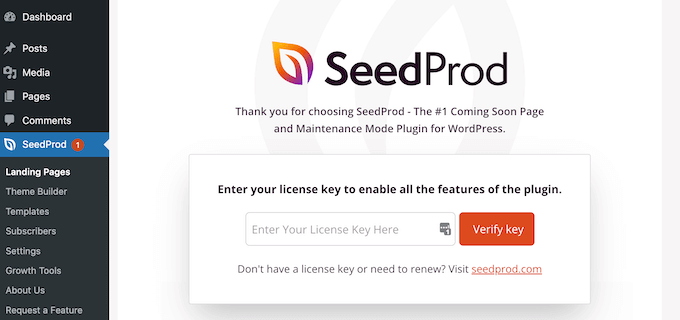
Una vez activado, vaya a SeedProd ” Ajustes desde su escritorio de WordPress. A continuación, introduzca su clave de licencia de SeedProd y haga clic en el botón “Verificar clave”.
Paso 2: Elija un kit de plantillas de temas SeedProd
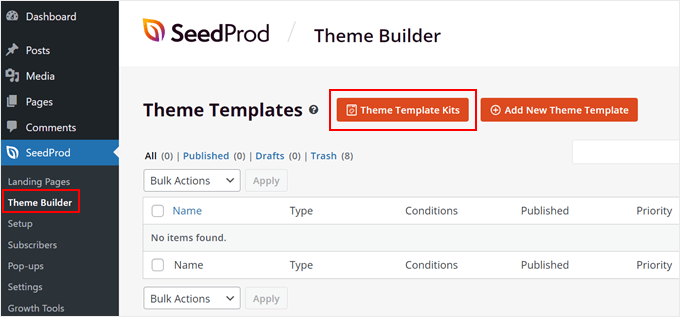
Ahora, dirígete a SeedProd ” Maquetador de temas. Aquí es donde puedes crear un tema de WordPress personalizado desde cero.
Haga clic en el botón “Kits de plantillas de temas” para navegar por una galería de plantillas prediseñadas.
Para este tutorial, utilizaremos el tema Smile Craft Medical Website Theme. Sin embargo, no dudes en elegir cualquier plantilla que se adapte a tu negocio.
Puede ver una vista previa de estos kits de plantillas de temas al hacer clic en el icono de la lupa para ver cuál se ajusta al estilo de su sitio web.
Una vez que hayas encontrado una plantilla de tema que te guste, haz clic en el icono naranja de la marca de verificación para importar las partes de la plantilla.
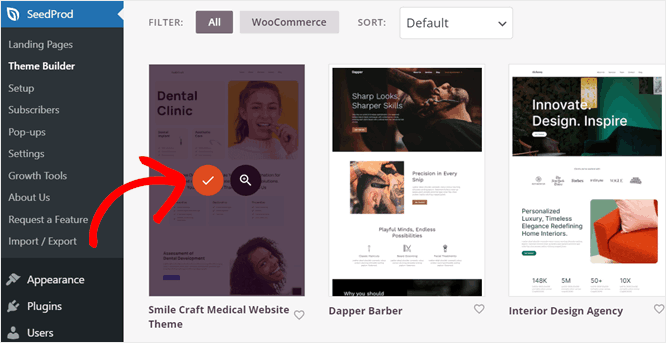
SeedProd ahora creará las secciones esenciales del sitio web como cabecera, pie de página, página de inicio, etc. Todos estos pueden ser editados visualmente utilizando el editor de arrastrar y soltar.
Paso 3: Personalizar el diseño del menú
Una vez instalada la plantilla del tema, volverá a la página del maquetador de temas.
En una plantilla de tema SeedProd, el menú de navegación se encuentra en la parte de la plantilla de cabecera.
Para editar su plantilla de cabecera, simplemente pase el cursor por encima y haga clic en el enlace “Editar diseño”. Se abrirá la plantilla en el editor de arrastrar y soltar.
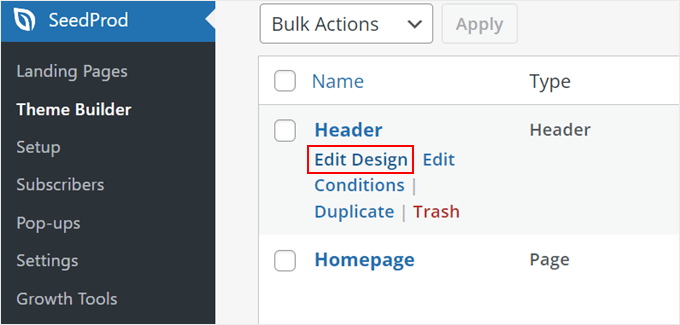
Ahora verá una sección de cabecera que consiste en el bloque Nav Menu (que es su menú de navegación) y otros bloques, dependiendo del tema.
Para editar el menú, haga clic en el bloque Menú de navegación. La barra lateral izquierda le mostrará un listado de ajustes del bloque.
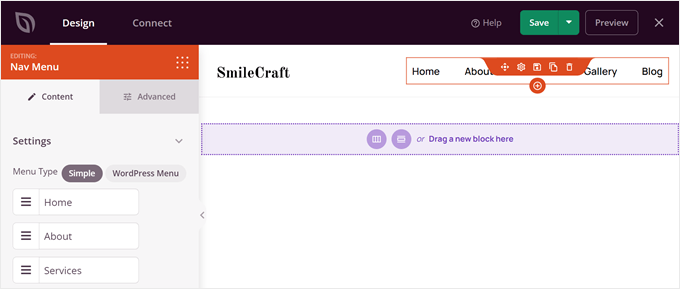
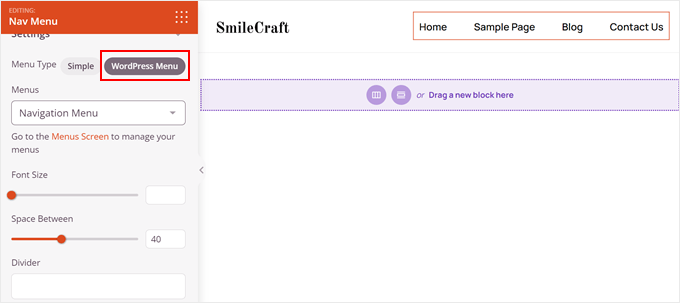
Por defecto, SeedProd utiliza el menú ‘Simple’ para crear un menú basado en la plantilla del tema que utilice. Sin embargo, también puede optar por la opción ‘Menú WordPress’ para utilizar un menú preexistente que ya haya creado utilizando el editor de menús estándar de WordPress(Apariencia ” Menús).
Veamos la diferencia entre ambos métodos. El método Simple le permite añadir, editar y eliminar enlaces directamente desde la interfaz del maquetador de páginas.
Para crear un nuevo elemento de menú, haga clic en el botón “+ Añadir nuevo artículo”.
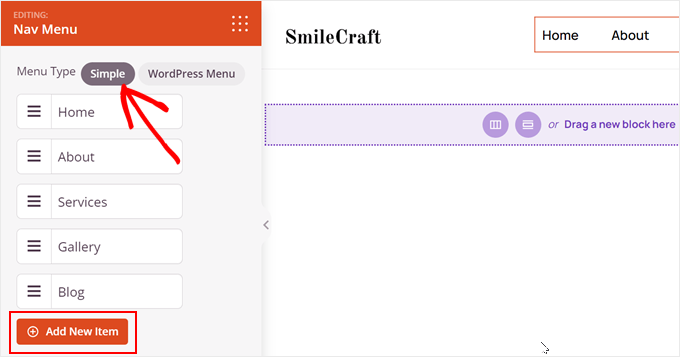
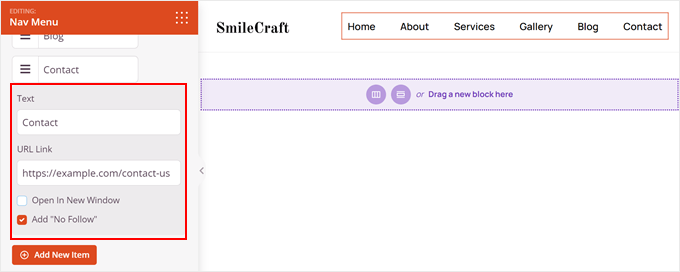
Aquí puede introducir la etiqueta de texto y la URL del enlace.
A continuación, elija abrir el enlace en una ventana nueva y añada un atributo nofollow (si es necesario). Así:
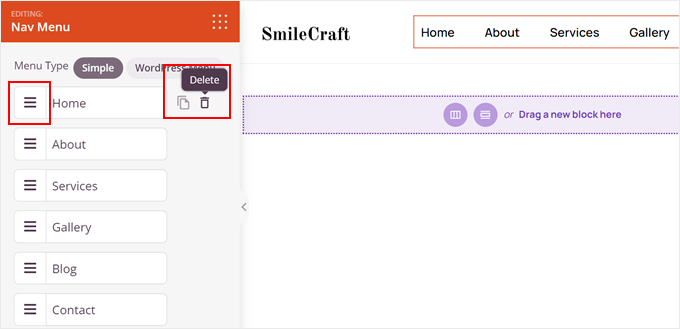
También puede reorganizar los elementos del menú haciendo clic en el botón de tres líneas situado junto a un elemento y arrastrándolo hacia arriba o hacia abajo.
Para borrar un elemento del menú, basta con pasar el cursor sobre él y hacer clic en el icono de la papelera que aparece a su lado.
El inconveniente de esta opción es que no se pueden crear menús desplegables. Por eso se llama ‘Simple’.
Por otro lado, la opción ‘Menú WordPress’ no le permite gestionar los elementos del menú directamente desde el editor de SeedProd. Tienes que hacerlo en el editor de menús.
La buena noticia es que si su menú preexistente es un menú desplegable, puede mostrarlo utilizando este método.
Sea cual sea el método que elija, puede personalizar el tamaño de letra y el espaciado entre los elementos del menú, añadir un separador de texto o ajustar la alineación.
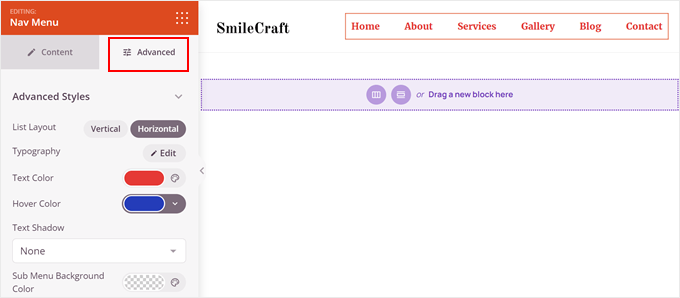
La pestaña “Avanzado” ofrece aún más opciones de personalización.
Puede cambiar la disposición de la lista de horizontal a vertical, ajustar la tipografía, modificar los colores del texto y al pasar el cursor, e incluso añadir sombras de texto.
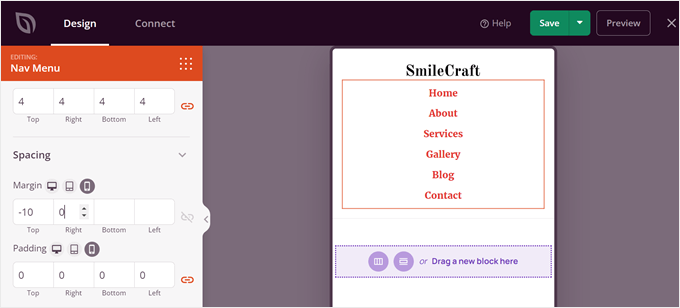
Si se desplaza hacia abajo, podrá controlar el relleno y los márgenes para dispositivos de sobremesa, tabletas y móviles.
De este modo, su menú es fácil de navegar en cualquier tamaño de pantalla.
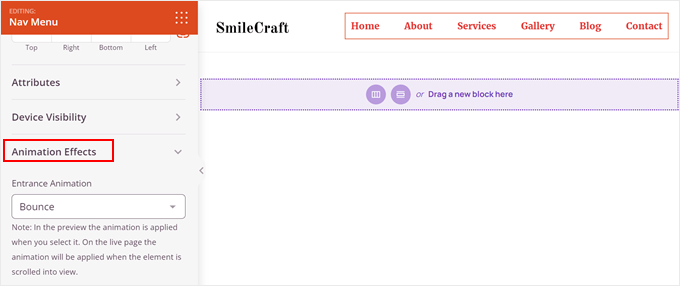
¿Quiere que su menú destaque?
SeedProd le permite añadir animaciones para una experiencia de usuario más atractiva. Puedes leer nuestra guía práctica sobre cómo añadir animaciones CSS en WordPress para más información.
Si desea añadir un nuevo botón de llamada a la acción en su barra de navegación, puede utilizar el bloque Botón de SeedProd.
Sólo tiene que abrir el buscador de bloques en la barra lateral izquierda y encontrar el bloque Botón en la barra lateral izquierda.
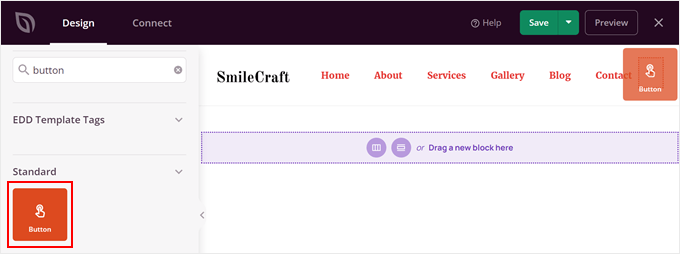
A continuación, arrastre el bloque a cualquier lugar de su cabecera.
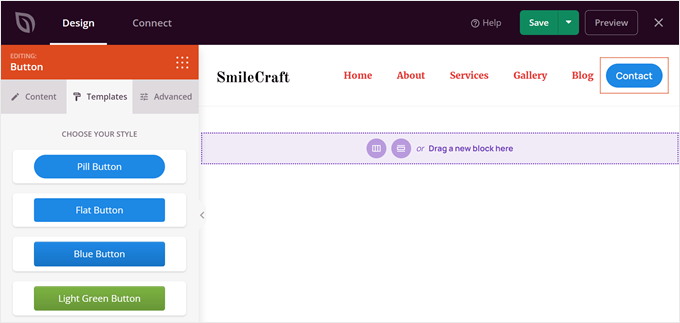
Una vez hecho esto, sólo tiene que personalizar la llamada a la acción, el enlace, el estilo y otros ajustes del botón.
También puede crear un menú fijo que permanezca en la parte superior de la página mientras el usuario se desplaza hacia abajo. Así no tendrán que subir cada vez que quieran ir a una página diferente.
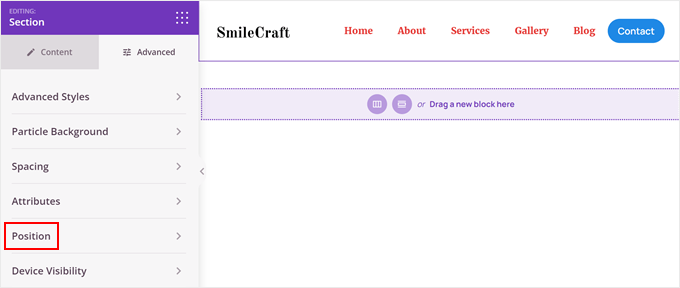
Para ello, sólo tiene que pasar el cursor por encima de la sección hasta que aparezca una línea morada y, a continuación, hacer clic en el icono del engranaje “Ajustes”.

Ahora, cambie a la pestaña “Avanzado”.
A continuación, desplácese hasta el menú “Posición”.
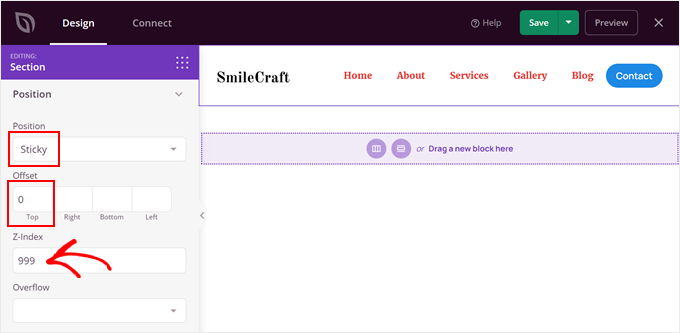
Aquí, elige “Fijo”.
Después, añade un cero al desplazamiento superior y un número z-index alto (como 999). Esto es para asegurarse de que la cabecera siempre aparece justo encima de la página.
Cuando esté satisfecho con su menú de navegación personalizado, haga clic en el botón “Guardar”.
Paso 4: Publique su tema personalizado de WordPress
En este punto, ya está listo para utilizar su nuevo tema personalizado de WordPress. Para activarlo, vuelve a la página ‘Theme Builder’ y conmuta el botón ‘Enable SeedProd Theme’.

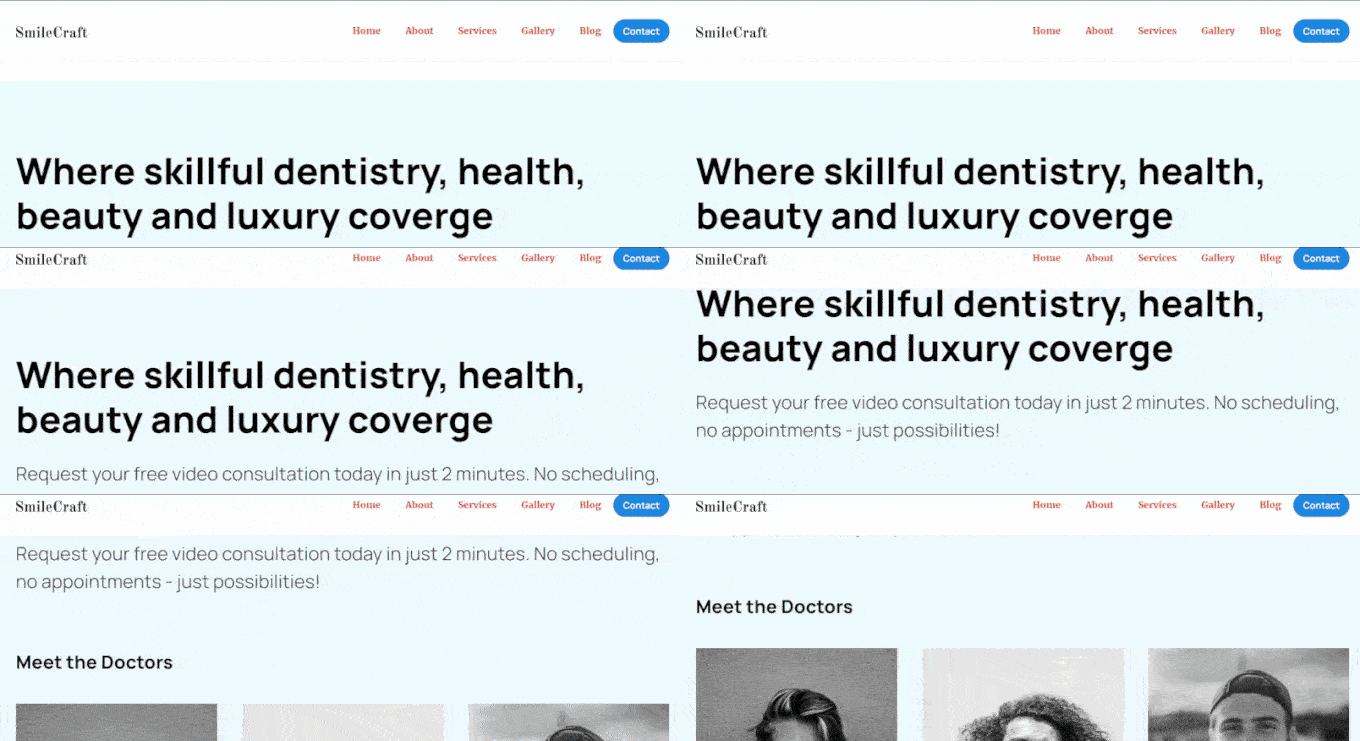
Todo lo que necesita hacer ahora es ver su sitio web y comprobar su nuevo menú de navegación personalizado.
Este es el aspecto de nuestro menú de navegación en nuestro sitio de demostración:
Método 4: Personalice su menú de navegación con el editor visual de CSS (más personalizable)
Este método ofrece más opciones de personalización que las características integradas de WordPress, pero no es tan flexible como usar un plugin maquetador de páginas. Dicho esto, es una gran solución si quieres hacer algunos retoques de diseño a tu menú de navegación sin reemplazar completamente tu tema.
Este método también es una buena alternativa para aquellos que utilizan temas clásicos que carecen de opciones de estilo, pero no se sienten cómodos con la edición de CSS en el método 2.
Aquí, te guiaremos a través del uso de un plugin premium para WordPress llamado CSS Hero. Te permite diseñar visualmente tu sitio web sin escribir ningún código. No es obligatorio / requerido / necesario tener conocimientos de HTML o CSS.
Nota: Marca / comprueba nuestra reseña de CSS Hero para saber más acerca de sus características. Los usuarios de WPBeginner también pueden ahorrar hasta un 34% en CSS Hero con nuestro código de cupón exclusivo.
Primero, instala el plugin CSS Hero en WordPress. Puedes leer nuestra guía sobre cómo instalar un plugin de WordPress para más información.
Una vez que hayas activado el plugin CSS Hero, verás un nuevo botón llamado ‘CSS Hero’ en tu barra de herramientas de administrador de WordPress. Haz clic en este botón para iniciar el editor visual.
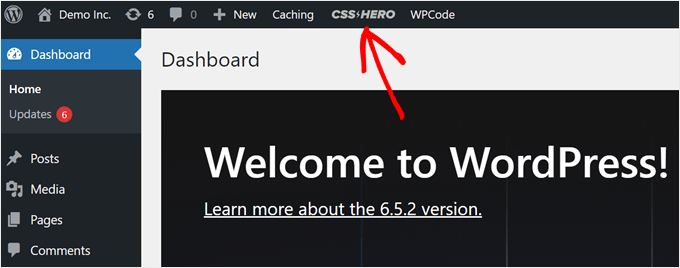
CSS Hero utiliza una interfaz WYSIWYG. Al hacer clic en el botón se abrirá su sitio web junto al panel de CSS Hero en el lado izquierdo de la pantalla.
Para editar tu menú de navegación, puedes mover el ratón sobre él. CSS Hero lo resaltará con un borde. Haz clic en el área resaltada para empezar a personalizar el menú.
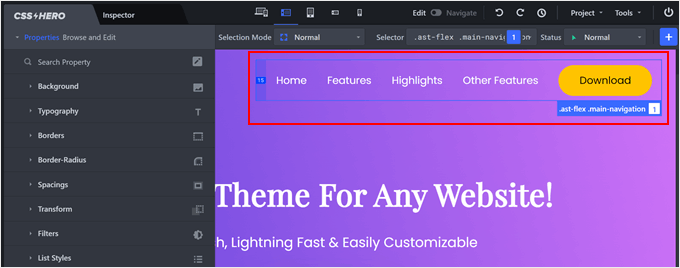
CSS Hero te permite editar varios aspectos del contenedor de tu menú de navegación, como el fondo, la tipografía, los bordes, el espaciado, las listas e incluso efectos adicionales.
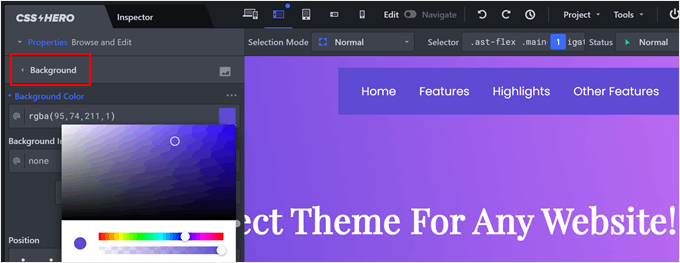
Por ejemplo, supongamos que quiere modificar el color de fondo del menú. Al hacer clic en “Fondo” se abrirá una interfaz fácil de usar en la que podrá elegir un nuevo color, degradado o imagen.
A medida que realice cambios, los verá reflejados en directo en la vista previa del sitio web de la derecha.
También puede añadir una sombra de recuadro a los elementos del menú para hacerlos más llamativos.
Para ello, vaya a la pestaña “Extra”.
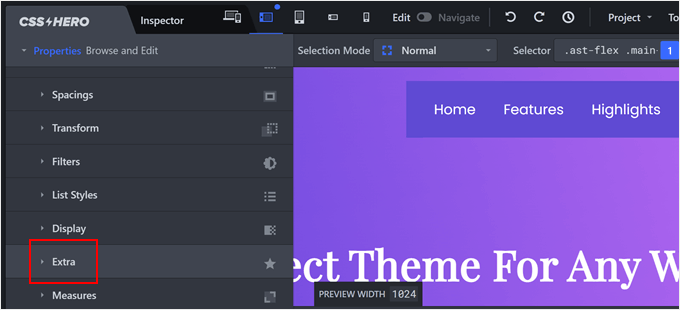
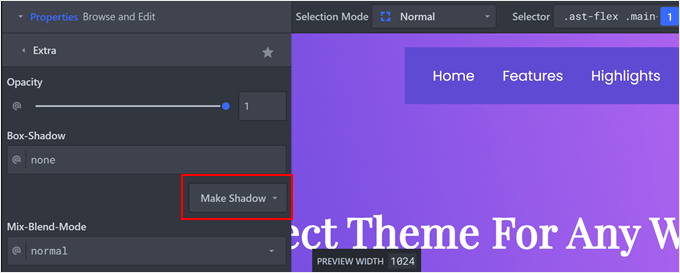
A continuación, haz clic en “Crear sombra”.
Aquí podrás editar los ajustes de las sombras.
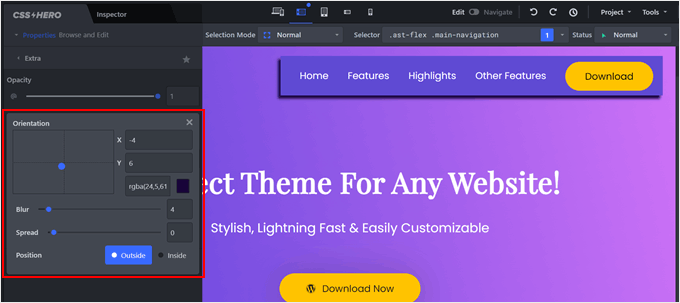
Ahora, puedes jugar con el aspecto de la sombra.
No dudes en modificar la orientación de la sombra, la calidad del desenfoque y la dispersión, así como su posición.
Puedes cambiar lo que quieras con la interfaz de CSS Hero, así que puedes experimentar para encontrar lo que mejor funciona para tu sitio.
Consejo profesional: Si has seguido los pasos del método 2 para añadir clases CSS a cada uno de tus elementos de menú, también puedes utilizar CSS Hero para personalizar esos elementos de menú específicos y así tener un control aún más detallado de la apariencia de tu menú de navegación.
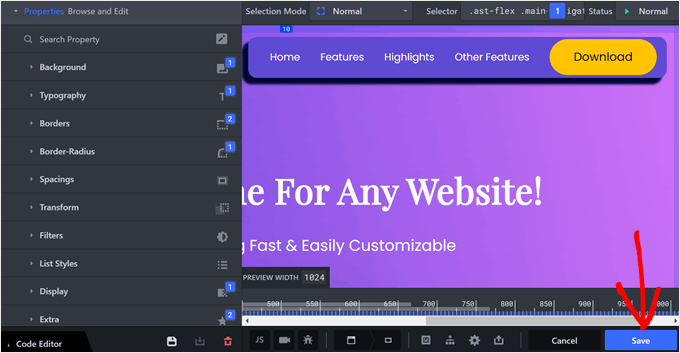
Cuando esté satisfecho con su menú personalizado, haga clic en el botón “Guardar” para guardar las modificaciones.
Puedes leer estas guías para aprender más acerca de lo que puedes hacer con CSS Hero:
- Cómo cambiar el tamaño del logotipo de WordPress (funciona con cualquier tema)
- Cómo añadir efectos de imagen al pasar el cursor en WordPress (paso a paso)
Método 5: Personalice su menú de navegación con código (Avanzado)
Este método es más adecuado para usuarios cómodos con el código. También le permite crear un menú personalizado si su tema no incluye uno por defecto.
Añadir fragmentos de código personalizados puede parecer desalentador al principio, ya que implica editar archivos de temas como functions.php y header.php. Sin embargo, hay formas de hacerlo más fácil.
Recomendamos el uso de un plugin llamado WPCode. Proporciona una manera segura y fácil de usar para añadir código personalizado a su sitio de WordPress sin modificar los archivos del núcleo.
Nuestra guía sobre cómo añadir un menú de navegación personalizado en temas de WordPress puede guiarte a través de los pasos para crear un menú con WPCode.
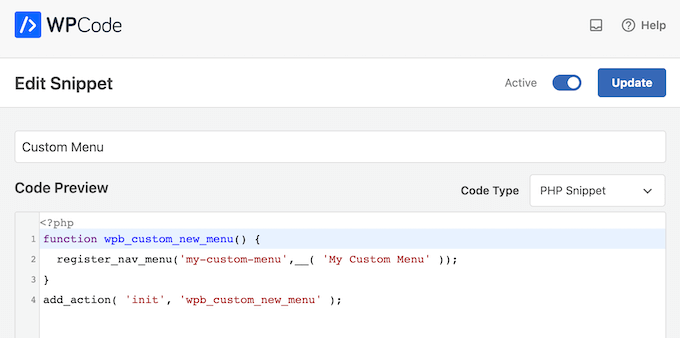
Una vez creado el menú, puedes explorar estos tutoriales.
- Cómo añadir iconos de imagen con menús de navegación en WordPress
- Cómo añadir un botón al menú de cabecera de WordPress
- Cómo crear un menú de navegación flotante fijo en WordPress
Cada uno incluye un método para personalizar el menú utilizando WPCode.
Guías para personalizar el menú de navegación de WordPress
Ahora que ya has explorado los conceptos básicos para dar estilo a tu menú de navegación de WordPress, aquí tienes más guías que puedes leer para llevar tu menú al siguiente nivel:
- Cómo añadir un mega menú en su sitio WordPress. Mega menús le permiten incluir subcategorías, proporcionando una manera fácil de usar para organizar el contenido extenso sitio web.
- Cómo crear un menú de WordPress adaptable a dispositivos móviles. Esta guía explica cómo crear un menú adaptable a diferentes tamaños de pantalla.
- Cómo añadir un menú adaptable a pantalla completa en WordPress. Este tutorial le enseñará cómo implementar un menú de pantalla completa que se expande por toda la pantalla cuando se activa, ofreciendo una experiencia de navegación audaz.
- Cómo añadir un menú de panel deslizante en temas de WordPress. Los menús de panel deslizante son una solución para ahorrar espacio que oculta la navegación principal hasta que un usuario desliza o hace clic en un botón para revelarla.
- Cómo crear un menú de navegación vertical en WordPress. Los menús de navegación verticales pueden ser una gran manera de mostrar un gran número de elementos de menú en una barra lateral u otro espacio vertical en su sitio web.
- Cómo añadir iconos de medios sociales a los menús de WordPress. Integra iconos de medios sociales directamente en tu menú de navegación para facilitar a los visitantes la conexión contigo.
- Cómo crear un menú de barra lateral plegable en WordPress. ¿Tienes muchas páginas? Facilite a los usuarios la navegación por su sitio web añadiendo un menú plegable a su barra lateral.
Esperamos que este artículo te haya ayudado a aprender a diseñar menús de navegación en WordPress. También puedes consultar nuestra guía definitiva sobre los elementos de diseño de WordPress y nuestra guía para principiantes sobre cómo crear una página personalizada en WordPress.
If you liked this article, then please subscribe to our YouTube Channel for WordPress video tutorials. You can also find us on Twitter and Facebook.


Sydney Peason
The “Menu” option has disappeared under my “Appearance” menu option > is there another way to see the container CSS of my menu and options?
Thanks!
WPBeginner Support
IF you’re using a block theme that does not have the appearance menu then you can use Inspect element to see the CSS container information. You can see our guide below on using Inspect Element:
https://www.wpbeginner.com/wp-tutorials/basics-of-inspect-element-with-your-wordpress-site/
Admin
Kristyna
Hello, I need advice, please:
I have successfully added CSS to make one of my menu items different in color. However, when I scroll down, my fixed navigation primary menu comes down with me, and the changed color of that one item changes back to its original – How do I keep the new color of that one item even when scrolling down?
Thanks!
WPBeginner Support
Your theme may modify the menu when you are scrolling down. If you use inspect element you should be able to select the menu item while scrolled down to add your CSS. We have a guide on using inspect element you can take a look at below:
https://www.wpbeginner.com/wp-tutorials/basics-of-inspect-element-with-your-wordpress-site/
Admin
Venkat Vavilala
Hi,
I want to increase menu font size. How can I do this?
If it is default, then how can I customize?
Please show me easy method to increase the menu font size
WPBeginner Support
It would depend on which method from this article you plan on using. As an example, if you use the CSS method then you would use inspect element the same as under method 2’s examples and modify the font-size
Admin
Budi Santoso
Hello Admin.
How the Orange ribbon navigation menu in this site was made?
Thanks
WPBeginner Support
To understand that you would want to take a look at our guide on using inspect element here: https://www.wpbeginner.com/wp-tutorials/basics-of-inspect-element-with-your-wordpress-site/
Admin
maria
how did you make the menu for this site
did you have to edit the theme files ?
thanks
WPBeginner Support
Our theme was one we custom created
Admin
Trish
I am wanting to create a menu on the shop page of my woo commerce site, horizontally, that has all the categories of product that is sold. How can I do that, please? Thank you all for your help in advance.
WPBeginner Support
If your theme has a menu in that location you could set up a normal menu using:
https://www.wpbeginner.com/beginners-guide/how-to-add-navigation-menu-in-wordpress-beginners-guide/
Then, you can use conditional logic to only have it appear on your shop page using our article here: https://www.wpbeginner.com/plugins/how-to-add-conditional-logic-to-menus-in-wordpress/
Admin
Kushal Sonwane
Though it was a great task to do, but after reading this article, it is very simple to customise navigation menus.
Thanks.
WPBeginner Support
You’re welcome
Admin
Lisa
I am very new to doing this and I am creating a site in WP using the theme Oceanwp. I have done as you have suggested by clicking on CCS from the menu. I am trying to remove the arrow on my drop down menu and nothing I try works at removing it.
Thanking you in advance for any help.
WPBeginner Support
Hi Lisa,
You may want to reach out to theme authors, they would be able to help you with that.
Admin
Anirudhya
sir which theme you are using. iam starting a wordpress blog,i want a simple layout blog for my educational purpose.
WPBeginner Support
Hi Anirudhya,
We are using a custom theme made specifically for WPBeginner.
Admin
Bobby
Hi, how about with HTML code?
I want to add a header to the neseted menus. But I don’t kow where or how to put it.
Daniela
Hi,
I Would like to change the appearance of only the menu I have added for my salespage. I would like to change the height and add a logo.
I am not a pro and I have tried some things to see if anything changes in the menu, but it doesn’t. This is what I have tried:
#Salespage-menu {
background:#2194af;
height:40px;
}
Can you please help me on my way?
Thank you so much for your effort!
Eugene
Hi Guys,
I have an issue with my nav menu that I really would be glad of some help with pleas… The primary menu itself is perfect looking, the problem is with the submenu which drops down with a large gap approx 100px or so in size between it and the parent above.
When I try to navigate onto the submenu it simply disappears from view.
I have tried everything I can think of so far to move it directly up under the parent menu so that it will remain open and clickable but I have failed so far.
This is the Custom CSS being used for the Point Theme:
#logo {
margin: 0;
}
.site-branding {
padding: 0;
}
.post-info {
display: none;
}
#navigation ul li a {
min-height: 22px;
padding: 5px 10px 5px 10px;
}
.post-date {
display: none;
}
Thanks and Regards.
WPBeginner Support
Hi Eugene,
We are not sure what may be causing this issue. It depends on your theme’s CSS and layout and which classes they have used. You can try this custom CSS:
.primary-navigation li ul {margin:0px;padding:0px;}1-click Use in WordPress
Admin
Eugene
I’m sorry to say, that didn’t work either…
Thanks for trying, it seems there’s a new theme called for.
Regards.
Amirul Farhan
Hello.
Is the plugin works even though with the theme purchased have its own menu design?
Thanks
Rida
if you want to use bootstrap you simply add the css classes of your own with simple one line code on your header.php
‘primary’, ‘container’ => ‘div’, ‘container_class’ => ‘collapse navbar-collapse’, ‘menu_class’ => ‘nav navbar-nav pull-right’, ‘menu_id’ => ‘primary-menu’ ) ); ?>
Dhany
Yeay..another PLUGIN you guys share how to use PLUGIN sooo much, not exactly use wordpress…great job
WPBeginner Support
Hi Dhany,
Thanks for the feedback. At WPBeginner, our target audience is mostly beginner level users. Most of them are not familiar with CSS, HTML, PHP, etc. Plugins make it easier for them to get things done without breaking their websites.
Admin
Andrew
Dude…it says ‘beginner’ in the URL.
Plus…they laid out a manual option halfway through.
Malin
Hi! I desperately need help with my menu on the site using Baskerville theme. With the latest update the menu has gone completely bananas! Please HELP!
Malin
Raymond
This helped me a lot when I was trying to figure out how to get my styles from a bootstrap theme to work in WordPress. Thank you
Samseen
Nice Post here,
However, how can one target a particular item in the list. I actually did a work-around at this time, but I will want to target that particular menu item.
Say for example, I want to have a different background color for the menu of that particular item. How can this be done?
Marko
Inspect element tool in Chrome, Firefox.
benjamin
Hello guys am new in coding, please I need real help here I have a WordPress site and my site theme is Baskerville , this theme support only one menu am trying to create navigational menus to my curious pages, please if there is code for doing that please where can I place it ,please I’ll so much appreciate a reply thank you.
Arsh Dznr
i m ussing my css menu in wordpress but menus dropdown not showing pls help me
thanxxxxxxxx
umanga
did you add your scripts into function.php properly ?
Andika Amri
Hello wpbeginner, nice tuts!
I am using vantage theme, already put custom class in one of my menu = “.menu-about”, but when i’m styling it stylesheet.css, its not applicable at all, do you have any suggestion at all?
thanks!
shaon
I am using twenty Twelve theme. Already made changes to my menu with different colors. But i cant move the navigation menu position on the header, it got too much space at bottom from the baseline of the header . I want it touching the bottom of the header.
Niveditha
Hi,
I have created a main menu in header and a footer menu using the wordpress codex. Now my two menus sit vertically on my page. How to code them for horizontal menus?
Please help out, this is real urgent!
TIA
WPBeginner Support
For that you need to use CSS. Study the code in the default themes, the best example would be twenty thirteen or twenty twelve themes.
Admin
Judy
I would kill for an infographic for what all those classes actually modify. Like:
.current-page-ancestor
.current-menu-parent
.current_menu_parent
.current-page-parent
.current_page_parent
.current-menu-ancestor
and what the difference is between the dashes/underscores like in .current-menu-parent vs .current_menu_parent
i will make one for you if you explain it to me!
thank you…
Tarmizi Achmad
thx about information…
Yogesh Kumar
hey i want to ask a very important thing
Like the bar shown on your website’s nav bar above for the link Blog shows 8 links as we move our cursor on that …now my site’s are also showing in the same style but i want them to be displayed in such a manner that when i will move my cursor over it will show the 8 links side by side means 4-4……Please sir i am in a great need of this …please reply to this asap…
Editorial Staff
Usually menus are organized in unordered lists ul. When you have sub navigation or dropdowns, then are its own unordered list inside a list element. So an example CSS class that you would be modifying would be like:
ul.menu li ul{width: 220px;}
ul.menu li li{float: left; width: 100px;}
Now this would set each second level list item to have an exact width and float left.
Admin
Jim
Great article, thanks.
I never new about that CSS class feature, at least I know now.
Its really going to benefit me.
Thanks.
Nilamkumar Patel
This is very helpful. Prior to this, I had understanding that we can’t add custom classes in wordpress from admin and I always used to do it in functions.php, but this is awsome. These people are rockers. And many thanks to Sayed for this helpful post
wiseroner
great tutorial!! but how do i do something as simple as change the font size? what do i enter in to change the font size? thank you!
wpbeginner
@wiseroner You cant just add the font-size in the main menu class in your css file.
wpbeginner
@mriulian Look in the tutorial above… the classes for current pages are already defined…
In the header code, you need to define the menu container ID and container class… follow the article as it says, and it will work.
mriulian
Just trying to be more clear, this is my code:
// in the function page
if (function_exists(‘register_nav_menus’)) { register_nav_menus( array( ‘mainNav’ ) ); }
// in the header page
‘main_nav_menu’)); ?>
// in the css file
.current{ background-color: #0188AA; color: #fff; text-decoration: none; }
How do I apply this class to my navigation? ( very easy in a static html page but apparently pretty complicated in wordpress).
Thanks in advance
mriulian
This is what I did but it doesn t work. I registered my menu in the
functions page and then I called it from the header page as my main
navigation. Now, I have a . current class in my stylesheet to be applied
to the current page but it is not obvious how to do that.
Can you help with a suggestion?
wpbeginner
The way WordPress navigation menus work, it will automatically know which page is the current one..
iirimina
Thank you for mentioning about the css classes in the screen options panel. The problem that I have with my navigation is how to style the nav menu so that each menu item gets a specific background color when you arrive at a certain page. You mention creating a class such as .current_page_item{} in your style sheet. But how to apply this class in the header.php?
Rick
Where can I get further more detailed info on how to add the icons to the menu names. Whats a real good css guide for doing alot of these things you outlined here?
Thanks
Editorial Staff
CSS-Tricks is a good forum, but you should probably look at CSS for Beginner books to learn CSS. Because all you are doing is adding a background image.
Admin
Francisco
Hello. I absolutely loved this post and found it very useful, particularly the option to set individual CSS classes, so many thanks for this information.
What I was wondering is if it would be possible to dynamically assign CSS classes from the php wp_nav_menu function call to certain types of elements, for instance, to parent menu items only. That way, you wouldn’t have to manually add that class in the Menu Screen every time a new type element (in the example, a new parent item) is created.
Any thoughts on that would be greatly appreciated,
Editorial Staff
Yes, you would utilize Menu Class parameter for that.
Admin
Francisco
That’s what I was thinking. Thanks for confirming, and for getting back to me.
Cheers!
Jayesh
nice article.
I want to change out put of wp_nav_menu().
I do not like HTML generated by wp_nav_menu().
I have my own nice HTML for Menu I want.
so I wanted to modify HTML structure generated by wp_nav_menu().
is this possible ?
Kindly advise asap.
Editorial Staff
You can add your own divs etc, but it will always be the list output. You can style it to be however you want.
Admin
chunky
Thank you! Now I can stop pulling my hair out! Bookmarked this and will tell others!
Kalid
hi, thank for the tutorial. it would be nice if you guide me to have the nav menu used in your theme. Id like to have a drop-down menu like yours. tnks!
Editorial Staff
The WordPress default navigation menu lets you have drop down menus. Just drag them a little to the right of the main item, and it is possible. If you use a framework like Genesis, it already has Fancy Drop down option available, so you can simply select that. Or you can utilize jQuery techniques like SuperFish to do this. We may add a tutorial in the future.
Admin
tuba
very nice article, helped me for my wordpress project, thanks!
GrimCris
Great article. I didn’t know about the CSS classes in WordPress Menus. Thank you so much!
Keith Davis
You guys know your WordPress.
This is not an easy tutorial but well explained and certainly adds to my understanding.
Appreciate you educating the rest of us.
Rick
Dude! Awesome! I had no idea about CSS option for menus! Rad-a-tad
Adam W. Warner
Great write up, super informative! I didn’t realize the screen options for menus either.
Eli
I’m not sure in what you should place the first php wp_nav_menu code. Would it be in the functions file or header or…?
Tony
Didn’t know about the CSS Classes menu item! Thanks for pointing that out.
Editorial Staff
You are welcome
Admin
Steve Meisner
Me neither! That was exactly what I needed. God bless you all and the WordPress dev team!
Pieter
Respect for pointing out the css styles! I always used the css attribute to style a list item, but these styles are definitely more handy. You just earned yourself another feed subscriber!
Regards from Belgium.
Editorial Staff
Glad we were able to help Pieter.
Admin