¿Te preguntas por qué tus correos electrónicos de WordPress no llegan a las bandejas de entrada? No es el único.
Muchos propietarios de sitios web se enfrentan a este problema porque la mayoría de los alojamientos web restringen la función de correo PHP por defecto, lo que provoca que los correos electrónicos se pierdan o acaben en Spam.
Puedes corregirlo fácilmente utilizando el servidor SMTP de Gmail, una solución fiable y gratuita que garantiza la correcta entrega de tus correos electrónicos. Nosotros mismos lo hemos utilizado y nos ha parecido una gran opción para blogueros, pequeñas empresas y cualquiera que desee enviar correos electrónicos sin complicaciones.
En esta guía, te mostraremos exactamente cómo establecer el SMTP de Gmail en WordPress para que tus correos electrónicos lleguen siempre a las bandejas de entrada . ✅

Por qué y cuándo necesitas el servidor SMTP de Gmail para los correos electrónicos de WordPress
Su sitio WordPress envía correos electrónicos para avisarle del registro de nuevos usuarios, el restablecimiento de contraseñas perdidas, actualizaciones automáticas y notificaciones de sus formularios de contacto.
Por defecto, WordPress utiliza la función PHP mail para enviar avisos por correo electrónico. Sin embargo, esta función no funciona como se espera por varias razones.
La mayoría de las empresas de alojamiento de WordPress restringen el uso de esta función para evitar abusos y Spam.
Los filtros de Spam de los proveedores de servicios de correo electrónico más conocidos marcan / comprueban si los correos electrónicos entrantes se envían desde servidores de correo auténticos. A veces, los correos electrónicos de WordPress por defecto pueden fallar en esta comprobación y ni siquiera llegar a la carpeta de Spam.
SMTP (Simple Mail Transfer Protocol) es el estándar de la industria para el envío de correos electrónicos. A diferencia de la función de correo de PHP, SMTP utiliza una identificación adecuada, lo que aumenta la entregabilidad del correo electrónico.
Gmail ofrece un servicio SMTP que puedes utilizar para enviar correos electrónicos desde tu sitio de WordPress. Sus servidores son la mejor opción si solo quieres enviarte correos electrónicos de aviso de WordPress a ti mismo y a unos pocos usuarios de tu sitio.
Sin embargo, en caso de que desee enviar correos electrónicos de boletines o tenga una tienda en línea.
Entonces debería utilizar un proveedor de servicios de correo electrónico masivo, como Constant Contact, Brevo (antes Sendinblue) o Mailgun.
Servicio SMTP de Gmail gratuito o de pago para WordPress
Puedes utilizar tu cuenta gratuita de Gmail para enviar correos electrónicos de WordPress. Sin embargo, para mejorar la capacidad de entrega, te recomendamos que utilices Google Workspace, de pago.
Con Google Workspace, obtienes tu propia dirección de correo electrónico de marca profesional, como name@yoursite.com.
Google Workspace te obliga a añadir registros MX a tu nombre de dominio. Esto significa que tus correos electrónicos parecerán proceder de tu nombre de dominio, lo que ayuda a impulsar la autenticidad y a garantizar una mejor capacidad de entrega.
Si prefieres instrucciones escritas, sigue leyendo. Aquí tienes un resumen rápido de todos los métodos que trataremos en esta guía:
¿Preparados? Primeros pasos.
Cómo enviar correos electrónicos de WordPress utilizando el servidor SMTP de Gmail
Si decides utilizar Google Workspace, primero tendrás que establecer tu dominio para que funcione con Google Apps. Tenemos un tutorial paso a paso sobre cómo establecer una dirección de correo electrónico profesional con Google Workspace.
El resto de las instrucciones son las mismas tanto si utilizas una cuenta de Gmail de pago como gratuita.
Ahora, WP Mail SMTP es el mejor plugin SMTP para WordPress del mercado. Le permite utilizar fácilmente cualquier servidor SMTP para enviar correos electrónicos de WordPress con mayor capacidad de entrega.
📌 Nota: Nosotros mismos utilizamos WP Mail SMTP en nuestro sitio, y hemos visto cómo nos ayuda a asegurarnos de que todos nuestros correos electrónicos llegan a las bandejas de entrada de los usuarios, y no a la carpeta de Spam. Consulta nuestra reseña completa de WP Mail SMTP para conocer sus características!
Así que, vamos a instalar y activar el plugin WP Mail SMTP. Para más detalles, consulte nuestra guía paso a paso sobre cómo instalar un plugin de WordPress.
Aunque hay una versión gratuita, recomendamos comprar la versión de pago llamada WP Mail SMTP Pro, que le da acceso a soporte premium, más servicios de envío, y un guante blanco establecido por uno de sus expertos.
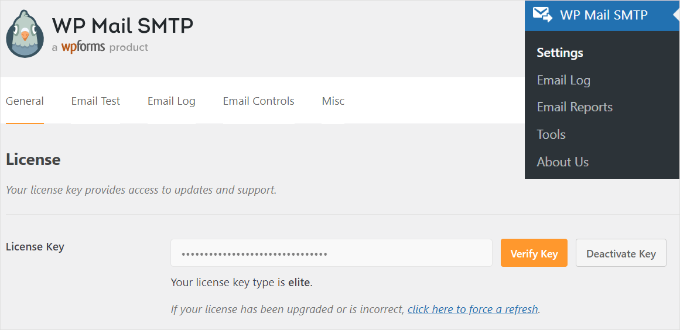
Una vez activado, debe visitar la sección Ajustes ” WP Mail SMTP para establecer los ajustes del plugin. Luego, simplemente ingrese su clave de licencia y haga clic en el botón ‘Verificar Clave’. Puedes encontrar la clave en el área de tu cuenta WP Mail SMTP.
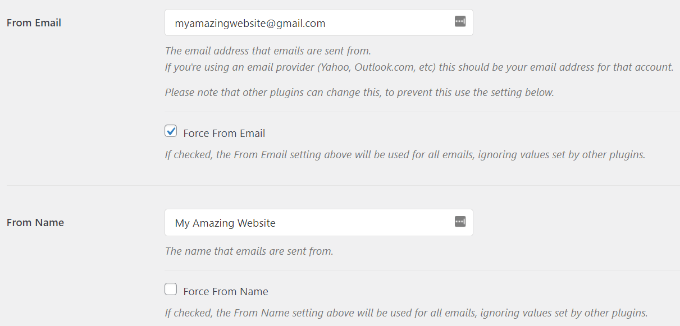
En la pestaña “Ajustes generales”, debes asegurarte de que utilizas tu dirección de correo electrónico de Gmail en el campo “De correo electrónico”.
A continuación, debe indicar el nombre del remitente.
El plugin WP Mail SMTP ofrece 3 formas de conectar tu sitio WordPress a los servidores de Gmail:
- El primer método utiliza una instalación con un solo clic, que es la más fácil y la más adecuada para principiantes, pero solo está disponible para usuarios de plugins premium.
- El segundo método utiliza la identificación OAuth. Este método es seguro y no requiere un plugin premium.
- El tercer método consiste en configurar manualmente los ajustes SMTP de Gmail. En general, no recomendamos este método porque es menos seguro.
Teniendo esto en cuenta, vamos a establecer que WordPress utilice SMTP de Gmail para enviar correos electrónicos.
Método 1: Configuración de Gmail para enviar correos electrónicos de WordPress mediante la instalación con un solo clic
Este método es el más rápido y sencillo para todos, lo que significa que puede ayudarle a ahorrar tiempo y confusión.
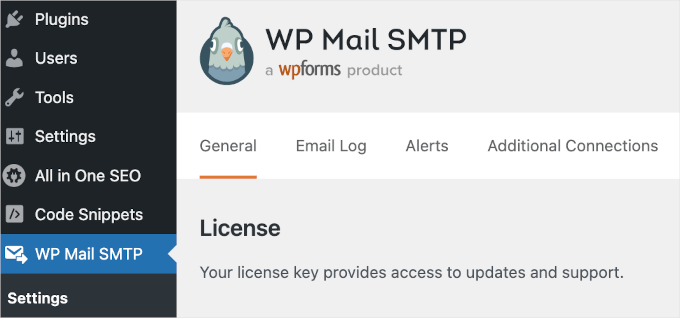
Después de instalar y activar el plugin WP Mail SMTP, vamos a navegar a WP Mail SMTP ” Ajustes y asegúrese de que está en la pestaña ‘General’.
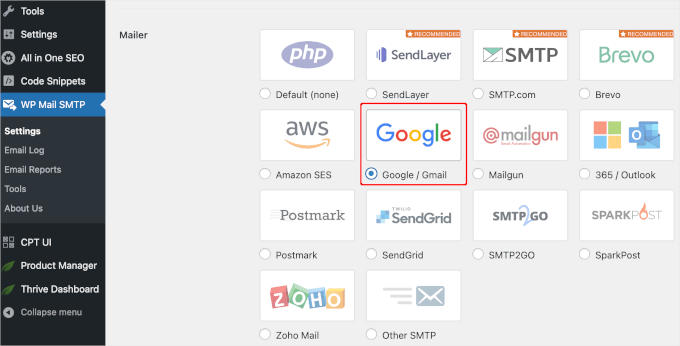
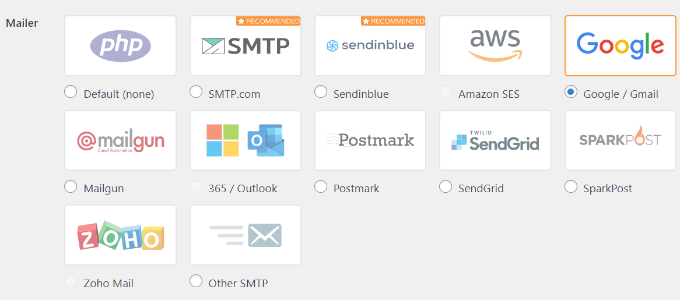
A continuación, deberás elegir “Google / Gmail” en la sección “Servicio de envío”.
Esto le permitirá utilizar la opción “Configuración con un clic”.
Una vez hecho esto, el siguiente paso es autorizar tu cuenta de Google.
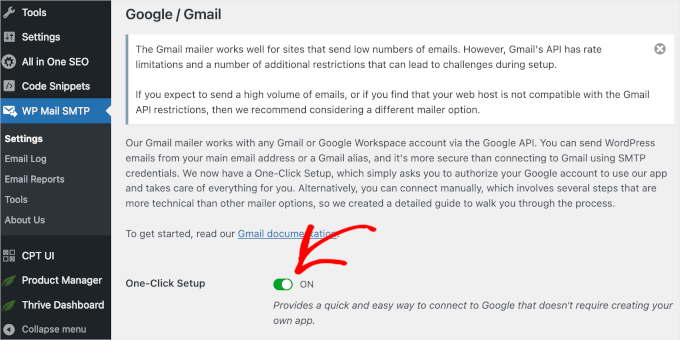
Verás una sección “Google / Gmail” debajo de “Servicio de envío” en tu pantalla. Sigue adelante y haz clic en el interruptor para activar la característica de instalación con un solo clic.
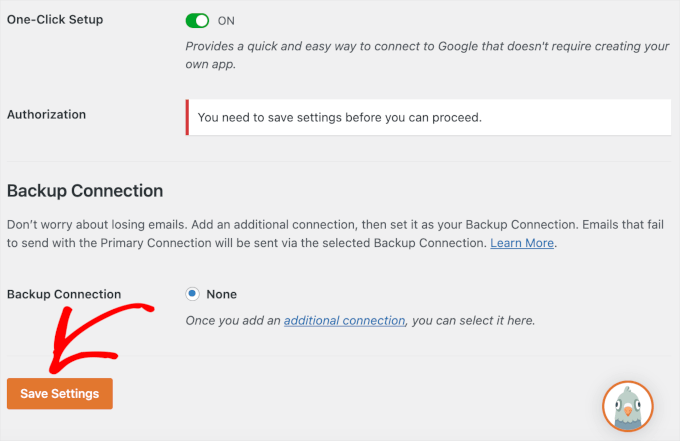
A continuación, es posible que aparezca un aviso que le indique que primero debe guardar los cambios para continuar con el proceso de autorización.
Así que vamos a hacer clic en el botón “Guardar ajustes”.
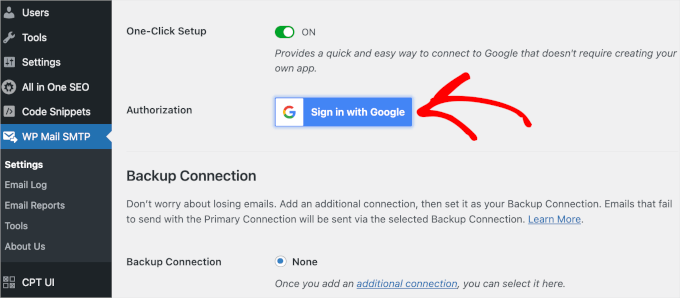
Después de eso, usted debería ser capaz de continuar el proceso.
Se te indicará que accedas a tu cuenta de Google. Sólo tienes que hacer clic en el botón “Acceder a Google” y elegir una cuenta.
A continuación, Google te pedirá permiso para que WP Mail SMTP envíe correos electrónicos en tu nombre.
Puede hacer clic en “Permitir” para continuar.
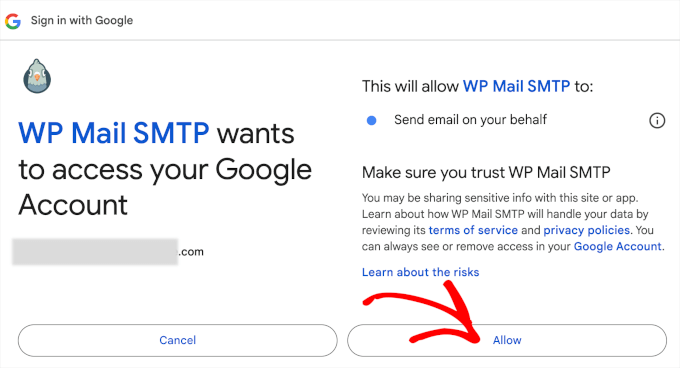
Al hacer clic en el botón, será redirigido de nuevo a la pestaña ‘General’ de WP Mail SMTP en su área de administrador / administración de WordPress.
Desde aquí, desplázate hasta la sección “Autorización” para comprobar que la cuenta de Gmail que has establecido está correctamente conectada.
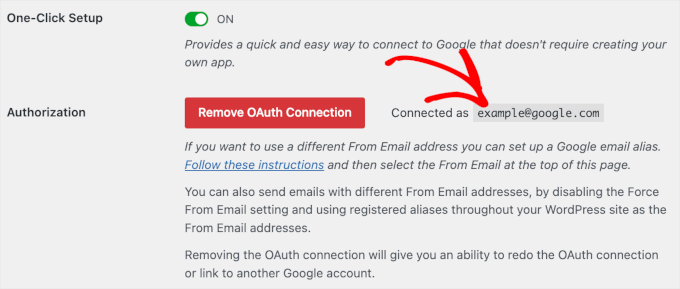
Ya está. Has conectado correctamente tu cuenta de Gmail a WP Mail SMTP utilizando el método de configuración de un clic.
Método 2: Configuración de Gmail para enviar correos electrónicos de WordPress mediante el protocolo OAuth
Este método es una gran opción si estás usando una versión gratuita del plugin WP Mail SMTP. Es seguro, y una vez que lo establezcas, nunca tendrás que volver a hacerlo.
Para empezar, selecciona “Google/Gmail” como servicio de envío.
A continuación, verá tres campos que deberá rellenar cuando se desplace hacia abajo.
Sólo tiene que rellenar los campos “Client ID”, “Client Secret” y“Authorized Redirect URI“.
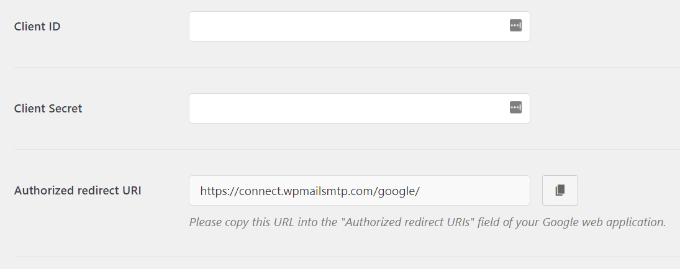
Vamos a establecer estos campos.
Creación de una aplicación y generación de claves API para Gmail
Para empezar, basta con visitar el sitio web de Google Cloud Platform y, a continuación, hacer clic en “Mi primer proyecto” en la parte superior.
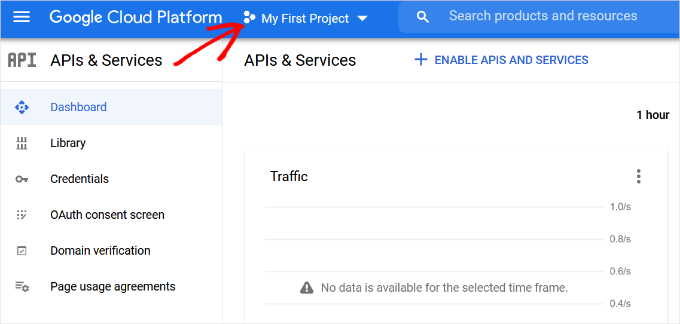
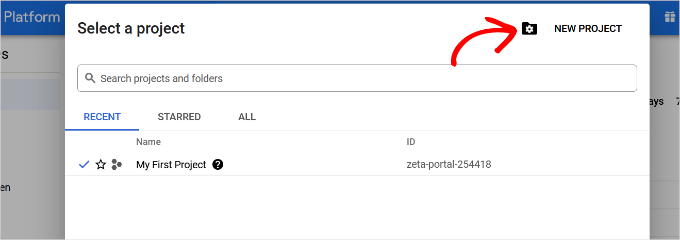
Se abrirá una pequeña ventana emergente en la que podrá seleccionar sus proyectos.
A continuación, haga clic en la opción “Nuevo proyecto”.
En la pantalla siguiente, se le pedirá que indique un nombre para su proyecto.
Te recomendamos que le des un nombre memorable para que puedas reconocerlo fácilmente en el futuro.
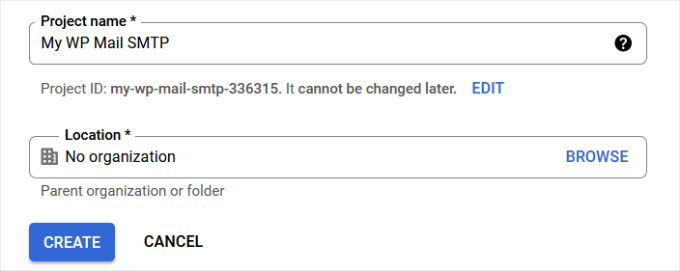
Después, hagamos clic en el botón “Crear” para continuar.
La consola de desarrollador creará ahora tu proyecto y te llevará a su Escritorio.
Google ofrece a los desarrolladores acceso a muchas de sus API y servicios. Debes activar las API que necesites para este proyecto.
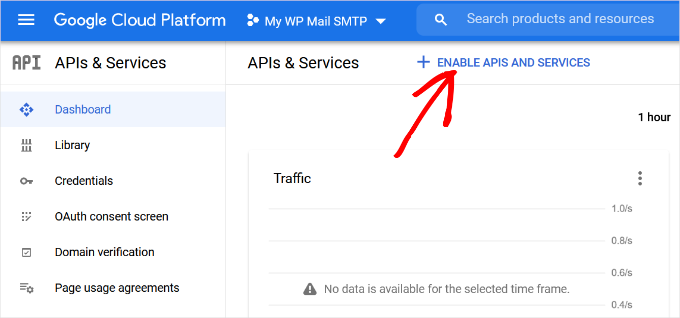
Sólo tiene que hacer clic en el botón “Activar API y servicios” para continuar.
Accederá a la página de la biblioteca de APIs.
Desde aquí, puedes escribir Gmail en el cuadro de búsqueda para encontrar rápidamente la API de Gmail y hacer clic para seleccionarla.

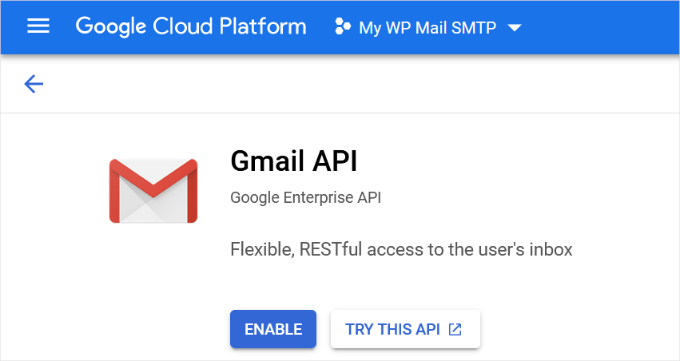
Ahora verá un resumen de la API y lo que puede hacer.
Basta con hacer clic en el botón “Activar” para continuar.
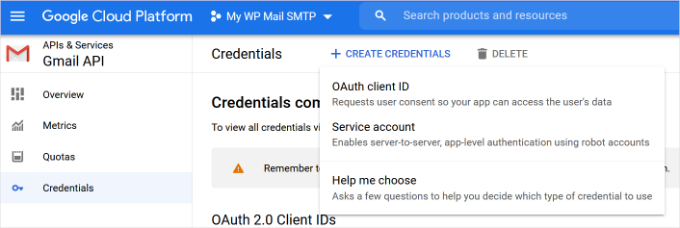
Ahora que su API está activada, el siguiente paso es crear las credenciales que puede utilizar en los ajustes de su plugin WP Mail SMTP.
Deberá hacer clic en el botón “+ Crear credenciales” para continuar y seleccionar la opción “Ayúdame a elegir” del menú desplegable.
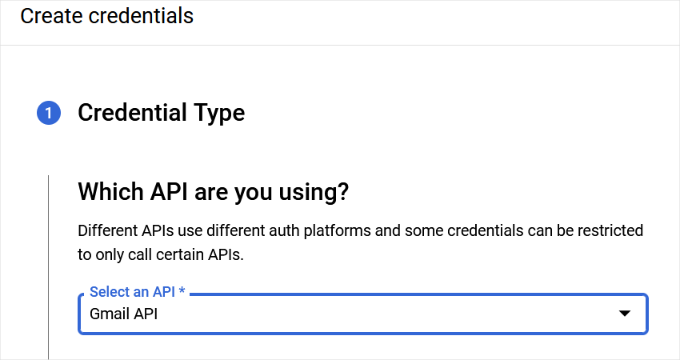
En la pantalla siguiente, le preguntará qué API desea utilizar.
Selecciona “API de Gmail” en el menú desplegable “¿Qué API utilizas?”.
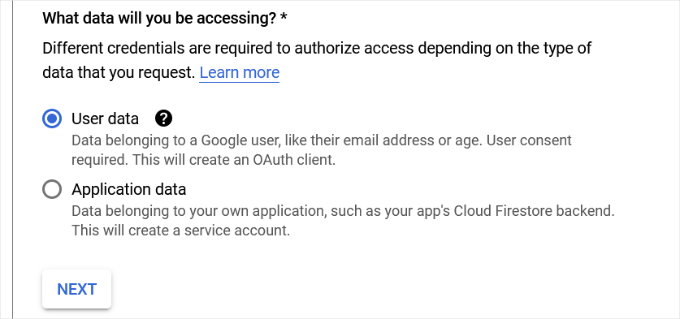
A continuación, elija “Datos de usuario” en el campo “¿A qué datos accederá?”.
Una vez hecho esto, siga adelante y haga clic en el botón “Siguiente”.
Ahora, tendrás que introducir la información de tu aplicación.
Puedes empezar dando un nombre a tu aplicación, seleccionando la dirección de correo electrónico que has proporcionado y añadiendo un logotipo de la aplicación si lo deseas.
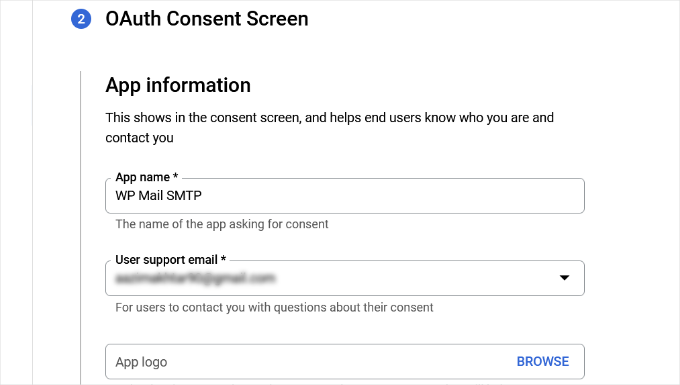
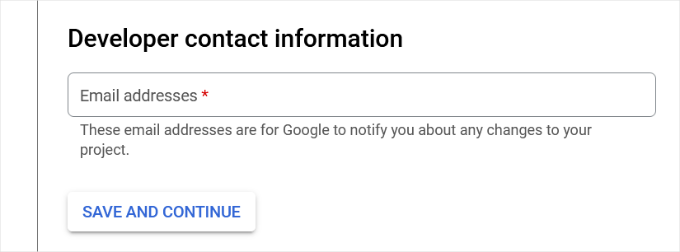
A partir de ahí, tendrá que desplazarse hacia abajo e introducir la información de contacto de un promotor.
Una vez introducida la dirección electrónica, basta con hacer clic en el botón “Guardar y continuar”.
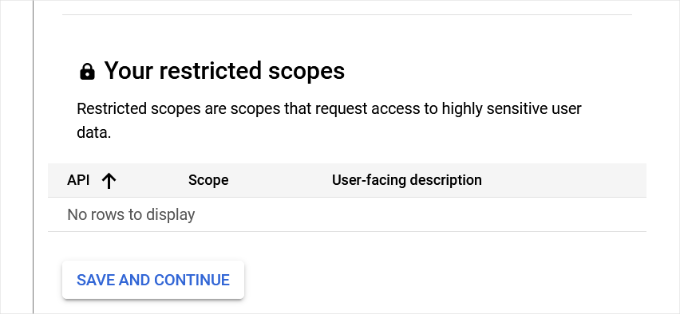
En la pantalla siguiente, puedes configurar los “Ámbitos” para la API de Gmail. Este paso es opcional y puedes omitirlo por ahora.
Basta con desplazarse hasta el final de la página y hacer clic en el botón “Guardar y continuar”.
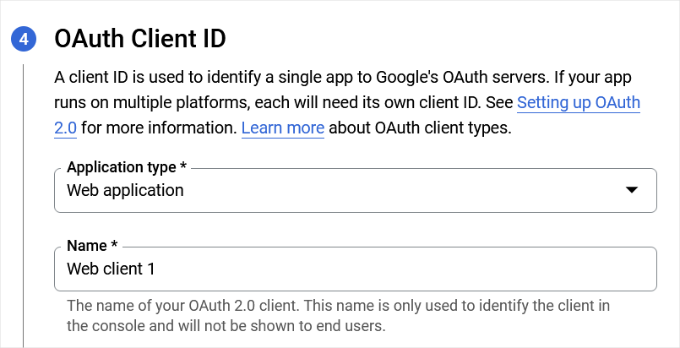
A continuación, introduzca los datos de la sección “ID de cliente OAuth”.
Puede empezar por elegir “Aplicación Web” como “Tipo de aplicación” en el menú desplegable y, a continuación, introducir un nombre.
Cuando se desplace hacia abajo, verá opciones para los orígenes de “JavaScript autorizado”. Puede omitir esta opción y dirigirse a “URI de redireccionamiento autorizadas”.
Haz clic en el botón “+ Añadir URL” situado debajo de “URI de redireccionamiento autorizadas” e introduce https://connect.wpmailsmtp.com/google/ en el campo "URI".
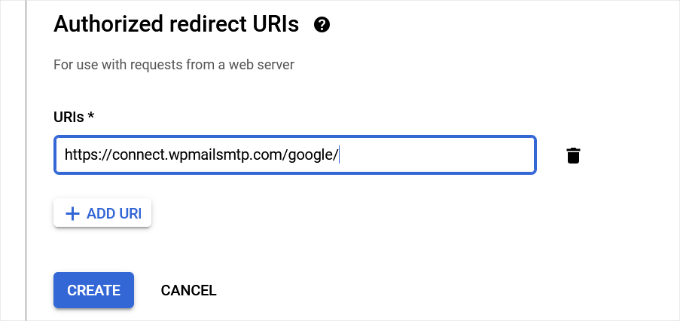
Una vez introducida la URL, basta con hacer clic en el botón “Crear”.
A continuación, verá sus credenciales en el área “Sus credenciales”.
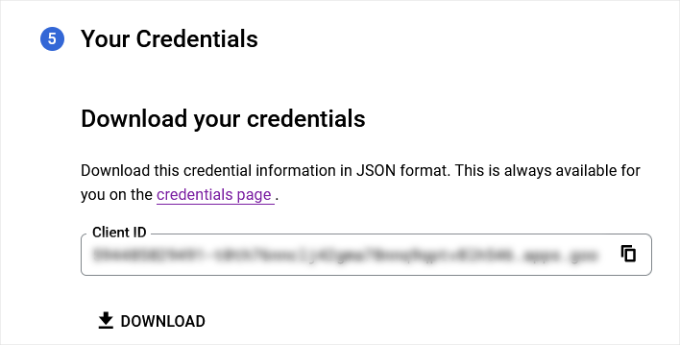
Haz clic en el botón “Listo” de la parte inferior para continuar.
Accederá a la página de credenciales de su proyecto.
En esta página, puede ver sus credenciales creadas recientemente en este anuncio / catálogo / ficha. Debe hacer clic en el icono de edición situado al lado de sus credenciales para continuar.
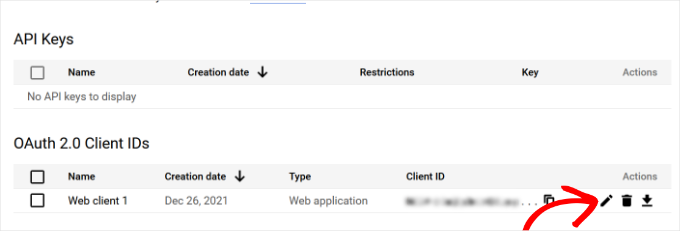
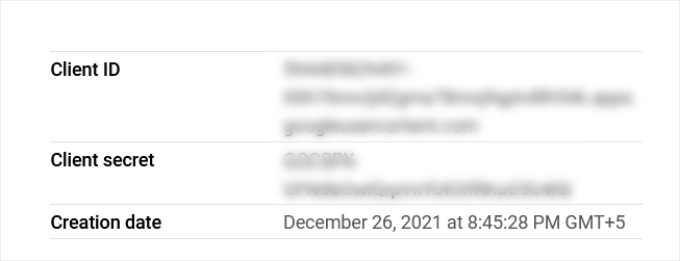
Esto te llevará a la página de edición de credenciales, donde podrás ver tu secreto de cliente y tu ID de cliente.
Todo lo que tiene que hacer es copiar y pegar la clave en la página de ajustes de su plugin.
Una vez hecho esto, puede volver a la página de ajustes del plugin en el área de administración de WordPress.
Ahora que ya tienes el ID de cliente y las claves secretas de cliente, tienes que hacer clic en el botón “Guardar ajustes” para continuar.
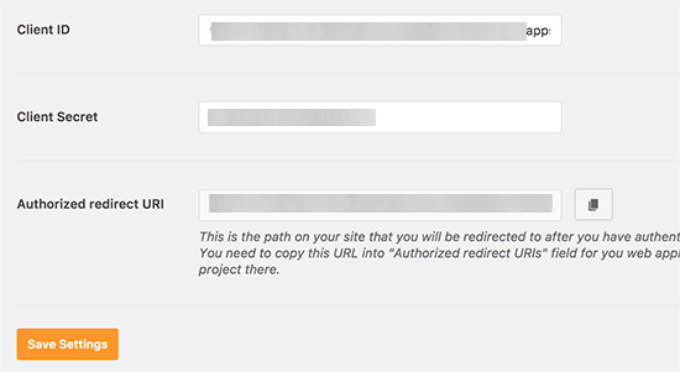
El plugin guardará tus ajustes y recargará la página.
A continuación, desplázate hasta la parte inferior de la página de ajustes y haz clic en el botón “Permitir que el plugin envíe correos electrónicos a través de tu cuenta de Google”.
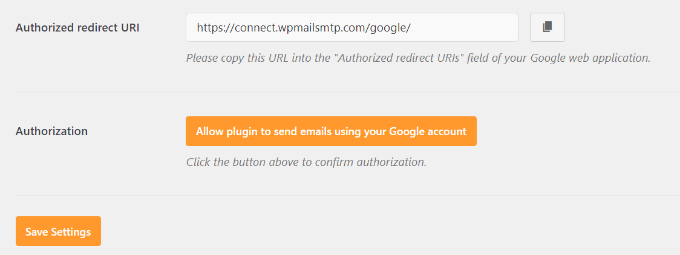
Accederás a tu cuenta de Google.
A continuación, se le pedirá que autorice al sitio web a enviar correos electrónicos en su nombre.
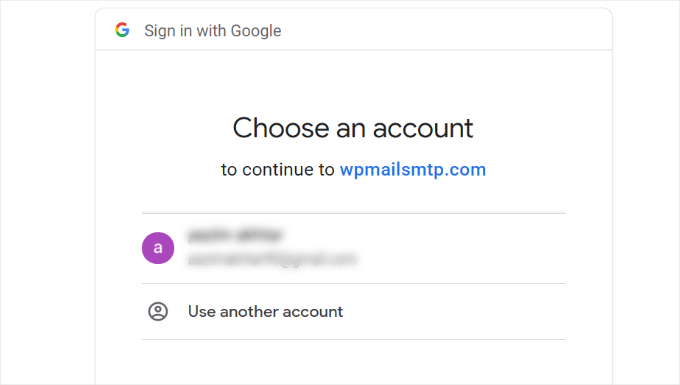
Sólo tienes que seleccionar tu cuenta de Gmail y dar permiso para enlazar tu proyecto de API de Google.
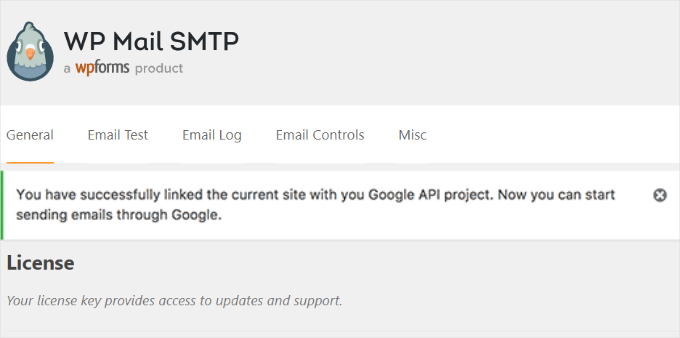
A continuación, se le redirigirá de nuevo a su sitio web, donde verá un mensaje de correcto funcionamiento.
Método 3: Establecer SMTP de Gmail como remitente SMTP
Este método te permite conectarte manualmente a los servidores SMTP de Gmail para enviar tus correos electrónicos de WordPress.
En primer lugar, deberá dirigirse a Ajustes ” WP Mail SMTP desde el área de administración de WordPress para establecer los ajustes del plugin.
A partir de aquí, puedes empezar indicando la dirección de Gmail que deseas utilizar en el campo “De correo electrónico” y tu nombre en el campo “De nombre”.

A continuación, seleccione “Otro SMTP” como servicio de envío.
Además, deberás marcar / comprobar la casilla siguiente a la ruta de vuelta.
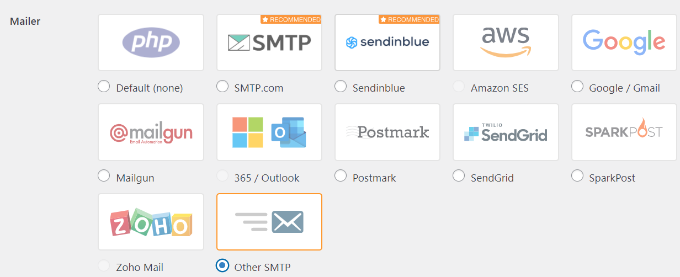
A continuación, desplácese hasta la sección “Otros SMTP”.
Aquí es donde establecerás más ajustes para conectarte a los servidores SMTP de Gmail.
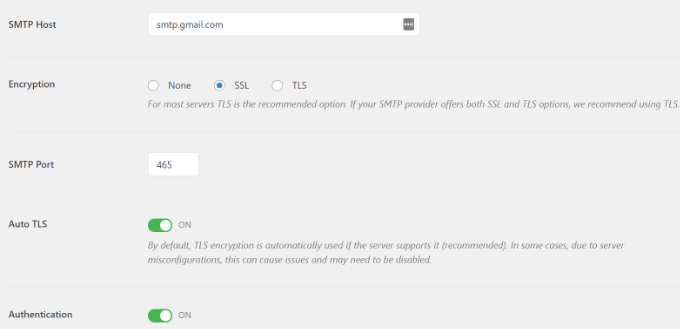
Esta es la configuración exacta que debe añadir a los ajustes del plugin:
- Alojamiento SMTP: smtp.gmail.com
- Cifrado: Utilice el cifrado SSL.
- Puerto SMTP: 465 (debería aparecer automáticamente al seleccionar el cifrado SSL)
- Auto TLS: Desactivar TLS
- Identificación: Activar la identificación
- Nombre de usuario SMTP: Tu dirección completa de Gmail, por ejemplo john.smith@yourdomain.com o john.smith@gmail.com
- Contraseña SMTP: Contraseña de su cuenta de Gmail
Cuando hayas terminado, haz clic en el botón “Guardar cambios” para guardar tus ajustes.
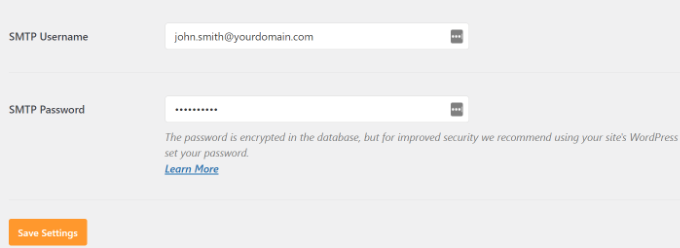
Eso es todo; has establecido correctamente WP Mail SMTP para utilizar los servidores SMTP de Gmail.
Cómo probar los ajustes de WP Mail SMTP
WP Mail SMTP plugin le permite probar sus ajustes de correo electrónico para que pueda asegurarse de que todo funciona correctamente.
Necesita navegar a Ajustes ” WP Mail SMTP y hacer clic en la pestaña ‘Prueba de correo electrónico’.
Después, sólo tiene que indicar una dirección de correo electrónico a la que pueda acceder en el campo “Enviar a” y, a continuación, hacer clic en el botón “Enviar correo electrónico”.
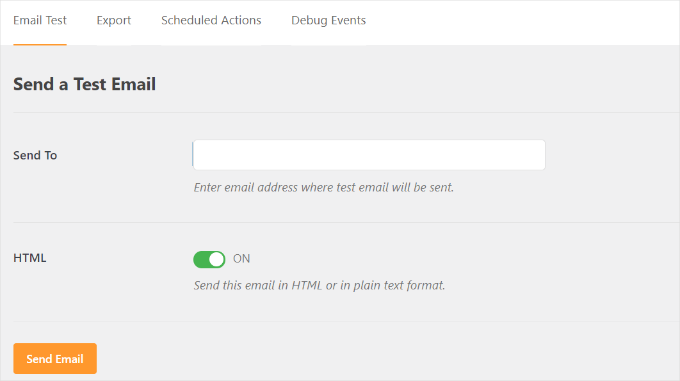
Debería aparecer un mensaje de correcto.
Para asegurarte, puedes marcar / comprobar tu bandeja de entrada para ver un mensaje con el asunto ‘WP Mail SMTP: Test Email to…’.
Eso es todo; has establecido correctamente tu sitio de WordPress para enviar correos electrónicos mediante los servidores SMTP de Gmail.
Consigue más con WP Mail SMTP Pro
Si desea aún más funcionalidad, debería probar WP Mail SMTP Pro. Con la versión Pro del plugin, se puede conectar con:
- Espacio de trabajo de Google/Gmail
- Amazon SES
- Mailgun
- Office 365 / Outlook.com
- SendGrid
- Y más
También obtendrá características adicionales como registros de correo electrónico, la posibilidad de ajustar o controlar qué notificaciones envía su sitio WordPress y mucho más.
Diagnosticar problemas de SMTP de Gmail que no funciona
Hemos observado que algunos usuarios tienen problemas al utilizar Gmail SMTP con determinadas configuraciones de alojamiento compartido.
Puedes seguir estos pasos para corregir el problema / conflicto / incidencia de SMTP de Gmail:
En primer lugar, tendrás que acceder a tu cuenta de cPanel. A continuación, busca el botón “+ Crear” en la página de cuentas de correo electrónico.

Solo tienes que crear una cuenta de correo electrónico que coincida con tu dirección de correo electrónico de Google Apps.
Al crear la cuenta de correo electrónico, básicamente estás haciendo que tu servidor de alojamiento conozca una dirección de correo electrónico que debería enviar correos electrónicos. Este paso es una solución para convencer al servidor de que estás enviando correos electrónicos a través de él, aunque planees utilizar el servidor SMTP de Gmail.
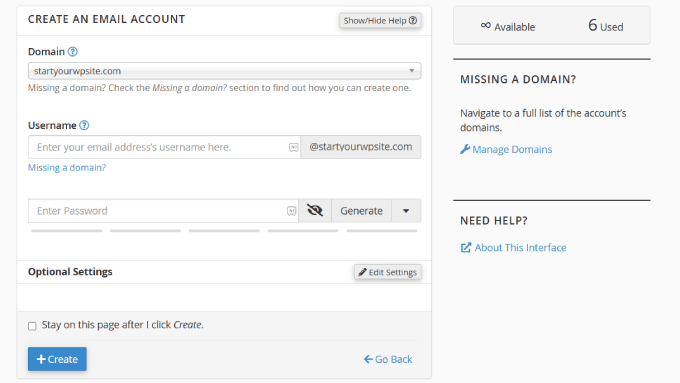
Esto puede parecer extraño porque no estás utilizando tu servidor para el correo electrónico. Básicamente engaña a tu servidor haciéndole creer que estás enviando el correo electrónico a través del servidor.
Desde su cuenta de cPanel, vayamos a los Registros MX y cambiemos el enrutamiento MX de automático a remoto. Tenga en cuenta que esto puede ser un poco difícil de encontrar ya que cada alojamiento tiene ahora una interfaz de cPanel personalizada.
A continuación, tendrás que buscar un pequeño enlace junto a MX que dice ‘Email Routing: Remote Mail Exchanger”.
Después de eso, puede acceder de nuevo a su sitio de WordPress y enviar un correo electrónico de prueba. Para más detalles, puedes seguir nuestra guía sobre cómo cambiar los registros MX de tu sitio WordPress en función de tu servicio de alojamiento.
Tutorial en vídeo
🎥 Sigue nuestro tutorial en vídeo paso a paso para establecer rápidamente Gmail SMTP en WordPress y asegurarte de que tus correos electrónicos se entregan de forma fiable.
Dale al play y síguenos.
Esperamos que este artículo te haya ayudado a aprender a enviar correo electrónico en WordPress utilizando el servidor SMTP de Gmail. También puedes consultar nuestros consejos de expertos para diagnosticar problemas cuando un formulario de WordPress no funciona y nuestra guía sobre cómo exportar entradas / registros de formularios de WordPress a CSV y Excel.
If you liked this article, then please subscribe to our YouTube Channel for WordPress video tutorials. You can also find us on Twitter and Facebook.


David
Hi, I used this tutorial last year to install and configure the Gmail SMTP plugin. Until very recently, the Gmail SMTP plugin in conjunction with my website’s contact form worked perfectly. But I tested my website’s contact form today, and I got the following fatal-error message:
Fatal error: Uncaught exception ‘Google_Auth_Exception’ with message ‘Error refreshing the OAuth2 token, message: ‘{ “error” : “invalid_grant” }”
I don’t have a clue what that means. I get the same fatal-error message when I use the plugin to send a test message at Gmail SMTP plugin>Settings>Test email.
I haven’t changed any of the plugin settings since I first installed it a year ago, and I haven’t done anything new with my Google Console account either. I’m using the most recent version of the Gmail SMTP plugin, and also the newest version of WordPress.
Any ideas or suggestions?
Thanks!
WPBeginner Support
Hey David,
It seems like your Oauth2 token has expired. Try following the tutorial again from the beginning to set it up again.
Admin
Ehsan
Thank U very much – one of my problem was this “my emails goes to spam folder”
with this service(Method 1) Now It’s great – of course after 14 days you must pay for that but still it’s prefect
I have question;
Can I send 100 Emails like newsletter for my customer is it OK for Google!?
I afraid my Emails after it goes to spam folder again
Sharon
I did everything as described, but the contact form on my website still does not work.
Adondriel
Hey, add a thing at the end for the troubleshooting thing: “Check with your website host and verify that they do not block outgoing requests by default.” I know 1. GoDaddy does this, and won’t let you unblock. and 2. Namecheap also blocks by default but you just gotta contact support, give em your info and ask em to unblock port 587 and boom, it’ll all work again.
Lucas
You save my life!
Tks!
adam
i keep getting a Error: redirect_uri_mismatch when i press ‘grant permission’. It’s driving me nuts as I can’t work out what is wrong? Everything seems to match.
Adam
Grzegorz
Same here. i get redirect_uri_mismatch
Macky
This video has been a fantastic help.
I’m a complete WordPress beginner.The step-by step instructions are very easy to follow. Now my emails are working perfectly!! Plus I also learnt how to insert headers & footers with ease.
Thanks once again!!
WPBeginner Support
Hi Macky,
We are glad you found the video helpful. You may also want to subscribe to our YouTube Channel for WordPress video tutorials.
Admin
Fabio
Your tutorial saved my site! Thank you very much mate!
Maggie Z
A follow-up question – because of the login conflict issue, I was also considering using WP Mail SMTP. However, many users on the support forum for that plugin express concern that the password for the email account is visible on the admin page in plain text.
I have a firewall set up that prevents non-admins from getting in to the back end, so is there any real security concern regarding the password showing in plain text? Any advice much appreciated!!!
Maggie Z
After troubleshooting quite a bit, I finally relented and went with WP Mail SMTP, which requires the “allow less secure apps” solution – a tech support person at G Suite told me that it was safe, and it seems like the only way to go for my particular setup. Appears to be working now. Thanks for the incredibly clear instructions!!! I am now a firm fan of this site.
Maggie Zellner
The video is fantastic, and the plugin installed perfectly. Unfortunately I didn’t realize until after I went through the whole process (because I didn’t read the documentation on the plugin carefully), the Gmail SMTP plugin eliminates the need for users to log in, and therefore it interfered with the login process that we have instituted for paid members on our website (which we manage through a plugin called PaidMembershipsPro).
Is there any way to disable that aspect of this plugin, so I can send all email via our Gmail account, but can still have users log in and out?
Eric
Great article! However, I am unclear on something when using WordPress for sending newsletters. What is the difference between those mass emailing service providers (mailgun & Sendgrid) and using Google Apps for work SMTP?
Can’t we use Google Apps for work to send newsletters just as well?
WPBeginner Support
with Google Apps for Work, you can only send an email to 500 recipients max (for paid business accounts). You cannot use it for newsletters.
Admin
Eric
Thanks so much for your response! With Google Apps for Work only limiting to 500 recipients, then I suppose it would work if we sent it to 500 or less people.
My next question, is it max to send all at one time or per day? If we throttle it to only send out a few per minute, do you know if it would allow it to send thousands within a few hours?
Heather
Thank you so much! This was so helpful!
zim ejin
Hi, this was very informative thank you for posting. however i have a website hosted on aws ec2, and route53 for dns. i tried the secure configuration. it didn’t work. Is there a special configuration for self hosted websites on aws ec2/route53. btw : i don’t have a cpanel installed.
Lanrz
After granting access and clicking on the allow button, I was not being redirected back to wordpress and the SMTP status is still not connected.
Any advice on how I should go about doing it?
Thanks!
Nathalie
Doesn’t work: test email retuens Connection: opening to smtp.gmail.com:587, timeout=300, options=array ( ‘ssl’ => array ( ‘verify_peer’ => false, ‘verify_peer_name’ => false, ‘allow_self_signed’ => true, ),)
I checked Email Routing -> Remote Mail Exchanger but it didn’t help
Raph Divine
Thanks for the write-up. It really helped me! 5stars!
Real Name
This guide worked wonderfully until my server stopped sending emails and I can’t get it to work again. The “Test Email” tab doesn’t make it clear if the email has successfully sent or not since it just spews out 52 lines that don’t mean much to me. :/
Boro
Amazing Tutorial !!!!
Thank you
peter
Ok, so I have followed the OAuth instructions and my SMPT status button has gone green. However, whether through test email or my site, I can not send an email through the contact us form (pluggin contact form builder by web Durado). The hanging message say waiting for and eventually I get a 405 error notice.
Any thoughts.
Thomas
Hoping you can help me?
I tried setting up method 1 using gmail and I got the ‘green light’ from wordpress however when testing the email I receive the following error message after waiting 1 minute for it to send:
Connection: opening to smtp.gmail.com:587, timeout=300, options=array ()
Any ideas on how to fix this?
Very best,
Tom
Fernando Santos
This tutorial is awesome!
I have one question, though. I directed the contact form messages to a gmail group email address, but, for some reason, the messages aren’t being delivered. When I direct to a “real” e-mail address like the messages are normally delivered.
I would really appreciate if someone could give me a hand figuring out why this happens.
Thank you!!!
Paul
+1 for this question. Have exactly the same question as wish to use our info@.. address
Andres
Thanks guys for such useful article. I followed all the steps and was able to configure the email correctly. However, when I receive the email from mydomain.com address (sent by wordpress after purchasing a product), the user avatar (gmail picture) doesn’t appear even though mydomain.com has a picture already.
In fact, if I send an email directly from mydomain.com account via google for work, the receiver is able to see the image right away, but it’s not the case if the email is sent via wordpress.
Do you have any suggestions? Thanks a lot, and keep rocking!
Sahar
Thanks for this helpful information. You really helped me out in setting this up, and I appreciate you taking the time to create this useful information!
WPBeginner Support
Glad you found it helpful.
Admin
lokesh kumar CL
What is origin URI of the client application. its not accepting website URL ….please help me out
Susan
Excellent instructions and thanks for walking me through setting this up. I did try the MX record change but no luck there either.
I get a 405 Not allowed message when I try to send an email.
I am hosted by Bluehost and am using the DIVI theme.
If anyone has any ideas I would be very grateful.
Leista
Hello, having a similar issue. Getting a 405 error, and also hosted on Bluehost. By any chance, were you able to fix the problem? Thanks.
JDC
I had the same problem with bluehost. But this gave me the solution.
I uninstalled any extra plugin for mail, including smtp mailer or gmail smtp plugin and just used a random address like mynewaddress@example.com (replace example.com with your own domain name) and it worked. I sent an email to my gmail account I it passes all the filters. It seems that BlueHost validates the address if it is comming from the server that hosts that domain. In gmail you usually get a warning that says that this email might not have being validated, but my email are comming fine with custom wordpress email functions. No extra plugin needed.
Prashant Bhandarkar
Thank you so much. This was of great help. God Bless you!
Karmen
Awesome tutorial!!!
Louise
I have this working brilliantly with a Google apps for work account for a woocommerce solution on wordpress, thank you.
Should this work if I use a Google group mail instead of an account?
Thanks very much.
Brian Treiber
I am not using Google apps for work, I have everything set up and connected. I tried to send a test email however I get a 405 not allowed error. I went into my cpanel and changed the mx records to the recommended” remote.” Still can’t send. Does this mean I need to use the less secure method?
Jason North
I’m getting this error when I try to activate the plugin:
Plugin could not be activated because it triggered a fatal error. Parse error: syntax error, unexpected T_FUNCTION, expecting ‘)’ in /home3/north23/public_html/forcebrain/wp-content/plugins/gmail-smtp/google-api-php-client/src/Google/autoload.php on line 19
genie
Hello, I use gmail-smtp plugin but it conflict with ultimate membership. Could you help me ?
I try another wp mail smtp but in the last feld: user account pass. Google app not allow to login from plugin. Pls help
Thank you
Leslie Andrews
Clearly I’m doing something wrong. When I get to “add credentials” I’m getting this error message and can’t move forward.
Invalid Redirect: must end with a public top-level domain (such as .com or .org)
Any help would be great
WPBeginner Support
If you look at the URL closely, you will notice that you are missing a . between domainname and the TLD, yours is examplecom when it should be example.com.
Admin
Graham
Thanks for the tutorial, but I get this error when I try to send a test email:
Connection: opening to ssl://smtp.gmail.com:587, timeout=300, options=array ()
SMTP ERROR: Failed to connect to server: Connection refused (111)
SMTP connect() failed.
Does it have something to with my site being secured with SSL?
Tony
I’m having the same issue. Did you figure it out?
Tom
Nice Article, I’m having a few issues to get this working. So I Deactivated the Plugin and tested a Contact Form to see if all was the same before setting up Gmail SMTP, unfotunately No Emails are being sent through now.
Even though the Gmail SMTP Plugin is NOT active, do we need to reset back to the default settings somehow?
WPBeginner Support
Nope simply deactivating it would turn it off.
Admin
Jenny
Hi,
I have this all set up properly and the test email worked…I just commented on my own blog to see if I would get an email when a comment was posted but I unfortunately didn’t. Can someone help me figure out where I went wrong?
Sachin
Hey thanks for the tutorial. Everything works fine in Setup, but when mail is being sent the site freezes for about 5 mins. site doesnt open at that time. It doesnt respond at that time. Any idea what might be causing this issue. But the point is mail is sent at last finally
WPBeginner Support
Please contact your WordPress hosting provider. They may be able to help you better.
Admin
crissy
Hi,
I’m having problem with the test email send
Fatal error: Cannot redeclare class phpmailer in /home/mywebsite/wp-includes/class-phpmailer.php on line 29
please help
David
Hi, I just installed this plugin, and everything went perfectly–thanks to your excellent tutorial! (I definitely couldn’t have done it without you.) My website’s outgoing email immediately started landing in people’s inboxes rather than in their spam folders.
But since I’m a novice at these matters and don’t know SMTP from RSVP, I did some reading on SMTP, and on one website I came across made this statement:
“Another strategy that hackers use: If your app sends email using SMTP, the IP address will be recorded in the Received header lines. Either scrub the original Received line [no explanation provided of how that’s done], or don’t use SMTP for email submission.”
Is this something I should be concerned about security-wise? Or does this plugin solve this problem somehow? And if not, how should I fix it?
Thanks!
WPBeginner Support
You shouldn’t be concerned about it. Most popular email service providers and their spam filters can check if an email is originating from the IP address it claims to be coming from.
Admin
Rob
Thank YOU so much for this!! I’ll keep coming back for more!!
Travis
Thanks so much for this tutorial.
Originally I had this all setup and working fine, but I moved my website and did some other fixes to it, and suddenly mailing stopped working.
Previously I spent some time trying to set it up and get it to work, but then it “stopped” working randomly.
Anyways, option #1 really saved me a major headache.
Christine Tabor
I configured, and got the green go to go button… THANKS FOR THE STEP BY STEP…
(doing this on a client test site)…
BUT REGARDING GRAVITY FORMS (or any form plug in)… do I also need to change up the notification emails that I’ve used for the Gravity Forms submissions?
Is it ok for the “from” email I used in the configuration to be different than the gmail used to set i up?
The issue that started all this was client not getting his Gravity Form notifications.
SO, before I install on their live site… (which is ecommerce and SSL)… can you reply to this … and should I still use the TSL for the configuration? I wasn’t sure if a certificate on the site made any difference in configuring this.
Thanks,
Christine
WPBeginner Support
No you don’t need to change notification emails.
It is OK, but to ensure maximum deliverability you should use the email address that is actually sending the email.
You should try with SSL first for the Gmail Configuration.
Admin
Christine
Thanks for reply…little bit more clarification please.
I set up an email…info@domain.com as a forwarder in cpanel, and I forward to their Verizon email.
I left the Verizon email in the GF notification list, added the info email, and another alternate email.
So the info email is the one in Gmail plugin set up that is sending the email…is it ok that it’s a forwarder?
Also, when I set up the plugin, I used a gmail I had created … CompanyName@gmail.com
But not using it as the sending email or anywhere else.
I sent a test and it appears all worked… Should I go back and change to SSL instead of the TSL or leave as is?
Thanks again…
Christine
WPBeginner Support
Sounds about right. However, if it was up to us we would use the Gmail address as the sender and add the forwarding email address as the Reply-to address.
Tribhuwan Bhatt
Thank You
Tim R
Doesn’t work for me on April 14, 2016.
Things I do rarely work.
Connection: opening to smtp.gmail.com:587, timeout=300, options=array ()
SMTP ERROR: Failed to connect to server: Network is unreachable (101)
SMTP connect() failed.
Mailer Error: SMTP connect() failed.
Any point in fussing with this ?
zse
Hi,
I have this same error.
Did you solved this problem?
Regards
Tim R
Here’s a follow up:
Settings of my web host’s server made this impossible.
Switched hosts and now it works easy as pie.
Don’t forget to change settings on gmail account to allow for unregistered apps (a search will discover many instructions to do that so I won’t add it here)
Monica
Hey i tried allowing access for unregistered apps it still doesnt work for me.
I am getting the error:
Connection: opening to smtp.gmail.com:587, timeout=300, options=array ()
SMTP ERROR: Failed to connect to server: Connection refused (111)
SMTP connect() failed.
Any ideas ?
Bclose
Hi ,
Thanks for this ticket ..i was fighting with my emial provider weblayer and nothing. it worked with your magic touch , one simple note .. by the end of Ouauth when explaining to create a fake local email you forgot to include that we must use MX record and what is is , i search on google and found ALT2.ASPMX.L.GOOGLE.COM, but this last simply thing could be a danwfault for all readers
Either way thank you..a lot!
Kay
Thank you soooooo much for this! Worked like a charm. The instructions are 100% on point!
Tyler
Anyone get this working with google apps email? I’ve created API credentials. SMTP status is green. But Test email says connection refused. Already set mx to remote on godaddy. Are there any security setting ls in google apps email that have to be configured?
TJ
Nice article, was able to install the plugin and it sent the email from the plugin test email.
Fails when using Contact Form 7, any recommendations for a contact form plugin that this might work with?
Thanks
WPBeginner Support
You can try it with WPForms.
Admin
Muhammad
thanks for the nice post.i was thinking to set up this for my site.
Ripul
Interesting, however I am getting this error : “Error: redirect_uri_mismatch”
Ripul
I forgot to mention I am testing this on Localhost.
Rashmirekha Moharana
Hi Syed.
Thanks a lot for such a wonderful solution. Let me implement and see.
Kudos to you.