Todos los días, ayudamos a los propietarios de sitios web a corregir la lentitud de carga de sus páginas a través de WPBeginner. Y casi siempre, el mayor culpable resulta ser el mismo: imágenes no optimizadas que consumen valioso ancho de banda y recursos del servidor.
El reto no es sólo reducir el tamaño de las imágenes, sino hacerlo sin que se conviertan en un caos de píxeles. Después de ayudar a innumerables propietarios de sitios web a resolver este problema, hemos desarrollado un sistema infalible para la optimización de imágenes que mantiene la calidad al tiempo que mejora drásticamente los tiempos de carga.
En esta guía, le guiaremos a través de nuestro proceso probado y comprobado para optimizar imágenes. Son las mismas técnicas que utilizamos en nuestros propios sitios, que reciben millones de visitas al mes, y funcionan independientemente de tus conocimientos técnicos.
Dado que se trata de una guía exhaustiva sobre la optimización de imágenes para la web, hemos creado un índice fácil de seguir:
- What Is Image Optimization?
- What Are the Benefits of Image Optimization?
- How to Save and Optimize Images for Web Performance
- Best Image Optimization Tools and Programs
- Best Image Optimization Plugins for WordPress
- Final Thoughts and Best Practices for Image Optimization
- Expert Guides on Improving WordPress Performance
1. ¿Qué es la optimización de imágenes?
La optimización de imágenes es el proceso de guardar y entregar imágenes en el tamaño de archivo más pequeño posible sin reducir la calidad general de la imagen.
Aunque el proceso parece complejo, hoy en día es bastante fácil. Puedes utilizar uno de los muchos plugins y herramientas de optimización de imágenes para comprimirlas automáticamente hasta un 80% sin pérdida visible de calidad.
He aquí un ejemplo de una imagen optimizada frente a una no optimizada:
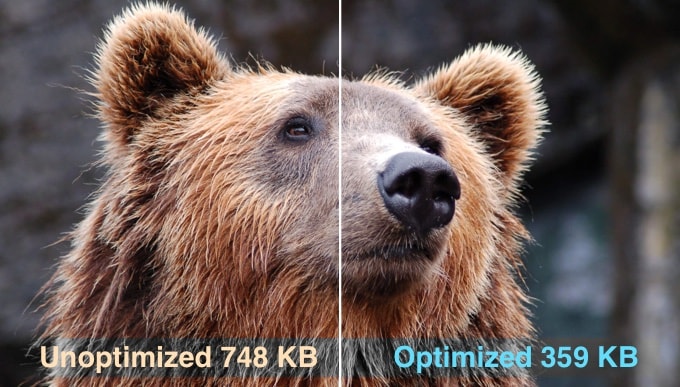
Como puede ver, cuando se optimiza correctamente, la misma imagen puede ser hasta un 80% más pequeña que la original sin pérdida de calidad. En este ejemplo, la imagen es un 52% más pequeña.
¿Cómo funciona la optimización de imágenes?
En términos sencillos, la optimización de imágenes funciona mediante la tecnología de compresión.
La compresión puede ser “con pérdida” o “sin pérdida”.
La compresión sin pérdidas reduce el tamaño total del archivo sin pérdida alguna de calidad de imagen. Con la compresión con pérdida, puede haber una pérdida menor de calidad, pero lo ideal es que no sea un aviso para tus visitantes.
¿Qué significa optimizar imágenes?
Es posible que haya recibido una recomendación para optimizar las imágenes del soporte de su alojamiento WordPress o de una herramienta de prueba de velocidad y se pregunte qué debe hacer.
Tendrás que reducir el tamaño de archivo de tus imágenes optimizándolas para la web. Te mostraremos cómo hacerlo paso a paso.
2. ¿Cuáles son las ventajas de la optimización de imágenes?
Aunque optimizar las imágenes tiene muchas ventajas, éstas son las principales que debe conocer:
- Mayor velocidad del sitio web
- Mejora del posicionamiento SEO
- Una mayor tasa de conversión global de ventas y clientes potenciales
- Menos almacenamiento y ancho de banda (lo que puede reducir los costes de alojamiento y CDN)
- Copias de seguridad de sitios web más rápidas (lo que puede reducir el coste del almacenamiento de copias de seguridad).
Las imágenes son el segundo elemento / artículo más pesado de una página web después de los vídeos. Según el archivo HTTP, las imágenes representan el 42% del peso total de una página web media.
Como sabemos que los sitios web rápidos se posicionan mejor en los motores de búsqueda (SEO) y tienen mejores conversiones, la optimización de imágenes es algo que todo sitio web empresarial debe hacer si quiere tener éxito en Internet.
Ahora te preguntarás hasta qué punto la optimización de las imágenes puede marcar la diferencia.
Según un estudio de Strangeloop, un retraso de un segundo en el tiempo de carga de un sitio web puede costarle un 7% de las ventas, un 11% menos de páginas vistas y una disminución del 16% en la satisfacción del cliente.
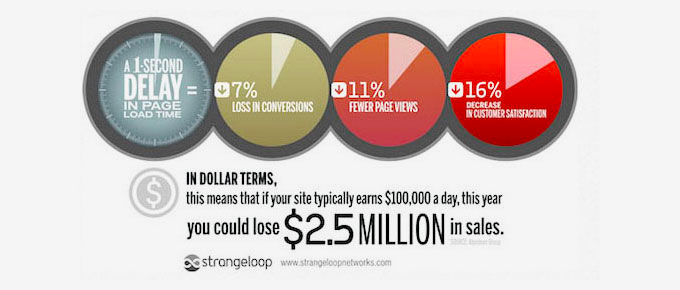
Si estas no son razones suficientes para acelerar su sitio web, debe saber que los motores de búsqueda como Google también dan un tratamiento SEO preferente a los sitios web que cargan más rápido.
Esto significa que al optimizar sus imágenes para la web, puede mejorar la velocidad del sitio web y aumentar la clasificación SEO de WordPress.
Tutorial en vídeo
Si prefiere instrucciones escritas, siga leyendo.
3. Cómo guardar y optimizar imágenes para mejorar el rendimiento de la Web
La clave de una correcta optimización de imágenes para el rendimiento web es encontrar el equilibrio perfecto entre el menor tamaño de archivo y una calidad de imagen aceptable.
Los tres aspectos que desempeñan un papel fundamental en la optimización de imágenes son:
- Formato de archivo de imagen (JPEG vs. PNG vs. GIF)
- Compresión (mayor compresión = menor tamaño del archivo)
- Dimensiones de la imagen (alto y ancho)
Si eliges la combinación adecuada de los tres, puedes reducir el tamaño de la imagen hasta un 80%.
Veamos cada una de ellas con más detalle.
1. Formato de archivo de imagen
Para la mayoría de los propietarios de sitios web, los tres únicos formatos de archivo de imagen que realmente importan son JPEG, PNG y GIF. La elección del tipo de archivo adecuado desempeña un perfil importante en la optimización de imágenes.
Para simplificar las cosas, conviene utilizar JPEG para fotos o imágenes con muchos colores, PNG para imágenes sencillas o transparentes y GIF solo para imágenes animadas.
Para quienes no conozcan la diferencia entre cada tipo de archivo:
- El formato de imagen PNG no está comprimido, lo que significa que es una imagen de mayor calidad. El inconveniente es que el tamaño de los archivos es mucho mayor.
- Por otro lado, JPEG es un formato de archivo comprimido que reduce ligeramente la calidad de la imagen para proporcionar un tamaño de archivo significativamente menor.
- Mientras que el GIF solo utiliza 256 colores junto con una compresión sin pérdidas, lo que lo convierte en la mejor opción para las imágenes animadas.
En WPBeginner, utilizamos los tres formatos de imagen en función del tipo de imagen. Muchos sitios web también están utilizando el formato WebP, que ahora es ampliamente compatible con / dar soporte.
Para más información sobre formatos de imagen, consulte nuestra guía sobre WebP vs. PNG vs. JPEG: cuál es el mejor formato de imagen para WordPress.
2. Compresión
Lo siguiente es la compresión de imágenes, que desempeña un gran perfil en la optimización de imágenes.
Existen distintos tipos y niveles de compresión de imágenes. Los ajustes de cada uno variarán en función de la herramienta de compresión de imágenes que utilice.
La mayoría de las herramientas de edición de imágenes, como Adobe Photoshop, ON1 Photo, GIMP, Affinity Photo y otras, incorporan características de compresión de imágenes.
También puedes guardar las imágenes normalmente y luego utilizar una herramienta web como TinyPNG o JPEGmini para facilitar su compresión.
Aunque requieren cierto esfuerzo manual, estos dos métodos permiten comprimir las imágenes antes de subirlas a WordPress, y esto es lo que hacemos en WPBeginner.
También hay varios plugins populares de WordPress como Optimole y EWWW Image Optimizer que pueden comprimir automáticamente las imágenes cuando las subes por primera vez. Esto es muy práctico, y muchos principiantes e incluso grandes empresas prefieren utilizar estos plugins de optimización de imágenes.
Compartiremos más acerca del uso de plugins de WordPress más adelante en el artículo.
3. Dimensiones de la imagen
Normalmente, cuando importas una foto de tu teléfono o de una cámara digital, tiene una resolución muy alta y unas dimensiones de archivo grandes (alto y ancho).
Normalmente, estas fotos tienen una resolución de 300 PPP y unas dimensiones a partir de 2000 píxeles y más. Aunque las fotos de alta calidad son adecuadas para la impresión o la autoedición, su gran tamaño las hace inadecuadas para sitios web.
Reducir las dimensiones de la imagen a algo más razonable puede disminuir significativamente el tamaño del archivo de imagen. Puedes cambiar el tamaño de las imágenes con un programa de edición de imágenes de tu ordenador.
Por ejemplo, optimizamos una foto con una resolución de 300 PPP y unas dimensiones de imagen de 4900×3200 píxeles. El tamaño original del archivo era de 1,8 MB.
Elegimos el formato JPEG para una mayor compresión y cambiamos las dimensiones a 1200×795 píxeles. El tamaño del archivo se redujo a sólo 103 KB. Es decir, un 94% menos que el tamaño del archivo original.
Ahora que ya conoce los tres factores importantes en la optimización de imágenes, echemos un vistazo a varias herramientas de optimización de imágenes para propietarios de sitios web.
4. Las mejores herramientas y programas de optimización de imágenes
Como hemos mencionado antes, la mayoría de los programas de edición de imágenes incluyen ajustes de optimización y compresión de imágenes.
Aparte del software de edición de imágenes, también hay varias potentes herramientas gratuitas de optimización de imágenes que puedes utilizar para optimizarlas para la web (con sólo unos clics).
Le recomendamos que utilice estas herramientas para optimizar las imágenes antes de subirlas a WordPress, sobre todo si es un perfeccionista.
Este método le ayuda a ahorrar espacio en disco en su cuenta de alojamiento de WordPress, y le garantiza la imagen más rápida con la mejor calidad, ya que usted revisa manualmente cada imagen.
Adobe Photoshop
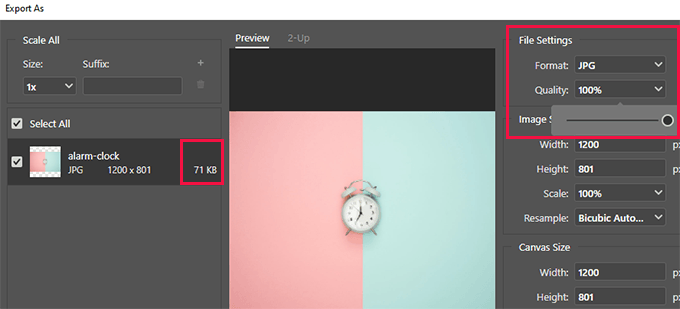
Adobe Photoshop es una aplicación de edición de imágenes de primera calidad que permite exportar imágenes con un tamaño de archivo menor para la web.
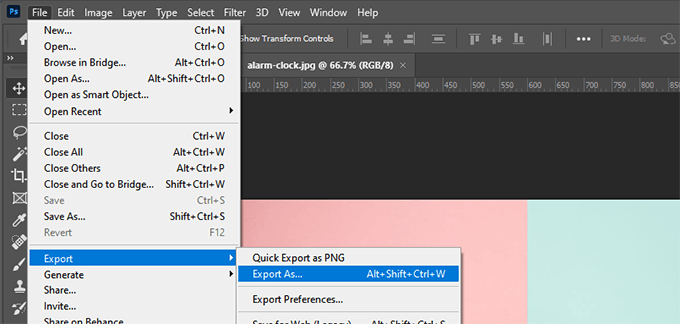
En el cuadro de diálogo de exportación, puede elegir el formato de archivo de imagen (JPG, PNG, GIF) que le ofrezca el tamaño de archivo más pequeño.
También puedes reducir la calidad de la imagen, los colores y otras opciones para disminuir aún más el tamaño del archivo.
GIMP
GIMP es una alternativa gratuita y de código abierto a Adobe Photoshop. Se puede utilizar para optimizar sus imágenes para la web. El inconveniente es que no es tan fácil de usar como otras soluciones de esta lista.
Primero, necesita abrir su imagen en GIMP y luego seleccionar la opción Archivo ” Exportar como…. Aparecerá el cuadro de diálogo Exportar imagen, donde puede dar un nuevo nombre al archivo. A continuación, haga clic en el botón “Exportar”.
Ahora verás las opciones de exportación de imágenes. En el caso de los archivos JPEG, puede utilizar el carrusel / control deslizante “Calidad” para seleccionar el nivel de compresión y reducir el tamaño del archivo.
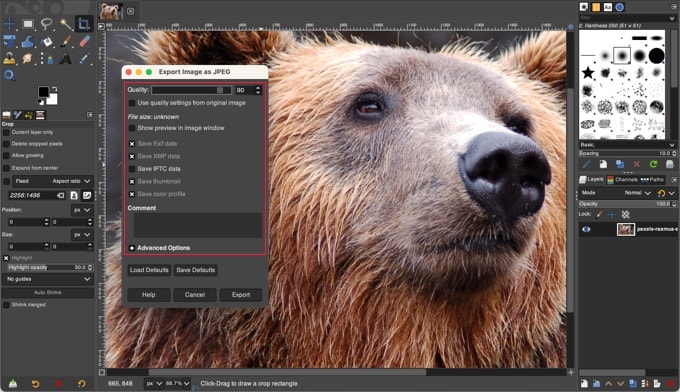
Por último, debe hacer clic en el botón “Exportar” para guardar el archivo de imagen optimizado.
TinyPNG
TinyPNG es una aplicación web gratuita que utiliza una técnica inteligente de compresión con pérdida para reducir el tamaño de tus archivos PNG y JPEG. Todo lo que tienes que hacer es ir a su sitio web y subir tus imágenes con solo arrastrar y soltar.
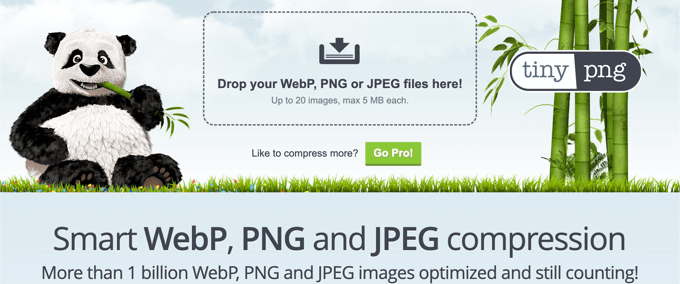
Comprimirán la imagen y te darán un enlace para descargarla.
También tienen una extensión para Adobe Photoshop, que es lo que utilizamos como parte de nuestro proceso de edición de imágenes porque te permite acceder a TinyPNG desde dentro de Photoshop.
Para los desarrolladores, disponen de una API para convertir imágenes automáticamente. Además, para los principiantes, tienen un plugin de WordPress que lo hará por ti. Hablaremos de esto más adelante.
JPEGmini
JPEGmini utiliza una tecnología de compresión sin pérdidas que reduce significativamente el tamaño de las imágenes sin afectar a su calidad percibida. También puedes comparar la calidad de la imagen original y la imagen comprimida.
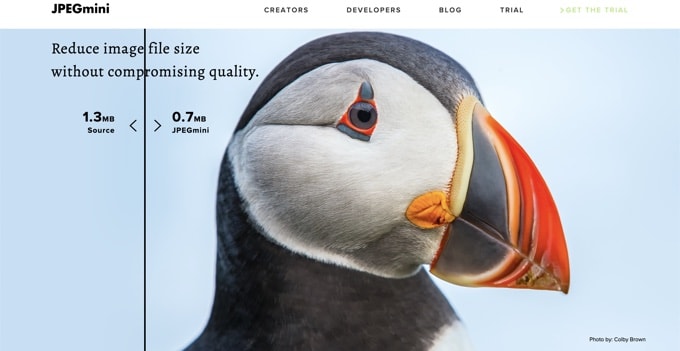
Puedes utilizar su versión web de forma gratuita o comprar el programa para tu ordenador. También tienen una API de pago para automatizar el proceso para tu servidor.
ImageOptim
ImageOptim es una utilidad para Mac que permite comprimir imágenes sin perder calidad, encontrando los mejores parámetros de compresión y eliminando los perfiles de color innecesarios.
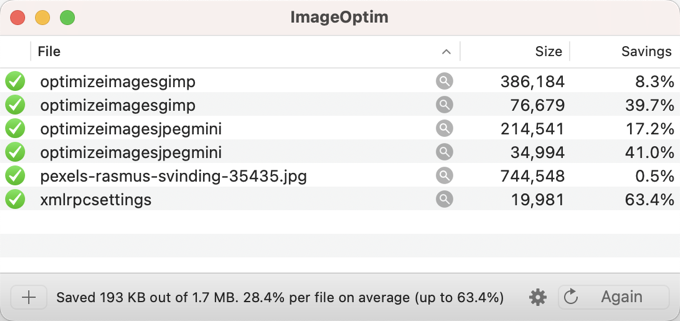
Una alternativa para Windows es Trimage.
5. Los mejores plugins de optimización de imágenes para WordPress
Creemos que la mejor forma de optimizar tus imágenes es hacerlo antes de subirlas a WordPress. Sin embargo, si tienes un sitio con varios autores o necesitas una solución automatizada, puedes probar un plugin de compresión de imágenes para WordPress.
Aquí está nuestra lista de los mejores plugins de compresión de imágenes para WordPress:
- Optimole, un popular plugin del equipo de ThemeIsle
- Optimizador de imágenes EWWW
- JPEG, PNG & WebP Image Compression, un plugin del equipo TinyPNG mencionado anteriormente.
- Imagify, un plugin del popular equipo WP Rocket
- Optimizador de imágenes ShortPixel
- Smush
- reSmush.it
- Envira Gallery es un plugin de WordPress para galerías con compresión de imágenes integrada.
Estos plugins de optimización de imágenes para WordPress te ayudarán a acelerar tu sitio web.
6. Reflexiones finales y mejores prácticas para la optimización de imágenes
Si no estás guardando imágenes optimizadas para la web, tienes que empezar a hacerlo ya. Supondrá una gran diferencia en la velocidad de su sitio, y sus usuarios se lo agradecerán.
Por no mencionar que los sitios web más rápidos son excelentes para el SEO, y es probable que vea un aumento en su posicionamiento en los motores de búsqueda.
Aparte de la optimización de imágenes, las dos cosas que le ayudarán significativamente a acelerar su sitio web son el uso de un plugin de caché de WordPress y el uso de un CDN de WordPress.
En WPBeginner, usamos WP Rocket porque combina potentes características de almacenamiento en caché y optimización de imágenes, incluyendo carga diferida y soporte WebP, en una única solución.
Como alternativa, puede utilizar una empresa de alojamiento gestionado de WordPress, ya que suelen ofrecer tanto almacenamiento en caché como CDN como parte de la plataforma.
Guías de expertos para mejorar el rendimiento de WordPress
Esperamos que este artículo te haya ayudado a aprender cómo optimizar tus imágenes en WordPress. Puede que también quieras ver otros artículos relacionados con la mejora del rendimiento de WordPress:
- La guía definitiva para aumentar la velocidad y el rendimiento de WordPress
- Cómo acelerar el rendimiento de WooCommerce
- Cómo descargar los medios de WordPress para mejorar la velocidad del sitio web
- Los mejores plugins de caché de WordPress para acelerar su sitio web
- Cómo optimizar Core Web Vitals para WordPress (Guía definitiva)
- Cómo reducir el tiempo hasta el primer byte (TTFB) en WordPress – Consejos de expertos
- Cómo utilizar el plugin GTmetrix para mejorar el rendimiento de un sitio WordPress
- Alojamiento WordPress más rápido (pruebas de rendimiento)
- Métricas importantes que debe medir en su sitio de WordPress
- Cómo realizar correctamente una prueba de velocidad de un sitio web
- Cómo poner a prueba un sitio web WordPress
If you liked this article, then please subscribe to our YouTube Channel for WordPress video tutorials. You can also find us on Twitter and Facebook.


Diane Talbotier
Hi, does resizing mean changing the size of the images as they are shown on the website, or resizing the size of the file , please?
And how do I know what is the optimal size?
WPBeginner Support
It would depend on what you mean, for compression in this guide, it is the size for the file. You can also reduce the width and height of an image if it is too large. Your specific theme would determine the specific image size you want to use.
Admin
Terri
You mentioned in your optimise example that your original photo was 300dpi, then you optimised it to a smaller file size. But you did not say what the target dpi was. Is it 72 for web? Or higher? Thanks for the informative article.
WPBeginner Support
That would depend on your personal preference and how large you are wanting/needing the images to be.
Admin
Romel
thanks a lot it cleared a lot of doubts.
WPBeginner Support
Glad our article was helpful
Admin
Odenyi Emmanuel Chidera
What I like most about wpbeginner is how they will give you information on what to implement on your own site but also tell you what they are using on their own site. It really helps me decide faster. Learning from a master is always easier. Thanks.
WPBeginner Support
You’re welcome, glad you like our content
Admin
Luz Manalo-Cruz
I’ve compressed images via TinyPNG and tried to replace the heavier images on my site with these (ie. I deleted the heavy photos and uploaded the compressed ones). However the media library is still uploading the old heavier images. Does that mean that I can’t replace the old images already uploaded? Will it only upload the compressed images that have not been uploaded at all?
WPBeginner Support
If you are replacing the heavier images, you would want to ensure you don’t have caching on your site that is showing the old image and when you upload the new image that you are uploading the correct image.
Admin
Giovanna
Thanks for the informative article, Syed.
Moving forward I am going to make sure to always use optimized images. Do you recommend I go back to already published posts and replace my images with optimized ones?
WPBeginner Support
If possible we would recommend updating your older images, the plugins we recommended should handle that for you
Admin
Percy Young
Thank you for your post. many nice tools. I wonder if theres any thing to be done to rezize images that have been previously uploaded, and how to delete images the worpress is not using any more.
WPBeginner Support
If you need to generate new images you could follow our guide here:
https://www.wpbeginner.com/plugins/regenerate-thumbnails-new-image-sizes-wordpress/
For removing the extra images there are media cleanup plugins that you are able to use
Admin
WPBeginner Support
Glad you’ll use our recommendations
Admin
Dr Amandeep Sandhu
Thanks for sharing such ideas….!
WPBeginner Support
You’re welcome, thanks for reading our articles
Admin
İbrahim BOZKURT
I’m a WordPress developer. I am writing from Turkey.
Very difficult to find quality WordPress resources.
I discovered you. I didn’t know English but learned English. Thanks to you everything.
WPBeginner Support
Thank you for reading our articles and congratulations on learning a new language
Admin
Felipe Adan Lerma
Hi, it seems maybe WordPress has incorporated some of this into its current image upload process, at least in the Premium bracket?
I ask cause I now get the option to choose the actual size or something larger or smaller?
Or is that process not an optimization / reduction in size of the image?
Thanks so much! Very important useful topic.
Adan
WPBeginner Support
It sounds like you may be talking about WordPress.com and they have custom plugins setup for sites on their service
Admin
Felipe Adan Lerma
Ahhh, yes, I forget the two WP’s differ, sorry. I’m still trying to figure out how to work where I am w/WP & it’s definitely via their .com sites. Thank so much then, WP – Adan
WPBeginner Support
No worries, should it help we have our article listing the differences here:
https://www.wpbeginner.com/beginners-guide/self-hosted-wordpress-org-vs-free-wordpress-com-infograph/
Anna
Very helpful info!! I was just researching how to do this when your email came through! Saved em time and effort and had just the advice I was looking for.
WPBeginner Support
Glad our guide and newsletter could be helpful
Admin
Lindsay
When saving on photoshop what width do you suggest for optimum web performance?
My theme is saving 1600×1050 for optimum header but what should I do for the body images. Theme designer doesn’t have a recommendation.
WPBeginner Support
If you’re going through the other steps in this article then the image size would be what would fit your content’s dimensions best so WordPress wouldn’t need to resize the image.
Admin
edccde
Please update that youtube video.First of all Jpegmini isn’t a web app and it is a software which i have to install in my pc.
WPBeginner Support
Thank you for letting us know about the video, we’ll certainly look into updating the video
Admin
Jackie
Is there way to compress images already uploaded to wordpress? Or do I need to compress all my images and then reupload into WP? THanks in advance for the advices.
Irina
Hi,
Need an advice: I need to upload Low res and Hi-res images (1200pix at 300dpi) so my customers can download them. I have no questions about LR image optimization. How can I save hi-res images? The size is up to 2 MB. I have hundreds of thousands of images…
Ratan Kumar
This post is awesome and really add value to my site. However, I recently tried to save images from flipkart but it saved in very low pixel format. Wondering if you can help me to figure out on how to do that.
Ray
I already bulk uploaded 1500 product images that were connected to image urls I found on the internet.
Now that I have those 1500 images already in my Media Library, how can I go back and resize and compress them?
Also, I’m confused about whether resizing means changing the size of the images as they are shown on the website, or resizing the size of the file.
Thanks!
Sara Lewis
what about the plugin ewww image optimizer?
WPBeginner Support
Hey Sara,
Yes its a good alternative. However, for better results we would still recommend optimizing images in your image editing program before uploading to WordPress.
Admin
Donna
I will be travelling to a place where internet connectivity is limited and expensive. So, I want to reduce the file size of my photos before I go online to upload them to my blog. Can someone please recommend for me what resolution and dpi would be good to use? The app I am planning to use asks for three measurements:
resolution – from 200 to 2048
DPI – from 72×72 to 300×300
jpeg quality (compression level) – from 0.00 to 1.00
Carrie
In the video she changes her pic. I understand the screen in PS. But you have not explained what should the width and height be in pixels for WP the limit is 2mb. What would be a good standard for sliders, etc for a wp site?
Carrie
Sorry for being the dunce in the corner, but could someone please clarify one thing? I installed the WP Smush it plugin and have been slowly working through all the photos I’ve uploaded to my site for the last 2 years. I’m doing 50 at a time, the free limit. However, now that I have the plugin, for future photo uploads, does having it mean I don’t have to use any other program to resize my photos before uploading them to my WP site? If I have an 8 MB photo and upload it to my site, the plugin does everything for me? I just want to confirm that the original photo is not still uploaded and saved to my host server, SiteGround. My site is wicked slow, I’ve run tons of diagnostics, and I still can’t figure out why except that everything points to my photos. Thanks!
Tony Squibb
Hi Carrie, I’m defo not an expert in any way but I do have experience with WP Smush it and yes, future uploads should be auto ‘smushed’. There is a little notification in the media gallery as you do so.
To check the causes of your slow site you can use GTmetrix and then open the waterfall page where it will show the times of the individual pages items loading. Once you know what is the problem you can then address it.
I hope that helps from one ‘dunce’ to another
Carrie
Hi Tony,
Thanks for weighing in! Unfortunately I uninstalled WP Smush and tried EWWW Image Optimizer along with the Thumbnail Regerate plugin (based on another bloggers suggestion) and royally messed up the photos on my site. I’m a newb with regards to how to manage my files through the FTP on my web host, so I ended up deleting a bunch of images (as in hundreds) and re-uploading them after resizing them manually in an image program. Turns out that too was a bad idea. Now I have a bunch of error messages when I render my site in my Google Console because when Google crawls my site, those files are now gone or moved. AGH! I’m on the verge of simply paying someone to revamp my site or quitting altogether. But I really appreciate that you took the time to leave a helpful comment.
Happy New Year! May 2017 be better than 2016.
Jeff
hi
Best Image Optimization Plugins for WordPress Site Which is?
Gagan
I was thinking what if i upload my Images to Google Blogger and use them on my wordpress Site by “Insert From URL” option?
Any suggestion if this is a Good Idea or no?
Thanks in advance
Zimbrul
I came back here as I’m looking for plugins that upload a large image as a optimised image straight to WordPress. I’m sure I’ve seen this somewhere here at WP Beginner but I cannot find it.
WPBeginner Support
Please take a look at Optimizing images with WP Smush pros, cons, and alternatives.
Admin
Jack
Photoshop is definitely the best one, for online services, kraken.io and resizeimage.net are good alternatives to tinypng.
tanveer
is xnview a good option for compressing images?
WPBeginner Support
We haven’t tried it.
Admin
Larry Aldrich
Someone mentioned RIOT in an earlier comment. It is my go-to app for minimizing images BEFORE you upload them. The compression rate is close to phenomenal. Sorry MAC users, but it’s only available for Windows.
Martin
Hello WPBeginner,
I would be very interested in the Windows version of Trimage you have apparently seen.
On the Trimage homepage you just see a link asking for help with the windows port…
Greg
I have got used to using Fireworks even though I have CS3
Zimbrul
Me too. I use CSS4 and still go to Fireworks for image optimisation.
Marianne P.
I just checked out the Trimage site and did not see the Windows version – just various *nix versions. Please point me in the right direction. Thanks so much – really great article!
Corinna
I was wondering if there was any way of reducing the size of the images already uploaded to a site? I have changed the way I upload them so in future all my images will be smaller. But I thought maybe it would be useful to change the size of those already uploaded.
Julie Anglesey
I would also like to know how to reduce the size of images already uploaded.
Zimbrul
It’s (or was) Smush-It.
Samiullah Khan
Search the web too much to find good solution to optimize images; but most of them most of them doesn’t let’s see tools mentioned in this post work or not
Graham
The article defines PNG as an uncompressed file format, but as far as I know, standard PNGs use lossless compression.
And I think it would be helpful to mention why you might choose one format over another for continuous tone images (eg. a photo) vs. limited palette images (eg. a logo).
Rob Dewing
Why no mention of Photoshop Elements, the cut down home use version of Photoshop? It does 90+% of the things full phat Photoshop will do, including ‘save for web’ image compression, all for less than $100.
Ines
Would you recommend to use Flickr to upload your images and then copy the HTML code to your wordpress site? What would you suggest for travel blogs that contain lots of pictures? Thanks.
WPBeginner Support
You can add flickr photos in WordPress by simply pasting the photo URL in a post. Normally we would not recommend it, because people will be viewing and finding your photos on Flickr and may never even get a chance to visit your website. However, if you feel that building a community around your photos on flickr is more useful for you, then sure go ahead.
Admin
Benjamin
You could add kraken.io to your list. It does the same thing as Jpegmini but also works with PNG images.
Aurel
I am using RIOT, which is free, very fast and exelent program.
Debra Torres
I’ve been using the Yahoo Smush it tool at: http://www.smushit.com/ysmush.it/
Would you recommend this one? Or are the others you mentioned better?
WPBeginner Support
Smushit is a great tool too. But try other tools we mentioned and compare the results.
Admin
James DiGioia
There is WordPress plugin for Smush.it:
http://wordpress.org/plugins/wp-smushit/
This makes it easier to compress images using Smush.it without having to prep them beforehand.
Youri van Dijk
I was about to mention that plugin as well. I generally do save my images optimized myself, but for clients that are not very familiar with these tools installing the plugin is a huge benefit.
John Mauldin
Your article is VERY timely. Just encountered the need to reduce hundreds of photos for a kitchen and bath showroom. Bought JPEGmini since I could only do 20 photos a day in the free version but $19.99 is nothing for the ability to drag and drop entire folders into the program and have it zip them in seconds/minutes. Thanks so much for the help!
Haseeb
Isn’t there any automated way of doing this on wordpress? How about ‘WP Smush.it’ ?
Editorial Staff
You can automate the process with some tools that we mentioned or using this plugin:
http://wordpress.org/plugins/ewww-image-optimizer-cloud/
But why create more server load when this can be resolved by educating the user.
Admin
Marlene
Great article, however I was under the impression that any images with text on them should be saved as PNG files for best sharpness….?
Editorial Staff
PNG will definitely have a higher quality, but most folks won’t be able to tell the difference unless you put them side-by-side. If you can speed up your site with a non-noticeable difference, then why not
Admin
Adam W. Warner
Great article, and an important subject many WordPress admins miss.
[Link Removed]
Lynn
Lightroom has a number of presets for exporting to Facebook and Web – do those compress the photo files sufficiently or should I still turn to Photoshop?
Editorial Staff
Not sure about lightroom and how it exports image. You can run a side-by-side test.
Admin
Graham
Lightroom will do pretty much the same job as Photoshop when exporting photos to JPEGs.
Bill Wells
Lightroom is the go-to for photographers; it allows you to optimise your photos in batches and then will export the batch to your preferred pixel size and compression in a number of formats, including jpeg. It also automatically adds your copyright message to the batch if you want.
I don’t know about batch-processing in Photoshop but I use it for major image manipulation only.
I guess if you’re doing graphics or heavy manipulation, use Photoshop but if you’re using lots of photos and just want them to look their best, use Lightroom.
Scott Wyden Kivowitz
I’m a big advocate for many of the products you mentioned. Now I get to add this link to my resources for whenever customers ask me this exact question. Thanks Syed.
Editorial Staff
You’re very welcome Scott.
Admin
Dave Kulas
If you are taking the pictures yourself for your website …. set your camera to take a picture at 800 x 600 and at less resolution. Some camera have a Good – Better – Best resolution setting … use the “GOOD” setting. . You should get an image that will load quickly.
If you already have some images … take a look at for FREE … http://www.getpaint.net ….. I have been using it for years. I take the HUGE photos given to me by clients … then RE-SIZE them to 800 x 600. Then I use the built in compression tool to compress the image.
Steven Alig
I would not recommend taking low resolution photos.
You will want to take your original photos at higher resolutions just in case you want to use them for something else. Plus if you take photos at a higher resolution, you will have the ability to crop in on an area if desired.
If the photos are a lower resolution, you will not have that option and will be stuck with what you have taken as the original.
Mark Pridham
I have to agree with Steven on this. I highly recommend taking high resolution images in your camera. You then have a large file that you can work with, It very easy to reduce file size from a hi-res image, but impossible to go the other way. By taking hi-res images, you also have the option of using them for print work if the need arises, Generally, I end up with the large, raw image, a cropped and retouched print image, and a smaller image for web-based work.
Michael Maye
I would agree too about taking full high resolution photos. Then resize down and compress for uploading to your website. You will always have the original high res photo for other uses.
Zimbrul
I usually use Fireworks and then Tiny PNG if required.
Editorial Staff
Yup that’s a good combination
Admin
Geoffrey Gordon
Great article Syed.
However I really think that fireworks is the king when it comes to optimising images for the web and its a whole lot cheaper than Photoshop.
Editorial Staff
Thanks Geoffrey. Yup I know Photoshop is expensive which is why I mentioned other free tools as well. GIMP and Fireworks both has this functionality.
Admin
paul
So I’ll just follow the options as seen on the image in this article’s Photoshop section and it’s all good?
Editorial Staff
Yup, if you do that, then you will have probably one of the best performance results. However depending on an image, some might not look as good, so in those cases we try the Very High. Do it on case by case basis, but most images would be fine.
Admin
Andrew Brown
You discuss using Photoshop, which is way beyond most bloggers needs or price – why do you not refer to Lightroom, which also has an excellent image export option, including an option to restrict the max file size, as well as save by dimension or using a set dpi.
Once some one knows the comp screens work at 72dpi, the rest becomes much easier, and it becomes amazing as to how easy it is to have a web template amongst the export options without needing any real in depth knowledge of what needs to be done.
Editorial Staff
Andrew,
Yes we understand that Photoshop is expensive which is why we mentioned several other free options. Just updated the article now to add a link to GIMP right below photoshop.
As for Lightroom, didn’t mention it because we don’t use it. Same reason why Fireworks was left out.
Admin