Microsoft Outlook es una opción excelente para empresas de cualquier tamaño. Sin embargo, si utilizas un plan gratuito, te encontrarás con el dominio de correo electrónico por defecto. Es decir, verás “@outlook.com” al final de tu dirección de correo electrónico.
Mantener el dominio de correo electrónico por defecto no es lo ideal, ya que no dejará una muy buena impresión en su público. Esto se debe a que una dirección de correo electrónico genérica no es compatible con una fuerte identidad de marca ni tiene un aspecto muy profesional.
Afortunadamente, el plan Microsoft 365 Business Premium te permite utilizar tu nombre de dominio para crear una dirección de correo electrónico empresarial con Outlook. Esto crea un aspecto más profesional al enviar correos electrónicos. Además, el plan Premium también te ofrece potentes características como la protección frente al Spam y una mayor seguridad.
En este artículo, te mostraremos cómo establecer una dirección de correo electrónico de marca personalizada con Outlook.

¿Qué es una dirección de correo electrónico de marca profesional?
Un correo electrónico profesional lleva el nombre de su empresa. Por ejemplo, “support@yourdomain.com” es una dirección de correo electrónico profesional. En cambio, “yourdomain@yahoo.com” no es una dirección de correo electrónico profesional.
Hay muchas formas de crear una dirección de correo electrónico profesional. Puede utilizar el servidor de correo incorporado que viene con la mayoría de las empresas de alojamiento de WordPress.
Esto funcionará para la mayoría de los sitios web principiantes con un presupuesto ajustado. Sin embargo, carece de varias características críticas como una mejor protección antispam y antivirus, seguridad mejorada, gestión sencilla de cuentas, etc.
Si desea disfrutar de las potentes características antes mencionadas, necesitará un servicio profesional de correo electrónico para empresas que funcione con su nombre de empresa o dominio.
¿Qué es Outlook.com?
Outlook es un servicio de correo electrónico ofrecido por Microsoft. Puede crear una cuenta gratuita en ‘yourname@outlook.com’ para utilizar el servicio.
Sin embargo, si desea crear una dirección de correo electrónico de marca profesional con Outlook.com, deberá acceder a una cuenta de Microsoft 365 Business Premium.
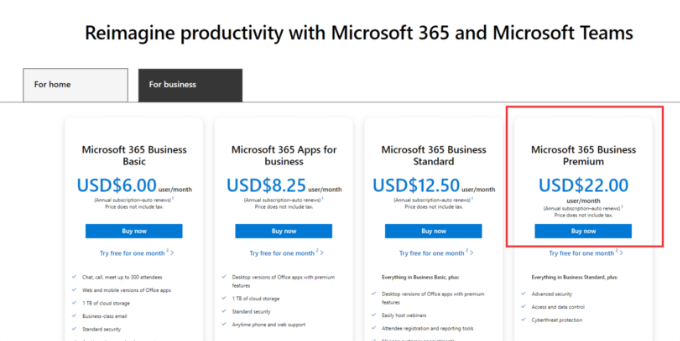
Es un servicio de pago a partir de 6,00 $ por usuario/mes. Incluye 1 TB de almacenamiento en OneDrive y las últimas versiones de Outlook, Word, Excel y PowerPoint para tu PC o Mac.
En WPBeginner, utilizamos y recomendamos Workspace o G Suite de Google para las direcciones de correo electrónico empresariales porque son más rentables. También preferimos Google Cloud ya que nuestro equipo está familiarizado con Gmail y otras Google Apps.
Para obtener más detalles, puedes consultar nuestra comparación de G Suite frente a Office 365 para saber cómo se compara con Outlook.com.
Dicho esto, veamos cómo crear una dirección de correo electrónico personalizada con Outlook.com.
Registrarse en Outlook Premium con Microsoft 365
En primer lugar, debe visitar el sitio web de Microsoft 365 y acceder a la suscripción “Microsoft 365 Business Premium”.
Es la única suscripción que incluye soporte para dominios personalizados. Para empezar, basta con hacer clic en el botón “Comprar ahora”.
Tendrá que introducir su dirección de correo electrónico en el paso siguiente. Puede ser tu correo electrónico del trabajo o de la escuela.
Una vez introducido el correo electrónico, haga clic en el botón “Siguiente”.
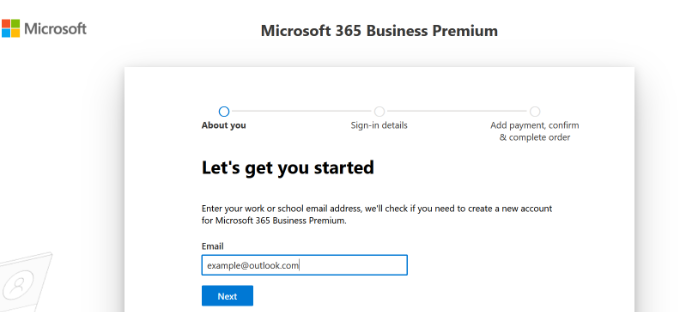
A continuación, comprobará si la dirección ya está asociada a una cuenta de Microsoft o si necesita crear una nueva.
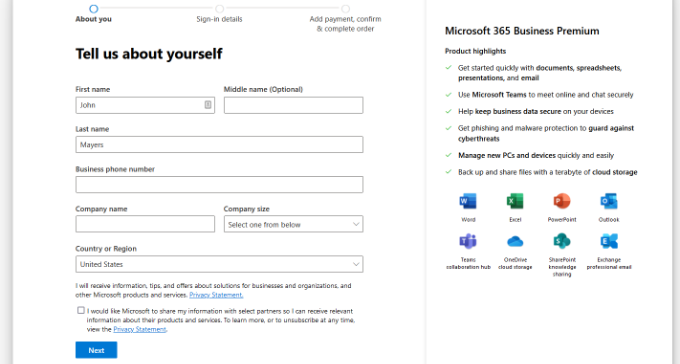
A continuación, se le pedirá que proporcione información personal, como su nombre, número de teléfono de la empresa, nombre de la empresa, tamaño de la empresa y país.
Después de introducir estos datos, siga adelante y haga clic en el botón “Siguiente”.
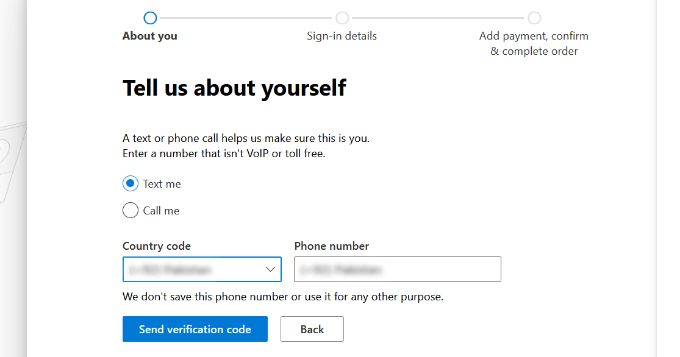
En la pantalla siguiente, tendrá que verificar el número de teléfono de su empresa.
Puede seleccionar recibir un mensaje de texto o recibir una llamada telefónica para obtener el código de verificación.
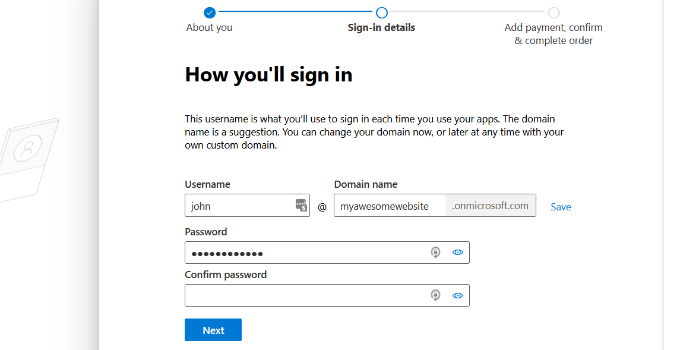
Tras la verificación, se le pedirá que introduzca una contraseña y un nombre de dominio.
Puede hacer clic en el botón “Siguiente” cuando haya terminado.
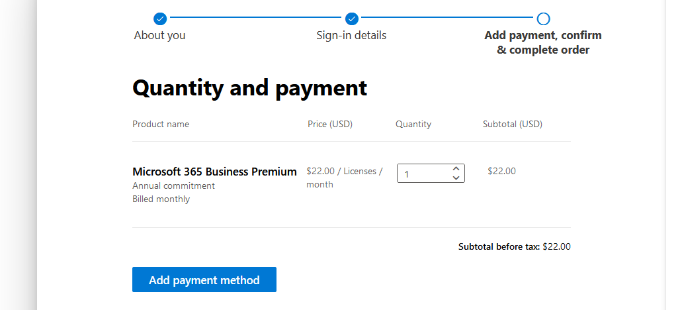
A partir de aquí, tendrás que seleccionar el número de cuentas de Microsoft 365 Business Premium que deseas.
A continuación, haga clic en “Añadir método de pago” para continuar.
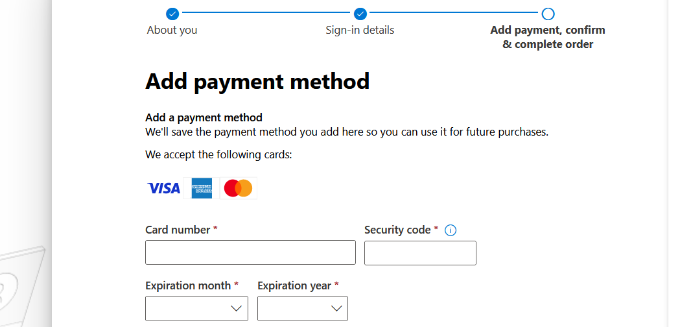
Microsoft le pedirá que seleccione un método de pago, como una tarjeta de crédito.
Introduzca los datos de pago para completar el proceso de registro.
Después de eso, usted aterrizará en el tablero de Office 365.
Establecer correo electrónico de Outlook con dominio personalizado
En el Escritorio, verá diferentes herramientas y aplicaciones ofrecidas por Microsoft dentro de la solución completa Office 365.
La barra lateral izquierda está llena de atajos a los distintos servicios y aplicaciones a los que tienes acceso con tu suscripción.
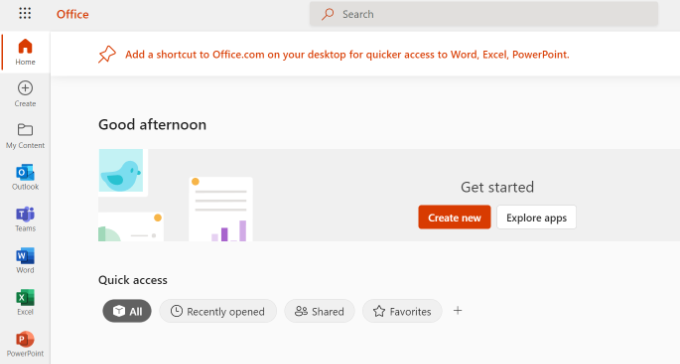
A continuación, puedes hacer clic en la opción “Aplicaciones” del menú de la barra lateral.
Ahora aparecerán más herramientas en Aplicaciones. Seleccione la opción “Administrador”.
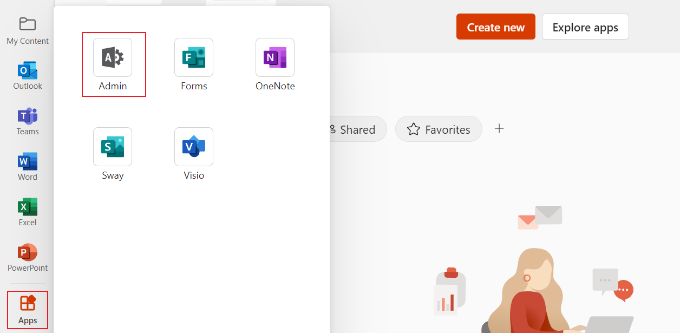
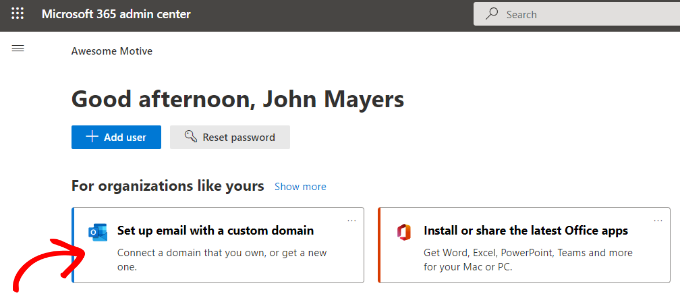
A continuación, verá el “Centro de administración de Microsoft 365” en la parte superior de la página.
Desde aquí, puede seleccionar la opción “Establecer correo electrónico con un dominio personalizado”.
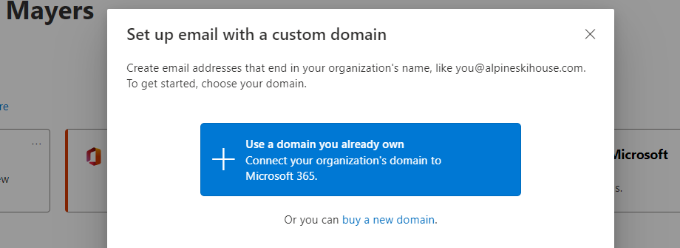
A continuación, se abrirá una ventana emergente en la que se te pedirá que utilices un dominio existente o que compres uno nuevo.
Sólo tiene que hacer clic en el botón “Utilizar un dominio que ya posee”.
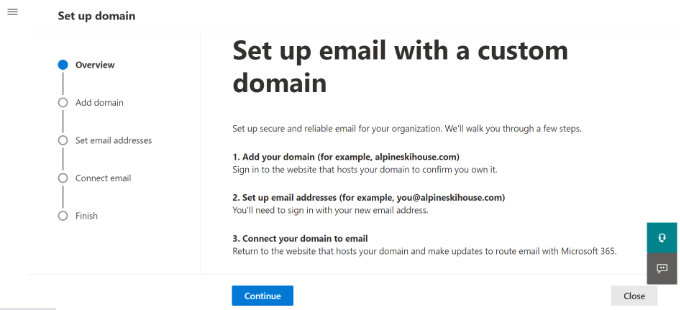
A continuación, se abrirá un asistente de configuración que te ayudará a configurar un dominio personalizado con Outlook.
El primer paso le dará una visión general de los pasos que debe seguir. Continúe y haga clic en el botón “Continuar” de la parte inferior.
En la pantalla siguiente, se le pedirá que introduzca el nombre de dominio que desea establecer.
Tras introducir el nombre de dominio, haga clic en el botón “Continuar”.
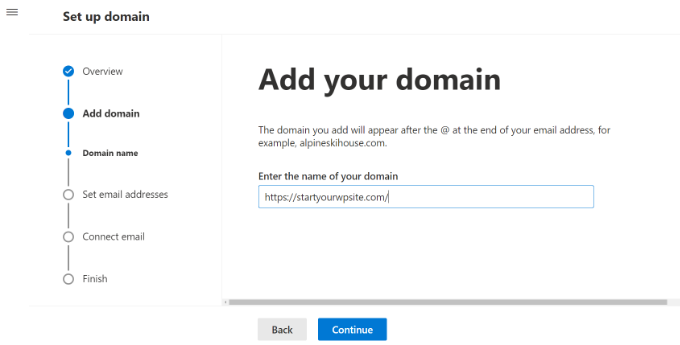
Microsoft buscará ahora su nombre de dominio.
Después, le pedirá que verifique la propiedad añadiendo información a los ajustes DNS de su dominio.
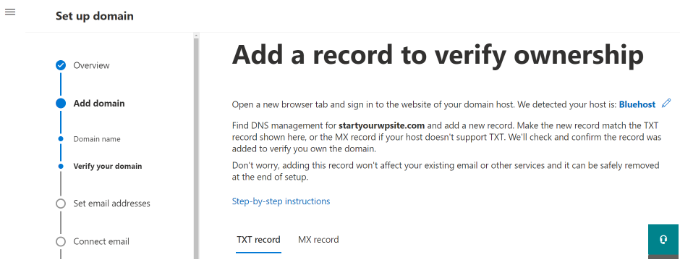
Para ello, debe abrir una nueva pestaña o ventana en el navegador e ir a la página de ajustes de su dominio. Dependiendo del registrador de su dominio, esta página se encontrará en su cuenta. Tienes que encontrar la opción de ajustes DNS.
Si su dominio está registrado por su empresa de alojamiento de WordPress, encontrará los ajustes del dominio en su panel de control de cPanel etiquetados como “Editor de zona” o “Editor de zona DNS”.
Nota: Si eres usuario de SiteGround, no tendrás cPanel. Lo encontrarás en la sección Dominio de tu Escritorio de Herramientas del Sitio.
Para este tutorial, usaremos el Escritorio de Bluehost. Para empezar, puedes ir a Dominios desde el menú de la izquierda. A continuación, localice su sitio web y haga clic en el botón “Ajustes”.
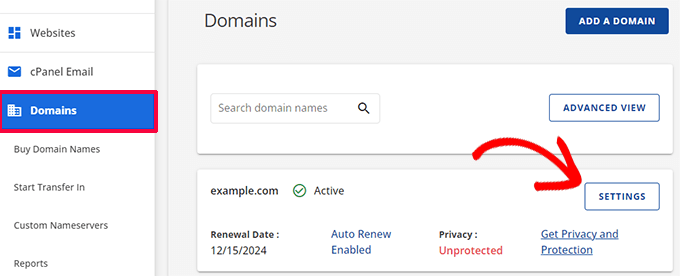
Desde aquí, puede desplazarse hacia abajo en los ajustes del dominio.
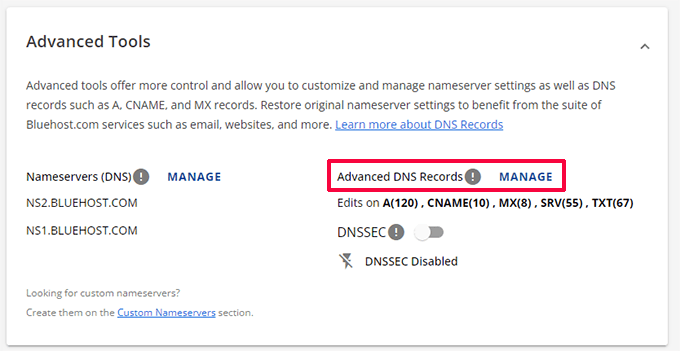
A continuación, haga clic en la opción “Herramientas avanzadas”.
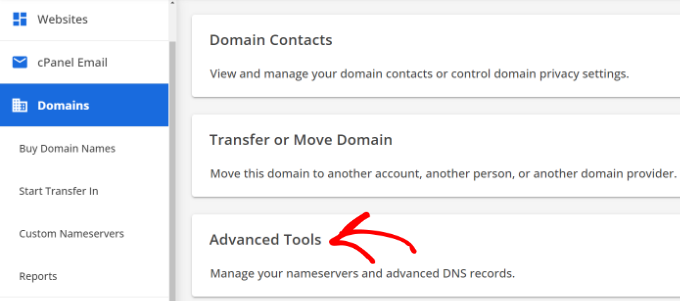
Aquí, Bluehost mostrará los servidores de nombres de su dominio y otros registros.
Para gestionar los registros DNS, puede hacer clic en el botón “Gestionar” situado al lado de “Registros DNS avanzados”.
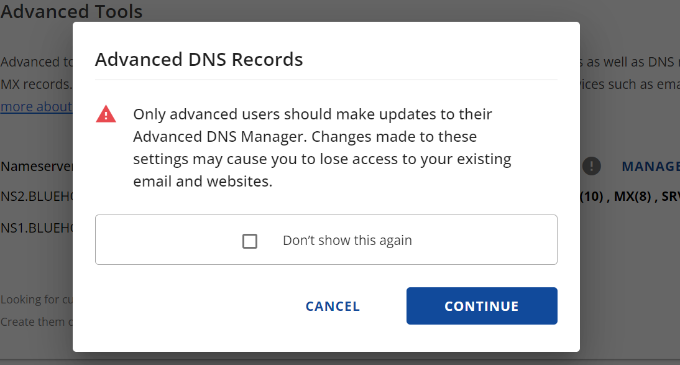
Bluehost mostrará entonces un mensaje de advertencia.
Puede hacer clic en el botón “Continuar” para seguir adelante.
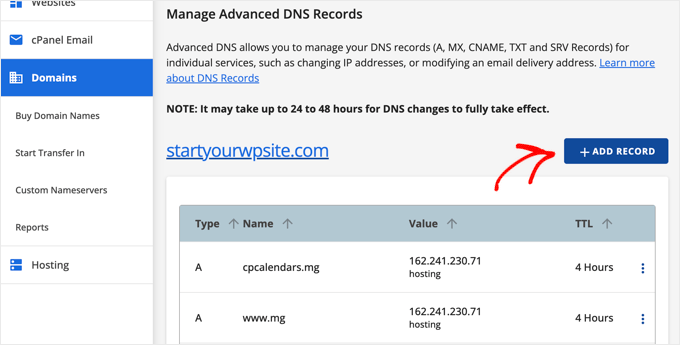
A continuación, verá diferentes tipos de registros DNS.
Basta con hacer clic en el botón “+ Añadir registro”.
Ahora aparecerá una nueva ventana emergente para añadir el registro.
A continuación, haga clic en el menú desplegable y seleccione “TXT” como tipo.
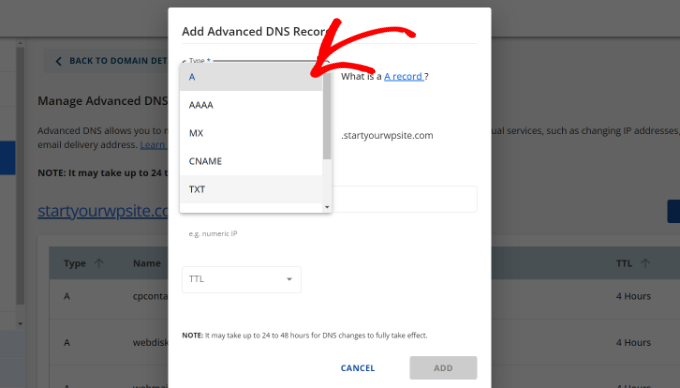
A partir de aquí, tendrás que introducir los detalles del TXT. Estos incluyen el registro de host, el valor TXT y el tiempo TTL.
Puede encontrar fácilmente esta información en la pestaña Microsoft Office 365.
Una vez añadidos los datos, haga clic en el botón “Añadir”.
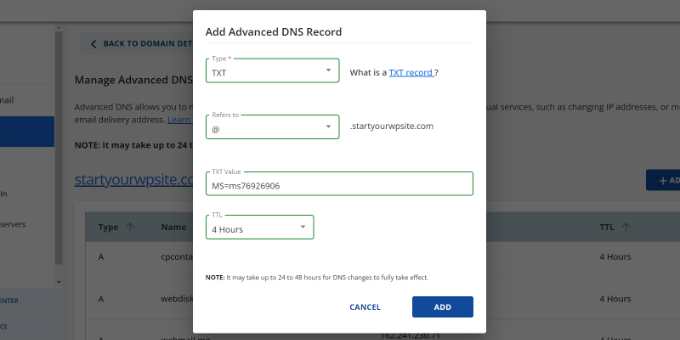
Cuando añada un registro DNS, asegúrese de que la información que introduce coincide con la que muestra Office 365.
A continuación, debe volver al portal de administrador de Microsoft Office 365 y hacer clic en el botón de verificación.
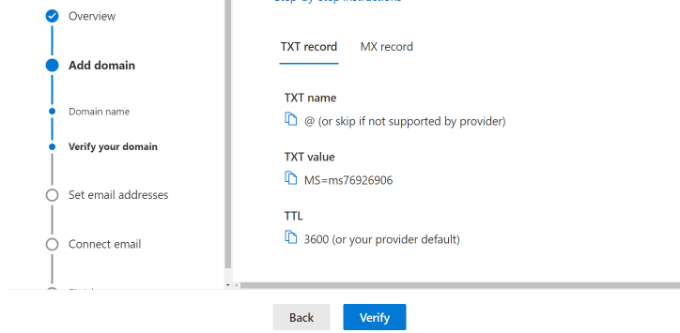
Office 365 ahora marcará / comprobará los registros DNS para verificar que usted es el propietario del nombre de dominio. La verificación de DNS puede tardar entre 5 y 10 minutos porque, a veces, los ajustes de DNS no se actualizan inmediatamente.
Tras la verificación, se le pedirá que establezca su nueva imagen de marca / dirección de correo electrónico. Una vez hecho esto, simplemente haga clic en el botón “Actualizar y salir”.
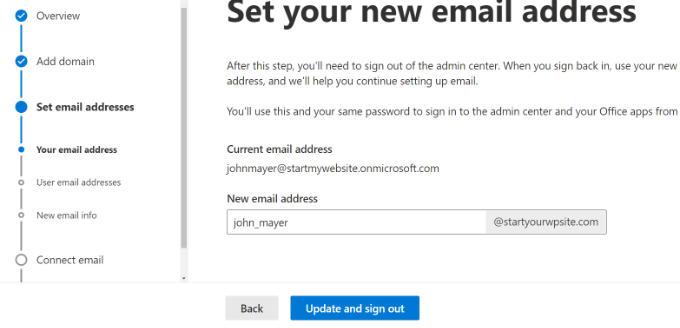
A continuación, tendrá que acceder de nuevo con la nueva dirección de correo electrónico de marca que acaba de añadir.
Una vez conectado, verás más registros para añadir a tu dominio y conectarte al correo electrónico de Outlook.
El intercambio de correo electrónico necesita tres registros DNS con los que trabajar, incluidos un registro MX, un registro CNAME y un registro TXT.
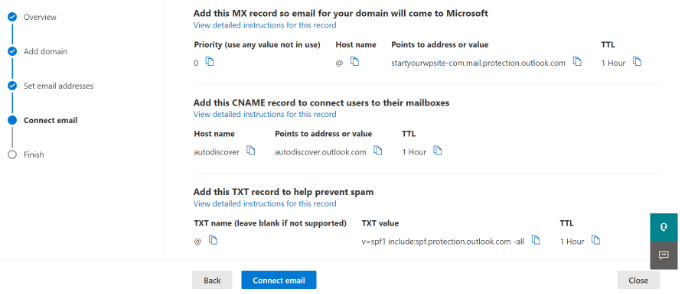
Una vez más, tendrá que ir a la página de ajustes DNS de su dominio y añadir estos registros individualmente.
En primer lugar, tiene un registro MX, que proporciona instrucciones sobre dónde entregar los mensajes de correo electrónico.
En Bluehost, vaya a los ajustes DNS de su sitio web y haga clic en el botón “+ Añadir registro” para añadir un nuevo registro MX.

A continuación, verá un mensaje / ventana emergente con los ajustes de grabación.
En primer lugar, haz clic en el menú desplegable de la parte superior y selecciona la opción “MX”.

Si su sitio web ya tenía un registro MX, se sustituirá por éste. Esto garantiza que pueda utilizar los servidores de correo de Outlook para enviar y recibir correos electrónicos desde la dirección de correo electrónico de su dominio personalizado.
Después de eso, tienes un registro TXT, que ayuda a evitar que alguien suplante tu correo electrónico para enviar Spam.

Por último, tiene un registro CNAME, que permite que programas como Outlook descubran el servicio de correo electrónico y se conecten a él.
Simplemente añada un nuevo registro CNAME en Bluehost e introduzca los detalles desde el panel de control de Microsoft.
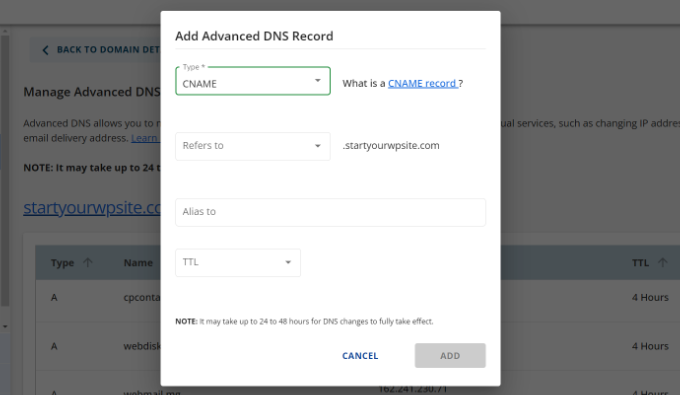
Una vez que haya introducido todos los registros DNS, puede volver a la pestaña Microsoft Office 365 y hacer clic en el botón “Conectar correo electrónico”.
Office 365 marcará / comprobará ahora los ajustes DNS de su dominio. Tenga en cuenta que la verificación de los registros TXT puede tardar entre 24 y 48 horas.

Una vez comprobado todo, llegarás al final de la configuración.
En el último paso, verás un resumen de tu configuración. Sigue adelante y cierra el asistente de configuración.
Ya está. Ha establecido correctamente su nombre de dominio para que funcione con Outlook.
Añadir dirección de correo electrónico de marca personalizada en Outlook
Ya está listo para crear direcciones de correo electrónico de dominio personalizadas con Outlook.
En el Escritorio de Office 365, vaya a Usuarios ” Usuarios activos.
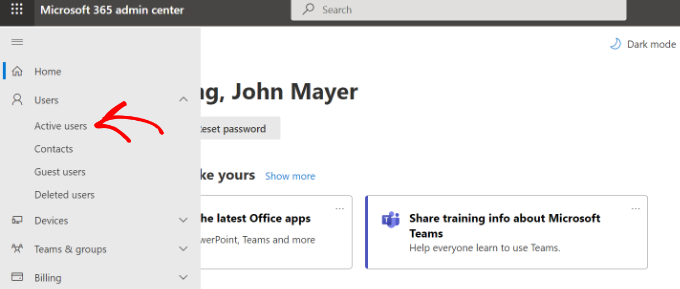
A continuación, verás un anuncio / catálogo / ficha de tus usuarios activos.
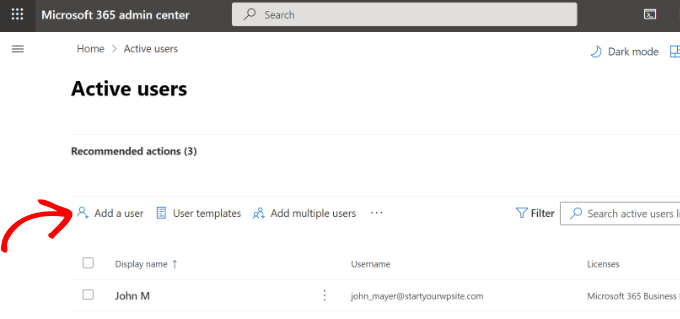
Siga adelante y haga clic en la opción “Añadir un usuario”.
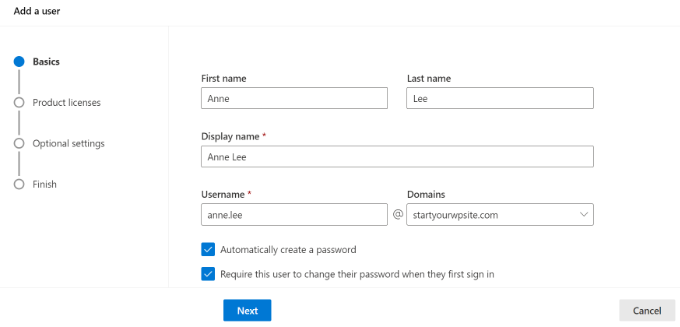
En la pantalla siguiente, deberá facilitar los datos personales del usuario y, a continuación, elegir una dirección de correo electrónico.
Una vez introducidos los datos, basta con hacer clic en el botón “Siguiente”.
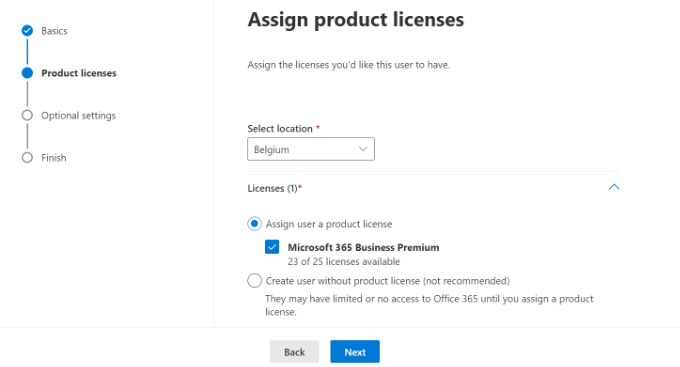
A continuación, tendrá que seleccionar una ubicación geográfica para su usuario y asignarle una licencia de producto.
En el plan Microsoft 365 Business Premium, puedes asignar hasta 25 licencias. Cuando hayas terminado, simplemente haz clic en el botón “Siguiente”.
Microsoft también ofrece ajustes adicionales para los nuevos perfiles de usuario.
Por ejemplo, puede seleccionar un perfil de usuario y concederle acceso al Centro de administración. También existe la opción de añadir información de perfil, como el cargo, el departamento, la oficina, etc.
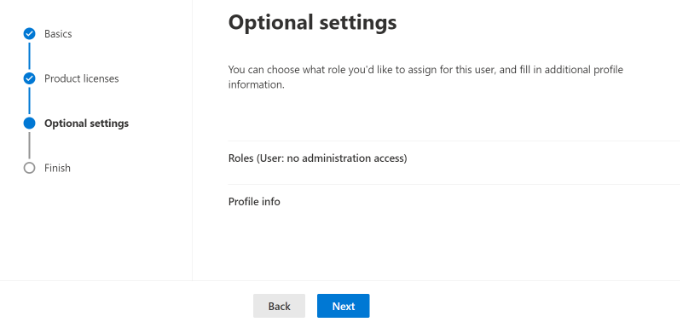
Estos ajustes son opcionales y también puedes dejarlos en blanco. Cuando haya terminado, simplemente haga clic en el botón “Siguiente”.
Por último, verás un resumen del nuevo usuario que acabas de añadir. Puedes reseñar los detalles, hacer los cambios necesarios y, a continuación, hacer clic en el botón “Terminar de añadir”.
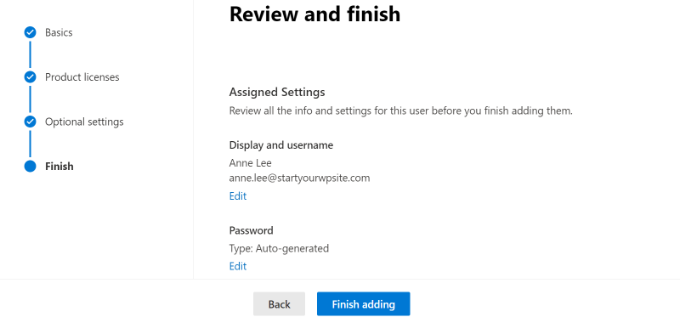
En este punto, has añadido correctamente un nuevo usuario y creado una dirección de correo electrónico de marca en Outlook.
Ahora puede acceder con la dirección de correo electrónico y la contraseña que creó en el paso anterior para utilizar su nuevo correo electrónico con marca profesional en Outlook.
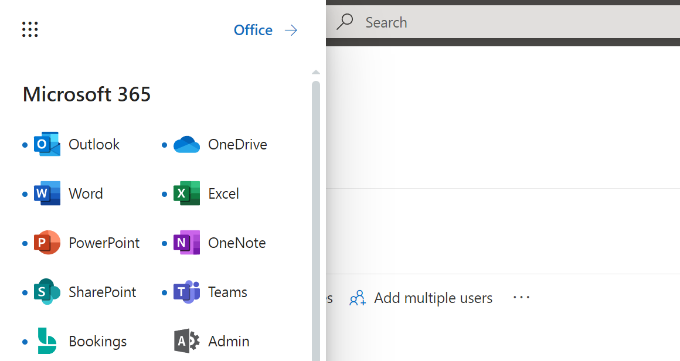
También puedes instalar aplicaciones de Office 365 en tu Mac y PC, incluido Outlook. Esto le permitirá utilizar su dirección de correo electrónico profesional de Microsoft Outlook con acceso sin conexión a través de la aplicación de Outlook.
Esperamos que este artículo te haya ayudado a aprender cómo establecer una dirección de correo electrónico de marca profesional con Outlook. Puede que también quieras ver nuestro artículo sobre los mejores proveedores SMTP con alta entregabilidad de correo electrónico y nuestra guía para principiantes sobre la automatización del correo electrónico en WordPress.
If you liked this article, then please subscribe to our YouTube Channel for WordPress video tutorials. You can also find us on Twitter and Facebook.


Nishant Thakur
Was looking for this! Perfect!
Peter
Hello, thanks for this tutorial, please where do I need to add this
v=spf1 include:hotmail.com ~all
Jay
its more than 72 hrs of changing my dns. but now also it is showing “You need to prove ownership of this domain by creating a DNS record. Use the settings below.”
WPBeginner Support
This probably means your DNS records are not correctly set.
Admin
Abhay
hey! nice article…thank you
Rani
Hi,
I set up the account following your instructions.Thanks
But I have this problem , i am not receiving any mails in my inbox. when i send mails from other accounts to this mail it is bounced.
i checked the microsoft support. looks like it is some internal problem and not a settings problem. people are reporting other issues with accounts.Microsoft says they resolved the issue. But doesnt look like so.
http://answers.microsoft.com/en-us/outlook_com/forum/oemail-osend/my-outlookcom-email-account-is-not-receiving-any/02581144-c02b-4cdc-9132-98a8e0531ab1?msgId=2fd9d76f-6dfa-45bc-9a46-81e11265a7a1&page=1
R
Ankush
Hi,
I am trying to setup emails for my domain. This tutorial is really helping me since I am a non technical person. I have set up my live account and I am getting a message ‘You need to prove ownership of this domain by creating a DNS record. Use the settings below’.
When contacted a person where I have hosted my site, he is saying that the settings displayed here are for CPANEL and my sited is on DreamHost. DreamHost has its own CPANEL and that doesn’t support entries like ‘Priority: 10 (or High priority)’ etc.
Can you please guide us to take this forward.
Thanks,
Ankush
WPBeginner Support
Ankush dreamhost does support A records and Max records. For records ask the person managing your account to go to Mail » Custom MX in Dreamhost Panel. As for A or TXT records go to Domains and then click on DNS.
Admin
Ria Parish
I don’t suppose you’d still be able to use this email for Google+ and YouTube account though, eh…. Better than nothing, I guess.
Thanks for the alternative!
princess
Hi I set up my domain via Godaddy.com..and I already have my live mail set up. My question is: When I tried replying to the email my replies bounces back. what could be the problem?
WPBeginner Support
seems like you have not correctly configured your site to use Outlook’s mail servers.
Admin
Verma
Hi- I did a setup of outlook.com with my domain. All seems to be working fine except i am not able to get emails from MS Outlook. If it is possible to access email via MS Outlook app please let me know.
Paul Jones
Great article thanks.
We run a mail server and batch import mail into a sql server database. Would it be viable/possible to switch our mx to outlook.com and forward all inbound and outbound email to our mail server so that we can still import mail into sql?
WPBeginner Support
Sounds doable. But make sure before you implement it.
Admin
Chris
Hi, I just created an outlook email admin account with my own domain name. i create 2 users. Will I be able to see the emails sent to the users I created? If so, how do I enable that feature? Thank you Great article by the way. Thanks.
sivakumar
Now showing it
You can create up to 50 accounts in your domain.
How to create 500 accounts
WPBeginner Support
Contact outlook support for more accounts.
Admin
david
If you want users to use mail.yourdomain.com to sign in for email address, then you can create a CNAME record in your domain’s custom DNS settings or in cpanel’s Simple DNS Editor. Enter Mail in the Name field, and enter subdomain in CNAME field, e.g. mail.example.com.
this is not well explained. Could you please…
WPBeginner Support
Using a subdomain will allow users to sign in to their accounts by typing in your domain name instead of outlook.com.
Admin
kaycee
please how can i create the sub domain
kaycee
If you want users to use mail.yourdomain.com to sign in for email address, then you can create a CNAME record in your domain’s custom DNS settings or in cpanel’s Simple DNS Editor. Enter Mail in the Name field, and enter subdomain in CNAME field, e.g. mail.example.com
…..Please can you provide a guide on how to create this? cos am using ipage and they said its not possible for me to have mail.businessname.com
thank you
Kelly
Hi, thanks for your tutorial.
So after a week of waiting for the service to become active it is now saying that “Your service is suspended. Please make the required DNS changes.” Can somebody please help?
Letitia
I’m having the same problem
Asad
Currently outlook allows 50 free Email addresses. If I need more Account then what is the procedure ?
WPBeginner Support
Contact outlook support and they will extend your user account limit.
Admin
Tihomir Valkanov
Very good article!!! It save me a lot of time Thank you!
phil
Hi I have a question, I bought my domain name off Godaddy, but I built the site and its being hosted by wix.com, I want to use my own domain with outlook so who do I update my mx and txt with godaddy or wix?
Hope to hear from you soon
Phil
WPBeginner Support
Go Daddy if your domain is controlled by GoDaddy.
Admin
Murali
Thank you. I also got good email service.
Lynn Jackson
Awesome post! Very user-friendly. This was almost effortless. I was up and running after about 10 minutes! Thanks.
JANARTHANAN
Hi Syed, as said earlier I’ve done setting of my domains mails on outlook.com. Let me know how to configure this on blackberry and iPhone devices.
Thanks – Janarthanan
tilak
I want to view my old mails from my previous employers where we were using Outlook server. I have those .pst data files in my external hard disk. But don’t know how to configure them in Outlook 2013. Could any one please help me on the step by step guide. thanks.
Haseeb Ahmad Ayazi
Guys the New UI of outlook is tooooo slow. While loading it makes my PC also slow. Outllook can compete Gmail but will loss badly only due to his loading speed.
Jon Adams
Check your computer. Due to the new Gmail compose debacle, I have been testing Outlook.com for the past few months in case Google makes the change permanent and mandatory. The only reason I don’t make the switch now is six years of company emails in twenty accounts. Not to mention everything that lives in Google Drive.
The Outlook UI is vastly superior to Gmail even without consideration of the new compose.
Kunal
I already have an email account on Google Apps, if I were to move to Outlook, what would happen to emails that I already have in my existing accounts on changing the MX record ? Do I have to transfer my emails from google apps to outlook?
quocnt
Thank you. I have successfully setup my professional email.
But can I go to mail.mydomain.com to check mail or must I go to outlook.com every time?
Ana
Hi,
I followed the steps and everything went fine. But when I started using the email, I can send emails, but not receive them. Any idea what can be the issues?
Thanks!
hunter
I have the exact same problem. help
JANARTHANAN
Hi Ana,
Have you got the solution, did your mail work fine on both send & receive ways!
If you got the solution pls let me know.
Thanks
Ankush
Hi Ana,
Did you get solution to your problem? Are you able to send/receive from your new email account. Please guide us as well.
Thanks,
Ankush
Leon
Hi! I finally finally got to the last part.. I had to login using my old @live.com account, I never saw the DNS options when trying to signup using just my domain name http://hempconnection.net
Anyways I was able to create an info@ email for my domain, but now where do I go to login? I tried mail.mydomain.net and I just see the last page I was on showing the emails I created, but not able to actually access my new email
Leon
Screw this, Outlook and Microsoft sucks… I’ve been trying for 3 hours.. this is freaking ridiculous
marco
Me too, I’ve been trying for 3 days using chrome, maybe I should try using I.E.
JANARTHANAN
Hi Syed,
I have my website already set up at windows live admin center and the emails are already in use by users.
But now i planned to migrating my domain from godaddy to a Blue Host (i came to know about the cheapest and best service of this host by reading your site), what should i do so the emails will not be deleted and users can continue using the same mails.
Pls give me clarification thru email or on you blog. It will be very helpful for me and all others.
Thanks in advance
Janarthanan
Editorial Staff
In your bluehost account setup the MX records. Then do the transfer, and it will work.
Admin
JANARTHANAN
Hi Buddy, Thanks for the info. But i’ve a doubt, before transfering a domain from Godaddy how can i setup MX records in Bluehost for the same domain. PLs explain as i was a newbie on this field.
Thanks
Editorial Staff
In the DNS settings in your Bluehost cPanel, you can specify MX records. Bluehost support will be able to help you with this.
JANARTHANAN
Hi Syed,
Thanks for your info, i followed your tuts, also as per your comment i get details from Blue Host too. Now i successfully transferred my domain. And all my emails associated to it (functions on outlook.com) work fine.
Thanks once again for your great tuts.
Janarthanan
Tuyen
Hi I set up my professional mail on outlook.com, it’s work fine for about a month but now when I send email to client it alway have hotmail_77425feceaf13aa1@live.com on behalf of my email, pls advise how to remove (hotmail_77425feceaf13aa1@live.com on behalf of my email)
hope to hear soon
all the best
WPBeginner Support
Please contact outlook support, they would be able to help you better.
Mohamed
Guys,
Be careful when trying to create a “professional” email account that uses your domain; particularly when using Microsoft Outlook/Live/Hotmail…. It will send your email to the recipient, on receipt of your email the recipient will see “hotmail [a random number]@live.com ON BEHALF OF yourname@yourdomain,com”. This is not professional at all. Its actually less embarrassing than using a regular free @hotmail.com.
O, and Microsoft has no plans to correct this! I’ve tried several forums and made multiple requests.
All the best.
Ed Fishman
This isn’t true as far as I can tell. I have a couple of domains that use Outlook.com and all of them send as the actual sender. No ‘On Behalf Of’ appears anywhere – either in From: or even hidden in the message headers.
Now that Google isn’t offering a free version of Google Apps, Outlook.com is still your best bet for setting up a free, non-pop, e-mail system that can use your own domain.
Ed
Verna
Are u sure about this, does yourname@yourdomain.com not appear in the recipient mail?
Glenn F
Thanks for posting this Mohamed. There is no way I plan on using this now.
Joshua Caluette
If you follow the directions and confirm that your DNS is configured properly and you are not sending your email through your live account as an alias of your professional domain, then this does not happen. I have mine setup and it works just fine. I have seen similar issues on Google Apps as well, but it is always due to mis-configuration.
Marco
I need a catch all alias to be sure to receive all the email adressess i used in the past…. How do i setup a catch-all with live domains? Can’t find it.
lmcpa
When switching from a paid hosted version with godaddy is there a way to save or move emails from the godaddy service to this free outlook.com setup?
Editorial Staff
Not entirely sure about that. Perhaps asking Godaddy would be best. Usually it is hard.
Admin
pishka
I have my website already set up at domains.live.com and the emails are already in use by users. Currently i’m migrating my domain to a new host, what should i do so the emails will not be have to be deleted and users can continue using the same mails?
If i add the mx records on the new host i can continue to use the mails on the same domains.live.com account I had?
Pls reply its important
Thanks
nick bacon
Hi, I am following the instructions but when i get to the screen that will give you a choice to either use an existing Microsoft account to administer this domain or create a new Microsoft account on your own domain name, e.g. yourname@yourdomain.com.
I do not get this option, it automatically goes to a regular live sign in page?
any tips?
Muhammad Tauseef
Thanks you so much buddy.
Your article resolve my biggest problem.
God Bless You
Vivie
Hi, is it possible to have more than one administrator for one domain?
Thanks
Julia
Hi,
Thanks much for the tutorial, and I’ve set up the service successfully. However, for some reason, the interface is the old version of hotmail, which is very ugly. In case you wonder what the old interface looks like, here it is http://4.bp.blogspot.com/-kDpSR53bY5U/UBnXmDiySfI/AAAAAAAAAlo/PwjJaZhdAFA/s1600/2-hotmail.jpg
Is this the interface everyone sees? How do I change it to the better interface?
Thanks.
Editorial Staff
They said they are slowly moving users over.
Admin
pishka
on the right side drop down click on upgrade to outlook or something similar
Lauren
Thank you! Outlook’s support is slooooow, you’ve helped me set up my email accounts, and in the comments above I learned that I could delete and recreate an email account.
Stephanie
Great tutorial!!!!!!! Worked like a charm. Using Joomla CMS though & Hostgator
Thank you so much! We were using the free <10 google apps accounts and have been looking for a replacement for awhile now.
Christine
Im being asked to verify my account. Outlook is sending the verification email to the same account Im trying to access. Do you know a way around that or if I can contact Outlook?
Christine
Also, can I just remove the domain email and just start over?
Editorial Staff
Yes you can do that.
Admin
Carlos Rivera
I followed the steps above and after clicking refresh Windows Live Admin Center says the service has been suspended. Any ideas how to get this corrected?
tony
Thank you! These instructions are much better than on the Live Admin site. Thank you, thank you!
Serge Conus
Thanks for the awesome post. Google apps for personal use was an amazing toolset, I have been forced to create forwarders to my personal gmail account which works ok for a small site, but an organization needs something bigger. I will check out outlook’s pro mail choice.
Rich C
Anyone know why I’d be getting this error message for any domain I’m entering in:
“This domain name can’t be used because it contains a protected word or inappropriate language. Please contact support if you feel this is not the case.”
Aamir Rizwan
I get the following error :
This domain name can’t be used because it contains a protected word or inappropriate language. Please contact support if you feel this is not the case.
Editorial Staff
Not sure why that is. We would suggest that you contact their support like the error ask you to do.
Admin
Héctor
I had the same thing! I searched in their forums and there were few people who had the same issue.
Bikash
I have a created email address in Microsoft using my domain and
How to Manage the user account in my admin panel in Microsoft account. Is there any option to reset the user password and read the user inbox mail for admin.
thanks
Bikash
Scott
My problem is this:
Step 2: Setting up DNS MX Records to use Outlook.com
After the registration, you will reach Windows Live Admin Center’s domain control page and it will be showing MX and TXT record strings which you need to add to your DNS settings.
After the registration, it did not take me to any such page.
Noumaan Yaqoob
@Scott: you can find those strings by going to Your domains click on YourDomain.com and then click on Domain Settings link in the left sidebar.
If that doesn’t work, check the email you provided during registration for an activation email.
Scott
OK. Now I was working with the support people on hostgator to try and figure out this tutorial between the two of us. The support person at hostgator showed me where to put all the codelines from the Windows Live Admin Center. Their chat support allowed him to tell me exactly where to copy and paste the lines of code, and where to paste them.
So…….On to step 3. According to your tutorial, The Windows Live Admin Center should say, “Your service is active” after 48 hours. I obligingly waited the 48 hours, logged in again, and it still was inactive, so I saw that the Windows support says it can take 72 hours. Now a week later I log in, and all it says is: “Your service is Suspended. Please make the required DNS changes.” I was never able to get the thing to the point where it says, “Your service is active.”
So, please kindly tell me what’s going on.
Rudy
When I click on mydomain.com in the YourDomains area, I’m just brought back to the YourDomains area again. It doesn’t go to a page that gives me the settings, etc.
Ed Nailor
Syed,
This is a great article and one work really investigating. I was disappointed to see Google do away with the free version of their Google Apps for Business. I had not yet really looked into Outlook.com, but will certainly have to try this out so I can best recommend options to my clients. Thanks for bringing this to light!
Ed
Damien Carbery
I take a simpler method – just set up a forwarder in the hosting control panel. In my client’s existing free email account (Yahoo/Gmail/Hotmail) I add the new account I want to send email as. This sends a verification email which, due to the forwarder, arrives in the existing inbox.
An advantage of Yahoo/Gmail/Hotmail is that they are built in account types in iOS. You can select the From address on your iOS device. I will admit that you are not using your hosting company email servers.
Editorial Staff
That is one way of doing it, and we have already shown that method a long time ago. Sometimes, when using that it ends up revealing your “real email” that you were sending it from. Even though you can mask it so it can be sent from yourname@domain.com, it will show sent from you@gmail.com
Admin
Carlos Acha
Hello,
I have tried to follow these steps but there is no Get Started button anywhere, I do get a Login button but it only sends me to Live Login Page. The address I am visiting is: domains.live.com
Any help I will appreciate.
Best regards,
Carlos
Noumaan Yaqoob
@Carlos: It is right above the sign in button. You can also click here to get started.
Noumaan Yaqoob
@Haseeb Ahmad Ayazi : Outlook allows you to create up to 500 accounts on one domain name. However, if you reach that limit and you need more free email accounts on your domain then you can contact support to extend your free accounts limit.
@Raheem Khan: I would recommend that you stick with Google Apps and try outlook.com separately by creating a yourname@outlook.com account. That way you can decide which one you like better.
Haseeb Ahmad Ayazi
You! There must be a comparison. How much accounts are allowed in free version?
Raheem Khan
Now there should be a compartision between Google Apps and Outlook Professional Emails. And do tell us which one is better. Currently I’m using Google apps.