Wenn Sie jemals an das Ende eines unserer Artikel gescrollt haben, haben Sie wahrscheinlich unser Widget “Beliebt bei WPBeginner Right Now! Diese Funktion ist ein Hit bei unseren Lesern. Sie hilft ihnen, unsere wertvollsten Inhalte zu entdecken und ermutigt sie, mehr von unserer Website zu entdecken.
Indem Sie Ihre beliebtesten WordPress-Blogbeiträge hervorheben, helfen Sie den Lesern nicht nur, Ihre besten Inhalte zu finden, sondern Sie steigern auch die Engagement-Metriken Ihrer Website. Das ist ein Gewinn für beide Seiten: Die Besucher erhalten großartige Inhalte und bleiben länger auf Ihrer Website.
In diesem Artikel zeigen wir Ihnen, wie Sie Ihre beliebtesten Beiträge auf der Grundlage ihrer Ansichten in WordPress ganz einfach anzeigen können.

Warum werden in WordPress beliebte Beiträge nach Ansichten angezeigt?
Wenn Benutzer Ihre beliebtesten WordPress-Blogbeiträge sehen, können sie herausfinden, welche Inhalte ihren Mitlesern am besten gefallen. Auf diese Weise können sie sich diese Artikel ansehen und sich an der Unterhaltung beteiligen.
Darüber hinaus kann die Anzeige Ihrer beliebtesten Inhalte in WordPress Ihre soziale Kompetenz stärken. Es ist, als würden Sie neuen Nutzern sagen: “Hey, andere Leute haben diese Beiträge wirklich hilfreich gefunden, und Sie vielleicht auch!”
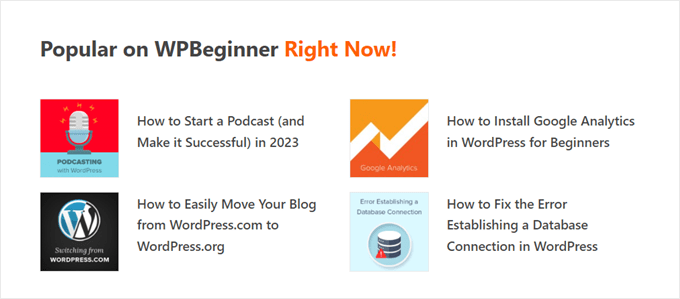
Und schließlich kann die Anzeige von Beiträgen, die zu den Trends gehören, die Besucher dazu bringen, länger auf Ihrer Website zu bleiben, was die Zahl der Seitenaufrufe erhöht und die Absprungrate verringert.
Je mehr sich Ihre Benutzer engagieren, desto mehr hält Google Ihre Inhalte für gut und wichtig. Im Gegenzug verbessert sich Ihre WordPress-SEO und Ihre Website kann besser ranken.
Leider gibt es in WordPress keine eingebaute Funktion oder einen Block, um Ihre beliebtesten Beiträge nach Seitenaufrufen anzuzeigen. In dieser Anleitung zeigen wir Ihnen, wie Sie genau das mit einem Plugin und mit Code erreichen können.
Klicken Sie einfach auf einen der unten stehenden Links, um direkt zu Ihrer bevorzugten Methode zu gelangen:
Methode 1: Beliebte WordPress-Beiträge nach Ansichten mit MonsterInsights anzeigen (empfohlen)
Der einfachste Weg, beliebte Beiträge nach Aufrufen in WordPress anzuzeigen, ist ein Plugin. Es gibt tatsächlich viele WordPress Plugins für beliebte Beiträge, aber unserer Meinung nach ist MonsterInsights die beste Wahl.

MonsterInsights wird von mehr als 3 Millionen Websites weltweit genutzt und ist das beste Google Analytics-Plugin für WordPress. Seine Hauptfunktionalität ist die Analyse, aber es hat auch eine benutzerfreundliche Funktion, die Ihre beliebtesten Beiträge anzeigt.
Als Erstes müssen Sie das MonsterInsights-Plugin installieren und es mit Ihrem Google Analytics-Konto verbinden. Weitere Details finden Sie in unserer Schritt-für-Schritt-Anleitung für die Installation von Google Analytics in WordPress für Anfänger.
Hinweis: Obwohl es eine kostenlose Version von MonsterInsights gibt, werden wir die Pro-Version verwenden, da sie die Funktion für beliebte Beiträge enthält.
Wählen Sie ein Widget-Thema fürbeliebte Beiträge
Sobald Sie das Plugin aktiviert und eingerichtet haben, gehen Sie im WordPress-Dashboard zu Einblicke ” Beliebte Beiträge. Klicken Sie dann auf den Menüpunkt “Popular Posts Widget”.
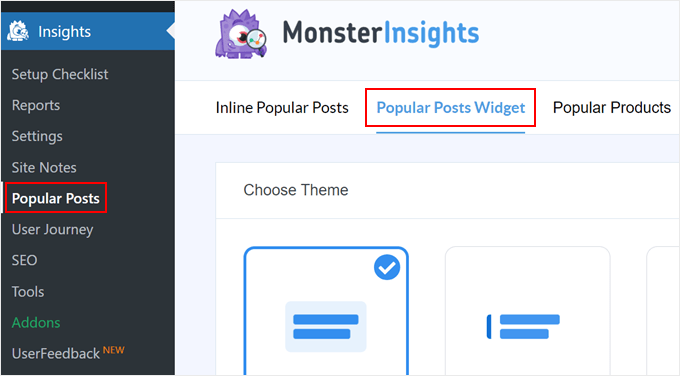
Wenn Sie nach unten scrollen, müssen Sie ein Thema für die Anzeige des Widgets für beliebte Beiträge auswählen. Es gibt verschiedene Optionen.
Einige enthalten ein Bild für den Beitrag, während andere eher minimalistisch sind.
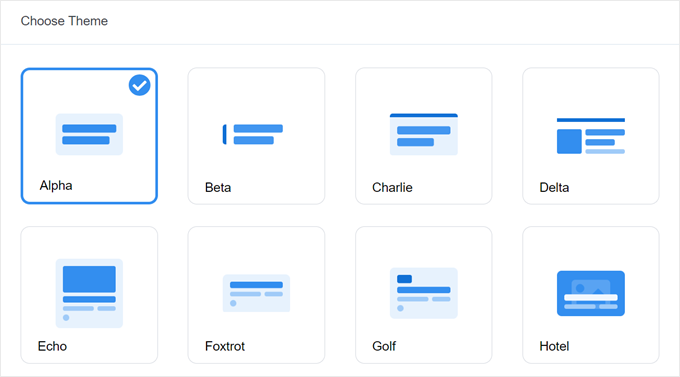
Wenn Sie sehen möchten, wie das Thema aussieht, bevor Sie Ihre Wahl treffen, gehen Sie einfach auf der Seite nach unten zum Abschnitt Themenvorschau.
Sie können auch eine Vorschau des Themas in einem breiten oder schmalen Format anzeigen. Im breiten Format sehen Sie Ihre Beiträge unter dem Inhalt der Seite oder des Beitrags, während im schmalen Format die Beiträge auf der rechten Seite angezeigt werden, wie in einer Seitenleiste.

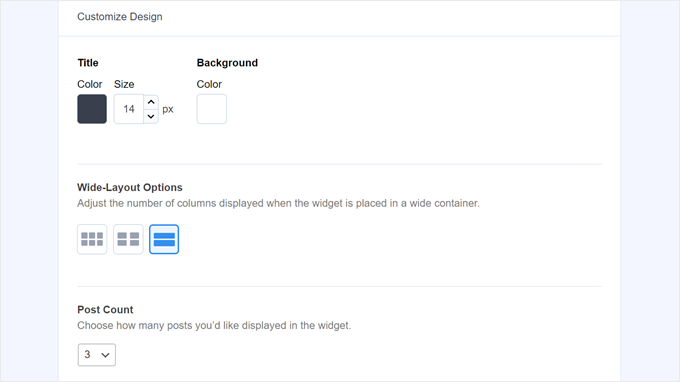
Als Nächstes scrollen wir nach unten zum Abschnitt “Design anpassen”. Hier können Sie die Farben des Themas, die Schriftgröße, das Layout und die Anzahl der angezeigten Beiträge ändern.
Die Anpassungsmöglichkeiten können je nach dem von Ihnen verwendeten Thema variieren. Probieren Sie also unbedingt die verschiedenen Themen aus, um zu sehen, welches Ihnen am besten gefällt.
Konfigurieren Sie das Verhalten des Widgets für beliebte Beiträge
Sobald Sie das Design des Themes konfiguriert haben, müssen Sie zum Abschnitt Verhalten gehen. Hier können Sie festlegen, wie das Widget für beliebte Beiträge auf Ihrer WordPress-Website angezeigt wird.
In den Einstellungen für das Widget-Styling können Sie wählen, ob Sie das oben erstellte Design verwenden möchten oder ob Sie das Widget überhaupt nicht gestalten möchten. Bei der zweiten Option folgt das Widget dem CSS des Themes Ihrer WordPress Website.
Dann können Sie wählen, wie das Widget Ihre beliebtesten Beiträge auswählen soll. Für dieses Tutorial wählen Sie “Kuratiert”, aber Sie können auch die beliebtesten Beiträge auf der Grundlage der Anzahl der Kommentare anzeigen.
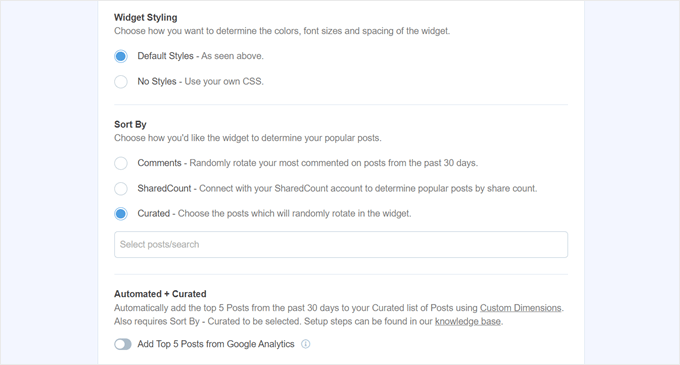
Als Nächstes müssen Sie die Option “Top 5 Posts aus Google Analytics hinzufügen” unten aktivieren. Aber bevor Sie das tun, benötigen Sie das MonsterInsights Dimensions Add-On und müssen den Beitragstyp als neue benutzerdefinierte Dimension hinzufügen.
Dadurch kann MonsterInsights die beliebtesten Beiträge auf der Grundlage von Google Analytics-Daten auswählen.
Dazu müssen Sie das MonsterInsights Dimensions Add-on herunterladen und es als Plugin in WordPress installieren. Eine Schritt-für-Schritt-Anleitung finden Sie in unserem Leitfaden zur Installation eines WordPress-Plugins.
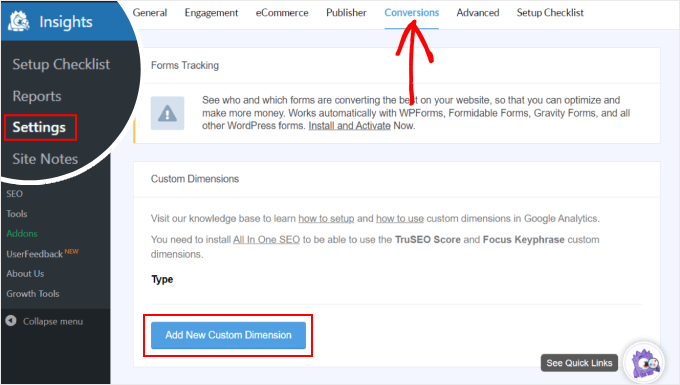
Gehen Sie dann zu Einblicke “ Einstellungen und wechseln Sie zur Registerkarte “Umrechnungen”. Klicken Sie dann auf “Neue benutzerdefinierte Dimension hinzufügen”.
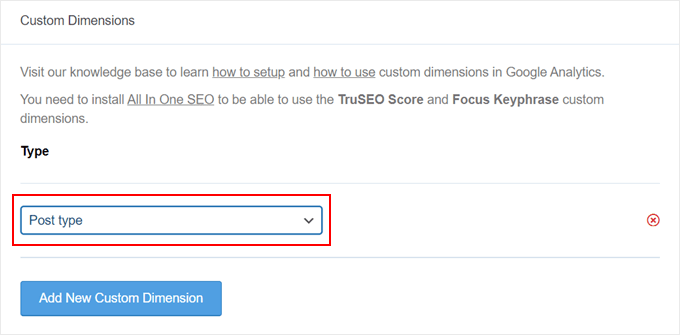
Wählen Sie anschließend im Dropdown-Menü die Option “Beitragstyp”.
Dies aktiviert MonsterInsights, um die Leistung Ihrer Blogbeiträge und anderer individueller Inhaltstypen zu verfolgen.
Kehren Sie nun einfach zu Einblicke ” Beliebte Beiträge zurück und gehen Sie zu “Widget für beliebte Beiträge”.
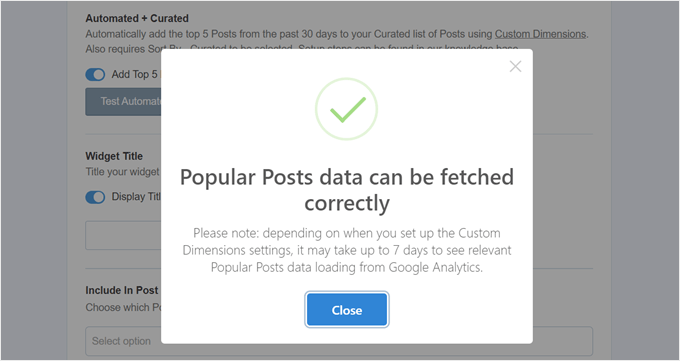
Aktivieren Sie einfach die Schaltfläche “Top 5 Beiträge aus Google Analytics hinzufügen”. Klicken Sie dann auf “Automatisierte Beiträge testen”, um zu sehen, ob die Einrichtung erfolgreich war.

Wenn ja, wird eine Erfolgsmeldung eingeblendet.
Die Meldung sollte lauten: “Popular Posts-Daten können korrekt abgerufen werden. Bitte beachten Sie: Je nachdem, wann Sie die Einstellungen für die benutzerdefinierten Dimensionen eingerichtet haben, kann es bis zu 7 Tage dauern, bis relevante Daten zu beliebten Beiträgen aus Google Analytics geladen werden.
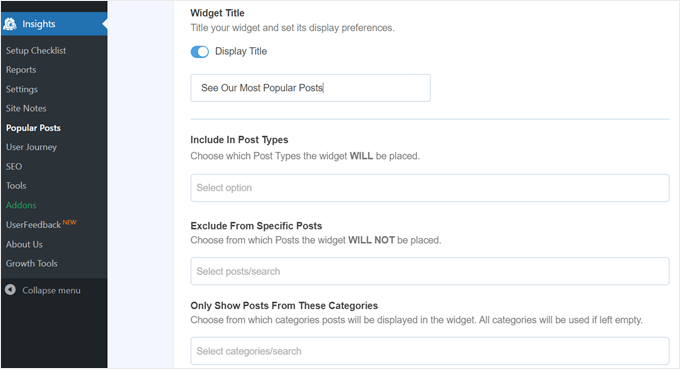
In den nächsten Schritten können Sie nun einen Titel hinzufügen, der über dem Widget erscheint. Das kann etwas sein wie “Sehen Sie sich unsere beliebtesten Beiträge an” oder etwas Ähnliches.
Darunter können Sie wählen, ob das Widget in allen Beitragstypen angezeigt werden soll, von bestimmten Beiträgen ausgeschlossen werden soll und/oder nur in bestimmten Beitragskategorien erscheinen soll.
Diese Einstellungen sind nützlich, wenn Sie individuelle Inhaltstypen erstellt haben, bei denen es sich nicht um Blog-Beiträge handelt, und Sie das Gefühl haben, dass das Widget für beliebte Beiträge dort irrelevant ist.
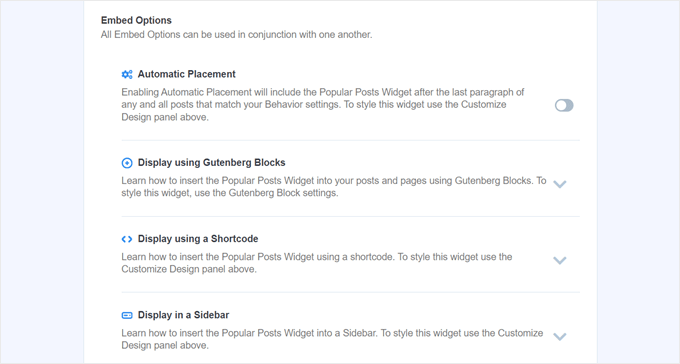
Einer der letzten Schritte besteht darin, das Widget für beliebte Beiträge einzubetten. Es gibt mehrere Möglichkeiten: automatische Platzierung, Verwendung eines Gutenberg-Blocks, Hinzufügen als Sidebar-Widget oder Verwendung eines Shortcodes.
Gehen wir die einzelnen Optionen nacheinander durch.
Automatisches Einbetten des Widget für beliebte Beiträge
Die automatische Platzierung wird empfohlen, wenn Sie möchten, dass das Widget in allen Beiträgen angezeigt wird, die den zuvor eingestellten Verhaltensweisen entsprechen.
Hierfür müssen Sie lediglich die Schaltfläche Automatische Platzierung aktivieren.

Der Nachteil dieser Option ist, dass Sie das Design des Widgets nicht so anpassen können, dass es im Beitrag oder auf der Seite am besten aussieht. Wenn Sie diese Art von Funktionalität benötigen, können Sie die nächste Methode ausprobieren.
Einbetten des Blocks Beliebte Beiträge in eine Seite oder einen Beitrag
Wenn Sie mehr Kontrolle darüber haben möchten, wie das Widget auf einer Seite oder in einem Beitrag aussieht, dann ist diese Methode genau das Richtige für Sie.
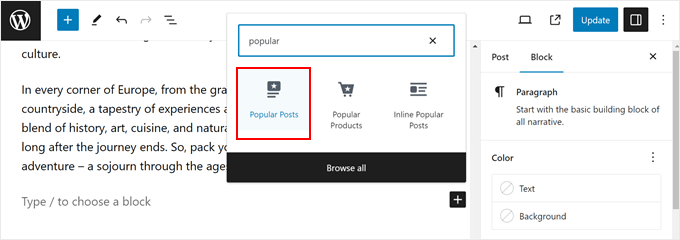
Gehen Sie zunächst zum Block-Editor des Beitrags oder der Seite, auf der Sie das Widget einfügen möchten. Klicken Sie dann auf die Schaltfläche “+” zum Hinzufügen von Blöcken an beliebiger Stelle im Editor und suchen Sie den Block “Beliebte Beiträge”.
Im Einstellungsbereich des Blocks sehen Sie, dass es Optionen gibt, um das Thema des Widgets, die Schriftgröße, die Farben, den Titel, das Layout und die Anzahl der Beiträge zu ändern.
Diese Einstellungen ähneln denen, die wir im MonsterInsights-Plugin gesehen haben.
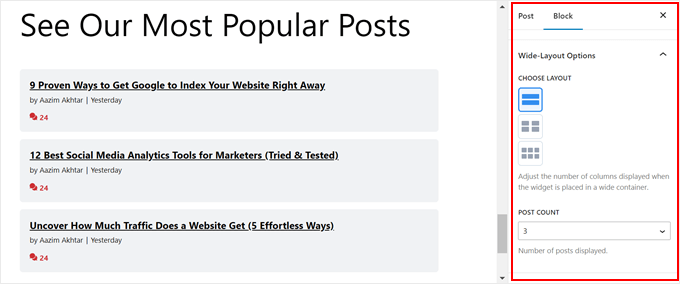
Der einzige Unterschied ist, dass Sie nicht ändern können, welche Beiträge im Widget ausgewählt werden.
In den Verhaltenseinstellungen ist es jedoch möglich, nur Beiträge aus bestimmten Kategorien zu veröffentlichen. Auf diese Weise können Sie die Auswahl der beliebten Beiträge besser auf Ihre Bedürfnisse abstimmen.
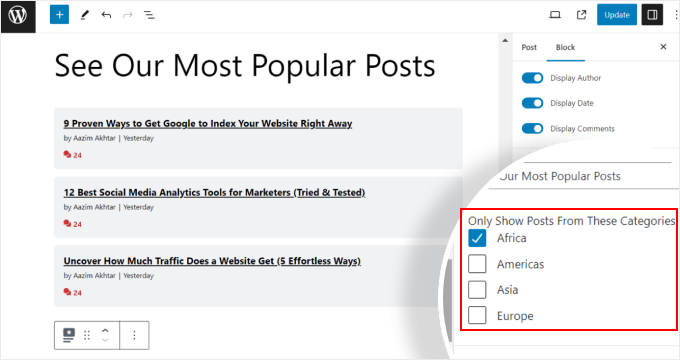
Wenn Sie mit den Blockeinstellungen zufrieden sind, klicken Sie einfach auf die Schaltfläche “Aktualisieren” im Beitrags- und Seiteneditor.
So sieht der Block “Beliebte Beiträge” auf unserer Test-Website aus:

Das Widget für beliebte Beiträge in eine Seitenleiste einbetten
Wenn Sie ein WordPress-Theme ohne Block-Theme verwenden, das über eine Seitenleiste mit Widgets verfügt, können Sie das Widget “Beliebte Beiträge” in diese Seitenleiste einfügen. Dies haben wir in unserem Artikel über das Hinzufügen von hervorgehobenen Beiträgen in Ihrer WordPress-Seitenleiste getan.
Alles was Sie tun müssen, ist, auf Darstellung ” Widgets zu gehen. Klicken Sie dann auf die Schaltfläche “+” zum Hinzufügen von Widgets im Bereich Sidebar und suchen Sie nach dem Widget “Beliebte Beiträge – MonsterInsights”.
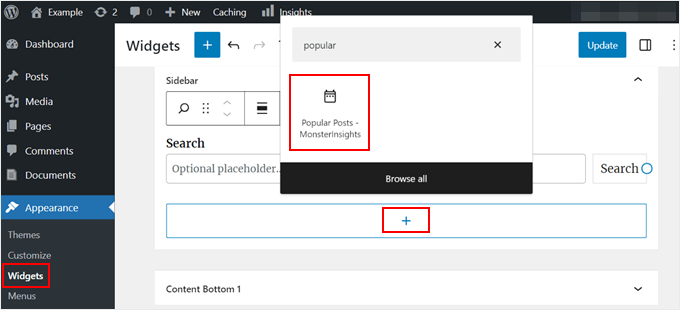
Wie bei der vorherigen Methode enthält das Widget ähnliche Einstellungen, mit denen Sie das Aussehen Ihres Themas anpassen können.
Der Unterschied ist, dass die Benutzeroberfläche etwas schwieriger zu bedienen ist. Während Sie die Einstellungen ändern, können Sie nicht sehen, wie das Widget tatsächlich aussieht. Sie müssen auf ein anderes Widget oder einen anderen Bereich klicken, um es in der Vorschau zu sehen.
Wenn Sie mit dem Aussehen des Widgets zufrieden sind, klicken Sie einfach auf “Aktualisieren” in der oberen rechten Ecke.
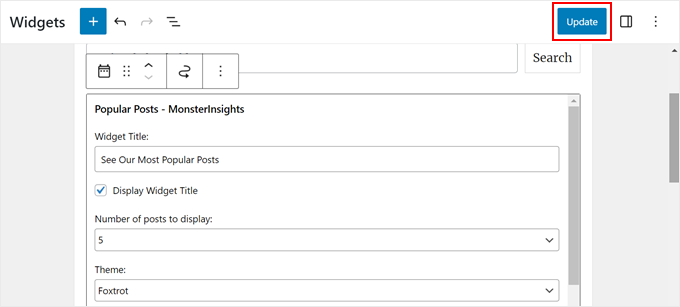
Gehen Sie auf Ihre Website, um zu prüfen, ob die Seitenleiste richtig aussieht.
So sieht unsere aus:

Wenn Sie das Widget “Beliebte Beiträge” nur auf bestimmten Seiten anzeigen lassen möchten, lesen Sie unsere Anleitung zum Ein- und Ausblenden von Widgets auf bestimmten WordPress-Seiten.
Einbetten des Popular Posts Widget mit einem Shortcode
Die letzte Option ist die Verwendung eines Shortcodes. Diese Methode wird empfohlen, wenn die oben genannten Optionen für Ihren speziellen Anwendungsfall nicht geeignet sind.
Scrollen Sie auf der Registerkarte “Beliebte Beiträge” ganz nach unten zum Abschnitt “Einbettungsoptionen”. Wählen Sie dann “Mit einem Shortcode anzeigen” und klicken Sie auf die Schaltfläche “Shortcode kopieren”.
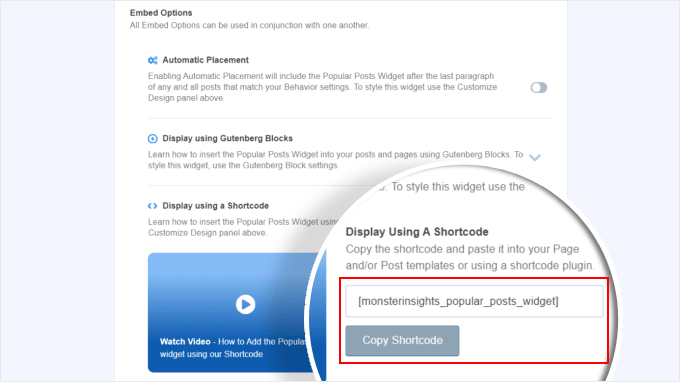
Danach platzieren Sie den Shortcode einfach dort, wo Sie ihn haben möchten. Weitere Informationen finden Sie in unserer Anleitung zum Hinzufügen von Shortcodes in WordPress.
Methode 2: Anzeige beliebter WordPress-Beiträge nach Ansichten mit Code (fortgeschrittener)
Die MonsterInsights-Methode ist der einfachste Weg, um Ihre beliebtesten und besten Inhalte nach Ansichten in WordPress anzuzeigen. Aber wenn Sie mit der Programmierung vertraut sind, können Sie auch Code verwenden, um Ihre beliebtesten WordPress-Beiträge anzuzeigen.
Für diese Methode empfehlen wir die Verwendung eines Code-Snippets-Plugins wie WPCode, das wir in diesem Leitfaden verwenden werden.

WPCode macht es sicher, benutzerdefinierten Code einzufügen, ohne direkt mit Ihren WordPress-Dateien zu interagieren. Und da diese Methode die Verwendung mehrerer Codeschnipsel erfordert, macht das Plugin die Verwaltung und Verfolgung aller dieser Codeschnipsel viel einfacher.
Zunächst müssen Sie WPCode in WordPress installieren. Es gibt eine kostenlose Version von WPCode, aber wir werden die Pro-Version verwenden, da sie über die Funktionen verfügt, die wir zum Einfügen des Codes an den richtigen Stellen benötigen.
Eine schrittweise Installationsanleitung finden Sie in unserem Artikel über die Installation eines WordPress-Plugins.
WordPress Post Views Zähler Funktion hinzufügen
Nach der Aktivierung des Plugins müssen Sie auf dem Dashboard zu Code Snippets ” + Snippet hinzufügen gehen. Fahren Sie dann mit dem Mauszeiger über “Add Your Custom Code (New Snippet)” und klicken Sie auf “+ Add Custom Snippet”.
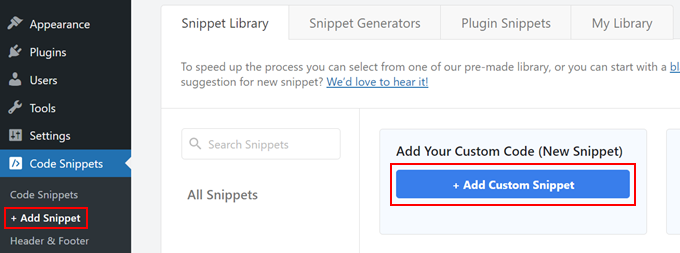
Jetzt befinden Sie sich im WPCode-Codefragment-Editor. Bevor Sie einen Code einfügen, fügen Sie einen Titel für das Snippet hinzu.
Für diesen ersten Code können Sie einen Namen wie “WordPress Post Views Counter Function” wählen. Der Grund dafür ist, dass der Zweck dieses ersten Codes darin besteht, eine Funktion zum Zählen von Beitragsaufrufen in WordPress zu erstellen.
Als Nächstes ändern Sie den Codetyp in “PHP Snippet”. Beachten Sie, dass alle Codeschnipsel, die Sie aus diesem Artikel hinzufügen müssen, in PHP geschrieben sind.
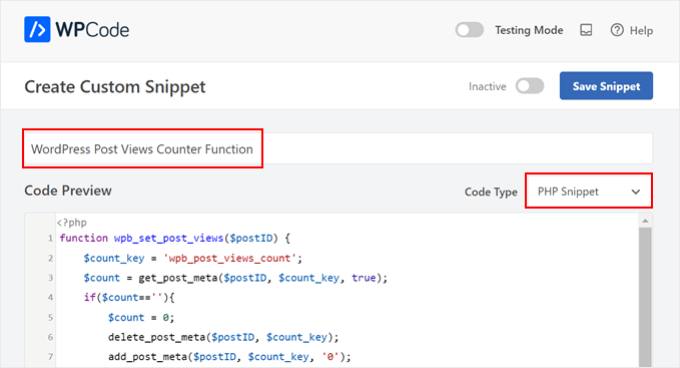
Danach können Sie den folgenden Code kopieren und einfügen:
1 2 3 4 5 6 7 8 9 10 11 12 13 14 | function wpb_set_post_views($postID) { $count_key = 'wpb_post_views_count'; $count = get_post_meta($postID, $count_key, true); if($count==''){ $count = 0; delete_post_meta($postID, $count_key); add_post_meta($postID, $count_key, '0'); }else{ $count++; update_post_meta($postID, $count_key, $count); }}//Get rid of prefetching to keep the count accurateremove_action( 'wp_head', 'adjacent_posts_rel_link_wp_head', 10, 0); |
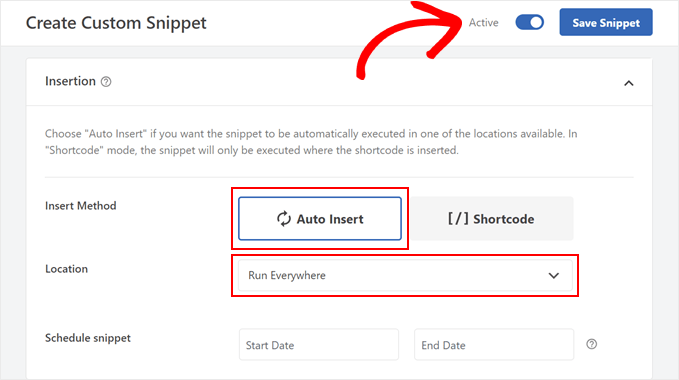
Scrollen Sie nun zum Abschnitt “Einfügen” und wählen Sie für die Einfügemethode “Automatisch einfügen” und für den Ort “Überall ausführen”. Dies funktioniert genauso wie das Einfügen des Codes in die Datei functions.php Ihres Themas.
Navigieren Sie dann zum oberen rechten Rand der Seite und aktivieren Sie den Code.
Klicken Sie dann auf “Snippet speichern”.
In diesem Stadium müssen Sie einen weiteren neuen benutzerdefinierten Codeschnipsel hinzufügen. Diesen können Sie “Track Post Views Function Call” nennen.
Dieser Code ruft die obige Funktion auf und aktiviert sie auf Ihren einzelnen Beitragsseiten.
Kopieren Sie anschließend den folgenden Ausschnitt und fügen Sie ihn ein:
1 | wpb_set_post_views(get_the_ID()); |
Das Besondere an diesem Code-Snippet ist, dass Sie die Position “Nach dem Beitrag einfügen” wählen, da es auf Ihren einzelnen Beitragsseiten ausgeführt werden soll.
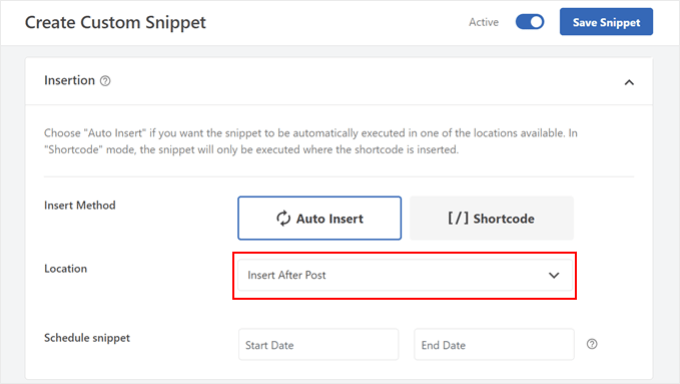
Wenn Sie fertig sind, aktivieren Sie den Code und speichern ihn.
WordPress Post Views Tracking Hook einfügen
Nun müssen Sie einen neuen Codeschnipsel hinzufügen, der überprüft, ob die aktuelle Seite ein einzelner Beitrag ist. Ist dies der Fall, wird die Funktion WordPress Post Views Counter aufgerufen, um die Anzahl der Aufrufe des Beitrags zu verfolgen und zu aktualisieren.
Auf diese Weise wird jedes Mal, wenn ein Nutzer den Beitrag besucht, die Anzahl der Aufrufe aktualisiert.
Nennen wir dieses Snippet “WordPress Post Views Tracking Hook”. Fügen Sie dann die folgenden Codezeilen ein:
1 2 3 4 5 6 7 8 9 | function wpb_track_post_views ($post_id) { if ( !is_single() ) return; if ( empty ( $post_id) ) { global $post; $post_id = $post->ID; } wpb_set_post_views($post_id);}add_action( 'wp_head', 'wpb_track_post_views'); |
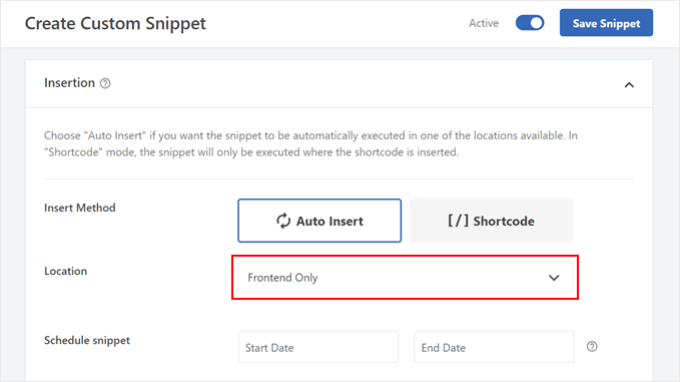
Sie können als Einfügemethode “Automatisch einfügen” und als Speicherort “Nur Frontend” wählen.
Wie bei den vorangegangenen Schritten müssen Sie nur den Code aktivieren und das Snippet speichern.
Hinweis: Wenn Sie ein Caching-Plugin verwenden, funktioniert diese Technik möglicherweise nicht standardmäßig. Sie könnten die Fragment-Caching-Funktion verwenden, die von einigen Caching-Plugins wie W3 Total Cache angeboten wird, damit es funktioniert.
Funktionen zum Abrufen der Anzahl der Beitragsaufrufe und zum Anzeigen der beliebtesten Beiträge mit Anzahl der Aufrufe hinzufügen
Wir sind nun bei den letzten Schritten dieser Anleitung angelangt. Sie müssen einen Codeschnipsel hinzufügen, der die Anzahl der Aufrufe für einen bestimmten WordPress-Beitrag abruft und formatiert. Dies wird später bei der Anzeige der Liste der am häufigsten angesehenen Beiträge nützlich sein.
Sie können diesen Code als “Retrieve Post Views Count Function” bezeichnen und den Speicherort auf “Run Everywhere” setzen.
Hier ist das Codeschnipsel:
1 2 3 4 5 6 7 8 9 10 | function wpb_get_post_views($postID){ $count_key = 'wpb_post_views_count'; $count = get_post_meta($postID, $count_key, true); if($count==''){ delete_post_meta($postID, $count_key); add_post_meta($postID, $count_key, '0'); return "0 View"; } return $count.' Views';} |
Achten Sie auch hier darauf, den Code in WPCode zu aktivieren und ihn anschließend zu speichern.
Danach erstellen Sie wieder ein neues Code-Snippet und nennen es “Display Most Popular Posts with View Counts”. Dies ist der Code, der Ihre beliebtesten Beiträge unten in Ihren Blogbeiträgen anzeigt.
Fügen Sie im Feld Codevorschau das folgende Snippet ein:
1 2 3 4 5 6 7 8 9 10 11 12 13 14 15 16 17 18 19 20 21 22 23 24 | // Customize the query parameters as needed$popularpost = new WP_Query( array( 'posts_per_page' => 3, // Feel free to adjust the number of posts to display 'meta_key' => 'wpb_post_views_count', 'orderby' => 'meta_value_num', 'order' => 'DESC'));?><div class="popular-posts"> <h2>See Our Most Popular Posts</h2> <!-- Feel free to customize the title --> <ul> <?php while ( $popularpost->have_posts() ) : $popularpost->the_post(); ?> <li> <a href="<?php the_permalink(); ?>"><?php the_title(); ?></a> - <?php echo wpb_get_post_views(get_the_ID()); ?> </li> <?php endwhile; ?> </ul></div><?php wp_reset_postdata(); |
Wie im Code angegeben, können Sie die Anzahl der anzuzeigenden Beiträge anpassen und den Titel für diesen Abschnitt individuell gestalten.
Wählen Sie im Abschnitt “WPCode einfügen” die Option “Nach Beitrag einfügen” für den Speicherort. Aktivieren Sie dann einfach den Code und speichern Sie das Snippet.
Jetzt müssen Sie nur noch einen Ihrer Blog-Beiträge besuchen und sehen, ob der Code funktioniert. Hier sehen Sie, wie der Bereich “Beliebteste Beiträge nach Ansichten” in unserem WordPress-Testblog aussieht:

Expertentipp: Wenn Sie den Code weiter anpassen möchten, aber keine Erfahrung im Programmieren haben, können Sie den AI-Code-Generator von WPCode verwenden, um Ihnen zu helfen. Diese Funktion kann Ihren bestehenden Code so bearbeiten, dass er genau Ihren Bedürfnissen entspricht.
Weitere Informationen finden Sie in unserem vollständigen WPCode-Test.
Video-Anleitung
Wenn Sie visuelle Anleitungen bevorzugen, schauen Sie sich bitte die Videoversion dieses Tutorials unten an:
Wir hoffen, dass dieses WordPress-Tutorial Ihnen geholfen hat zu lernen, wie man beliebte Beiträge nach Ansichten anzeigt. Vielleicht möchten Sie auch unsere Expertenauswahl der besten Plugins für verwandte Beiträge für WordPress und unseren Artikel darüber, was eine hochkonvertierende Landing Page ausmacht, lesen.
Wenn Ihnen dieser Artikel gefallen hat, dann abonnieren Sie bitte unseren YouTube-Kanal für WordPress-Videotutorials. Sie können uns auch auf Twitter und Facebook finden.


Bigdragon13th
Hello,
I’ve using this code for months and it’s work greats! That’s until I start using W3 Total Cache and this code stop count views for me.
I’m struck at where do I need to put the mfunc to let the code work with cache. Can you point that out?
FYI, I put all the code in a site-specific plugin.
AJ
Hell this is great! How would I display the view count outside of the post loop like in the sidebar?
leslie
hello, I have some problem on how setting up like when the login user won’t include on the count while viewing any pages?? how to do that.. please need some help on these. thanks
Sarah
Hey there, thanks for this. REALLY helpful!! Would you know how to apply a time range to this code? For example to show the most popular posts in the last day, week or month etc? I know there are plugins for this but I would like to do it without one
Dale Knight
Great!
Denis
Hello,
thanks for this nice tutorial. It works on my page!
– how can I exclude robots and spiders that hit my posts?
– May be I can set a timer of 10 seconds. after that the count should rise. So the people who only click thourgh the posts are not counted.
Cheers,
Denis
Sarah
You have no idea how much time you saved me. Thank you, works perfectly!
Clay Hickman
Thanks for the tip. Will use.
Jenni B
Hello – thanks so much for this! I noticed the question regarding the W3TC workaround, but have a slightly different question: does that still apply if I’m hooking into wp_head from functions.php, and if so, how exactly do I implement it there? Thank you!
rafi
this is really easy and very helpful! thanks man!
Kosmos
Hello, thanks for this snippet.
I have a problem, the orderby don’t work. I have five posts :
– Post 1 : 85 views
– Post 2 : 35 views
– Post 3 : 165 views
– Post 4 : 1 view
– Post 5 : 1 view
When i displayed it the order was : 1, 2, 4, 5 and 3
Do you have an idea please ?
Raj
It might be integer type issue ..
Iftekhar
following your article I am using post view count in my site since 6 months. It was working fine, but recently I am having problem with this. If a visitor view a post the count is increasing by 1 but the problem is the count is increasing in all other posts. I have w3 total installed and I m using mfunc according to your article. Please help me if you have any idea about this issue… Thanks.
WPBeginner Support
Iftekhar can you check what happens when you turn off w3 total cache?
Admin
Iftekhar
The problem seems to w3. Post view count is OK since deactivated. But I want to use both of them
ivan
Hello,
I am wanting to switch from using the plugin because it doesn’t support the polylang language (the author’s not getting back to me and I don’t really know if it’s possible to filter functions for the plugin..)
Two questions:
– I examined the code a bit and I’m not sure if this code starts counting posts from when it’s implemented? Or does it somehow retrieve where the post counts are currently?
– The current code on this website uses the get_posts() function so it creates an args array instead of using WP_Query(). Is this the same thing? I’m guessing not. And if it isn’t is the code below correct to get the array? I tried implementing this but it didn’t seem to work.
$args = array( ‘meta_key’ => ‘wpb_post_views_count’, ‘orderby’ => ‘meta_value_num’, ‘order’ => ‘DESC’,’numberposts’ => 6, ‘post_status’=>”publish”,’post_type’=>”post”,’lang’ => ‘en’);
thanks!
Tomas
This approach is very basic. If you want to count clicks from the same user (same IP) only every 5 minutes or 10 minutes etc. you need to have a separate table for that and before adding a new row in db you need to check the ip and time. If there is a record saved 3 minutes ago, the click is not added. Otherwise, it is added. Also this aproach allows you to create custom list of most viewed articles in 7 dyas, month, all time etc. Or even by category, user etc. (if you store appropriate values in appropriate table columns.
boson
i am trying .. when you say put code wpb_set_post_views(get_the_ID()); inside of single post loop, does that mean use this code inside of the theme single.php anywhere?
thank you for your help
WPBeginner Support
No it means paste the code inside the loop between
<?phpif( have_posts() ) :while( have_posts() ) : the_post(); ?>1-click Use in WordPress
and
<?phpendwhile;else: ?><p><?php _e('Sorry, no posts matched your criteria.'); ?></p><?phpendif; ?>1-click Use in WordPress
Admin
Cory Dobson
Is there a way of restricting when the post views are collected from? For example, I am looking to display the posts with the most views in the last 24 hours, how would you do something like that using this code?
Great post by the way, really helpful!
igor
how can I paginate the results.
10 results by page lets say
Mark
What if your single-xxxx.php doesn’t use the loop but custom fields. How can I use this code if I don’t use the loop?
WPBeginner Support
single-xyz.php means that file is used for a single post with xyz slug. You can still add the last code snippet in your template just where you think that the template ends displaying content.
Admin
quocminh86
comment policy,
Dusan
I’m confused as to where to put the mfunc code?
WPBeginner Support
If you are using W3 Total Cache then you can add this code just before wpb_get_post_views(get_the_ID()); in your templates where you want to display the popular posts. The purpose of this code is to allow W3 Total Cache to dynamically display popular posts and not cache it.
Admin
Waqas Munir
Dear, i am really confused about that… I am trying to add this to my blog, but I have no experience in all this.
WPBeginner Support
Then perhaps you should try using WordPress Popular Posts plugin instead.
Admin
Aleksander
What about using update_post_meta function instead of delete_post_meta and add_post_meta ?
George
Thanks for this post! Really really good.
I’ve two question:
1. Is there any possibility to count just one visit for each IP adress? How?.
2. Can i show the most popular posts by a specific period of time? For example, most visited posts this month, or the most popular posts from 1 of may to 1 of june…
Thank you!
Igor Gumush
thanks , working great
shishir umrao
Hi,
This code is working but whenever i reload the page , it is adding “2” to the total page count. For example if page count is 14 and after reloading total page count is 16 … can anyone guess where’s the problem ?
Shishir Umrao
Editorial Staff
Its happening because the function is loading twice somehow.
Admin
shishir umrao
Yeah. I figured out this piece of code was responsible for this.
Nick
Very useful post, I managed to make my Tag pages to order posts by a custom field value similar to post view count, however, I ave pagination on my tag pages and it keeps showing the same top ranking posts on all pages, even after I have removed this code:
‘posts_per_page’ => 4,
How do I fix the pagination so it show other posts on subsequent Tag pages?
Chris
How did you manage to make your Tag pages order posts by a custom field value similar to post view count?
It looks like the popular posts plugin only takes categories as a parameter.
Mike
Thanks for the very detailed instructions. Will using this to display the most popular posts cause a lot of additional server load if a site has significant traffic? Some of the WP plugins for this sort of thing tend to have this problem.
Editorial Staff
How much is significant traffic? We’re using it on WPBeginner.
Admin
Ryan Karpeles
Uh, awesome! Just awesome. THANK YOU for this!!! Works perfectly!
Lowell
I’m still learning this stuff so pardon my ignorance.
How do you allow the user to choose between queries like they do on codecanyon when they allow you to sort by price, sales, date etc.?
Thanks so much.
saeed
How can I change number of popular posts that display?
Editorial Staff
Change the posts_per_page to whatever number you like.
Admin
Adam Davies
Thank you so much for this. Life saver and a great tip that I definitely will be using more often.
Md. Ariful Islam
Hey, Really , Many Many thanks for this useful tips. I am highly glad to you.
Ar Ya
Hi , that’s great !
But ‘orderby’ => ‘wpb_post_views_count meta_value_num’ not working.
please use : ‘orderby’ => ‘meta_value_num’
thnx
nick
Thanks, it works for me, just with one important exception – popular posts are not as links, just their titles. How can I fix this, please?
Preston
I added this code in the manner described in the article and upon activation, I saw this….
The plugin generated 2 characters of unexpected output during activation. If you notice “headers already sent” messages, problems with syndication feeds or other issues, try deactivating or removing this plugin.
Preston
Fixed. I did two things:
1. Switched my permalink structure to a custom structure /%category%/%postname%/
2. Check through all of my pages for extra spaces.
One of them worked.
…go figure
Preston
Jose Vega
Hi, I think it´s necesary add – wp_reset_query(); – at the end of the query to destroys the previous query used on a custom Loop.
I hope It helps somebody.
Jon Edwards
I have this working to 95% using a custom WP Query to display popular posts from each category.
The only bit not working for me is the order – mine won’t display in descending order of views.
Cameron
Thanks for the post! This really helped.
I’m not sure if anyone else ran into this issue, but when you set up the arguments for WP_Query, you have orderby => ‘wpb_post_views_count’. This was a problem for me because I wasn’t sure how it was ordering my posts. In the codex it says that if your using numbers they will only sort by the first digit. To fix this, you can simply replace the ‘wpb_post_views_count’ with ‘meta_value_num’. This basically will tell the query to reach inside the post’s meta value and probably cast it to an integer before it sorts. Hope this helps anyone running into the same issues.
Overall, it works great! I have the 4 most popular posts in a slider on the home page. Thanks again!
Editorial Staff
Good suggestion. Updated the article with this.
Admin
efishinsea
Hi. Your code sample up top is *not * updated.
Instead of this:
‘orderby’ => ‘wpb_post_views_count meta_value_num’
you should have this as suggested :
‘orderby’ => ‘meta_value_num’
if you want to sort by “Most to Least”
Minh
Why it only shows posts which have count view < 100?
Editorial Staff
If you are using a caching plugin, then it doesn’t always update.
Admin
George
Thanks for the tutorial. How do you exclude current posts from displaying?
Kris
This looks great on my home page but it seem to want to display on my single.php or anywhere else on my site. I tried creating a sidebar-single.php and inserting the code but still no luck. Any idea why it wouldn’t work on other areas my theme?
Kris
i got it working. Thanks for this.
Anderson
Dont work, its show randomic posts :S and i use post_type = > ‘post-type-name’
Mody
This usually happens when meta key wpb_post_views_count is not available for posts, make sure you add the function that tracks views within wp while loop, otherwise it will keep showing random posts.
– Mody
Bent
Hello,
I’m using your code for track post view in the wordpress theme.
function wpb_get_post_views($postID){
$count_key = ‘wpb_post_views_count’;
$count = get_post_meta($postID, $count_key, true);
if($count==”){
delete_post_meta($postID, $count_key);
add_post_meta($postID, $count_key, ‘0’);
return “0 View”;
}
return $count.’ Views’;
}
The problem is that when I use W3 Total Cache the track view is not working right.
Is there a way in the W3 Total Cache’s Options to put ignore only on this function, but in the same time I want the code to work with W3 Total Cache?
Thank you!
Editorial Staff
Read the article again. We have already covered this “Fragmented Caching”.
Vaibhav
Hello
i followed your tutorials and have done exactly what u said.
i also added ur snippet
php query_posts(‘meta_key=post_views_count&orderby=meta_value_num&order=DESC’);
in index.php
i am facing a little error,
i am using infinite scrolling
when i put this snippet in index.php
the infinite scroll instead of loading next set of post
loads the same sets of post
For better Understanding u can check it live here
blog.newgags,com
Henry
For some reason my post views are incrementing by 2 on each page refresh. What could be happening there?
Henry
I do apologise. I had added the tracker to both the WP header and also to the single post body. Very stupid on my part :}
Nice tutorial, very easy to follow.
Brandon
First of all thanks for this post. Second I have been using this script for a few days now and for some reason it started out fine and now it is not displaying the most viewed posts, I don’t see any rhyme or reason to what posts are now being displayed. The last I checked the post that it is displaying at the top has 8 page views. I know there are posts with 25+ recorded page views. I would like to figure this out. Can you possibly point me in the right direction. I followed this post word for word. The post views are being recorded properly.
Editorial Staff
Not sure what could be going wrong. The WP_Query is suppose to list the posts with the highest counts first.
Admin
Einar Ólafsson
Hi. This works grade up until the view count gets over 999. All post with more view counts than 999 are not displayed, the query never post them. The latest post is the one with exactly 999 and the rest are under that. I have over 100 post that have more than thousand and are not being included.
Editorial Staff
Interesting. We have posts with over 10k views and it seems to be working just fine.
Admin
Martinbeasnunez
Guys you rockkk
Quick question:
If i have add a custom post type in your code ?
(popular post from especific custom post type)
Regards (:
Editorial Staff
This should work with CPTs as well.
Admin
Artem Russakovskii
This is a good basic tutorial, but be warned: it’s not going to work if you use caching strategies that bypass PHP (like wp-supercache, W3TC, nginx/varnish, etc). The only way to count those would be via Javascript or log parsing.
Editorial Staff
Hey Artem, Thanks for dropping by. Actually using W3 Total Cache, you can use fragment caching and it works just fine. Going to update the article for those who are using the caching plugin.
Admin
Artem Russakovskii
Interesting. However, I run nginx in front of W3TC, and it does a whole lot of its own caching, so it’s always safer/more reliable to use an AJAX approach. Nice info on the fragment caching though, I had no idea W3TC had it.
Ramon Fincken
Why use
//To keep the count accurate, lets get rid of prefetching
remove_action( ‘wp_head’, ‘adjacent_posts_rel_link_wp_head’, 10, 0); ?
if you can use the main loop or the footer ?
Editorial Staff
Some browsers prefetch the rel links with the next value. So technically when a user views one post, it can act as if they had viewed both posts. This will cause inaccurate count. If you like inflated views, then don’t take it off.
Admin
Nino Blasco
Great article! Explanation useful and easy to understand.
Thank you.
Connor Crosby
Yay! A tutorial that doesn’t require a plugin!
Editorial Staff
Yeah we try to balance things out for our audience. This was requested by the users, and we were using it on our own site.
Admin
Zach
Please stop saying stuff like this. Plugins aren’t bad, it’s articles like this that make them look bad. Enough articles have come out over the past few weeks to fully explain this – it’s getting a little embarrassing.
Editorial Staff
How would you suggest titling future posts instead? DIY prefix? These are different then just using a pre-made plugin. Also, if you read the article, there is no where in our article that we say “plugins are bad”. We clearly state that the only reason why coded this was to get more customization. It is up to a user to take either stance. Some can think that plugins are bad… whereas others like yourself can think that we are saying that plugins are bad…
Zach
I don’t think any type of prefix is needed. It’s one of the great/scary things about WordPress. You COULD put this code in your theme, but then begs the argument about needing to either, 1) Loose those customizations when you change your theme, or 2) have the knowledge to properly pull those over to another theme.
A lot of the users here are beginners (hence the point of this site), so many will just copy/paste what you give them. WP Beginner is obviously a fantastic resource (reason why I follow you on Twitter), but you have a responsibility to not put a false notion about how plugins/themes work.
Correct, you don’t flat out say, “Plugins are bad, put this in your theme instead!”, but the original commenter to the thread I replied to, said, “Yay! A tutorial that doesn’t require a plugin!” – so even though you didn’t say it, that’s how it was taken.
I’d suggest doing was Pippin does for his plugins – he has a simple starter plugin he uses for all of his tutorials. Why not create a blank “Starter Plugin” download, with just the basics, so others can download and put their customizations in there instead? Reference it in each article you do and it takes out some of the confusion. Thanks.
Editorial Staff
We have been following Otto’s advice on site-specific plugin for quite some time. It is probably similar to what Pippin does. If you read this article, site-specific plugin is hyperlinked. It is in most other articles as well. That article shows users the importance of site-specific plugin and advise users to not put everything in functions.php file. At the bottom of that article, the sample “starter plugin” is there for anyone to start with.
codekipple
In fairness this tutorial helped me out. I wanted a simple solution for popular posts after trying some of the plugins and not being able to fully control the markup. This tutorial helped me quickly implement some popular posts functionality into my own plugin.
So i agree that using pre-built plugins is not a bad thing, but at times tutorials like this are useful to take control and build out a plugin that works the way you need it to instead of fighting against an already built plugin.
Pippin
As Zach said, please stop using “without a plugin”. Sure, it’s cool to see how to code this yourself but there is literally no difference between this code and the code in a plugin. You could place this code into a plugin and it would function identically to placing it in your theme.
Ruben
If you say there’s no difference, you have no idea what you’re talking about. Lets say your are working on a site and don’t have access to the plugins directory, making a solution that works “without using a plugin” would be a viable alternative.
As for the title, semantically the title should reflect the content of the post and could be “How to Display Popular Posts by Views in WordPress with or without a Plugin”.
However, taking SEO in to consideration, lets say he would like this post to reach a specific audience, for example, people who don’t want to or can’t use a plugin, the title would probably be best as is.
Gautam Doddamani
i am using genesis child theme..can u tell me which all functions and codes to use..i am sorry i am a noob to genesis…
Editorial Staff
For child theme users, the wp_head solution would work to track post views. Not sure what else you meant.
Admin
Gautam Doddamani
is it true? as artim told, does this code become unresponsive when we use a caching plugin?? for example i currently use W3 total cache and i want to use this method to build my custom popular post by views widget…i read this kind of post on wpsnipp.com and the users suggested it does not work when we enable caching plugins…reply soon…
Editorial Staff
Read the comment reply to Artem. You can use fragment caching to make it work just fine.