Sie haben Contact Form 7 wahrscheinlich auf Ihrer WordPress-Website installiert, da es kostenlos und weit verbreitet ist.
Möglicherweise haben Sie jedoch festgestellt, dass die Standardformulare auf Ihrer Live-Website recht schlicht aussehen. Dieses einfache graue Design kann mit dem Rest Ihrer Website kollidieren und das Gesamtdesign weniger ausgefeilt wirken lassen.
Da Contact Form 7 keinen visuellen Editor oder integrierte Styling-Optionen bietet, erfordert die Durchführung von Änderungen etwas Arbeit, wenn Sie sich mit Code nicht auskennen.
Die gute Nachricht ist, dass Sie kein Entwickler sein müssen, um dies zu beheben. Mit nur wenigen CSS-Anpassungen können Sie Ihre Formulare sauber, modern und vollständig im Einklang mit Ihrer Marke gestalten.
In diesem anfängerfreundlichen Leitfaden führen wir Sie Schritt für Schritt durch die Anpassung von Contact Form 7, ohne fortgeschrittene Programmier- oder Designkenntnisse. 🙌
Warum Ihr Kontaktformular 7 gestalten?
Das Styling Ihrer Contact Form 7-Formulare lässt Ihre Website professioneller aussehen, verbessert die Lesbarkeit und hilft Ihren Formularen, Ihrer Marke zu entsprechen. All dies kann Vertrauen und Formular-Konversionen steigern.
Bevor wir beginnen: Contact Form 7 ist eines der beliebtesten Kontaktformular-Plugins für WordPress. Es ist kostenlos nutzbar und ermöglicht Ihnen das Hinzufügen eines WordPress-Formulars per Shortcode.
Der Nachteil ist, dass Contact Form 7 in Bezug auf Design und Anpassungsfunktionen recht eingeschränkt ist. Außerdem bietet das Plugin keine integrierten Optionen zur Änderung des Stils Ihrer Formulare.
Dies erschwert es, das Design Ihres Kontaktformulars mit Ihrem Website-Theme abzugleichen oder grundlegende Details wie Schriftart und Hintergrundfarbe zu ändern, damit Ihr Formular hervorsticht.
📦 Insider-Tipp: Wenn Sie anpassbarere Formulare mit erweiterten Funktionen wünschen, empfehlen wir WPForms. Es verfügt über einen Drag-and-Drop-Formularersteller, KI-Tools, über 2.000 vorgefertigte Formularvorlagen und zahlreiche Anpassungsoptionen.
Wir verwenden tatsächlich WPForms für fast alle unsere Formulare – vom WPBeginner-Kontaktformular über unsere jährlichen Leserumfragen bis hin zum Formular für Anfragen zur Website-Migration. Sehen Sie sich unsere detaillierte WPForms-Bewertung an, um zu sehen, warum wir diesen Formularersteller sehr empfehlen.
Wenn Sie ein begrenztes Budget haben, gibt es eine kostenlose Version von WPForms. Sie enthält über 60 Vorlagen, bedingte Logik, Stripe-Zahlungen und mehr.
Wir haben einen direkten Vergleich von Contact Form 7 vs WPForms, den Sie sich ansehen können!
Nun werden wir uns ansehen, wie Sie ein Contact Form 7-Formular in WordPress gestalten. Hier ist, was wir in den folgenden Abschnitten behandeln werden:
- Erste Schritte mit Contact Form 7
- Method 1: Styling Contact Form 7 Forms Using Custom CSS
- Methode 2: Kontaktformular 7 mit CSS Hero gestalten
- Bonustipp 💡: Eine codefreie Methode zum Stylen von WordPress-Formularen
- FAQ: Styling von Contact Form 7 in WordPress
- Zusätzliche Ressourcen für die Anpassung von WordPress-Formularen
Lass uns anfangen!
Erste Schritte mit Contact Form 7
Zuerst müssen Sie das Plugin Contact Form 7 auf Ihrer Website installieren und aktivieren.
Um dies zu tun, gehen Sie zu Plugins » Neues Plugin hinzufügen in Ihrem WordPress-Adminbereich.
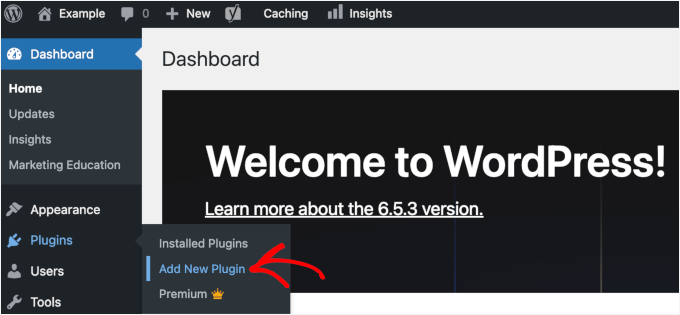
Dies öffnet die Seite, auf der Sie ein Plugin aus dem WordPress-Plugin-Verzeichnis auswählen können.
Nutzen Sie die Suchfunktion, um das Plugin schnell zu finden. Klicken Sie dann im Suchergebnis auf die Schaltfläche 'Jetzt installieren'.

Vergessen Sie nicht, auf die Schaltfläche 'Aktivieren' zu klicken, um es auf Ihrer WordPress-Site zu aktivieren. Wenn Sie Hilfe benötigen, lesen Sie bitte unseren Leitfaden zur Installation eines WordPress-Plugins.
Nach der Aktivierung können Sie in Ihrem WordPress-Dashboard zu Kontakte » Neu hinzufügen navigieren.
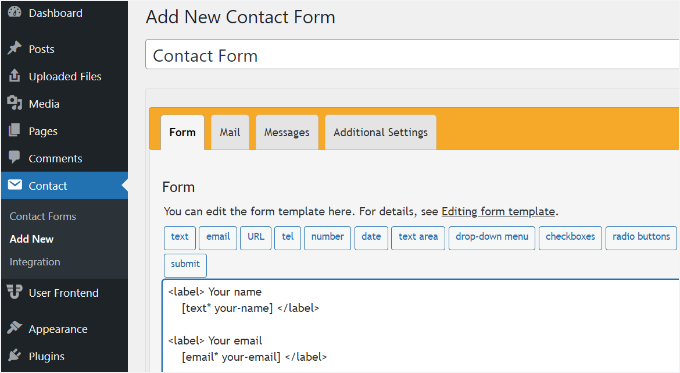
Sie können nun die Formulareinstellungen für Ihre Website bearbeiten und mit der Eingabe eines Titels für Ihr Formular beginnen.
Das Plugin fügt automatisch die Standardfelder für Name, E-Mail-Adresse, Betreff und Nachricht hinzu. Sie können auch weitere Felder hinzufügen, indem Sie sie einfach per Drag & Drop verschieben.
Wenn Sie fertig sind, vergessen Sie nicht, auf die Schaltfläche „Speichern“ zu klicken und den Shortcode zu kopieren.
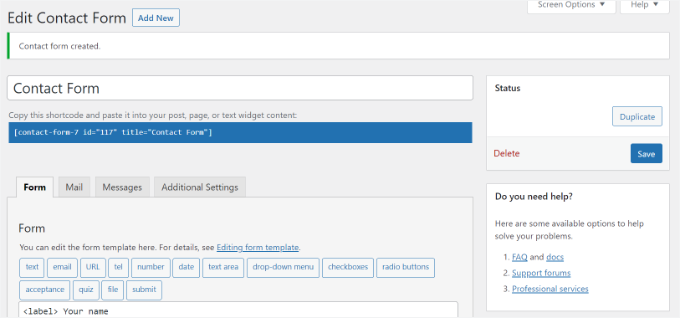
Der nächste Schritt ist, das Formular einzubetten in Ihren Blogbeitrag oder Ihre Seite.
Um das zu tun, bearbeiten Sie einfach einen Beitrag oder fügen Sie einen neuen hinzu.
Sobald Sie sich im WordPress-Editor befinden, klicken Sie auf das „+“-Zeichen oben und fügen Sie dann einen Shortcode-Block hinzu.

Geben Sie danach einfach den Shortcode für Ihr Kontaktformular 7 in den Shortcode-Block ein. Es wird ungefähr so aussehen:
[contact-form-7 id="117" title="Contact Form"]
Veröffentlichen Sie nun Ihren Beitrag oder Ihre Seite, um das Kontaktformular in Aktion zu sehen.
Für dieses Tutorial haben wir das Standard-Kontaktformular verwendet und es zu einer WordPress-Seite hinzugefügt. So sah das Kontaktformular auf unserer Testseite aus.
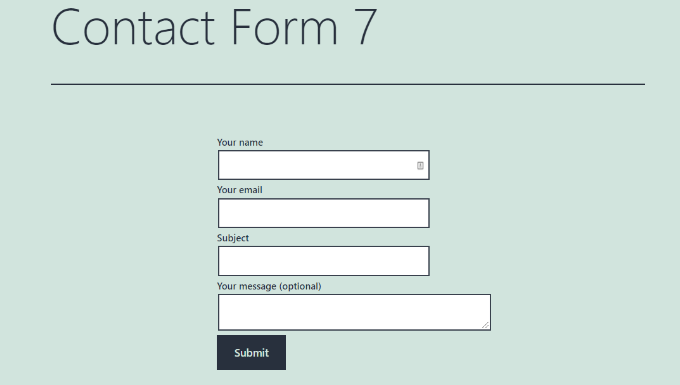
Jetzt sind Sie bereit, Ihr Contact Form 7-Formular in WordPress anzupassen.
Methode 1: Contact Form 7-Formulare mit benutzerdefiniertem CSS gestalten
Da Contact Form 7 keine integrierten Stiloptionen hat, müssen Sie CSS verwenden, um Ihre Formulare zu gestalten.
Contact Form 7 fügt den Formularelementen Standard-CSS-Klassen und -IDs hinzu. Dies erleichtert die Anpassung des Designs, wenn Sie sich ein wenig mit CSS auskennen.
Jedes Contact Form 7-Formular verwendet die CSS-Klasse .wpcf7, die Sie ansprechen können, um Ihr Formular zu gestalten.
In diesem Beispiel verwenden wir die benutzerdefinierte Schriftart namens Lora in unseren Eingabefeldern und ändern die Hintergrundfarbe des Formulars:
div.wpcf7 {
background-color: #fbefde;
border: 1px solid #f28f27;
padding:20px;
}
.wpcf7 input[type="text"],
.wpcf7 input[type="email"],
.wpcf7 textarea {
background:#725f4c;
color:#FFF;
font-family:lora, sans-serif;
font-style:italic;
}
.wpcf7 input[type="submit"],
.wpcf7 input[type="button"] {
background-color:#725f4c;
width:100%;
text-align:center;
text-transform:uppercase;
}
Sie können dieses CSS ganz einfach hinzufügen, indem Sie in Ihrem WordPress-Dashboard zu Design » Anpassen » Zusätzliches CSS navigieren. Wenn Sie weitere Hilfe benötigen, lesen Sie bitte unseren Leitfaden zum Thema wie Sie benutzerdefiniertes CSS einfach zu einer WordPress-Website hinzufügen.
So sah unser Kontaktformular nach Anwendung dieses CSS aus.
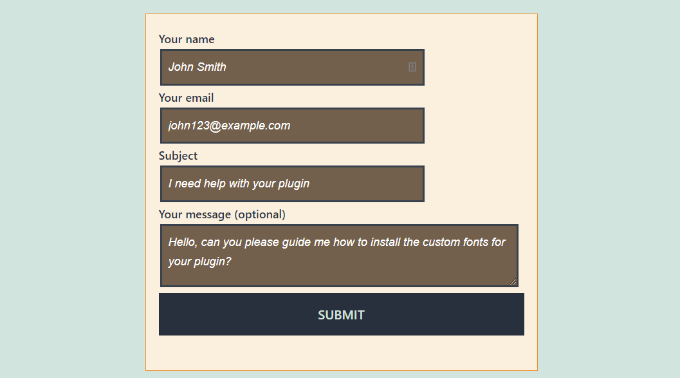
Mehrere Contact Form 7-Formulare gestalten
Wenn Sie mehrere Kontaktformulare verwenden und diese unterschiedlich gestalten möchten, können Sie die eindeutige ID ansprechen, die Contact Form 7 für jedes Formular generiert.
Der Nachteil des oben verwendeten CSS ist, dass es auf alle Contact Form 7-Formulare auf Ihrer Website angewendet wird.
Öffnen Sie zunächst einfach die Seite, die das zu ändernde Formular enthält. Klicken Sie dann mit der rechten Maustaste auf das erste Feld im Formular und wählen Sie die Option 'Untersuchen'.
Machen Sie sich keine Sorgen, wenn der Code komplex aussieht; Sie müssen nur eine bestimmte Zeile finden.
Der Browserbildschirm wird geteilt und Sie sehen den Quellcode der Seite. Im Quellcode müssen Sie die Startzeile des Formularcodes finden.
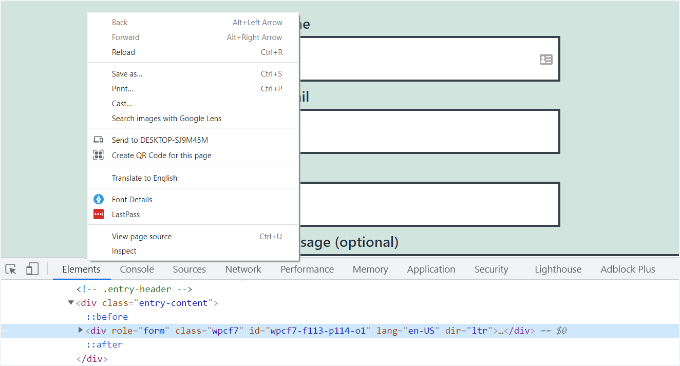
Wie Sie im obigen Screenshot sehen können, beginnt unser Kontaktformular-Code mit der Zeile:
<div role="form" class="wpcf7" id="wpcf7-f113-p114-o1" lang="en-US" dir="ltr">
Das ID-Attribut ist eine eindeutige Kennung, die von Contact Form 7 für dieses spezielle Formular generiert wird. Es ist eine Kombination aus der Formular-ID und der Beitrags-ID, wo dieses Formular hinzugefügt wird.
Wir werden diese ID in unserem CSS verwenden, um nur dieses spezielle Kontaktformular zu gestalten. Ersetzen Sie im folgenden Code .wpcf7 durch Ihre eindeutige ID (z. B. #wpcf7-f113-p114-o1).
div#wpcf7-f113-p114-o1{
background-color: #fbefde;
border: 1px solid #f28f27;
padding:20px;
}
#wpcf7-f113-p114-o1 input[type="text"],
#wpcf7-f113-p114-o1 input[type="email"],
#wpcf7-f113-p114-o1 textarea {
background:#725f4c;
color:#FFF;
font-family:lora, "Open Sans", sans-serif;
font-style:italic;
}
#wpcf7-f113-p114-o1 input[type="submit"],
#wpcf7-f113-p114-o1 input[type="button"] {
background-color:#725f4c;
width:100%;
text-align:center;
text-transform:uppercase;
}
Beachten Sie, dass Sie die auf Ihrer eigenen Website generierte ID verwenden müssen, sonst funktioniert das CSS nicht.
Sie können diesen Vorgang nun für jedes Formular wiederholen, das Sie anpassen möchten, und die ID durch die für dieses spezielle Formular generierte ersetzen.
Methode 2: Kontaktformular 7 mit CSS Hero gestalten
Eine einfachere Möglichkeit, das Aussehen von Contact Form 7-Formularen zu ändern, ist die Verwendung von CSS Hero. Damit können Sie Ihre Formulare bearbeiten, ohne CSS schreiben zu müssen.
Wir haben dieses Plugin ausprobiert und getestet, um zu sehen, ob es gut ist. Lesen Sie alles darüber in unserem vollständigen CSS Hero-Testbericht.
Da CSS Hero ein Premium-Plugin ist, müssen Sie zuerst ein CSS Hero-Konto auf deren Website erstellen. Klicken Sie einfach auf die Schaltfläche „Jetzt erhalten“, wählen Sie einen Plan aus und schließen Sie den Bestellvorgang ab.
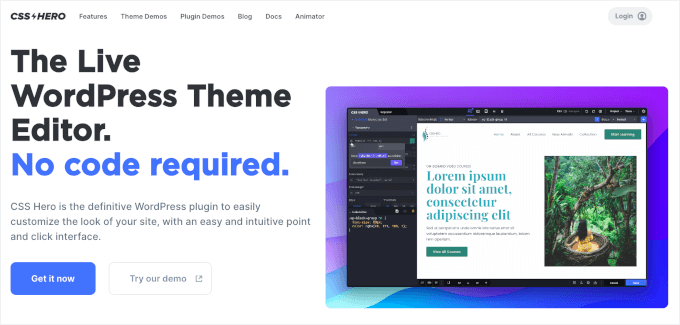
Sobald dies erledigt ist, erhalten Sie Ihr CSS Hero-Konto-Dashboard, auf dem Sie die Zip-Datei und den Lizenzschlüssel Ihres Plugins finden.
Sie können das Plugin CSS Hero jetzt auf Ihrer Website installieren und aktivieren. Gehen Sie in Ihrem WordPress-Adminbereich zu Plugins » Neues Plugin hinzufügen.

Sie können dann auf die Schaltfläche „Plugin hochladen“ klicken, um den Datei-Uploader zu öffnen.
Klicken Sie danach einfach auf „Datei auswählen“ und wählen Sie die .zip-Datei des Plugins aus.

Nach dem Hochladen können Sie auf die Schaltfläche „Jetzt installieren“ und dann auf „Aktivieren“ klicken, wenn sie erscheint. Details finden Sie in unserem Leitfaden zur Installation eines WordPress-Plugins.
Nach der Aktivierung können Sie die Seite mit Ihrem Formular auf Ihrer Live-Website besuchen. Sie sehen in der Admin-Symbolleiste oben die Option „Mit CSS Hero anpassen“.

CSS Hero bietet eine einfache Point-and-Click-Oberfläche, um die CSS zu bearbeiten, ohne Code schreiben zu müssen.
Mit dem Plugin können Sie auf jedes Feld, jede Überschrift und andere Elemente Ihres Formulars klicken und die Hintergrundfarbe, Schriftart, Ränder, Abstände und vieles mehr bearbeiten.
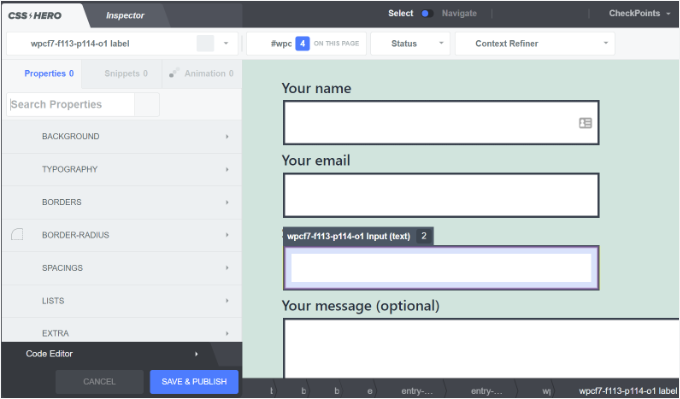
Nachdem Sie Ihr Formular angepasst haben, klicken Sie einfach unten auf die Schaltfläche „Speichern & Veröffentlichen“.
Bonustipp 💡: Eine codefreie Methode zum Stylen von WordPress-Formularen
Wenn Ihnen die Arbeit mit CSS in Contact Form 7 etwas zu technisch ist, gibt es eine viel einfachere, codefreie Lösung: WPForms.
WPForms ist einer der besten Formularersteller auf dem Markt. Es verfügt über einen visuellen Editor und vordefinierte Designs, sodass Sie Ihre Formulare vollständig anpassen können, ohne Code schreiben zu müssen.
So einfach gestalten Sie ein Formular in WPForms:
Nachdem Sie Ihr Formular zu einer Seite hinzugefügt haben, öffnen Sie das Blockeinstellungen-Panel auf der rechten Seite und scrollen Sie zum Abschnitt 'Themes'.
Dann können Sie aus über 40 wunderschönen, vordefinierten Designs wählen, um sie sofort an das Design Ihrer Website anzupassen.
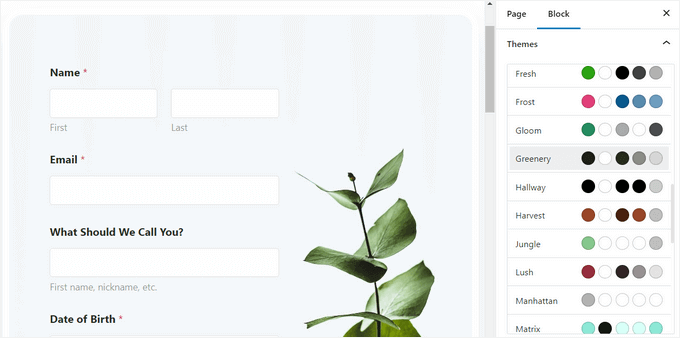
Darüber hinaus können Sie:
- Feldgröße, Rahmen und Farben anpassen
- Schriftarten, Unterbeschriftungen und Fehlermeldungen anpassen
- Gestalten Sie die Absenden-Schaltfläche passend zu Ihrem Branding
Für Schritt-für-Schritt-Anleitungen können Sie unseren Leitfaden zur Anpassung und Gestaltung von WordPress-Formularen einsehen.
FAQ: Styling von Contact Form 7 in WordPress
Wenn Sie gerade erst mit Contact Form 7 beginnen oder Ihr Design feinabstimmen möchten, helfen Ihnen diese schnellen FAQs bei den häufigsten Styling-Fragen.
Wie style ich den Absende-Button von Contact Form 7?
Sie können den Absende-Button von Contact Form 7 mit CSS stylen, indem Sie die Standard-Submit-Klasse .wpcf7-submit ansprechen. Fügen Sie dann Ihre benutzerdefinierten Stile unter Design » Anpassen » Zusätzliches CSS hinzu.
Wie konfiguriere ich Contact Form 7 in WordPress?
Um Contact Form 7 zu konfigurieren, können Sie Ihr Formular öffnen, zum Tab 'E-Mail' gehen, die Adresse 'An' (wohin Nachrichten gesendet werden sollen) festlegen und sicherstellen, dass die E-Mail-Tags mit Ihren Formularfeldern übereinstimmen.
Ist Contact Form 7 kostenlos?
Ja, Contact Form 7 kann kostenlos aus dem offiziellen WordPress.org Plugin-Verzeichnis heruntergeladen und verwendet werden. Das Kern-Plugin kostet nichts, obwohl einige optionale Add-ons oder Integrationen von Drittanbietern kostenpflichtig sein können.
Ist Contact Form 7 gut?
Contact Form 7 ist eine funktionale, weit verbreitete Option, wenn Sie ein kostenloses und flexibles Formular-Plugin wünschen und eine etwas technischere Einrichtung nicht stört.
Es ist leistungsstark in Kombination mit benutzerdefiniertem HTML und CSS, bietet jedoch keinen visuellen Drag-and-Drop-Builder. Daher erfordern Styling- und Layoutänderungen oft das Bearbeiten von Code oder die Verwendung zusätzlicher Tools.
Kann ich Contact Form 7 in Canva zur Bearbeitung einfügen?
Nein, Sie können ein Contact Form 7-Formular nicht in Canva bearbeiten, da Contact Form 7 ein WordPress-Plugin ist und eine WordPress-Umgebung zum Ausführen benötigt. Sie können jedoch das Aussehen Ihres Formulars in Canva als Mockup gestalten und dieses Design dann in WordPress nachbilden.
Zusätzliche Ressourcen für die Anpassung von WordPress-Formularen
Wir hoffen, dieser Artikel hat Ihnen geholfen zu lernen, wie Sie Contact Form 7-Formulare in WordPress gestalten.
Sie möchten vielleicht auch unsere anderen hilfreichen Anleitungen zu folgenden Themen sehen:
- Wie Sie Bildauswahlen in WordPress-Formularen hinzufügen
- So fügen Sie Autovervollständigung für Adressfelder in WordPress hinzu
- Tipps zur Erstellung interaktiverer Formulare in WordPress
- Bedingte Logik in WordPress-Formularen verwenden
- Ultimativer Leitfaden zur Verwendung von WordPress-Formularen
Wenn Ihnen dieser Artikel gefallen hat, abonnieren Sie bitte unseren YouTube-Kanal für WordPress-Video-Tutorials. Sie finden uns auch auf Twitter und Facebook.


Alejandro
Danke!
Ihre Anweisungen waren sehr nützlich.
Vielen Dank, dass Sie sich die Zeit genommen haben, sie zu teilen!
WPBeginner Support
Glad our guide was helpful
Admin
hmi
Hallo Herr, wo finde ich den CSS-Code der Felder?
Vielen Dank
WPBeginner Support
Um das aktuelle CSS zu finden, sollten Sie das Element untersuchen:
https://www.wpbeginner.com/wp-tutorials/basics-of-inspect-element-with-your-wordpress-site/
Admin
Tony Tran
Ich kann die Hintergrundfarbe des CSS-Buttons zum Absenden nicht ändern... bitte helfen Sie
WPBeginner Support
Möglicherweise zielen Sie auf das falsche Objekt ab. Möglicherweise möchten Sie sich unseren Artikel hier ansehen:
https://www.wpbeginner.com/wp-tutorials/basics-of-inspect-element-with-your-wordpress-site/
Admin
Deshave
Die Schaltfläche zum Absenden im PDF funktioniert nicht mehr, seitdem das Formular auf die WordPress-Website hochgeladen wurde.
WPBeginner Support
Das von uns empfohlene PDF-Einbettungsformat dient zur Anzeige von Inhalten. Zum Ausfüllen von Formularen empfehlen wir die Verwendung eines Formular-Plugins.
Admin
zeeshan alam
Danke fürs Teilen, Sir
WPBeginner Support
You’re welcome
Admin
Steve
Hallo, ist es möglich, eine Nachricht hinzuzufügen, wenn ich ein oder mehrere „Pflichtfelder“ nicht ausgefüllt habe, um eine Nachricht zu erhalten? Denn ich erhalte nur die „roten Pfeile“ auf den „Pflichtfeldern“, die ich nicht ausgefüllt habe. Ich möchte zusätzlich eine Fehlermeldung wie
"Ein oder mehrere Pflichtfelder enthalten einen Fehler. Bitte überprüfen Sie und versuchen Sie es erneut."
Aber ich habe nur die roten Pfeile, und das Problem ist, dass die roten Pfeile auf Mobiltelefonen nicht im Fenster sind und der Kunde sie nicht sieht.
WPBeginner Support
Sie müssten sich an den Support von Contact Form 7 wenden, um zu erfahren, was sie derzeit anbieten.
Admin
FRED_VERSATILE
Hallo,
Vielen Dank für dieses Tutorial.
Ich möchte ein benutzerdefiniertes Bild rechts neben dem „Senden“-Label in der Schaltfläche hinzufügen.
Ich habe es mit einem :before für die anderen Schaltflächen auf meiner Website gemacht, aber ich kann das Element im Sendeformular nicht finden, um das CSS einzufügen...
WPBeginner Support
Abhängig von Ihrem Formular würde sich ändern, was Sie ansprechen möchten. Wenn Sie das Element untersuchen, sollten Sie die ID oder Klasse des Objekts sehen können:
https://www.wpbeginner.com/wp-tutorials/basics-of-inspect-element-with-your-wordpress-site/
Sie könnten auch :after anstelle von :before als weitere Option verwenden
Admin
Muhammad Tahir
Wie man die Farbe des Antworttextes eines BESTIMMTEN Kontaktformulars ändert
waqas
Können wir ein Zeitfeld in Contact Form 7 ohne Plugin hinzufügen?
Mary Lou Hoffman
Ich bin ein Anfänger, aber entschlossen, das herauszufinden! Bitte geben Sie mir also Schritt-für-Schritt-Anleitungen, wenn Sie antworten.
Ich habe ein Kontaktformular7 auf meiner Website. Die Schrift wird für die Beschriftungen (Ihr Name, Ihre E-Mail usw.) als weiß auf weißem Hintergrund angezeigt.
Wie ändere ich die Farbe – wohin muss ich gehen, um sie zu ändern?
Ich habe versucht, einige der Codes, die ihr in euren Antworten oben hattet, zu kopieren und einzufügen, aber sie erschienen einfach auf meiner Seite, änderten aber nicht die Schrift.
Karu Price
Sie können den Beschriftungsbereich wie folgt anvisieren:
.wpcf7 form p label { color: white; background: black; font-family: sans-serif; }
Rita Accarpio
Hallo!
Ich kämpfe hier mit Modal-Überschriften. Ich habe den Formularhintergrund in eine dunklere Farbe geändert, möchte aber jetzt die Farbe der Überschrift ändern. Es scheint sich mit allen verschiedenen Optionen, die ich bisher ausprobiert habe, überhaupt nicht zu ändern.
Kennen Sie einen Weg, das zu tun? Helfen Sie mir bitte!
Danke!
Chris
Danke!
Abhijeet
Ich möchte den Abstand zwischen den Feldern für Name und E-Mail verringern... wie mache ich das.
Naveen
Danke für einen großartigen Beitrag, er war sehr hilfreich.
Josh
Das hat sehr geholfen. Danke!
Joel Desrosiers
Mein Kontaktformular hat einen dunklen Bildhintergrund, daher benötige ich, dass „Ihr Name“, „Ihre E-Mail“ und „Ihre Nachricht“ weiß sind. Ich kann keine Klasse oder ID für diese Elemente finden, ich habe es mit „Element untersuchen“ versucht, aber nichts gefunden, das funktioniert. Dies ist das einzige Kontaktformular auf dieser Website. Ich verwende CSS im Stylesheet meines Child-Themes und habe verschiedene Optionen ausprobiert, aber die Farbe kann ich nicht ändern. Kann mir jemand helfen?
Merriann Fu
Ich bin ziemlich neu bei WordPress und Plugins im Allgemeinen, habe aber dieses Plugin installiert und alles funktioniert korrekt, aber anstatt die Nachricht der Person zu sehen, wird im E-Mail-Text nur [Ihre-Nachricht] angezeigt. Ich habe alles wie oben eingerichtet und richtig geschrieben, daher bin ich mir nicht sicher, was das Problem ist. Jede Hilfe wäre sehr willkommen! Danke!
Don Walley
Ich habe dasselbe Problem. Ich bin neu bei Formularen in WP, aber ich stecke auch fest. Ich versuche, eine Registrierungsseite mit Firmennamen, Adresse usw. zusammen mit persönlichen Kontaktdaten und einem Dropdown-Menü zur Auswahl sowie natürlich einem Kommentarfeld zu erstellen. Nach zahlreichen Tests erhalte ich dasselbe wie Sie; den Inhalt des Kommentarfeldes.
Ich wünschte, es gäbe ein oder zwei Beispiele auf der Dokumentationsseite von Contact 7; etwas anderes als nur das Standard-Contact Form.
Miguel Ceballos
Ich glaube nicht, dass Contact Form 7 das beliebteste ist. Es ist bei vielen Themes und WordPress-Installationen vorinstalliert, deshalb haben sie so viele Benutzer. Es ist so frustrierend, etwas in diesem Plugin zu bearbeiten.
Osama Ali Khan
Hallo, falls jemand ein Kontaktformular mit transparentem Hintergrund wünscht oder ein Kontaktformular 7 auf einem großen Bannerbild mit transparentem Hintergrund hinzufügen möchte, fügen Sie diesen Code zu Ihrem benutzerdefinierten CSS hinzu.
.wpcf7 input[type="text"],
.wpcf7 input[type="email"],
.wpcf7 textarea
{
background-color: Transparent;
color: BLUE;
width: 100%;
}
div.wpcf7 { color: white; margin: 0; padding: 0; }
Deborah
Du bist ein absoluter Lebensretter. Ich habe stundenlang damit gekämpft.
Ein Punkt, den ich ansprechen möchte und der für andere nützlich sein könnte, ist, dass ich versucht habe, den Absende-Button zu stylen, der auf einem Kontaktformular 7 war, das ich in meine Seitenleiste eingefügt hatte.
Dies funktionierte für die erste Seite, auf der es sich befand, aber dann nicht mehr auf nachfolgenden Seiten. Ich bemerkte dann jedoch, dass der f2-Code auf der zweiten Seite ein Suffix von 'o2' hatte, und als ich dies zu meinem CSS hinzufügte, funktionierte das Styling auf dieser Seite ebenfalls.
Nochmals vielen Dank.
WPBeginner Support
Glad you found it helpful.
Admin
Mikko
Danke für einen tollen Beitrag, war sehr hilfreich. Eine Sache stört mich immer noch, und zwar, dass ich keinen Weg gefunden habe, Kontrollkästchen anzupassen. Haben Sie einen Weg gefunden, wie man die Größe von Kontrollkästchen ändern könnte, damit es in jedem Browser funktioniert?
Scheint, als ob die Eingabestruktur nicht geändert wurde, sodass keine zusätzlichen Spans hinzugefügt werden konnten, um die Kontrollkästchen zu simulieren, habe ich Recht?
Freut mich, wenn Sie Zeit haben, mir zu helfen, Prost.
Wendy
Oh mein Gott! Sie haben keine Ahnung, wie dankbar ich für diesen Beitrag bin! DANKE!
Ich wollte einfach die Schriftart für den Senden-Button ändern. Ich habe stundenlang gesucht und verschiedene CSS-Codevarianten ausprobiert, aber nichts funktionierte, bis ich auf Ihren Code gestoßen bin und dann ein Font-Element hinzugefügt habe. Problem gelöst!
pranav shinde
contact-form-7/includes/css/styles.css (inaktiv) dies erscheint über meiner CSS-Bearbeitungsdatei, wodurch keine meiner Änderungen auf der Website angewendet werden. Helfen Sie mir, wie ich sie aktiv machen kann
WPBeginner Support
Sie sollten die Kern-Plugin-Dateien nicht bearbeiten. Fügen Sie stattdessen Ihr CSS zum Stylesheet Ihres Themes hinzu.
Admin
pranav shinde
Ja, ich habe es verstanden, können Sie mir bitte helfen, wie ich das machen kann? Bitte helfen Sie mir im Detail.
pranav shinde
Vielen Dank, Sir, sehr hilfreich, ich werde Ihren Kanal abonnieren
pranav shinde
bedeutet, ich sollte diesen Code in die CSS-Datei meines Themes kopieren, richtig??
Monique
Hallo,
Ich frage mich, ob mir jemand helfen kann, das Kontaktformular für Mobilgeräte zu reparieren. Ich kann das Formular sehen, aber es ist zu breit und wird abgeschnitten.
Danke.
puneet singh
dieses sehr hilfreiche, wirklich nette Tutorial
Jiniya
Ich finde Ihre Website sehr hilfreich. Nur ein Vorschlag: Es wäre toll, wenn Sie bald eine App für Ihre Website herausbringen könnten… Apps sind bequemer als E-Mails zu verfolgen.
WPBeginner Support
Klingt nach einer guten Idee. In der Zwischenzeit können Sie WPBeginner über die Feedly-App auf Ihrem Mobilgerät aufrufen.
Admin
Anee
Die wichtigsten Funktionen in WordPress, die Sie ganz einfach gestalten können, ohne tiefgreifende Kenntnisse für die Verwaltung Ihrer Website in WordPress zu benötigen. Im Contact 7 Formular können Sie Ihre eigene Struktur verwenden, die Sie bereits in HTML oder einer anderen Form entworfen haben.
Neil Murray
Wenn die Arbeit mit CSS Ihre aktuellen Fähigkeiten übersteigt, könnten Sie auch https://wordpress.org/plugins/contact-form-7-skins/ in Betracht ziehen.
Contact Form 7 Skins, das direkt in der normalen Contact Form 7-Oberfläche funktioniert und es normalen WordPress-Benutzern erleichtert, professionell aussehende Contact Form 7-Formulare mit einer Reihe kompatibler Vorlagen und Stile zu erstellen – auch wenn Sie keine HTML- und CSS-Kenntnisse haben.
Sam
danke Neil
Andrew Wilkerson
Danke Neil, ich glaube, das ist genau das, was ich brauchte. Ich war aufgeregt und habe es installiert, dann meine bestehende Form gelöscht, also musste ich ein Backup meiner Website wiederherstellen, um es wieder zum Laufen zu bringen. Ich werde es mir genauer ansehen, wenn ich Zeit habe. Ich schätze, ich muss meine aktuelle Form hineinkopieren oder von vorne mit einer neuen beginnen. Ich gehe jetzt ein paar Tutorials schauen. Hoffentlich ist dies immer noch das beste, was man verwenden kann. Ich weiß, dass dies ein alter Beitrag hier ist, aber er besagt, dass er auf der Plugin-Seite kürzlich aktualisiert wurde.
Bhongo
Fantastischer Artikel. Ich werde dies verwenden, um meine Website zu gestalten.
Mark
Ein weiterer guter Artikel, bei dem man nicht noch ein Plugin verwendet.